Course
Understanding and implementing data validation principles is essential for junior data analysts and seasoned specialists. In this tutorial, we'll explore how to perform data validation in Excel. We'll cover the various data validation techniques available, and demonstrate how to add, edit, and remove data validation rules.
If you would like to review the basics of Excel before we get started, including the main formulas, operators, math functions, and more, explore our Excel Formulas Cheat Sheet.
What Is Data Validation in Excel?
Data validation in Excel refers to a specific feature that controls the values that can go into a cell. It offers a range of techniques that can be used to check both existing values or create rules that will apply to ones.
To find the Data Validation feature in Excel, we follow these steps:
- Open the Data tab.
- Go to the Data Tools group.
- Click on the Data Validation button.
 Opening the Data Validation feature
The following pop-up window appears on the screen.
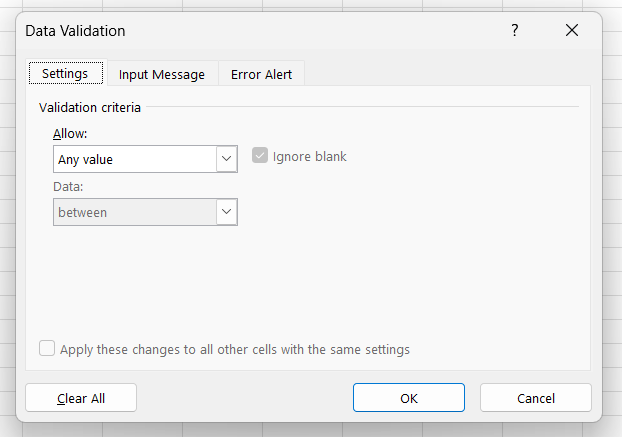
Data Validation pop-up window
Later in this tutorial, we'll explore how to set up this window in more detail, including how to modify and remove our data validation rules. First, let's learn more about data validation.
Why Is Data Validation Important?
Data validation is the process of checking the accuracy and consistency of data that has been or will be put into a database for further storage and processing. With data validation, we ensure that the data conforms to specific, predefined criteria. These criteria can include the correct data type, values within a specified range, and data elements with the appropriate length.
Robust data validation is a must for many reasons. It safeguards against data entry errors and ensures that the information used in analyses is reliable and valid. Let's take a closer look at the main reasons for data validation.
Data quality
Data validation prevents inaccurate or inconsistent values from being stored in the database. This reduces eventual errors, increases overall data quality, and enhances the meaningfulness of data analysis.
The importance of having high-quality data is perfectly encapsulated in the GIGO concept, which is popular in computer science and stands for garbage-in and garbage-out. Essentially, analyzing flawed data leads to erroneous and misleading results.
Let's see some examples where data validation rules were not applied and our data had weird values.
- University Records: A university can't have a decimal number of students; only whole numbers are valid.
- Medical Records: A person's maximum body temperature can't be higher than 50°C.
- Age Entries: An age field should only accept realistic values, typically between 0 and 120.
- Email Addresses: An email field should follow a specific format, which includes an '@' symbol.
- Inventory Counts: Product quantities in an inventory system should not be negative.
Remember that while data validation ensures data integrity, it doesn't guarantee absolute correctness. For example, in a table for cats and dogs, a validation rule can ensure only "cat" or "dog" entries are allowed, but it can't prevent a cat from being labeled as a dog by mistake.
Data integrity and compliance
Data validation is crucial for maintaining data integrity and ensuring industry regulations and standards compliance.
In healthcare, compliance with HIPAA is mandatory to protect patient information. Similarly, businesses operating in the EU must adhere to GDPR, ensuring data privacy and security for individuals.
Data cleaning and preprocessing
A famous principle states that data analysts spend approximately 80% of their time on getting data ready for use and only 20% on the analysis itself. Because data analysts often spend a disproportionate amount of their time cleaning and preprocessing data, data validation rules applied early in the workflow can save lots of time.
Decision making
Analyzing validated data leads to reliable and insightful findings that, in turn, help make more informed data-driven decisions. In the long run, data validation saves the time and money of the company and results in a healthier, more cost-efficient, and profitable business.
Different Data Validation Techniques in Excel
Excel has different data validation approaches to fit different needs. For convenience, let's divide them into groups and characterize each group.
Restricting data type and range/length
One common way to perform data validation in Excel is by restricting the data type or setting limitations on the range or length of values that can be entered in each cell.
In Excel, it's possible to select from the following Excel data types: Whole number, Decimal, Date, Time, and Text.
Let's now create a table to consider the applicability of certain logical conditions to our different data types. The logical conditions include: between, not between, equal to, not equal to, greater than, less than, greater than or equal to, and less than or equal to.
| Logical Condition | Whole Number | Decimal | Date | Time | Text |
|---|---|---|---|---|---|
| between | Within a specified range | Within a specified range | Within a specified range | Within a specified range | Length within range (when applicable) |
| not between | Outside a specified range | Outside a specified range | Outside a specified range | Outside a specified range | Length outside range (when applicable) |
| equal to | = specified value | = specified value | = specified date | = specified time | Matches a specified value |
| not equal to | ≠ specified value | ≠ specified value | ≠ specified date | ≠ specified time | Does not match a specified value |
| greater than | > specified value | > specified value | > specified date | > specified time | Length > specified value (when applicable) |
| less than | < specified value | < specified value | < specified date | < specified time | Length < specified value (when applicable) |
| greater than or equal to | ≥ specified value | ≥ specified value | ≥ specified date | ≥ specified time | Length ≥ specified value (when applicable) |
| less than or equal to | ≤ specified value | ≤ specified value | ≤ specified date | ≤ specified time | Length ≤ specified value (when applicable) |
It's important to note that the meaning of some of the logical conditions changes depending on the data type.
-
Between and Not Between: These conditions are generally used with numerical values, dates, and times. When applied to
text,betweenandnot betweenrefers to the length, or number of characters, in a cell. -
Equal to and Not Equal to: These can apply to all data types. For
text, it checks for exact matches. -
Greater Than, Less Than, Greater Than or Equal To, and Less Than or Equal To: These conditions are suitable for
whole number,date, andtimedata types, but are not directly applicable totextunless considering text length or, in some specific cases, alphabetical order.
Creating drop-down lists
Sometimes, limiting the options in certain Excel cells to a predefined set of values may be necessary. Let's consider our earlier example where only cats and dogs are valid entries in a table. The best way of creating a data validation rule to prevent crocodiles and other animals from entering our table is to create a drop-down list for each relevant cell. Let's explore the detailed steps.
- Enter the items you want to appear in your drop-down list. You can also sort the items in the list by selecting the whole list, right-clicking, selecting Sort, and choosing a method.
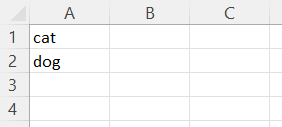 Entering the items for a drop-down list
- Convert your list to an Excel table. We select any cell in its range and press Ctrl+T. This step is important because, if you add or remove items from your list, any dependent drop-down lists will be automatically updated.
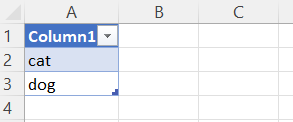 Converting the list for a drop-down to a table
- Select the Excel cell or cells in the worksheet where you want to add the drop-down list.
- Open the pop-up Data Validation window. Open the Data tab. Go to the Data Tools group and click on the Data Validation button.
- On the Settings tab, in the Allow field, select List. Leave the In-cell dropdown box checked. Leave the Ignore blank box checked if the Excel cell or cells where you want to add the drop-down list can remain empty; otherwise, uncheck it:
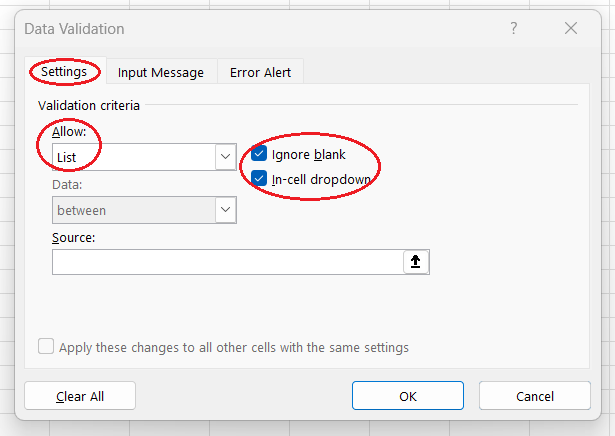
Setting a drop-down list as a data validation method
- Put the cursor into the Source box, select your list range, and press OK. You need to leave out the header row to avoid having it as a selection option.
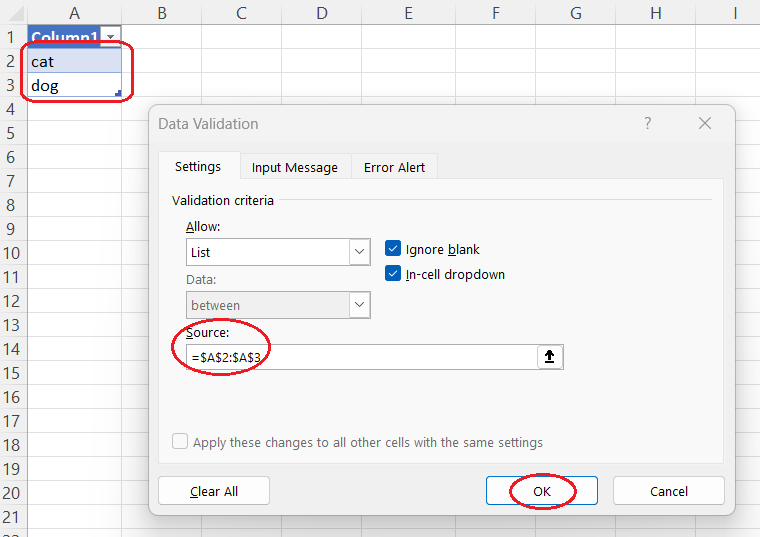 Selecting the source for a drop-down list
- Select the Excel cell or cells for which you created this data validation. You'll now see a drop-down triangle to the right of that cell. After clicking on the triangle, you can select the value you need for that cell.
 Opening a drop-down list in a cell
Applying custom formulas
The option to apply custom formulas provides significant flexibility to meet specific data validation requirements. Here we'll outline some of the most common scenarios and their respective formulas. For convenience, and to make our formulas universal, let's use the following annotations:
- range: Here we are referring to the range of Excel cells for which we want to apply custom formula-based data validation.
- uppermost_cell: Here we are referring to the first, or uppermost, cell in our range.
Numbers or text only
The purpose of the following two formulas is to verify if the content of a specific cell is either a number or a text. It is useful when you need to differentiate between numerical and non-numerical values, or if you need to differentiate between text and non-text values, respectively.
=ISNUMBER(uppermost_cell)=ISTEXT(uppermost_cell)Uppercase or lowercase text only
The purpose of the following two formulas is to ensure that a cell contains uppercase or lowercase text.
=AND(EXACT(uppermost_cell, UPPER(uppermost_cell)), ISTEXT(uppermost_cell))=AND(EXACT(uppermost_cell, LOWER(uppermost_cell)), ISTEXT(uppermost_cell))No duplicates
The following formula ensures that a value in uppermost_cell appears no more than once in a specified range. This can be useful to prevent duplicate entries.
=COUNTIF(range, uppermost_cell)<=1Values beginning with a specific substring only
The following formulas checks if the first n characters of a string are an exact match. This will return a TRUE or FALSE value.
=EXACT(LEFT(uppermost_cell, n), substring)Weekdays or Weekends only
The first formula checks if a given date falls on a weekday, while the second formula checks if it falls on a weekend.
=WEEKDAY(uppermost_cell, 2)<=5=WEEKDAY(uppermost_cell, 2)>5Past dates only
The following formula checks if a given date is in the past.
=uppermost_cell<TODAY()No leading or trailing spaces
The following formula checks if a text string in a cell has any extra spaces that need to be removed, which can be annoying.
=uppermost_cell=TRIM(uppermost_cell)No spaces
The following formula checks if a text string in a cell contains spaces.
=uppermost_cell=SUBSTITUTE(uppermost_cell, " ", "")Preventing exceeding the total
The following formula checks if the total of a range of numbers does not exceed a specified value. This can be useful for budgeting, inventory management, or project tracking.
=SUM(range)<=total_cellTo quickly enhance your level of expertise with formulas in Excel, consider taking a well-rounded and practice-oriented Data Analysis in Excel course.
How to Use Data Validation in Excel
I have divided this section into two subsections for clarity. The first subsection will show you how to set up your workbook to incorporate data validation rules. The second section will explain how to apply these rules to cells that already contain data. Let's take a look.
How to configure an Excel workbook for data validation rules
- Select the Excel cell or cells where you want data validation.
- Open the pop-up Data Validation window. Open the Data tab. Go to the Data Tools group and click on the Data Validation button.
- On the Settings tab, in the Allow field, select the necessary method, which by default is set to Any value (meaning no data validation).
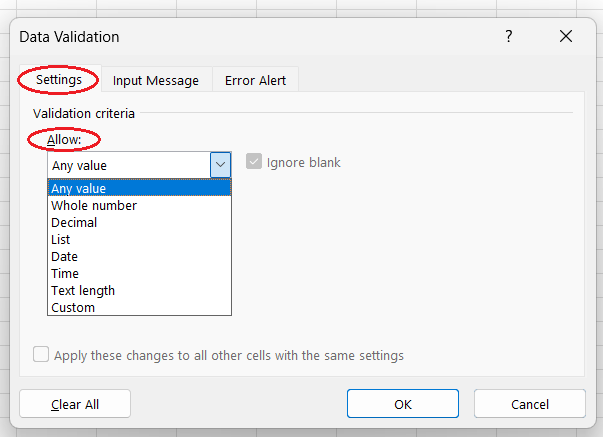
Selecting the necessary method
- Leave the Ignore blank box checked if the Excel cell or cells where you want to do data validation can remain empty; otherwise, uncheck it.
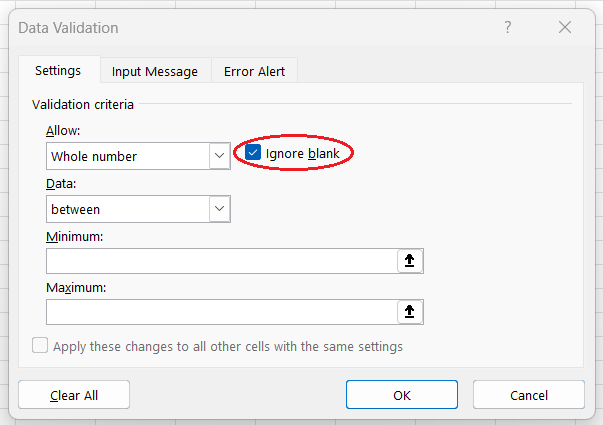
Handling blank cells
-
If you had selected the List method, choose a predefined rule relevant to your data type. If you had selected the Custom method, enter a custom formula.
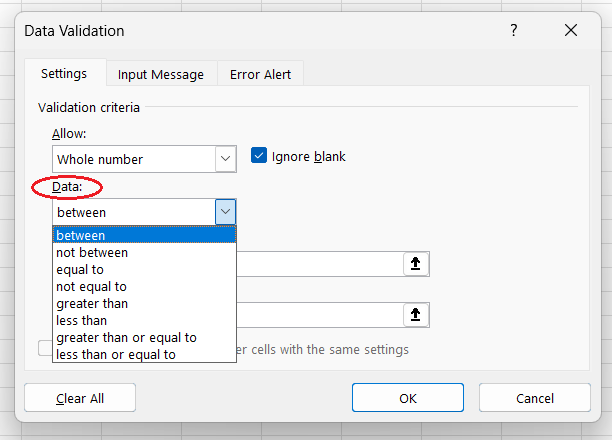
Selecting a logical condition to restrict the data range/length
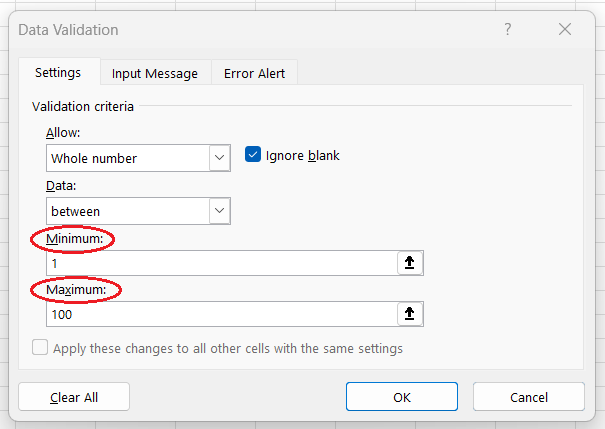
Entering the lower and upper bounds to restrict the data range/length
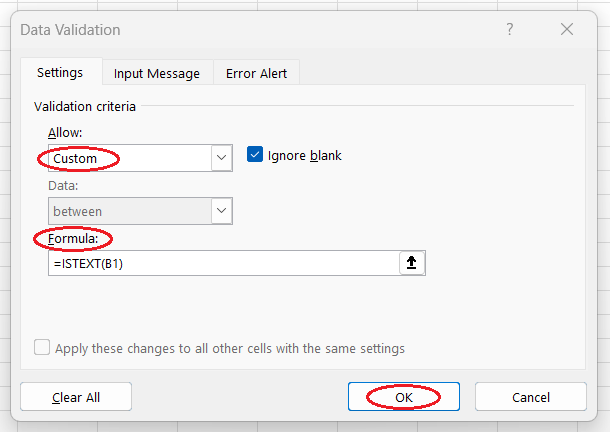
Applying a custom formula
- On the Input Message tab, you can set a Title and Input message. By default, there is no input message.
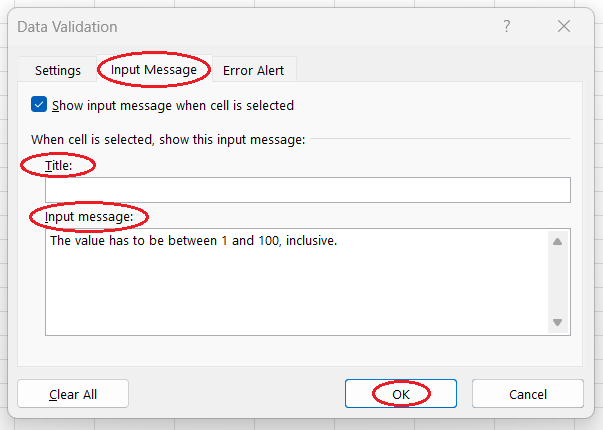
Setting an input message to prompt the user to the right kind of values
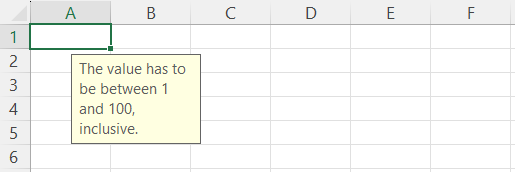
Checking what the input message looks like
- On the Error Alert tab, you can set an error message's Style (Stop, Warning, or Information), Title, and Error message. By default, an error message is of the Stop style.
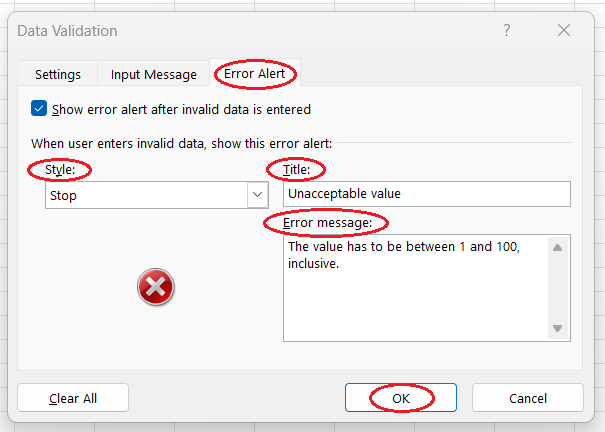
Setting an error message
After clicking OK, you can test that it works by selecting any empty Excel cells to which this data validation applies and entering an invalid value. For comparison, here is a sample error message in each of our styles.
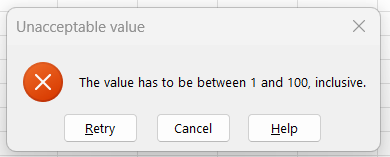
Getting an error message of the Stop style when entering an invalid value
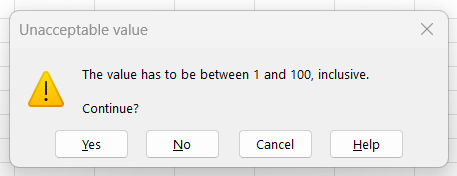
Getting an error message of the Warning style when entering an invalid value
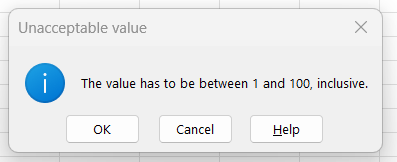
Getting an error message of the Information style when entering an invalid value

The default error message when entering an invalid value
Note: The error messages of Warning or Information styles don't prevent people from entering invalid data, but the error messages of the Stop style do.
How to use data validation in Excel on the already filled cells
What if some of the Excel cells where you want to do data validation are already filled with values? The Data Validation feature allows both entry and post-entry data validation.
- Select the Excel cells where you want to do data validation. Some of those cells will already contain values.
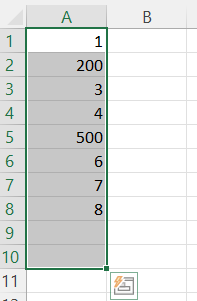
Selecting the cells for data validation, including the ones already containing values
- Open the Data Validation pop-up window. Open the Data tab. Go to the Data Tools group and open the Data Validation button.
- On the Settings tab, in the Allow field, select the necessary method, which by default is set to Any value.
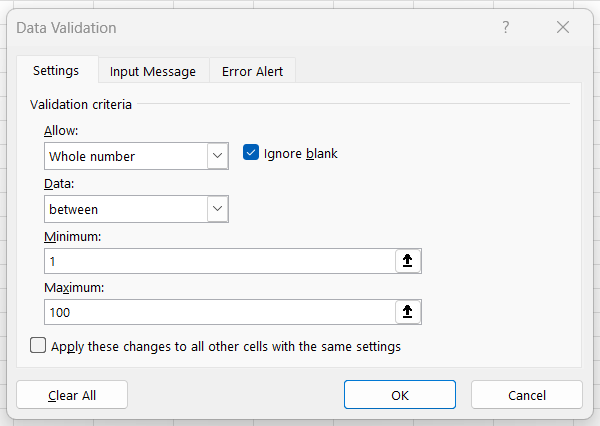
Setting data validation for the selected cells
- Select any Excel cell from those to which you applied this data validation, open the Data tab, click on the drop-down arrow to the right of the Data Validation button of the Data Tools group, and select Circle Invalid Data.
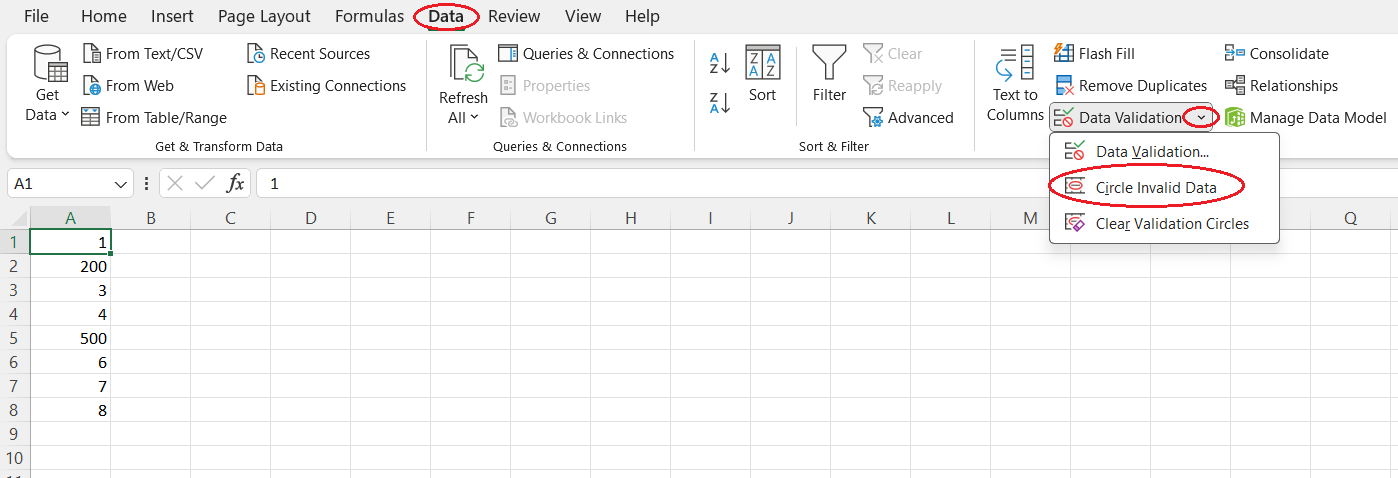
Circling invalid data in Excel
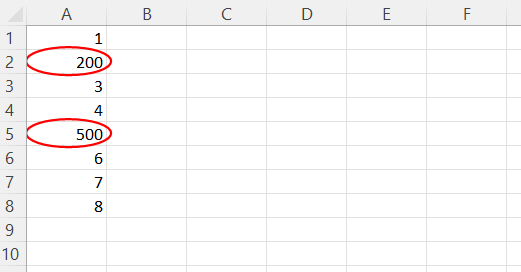
Circled invalid data in Excel
- Now you can modify each invalid value to make it satisfy the imposed criteria. After doing this, the circle around the value will disappear automatically. It's important to remember that if you just delete an invalid value, the circle will remain.
- To remove validation circles, select any Excel cell from those to which you applied this data validation, open the Data tab, go to the Data Tools group, open the Data Validation button, and then select Clear Validation Circles.
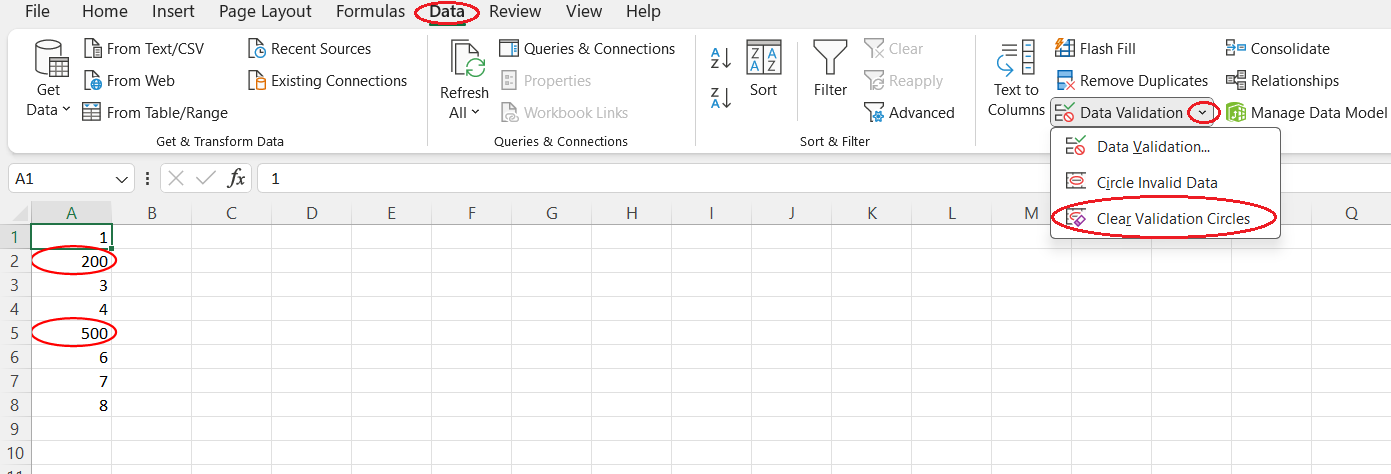
Removing validation circles from invalid data
How to Edit Data Validation in Excel
- Select any Excel cell that already has data validation applied.
- Open the pop-up Data Validation window. Open the Data tab. Go to the Data Tools group and click on the Data Validation button.
- Make any modifications you need on any of the tabs of the Data Validation window. If necessary, revise the instructions from the How to Use Data Validation in Excel section.
- Go to the Settings tab and check Apply these changes to all other cells with the same settings.
- Press OK.
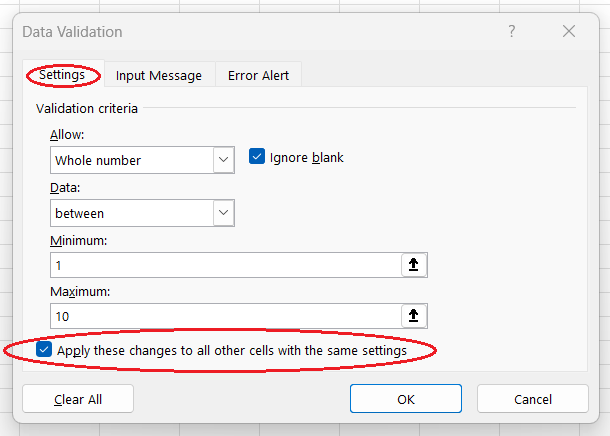
Applying data validation modifications to all other cells with the same settings
How to Remove Data Validation in Excel
- Select any Excel cell that already has data validation applied.
- Open the pop-up Data Validation window. Open the Data tab. Go to the Data Tools group and click on the Data Validation button.
- Go to the Settings tab and check Apply these changes to all other cells with the same settings.
- Click on the Clear All button.
- Press OK.
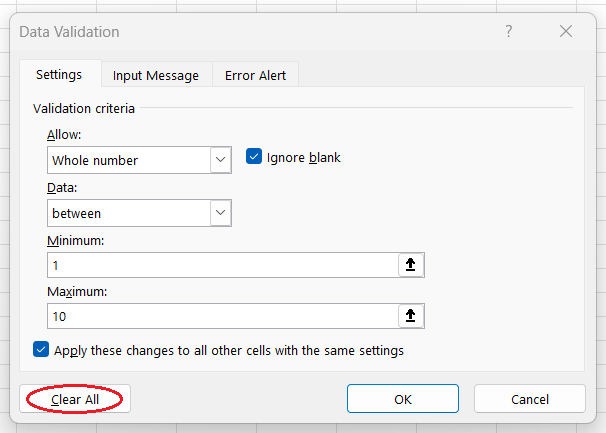
Removing data validation
Conclusion
This tutorial covered the definition of data validation, its benefits, implementation in Excel, various techniques available, and how to use, edit, and remove data validation in Excel.
If you want to unlock the full power of Excel and learn how to prepare, visualize, and analyze data through hands-on exercises, as well as discover some advanced features, give a try to a comprehensive and beginner-friendly skill track Excel Fundamentals. Also, consider specialized courses such as Data Preparation in Excel or Financial Modeling in Excel which offer focused training to deepen your expertise. These resources will help you progress from basic data validation to mastering advanced Excel features.

IBM Certified Data Scientist (2020), previously Petroleum Geologist/Geomodeler of oil and gas fields worldwide with 12+ years of international work experience. Proficient in Python, R, and SQL. Areas of expertise: data cleaning, data manipulation, data visualization, data analysis, data modeling, statistics, storytelling, machine learning. Extensive experience in managing data science communities and writing/reviewing articles and tutorials on data science and career topics.
Frequently Asked Questions
What is data validation?
Data validation is the process of checking the accuracy and consistency of the data that are going to be input (or are already input) in the database for further storing and processing. In other words, the data must meet predefined conditions, such as data type, range, length, etc.
What are the advantages of data validation?
Data validation contributes to higher data quality, facilitates maintaining data integrity and compliance, makes data cleaning and preprocessing faster and more efficient, leads to reliable and insightful findings, and helps make more informed data-driven decisions.
Where do you find the data validation feature in Excel?
On the Data tab, click on the Data Validation button of the Data Tools group.
What are the different data validation techniques in Excel?
- Restricting data type and range/length.
- Creating drop-down lists.
- Applying custom formulas.
How to restrict the choice of values in an Excel cell or cells by a predefined set of values?
By creating drop-down lists for such cells. We need to enter the items of the list in an Excel worksheet, convert this list to an Excel table, select the necessary Excel cells, and apply data validation to them to create a drop-down list for each cell in interest.
How to prevent entering duplicates in Excel?
By creating data validation for the cells in interest and applying to them the custom formula =COUNTIF(range, uppermost_cell)<=1. Here range is the range of Excel cells for which we want to apply this formula and uppermost_cell is the first (uppermost) cell in that range.
How to set an input prompt to the user on what kind of values are expected in Excel?
We can set a customized text and a title for an input prompt on the Input Message tab of the Data Validation pop-up window. By default, there is no input prompt.
How to set a customized error message for invalid data in Excel?
We can set a customized text and a title and select a suitable style for an error message on the Error Alert tab of the Data Validation pop-up window. To check the defaults for it, we need to set data validation without specifying an error message and try to enter an invalid value in one of the Excel cells of the range of interest.
How to detect invalid data that were entered before applying data validation in Excel?
Select any Excel cell from those to which this data validation was applied, open the Data tab, click on the drop-down arrow to the right of the Data Validation button of the Data Tools group, and select Circle Invalid Data.
How to delete data validation in Excel?
Select any Excel cell from those to which this data validation was applied, open the pop-up Data Validation window, check Apply these changes to all other cells with the same settings on the Settings tab, click on the Clear All button, and press OK.


