
Course
Data Preparation in Excel
3 hr
85.4K
Nested IF() statements can handle multiple conditions in a single formula. I’ve used them for everything from analyzing sales reports to categorizing client data and even creating dashboards. Instead of using multiple formulas or making extra columns, you can create one efficient formula that does it all.
But when I was just getting started, these advanced formulas were quite difficult to understand. If you’re in the same boat, I highly recommend starting with the Data Analysis in Excel course or the Excel Fundamentals skill track. They will help you build a solid foundation for advanced techniques like nested IF().
We use a simple IF() statement to check one condition. But when you have to check more than one condition, you can combine several IF() statements — this creates a nested IF(). This will allow you to run several logical tests one after another and get different results for each test.
Here’s the basic syntax:
=IF(condition1, value_if_true, IF(condition2, value_if_true, value_if_false))You can use nested IF() statements to handle complex decision-making logic in one place. For example, let’s say you’re calculating grades based on score ranges. With a nested IF(), you can write a formula like this:
=IF(A1>=90, "A", IF(A1>=80, "B", IF(A1>=70, "C", "F")))This formula checks if a score in cell A1 is greater than or equal to 90, 80, or 70, and assigns a corresponding grade.
You can use nested IF() to check each condition sequentially and return the corresponding value if a condition is met or moves on to the next one if not. Let me show you how it works with a couple of examples.
Say I want to assign a batch to each employee according to their years of service in the company.
| Years of service | Batch |
|---|---|
| ≥ 10 years | Platinum |
| 5–9 years | Gold |
| < 5 years | Silver |
Here’s the formula I’d use:
=IF(C2>=10, "Platinum", IF(C2>=5, "Gold", "Silver"))Now, let's understand how it works:
IF(C2>=10, "Platinum", ...) checks if the value in cell C2 is greater than or equal to 10. If it is, it returns Platinum. If not, it moves to the next condition.
Then, IF(C2>=5, "Gold", "Silver") checks if the value in C2 is greater than or equal to 5. If it is, it returns Gold.
If neither condition is met, it defaults to Silver.
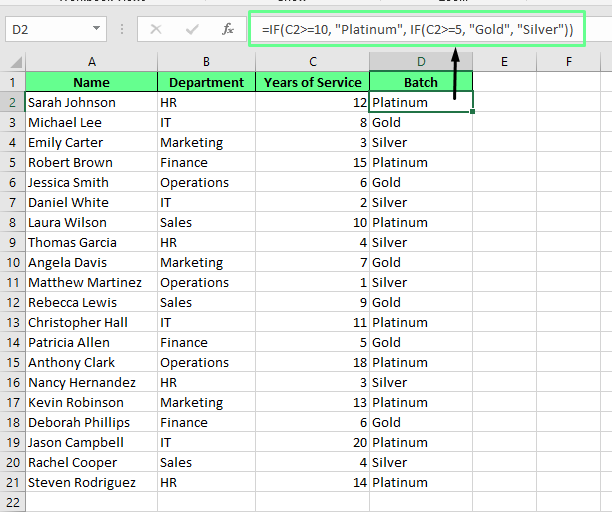
Applying the Nested IF() function. Image by Author.
Nested IF() statements are handy for scenarios like this where you need to categorize or group data quickly. But that’s just one way to use them. You can also use nested IF() statements for data validation, like checking if an entry falls within a specific range, or for conditional formatting, such as highlighting rows that meet certain criteria.
Suppose I want the values in Column A to be between 10 and 50. I can set up data validation to implement this rule. Here’s how:
Select the range for validation such as A1:A10.
Go to the Data tab and click Data Validation.
In the Data Validation dialog box, choose Custom from the Allow drop-down list.
Enter the following formula in the Source field:
=IF(A1>=10, IF(A1<=50, TRUE, FALSE), FALSE)This formula ensures that the value in A1 falls between 10 and 50. To make it even more user-friendly, you can add an error message. To do so, go to the Error Alert tab. Set a message like, "Value must be between 10 and 50."
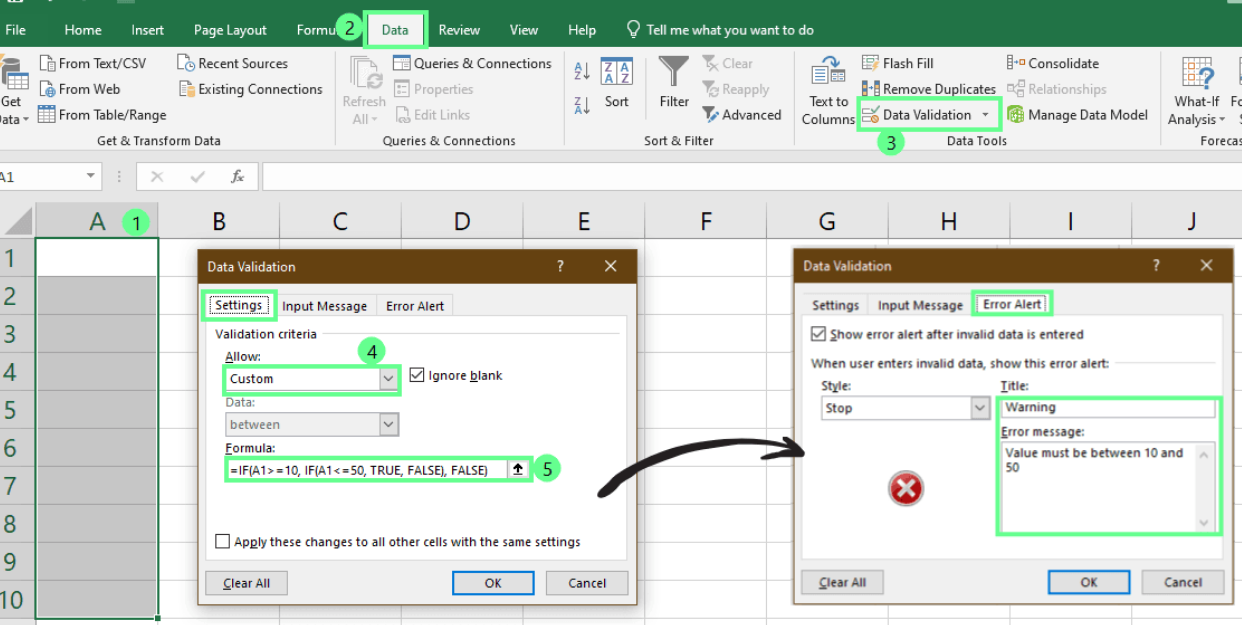
Using Nested IF() for data validation. Image by Author.
Now, if you enter a value outside the range, the error message will pop up to prevent invalid entries and keep your data consistent.
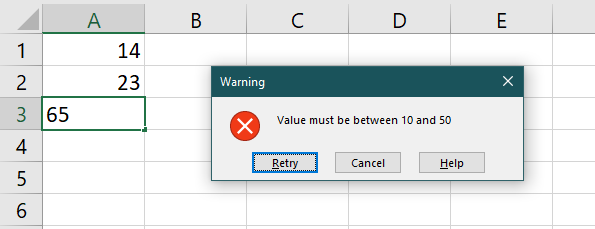
Error occurred. Image by Author.
Let’s take it a step further. Now, I want to highlight rows where the values in Column B are between 10 and 50. Here’s how to do it:
Select the range you want to format such as B1:B10.
Go to Home > Conditional Formatting > New Rule.
Choose Use a formula to determine which cells to format and enter the formula:
=IF($B1>=10, IF($B1<=50, TRUE, FALSE), FALSE)4. Click Format and choose a fill color. Next, click OK to apply the rule.
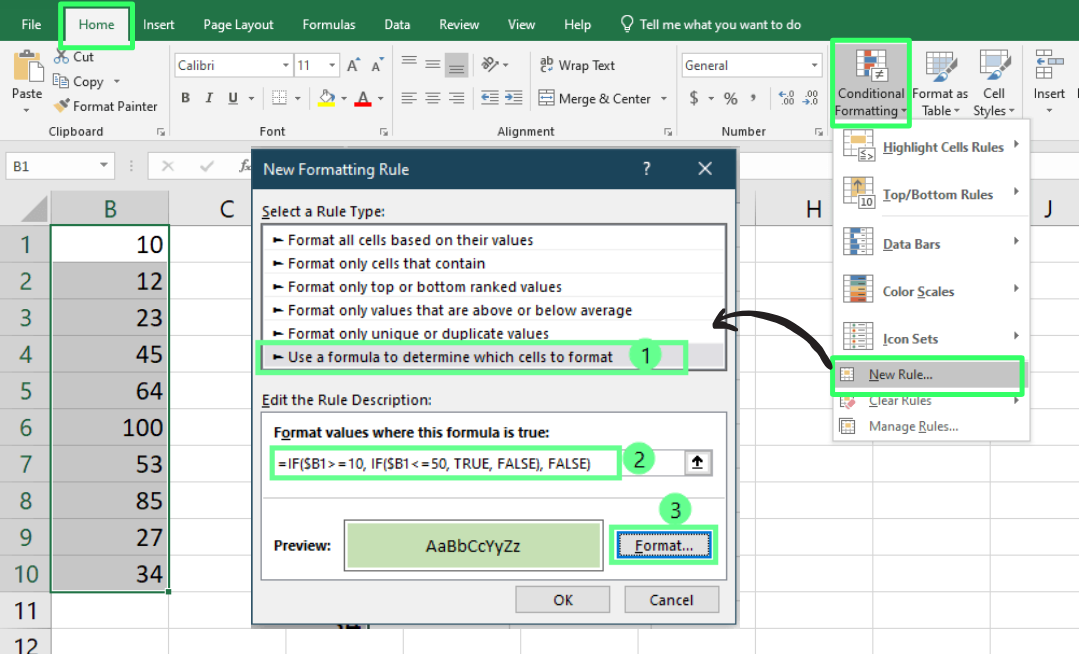
Using Nested IF() for conditional formatting. Image by Author.
Now, you can see all the rows that meet the criteria are highlighted:
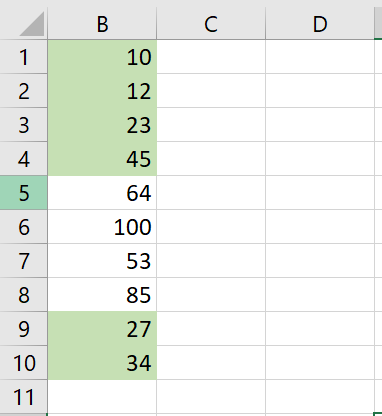
Conditional formatting with nested IF(). Image by Author.
Nested IF() functions are versatile on their own, but when you combine them with other Excel functions, they become even more helpful. Let me show you how with some examples.
When you combine VLOOKUP() with IF(), you can conditionally retrieve and manipulate data based on specific criteria. For example, you have a price list that varies by region. If the region is North, you want to apply a 10% discount — otherwise, you’ll show the standard price.
For this, use the following formula:
=IF(C2="North",VLOOKUP(B2,B2:D7,3,FALSE)*0.9,VLOOKUP(B2,B2:D7,3,FALSE))In the above formula, the IF() function checks if the region in C2 is North. If it is, the price retrieved by VLOOKUP() is multiplied by 0.9 to apply the 10% discount. If it’s not, VLOOKUP() retrieves the standard price.
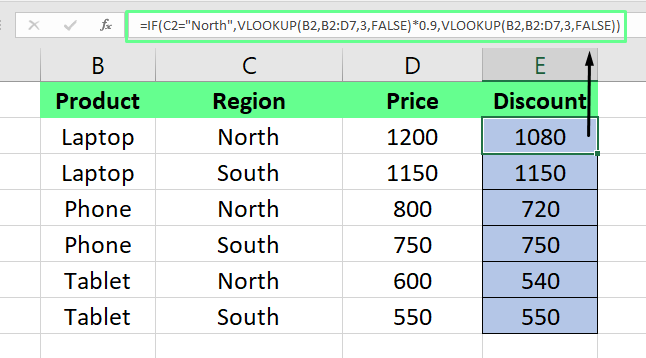
Combine IF() with VLOOKUP(). Image by Author.
The SUMIF() function adds values based on certain criteria. If you combine it with IF(), you can analyze data even better by adding up numbers that meet specific conditions. For example, if I want to calculate the total sales for the North region, I’ll use the following formula:
=IF(B2="North",(SUMIF(B2:C10,B2,C2:C10)),"")In the above formula, the IF() function checks if the region in B2 is North. If TRUE, SUMIF() adds up all the values in column C that match North. If FALSE, it returns an empty string.
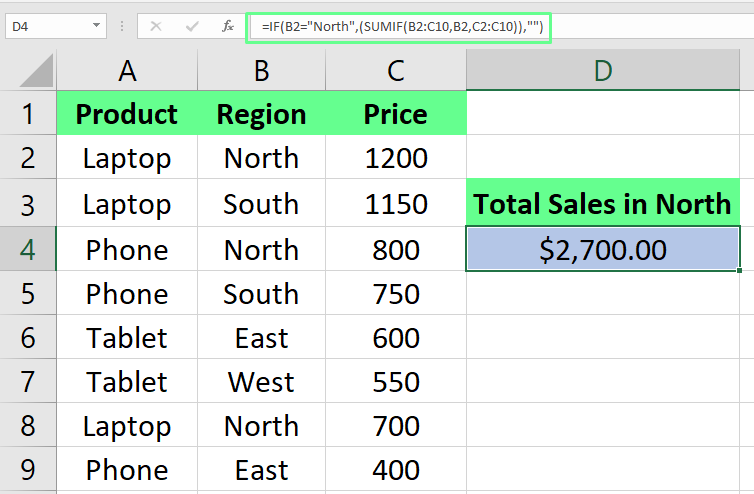
Combine IF() with SUMIF(). Image by Author.
It was tricky when I started combining multiple functions. I’d write these complex formulas, only to have them break because of something simple. Here are a few lessons I’ve learned the hard way:
Keep track of parentheses: This is where most of my mistakes happened. I’d miss a closing parenthesis and spend ages figuring out why my formula wasn’t working. Now, I always double-check that every opening parenthesis has a matching closing one. It saves me so much time.
Handle errors: If you’ve ever had a formula return an ugly error because of one missing value, you know how frustrating it can be. I always use IFERROR() now to catch those issues and replace them with something more helpful, like a custom message.
Use named ranges: Before I started naming my ranges, I’d lose track of which range I was referencing in long formulas. Then, I started giving them clear names so my formulas are easier to read and reduce the chance of messing up a reference.
In order to be thorough, let’s look at some options.
While Excel allows up to 64 nested IF() functions, let’s be real — stacking that many conditions creates error-prone formulas that no one wants to debug. If you’re using Excel 2016 or later, you can use the IFS() function. It’s a cleaner alternative for handling multiple conditions without nesting.
Here’s the syntax:
=IFS(logical_test1, value_if_true1, [logical_test2, value_if_true2])Let me show you how it works. Suppose I have to calculate tax rates based on employee salaries so I’ll apply the following formula.
=IFS(C2<=30000, "10%", C2<=60000, "20%", C2<=100000, "30%", C2>100000, "40%")If the salary in C2 is $30,000 or less, it returns 10%. If it’s between $30,001 and $60,000, it returns 20%. If it’s between $60,001 and $100,000, it returns 30%. Anything above $100,000 returns 40%.
Like the IF() function, the order of conditions matters. Excel stops evaluating as soon as it finds the first condition that’s TRUE. So, if none of your conditions are met, you’ll get an error. To avoid that, you can add a default condition at the end like this:
=IFS(C2<=30000, "10%", C2<=60000, "20%", C2<=100000, "30%", C2>100000, "40%", TRUE, "No Tax")Now Excel will return No Tax if none of the salary conditions are met instead of throwing a #N/A error.
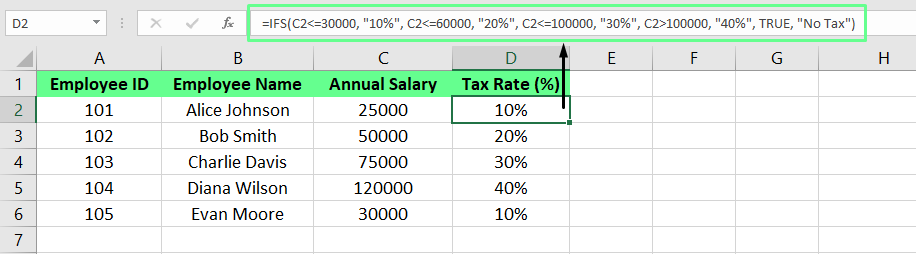
Using the IFS() function. Image by Author.
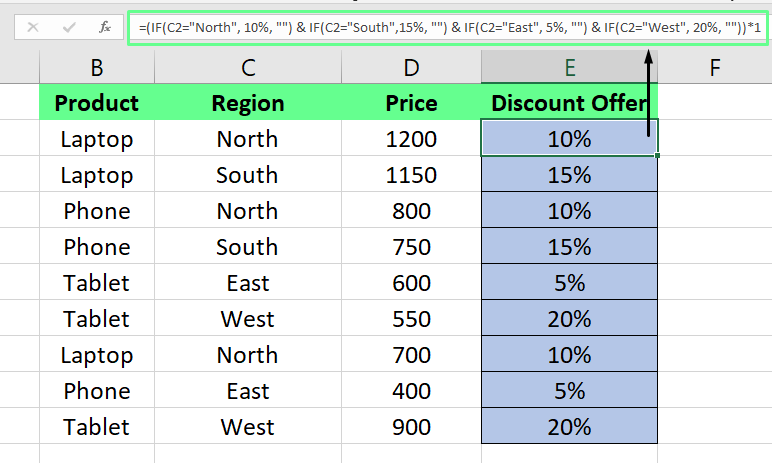
As an option, you can combine IF() with functions like & or CONCATENATE(). Here’s an example where I displayed the discount offer for each region:
=(IF(C2="North", 10%, "") & IF(C2="South",15%, "") & IF(C2="East", 5%, "") & IF(C2="West", 20%, ""))*1In the above formula, each IF() statement checks the region and appends the discount percentage as text. The *1 at the end converts the result into a number. If you want text output, you can skip it.
Concatenate multiple IF() functions. Image by Author.
If you’re looking foralternatives, CHOOSE() and SWITCH() are worth exploring. They are great for simple scenarios where you have to select from predefined options or match a single value to multiple outcomes. Check out DataCamp’s Data Analysis in Excel course which lets you practice a lot with a variety of functions.
I used to face a lot of errors when I began using nested IF() formulas. They felt impossible to solve. However, with time and mistakes, I learned lessons I wish I had known earlier. Here are some of them:
Data type confusion: Mixing numbers and text in comparisons can create unexpected results. If you’re comparing text, make sure it’s formatted as text. The same goes for numbers.
Hitting the limit: Excel caps nested IF() at 64 levels. If your formula stops working, check if you’ve hit the limit. At that point, it’s usually time to rethink the approach or switch to a different function like IFS() or SWITCH().
If your formula isn’t behaving as expected, here’s what you can do:
Here’s a simple challenge to apply what you’ve learned. Say you’re calculating employee bonuses based on their performance and years of service. You want to give:
Here’s how you could write the formula:
=IF(B2="Excellent", IF(C2>5, D2*10%, "No Bonus"), IF(B2="Good", IF(C2>3, D2*5%, "No Bonus"), "No Bonus"))Try this out and see if you can adapt it to your scenarios.
When I started using nested IF() statements, I was amazed at how much time I saved and how many new possibilities opened up. If you’ve followed along, you would have noticed the same potential.
The key to mastering nested IF() really is practice. The more you experiment and apply these techniques in your own projects, the faster they become second nature. If you’re ready to take your skills even further, I highly recommend the Financial Modeling in Excel course or the Data Analysis with Excel Power Tools skills track on DataCamp. They will help you bridge the gap between knowing formulas and using Excel as a real business tool.
Excel has so much to offer, and nested IF() is one part of it. Once you start using these formulas creatively, you’ll see how helpful Excel can be.
Gain the skills to maximize Excel—no experience required.
Learn Excel with DataCamp
Course
Course
Course
Tutorial
Laiba Siddiqui
Tutorial
Joleen Bothma
Tutorial
Laiba Siddiqui
Tutorial
Laiba Siddiqui
Tutorial
Laiba Siddiqui
Tutorial
Laiba Siddiqui