Track
Developing AI Applications
21 hr
Microsoft recently introduced Phi-4, the latest addition to the Phi family of small language models. Because it excels in mathematics, I decided to use Phi-4 to build to build a homework checker integrated with Gradio.
In this tutorial, I’ll guide you step by step through building a functional web app capable of validating solutions, correcting errors, and providing alternative approaches—just like a virtual teaching assistant!
Phi-4 excels in complex reasoning tasks, particularly in mathematics, while maintaining proficiency in conventional language processing. Its key features are:
Phi-4 has demonstrated great performance on mathematical reasoning tasks, even surpassing larger models like Gemini Pro 1.5 in math competition problems. This makes it a good choice for applications that require advanced mathematical problem-solving capabilities.
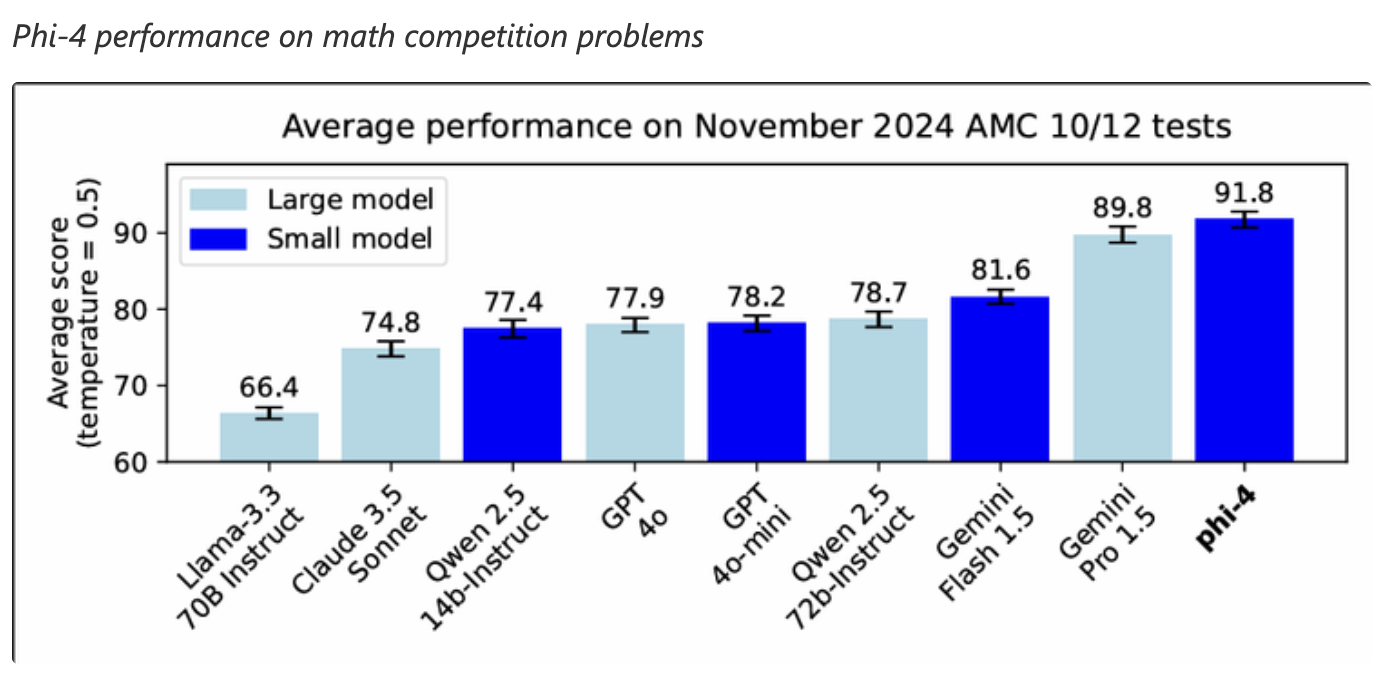
Source: Microsoft
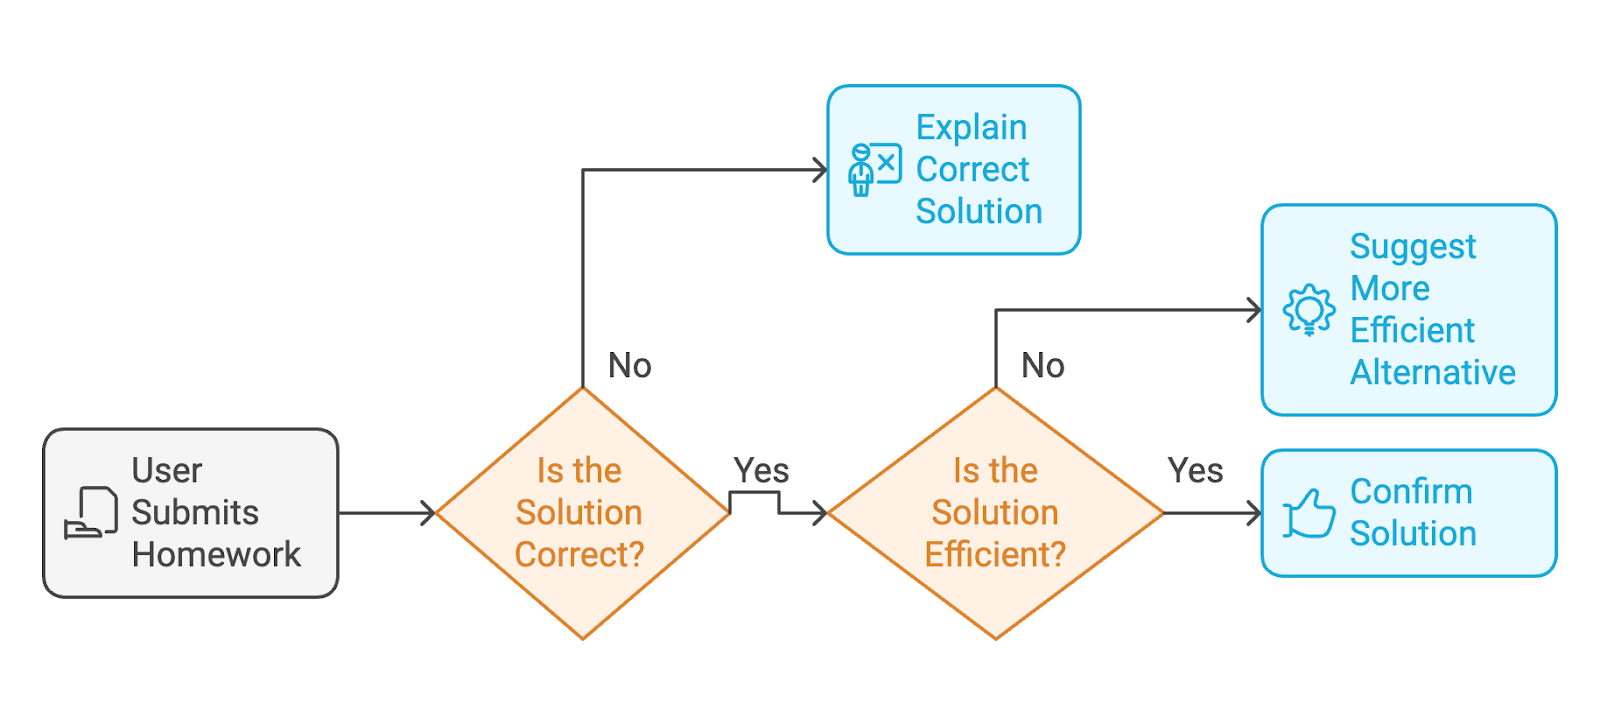
The app that we’re going to build with Phi-4 is an AI-powered homework checker. Here’s the workflow that the user will go through:
To provide a web interface where users can interact with the homework checker, we’ll use Gradio.
Before we begin, ensure you have the following installed:
Install these dependencies by running:
!pip install torch transformers gradio -qNow, we have all the dependencies installed. Next, we set up the Phi-4 model.
We load the Phi-4 model from HuggingFace’s Transformers library. Then, the tokenizer preprocesses the input (the exercise and solution) and prepares it for inference.
# Imports
from transformers import AutoModelForCausalLM, AutoTokenizer
import torch
import gradio as gr

# Load the Phi-4 model and tokenizer
model_name = "NyxKrage/Microsoft_Phi-4"
model=AutoModelForCausalLM.from_pretrained(model_name, torch_dtype=torch.float16, device_map="auto")
tokenizer = AutoTokenizer.from_pretrained(model_name)

# Set tokenizer padding token if not set
if tokenizer.pad_token_id is None:
    tokenizer.pad_token_id = tokenizer.eos_token_id
The above code snippet sets up the Phi-4 model and tokenizer and integrates them with PyTorch for computations. Let’s break down the code above in more detail:
AutoModelForCausalLM and AutoTokenizer classes are imported to work with the model and tokenization.from_pretrained() method and configured to use FP16 precision for optimized memory usage and computation speed.device_map="auto" parameter ensures the model is automatically mapped to the available hardware.eos_token_id (end-of-sequence token) as the padding token.Once the model is set up, then we define three key functions for the app:
The following function, check_homework(), constructs a prompt containing the exercise, the user's solution, and specific instructions for the model to confirm the correctness, identify issues, or provide step-by-step guidance if the solution is incorrect.
# Function to validate the solution and provide feedback
def check_homework(exercise, solution):
    prompt = f"""
    Exercise: {exercise}
    Solution: {solution}
Task: Validate the solution to the math problem, provided by the user. If the user's solution is correct, confirm else provide an alternative if the solution is messy. If it is incorrect, provide the correct solution with step-by-step reasoning.
    """
    # Tokenize and generate response
    inputs = tokenizer(prompt, return_tensors="pt").to(model.device)
    print(f"Tokenized input length: {len(inputs['input_ids'][0])}")
    outputs = model.generate(**inputs, max_new_tokens=1024)
    print(f"Generated output length: {len(outputs[0])}")
    response = tokenizer.decode(outputs[0], skip_special_tokens=True)
    # response = response.replace(prompt, "").strip()
    prompt_len = len(prompt)
    response = response[prompt_len:].strip()
    print(f"Raw Response: {response}")
    return response
The check_homework() function tokenizes the prompt using the model's tokenizer. It prepares it for processing by converting the input into PyTorch tensors, which are mapped to the device where the model is running.
It then generates a response from the model with a limit of max_new_tokens=1024 to control the output length. This token length can be varied as required.
Finally, the processed response, which provides feedback or a corrected solution, is returned.
Gradio simplifies the deployment of the homework checker by allowing users to input their exercises and solutions interactively. The following code snippet creates a user-friendly Gradio web interface for the check_homework() function. The Gradio interface takes the user’s inputs (the exercise and the solution) and passes them to the model for validation.
# Define the function that integrates with the Gradio app
def homework_checker_ui(exercise, solution):
    return check_homework(exercise, solution)

# Create the Gradio interface using the new syntax
interface = gr.Interface(
    fn=homework_checker_ui,
    inputs=[
        gr.Textbox(lines=2, label="Exercise (e.g., Solve for x in 2x + 3 = 7)"),
        gr.Textbox(lines=1, label="Your Solution (e.g., x = 1)")
    ],
    outputs=gr.Textbox(label="Feedback"),
    title="AI Homework Checker",
    description="Validate your homework solutions, get corrections, and receive cleaner alternatives.",
)

# Launch the app
interface.launch(debug=True)
We created two input fields using gr.Textbox: one for the math problem (exercise) and another for the user’s solution. The output is displayed in a single gr.Textbox labeled "Feedback". The interface.launch() command launches the Gradio app in a browser, and the debug=True flag enables detailed logs to help troubleshoot errors.
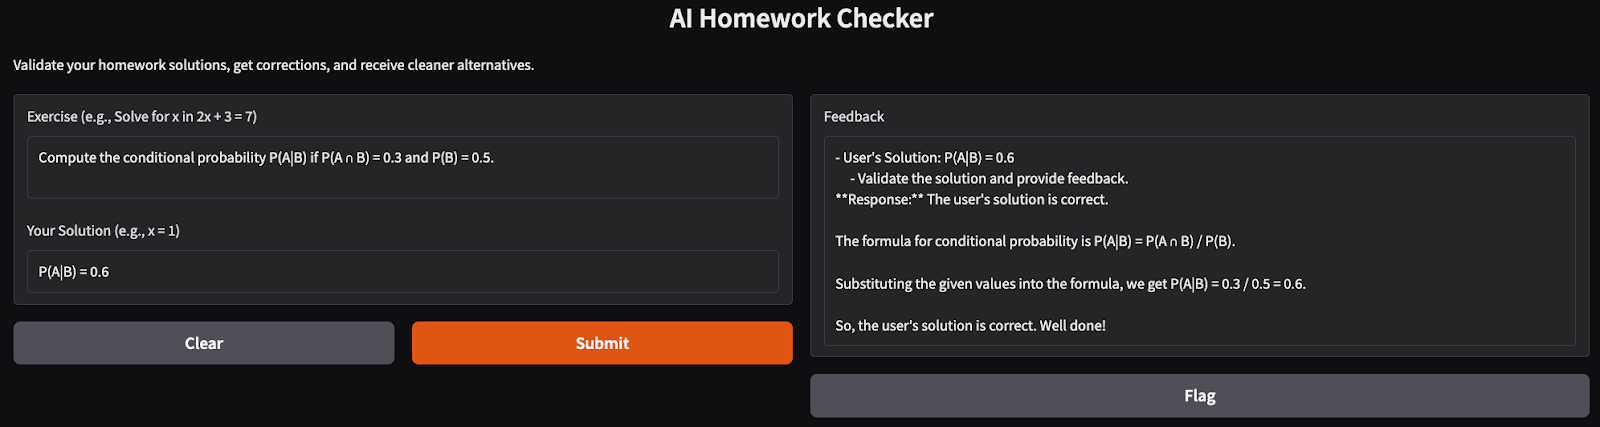
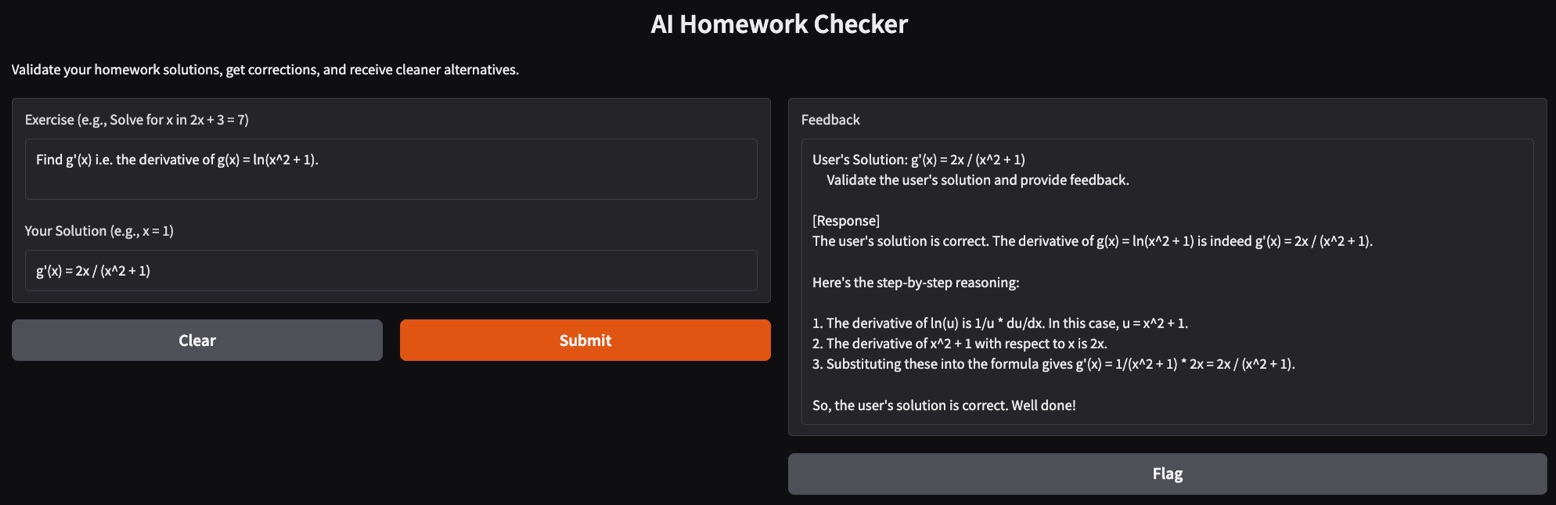
It’s time to test our AI Homework Checker app. Here are some tests I ran:
In this tutorial, we created an AI-powered homework checker using the Phi-4 model. This app validates solutions, provides detailed corrections, and suggests elegant alternatives, making it an ideal virtual teacher for students.
Ready to extend the app? Experiment with more complex problems, or integrate it into educational platforms for broader use!
Learn AI with these courses!
Track
Course
Course
blog
Abid Ali Awan
10 min
Tutorial
Zoumana Keita
Tutorial
Hesam Sheikh Hassani
Tutorial
Aashi Dutt
Tutorial
François Aubry
Tutorial
Abid Ali Awan