Track
Building APIs in Python
13 hr
In this guide, you will learn what the Universal Commerce Protocol (UCP) is, who it is built for, why a new commerce standard is needed, and how its architecture works.
You will also follow a hands-on walkthrough to set up your own UCP sample server, explore its discovery profile, create a checkout session, and run a complete example flow locally.
This will give you both a clear understanding of the protocol and a practical starting point for testing how UCP works in a real implementation.
The Universal Commerce Protocol is an open standard that helps AI agents, apps, businesses, and payment providers work together in one shared shopping flow. Instead of building a custom integration for every new partner, UCP provides a common way to communicate.
UCP is designed for modern agent-led shopping, where people discover and buy products through AI assistants and conversational interfaces. It supports the full journey, from discovering what a business offers to starting checkout and managing the purchase in a structured way.

Source: Google Developers Blog
In simple terms, UCP acts like a shared language for commerce. A business can publish what it supports, and an agent can read that information and interact with it without needing a one-off API integration. Shopify describes it as infrastructure built to power agentic commerce at scale.
UCP is also open source and vendor-neutral. It is designed to work with existing commerce systems, and it is compatible with the Agent Payments Protocol (AP2) for secure agent-driven payments. It can also work across different transports, including REST APIs, agent-to-agent communication, and MCP.
The UCP is built for the main groups involved in modern digital commerce. Its goal is to give all of them a shared way to communicate, so they can work together without needing custom integrations for every connection.
It is mainly designed for:
These are the apps, assistants, and discovery surfaces that help users find products and make purchases. UCP helps them understand what a business supports and interact with it in a structured way. Google describes this as connecting consumer surfaces with business backends for seamless shopping.
UCP helps businesses expose their products, checkout flows, and supported features in a standard format. This makes it easier for them to work with different AI platforms and agents without building a separate integration for each one.
Payment providers are also part of the UCP ecosystem. The protocol is designed to support different payment handlers and payment credentials in a flexible way, so payments can be handled securely across different systems.
UCP is open source, so it is also built for developers who want to implement, extend, or contribute to the standard. The UCP project explicitly invites businesses, developers, and payment providers to help shape the future of the protocol.
In simple words, UCP is built for anyone involved in AI-powered commerce, the platform that helps the user shop, the business that sells the product, the payment system that processes the transaction, and the developers building the connections between them.
A new commerce standard is needed because most current commerce systems were built for traditional websites and mobile apps, not for AI assistants and conversational shopping.
That older model often depends on custom APIs and one-off integrations, which makes it slow and hard to scale across many platforms. UCP was created to solve that by giving businesses, agents, and platforms one shared way to communicate.
As more people start shopping through AI tools, commerce needs to support live actions like product discovery, checkout, discounts, and order updates inside the same conversation.
UCP is designed for this newer style of shopping, where the experience is more interactive and happens across different digital surfaces.
It is also needed because today’s commerce ecosystem is fragmented. Different businesses, payment providers, and platforms often use different systems. UCP helps bring them together with a common standard, so they can work together without rebuilding the same integrations again and again.
In simple terms, UCP is needed because old commerce tools were not built for AI-led shopping. It gives the industry a more modern, flexible foundation for how people will discover and buy products going forward.
The Universal Commerce Protocol (UCP) is a modular system for agentic commerce. It gives businesses, AI agents, and payment providers a shared way to handle the shopping journey, from discovery to checkout and beyond.
Instead of building separate custom integrations for every platform, UCP lets a business publish what it supports so an agent can read that information and follow a standard flow.
UCP is designed to be modular and extensible, supports transports like REST, MCP, and A2A, and works with payment handlers so businesses can use existing payment setups more easily.
A UCP-enabled business exposes a profile at /.well-known/ucp. This profile tells platforms and agents what the business supports before any transaction begins, including available capabilities and endpoints.
After discovery, the agent checks which services and capabilities the business offers. UCP’s initial launch focuses on core capabilities such as Checkout, Identity Linking, and Order Management, which act as the main building blocks of the protocol.
UCP keeps the core flow simple, but businesses can add optional extensions when needed. These extensions build on core capabilities and let businesses support richer features without changing the whole protocol.
Once the agent knows what is supported, it can interact with the business using a supported transport such as REST, MCP, or A2A. This makes the same commerce logic easier to use across APIs, AI tools, and agent-to-agent systems.
UCP separates the commerce flow from the payment layer. Businesses can declare supported payment handlers, and the protocol is designed so merchants can keep using their existing payment integrations instead of rebuilding everything from scratch.
UCP is compatible with the Agent Payments Protocol (AP2), which adds a secure layer for agent-driven payments. This helps support safer authorization when an AI agent is acting on behalf of a user.
This guide shows a complete Universal Commerce Protocol flow using the Python reference implementation. You will set up the sample merchant server, load a demo flower-shop catalog, discover the business capabilities, create a checkout session, apply a discount, and then stop the server.
In this step, you will install uv for Python dependency management, then clone both the UCP Python SDK and the sample server repository. The sample server README follows the same setup pattern and notes that the relative path to the SDK matters for the examples.
Since our operating system is Linux, we will use the following command to install uv. uv is a fast and reliable Python package and environment manager. It serves a similar purpose to tools like Anaconda, but it is much lighter and faster.
curl -LsSf https://astral.sh/uv/install.sh | shOnce the installation is complete, reload your terminal session so the uv command becomes available in the current shell.
source ~/.bashrcNext, create a new folder called sdk. This folder will store the Universal Commerce Protocol Python SDK when we clone it from the GitHub repository.
mkdir sdk
git clone https://github.com/Universal-Commerce-Protocol/python-sdk.git
sdk/python
Now change into the sdk/python directory, where the SDK repository was cloned.
pushd sdk/python
Once you are inside the SDK directory, install all required Python dependencies for the SDK using uv sync.
uv sync
After the dependencies are installed, return to your previous working directory.
popdNow clone the samples repository, which contains the Python reference merchant server used in this walkthrough.
git clone https://github.com/Universal-Commerce-Protocol/samples.git
Next, move into the Python server example inside the samples repository.
cd samples/rest/python/serverFinally, install all Python dependencies required to run the sample server.
uv sync
At this point, the sample business server is ready in your workspace. This server already implements the core shopping capabilities defined by UCP.
In this step, you will create a local SQLite-based demo store for the sample business. The sample business in this tutorial is a flower shop, and this command loads the example product catalog and transaction database that the server will use.
First, create a temporary folder where the database files will be stored.
mkdir /tmp/ucp_testNext, run the import script to create and populate the product and transaction databases.
uv run import_csv.py \
  --products_db_path=/tmp/ucp_test/products.db \
  --transactions_db_path=/tmp/ucp_test/transactions.db \
  --data_dir=../test_data/flower_shop
This command does the following:
--products_db_path creates the product catalog database.--transactions_db_path creates the transactions database used for checkout state.--data_dir=../test_data/flower_shop points to the sample flower shop data included in the repository.
Once this step is complete, your local sample store data is ready, and the server will be able to use it.
In this step, you will start the sample UCP business server. This server will use the product and transaction databases you created in the previous step and expose the UCP shopping APIs on port 8182.
Run the following command to start the server in the background.
uv run server.py \
  --products_db_path=/tmp/ucp_test/products.db \
  --transactions_db_path=/tmp/ucp_test/transactions.db \
  --port=8182 &
SERVER_PID=$!
This command does the following:
uv run server.py starts the sample Python server.--products_db_path connects the server to the product database.--transactions_db_path connects the server to the transactions database.--port=8182 tells the server to run on port 8182.SERVER_PID=$! saves the process ID so you can stop the server later. At this point, the business server is running and ready to accept requests from an agent.
In this step, you will query the UCP discovery endpoint. Every UCP-enabled business publishes a discovery document at /.well-known/ucp, which allows agents to understand what the business supports before making any requests.
First, save the server URL in a variable so the next commands are easier to read.
export SERVER_URL=http://localhost:8182Now fetch the UCP discovery document from the business server.
curl -s $SERVER_URL/.well-known/ucp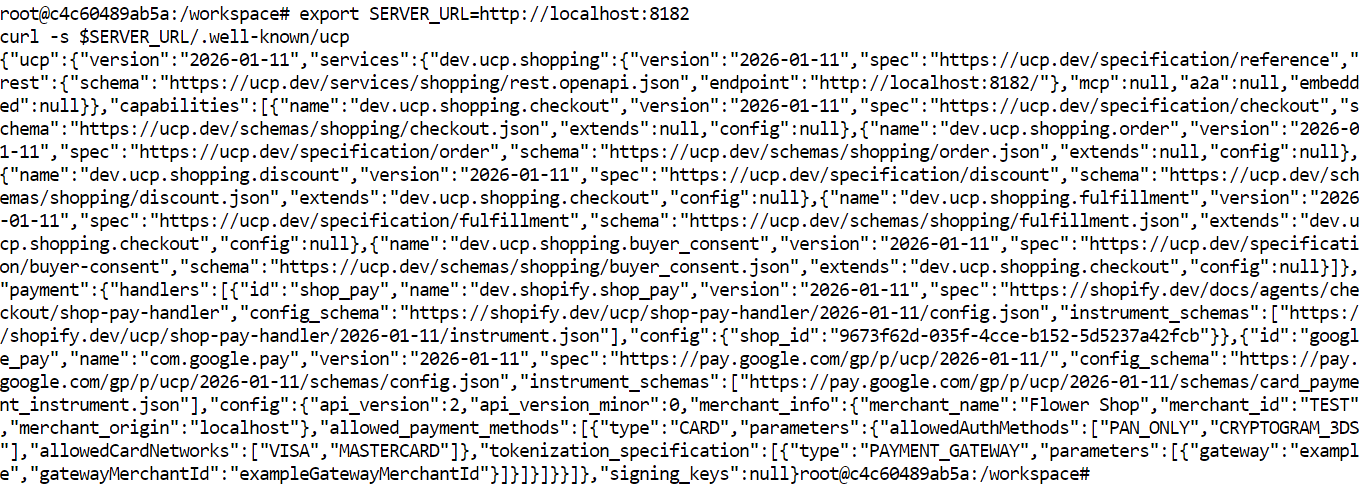
This response tells the agent:
This discovery step is important because it removes the need for hard-coded, custom integrations. The agent can inspect the server first and then decide how to interact with it.
In this step, you will create a new checkout session using the UCP checkout capability. This is the point where the agent sends the selected product, buyer information, and payment structure to the business server.
Before sending the request, generate the required request headers. These headers help with request tracing, idempotency, and signature validation.
export REQUEST_ID=$(uuidgen 2>/dev/null || cat /proc/sys/kernel/random/uuid)
export IDEMPOTENCY_KEY=$(uuidgen 2>/dev/null || cat /proc/sys/kernel/random/uuid)
export REQUEST_SIGNATURE="dev"
This does the following:
REQUEST_ID creates a unique identifier for the request.IDEMPOTENCY_KEY ensures the same request is not processed twice if it is retried.REQUEST_SIGNATURE provides the required signature header. In a local demo, "dev" may be used if strict signature validation is not enforced.Now send the checkout request to the server.
curl -X POST "$SERVER_URL/checkout-sessions" \
  -H "Content-Type: application/json" \
  -H "UCP-Agent: profile=\"https://agent.example/profile\"" \
  -H "request-id: $REQUEST_ID" \
  -H "idempotency-key: $IDEMPOTENCY_KEY" \
  -H "request-signature: $REQUEST_SIGNATURE" \
  -d '{
    "line_items": [
      { "item": { "id": "bouquet_roses", "title": "Red Rose" }, "quantity": 1 }
    ],
    "buyer": { "full_name": "John Doe", "email": "john.doe@example.com" },
    "currency": "USD",
    "payment": { "handlers": [], "instruments": [] }
  }'
This request includes:
line_items to define what the buyer wants to purchase,item.id to identify the product,item.title to provide a readable name,quantity to specify how many units are being purchased,buyer to include customer details,currency to define the checkout currency,payment to provide the required payment structure.The response will return a checkout session object. This includes the new checkout ID, line item IDs, totals, buyer information, and the current checkout status.
In this step, you will update the existing checkout session and apply a discount code. Discounts in UCP are implemented as an extension of the checkout capability, so the discount is added as part of the checkout update request.
First, save the real checkout ID and line item ID returned from the previous checkout response.
export CHECKOUT_ID=5dd08e18-c9c1-4fa1-a0d1-885ca81cda29
export LINE_ITEM_ID=ed72ebe6-2484-4e7b-afc8-a8ff5c8f430e
Next, generate a new request ID and idempotency key for this update request.
export REQUEST_ID=$(uuidgen 2>/dev/null || cat /proc/sys/kernel/random/uuid)
export IDEMPOTENCY_KEY=$(uuidgen 2>/dev/null || cat /proc/sys/kernel/random/uuid)
export REQUEST_SIGNATURE="dev"
Now send the updated checkout request with the discount code included.
curl -X PUT "$SERVER_URL/checkout-sessions/$CHECKOUT_ID" \
  -H "Content-Type: application/json" \
  -H "UCP-Agent: profile=\"https://agent.example/profile\"" \
  -H "request-id: $REQUEST_ID" \
  -H "idempotency-key: $IDEMPOTENCY_KEY" \
  -H "request-signature: $REQUEST_SIGNATURE" \
  -d "{
    \"id\": \"$CHECKOUT_ID\",
    \"line_items\": [
      {
        \"id\": \"$LINE_ITEM_ID\",
        \"item\": { \"id\": \"bouquet_roses\", \"title\": \"Red Rose\" },
        \"quantity\": 1
      }
    ],
    \"buyer\": {
      \"full_name\": \"John Doe\",
      \"email\": \"john.doe@example.com\"
    },
    \"currency\": \"USD\",
    \"discounts\": {
      \"codes\": [\"10OFF\"]
    },
    \"payment\": {
      \"handlers\": [],
      \"instruments\": []
    }
  }"
This request does the following:
PUT,discounts section,10OFF.
The response should return the updated checkout object with:
The discount code is valid; you should see the pricing change in the response.
In this final step, you will stop the sample business server that you started earlier. Since you saved the process ID when starting the server, you can shut it down easily with one command.
Run the following command to stop the server.
kill $SERVER_PIDFrom start to finish, you successfully built and tested a complete end-to-end UCP flow on your local machine.
You have:
uv,In simple terms, you set up a working UCP-enabled business, connected to it like an agent, created a shopping checkout, and tested how UCP handles updates such as discounts. This gives you a full basic example of how a business and an agent can interact using the Universal Commerce Protocol.
The Universal Commerce Protocol gives the industry a shared foundation for AI-led commerce. It creates a standard way for businesses, AI agents, and payment systems to communicate, making it easier to support discovery, checkout, updates, and payments without rebuilding custom integrations for every new platform.
In this guide, you have learned what UCP is, why it matters, how its architecture works, and how to run a complete local example from start to finish. By setting up the sample server, discovering its capabilities, creating a checkout session, and applying a discount, you saw how UCP turns commerce into a structured, agent-friendly workflow.
The biggest opportunity for UCP is clear: it can reduce fragmentation and make commerce more interoperable in a world where shopping increasingly happens through AI assistants and conversational interfaces.
The real challenge, however, will be adoption. Businesses may still choose custom APIs, existing REST-based integrations, MCP-based tools, or other agent workflows they already use today. For UCP to succeed, it will need strong ecosystem support from merchants, platforms, developers, and payment providers.
Top DataCamp Courses
Track
Track
Course
Tutorial
Aashi Dutt
Tutorial
Khalid Abdelaty
Tutorial
Aryan Irani
Tutorial
Aryan Irani
Tutorial
Arun Nanda
Tutorial
Tim Lu