Course
Building AI Agents with Google ADK
1 hr
6.5K
This project builds a travel planner that:
flight_agent: Recommends flight options.stay_agent: Finds hotels within budget.activities_agent: Suggests engaging activities.host_agent to orchestrate all requests.All agents are hosted as separate FastAPI servers and expose a /run endpoint. The communication is done via the shared A2A-compatible client.
Note: This project runs entirely on your local machine for simplicity, but you can easily deploy each agent and the UI to cloud platforms like Render, Railway, or Google Cloud Run for scalable access.
Let’s start by installing the following libraries:
pip install google-adk litellm fastapi uvicorn httpx pydantic openai streamlitThen, set up your OpenAI API key—feel free to use another model provider. To learn how to set up your OpenAI’s API key, I recommend this introductory tutorial on GPT-4o API.
export OPENAI_API_KEY="your_key_here"Before we can build intelligent agents, we need to define a common language for them to talk to each other. In our setup, this is done using:
/run endpoint across all agentsThese are placed in shared/ and common/ folders to keep the code modular. Let’s look at each one.
shared/schemas.py fileWe define a TravelRequest schema using Pydantic. This ensures that all agents agree on the structure of incoming requests, which includes the destination, travel dates, and user budget.
from pydantic import BaseModel
class TravelRequest(BaseModel):
    destination: str
    start_date: str
    end_date: str
    budget: float
This class helps in:
common/a2a_client.py fileThis lightweight async utility allows any agent (especially the host) to invoke another agent using the A2A protocol by calling the /run endpoint.
import httpx
async def call_agent(url, payload):
    async with httpx.AsyncClient() as client:
        response = await client.post(url, json=payload, timeout=60.0)
        response.raise_for_status()
        return response.json()
This utility asynchronously sends a POST request to another agent’s /run endpoint using httpx. It returns the parsed JSON response and raises an error if the request fails.
We’ll use this utility in our host agent to call the flight_agent, stay_agent, and activities_agent.
common/a2a_server.py fileInstead of writing a custom FastAPI route for each agent, we generalize it using the create_app(agent) function, which handles:
/runfrom fastapi import FastAPI
import uvicorn
def create_app(agent):
app = FastAPI()
@app.post("/run")
async def run(payload: dict):
return await agent.execute(payload)
return appThis utility creates a FastAPI app with a standard /run route that delegates execution to the provided agent. It ensures a consistent agent-to-agent (A2A) interface for all services using structured JSON input.
Together, these shared components make our multi-agent system more maintainable, reusable, and aligned with Google's A2A philosophy of simple, structured inter-agent messaging.
Now that we have shared contracts and utilities in place, let’s start building the individual agents. To transform this into a truly modular and multi-agent system, we’ll use Google’s A2A protocol—a simple HTTP-based interface that allows agents to communicate consistently and interoperably.
A2A (Agent-to-Agent) enables plug-and-play coordination among agents, whether they’re local Python functions or hosted across networks. Each agent exposes a /run endpoint with a common schema and acts as a service.
In our demo, we have four agents:
host_agent: Orchestrates all other agentsflight_agent: Finds suitable flightsstay_agent: Suggests accommodationsactivities_agent: Recommends engaging in local activitiesAll agents are structured similarly, with 3 files and a subfolder:
agents/
├── host_agent/
│   │   ├── agent.py              # Optional if host logic is minimal
│   │   ├── task_manager.py       # Calls other agents and aggregates responses
│   │   ├── __main__.py           # Starts FastAPI app via common/a2a_server.py
│   │   └── .well-known/
│   │       └── agent.json        # A2A Agent Card metadata
├── flight_agent/
├── stay_agent/
└── activities_agent/
Each agent uses google.adk.agents.Agent, a LiteLlm model wrapper, and Runner for execution. Start by creating the following files within the activities_agent folder and repeat the same for flight_agent and stay_agent.
agent.py fileLet’s now define the logic for our activities_agent, which will be responsible for generating engaging local experiences based on the user’s travel itinerary.
We begin by importing essential modules to configure and run our agent.
from google.adk.agents import Agent
from google.adk.models.lite_llm import LiteLlm
from google.adk.runners import Runner
from google.adk.sessions import InMemorySessionService
from google.genai import types
import json
This agent uses Google ADK’s components like Agent, ' Runner, ' and LiteLlm and handles state management using InMemorySessionService. The Types library is used for constructing structured prompts.
Now, we instantiate the agent itself using ADK's Agent class.
activities_agent = Agent(
    name="activities_agent",
    model=LiteLlm("openai/gpt-4o"),
    description="Suggests interesting activities for the user at a destination.",
    instruction=(
        "Given a destination, dates, and budget, suggest 2-3 engaging tourist or cultural activities. "
        "For each activity, provide a name, a short description, price estimate, and duration in hours. "
        "Respond in plain English. Keep it concise and well-formatted."
    )
)
The instruction parameter defines the system prompt that guides the LLM's behavior. Although this example uses plain English, you can adjust the instruction to return structured JSON for easier parsing.
Next, to keep track of user interactions, we configure a Runner along with session information.
session_service = InMemorySessionService()
runner = Runner(
    agent=activities_agent,
    app_name="activities_app",
    session_service=session_service
)
USER_ID = "user_activities"
SESSION_ID = "session_activities"
The Runner manages agent execution for a particular app session. While the InMemorySessionService class stores the context in the memory. Then, we define user and session IDs. However, in production, these could be dynamic or user-specific. This ensures a fresh ADK session exists before sending any prompts to the LLM agent.
The execute() function handles incoming requests, builds a prompt, invokes the model, and parses the output.
async def execute(request):
    session_service.create_session(
        app_name="activities_app",
        user_id=USER_ID,
        session_id=SESSION_ID
    )
    prompt = (
        f"User is flying to {request['destination']} from {request['start_date']} to {request['end_date']}, "
        f"with a budget of {request['budget']}. Suggest 2-3 activities, each with name, description, price estimate, and duration. "
        f"Respond in JSON format using the key 'activities' with a list of activity objects."
    )
    message = types.Content(role="user", parts=[types.Part(text=prompt)])
    async for event in runner.run_async(user_id=USER_ID, session_id=SESSION_ID, new_message=message):
        if event.is_final_response():
            response_text = event.content.parts[0].text
            try:
                parsed = json.loads(response_text)
                if "activities" in parsed and isinstance(parsed["activities"], list):
                    return {"activities": parsed["activities"]}
                else:
                    print("'activities' key missing or not a list in response JSON")
                    return {"activities": response_text}  # fallback to raw text
            except json.JSONDecodeError as e:
                print("JSON parsing failed:", e)
                print("Response content:", response_text)
                return {"activities": response_text}  # fallback to raw text
The execute() function dynamically builds a prompt using the incoming request parameters like destination, dates, and budget. Here's what happens under the hood:
Content object is constructed and passed to the ADK Runner, which asynchronously waits for the model's final response using a streaming generator.This strategy improves robustness and user experience, especially when model outputs vary slightly due to temperature or prompt interpretation.
task_manager.py fileAfter defining the execute() logic inside agent.py, we now wire it up into the ADK-compatible server setup using task_manager.py.
from .agent import execute
async def run(payload):
    return await execute(payload)
This file acts as a thin wrapper around the execute() function defined earlier. It makes the run() method available to external modules, especially the server script in __main__.py.
__main__.py fileThe __main__.py file launches a FastAPI server on port 8003, serving the agent at the /run endpoint.
from common.a2a_server import create_app
from .task_manager import run
app = create_app(agent=type("Agent", (), {"execute": run}))
if __name__ == "__main__":
    import uvicorn
    uvicorn.run(app, port=8003)
Here is what’s happening:
create_app() (from common/a2a_server.py) wraps our agent in a standard A2A-compatible FastAPI interface.execute() method so ADK can invoke run() properly..well-known/agent.json fileWe use this JSON file to describe the agent’s identity and purpose as per the A2A (Agent-to-Agent) protocol.
{
    "name": "activity_agent",
    "description": "Agent providing activity details."
  }
Note: While the .well-known/agent.json file is not directly used by our agents in this project, it adheres to the A2A specification and is important for discovery, introspection, and future compatibility with orchestrators like LangGraph, CrewAI, or Google's agent registry.
Similar logic is used for flight_agent and stay_agent as well.
host_agentThe host_agent acts as a central planner for the demo. The host_agent exemplifies the controller pattern in multi-agent systems. It separates decision-making and execution, allowing each downstream agent to focus on its niche while centralizing coordination logic. This not only simplifies testing and scaling but also mirrors real-world microservice architecture in distributed systems.
It sends the same payload to all three agents using their exposed /run APIs and merges the results. Let’s add the following files to the host_agent folder.
agent.py fileLet’s start with basic imports.
from google.adk.agents import Agent
from google.adk.models.lite_llm import LiteLlm
from google.adk.runners import Runner
from google.adk.sessions import InMemorySessionService
from google.genai import types
This import block brings in all the core building blocks needed to define and run an LLM-based agent using Google ADK: Agent class, lightweight LLM wrapper, Runner for handling execution, and in-memory session management.
host_agent = Agent(
    name="host_agent",
    model=LiteLlm("openai/gpt-4o"),
    description="Coordinates travel planning by calling flight, stay, and activity agents.",
    instruction="You are the host agent responsible for orchestrating trip planning tasks. "
                "You call external agents to gather flights, stays, and activities, then return a final result."
)
session_service = InMemorySessionService()
runner = Runner(
    agent=host_agent,
    app_name="host_app",
    session_service=session_service
)
USER_ID = "user_host"
SESSION_ID = "session_host"
The above code defines a top-level ADK agent responsible for coordinating the full trip plan. While we don’t invoke sub-agents from the LLM in this implementation, the system prompt sets up the role for a future extension where the LLM could potentially handle tool use and meta-reasoning.
async def execute(request):
    # Ensure session exists
    session_service.create_session(
        app_name="host_app",
        user_id=USER_ID,
        session_id=SESSION_ID
    )
    prompt = (
        f"Plan a trip to {request['destination']} from {request['start_date']} to {request['end_date']} "
        f"within a total budget of {request['budget']}. Call the flights, stays, and activities agents for results."
    )
    message = types.Content(role="user", parts=[types.Part(text=prompt)])
    async for event in runner.run_async(user_id=USER_ID, session_id=SESSION_ID, new_message=message):
        if event.is_final_response():
            return {"summary": event.content.parts[0].text}
This execute() function serves as the main entry point to the host agent’s LLM. It:
methodtask_manager.py fileThe task manager executes the orchestration logic by calling remote agents and handling the full trip-planning workflow. For its practical implementation, we define the service URLs for each child agent. These endpoints conform to the A2A /run protocol and expect a shared TravelRequest` JSON schema.
from common.a2a_client import call_agent
FLIGHT_URL = "http://localhost:8001/run"
STAY_URL = "http://localhost:8002/run"
ACTIVITIES_URL = "http://localhost:8003/run"
Now, we define the payload.
async def run(payload):
    #Print what the host agent is sending
    print("Incoming payload:", payload)
    flights = await call_agent(FLIGHT_URL, payload)
    stay = await call_agent(STAY_URL, payload)
    activities = await call_agent(ACTIVITIES_URL, payload)
    # Log outputs
    print("flights:", flights)
    print("stay:", stay)
    print("activities:", activities)
    # Ensure all are dicts before access
    flights = flights if isinstance(flights, dict) else {}
    stay = stay if isinstance(stay, dict) else {}
    activities = activities if isinstance(activities, dict) else {}
    return {
        "flights": flights.get("flights", "No flights returned."),
        "stay": stay.get("stays", "No stay options returned."),
        "activities": activities.get("activities", "No activities found.")
    }
This function uses the call_agent() helper function to dispatch the payload to each downstream service and logs inputs and outputs for visibility during development. This file is essentially where the true orchestration logic lives.
__main__.py fileThe __main__.py file serves as the entry point for the FastAPI server that wraps the host agent.
from common.a2a_server import create_app
from .task_manager import run
app = create_app(agent=type("Agent", (), {"execute": run}))
if __name__ == "__main__":
    import uvicorn
    uvicorn.run(app, port=8000)
The main file does the following:
create_app() from common/a2a_server.py to generate a FastAPI application with a standardized /run endpoint.execute() method that internally delegates to the task_manager.run() function.uvicorn on a specified port (usually 8000).This aligns the host agent’s interface with other downstream agents, maintaining consistency across the system.
.well-known/agent.json fileThis file acts as a classic multi-agent pattern where a central node delegates and composes tasks.
{
  "name": "host_agent",
  "description": "Coordinates travel planning among specialized agents."
}
While optional, it’s a great practice to include this in all agent directories, as explained previously.
Finally, let’s build a simple app where users can input their preferences and receive a structured itinerary. Start by making a travel_ui.py file in the root directory and add the following code to it.
import streamlit as st
import requests
We import basic libraries like Streamlit and requests for UI support.
st.set_page_config(page_title="ADK-Powered Travel Planner", page_icon="✈️")
st.title("🌍 ADK-Powered Travel Planner")
origin = st.text_input("Where are you flying from?", placeholder="e.g., New York")
destination = st.text_input("Destination", placeholder="e.g., Paris")
start_date = st.date_input("Start Date")
end_date = st.date_input("End Date")
budget = st.number_input("Budget (in USD)", min_value=100, step=50)
if st.button("Plan My Trip ✨"):
if not all([origin, destination, start_date, end_date, budget]):
st.warning("Please fill in all the details.")
else:
payload = {
"origin": origin,
"destination": destination,
"start_date": str(start_date),
"end_date": str(end_date),
"budget": budget
}
response = requests.post("http://localhost:8000/run", json=payload)
if response.ok:
data = response.json()
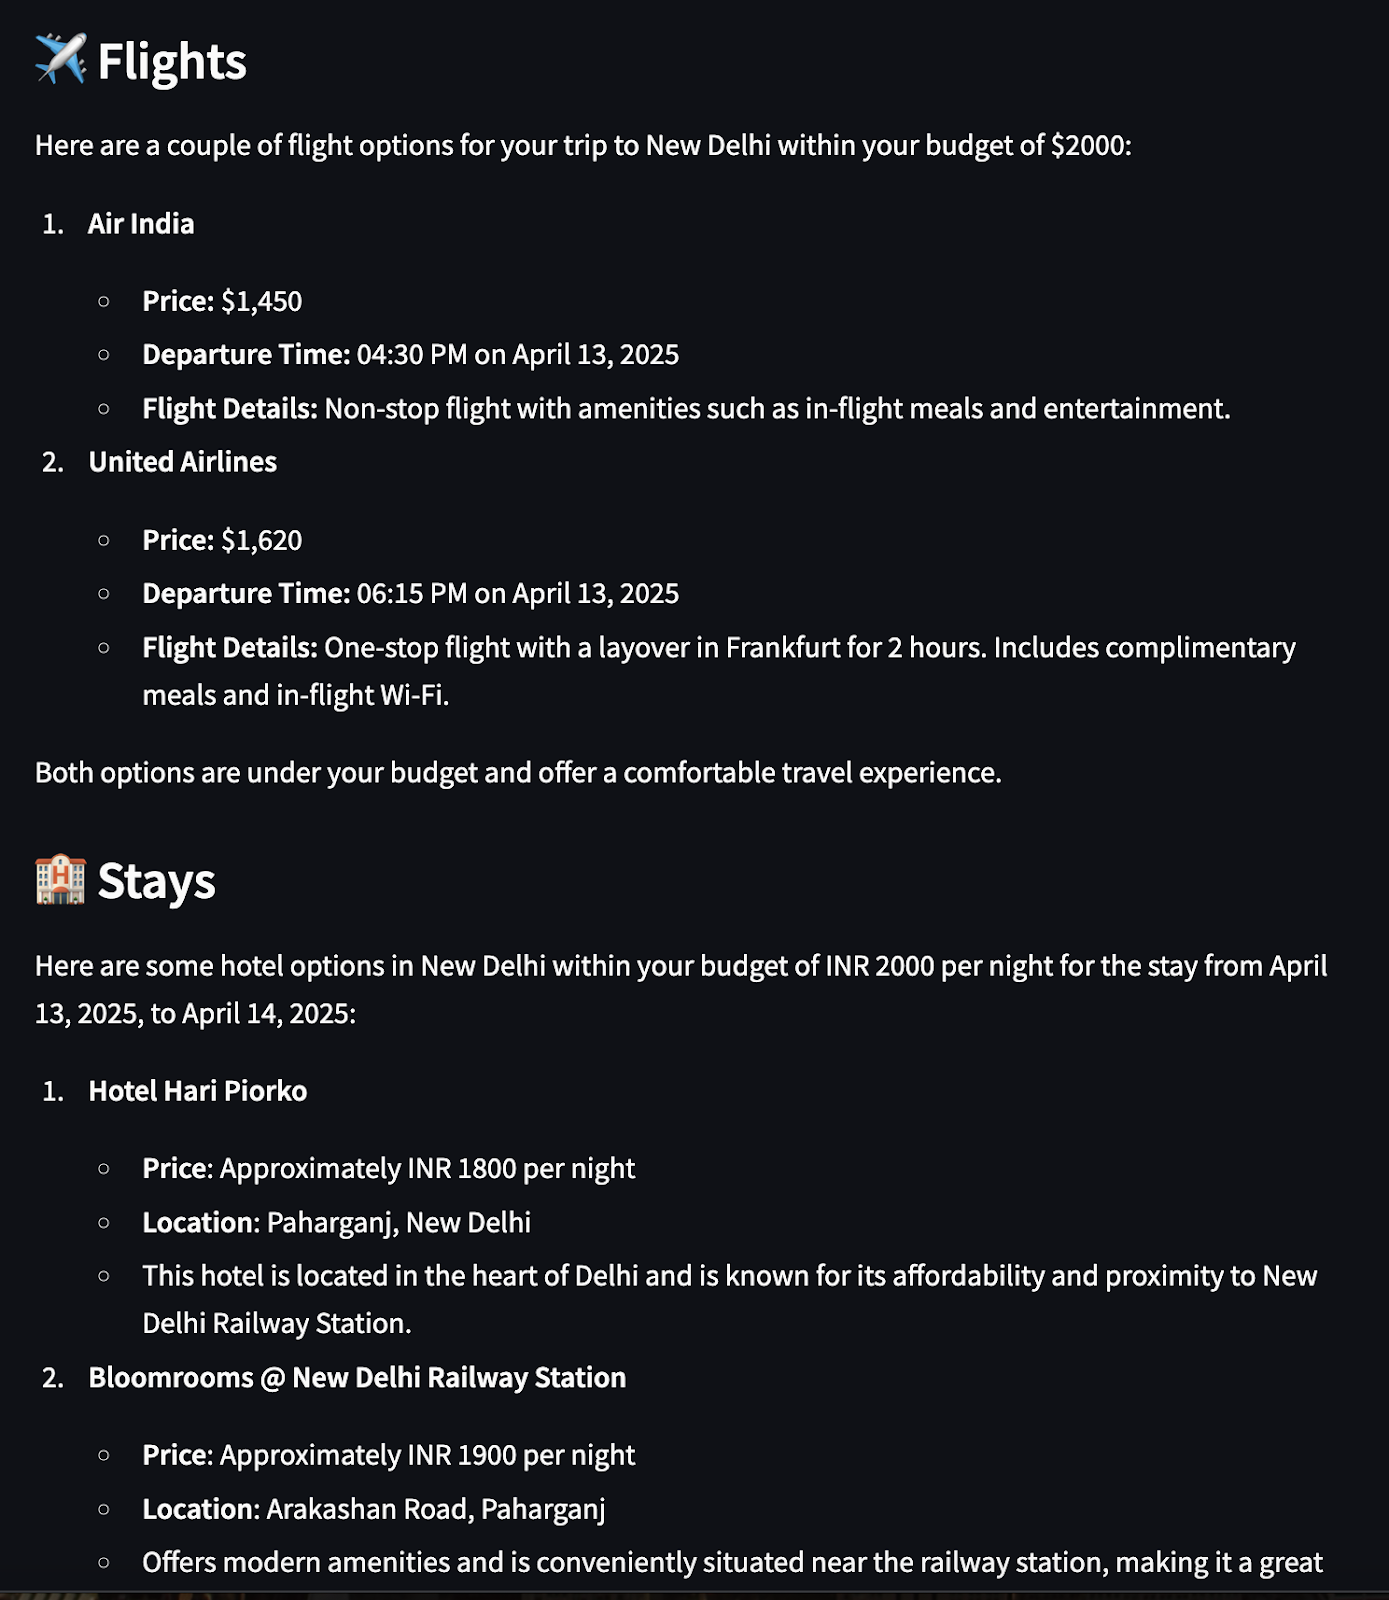
st.subheader("✈️ Flights")
st.markdown(data["flights"])
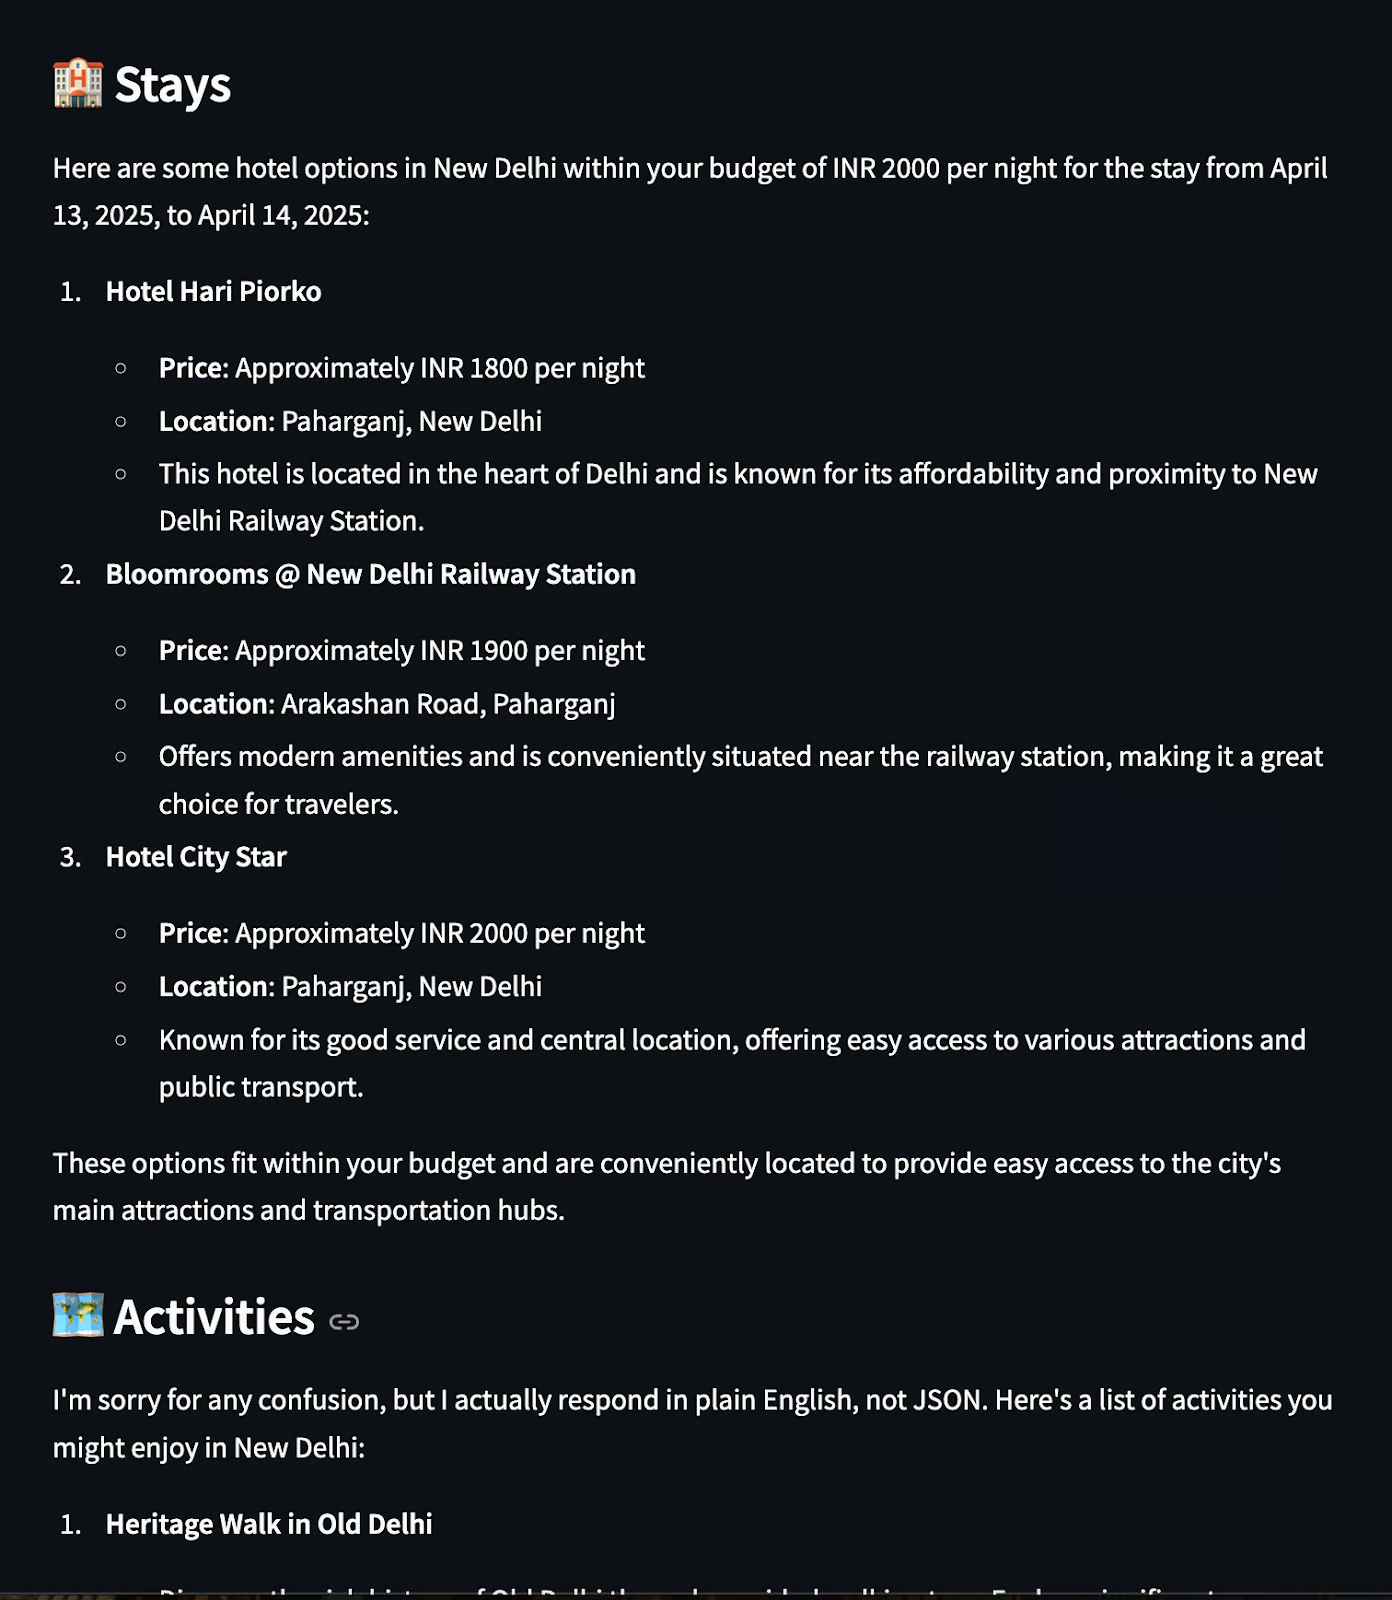
st.subheader("🏨 Stays")
st.markdown(data["stay"])
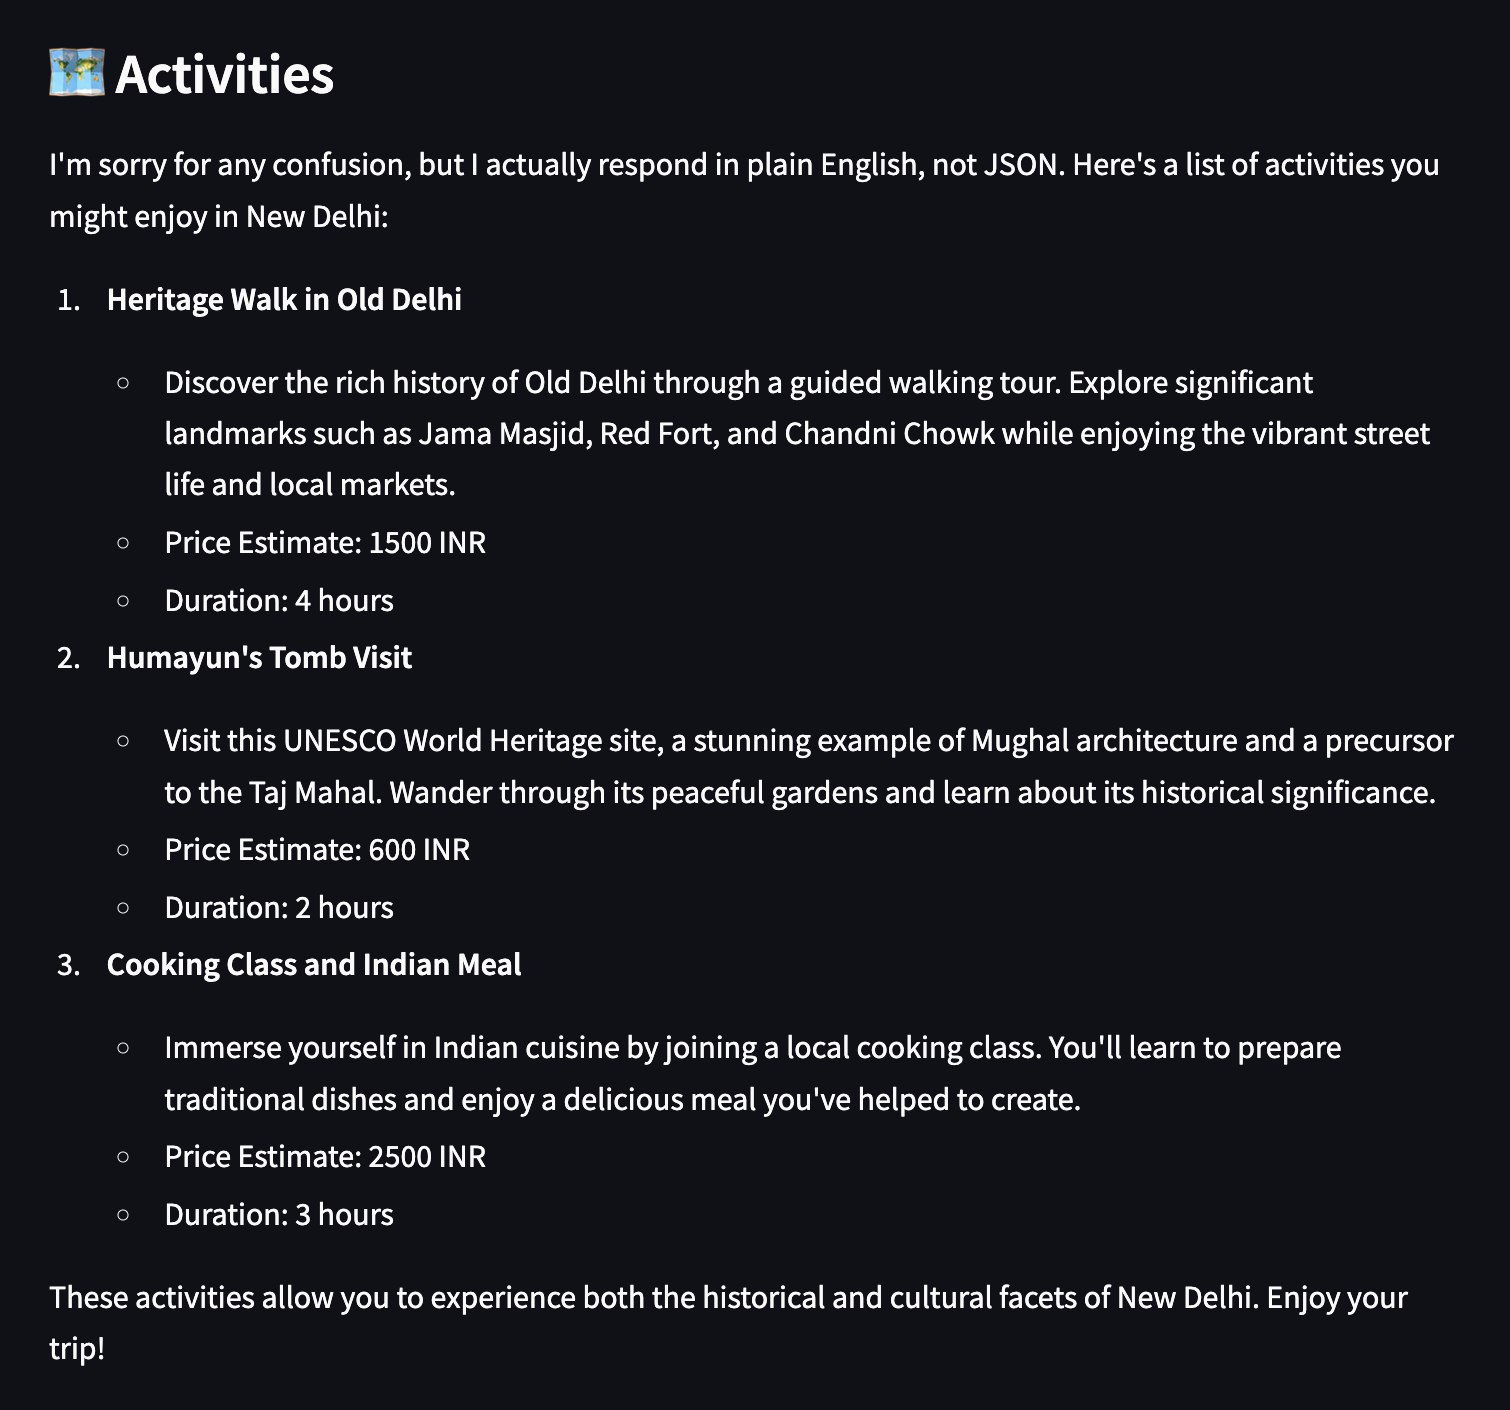
st.subheader("🗺️ Activities")
st.markdown(data["activities"])
else:
st.error("Failed to fetch travel plan. Please try again.")The Streamlit app provides a user-friendly UI for interacting with the multi-agent travel planner built using ADK. Here are a few things we touch upon in the above code.
text_input, date_input, and number_input to collect origin, destination, dates, and budget.host_agent at http://localhost:8000/run.host_agent invokes all child agents (flight, stay, activity), aggregates their responses, and returns a unified travel plan.st.markdown() method under separate headers for flights, stays, and activities.st.error().Now, run the following command on your terminal locally:
uvicorn agents.host_agent.__main__:app --port 8000 &
uvicorn agents.flight_agent.__main__:app --port 8001 &
uvicorn agents.stay_agent.__main__:app --port 8002 &
uvicorn agents.activities_agent.__main__:app --port 8003 &
streamlit run travel_ui.py
When a user clicks “Plan My Trip,” the host agent takes over, activates the agents, and displays the results in the UI:

Your overall file structure would look something like this:
ADK_demo/
├── agents/
│   ├── host_agent/
│   │   ├── agent.py
│   │   ├── task_manager.py
│   │   ├── __main__.py
│   │   └── .well-known/
│   │       └── agent.json
│   │
│   ├── flight_agent/
│   │   ├── agent.py
│   │   ├── task_manager.py
│   │   ├── __main__.py
│   │   └── .well-known/
│   │       └── agent.json
│   │
│   ├── stay_agent/
│   │   ├── agent.py
│   │   ├── task_manager.py
│   │   ├── __main__.py
│   │   └── .well-known/
│   │       └── agent.json
│   │
│   └── activities_agent/
│       ├── agent.py
│       ├── task_manager.py
│       ├── __main__.py
│       └── .well-known/
│           └── agent.json
│
├── common/
│   ├── a2a_client.py             # Utility to send requests to other agents
│   └── a2a_server.py             # Shared FastAPI A2A-compatible server template
│
├── shared/
│   └── schemas.py                # Shared Pydantic schema
│
├── streamlit_app.py             # Frontend UI for user input and response rendering
├── requirements.txt
└── README.md 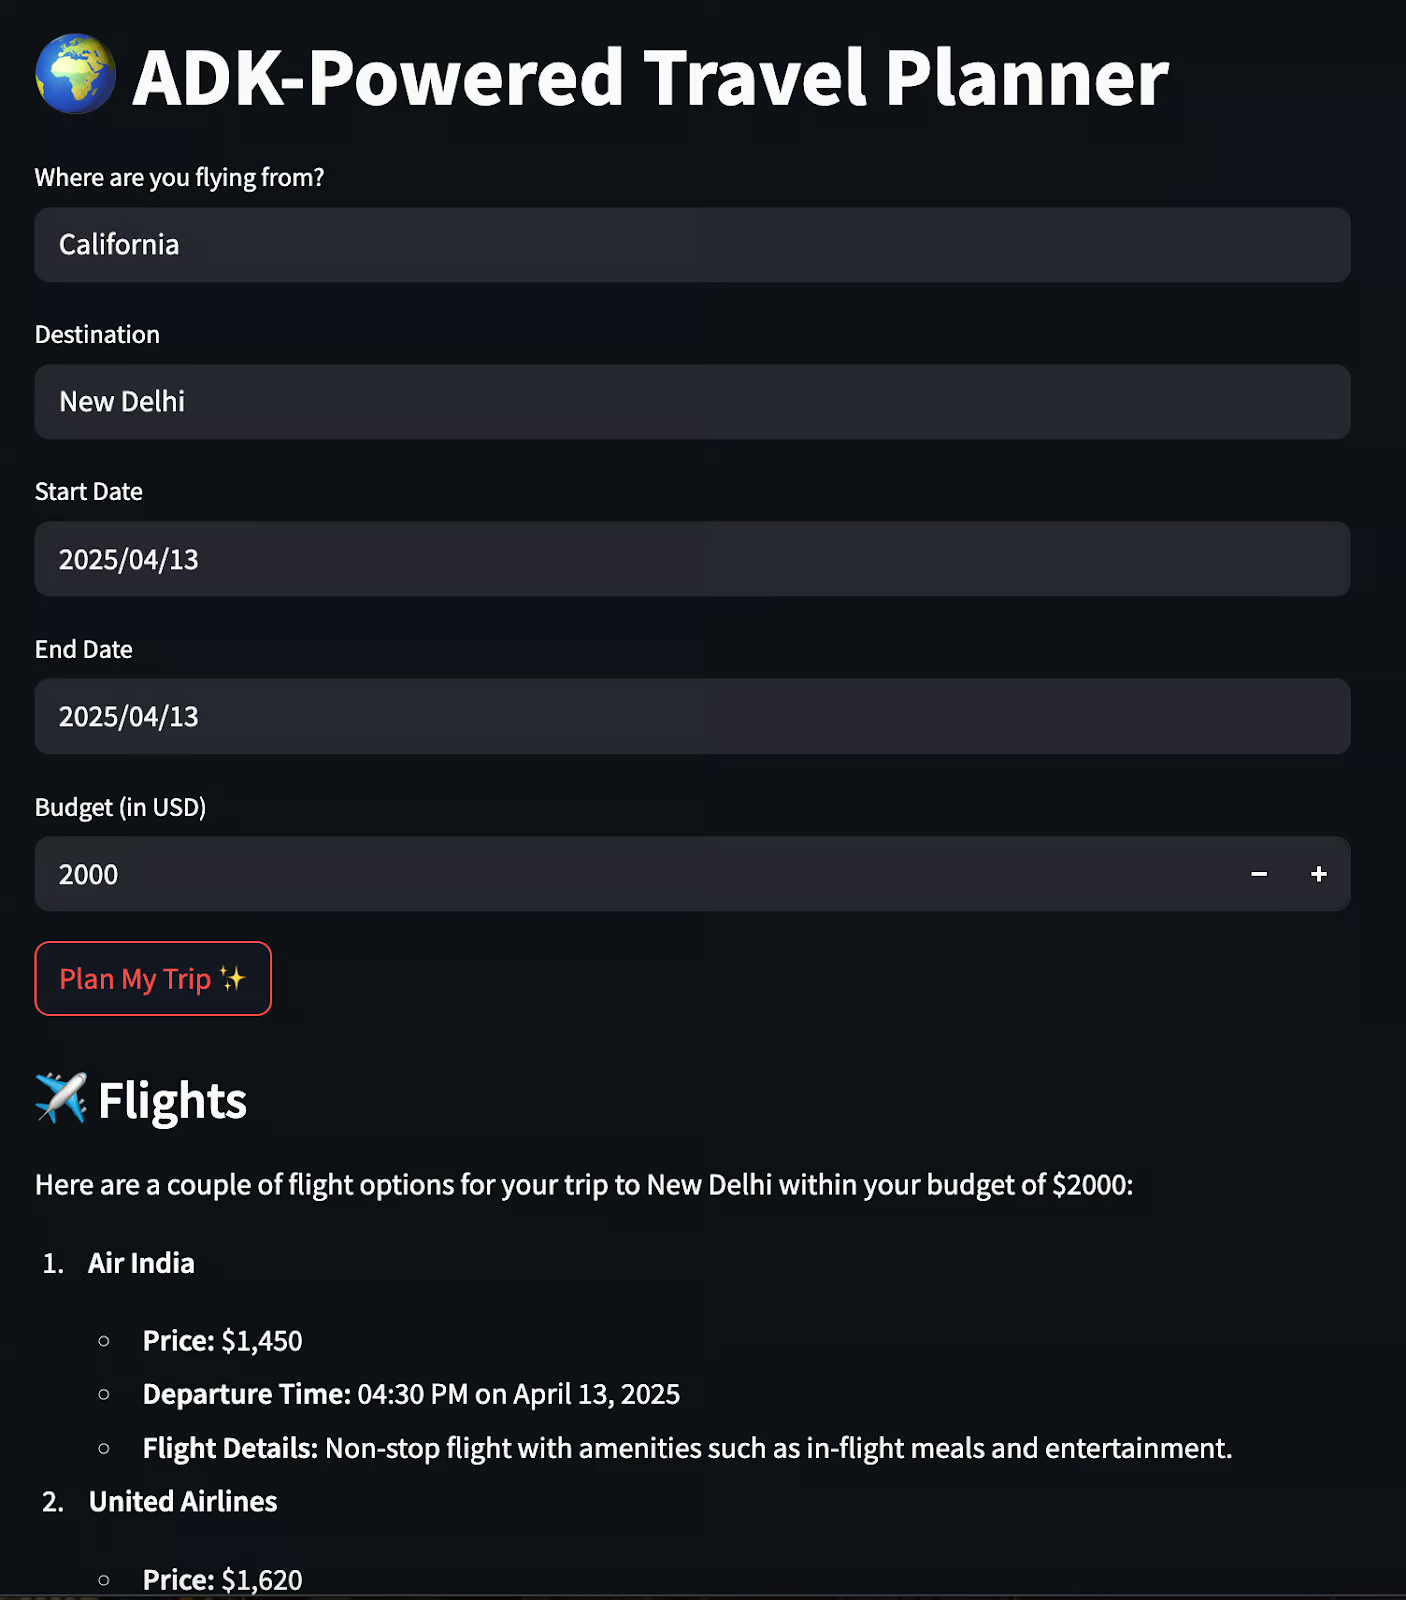
And that’s it! I’ve put together all we’ve built in this GitHub project.
With just a few FastAPI apps and ADK agents, we’ve built a collaborative travel planner that:
Even though all agents use the same model under the hood, this system is multi-agent in behavior, i.e., agents have distinct roles, isolated responsibilities, and structured communication.
Here are a few resources to get started:
Build AI agents with these courses!
Course
Course
Course
blog
Aashi Dutt
5 min
Tutorial
Aashi Dutt
Tutorial
Aryan Irani
Tutorial
Aashi Dutt
Tutorial
Bex Tuychiev
Tutorial
Aashi Dutt