
Track
Developing AI Applications
21 hr
The AWS Multi-Agent Orchestrator is a flexible, tool-packed framework designed to manage AI agents and facilitate complex multi-turn conversations. Its pre-built components enable quick development and deployment, so we can focus on our application without needing to rebuild these components from scratch.
The AWS Multi-Agent Orchestrator offers the following features:
The framework is implemented to support both Python and TypeScript.
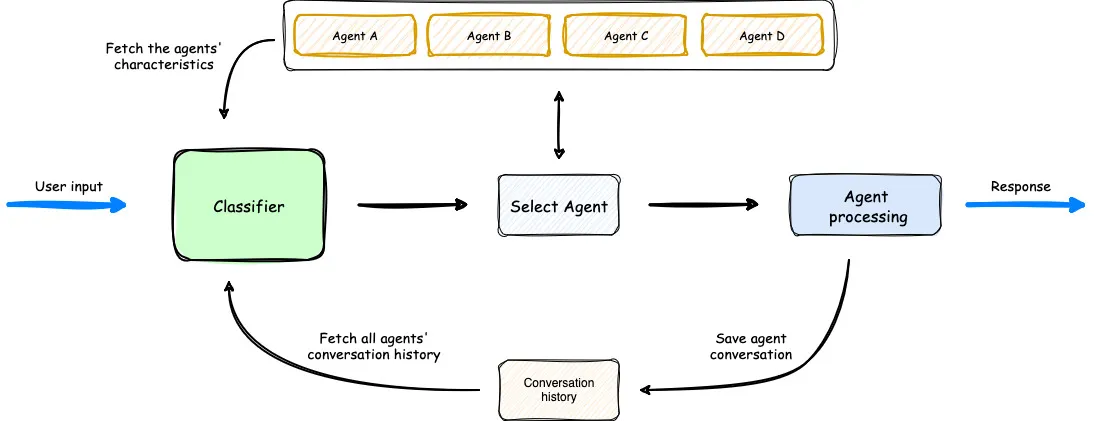
An overview of how Multi-Agent Orchestrator operates. (Source)
In the diagram above, we see that the classifier considers the available agents, the user prompt, and previous conversation history to select the optimal agent for user input. Then, the agent processes the request. The workflow is simple yet effective.
For a quick setup of the environment, you can follow the instructions in the documentation.
First, we create a new folder and a new Python environment to install the required libraries.
mkdir test_multi_agent_orchestrator
cd test_multi_agent_orchestrator
python -m venv venv
source venv/bin/activate  # On Windows use venv\\Scripts\\activate
With the new virtual environment activated, install the library
pip install multi-agent-orchestratorNext, we need to configure our AWS account. If you don’t have an AWS account, sign up for free for a free tier account. After signing up, download the AWS CLI.
The AWS CLI needs to be configured as well. For detailed instructions, follow Setting up the AWS CLI, but you can take an easier approach by using the command aws configure and providing the AWS access key ID and secret access key. You can get these keys after creating a new user in your dashboard.
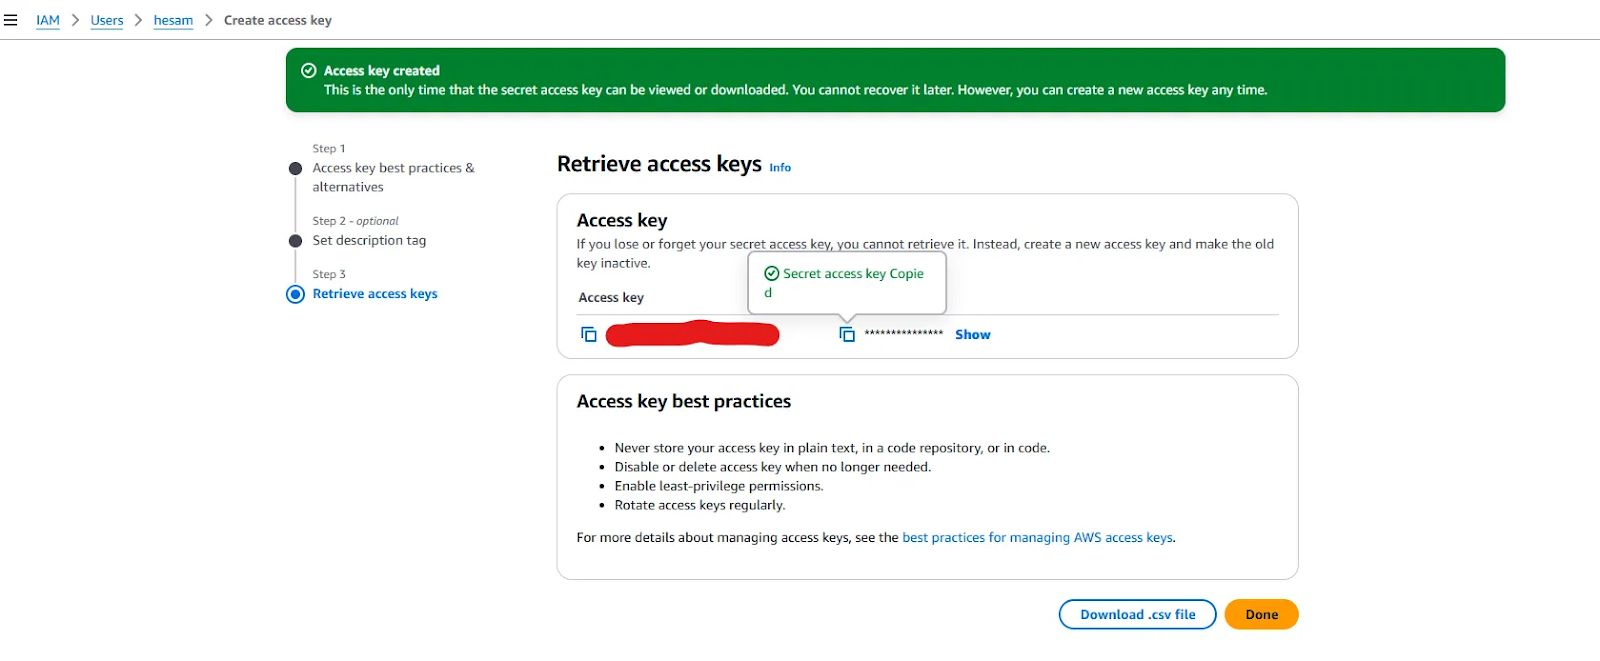
Provided access keys when creating a new user.
With the access keys at hand, run aws configure and provide the keys, select the region name (a full list is provided here) closest to you, and set the default output format to json.

If your CLI is configured properly, running the command aws sts get-caller-identity should show your AWS account ID, user ID, and ARN.
Now that we have the AWS CLI ready to go, we need to configure AWS Bedrock to give access to the LLMs we will need. Amazon Bedrock is a service that allows you to test and call foundational models (such as Llama 3.2 or Claude 3.5 Sonnet) through an API. The Multi-Agent Orchestrator uses this service to call two models by default:
Of course, these models can be changed, but let’s continue with the default choice.
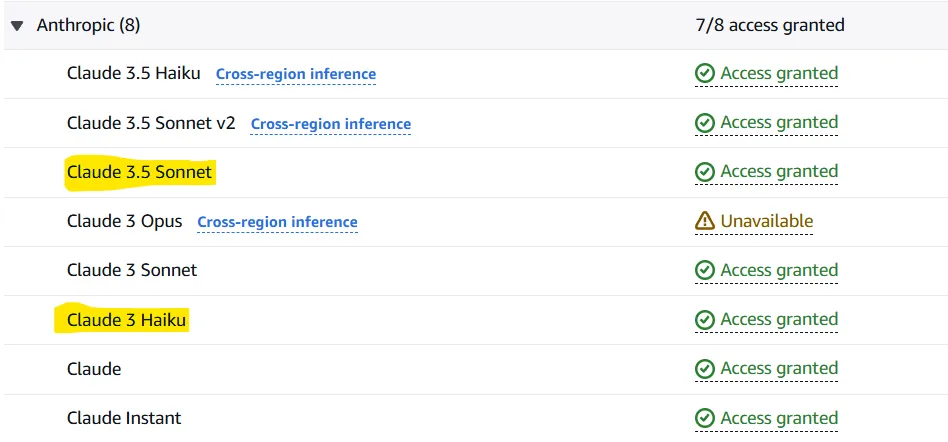
To give access to these two models, go to Amazon Bedrock > Model Access and select “Modify model access.” Select the two models (and others if you like) and fill in any required information. This part will look as follows:

After finishing the request, the models will be available in 1-2 minutes. When access is granted for the requested models, you must see “Access granted” in front of them.
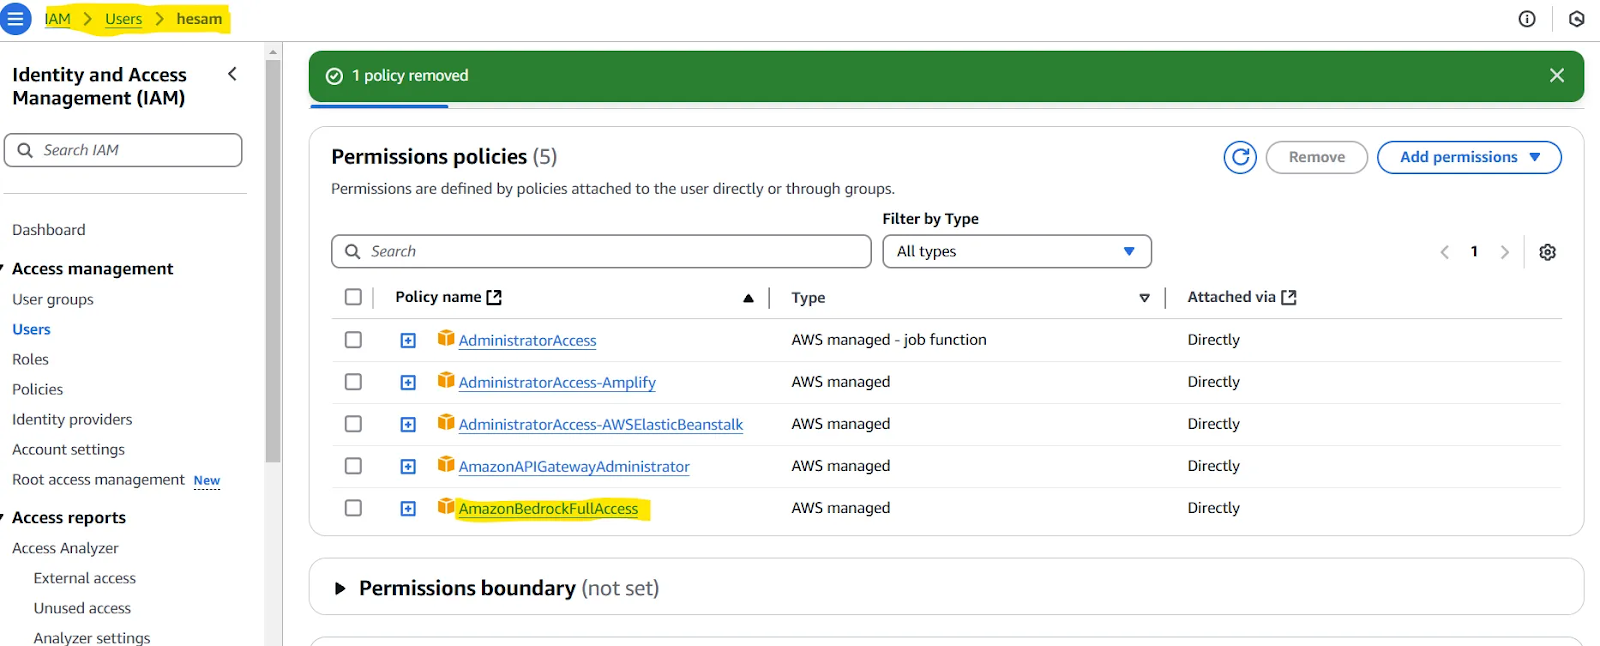
Note: You may be required to assign a policy to the user you have created. You can test this if you encounter issues in the next subsection of our article (Test your setup). If so, check out this page. In summary, you would need to give the user you have defined access to AmazonBedrockFullAccess.
To check if all of the previous steps are set up properly, use this code:
import uuid
import asyncio
import json
import sys
from typing import Optional, List, Dict, Any
from multi_agent_orchestrator.orchestrator import MultiAgentOrchestrator, OrchestratorConfig
from multi_agent_orchestrator.agents import (
    BedrockLLMAgent,
    BedrockLLMAgentOptions,
    AgentResponse,
    AgentCallbacks,
)
from multi_agent_orchestrator.types import ConversationMessage, ParticipantRole

orchestrator = MultiAgentOrchestrator(
    options=OrchestratorConfig(
        LOG_AGENT_CHAT=True,
        LOG_CLASSIFIER_CHAT=True,
        LOG_CLASSIFIER_RAW_OUTPUT=True,
        LOG_CLASSIFIER_OUTPUT=True,
        LOG_EXECUTION_TIMES=True,
        MAX_RETRIES=3,
        USE_DEFAULT_AGENT_IF_NONE_IDENTIFIED=True,
        MAX_MESSAGE_PAIRS_PER_AGENT=10,
    )
)


class BedrockLLMAgentCallbacks(AgentCallbacks):
    def on_llm_new_token(self, token: str) -> None:
        # handle response streaming here
        print(token, end="", flush=True)


tech_agent = BedrockLLMAgent(
    BedrockLLMAgentOptions(
        name="Tech Agent",
        streaming=True,
        description=(
            "Specializes in technology areas including software development, hardware, AI, "
            "cybersecurity, blockchain, cloud computing, emerging tech innovations, and pricing/costs "
            "related to technology products and services."
        ),
        model_id="anthropic.claude-3-sonnet-20240229-v1:0",
        callbacks=BedrockLLMAgentCallbacks(),
    )
)

orchestrator.add_agent(tech_agent)


async def handle_request(
    _orchestrator: MultiAgentOrchestrator, _user_input: str, _user_id: str, _session_id: str
):
    response: AgentResponse = await _orchestrator.route_request(
        _user_input, _user_id, _session_id
    )
    # Print metadata
    print("\nMetadata:")
    print(f"Selected Agent: {response.metadata.agent_name}")
    if response.streaming:
        print("Response:", response.output.content[0]["text"])
    else:
        print("Response:", response.output.content[0]["text"])


if __name__ == "__main__":
    USER_ID = "user123"
    SESSION_ID = str(uuid.uuid4())
    print("Welcome to the interactive Multi-Agent system. Type 'quit' to exit.")
    while True:
        # Get user input
        user_input = input("\nYou: ").strip()
        if user_input.lower() == "quit":
            print("Exiting the program. Goodbye!")
            sys.exit()
        # Run the async function
        asyncio.run(handle_request(orchestrator, user_input, USER_ID, SESSION_ID))
If you can prompt and receive an answer, everything works fine.
The AWS Multi-Agent Orchestrator repository provides several example projects in TypeScript and Python. We will now write a simplified Python application consisting of two agents: Python Developer Agent and ML Expert Agent.
We will also use Chainlit, an open-source Python package, to implement a simple UI for the application. To begin with, install the necessary libraries:
chainlit==1.2.0
multi_agent_orchestrator==0.0.18
We use the code below for our demo application, but let’s first explain it:
“anthropic.claude-3-haiku-20240307-v1:0” as the model for our classifier. This classifier will choose which agent to use when a new user input arrives.MultiAgentOrchestrator and define some configurations.BedrockLLMAgent class is used to create our agents. A name and a description for each agent are provided. For an agent, you can choose any of the accessible models or even use Ollama to run them locally. Setting streaming=True and passing ChainlitAgentCallbacks() as the callback will have the agents return responses streamed rather than complete. Finally, we add each agent to the orchestrator.user_session is set, and the main section to handle user and agent messages is defined.### 1
import uuid
import chainlit as cl
from multi_agent_orchestrator.orchestrator import MultiAgentOrchestrator, OrchestratorConfig
from multi_agent_orchestrator.classifiers import BedrockClassifier, BedrockClassifierOptions
from multi_agent_orchestrator.agents import AgentResponse
from multi_agent_orchestrator.agents import BedrockLLMAgent, BedrockLLMAgentOptions, AgentCallbacks
from multi_agent_orchestrator.orchestrator import MultiAgentOrchestrator
from multi_agent_orchestrator.types import ConversationMessage
import asyncio
import chainlit as cl
class ChainlitAgentCallbacks(AgentCallbacks):
def on_llm_new_token(self, token: str) -> None:
asyncio.run(cl.user_session.get("current_msg").stream_token(token))
### 2
# Initialize the orchestrator & classifier
custom_bedrock_classifier = BedrockClassifier(BedrockClassifierOptions(
model_id='anthropic.claude-3-haiku-20240307-v1:0',
inference_config={
'maxTokens': 500,
'temperature': 0.7,
'topP': 0.9
}
))
### 3
orchestrator = MultiAgentOrchestrator(options=OrchestratorConfig(
LOG_AGENT_CHAT=True,
LOG_CLASSIFIER_CHAT=True,
LOG_CLASSIFIER_RAW_OUTPUT=True,
LOG_CLASSIFIER_OUTPUT=True,
LOG_EXECUTION_TIMES=True,
MAX_RETRIES=3,
USE_DEFAULT_AGENT_IF_NONE_IDENTIFIED=False,
MAX_MESSAGE_PAIRS_PER_AGENT=10,
),
classifier=custom_bedrock_classifier
)
### 4
def create_python_dev():
return BedrockLLMAgent(BedrockLLMAgentOptions(
name="Python Developer Agent",
streaming=True,
description="Experienced Python developer specialized in writing, debugging, and evaluating only Python code.",
model_id="anthropic.claude-3-sonnet-20240229-v1:0",
callbacks=ChainlitAgentCallbacks()
))
def create_ml_expert():
return BedrockLLMAgent(BedrockLLMAgentOptions(
name="Machine Learning Expert",
streaming=True,
description="Expert in areas related to machine learning including deep learning, pytorch, tensorflow, scikit-learn, and large language models.",
model_id="anthropic.claude-3-sonnet-20240229-v1:0",
callbacks=ChainlitAgentCallbacks()
))
# Add agents to the orchestrator
orchestrator.add_agent(create_python_dev())
orchestrator.add_agent(create_ml_expert())
### 5
@cl.on_chat_start
async def start():
cl.user_session.set("user_id", str(uuid.uuid4()))
cl.user_session.set("session_id", str(uuid.uuid4()))
cl.user_session.set("chat_history", [])
@cl.on_message
async def main(message: cl.Message):
user_id = cl.user_session.get("user_id")
session_id = cl.user_session.get("session_id")
msg = cl.Message(content="")
await msg.send() # Send the message immediately to start streaming
cl.user_session.set("current_msg", msg)
response:AgentResponse = await orchestrator.route_request(message.content, user_id, session_id, {})
# Handle non-streaming or problematic responses
if isinstance(response, AgentResponse) and response.streaming is False:
# Handle regular response
if isinstance(response.output, str):
await msg.stream_token(response.output)
elif isinstance(response.output, ConversationMessage):
await msg.stream_token(response.output.content[0].get('text'))
await msg.update()
if __name__ == "__main__":
cl.run()It’s now time to run the application. To do this, first run chainlit run [app.py](<http://app.py/>) -w . You can now test your application in the new tab opened in your browser.
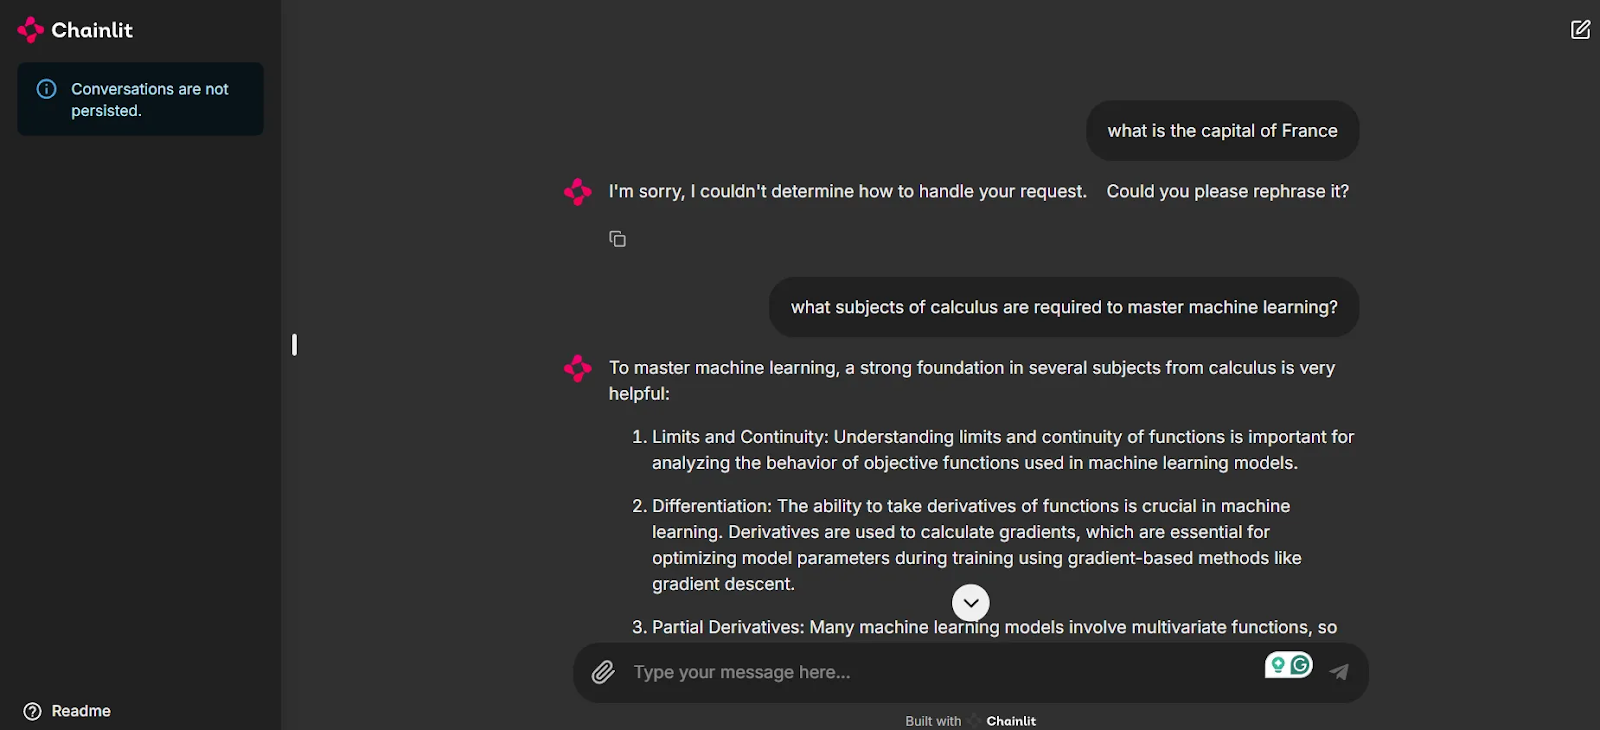
As you can see in the screenshot, we are now provided with a UI to test out our application and chat with the agents.
Notice that since the first prompt “What is the capital of France?” is not related to either of our agents, the system does not provide an answer. This is key to keeping the chats relevant and avoiding spending unnecessary credits when using these models. However, when prompted with a related question, our Machine Learning Expert agent comes into play to give a response, thanks to the intelligent routing of the Multi-Agent Orchestrator.
In this blog, we’ve introduced the recent AWS Multi-Agent Orchestrator framework, highlighted some of its unique features, outlined the steps to set up the environment, explored the foundational models served by Amazon Bedrock, and implemented a demo project.
At the time of writing this article, the framework lacks comprehensive and detailed documentation. To benefit from other features, such as memory and tool usage, you must read the codebase and take a look at the provided example projects.
Keeping a curious eye on agentic AI frameworks is a wise choice to keep up with this fast-paced field. The AWS Multi-Agent Orchestrator is a promising option built on the infrastructures of AWS services, and its development is worth watching.
Learn AI with these courses!
Track
Course
Course
blog
Vikash Singh
13 min
Tutorial
Aashi Dutt
Tutorial
Aashi Dutt
Tutorial
Bhavishya Pandit
Tutorial
Bhavishya Pandit
Tutorial
Dr Ana Rojo-Echeburúa