
Track
Developing AI Applications
21 hr
This new release from OpenAI includes three models:
gpt-4o-mini-tts: A text-to-audio model capable of generating audio from text with various tones and voices. A neat feature of this text-to-speech model is that we can guide how the voice sounds by giving specific text instructions. This brings a high level of customization, allowing for the creation of unique and tailored voice experiences. You can try it out on OpenAI.fm.gpt-4o-transcribe and gpt-4o-mini-transcribe: Two audio-to-text models that are designed for converting spoken language into written text. Their main function is to provide highly accurate and reliable transcriptions of audio. These models demonstrate a lower word error rate (WER), which means they make fewer mistakes in recognizing spoken words compared to previous solutions.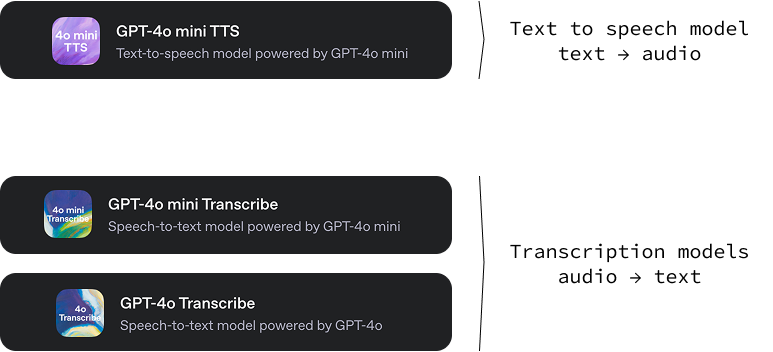
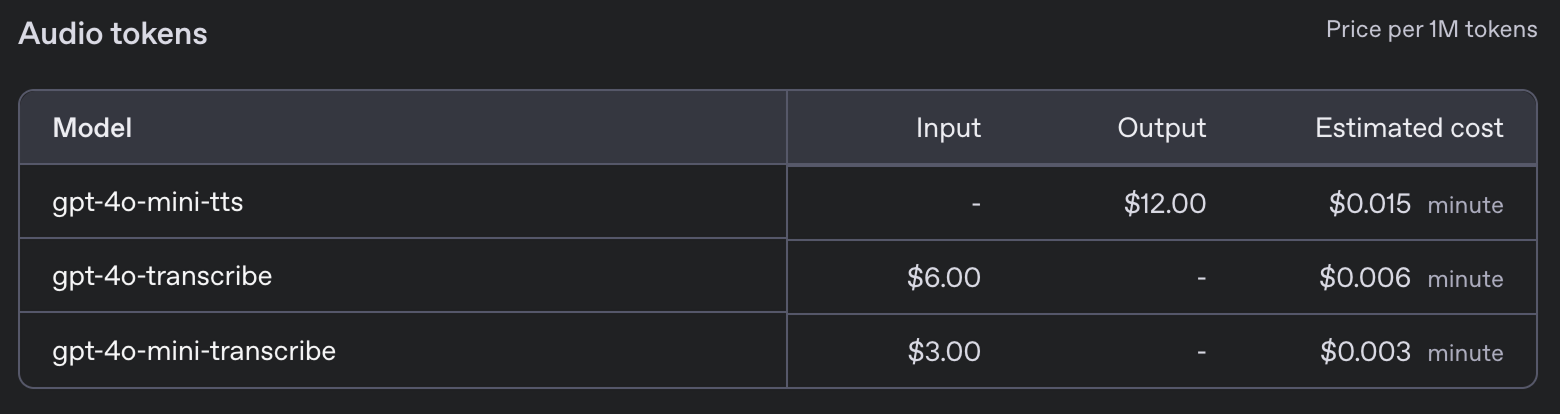
These new models come with the following pricing:
In this tutorial, I'll guide you through building an AI voice assistant right in your terminal. This voice assistant will essentially mimic a popular text-based AI model but will interact entirely through spoken language. Imagine being able to speak directly to your computer, ask any question you have, and receive a vocal response almost instantly.
Our project will use a simple yet effective architecture. We'll begin by using your microphone to capture your spoken prompt. Once recorded, we'll convert this audio input into text with the help of advanced speech-to-text models.
This text is then fed into a large language model to generate a suitable response. Finally, we'll convert the text response back into audio, allowing the assistant to “speak” the answer back to you. Each step of this process is designed to ensure that our voice assistant is both accurate and engaging.
Although OpenAI offers a dedicated Realtime API that can enhance interactions by streamlining the entire process, we will opt for a different approach. The Realtime API, while impressive and perfect for developers looking for swift integrations, is often costlier and offers less flexibility.
By choosing to build our project using separate components for each step, we gain greater control over the customization of our AI assistant. This approach lets us decide the models we want to use, thereby optimizing for specific needs, whether it be accuracy, speed, or preference in tone of response. This way, our voice assistant becomes not only a powerful tool but also a highly tailored one, capable of fitting unique project requirements.
All the code we develop here is available in this GitHub repository.
To get started, we'll first set up a new Anaconda environment named audio-demo. Anaconda's environments enable us to create isolated spaces for each project where we can install specific versions of packages without conflicts. Execute the following commands in your command-line interface:
conda create -n audio-demo -y python=3.9
conda activate audio-demo
pip install openai
pip install numpy
pip install dotenv
pip install sounddevice
pip install scipy
Let's break down what each command and package does:
conda create -n audio-demo -y python=3.9: This command creates a new environment called audio-demo with Python version 3.9. The -y flag automatically agrees to the package installations without prompting.conda activate audio-demo: Activates the newly created audio-demo environment, so we can work within it.pip install openai: OpenAI is a library that provides easy access to OpenAI's models and APIs.pip install numpy: NumPy is a library essential for numerical computing.pip install dotenv: Dotenv helps load environment variables from a .env file, making configuration management easier and safer.pip install sounddevice: Sounddevice allows us to record and play sound using simple functions, which is ideal for handling audio input and output in Python.pip install scipy: SciPy builds on NumPy and provides additional functionality for scientific and technical computing, such as signal processing. In our case, we'll use it to store the audio file.With our audio-demo environment set up, we are ready to start working on our AI assistant that can process audio inputs. This structured setup helps us maintain a clean development space, ensuring all dependencies are in place for our project.
To use the OpenAI API, we need an API key. Go to their API key page and generate an API key by clicking the "Generate new secret key" button. Copy the key, create a file named .env, and paste it there with the following format:
OPENAI_API_KEY=<paste_your_api_key_here>Let's walk through the steps to create a Python script that uses OpenAI's text-to-audio capabilities, transforming text into speech with a personalized touch. We write our code in a file named text_to_audio.py in the same folder as the .env. file.
First, we need to import the necessary libraries that will make up our script:
import asyncio
from openai import AsyncOpenAI
from openai.helpers import LocalAudioPlayer
from dotenv import load_dotenv
Let’s quickly walk through what each of these imports does:
asyncio: This library is required for writing asynchronous code in Python, which is essential for working with streaming APIs.AsyncOpenAI: A part of the OpenAI library, this provides tools to interact with OpenAI's APIs asynchronously.LocalAudioPlayer: This helper from OpenAI allows us to play audio locally on our machine.load_dotenv: Loads environment variables from the .env file, which is where we store sensitive information like our API keys.Next, we load our API key from the .env file using the load_dotenv function:
load_dotenv()This ensures that our script has secure access to the API key.
We create an instance of AsyncOpenAI to start interacting with the OpenAI API:
openai = AsyncOpenAI()Now we define our main function, text_to_audio(), which will use OpenAI's text-to-audio feature to process the input and play the resulting audio:
async def text_to_audio(text, tone_and_style_instructions):
  async with openai.audio.speech.with_streaming_response.create(
    model="gpt-4o-mini-tts",
    voice="coral",
    input=text,
    instructions=tone_and_style_instructions,
    response_format="pcm",
  ) as response:
    await LocalAudioPlayer().play(response)
Let’s quickly explain what we did above:
model and voice parameters to control the speech synthesis. The model used is gpt-4o-mini-tts and the voice selected is "coral".response_format is set to "pcm", suitable for audio processing.LocalAudioPlayer then plays the audio response generated by the API.We complete the script with the following lines to ensure the text_to_audio() function runs when we execute the script:
if __name__ == "__main__":
  asyncio.run(text_to_audio("Hello world!", "Enthusiastic voice."))
This code block checks if the script is the main module being run and executes the text_to_audio() function using asyncio.run() to handle the asynchronous logic.
With these steps, our script is ready to convert text input into speech using OpenAI's text-to-audio service. This setup allows us to experiment with different inputs and styles, bringing text to life through sound.
We can run the script using the command:
python text_to_audio.pyThe complete code can be found here.
In this section, let's explore how to transcribe an audio file into text using OpenAI’s audio transcription tool. Our script is designed to handle audio files asynchronously to make the process efficient and quick. We'll implement this script in a file named audio_to_text.py.
The imports and initial setup are the same as before, except that we don't need to import the LocalAudioPlayer here. Here's how we can write a function that transcribes an audio file:
async def transcribe_audio(audio_filename = "audio.wav"):
  audio_file = await asyncio.to_thread(open, audio_filename, "rb")
  stream = await openai.audio.transcriptions.create(
    model="gpt-4o-mini-transcribe",
    file=audio_file,
    response_format="text",
    stream=True,
  )
  transcript = ""
  async for event in stream:
    if event.type == "transcript.text.delta":
      print(event.delta, end="", flush=True)
      transcript += event.delta
  print()
  audio_file.close()
  return transcript
Let’s break down what happens here:
audio_file = await asyncio.to_thread(open, audio_filename, "rb"): This line opens the audio file in binary read mode ("rb"). The method asyncio.to_thread() allows this file opening operation to run in a separate thread, preventing it from blocking other parts of the program.stream = await openai.audio.transcriptions. create(...): This line calls the transcription API. model parameter as gpt-4o-mini-transcribe, designed specifically for transcription tasks.file parameter holds our opened audio file.response_format="text" tells the API to return the transcription as text.stream=True is used to stream the transcription in real time, which means as soon as a part of the audio is processed, it is immediately returned, speeding up the response.async for event in stream: Starts a loop to read events from the transcription stream as they occur.if event.type == "transcript.text.delta":: Checks each event type and processes it if it is of type transcript.text.delta, which indicates that a part of the transcription is ready.print(event.delta, end="", flush=True): Prints the incremental transcription as it becomes available, ensuring our output is real-time.audio_file.close(): After we complete the transcription, it's good practice to close the audio file to free up system resources.By executing the main() function, we can convert an audio file into text efficiently and process it in a streamed fashion to get immediate feedback. This setup is ideal for applications that need fast transcription or involve long audio files.
You can try it by placing an audio file in the same folder as the script, replacing audio.wav with the name of your audio file, and running the command:
python audio_to_text.pyThe complete code can be found here.
Because our goal is to create a voice assistant, we need to record the user's audio prompt into an audio file.
We will create a new file named record.py with a function called record_audio. This function captures sound from the microphone and saves it as an audio file. We won't go into much detail about how it works because it is not the main focus of this article:
import sounddevice as sd
import numpy as np
import scipy.io.wavfile as wavfile

SAMPLE_RATE = 44100  # Sample rate in Hz

def record_audio():
    print("[INFO: Recording... Press <Enter> to stop]")
    audio_data = []  # Initialize a list to store audio frames
    def callback(indata, frames, time, status):
        audio_data.append(indata.copy())
    with sd.InputStream(samplerate=SAMPLE_RATE, channels=1, callback=callback, dtype='int16'):
        input()  # Wait for the user to press Enter to stop recording
    print("[INFO: Recording complete]")
    print()
    audio_data = np.concatenate(audio_data)  # Concatenate the list into a single array
    filename = "output.wav"
    wavfile.write(filename, SAMPLE_RATE, audio_data)
    return audio_data
When we call this function, it will start recording from the user's microphone. It waits until the user presses "Enter" and then saves the audio into a file with the given filename.
To test this, we can combine this function with the transcription function above to transcribe a message spoken by the user. Here's how we can create a new file named record_and_transcribe.py to implement this:
import asyncio
from audio_to_text import transcribe_audio
from audio_recorder import record_audio

async def main():
  record_audio("prompt.wav")
  await transcribe_audio("prompt.wav")

if __name__ == "__main__":
  asyncio.run(main())
You can try running it using the command python record_and_transcribe.py. The script will record what you say until you press "Enter" and then transcribe what you said.
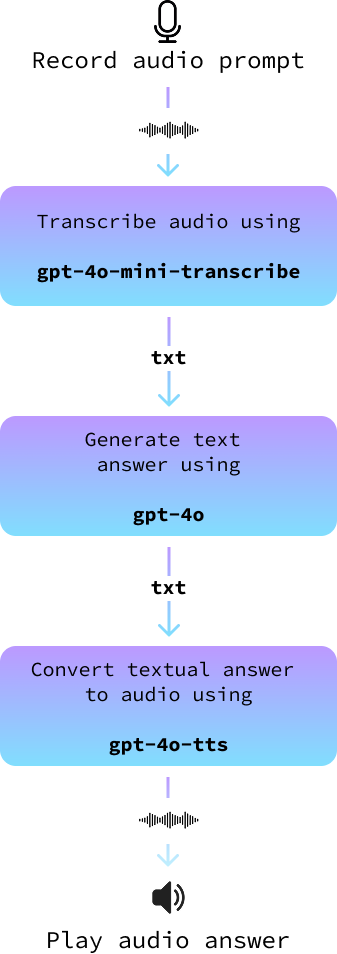
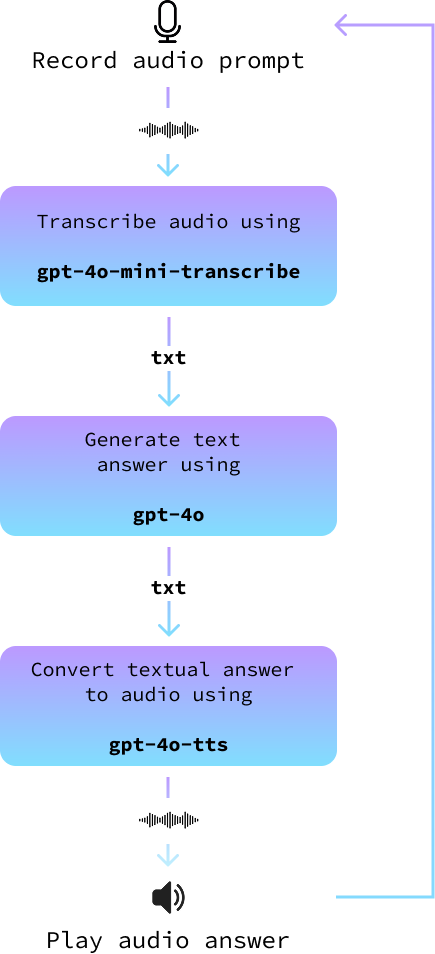
In this section, we put it all together to build an audio assistant. We implement it in a new file called audio_assistant.py by following these steps:
record_audio() function.transcribe_audio() function.gpt-4o to generate an answer.text_to_audio() function.The following diagram illustrates this:
I encourage you to try building it yourself before reading further.
First, we import the functions we implemented before and initialize the OpenAI client.
# Import the functions we created
from text_to_audio import text_to_audio
from audio_to_text import transcribe_audio
from audio_recorder import record_audio

# Import other dependencies and initialize OpenAI
import asyncio
from openai import AsyncOpenAI
from dotenv import load_dotenv
load_dotenv()
openai = AsyncOpenAI()
Then, we need a function to generate the answer. This uses the normal OpenAI GPT API with a model like gpt-4o or any other text-to-text model. If you're new to this, you might wanna check this GPT-4o API tutorial.
Here's an async implementation of this function:
async def get_answer(prompt):
  stream = await openai.chat.completions.create(
    model="gpt-4o",
    messages=[
      {"role": "user", "content": prompt}
    ],
    stream=True,
  )
  answer = ""
  async for chunk in stream:
    content = chunk.choices[0].delta.content
    if content is not None:
      answer += content
      print(content, end="", flush=True)
  print("\n\n")
  return answer
To implement the main loop, we follow the steps outlined above:
async def main(tone_and_style_instructions):
  await text_to_audio("Hello, how can I help you today?", tone_and_style_instructions)
  while True:
    record_audio("prompt.wav")
    prompt = await transcribe_audio("prompt.wav")
    print()
    answer = await get_answer(prompt)
    await text_to_audio(answer, tone_and_style_instructions)
Finally, we run the main loop when the script is executed:
if __name__ == "__main__":
  tone_and_style_instructions = "Enthusiastic voice."
  asyncio.run(main(tone_and_style_instructions))
Here's a demo of it in action:
Learn AI with these courses!
Track
Course
Course
Tutorial
François Aubry
Tutorial
Abid Ali Awan
Tutorial
Zoumana Keita
Tutorial
Kurtis Pykes
Tutorial
François Aubry
Tutorial
Aashi Dutt