Track
In this tutorial, we will learn about DeepChecks and how to use it to perform data validation and machine learning testing. We will also use GitHub Actions to automate the model testing and save the results as artifacts.
As we progress, we will learn about machine learning testing and DeepChecks, run the DeepChecks data integrity suite, and generate a comprehensive report. We will also generate machine learning testing reports by running a model evaluation suite, learn to run a single test instead of a full suite, automate our testing workflow using GitHub Actions, and save the machine learning testing report as a GitHub Artifact.
Image by Author
What is Machine Learning Testing?
Machine learning testing is a critical process that involves evaluating and validating the performance of machine learning models to ensure their fairness, accuracy, and robustness. It is not all about model accuracy and performance. We have to look at model biases, false positives, false negatives, various performance metrics, model throughput, and model alignment with AI ethics.
The testing process includes various types of assessments such as data validation, cross-validation, F1-score, confusion matrix, prediction drift, data drift, and robustness testing, each designed to verify different aspects of the model's performance and reliability.
We also divide our dataset into three splits so that we can evaluate the model during the training process and after the training process on an unseen dataset.
Machine learning testing is an essential part of AI applications, and automating it along with model training will give us reliable AI systems that work for people.
If you are new to machine learning and want to learn the basics, take the Machine Learning Fundamentals with Python skill track. This course will teach you the fundamentals of machine learning with Python, starting with supervised learning using the scikit-learn library.
Getting Started with DeepChecks
DeepChecks is an open-source Python package designed to facilitate comprehensive testing and validation of machine learning models and data. It provides a wide array of built-in checks to identify issues related to model performance, data distribution, data integrity, and more. DeepChecks includes functionalities for continuous validation, ensuring that models remain reliable and effective as they are deployed and used in real-world scenarios.
We will start by installing the Python package using the pip command.
%pip install deepchecks --upgrade -qLoading the dataset
For this tutorial, we are using the Loan Data from DataCamp datasets. It consists of 9578 rows and information on the loan structure, the borrower, and whether the loan was paid back in full.
Load the CSV file using Pandas and display the top 5 rows.
import pandas as pd
loan_data = pd.read_csv("loan_data.csv")
loan_data.head()
Preparing the dataset
Create the DeepChecks dataset using the loan dataset, label column name, and categorical feature name.
from sklearn.model_selection import train_test_split
from deepchecks.tabular import Dataset

label_col = 'not.fully.paid'

deep_loan_data = Dataset(loan_data, label=label_col, cat_features=["purpose"])
Running the DeepChecks data integrity suite
We will use a data integrity suite for tabular data. The suite will run all tests autonomously and generate an interactive report with the results.
To do this, we will import the data integrity suite, initiate it, and then run the suite by providing it with DeepChecks loan data. Lastly, we will display the results.
from deepchecks.tabular.suites import data_integrity

integ_suite = data_integrity()
suite_result = integ_suite.run(deep_loan_data)
suite_result.show()
Note: We are using DataLab as the developer environment. The use of ipywidgets has been disabled, preventing it from displaying the results. Instead, we will utilize the 'show_in_iframe' function to display the result as an iframe. The results will be the same at every level.
suite_result.show_in_iframe()Our data integrity report includes test results on:
- Feature-Label Correlation
- Feature-Feature Correlation
- Single Value in Column
- Special Characters
- Mixed Nulls
- Mixed Data Types
- String Mismatch
- Data Duplicates
- String Length Out Of Bounds
- Conflicting Labels
- Outlier Sample Detection
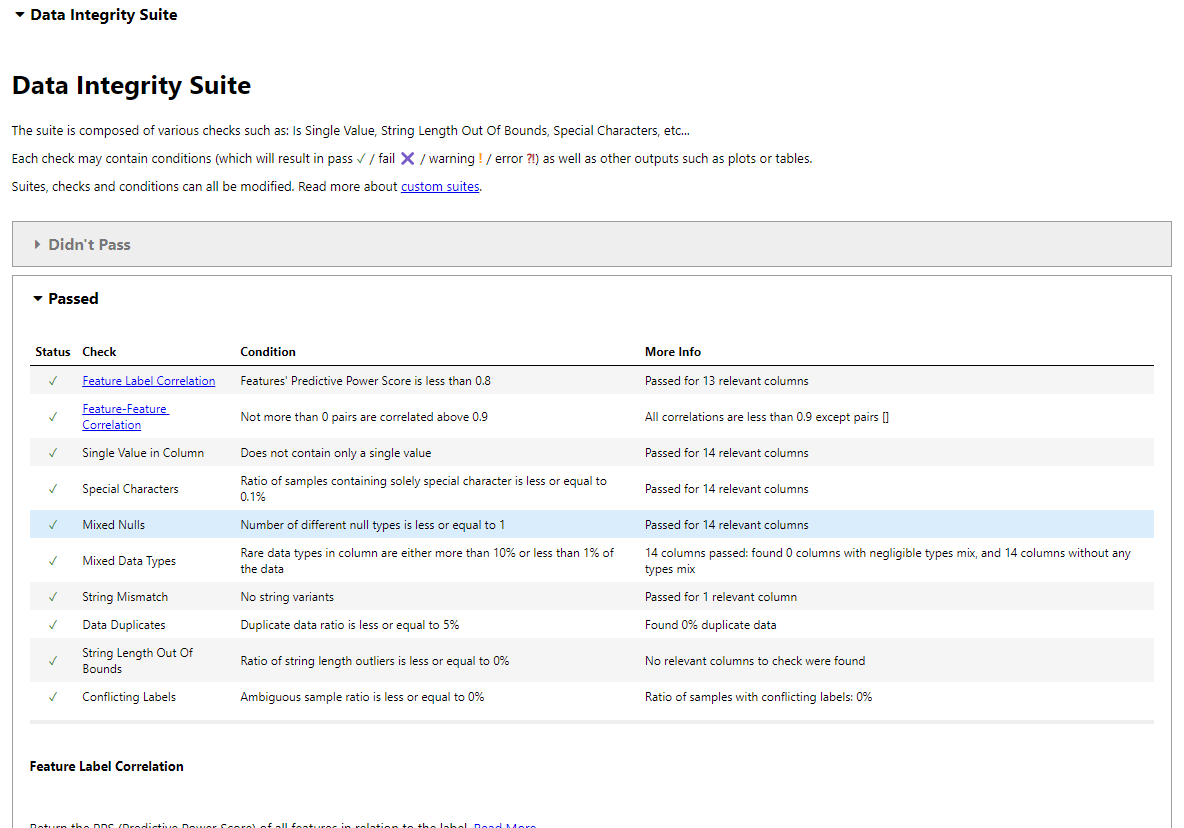
Data Integrity test results in the Jupyter Notebook.
You can even save the results as an HTML file and share it with your colleagues.
suite_result.save_as_html()'output.html'Running a single test
Running the entire suite on the large dataset is not an efficient way as it will take a long time to generate the results. Instead, you can run a few individual tests that are relevant to your data and generate a report on your own.
To run a single test, import the tabular checks, initialize the check, and run it with DeepCheck Loan data. After that, display the values instead of generating an interactive report using the results.value function.
from deepchecks.tabular.checks import IsSingleValue, DataDuplicates

result = IsSingleValue().run(deep_loan_data)
result.value
As we can see, it displays the number of unique values present in each column.
{'credit.policy': 2,
 'purpose': 7,
 'int.rate': 249,
 'installment': 4788,
 'log.annual.inc': 1987,
 'dti': 2529,
 'fico': 44,
 'days.with.cr.line': 2687,
 'revol.bal': 7869,
 'revol.util': 1035,
 'inq.last.6mths': 28,
 'delinq.2yrs': 11,
 'pub.rec': 6,
 'not.fully.paid': 2}
Let’s try to check duplicate samples within our data.
result = DataDuplicates().run(deep_loan_data)
result.value
We have zero duplicates in our dataset.
0.0Machine Learning Testing with DeepChecks
In this section, we will ensemble multiple models and train them on the processed load dataset. Then, to generate a model testing report, we will run a model valuation suite on the training and testing datasets.
Data processing and model training
- Import essential functions from Scikit-learn library.
- Split the dataset into train and test sets.
- Convert the categorical column 'purpose' into numerical using the label encoder.
- Define LogisticRegression, RandomForestClassifier, and GaussianNB models.
- Ensemble models using the voting classifier.
- Train the ensemble model on a training set.
from sklearn.linear_model import LogisticRegression
from sklearn.ensemble import RandomForestClassifier
from sklearn.ensemble import VotingClassifier
from sklearn.naive_bayes import GaussianNB
from sklearn.preprocessing import LabelEncoder

# Train test split
df_train, df_test = train_test_split(loan_data, stratify=loan_data[label_col], random_state=0)

# Encode the 'purpose' column
label_encoder = LabelEncoder()
df_train['purpose'] = label_encoder.fit_transform(df_train['purpose'])
df_test['purpose'] = label_encoder.fit_transform(df_test['purpose'])

# Define models
model_1 = LogisticRegression(random_state=1, max_iter=10000)
model_2 = RandomForestClassifier(n_estimators=50, random_state=1)
model_3 = GaussianNB()

# Create the VotingClassifier
clf_model = VotingClassifier(
    estimators=[('lr', model_1), ('rf', model_2), ('svc', model_3)],
    voting='soft'
)

# Train the model
clf_model.fit(df_train.drop(label_col, axis=1), df_train[label_col])
Running model evaluation suite
We will run the DeepChecks model evaluation suite to evaluate the model's performance.
- Convert both train and test sets into the DeepCheck dataset.
- Initiate the model evaluation and run it using the train, test sets, and model.
- Show the results in the iframe.
from deepchecks.tabular.suites import model_evaluation

deep_train = Dataset(df_train, label=label_col, cat_features=[])
deep_test =  Dataset(df_test,  label=label_col, cat_features=[])

evaluation_suite = model_evaluation()
suite_result = evaluation_suite.run(deep_train, deep_test, clf_model)
suite_result.show_in_iframe()
Our model evaluation report includes test results on:
- ROC report
- Weak Segment Performance
- Unused Features
- Train Test Performance
- Prediction Drift
- Simple Model Comparison
- Model Inference Time
- Confusion Matrix Report
- And more
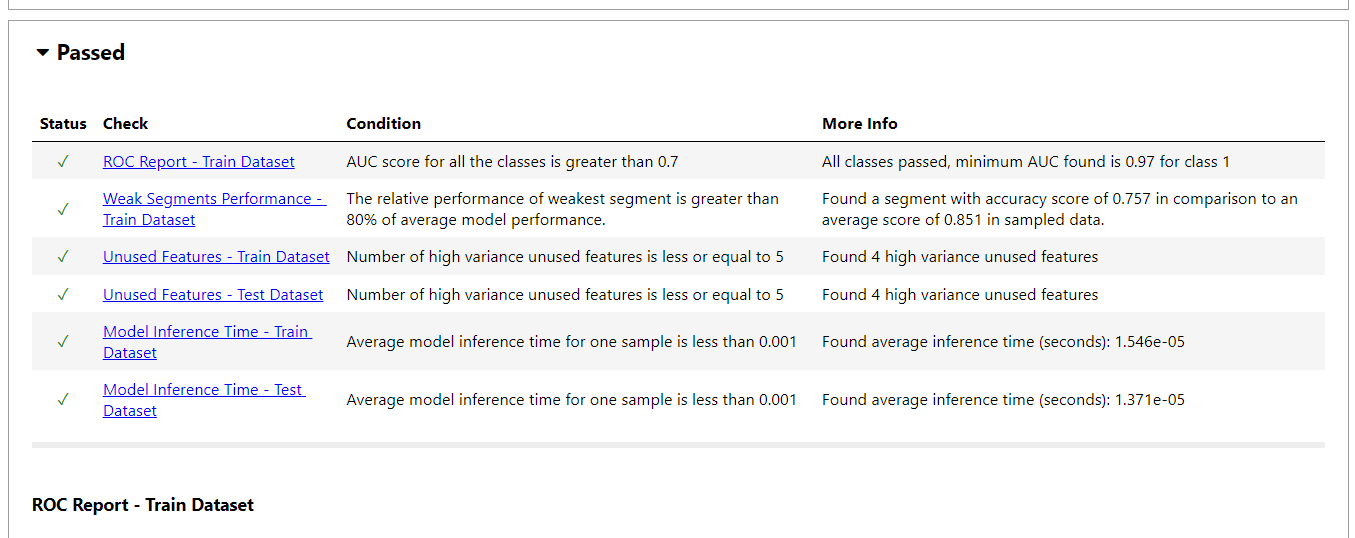
- To view the result in JSON format, use the
to_json()function.
suite_result.to_json()Running a Single Test
Just like data validation, you can run a single machine learning test. In our case, we will run label drift on training and test split to check if our labels have changed over time.
from deepchecks.tabular.checks import LabelDrift
check = LabelDrift()
result = check.run(deep_train, deep_test)
result.value
There is no drift detected in the data.
{'Drift score': 0.0, 'Method': "Cramer's V"}If you are experiencing difficulties running the data validation and model evaluation suites, please consult the DataLab workspace at Machine Learning Testing with DeepChecks.
If you’re interested in "manual" machine learning testing, follow the Machine Learning Experimentation tutorial to learn how to structure, log, and analyze your machine learning experiments using Weights & Biases.
Automating Machine Learning Testing using GitHub Actions and DeepChecks
Let’s automate the data validation, model training, and model evaluation phase with GitHub Actions and save the results as a zip file.
Automating machine learning testing is an integral part of the MLOps pipeline. Learn more about this by taking the MLOps Fundamentals skill track. In this series of courses, you will learn about the fundamental principles of putting machine learning models into production and monitoring them to deliver business value.
Setting up
- Go to the GitHub account and create a new repository with all the necessary information.
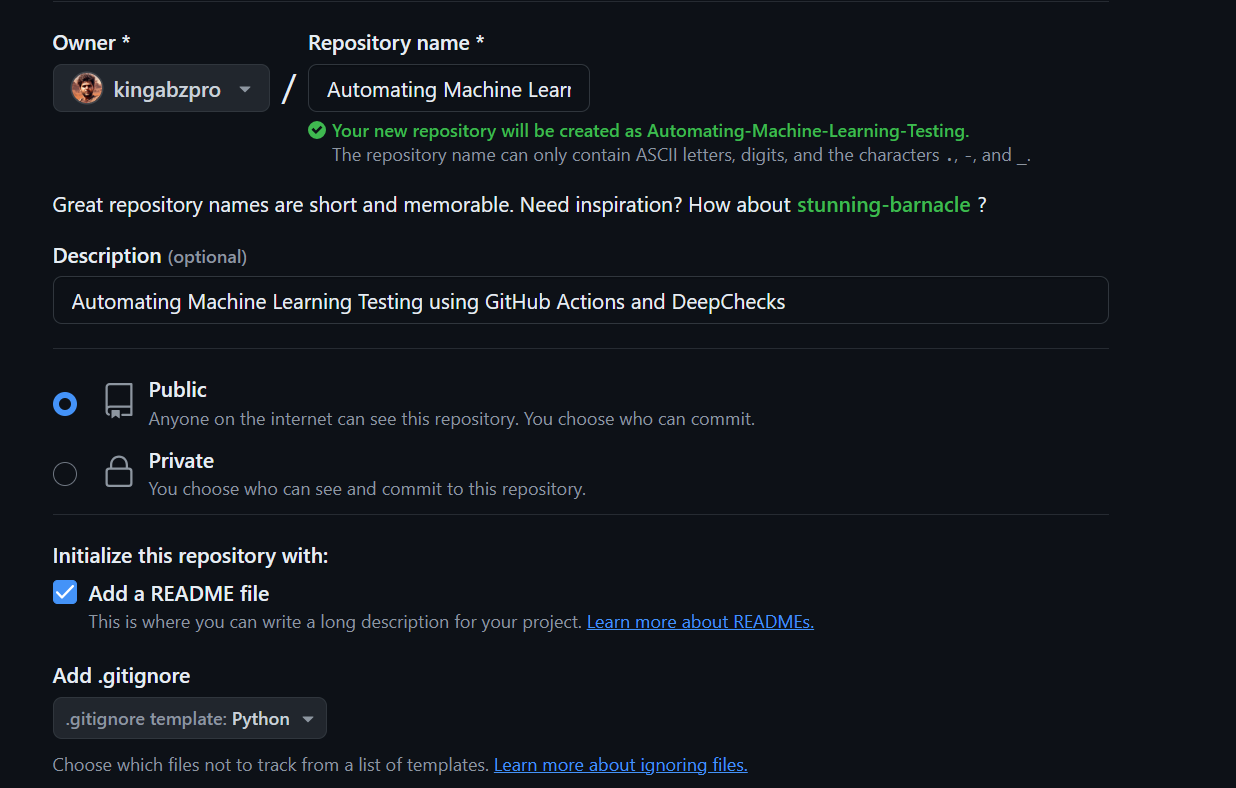
- Clone the repository on the local system.
- Change the directory to the repository.
- Create a new folder, “data,” and move the loan data CSV file from the "Downloads" folder to the repository folder.
- Create the data validation in Python and launch VSCode (Integrated developer environment).
$ cd C:\Repository\GitHub\
$ git clone https://github.com/kingabzpro/Automating-Machine-Learning-Testing.git

$ cd .\Automating-Machine-Learning-Testing\
$ mkdir data
$ mv -v ".Downloads\loan_data.csv" ".\Automating-Machine-Learning-Testing\data"
$ code -r data_validation.py
Data validation file
- In the data validation file, you will load the CSV file, convert it into the DeepChecks dataset, initiate the data integration suite, and run it on the loan dataset.
- Create the new folder “results” and save it as an HTML file.
import pandas as pd
from deepchecks.tabular import Dataset
from deepchecks.tabular.suites import data_integrity

# Load the loan data from a CSV file
loan_data = pd.read_csv("data/loan_data.csv")

# Define the label column
label_col = "not.fully.paid"

# Create a Deepchecks Dataset object with the loan data
deep_loan_data = Dataset(loan_data, label=label_col, cat_features=["purpose"])

# Initialize the data integrity suite
integ_suite = data_integrity()

# Run the data integrity suite on the dataset
suite_result = integ_suite.run(deep_loan_data)

# Save the results of the data integrity suite as an HTML file
suite_result.save_as_html("results/data_validation.html")
Model testing file
- Create a Python file for data validation that includes data processing, model building, training, and evaluation. The file should also include converting the dataset into a DeepChecks dataset, running the model evaluation suite, and saving it as an HTML file in the "results" folder.
$ code -r train_validation.pyimport pandas as pd
from sklearn.ensemble import RandomForestClassifier, VotingClassifier
from sklearn.linear_model import LogisticRegression
from sklearn.model_selection import train_test_split
from sklearn.naive_bayes import GaussianNB
from sklearn.preprocessing import LabelEncoder, StandardScaler
from deepchecks.tabular import Dataset
from deepchecks.tabular.suites import model_evaluation
# Load the loan data from a CSV file
loan_data = pd.read_csv("data/loan_data.csv")
# Define the label column
label_col = "not.fully.paid"
# Train test split
df_train, df_test = train_test_split(
loan_data, stratify=loan_data[label_col], random_state=0
)
# Encode the 'purpose' column
label_encoder = LabelEncoder()
df_train["purpose"] = label_encoder.fit_transform(df_train["purpose"])
df_test["purpose"] = label_encoder.transform(df_test["purpose"])
# Standardize the features
scaler = StandardScaler()
df_train[df_train.columns.difference([label_col])] = scaler.fit_transform(df_train[df_train.columns.difference([label_col])])
df_test[df_test.columns.difference([label_col])] = scaler.transform(df_test[df_test.columns.difference([label_col])])
# Define models
model_1 = LogisticRegression(random_state=1, max_iter=10000)
model_2 = RandomForestClassifier(n_estimators=50, random_state=1)
model_3 = GaussianNB()
# Create the VotingClassifier
clf_model = VotingClassifier(
estimators=[("lr", model_1), ("rf", model_2), ("gnb", model_3)], voting="soft"
)
# Train the model
clf_model.fit(df_train.drop(label_col, axis=1), df_train[label_col])
# Calculate the accuracy score using the .score function
accuracy = clf_model.score(df_test.drop(label_col, axis=1), df_test[label_col])
# Print the accuracy score
print(f"Accuracy: {accuracy:.2f}")
# Create Deepchecks datasets
deep_train = Dataset(df_train, label=label_col, cat_features=["purpose"])
deep_test = Dataset(df_test, label=label_col, cat_features=["purpose"])
# Run the evaluation suite
evaluation_suite = model_evaluation()
suite_result = evaluation_suite.run(deep_train, deep_test, clf_model)
# Save the results as HTML
suite_result.save_as_html("results/model_validation.html")Using GitHub Actions
If you are new to GitHub Actions, please complete the tutorial "GitHub Actions and MakeFile: A Hands-on Introduction" before starting the automation process. This tutorial will provide a detailed understanding of how GitHub Actions work with code examples.
- To initialize the GitHub Actions, you have to stage and commit the changes and push them to the remote GitHub repository.
$ git add .
$ git commit -m "Data and Validation files"
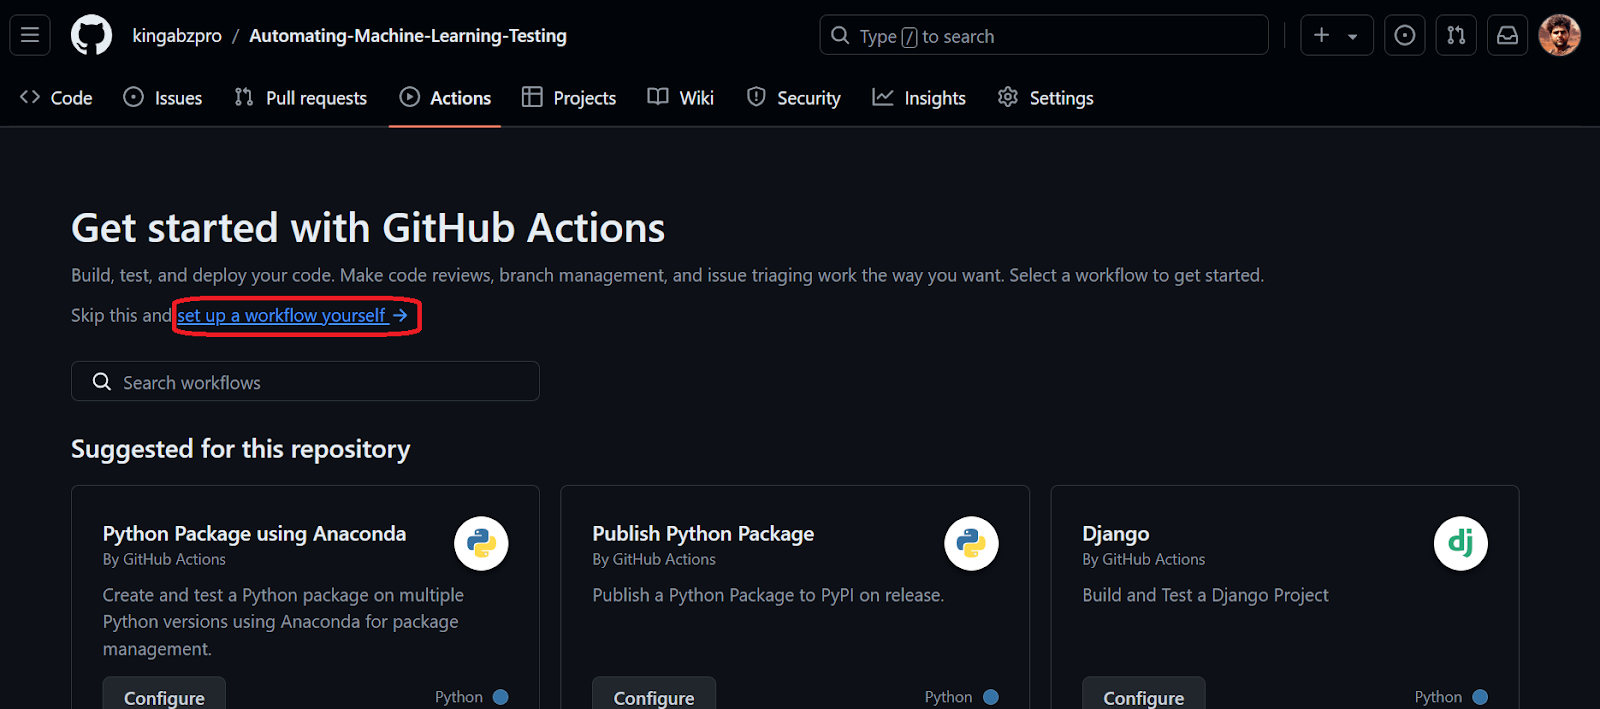
$ git push- Go to the GitHub repository and click on the “Actions” tab and after that click on the blue text “set up a workflow yourself”.
- We will be redirected to the workflow
main.ymlfile. Please copy and paste the following code. The code below will first set up the environment and install the DeepChecks package. After that, it will create the folder, run data validation and model evaluation, and save the results as a GitHub Artifact.
name: Model Training and Validation

on:
  push:
    branches: [ main ]
  pull_request:
    branches: [ main ]

jobs:
  build:
    runs-on: ubuntu-latest
    steps:
      - name: Checkout Repository
        uses: actions/checkout@v4

      - name: Set up Python 3.10
        uses: actions/setup-python@v5
        with:
          python-version: '3.10'

      - name: Install dependencies
        run: |
          python -m pip install --upgrade pip
          pip install deepchecks

      - name: Create a folder
        run: |
          mkdir -p results

      - name: Validate Data
        run: |
          python data_validation.py
      - name: Validate Model Performance
        run: |
          python train_validation.py
      - name: Archive Deepchecks Results
        uses: actions/upload-artifact@v4
        if: always()
        with:
          name: deepchecks results
path: results/*_validation.html- Commit the changes with the message.
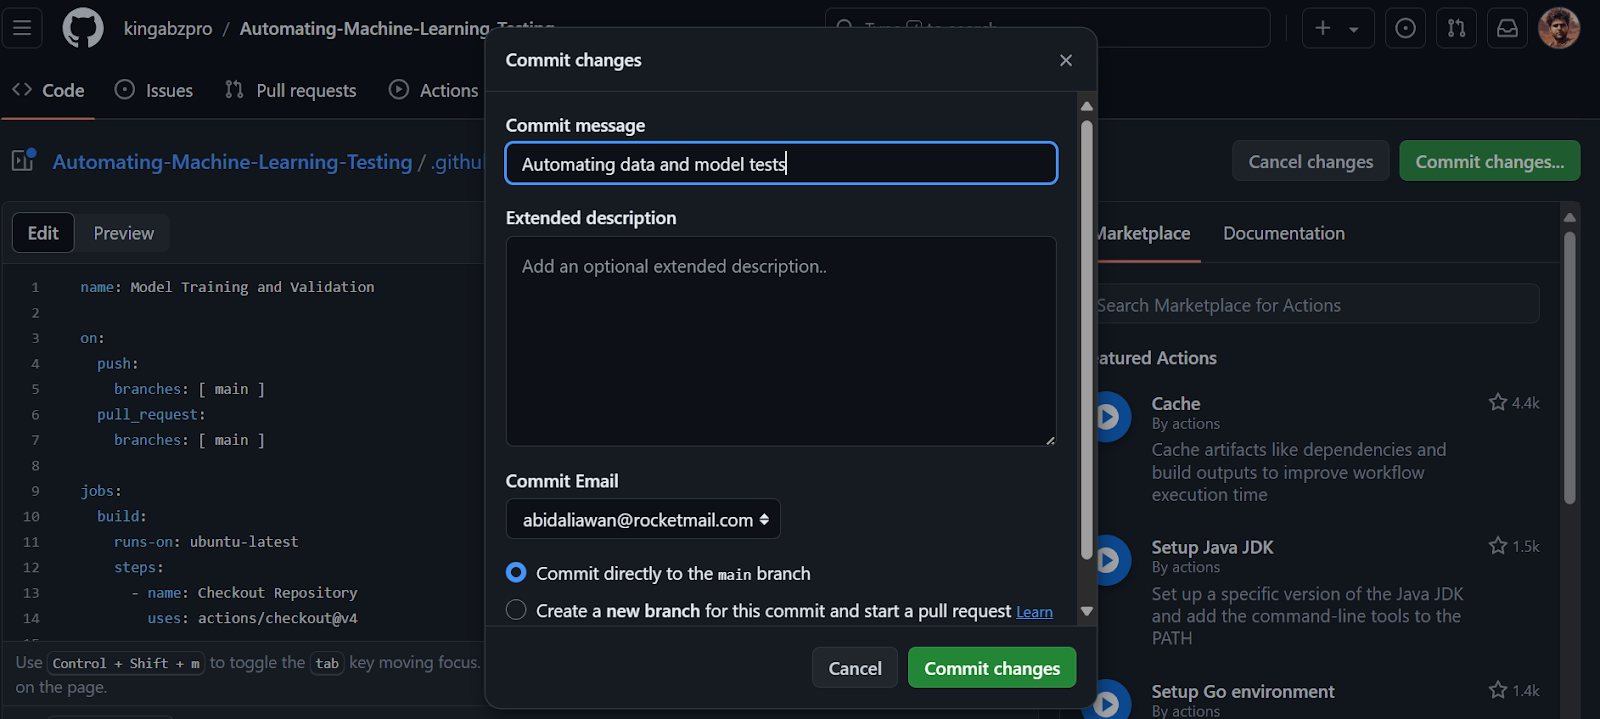
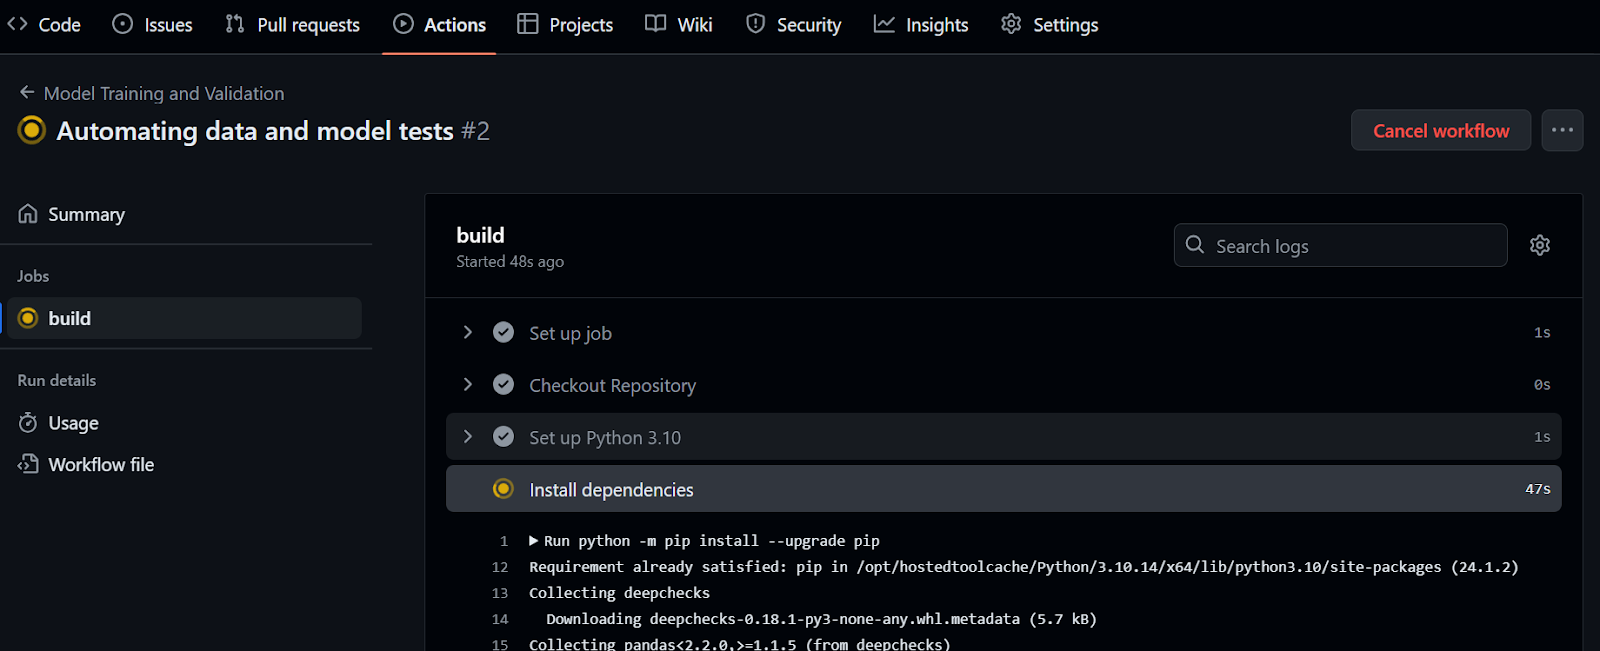
By committing the changes to the main branch, the workflow run will be initiated. To view the run log, navigate to the "Actions" tab and click on the current workflow run associated with the commit message.
- When the workflow run is completed, please scroll down and download the zip file under the “Artifacts” section.
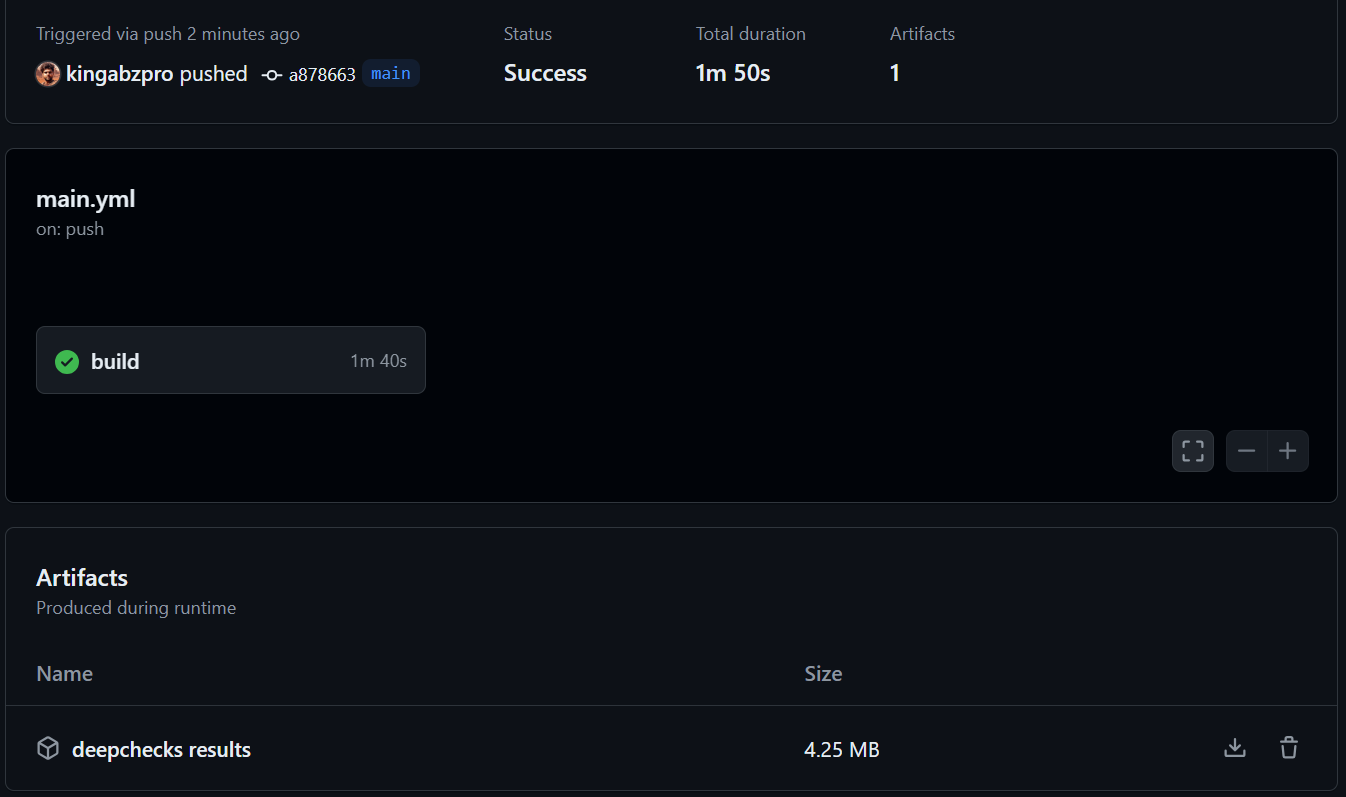
- Open the zip file locally and view the data and model validation results.

Please check out the kingabzpro/Automating-Machine-Learning-Testing GitHub repository as a guide. It contains data, Python code, workflow files, and other necessary files for running fully automated testing.
Automating the entire machine learning pipeline requires knowledge of various processes and tools. To learn about these, consider taking an MLOps Deployment and Lifecycle course. This course explores modern MLOps frameworks, focusing on the lifecycle and deployment of machine learning models.
Conclusion
By automating the testing process, developers can quickly and efficiently validate the accuracy and robustness of models against large and complex datasets. Automated testing helps in identifying issues early, such as data inconsistencies, data drift, and model biases, which might not be apparent through manual testing. This saves time and enhances the model's ability to make fair and accurate predictions.
In this tutorial, we learned about machine learning testing and how to use DeepChecks for data validation and machine learning testing. We also automated data and model testing and saved the results as artifacts using GitHub Actions.
If you enjoyed the tutorial and are interested in starting a career in machine learning, consider enrolling in the Machine Learning Scientist with Python career track. Complete all the courses within 3 months to gain the skills you need for a job as a machine learning scientist.

As a certified data scientist, I am passionate about leveraging cutting-edge technology to create innovative machine learning applications. With a strong background in speech recognition, data analysis and reporting, MLOps, conversational AI, and NLP, I have honed my skills in developing intelligent systems that can make a real impact. In addition to my technical expertise, I am also a skilled communicator with a talent for distilling complex concepts into clear and concise language. As a result, I have become a sought-after blogger on data science, sharing my insights and experiences with a growing community of fellow data professionals. Currently, I am focusing on content creation and editing, working with large language models to develop powerful and engaging content that can help businesses and individuals alike make the most of their data.