Course

In this tutorial, we will learn how to install and use Jenkins, as well as how to create agents and pipelines and execute them.
Specifically, we will:
- Set up Jenkins to run smoothly on a Windows machine. We also provide links to installation in other operating systems.
- Create and run an agent in Jenkins to execute all our pipelines.
- Build and run a simple pipeline to demonstrate the automation of various project steps.
- Develop an MLOps project using a Jenkins pipeline to ingest data, process it, train the model, evaluate the model, and serve the model.
If you need to brush up your knowledge, take a short and straightforward MLOps Concepts course to learn how to take machine learning models from Jupyter notebooks to functioning models in production that generate real business value.
What is Jenkins?
Jenkins is an open-source automation server that plays an important role in the machine learning development process by facilitating continuous integration (CI) and continuous deployment (CD).
Written in Java, Jenkins helps automate data processing, training, evaluation, and deploying machine learning projects, making it an essential tool for MLOps practices.
Jenkins features:
- Easy installation: Jenkins can be easily installed on Windows, Linux, macOS, Docker, and Kubernetes.
- Ease of setup and configuration: Jenkins can be easily set up and configured via its web interface, which includes on-the-fly error checks and built-in help.
- Extensive plugin ecosystem: With hundreds of plugins available, Jenkins integrates with practically every third-party tool in the CI/CD toolchain. In terms of functionality and features, it is similar to GitHub Actions.
- Distributed workload: Jenkins can distribute work across multiple machines using local and cloud agents, helping drive testing, training, and deployments across multiple platforms faster.
Task automation using Jenkins is just one part of the MLOps ecosystem. You can learn about other tasks by reading the 25 Top MLOps Tools You Need to Know in 2024 blog. It consists of tools for experiment tracking, model metadata management, workflow orchestration, data and pipeline versioning, model deployment, and serving and model monitoring in production.
Build MLOps Skills Today
Setting Up Jenkins on Windows 11
We can easily install Jenkins on Linux and macOS. However, installing it on Windows requires several steps. These steps include installing the Java Development Kit, setting up the local security policy, installing Jenkins with a domain user, and starting the Jenkins server.
Installing OpenJDK
Let’s start by installing Java. We need to go to the Adoptium website and download the latest LTS release for Windows 11.
Why do we need to install OpenJDK? Jenkins is a Java-based application that requires a Java Runtime Environment (JRE) or Java Development Kit (JDK) to run.
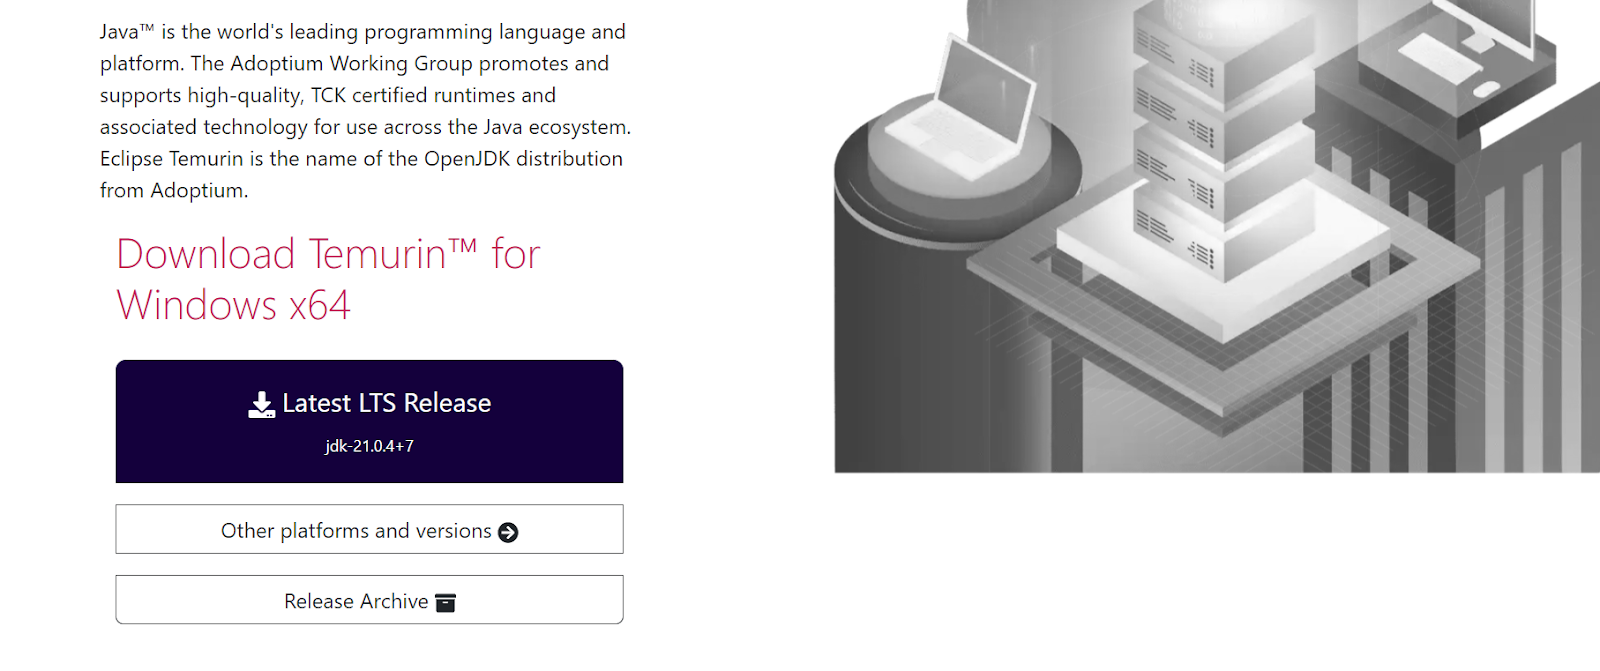
Image source: Adoptium
Install the OpenJDK with the default values, except we need to check the mark “Set or override JAVA_HOME variable.”
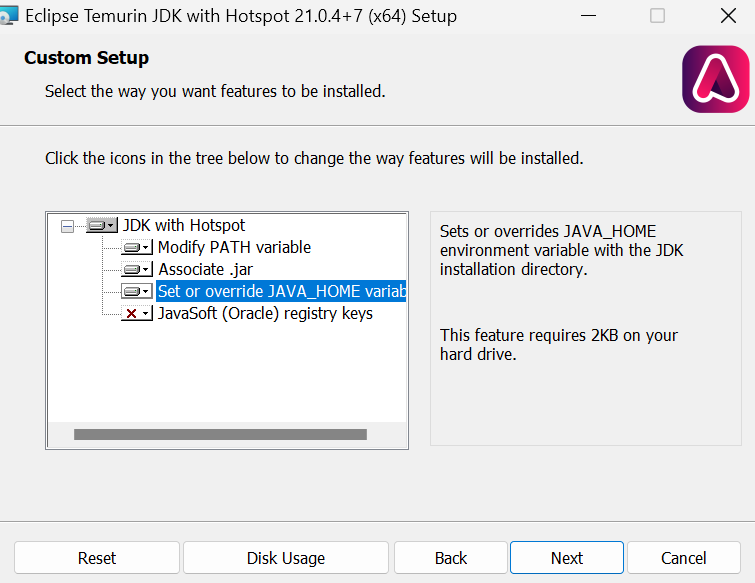
After the installation is complete, we can check if it is correctly installed by typing java -version in the terminal window:

Setting up a user account for “Log on as service”
To install Jenkins, you need to modify the “Local Security Policy” to enable user login access for the installer. To do this, press the Win + R keys on your keyboard, type “secpol.msc” and press Enter. Then navigate to “Local Policies” > “User Rights Assignments” > “Log on as a service.”
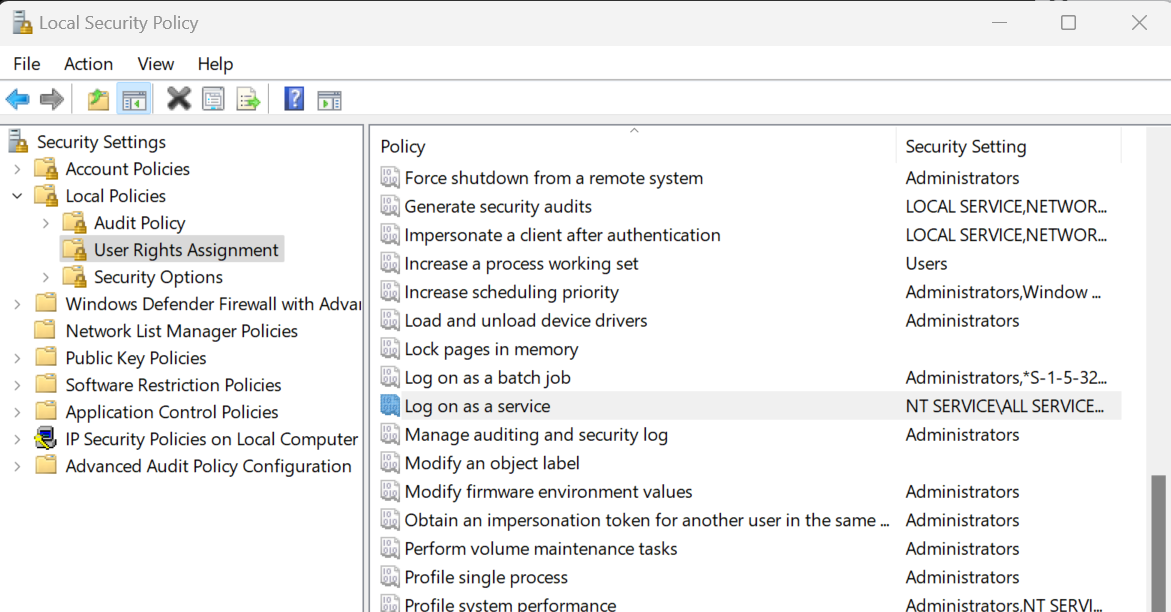
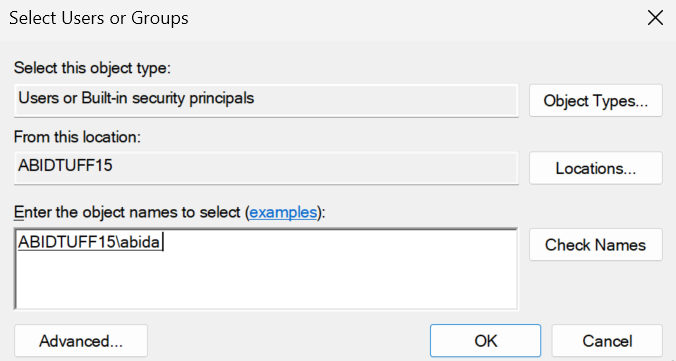
We will be redirected to a new window, where we will type our Windows username and click on the “Check Names” button. After that, press the “OK” button and exit the “Local Security Policy” window.
Installing Jenkins
Go to the jenkins.io website and download the Windows Installer package for Jenkins.
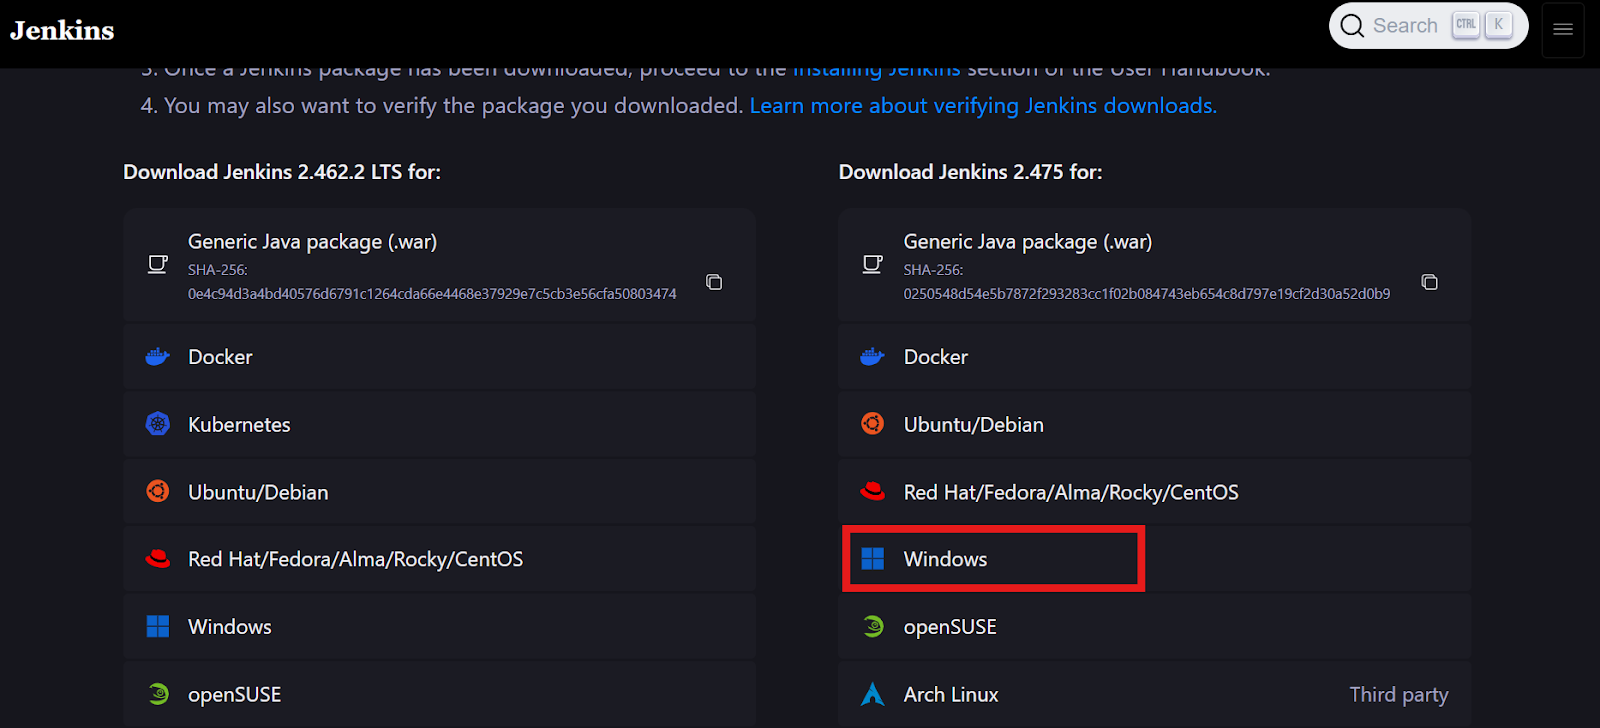
Image source: jenkins.io
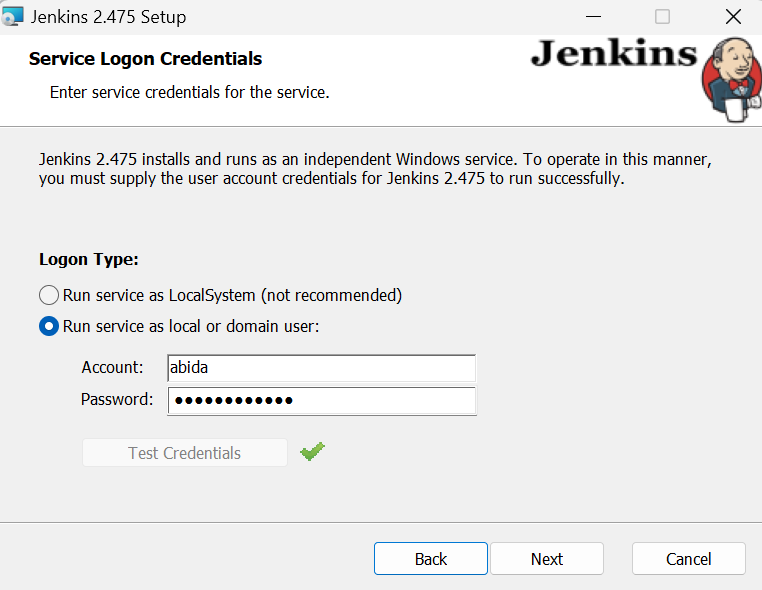
When we reach the window that says "Run service as a local or domain user," type your Windows username and password, then press the “Test Credentials” button. If it is approved, click the “Next” button.
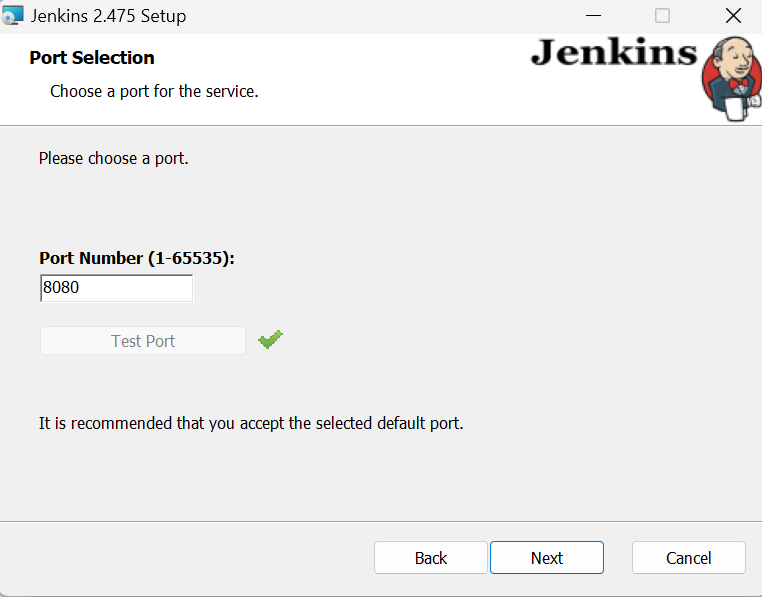
Keep everything else as default and finish the installation. It might take a few minutes for it to set up.
Starting the Jenkins server
Starting the Jenkins server is straightforward. All we have to do is click the Windows key and search for "Services." In the Services window, search for Jenkins and click the play button at the top.
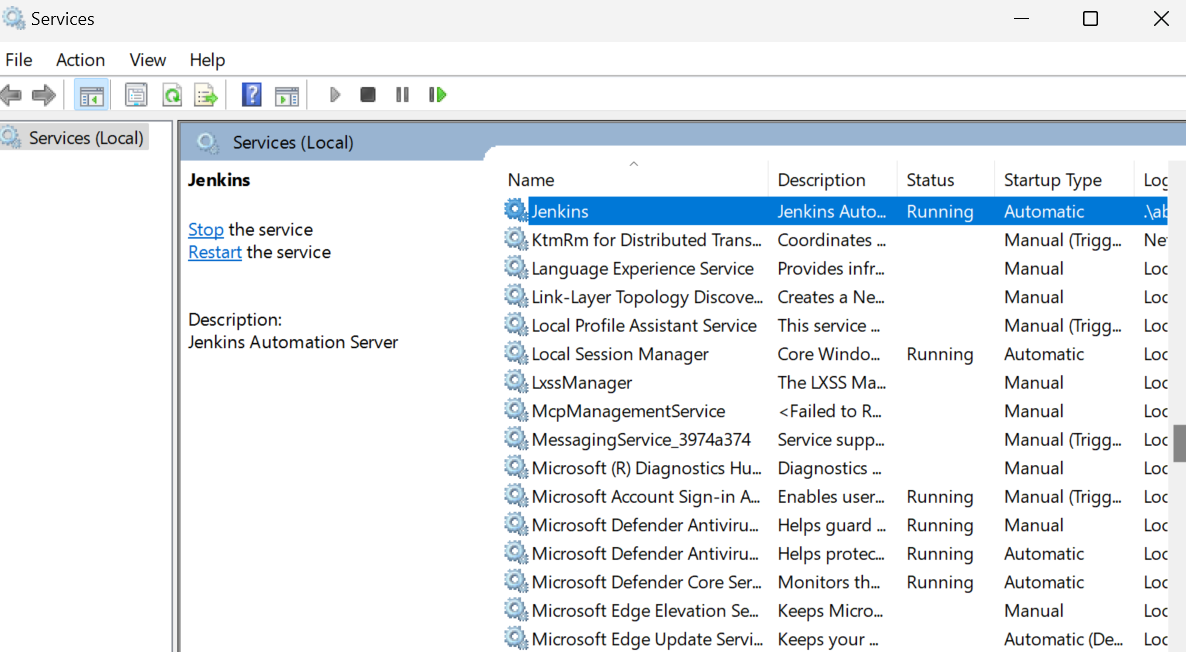
By default, Jenkins runs at https://localhost:8080/. Simply paste that URL into a browser to access the dashboard. To enter the Jenkins dashboard, you have to type the administrator password.
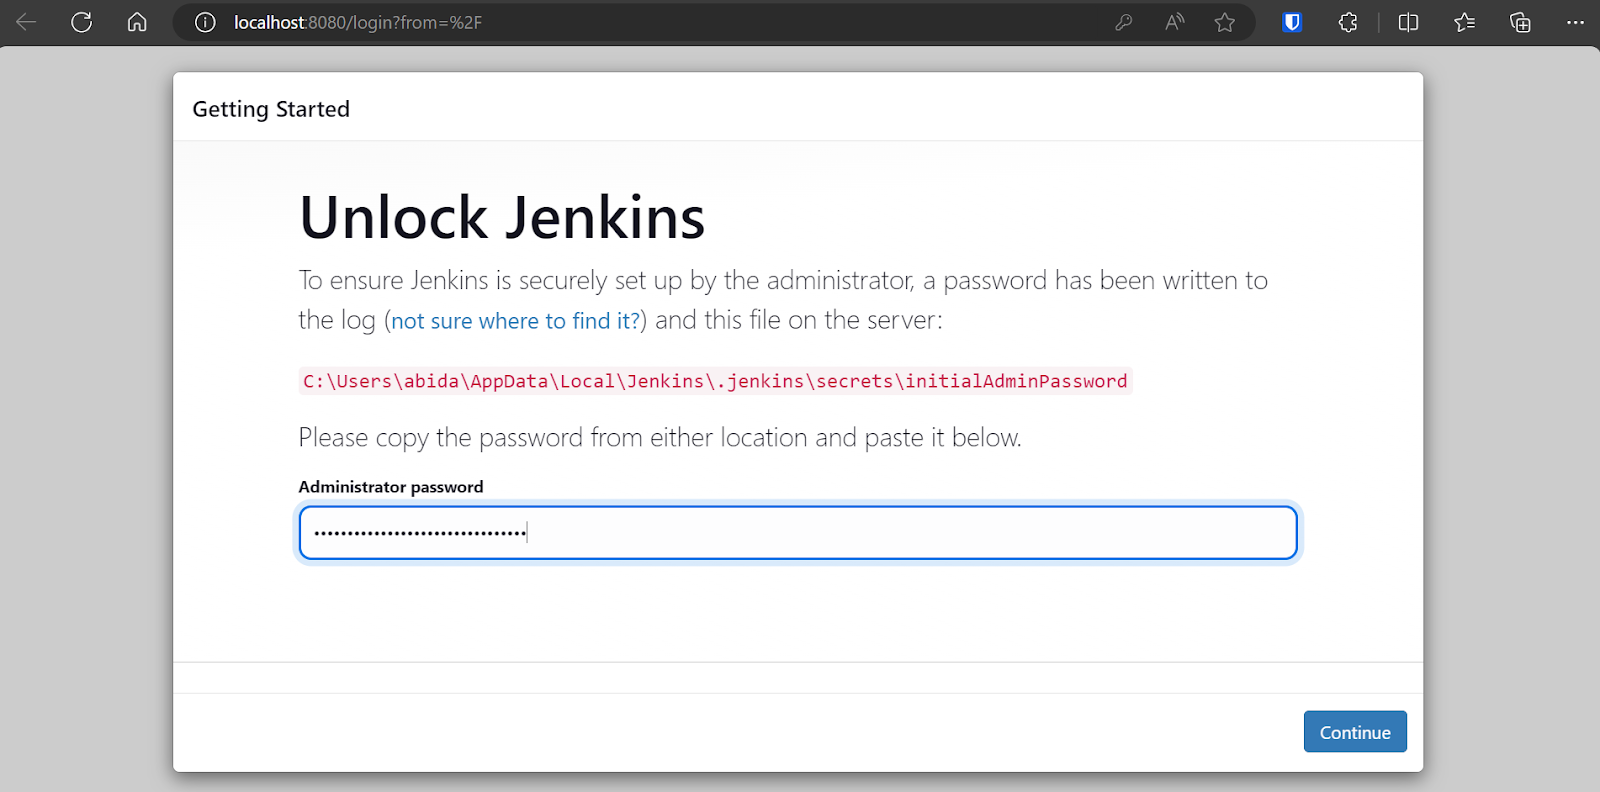
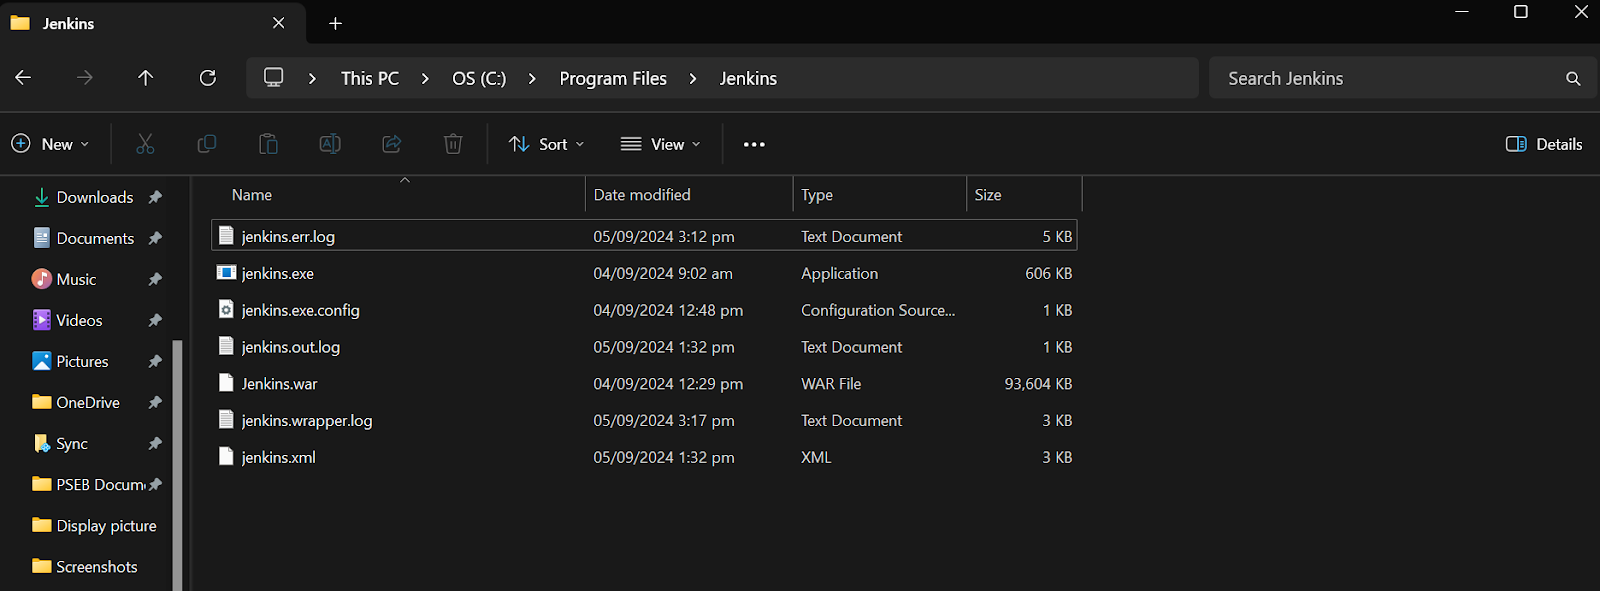
To obtain the default administrator password, navigate to the Jenkins directory and locate and open the file Jenkins.err.log.
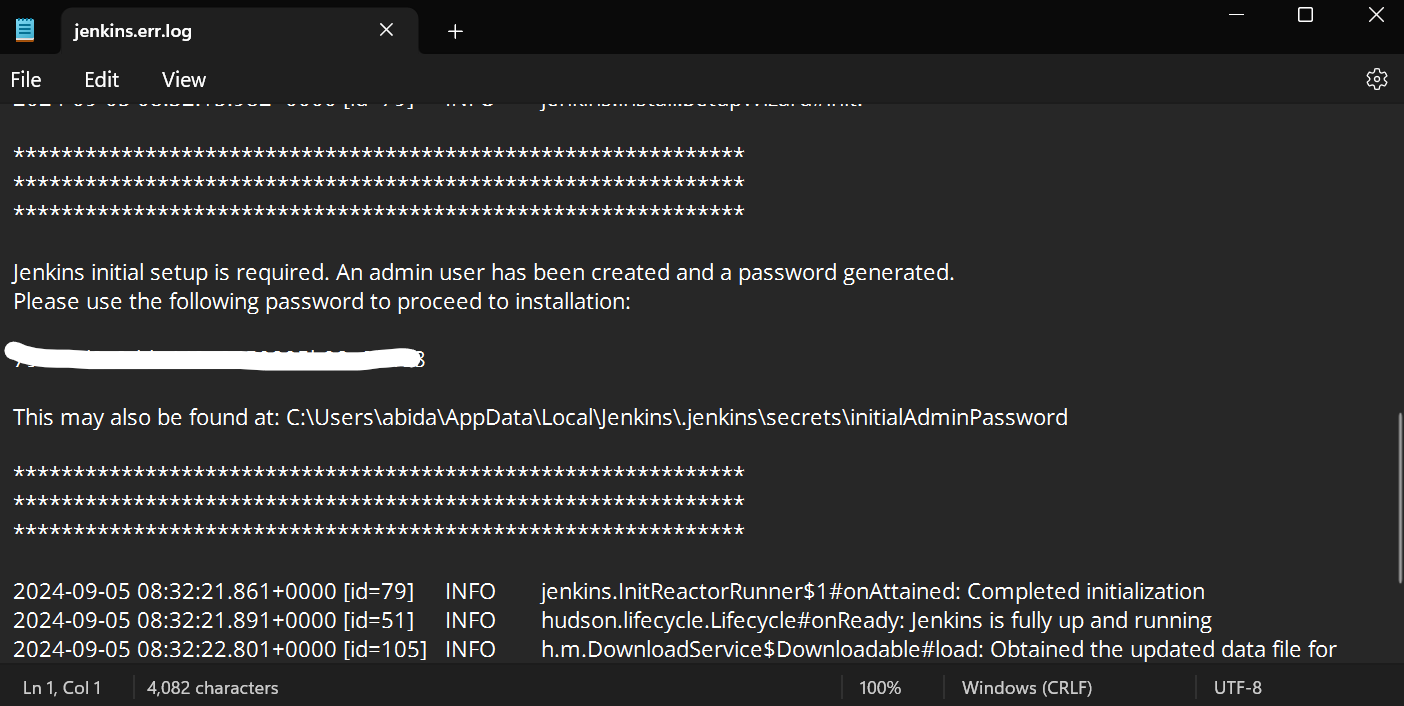
Scroll down the Jenkins error file to find the generated password. Copy it and paste it into the administrator password input box.
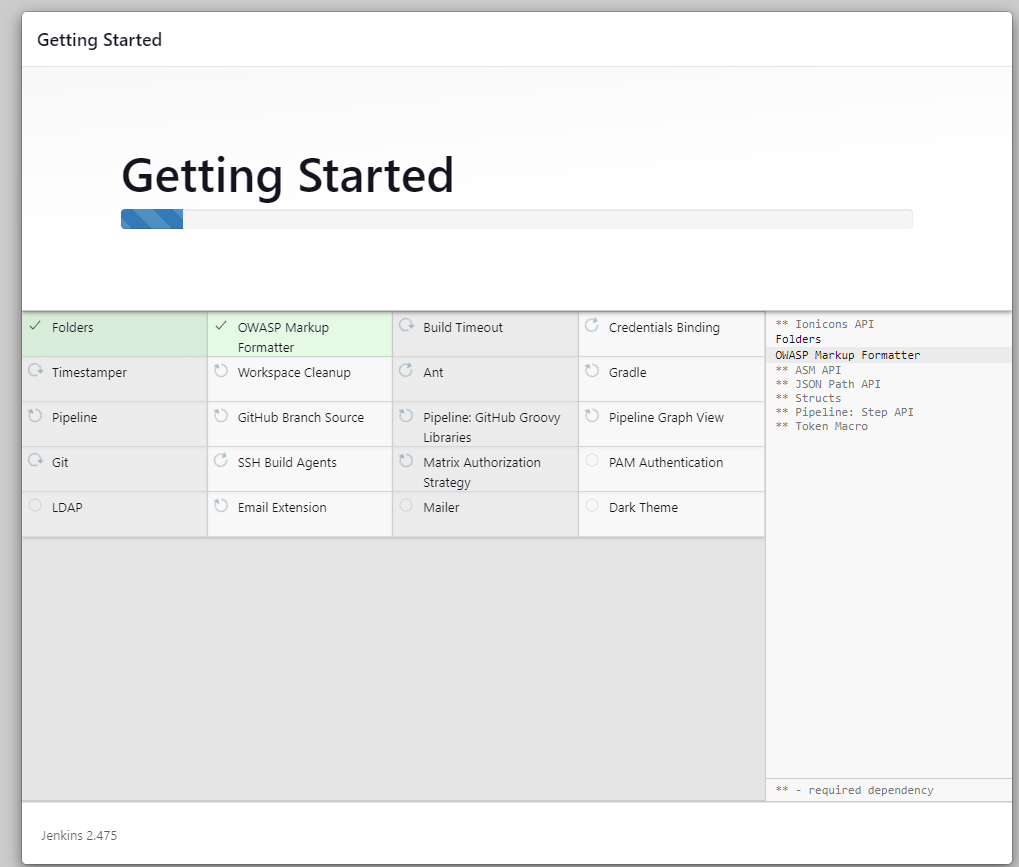
After that, the server will take a few minutes to install the necessary tools and extensions.
Once the server setup is complete, it will prompt us to create a new user. Enter all the necessary information and click the "Save and Continue" button.
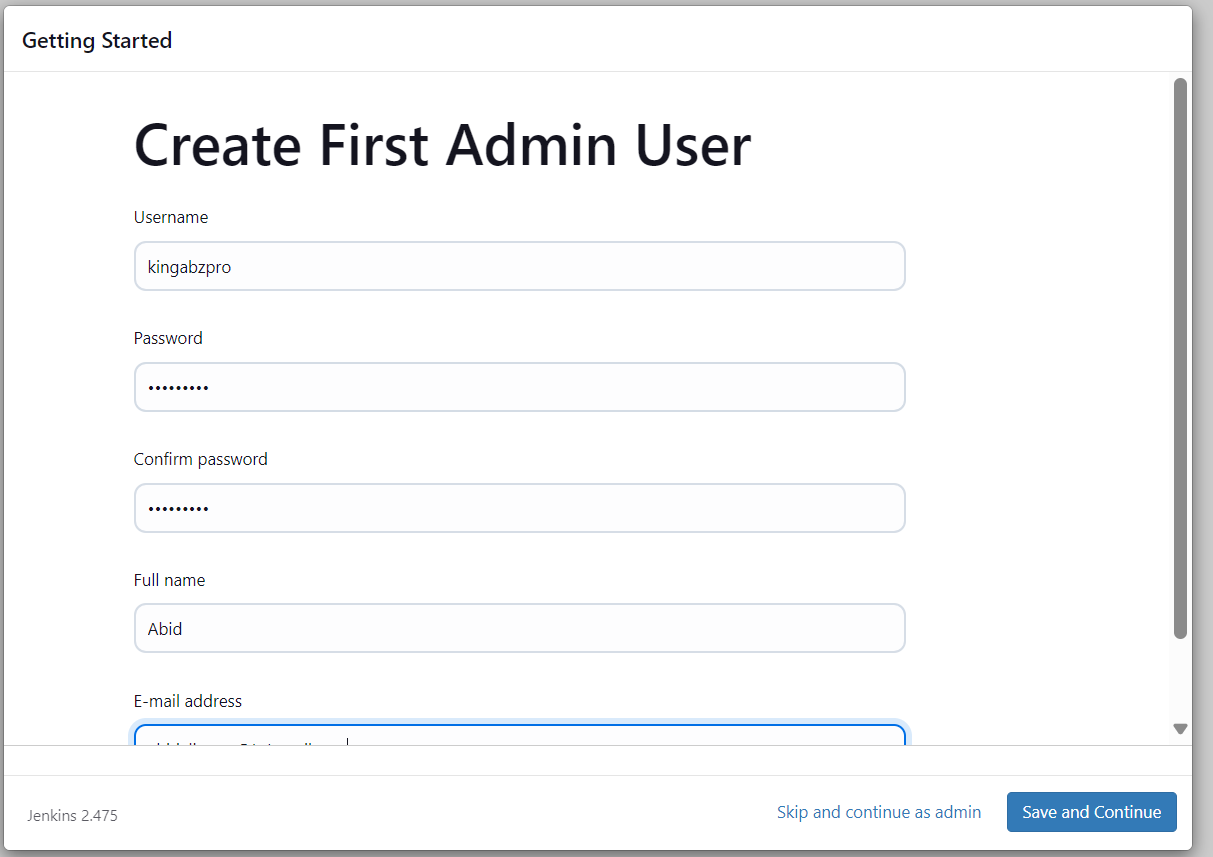
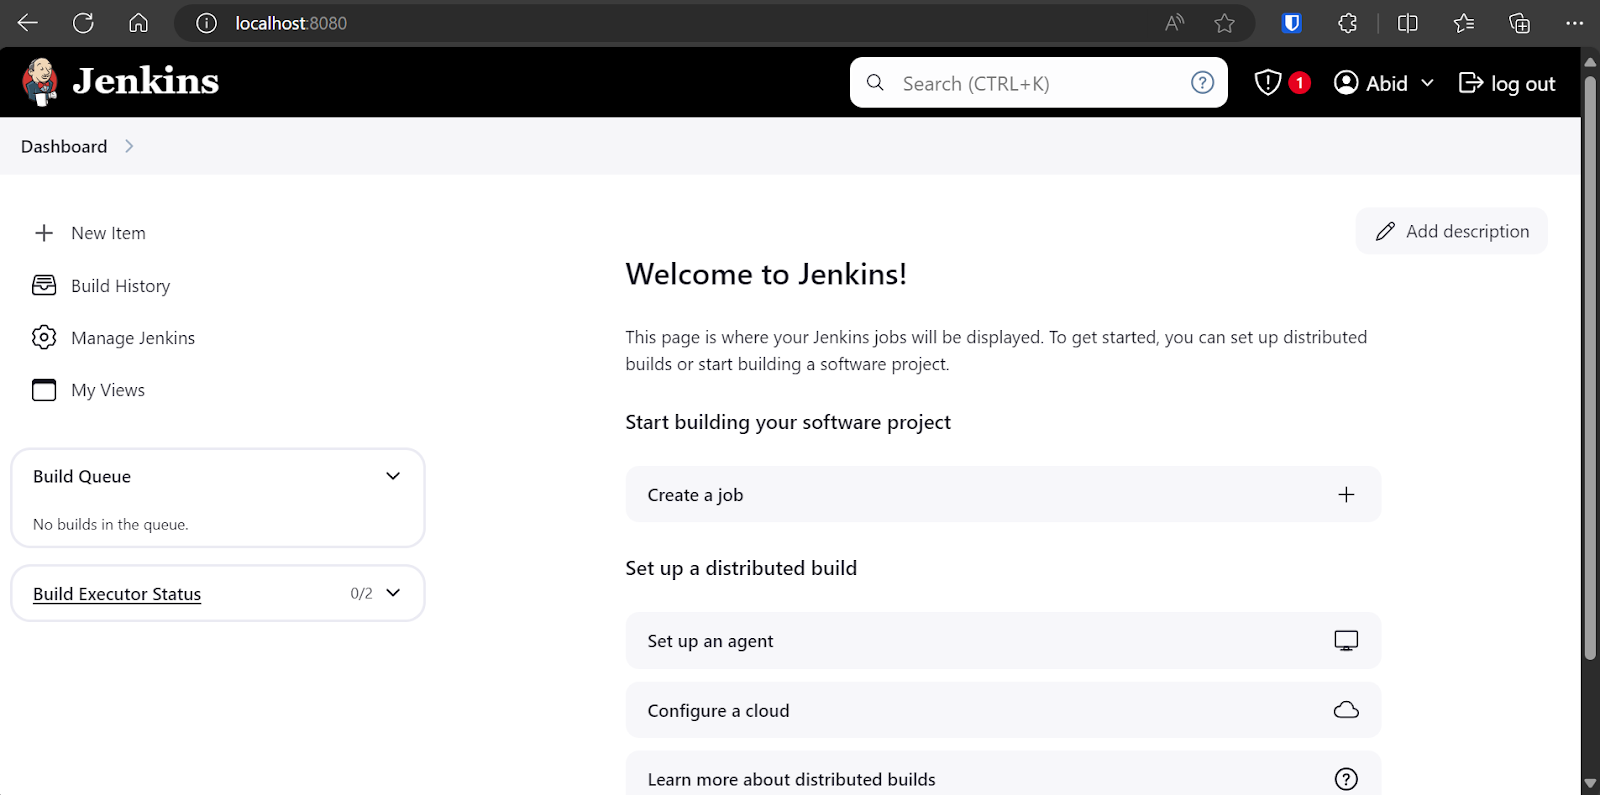
We will be directed to the dashboard, where we will create, view, and run various Jenkins pipelines.
Creating an Agent in Jenkins
Agents, also known as nodes, are machines that are set up to execute jobs dispatched by the Jenkins master server. These agents provide the environment and compute to run pipelines. A Windows 11 agent is available by default, but we can always create our own agent with customized options.
Setting up agents
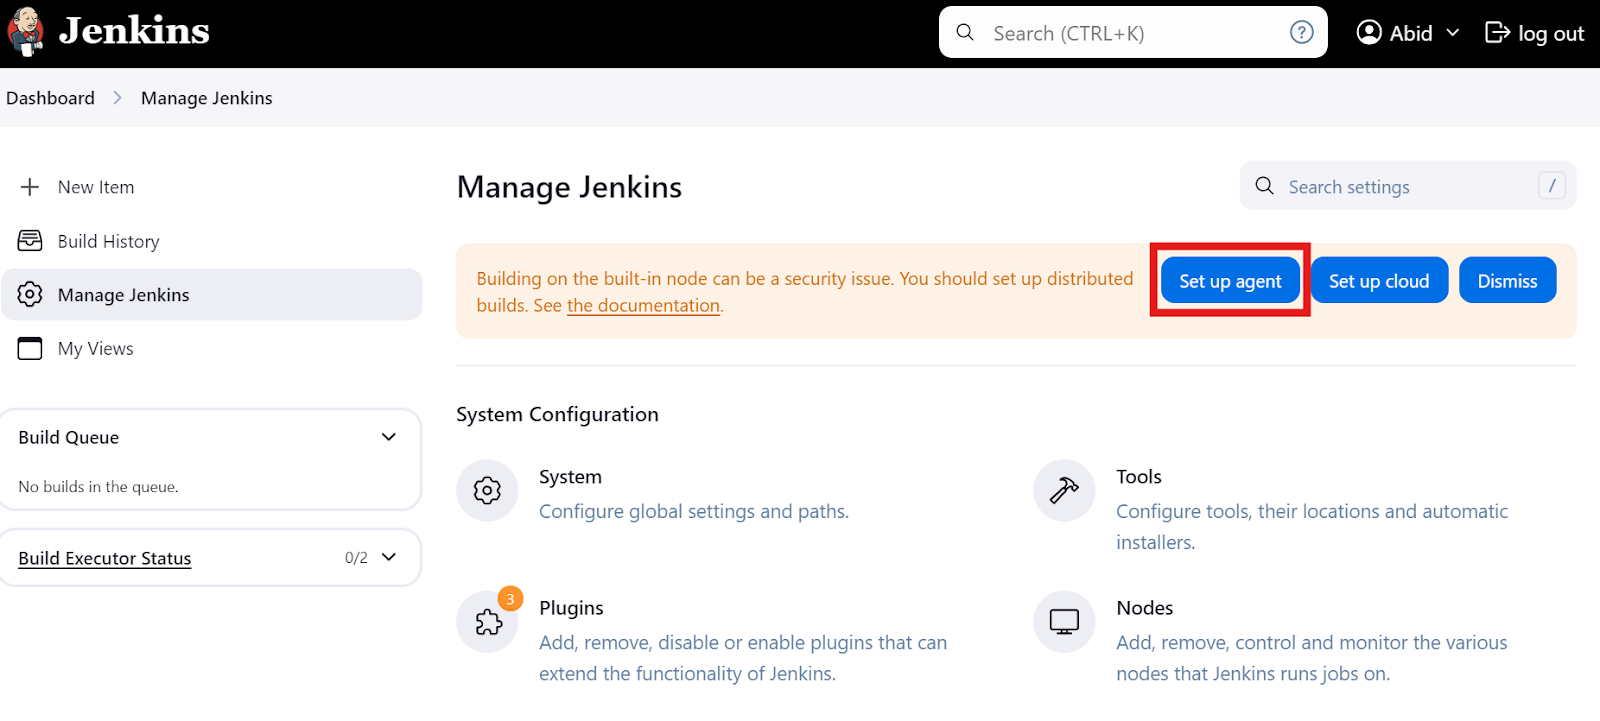
On the main dashboard, click on the “Manage Jenkins” option and then click on the “Set up agent” button as shown below. Alternatively, you can click the “Nodes” button to create and manage agents.
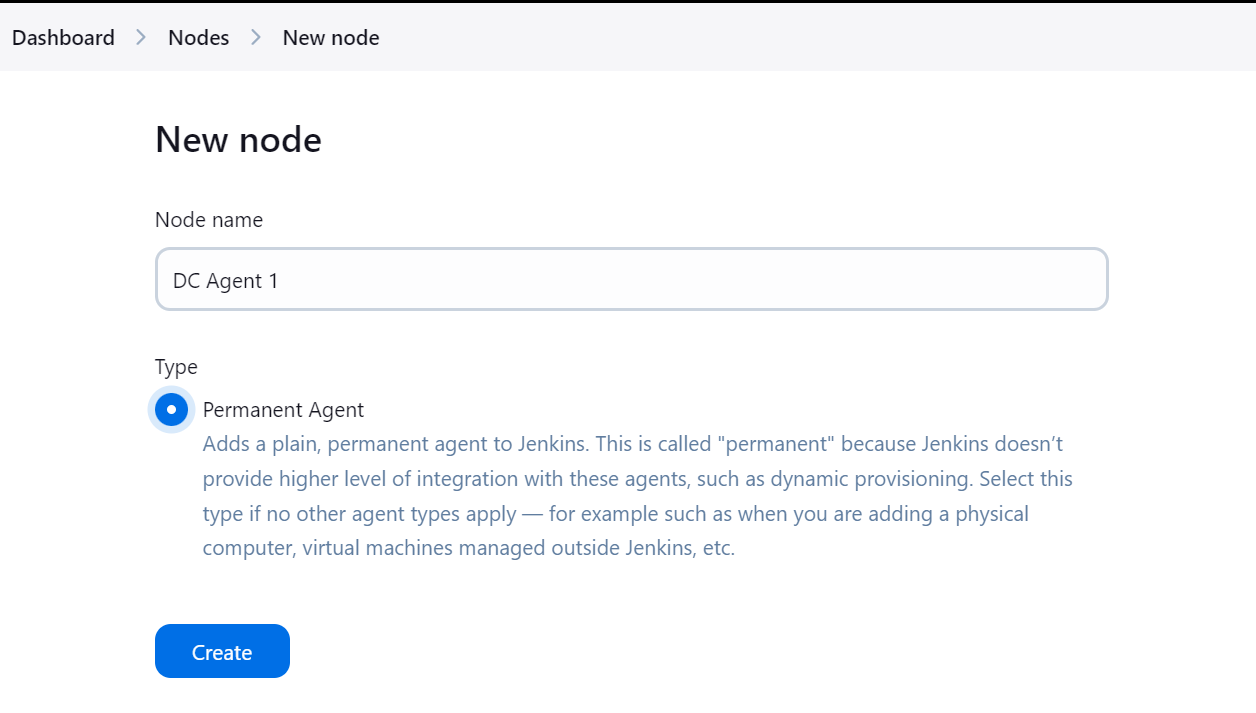
Type out the name of the agent and select the “Permanent Agent” type.
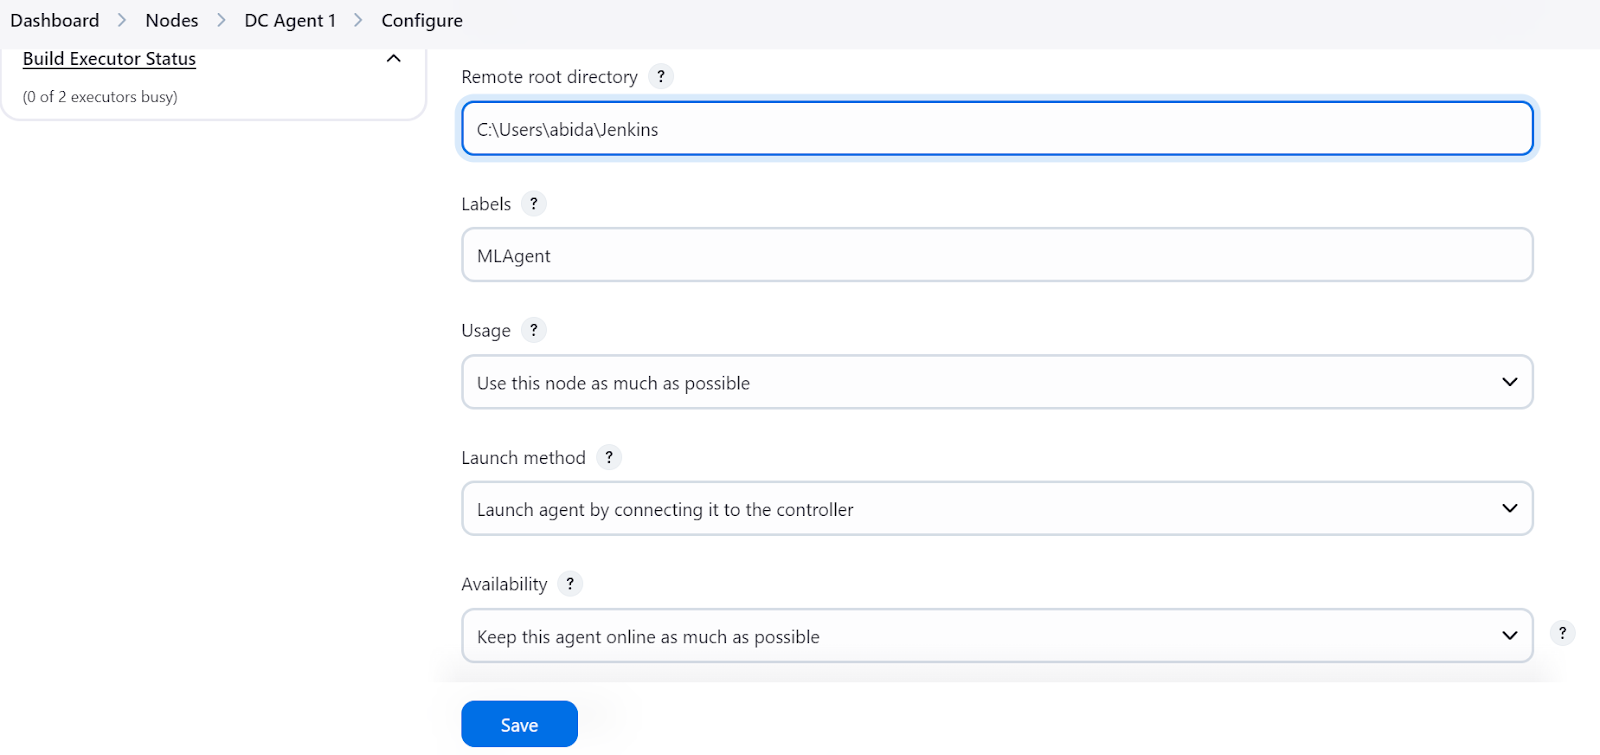
Please ensure you provide a directory for the agent where all files and logs will be saved. Add a label and keep the rest of the settings as default. When creating the pipeline, we will use the agent label to run the tasks.
Running the agent locally
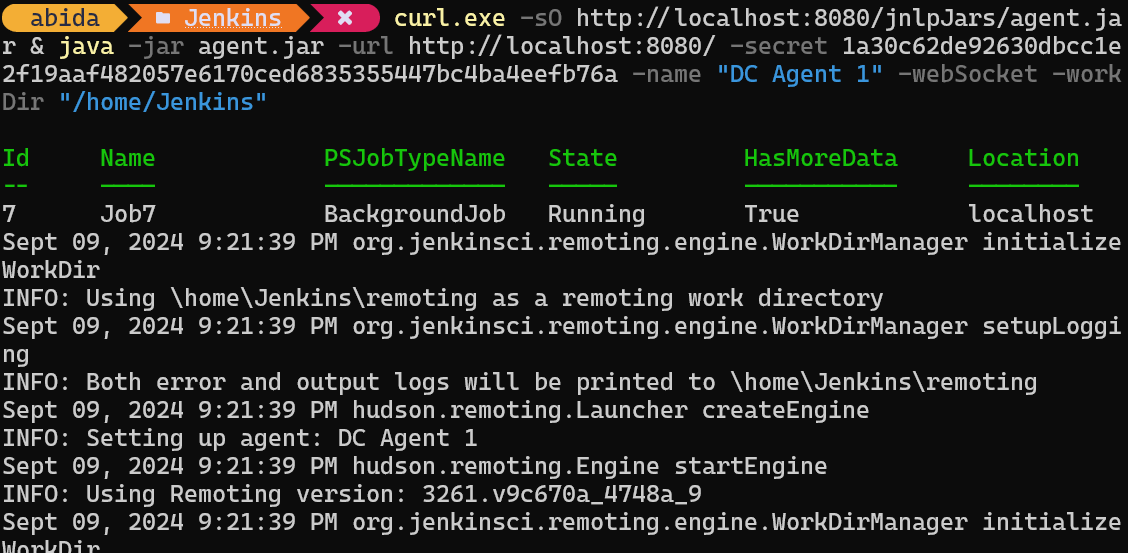
When the “Save” button is pressed, a prompt will appear, instructing us to copy and paste the appropriate command into the terminal based on our operating system.
curl.exe -sO http://localhost:8080/jnlpJars/agent.jar & java -jar agent.jar -url http://localhost:8080/ -secret 1a30c62de92630dbcc1e2f19aaf482057e6170ced6835355447bc4ba4eefb76a -name "DC Agent 1" -webSocket -workDir "/home/Jenkins"After pasting and running the command in the terminal, we will see a success message indicating that our agent, in my case, DC Agent 1, is running in the background.
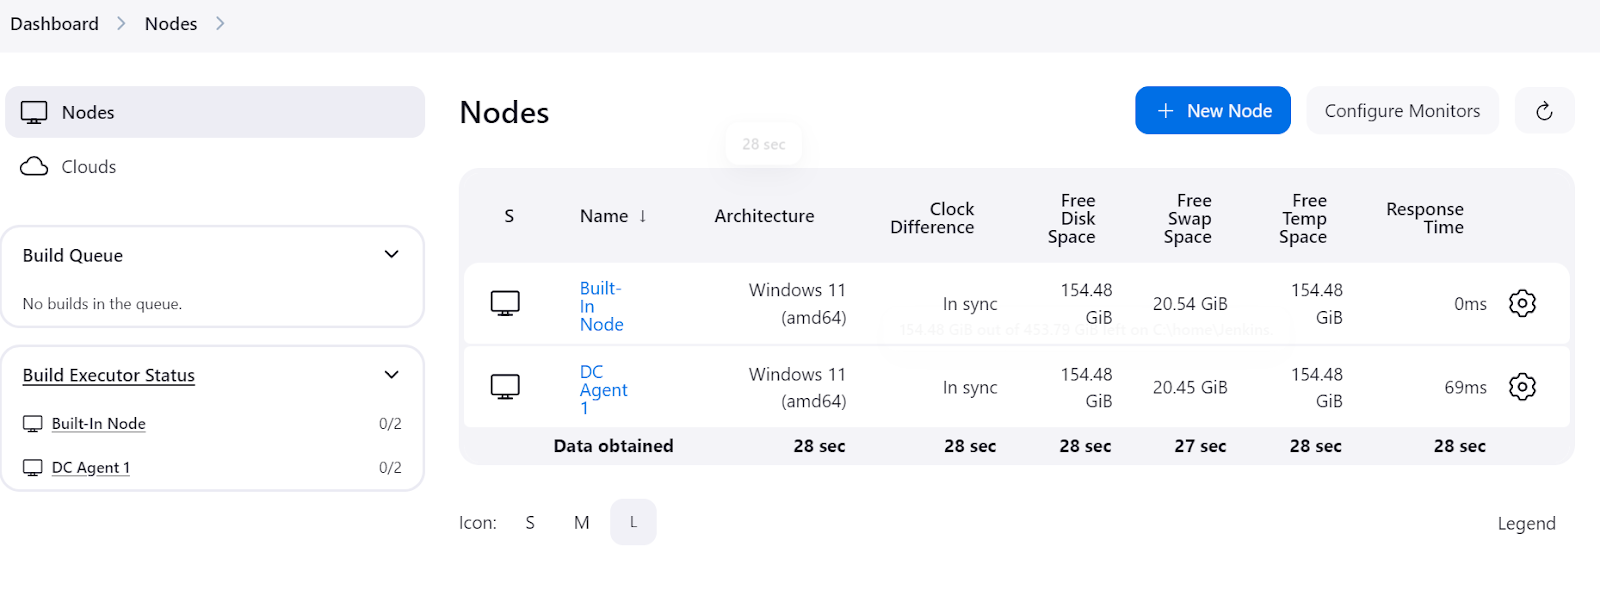
To check if the agent is running and ready to execute a job, navigate to the Jenkins dashboard, click on “Manage Jenkins,” and then click on the “Nodes” button to view the status of the agent.
Creating a Simple Jenkins Pipeline
A Jenkins pipeline is a series of automated steps that aid in training, evaluating, and deploying models. It defines these processes using a simple programming script, making it easier to manage and automate project workflows.
In this section, we will create a sample Jenkins pipeline and use our newly created agent as a pipeline executor.
Setting up a Jenkins pipeline
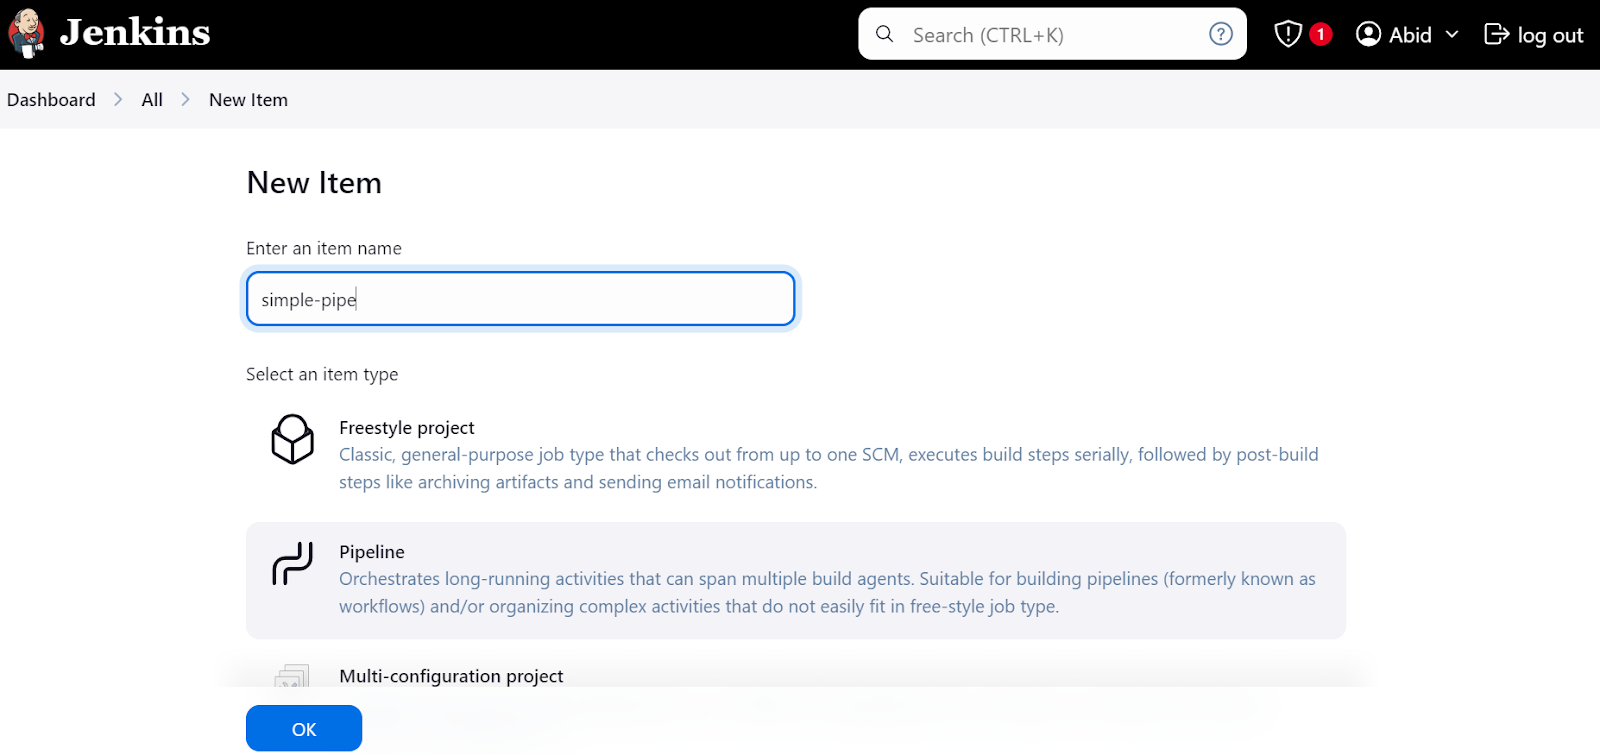
On the dashboard, click on the “New Item” button, type the item's name, select the “Pipeline” option, and click “OK”.
After that, a prompt will ask us to configure the pipeline. Scroll down to the “Pipeline” section, where we need to write the Jenkins pipeline script.
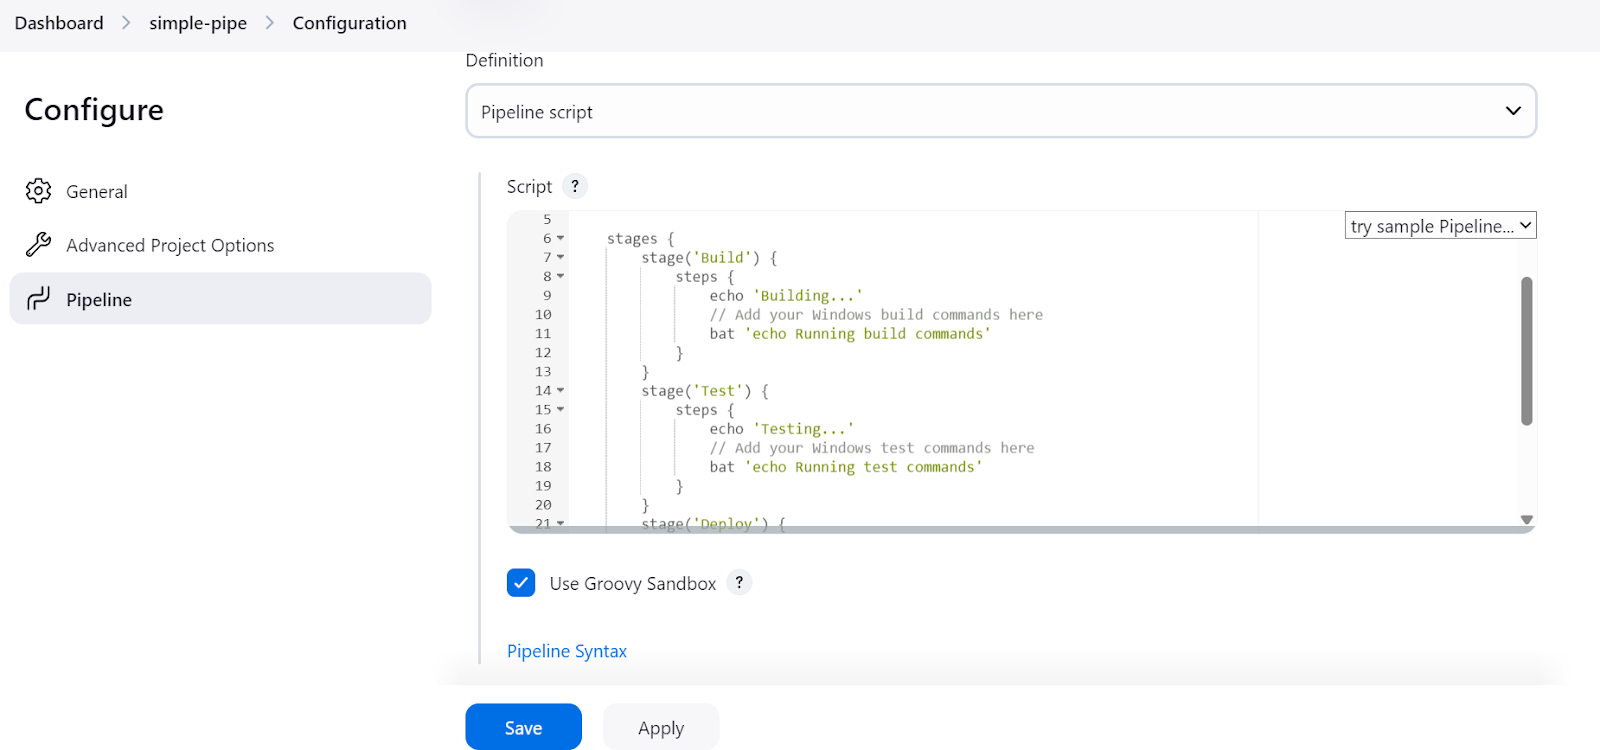
In the Jenkins pipeline script, we start by setting up the environment and the agent. In our case, we are setting the agent by providing it with the agent's label that we defined before.
After that, we will write a stages section where all the various steps of the pipeline (Build, Test, Deploy) will be added. In our case, we are just printing using the echo command and running the terminal commands using the bat command.
batis used for Windows 11shis for Linux
That's it. It's that simple. Here’s the script code:
pipeline {
    agent {
        label 'MLAgent' // Ensure this label matches your Windows 11 agent
    }

    stages {
        stage('Build') {
            steps {
                echo 'Building...'
                // Add your Windows build commands here
                bat 'echo Running build commands'
            }
        }
        stage('Test') {
            steps {
                echo 'Testing...'
                // Add your Windows test commands here
                bat 'echo Running test commands'
            }
        }
        stage('Deploy') {
            steps {
                echo 'Deploying...'
                // Add your Windows deploy commands here
                bat 'echo Running deploy commands'
            }
        }
    }
}
After adding the script, click the “Apply” and “Save” buttons.
Running the Jenkins pipeline
Click on the “Build Now” button to test and run the pipeline. To see its status, click on the “Status” button.
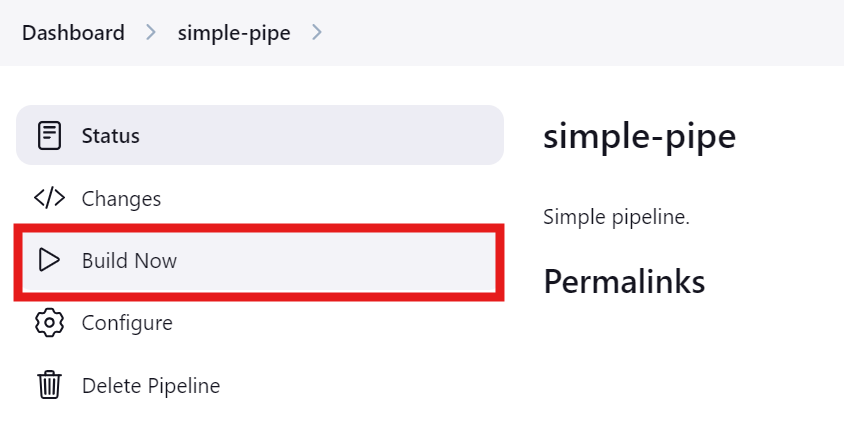
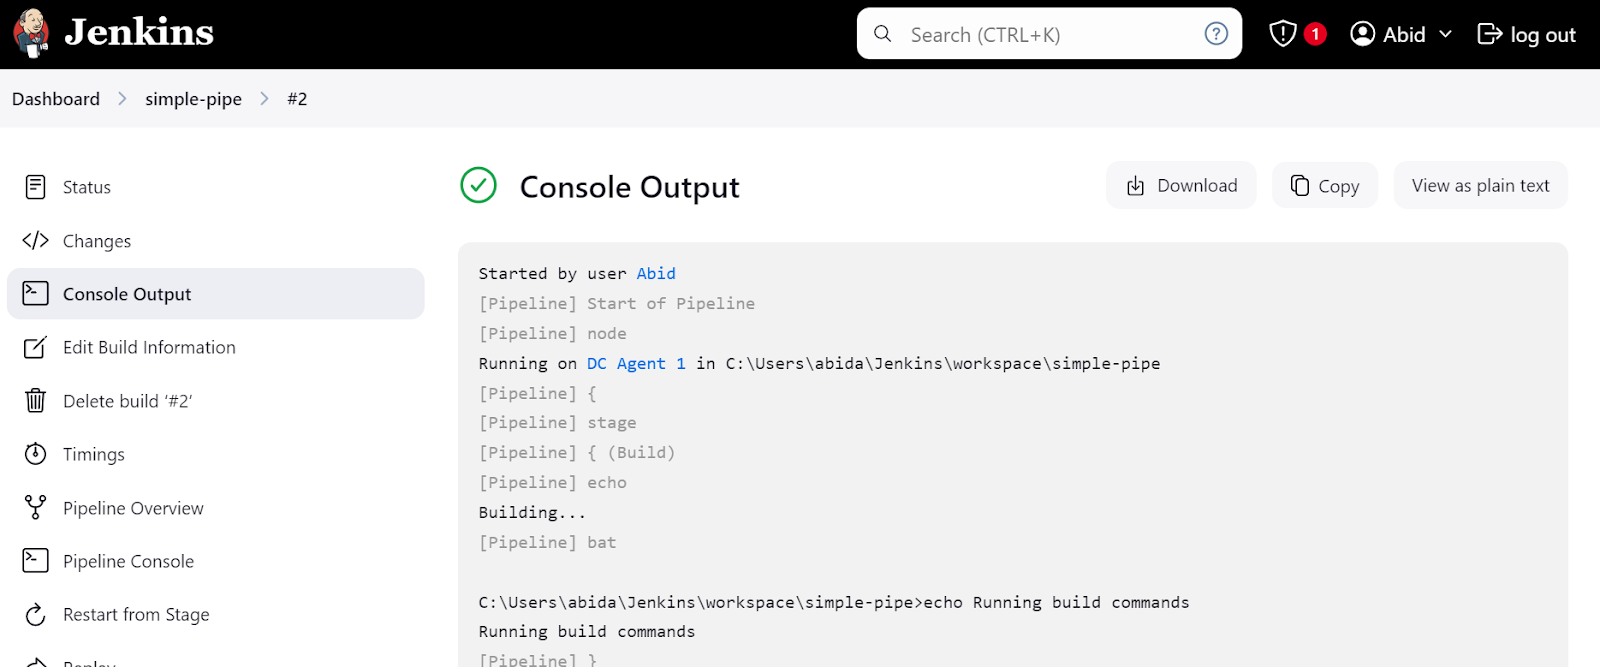
After the run is completed, we can view the logs by clicking on the specific run in the "Status" menu.
Click on the "Last build (#2)" link and then click on the "Console Output" button. This will take us to the console output window, where we can find the pipeline's logs and results.
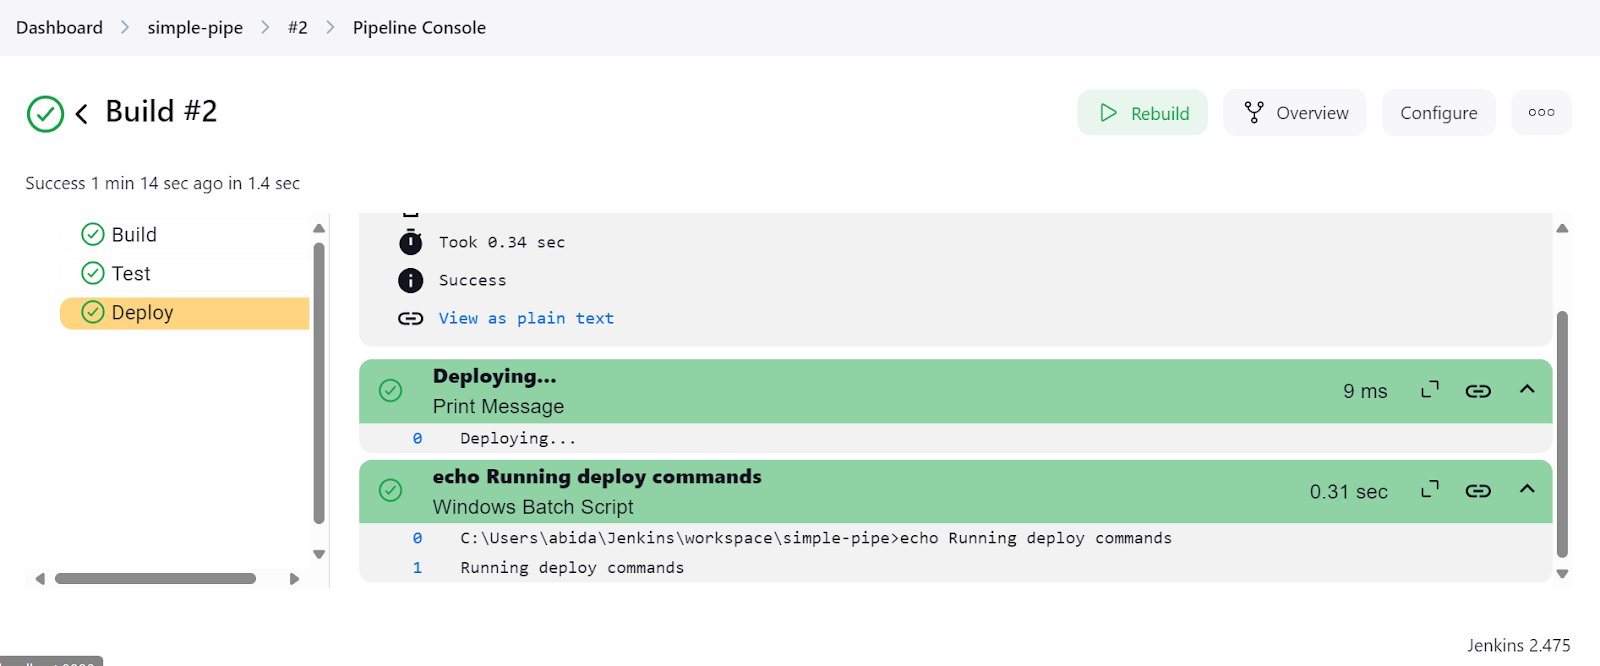
We can even click on the “Pipeline Console” button to view every step in the pipeline in detail. This includes the output, the time it took to start and finish, pipeline commands, and logs.
After completing the Jenkins installation setup, creating and running pipelines was easy and fast. It took me less than an hour to understand the script and how to create my own. I will be using Jenkins instead of GitHub Actions because it offers me more flexibility.
Author's opinion
Creating a Jenkins Pipeline for an MLOPs Project
After the initial introduction to Jenkins, it is time for us to get serious and work on the MLOps project.
We will create two pipelines: The first pipeline will be CI, which will load and process the data, train the model, evaluate the model, and then test the model server. After that, it will initiate the CD pipeline, starting the model inference server.
To understand the process in detail, take the CI/CD for Machine Learning course, which teaches you how to streamline machine learning development processes.
Project files
Like any project, we need to create the project files, including the data loading, model training, model evaluation, and model serving Python files. We also need a requirements .txt file to install the necessary Python packages.
data_loading.py:
In this script, we will load a scikit-learn dataset called the Wine dataset and convert it into a pandas DataFrame. Then, we will split the dataset into training and testing sets. Finally, we will save the processed data as a pickle file.
from sklearn.datasets import load_wine
from sklearn.model_selection import train_test_split
import pandas as pd
import joblib

def load_data():
    # Load the wine dataset
    wine = load_wine(as_frame=True)
    data = pd.DataFrame(data=wine.data, columns=wine.feature_names)
    data["target"] = wine.target
    print(data.head())
    return data

def split_data(data, target_column="target"):
    X = data.drop(columns=[target_column])
    y = data[target_column]
    X_train, X_test, y_train, y_test = train_test_split(
        X, y, test_size=0.2, random_state=42
    )
    return X_train, X_test, y_train, y_test

def save_preprocessed_data(X_train, X_test, y_train, y_test, file_path):
    joblib.dump((X_train, X_test, y_train, y_test), file_path)


if __name__ == "__main__":
    data = load_data()
    X_train, X_test, y_train, y_test = split_data(data)
    save_preprocessed_data(X_train, X_test, y_train, y_test, "preprocessed_data.pkl")
model_training.py:
In this file, we will load the processed data, train a random forest classifier, and save the model as a pickle file.
from sklearn.ensemble import RandomForestClassifier
import joblib

def load_preprocessed_data(file_path):
    return joblib.load(file_path)

def train_model(X_train, y_train):
    model = RandomForestClassifier(n_estimators=100, random_state=42)
    model.fit(X_train, y_train)
    return model

def save_model(model, file_path):
    joblib.dump(model, file_path)


if __name__ == "__main__":
    X_train, X_test, y_train, y_test = load_preprocessed_data("preprocessed_data.pkl")

    model = train_model(X_train, y_train)
    save_model(model, "model.pkl")
model_evaluation.py:
To evaluate the model, we will load both the model and preprocessed dataset, generate a classification report, and print out the accuracy score.
import joblib
from sklearn.metrics import accuracy_score, classification_report

def load_model(file_path):
    return joblib.load(file_path)

def load_preprocessed_data(file_path):
    return joblib.load(file_path)

def evaluate_model(model, X_test, y_test):
    predictions = model.predict(X_test)
    accuracy = accuracy_score(y_test, predictions)
    report = classification_report(y_test, predictions)
    return accuracy, report

if __name__ == "__main__":
    X_train, X_test, y_train, y_test = load_preprocessed_data("preprocessed_data.pkl")

    model = load_model("model.pkl")
    accuracy, report = evaluate_model(model, X_test, y_test)
    print(f"Model Accuracy: {accuracy}")
    print(f"Classification Report:\n{report}")
model_serving.py:
For model serving, we will use FastAPI to create a REST API where users can input features and generate predictions. Normally, the labels are generic. To make things more interesting, we will change the wine categories to Verdante, Rubresco, and Floralis.
When we run this file, we launch the FastAPI server, which we can access through the curl command or by using the requests library in Python.
from typing import List

import joblib
import uvicorn
from fastapi import FastAPI
from pydantic import BaseModel

app = FastAPI()

# Define the labels corresponding to the target classes
LABELS = [
    "Verdante",  # A vibrant and fresh wine, inspired by its balanced acidity and crisp flavors.
    "Rubresco",  # A rich and robust wine, named for its deep, ruby color and bold taste profile.
    "Floralis",  # A fragrant and elegant wine, known for its floral notes and smooth finish.
]

class Features(BaseModel):
    features: List[float]

def load_model(file_path):
    return joblib.load(file_path)

model = load_model("model.pkl")

@app.post("/predict")
def predict(features: Features):
    # Get the numerical prediction
    prediction_index = model.predict([features.features])[0]
    # Map the numerical prediction to the label
    prediction_label = LABELS[prediction_index]
    return {"prediction": prediction_label}

if __name__ == "__main__":
    uvicorn.run(app, host="127.0.0.1", port=9000)
requirements.txt:
This file will help us download and install all the packages required to run the above Python files.
scikit-learn
pandas
fastapi
uvicorn
Main MLOps (CI) pipeline
We will now create continuous integration Jenkins pipelines. Just like we created a simple pipeline, we will create an "MLOps-pipe" and write the script that covers everything from data processing to model evaluation.
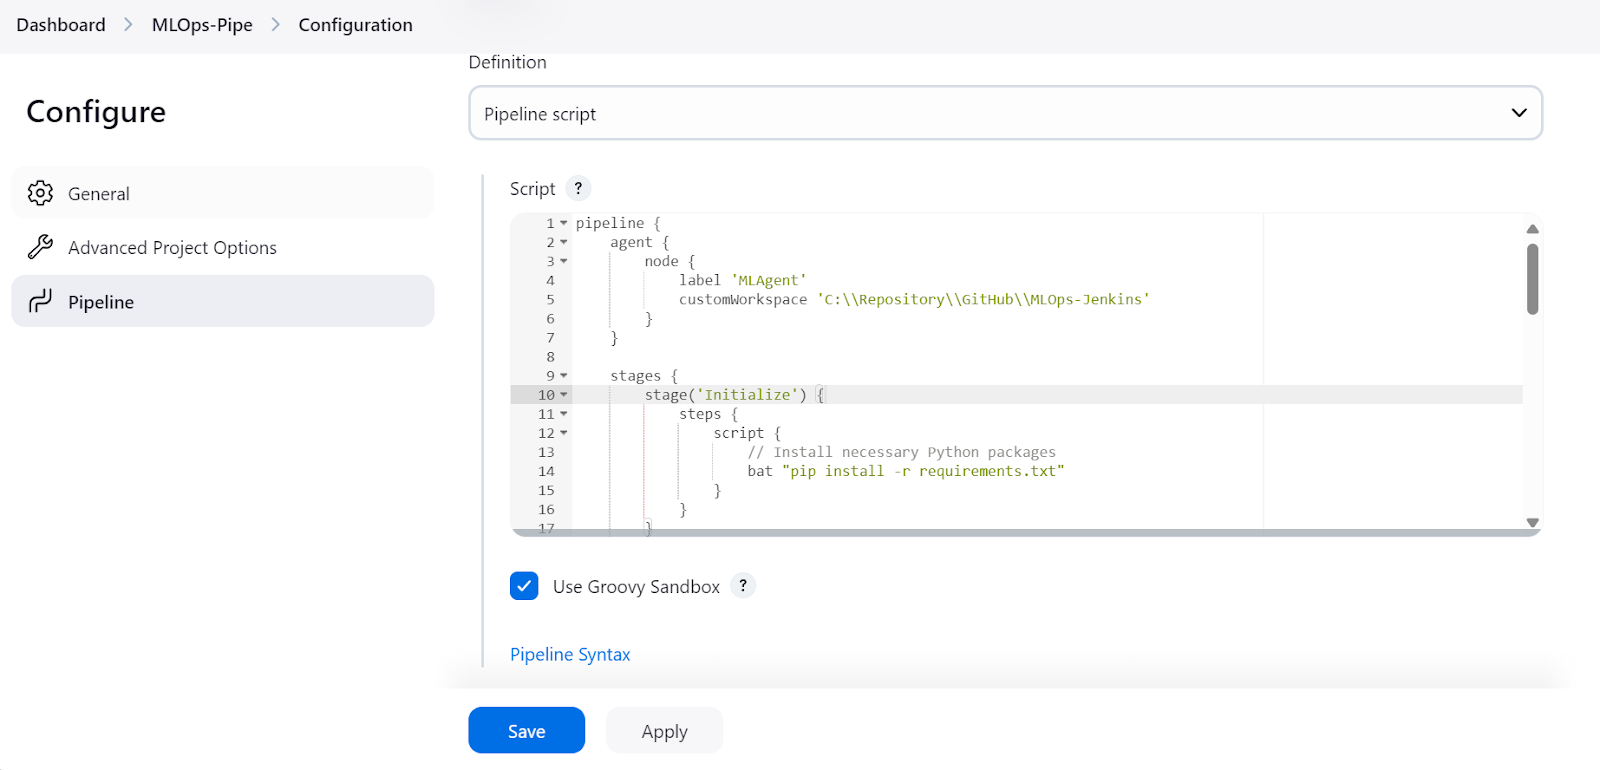
The MLOps pipeline script consists of:
- Initializing the
agentwith thelabel“MLAgent.” - Setting the workspace directory where all of our Python files are located.
- Creating stages for each step in the machine learning pipeline:
- Installing all the necessary Python packages (
Initialize). - Processing the loaded dataset (
Load and Preprocess Data). - Training the model on a processed dataset (
Train Model). - Evaluating the model and generating the report (
Evaluate Model). - Testing the model server using the
curlcommand (Test Serve Model). - After passing the server testing, another pipeline will be triggered to deploy the server. This will be covered in the next section.
- In the post node, we will process data and save it as an artifact by providing it with the pickle file extension.
Note: The start /B command launches a new terminal window in the background and runs the model-serving script. Also, this Jenkins pipeline script will only work on Windows, and we need to change the commands for Linux or other operating systems.
pipeline {
    agent {
        node {
            label 'MLAgent'
            customWorkspace 'C:\\Repository\\GitHub\\MLOps-Jenkins'
        }
    }

    stages {
        stage('Initialize') {
            steps {
                script {
                    // Install necessary Python packages
                    bat "pip install -r requirements.txt"
                }
            }
        }

        stage('Load and Preprocess Data') {
            steps {
                script {
                    // Run data loading script
                    bat "python data_loading.py"
                }
            }
        }

        stage('Train Model') {
            steps {
                script {
                    // Run model training script
                    bat "python model_training.py"
                }
            }
        }

        stage('Evaluate Model') {
            steps {
                script {
                    // Run model evaluation script
                    bat "python model_evaluation.py"
                }
            }
        }

        stage('Serve Model') {
            steps {
                script {
                    // Start FastAPI server in the background
                    bat 'start /B python model_serving.py'
                    // Wait for the server to start
                    sleep time: 10, unit: 'SECONDS'
                }
            }
        }

        stage('Test Serve Model') {
            steps {
                script {
                    // Test the server with sample values
                    bat '''
                        curl -X POST "http://127.0.0.1:9000/predict" ^
                        -H "Content-Type: application/json" ^
                        -d "{\\"features\\": [13.2, 2.77, 2.51, 18.5, 103.0, 1.15, 2.61, 0.26, 1.46, 3.0, 1.05, 3.33, 820.0]}"
                    '''
                }
            }
        }

        stage('Deploy Model') {
            steps {
                script {
                    // Trigger another Jenkins job for model serving
                    build job: 'ModelServingPipeline', wait: false
                }
            }
        }
    }

    post {
        always {
            archiveArtifacts artifacts: '**.pkl', fingerprint: true
            echo 'Pipeline execution complete.'
        }
    }
}
Model serving (CD) pipeline
Now, we will create a continuous deployment pipeline to deploy and run the server locally.
The pipeline script is simple. We begin by defining the agent and changing the working directory to our project. After that, we run the server indefinitely.
Note: Running a server in Jenkins indefinitely is not recommended, as pipelines should have a defined start and end. For this example, we will assume that we have deployed the app, but in practice, it is better to integrate Docker and run the app on a Docker server.
If you are interested in learning how to think like a machine learning engineer, consider taking the Developing Machine Learning Models for Production with an MLOps Mindset course, which will enable you to train, document, maintain, and scale your machine learning models to their fullest potential.
pipeline {
    agent {
        node {
            label 'MLAgent'
            customWorkspace 'C:/Repository/GitHub/MLOps-Jenkins/'
        }
    }

    stages {
        stage('Start FastAPI Server') {
            steps {
                script {
                    // Start the FastAPI server
                    bat 'python model_serving.py'
                }
            }
        }
    }

}
Running the CI/CD pipelines
Go to the “MLOps-pipe” pipeline and click the “Build Now” button to initiate the CI/CD pipeline.
Once the pipeline is successfully executed, it generates two artifacts: one for the model and one for the processed dataset.
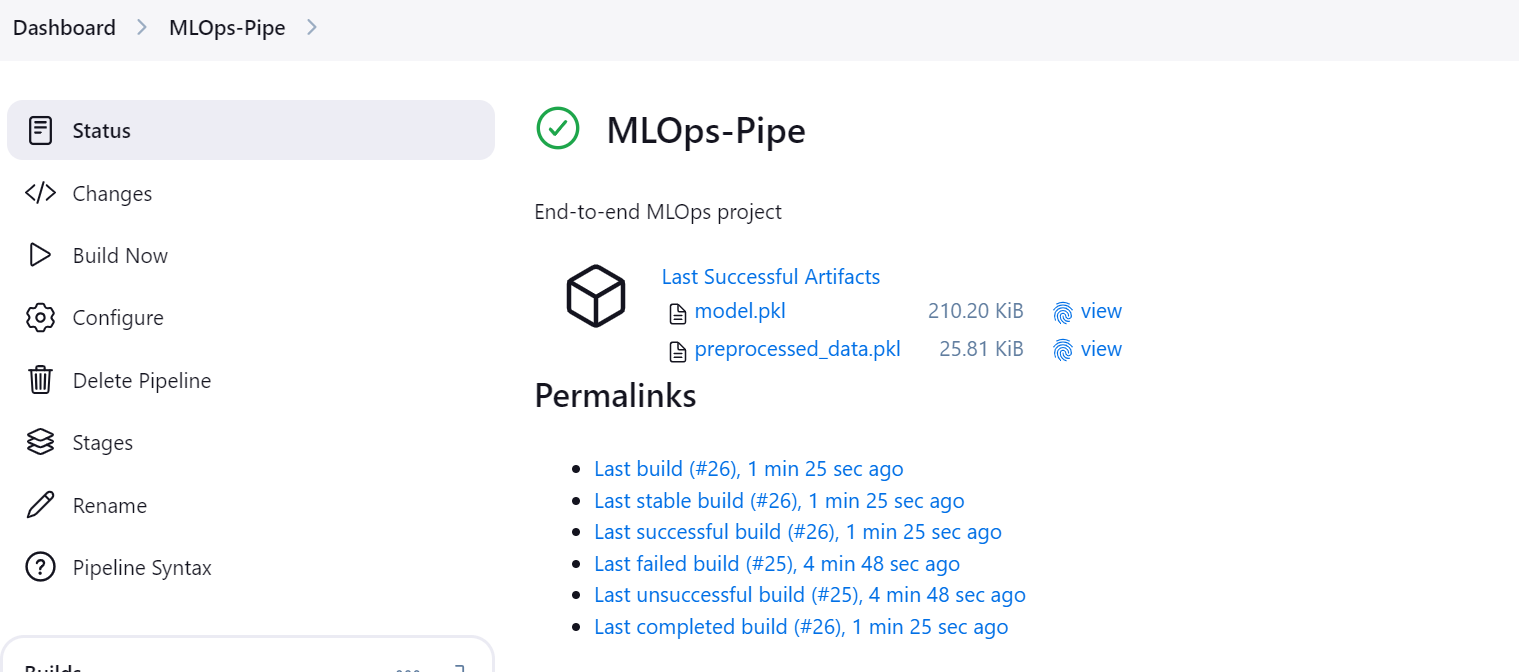
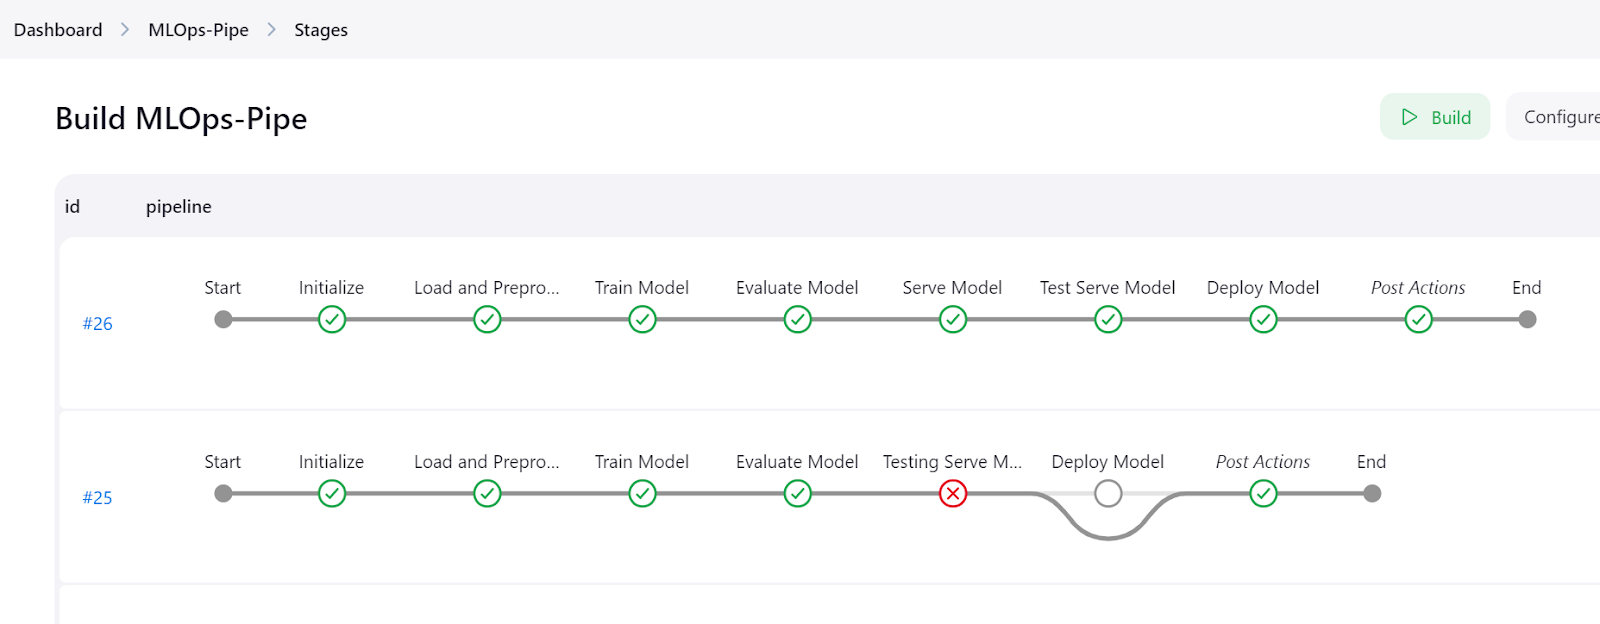
Click the “Stages” button on the Jenkins dashboard to visualize the pipeline and view all the steps.
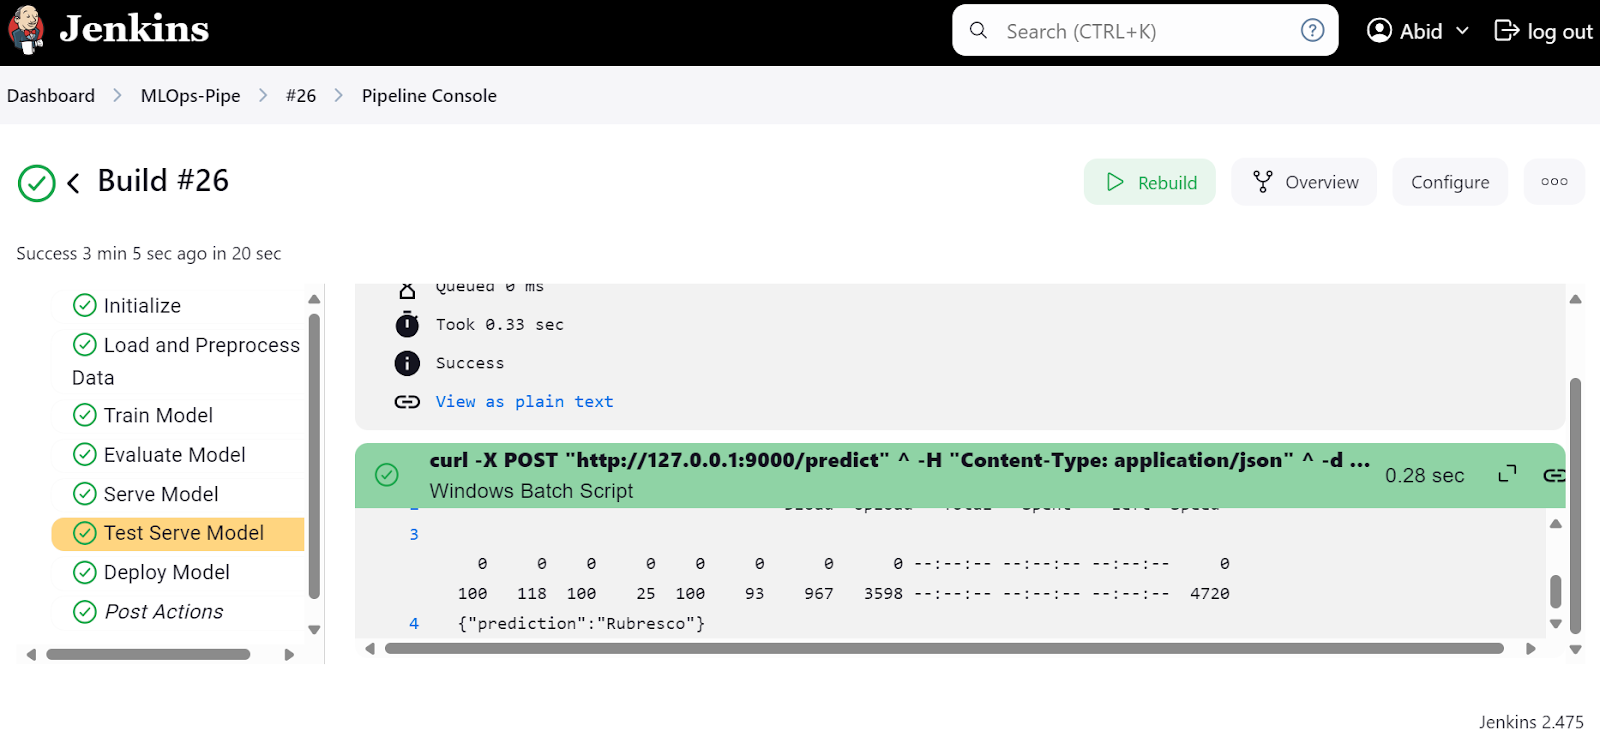
To view the detailed logs of each step, check the "Pipeline Console" menu.
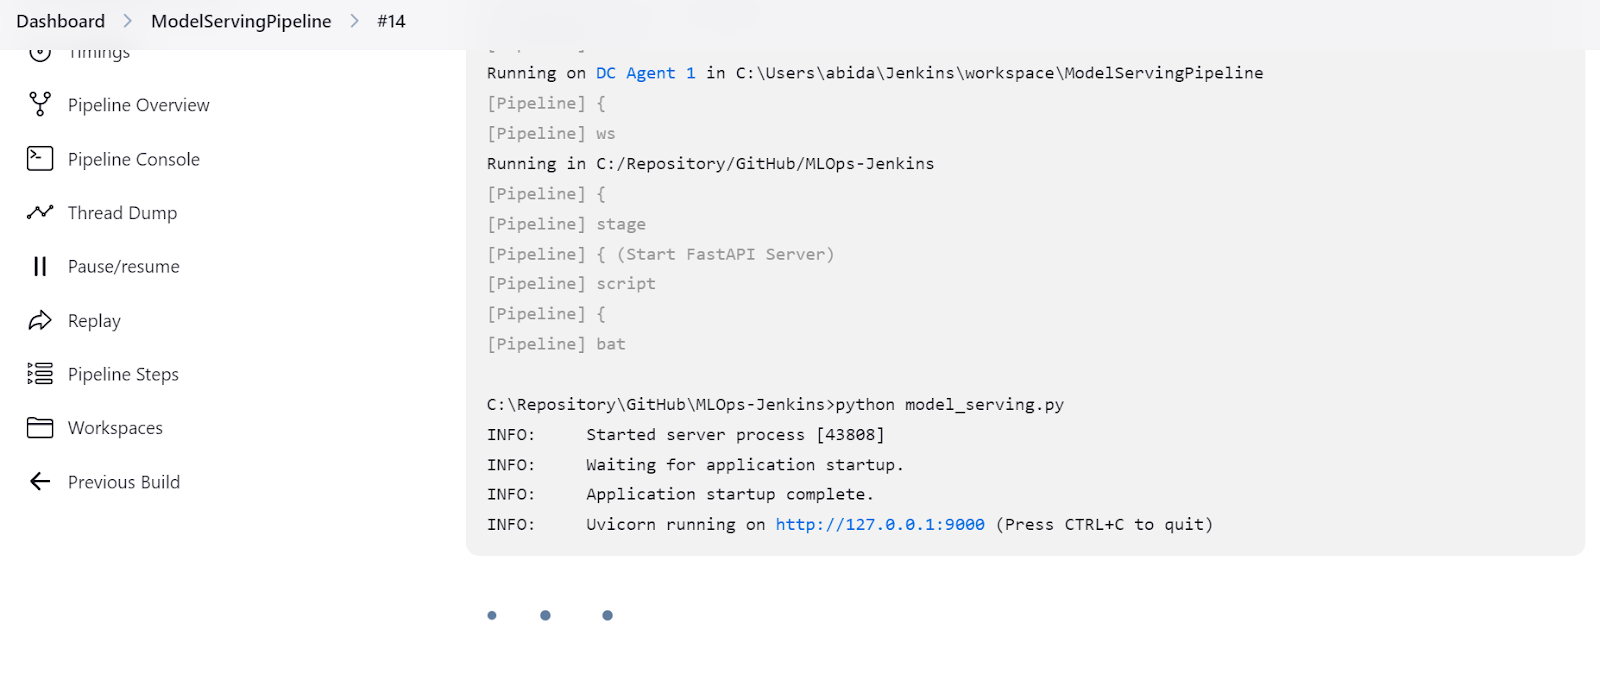
We can also check the "ModelServingPipeline" to verify that our server is running on the local URL http://127.0.0.1:9000.
Trying the FastAPI application in browser
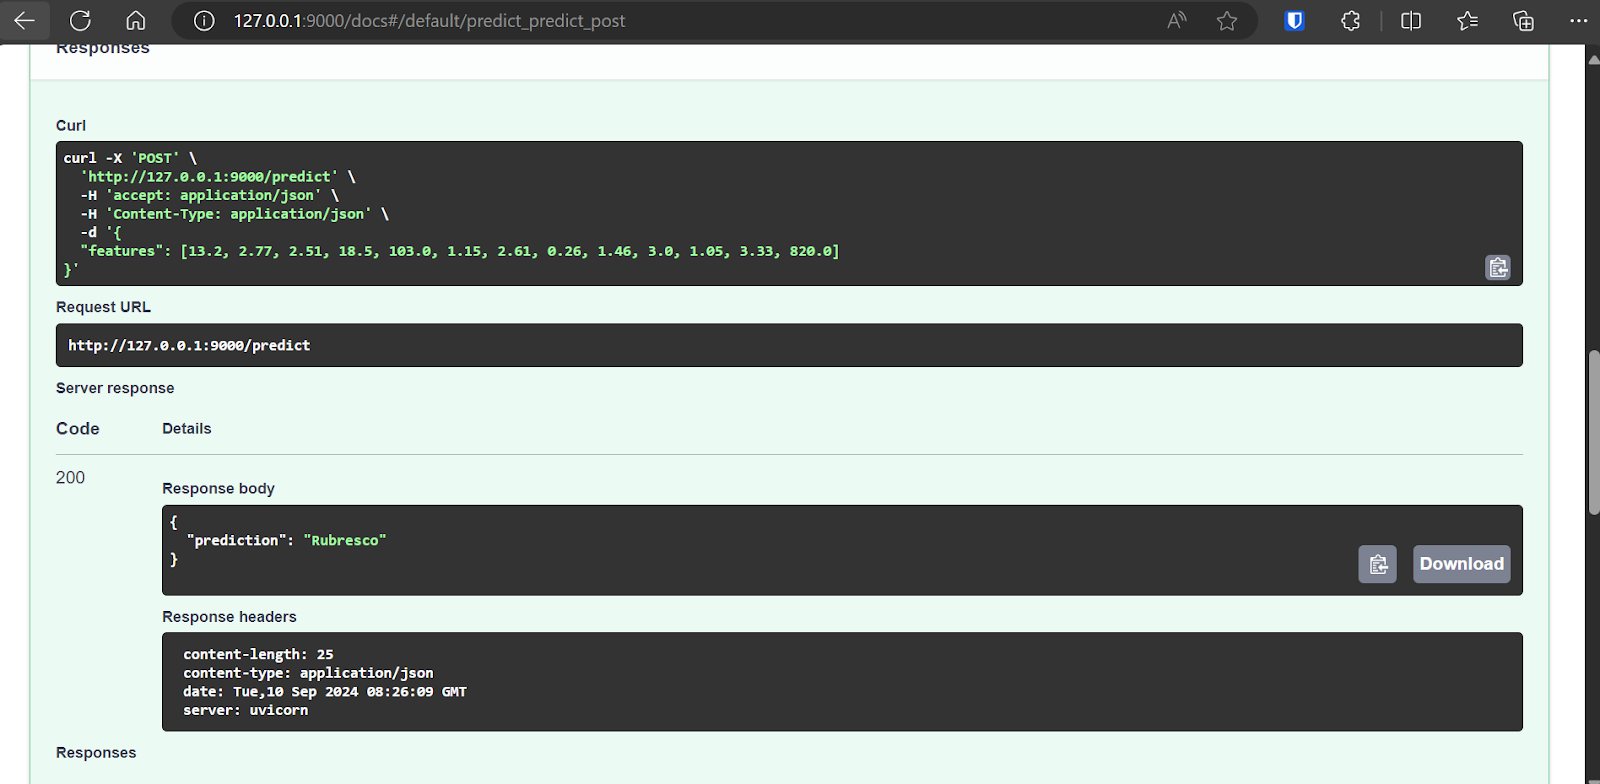
The FastAPI comes with Swagger UI, which can be accessed by adding /docs to the local URL: http://127.0.0.1:9000/docs.
The Swagger UI allows us to test the FastAPI application in the browser. It is simple, and we can see that our model server is working fine. The predicted sample values suggest that the wine type is Rubresco.
Always make sure to shut down the model server after you are done experimenting. You can do that by going to the “Status” menu in the Jenkins dashboard and then clicking on the cross button, as shown below:

All of the code, datasets, models, and metafiles in this tutorial are available on the GitHub repository for you to try: kingabzpro/MLOps-with-Jenkins.
Conclusion
Jenkins is a great automation server for all kinds of MLOps tasks. It stands out as an excellent alternative to GitHub Actions by offering more features, greater control, and enhanced privacy.
One of Jenkins's most appealing aspects is its simplicity in creating and executing pipelines, making it accessible for both beginners and experienced users.
If you are interested in exploring similar capabilities using GitHub Actions, don't miss out on the A Beginner's Guide to CI/CD for Machine Learning tutorial. For those looking to deepen their understanding of MLOps, the Fully Automated MLOps course is a fantastic resource. It offers comprehensive insights into MLOps architecture, CI/CD/CM/CT techniques, and automation patterns to deploy ML systems that can consistently deliver value over time.
Build Machine Learning Skills

As a certified data scientist, I am passionate about leveraging cutting-edge technology to create innovative machine learning applications. With a strong background in speech recognition, data analysis and reporting, MLOps, conversational AI, and NLP, I have honed my skills in developing intelligent systems that can make a real impact. In addition to my technical expertise, I am also a skilled communicator with a talent for distilling complex concepts into clear and concise language. As a result, I have become a sought-after blogger on data science, sharing my insights and experiences with a growing community of fellow data professionals. Currently, I am focusing on content creation and editing, working with large language models to develop powerful and engaging content that can help businesses and individuals alike make the most of their data.
