Track
Python Developer
28 hr
Traditional PDF extraction tools like pypdf or PDFMiner give you raw text but lose document structure. Tables become jumbled text, headers mix with body content, and images disappear. For RAG systems, this messy data means poor retrieval and unreliable answers. Docling is an open-source toolkit from IBM Research that uses computer vision models to understand document layouts, preserving tables, images, headings, and structure. It processes documents up to 30 times faster than traditional OCR-based methods and runs locally on your machine.
In this tutorial, we’ll use Docling to build a Document Intelligence Assistant — a Streamlit web app that lets you upload documents, visualize their structure, and ask questions using a RAG-powered chatbot. You’ll learn how to process multi-format documents with Docling, extract and display tables and images, build a vector store with ChromaDB, and create a conversational agent with LangGraph. By the end, you’ll have a working application that transforms complex documents into structured data and enables intelligent question-answering.
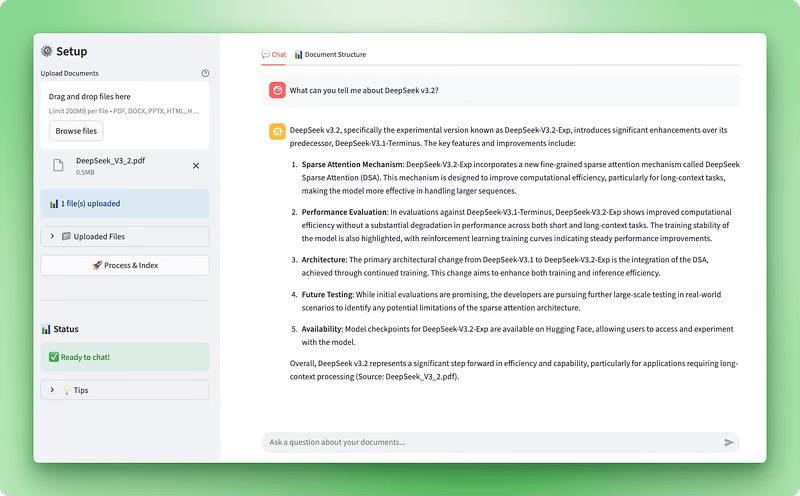
Application preview:
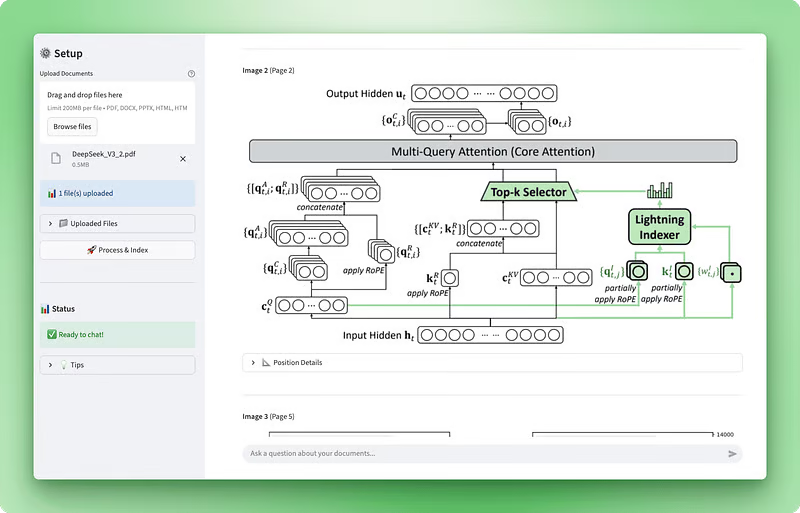
Document structure visualization:
Before starting this tutorial, you should have:
Technical skills: Comfort with Python classes, decorators, type hints, and context managers. We’ll use async operations and factory patterns throughout. Understanding of how large language models work with prompts, tokens, and embeddings is necessary. Familiarity with retrieval-augmented generation systems and vector databases is helpful but not required — we’ll explain core concepts as we build.
Development setup: Python 3.10 or higher with pip for package management. A code editor like VS Code is recommended. You’ll need an OpenAI API key from platform.openai.com — processing costs approximately $0.10–0.20 per document.
Time commitment: Plan for 60–90 minutes to complete the tutorial, including reading explanations, writing code, and testing the application. This tutorial assumes intermediate Python skills.
Most document processing tools treat PDFs like image files or text streams. They either run OCR on every page or extract plain text without understanding what they’re reading. Docling takes a different approach. It’s an open-source toolkit from IBM Research that uses computer vision models to understand document structure the way a human would.
When you feed a document into Docling, two AI models analyze it:
These models understand that a document isn’t just a blob of text. It has hierarchy, relationships, and meaning.
This structural understanding matters for RAG systems. When you’re building retrieval-augmented generation applications, the quality of your document processing directly impacts your retrieval accuracy. If your PDF extraction turns a financial table into jumbled text, your vector search will retrieve garbage. Docling preserves the structure, so when you chunk and embed your documents, you’re working with clean, organized data.
Docling supports multiple document formats out of the box:
You can also enable OCR for scanned documents using engines like EasyOCR, Tesseract, or RapidOCR. The toolkit exports to several formats including Markdown (great for LLMs), JSON (for structured data pipelines), and DocTags (a format that captures complex elements like math equations and code blocks).
Beyond format flexibility, Docling offers performance advantages. Traditional OCR-based document processing is slow because it treats every page as an image that needs character recognition. Docling skips this step for digital documents, offering much faster processing. It runs locally on commodity hardware, so you’re not paying API costs or sending sensitive documents to third-party services. Processing speed varies based on document complexity, page count, and hardware specifications, with typical performance ranging from less than a second to several seconds per page on modern hardware.
IBM has continued improving Docling’s capabilities. They released Granite-Docling, a 258-million parameter vision-language model that excels at complex layouts and offers experimental multilingual support (with English as the primary language and early-stage support for Arabic, Chinese, and Japanese). The toolkit also now supports image extraction with configurable resolution, which we’ll use in our application to display actual images from PDFs alongside their text content.
For our use case, Docling makes sense because we need structured data, not just raw text. If you only need basic text extraction, simpler tools like pypdf might suffice. But since we’re building an AI application that processes documents for analysis and conversation, Docling’s structure-aware processing is the better choice. It’s particularly valuable when working with technical documents, research papers, or business reports where tables and layout matter.
Before we start building the document processor, you need to set up your project structure and install the required packages. This section covers the initial setup: creating directories, installing dependencies, and configuring your API keys.
Start by creating a new directory for your project:
mkdir docling-demo
cd docling-demo
Inside this directory, create a src/ folder for your Python modules:
mkdir src
touch src/__init__.py
The __init__.py file tells Python that src/ is a package, allowing imports like from src.document_processor import DocumentProcessor.
Your project structure:
docling-demo/
├── src/
│ └── __init__.pyCreate a requirements.txt file in your project root:
docling>=2.55.0
langchain-docling>=0.1.0
langchain>=0.3.0
langchain-openai>=0.2.0
langgraph>=0.2.0
langchain-chroma>=0.1.0
streamlit>=1.28.0
streamlit-extras>=0.7.0
python-dotenv>=1.0.0
chromadb>=0.4.22
tiktoken>=0.5.0
pandas>=2.0.0
numpy<2
The numpy<2 constraint exists because Docling's dependencies (TensorFlow and Transformers) require NumPy 1.x.
Install the packages:
pip install -r requirements.txtThe first installation takes a few minutes because Docling downloads pre-trained AI models (around 500MB). These models handle layout analysis and table structure recognition. They’re cached locally, so subsequent runs are faster.
Create a .env file to store your OpenAI API key:
OPENAI_API_KEY=your-openai-api-key-hereGet your API key from platform.openai.com. You’ll need it for embeddings and the chat agent.
Create a .env.example template:
OPENAI_API_KEY=your-openai-api-key-hereAdd a .gitignore to avoid committing sensitive data:
# Environment variables
.env

# Python
__pycache__/
*.py[cod]
*.so
venv/
*.egg-info/

# Chroma
chroma_db/Create app.py in your project root. We'll build this file gradually throughout the tutorial. For now, add the basic imports and configuration:
import streamlit as st
from dotenv import load_dotenv

# Load environment variables
load_dotenv()

# Page configuration
st.set_page_config(
    page_title="Document Intelligence Assistant",
    page_icon="📄",
    layout="wide"
)

st.title("Document Intelligence Assistant")
st.write("Application setup complete. We'll build the functionality next.")
Test your setup:
streamlit run app.pyStreamlit opens a browser window at http://localhost:8501 showing your basic page.
Your final project structure (before we add new scripts in the coming sections):
docling-demo/
├── .env
├── .env.example
├── .gitignore
├── requirements.txt
├── app.py
└── src/
   └── __init__.py
With the environment ready, we can build the document processor that uses Docling to extract structure from uploaded files.
> Note: The sections below will break down the application scripts in chunks. So, to see the full picture and follow along easily, we recommend opening the GitHub repository for this project in a separate tab.
📄 Full script: src/document_processor.py
The document processor is where Docling does its work. This component takes uploaded files and transforms them into structured data we can use for both RAG and visualization. We need two outputs from this process: clean markdown text for the vector store and the original Docling document object that preserves all the structural information like tables and images.
Let’s build this by creating a new file called document_processor.py in your src/ directory. We'll create a DocumentProcessor class that configures Docling's processing pipeline and handles file uploads.
Docling lets you control how it processes documents through pipeline options. For PDFs, you can turn on OCR for scanned documents, activate table structure recognition, and extract images:
from docling.document_converter import DocumentConverter, PdfFormatOption
from docling.datamodel.base_models import InputFormat
from docling.datamodel.pipeline_options import PdfPipelineOptions
from langchain_core.documents import Document

class DocumentProcessor:
    def __init__(self):
        # Configure pipeline options for PDF processing
        pipeline_options = PdfPipelineOptions()
        pipeline_options.do_ocr = True
        pipeline_options.do_table_structure = True
        pipeline_options.generate_picture_images = True
        pipeline_options.images_scale = 2.0
We create a PdfPipelineOptions object to configure how Docling processes PDF files. Each option controls a specific processing capability: do_ocr enables optical character recognition for scanned documents, do_table_structure activates table detection and parsing, generate_picture_images tells Docling to extract embedded images as PIL objects, and images_scale sets the resolution multiplier for extracted images.
# Initialize converter with PDF options
self.converter = DocumentConverter(
    format_options={InputFormat.PDF: PdfFormatOption(pipeline_options=pipeline_options)}
)
The DocumentConverter is Docling's main processing engine. We initialize it with our PDF pipeline options wrapped in a PdfFormatOption object, which associates these settings with PDF input files specifically.
Let’s look at what each pipeline option does. The do_ocr flag activates optical character recognition. When processing digital PDFs with embedded text layers, Docling automatically skips OCR to save time. For scanned documents or images containing text, this setting tells Docling to run vision models to extract the text.
The do_table_structure option enables table structure recognition. Without this, tables get extracted as plain text with formatting lost. With it enabled, Docling uses its TableFormer AI model to identify rows, columns, headers, and cell relationships. This structured representation lets you export tables as pandas DataFrames later, preserving the tabular format.
Setting generate_picture_images to True enables image extraction. By default, Docling only records image locations without extracting the actual images. Enabling this gives you PIL image objects you can display in your UI or process with vision models. The images_scale parameter controls extraction resolution—a value of 2.0 doubles the resolution for better quality when displaying images or running additional analysis.
With the pipeline configured, we can add the method that processes files uploaded through Streamlit. This method handles Streamlit’s file objects, saves them temporarily, runs Docling’s conversion, and returns both markdown for RAG and Docling documents for visualization:
import os
import tempfile
from typing import List, Any

def process_uploaded_files(self, uploaded_files) -> tuple[List[Document], List[Any]]:
    documents = []
    docling_docs = []
    temp_dir = tempfile.mkdtemp()

    try:
        for uploaded_file in uploaded_files:
            # Save uploaded file to temporary location
            temp_file_path = os.path.join(temp_dir, uploaded_file.name)
            with open(temp_file_path, "wb") as f:
                f.write(uploaded_file.getbuffer())
Streamlit provides uploaded files as in-memory file objects, but Docling needs actual files on disk to process. We create a temporary directory and write each uploaded file to it, preserving the original filename.
# Process the document with Docling
result = self.converter.convert(temp_file_path)

# Export to markdown
markdown_content = result.document.export_to_markdown()
The converter.convert() call runs Docling's full document analysis pipeline. It identifies document layout, applies OCR if needed, detects tables and images, and builds a structured representation. Expect 20-30 seconds for processing without image extraction, or 40-60 seconds with images enabled.
After conversion completes, we export to markdown format which produces clean, LLM-friendly text with proper formatting preserved — headers remain headers, lists stay structured, and tables convert to markdown tables.
# Create LangChain document
doc = Document(
    page_content=markdown_content,
    metadata={
        "filename": uploaded_file.name,
        "file_type": uploaded_file.type,
        "source": uploaded_file.name,
    }
)

documents.append(doc)

# Store the Docling document for structure visualization
docling_docs.append({
    "filename": uploaded_file.name,
    "doc": result.document
})
We create two representations of each processed document. The LangChain Document object contains the markdown text as page_content with associated metadata—this goes to the vector store for RAG. The original Docling document object gets stored separately with its filename, preserving all structural information (tables, images, hierarchy) for visualization later.
finally:
    import shutil
    shutil.rmtree(temp_dir)

return documents, docling_docs
The finally block ensures temporary files get cleaned up regardless of whether processing succeeds or fails. We return a tuple containing both document representations: LangChain documents for the RAG system and Docling documents for structure visualization.
The document processor is now ready. Next, we’ll build the Streamlit interface that lets users upload files and see processing status.
📄 Full script: src/structure_visualizer.py
Now that we can process documents with Docling, we need a way to visualize what was extracted. The raw Docling document object contains rich structural information (headings, tables, images, and metadata) but it’s not user-friendly in its native form. We’ll build a visualization layer that transforms this data into an interactive interface with four views: a summary dashboard, a hierarchical outline, interactive tables, and extracted images.
Create a new file called structure_visualizer.py in your src/ directory. This component will parse Docling's document structure and organize it for display.
Start by creating a class that wraps a Docling document and provides methods for extracting different structural elements:
from typing import List, Dict, Any
import pandas as pd
from docling_core.types.doc import DoclingDocument

class DocumentStructureVisualizer:
    def __init__(self, docling_document: DoclingDocument):
        self.doc = docling_document
The initializer takes a DoclingDocument object (the same object returned by DocumentConverter.convert()). This object contains everything Docling extracted from the document. The texts attribute contains all text elements with their labels and positions, tables holds table data with structure information, pictures stores image metadata and actual image data, and pages provides page-level information.
Documents have structure beyond just paragraphs. Headings create hierarchy that helps readers navigate content. Here’s how to extract this hierarchy:
def get_document_hierarchy(self) -> List[Dict[str, Any]]:
    hierarchy = []

    if not hasattr(self.doc, "texts") or not self.doc.texts:
        return hierarchy

    for item in self.doc.texts:
        label = getattr(item, "label", None)

        if label and "header" in label.lower():
            text = getattr(item, "text", "")
            prov = getattr(item, "prov", [])
            page_no = prov[0].page_no if prov else None

            hierarchy.append({
                "type": label,
                "text": text,
                "page": page_no,
                "level": self._infer_heading_level(label)
            })

    return hierarchy
We iterate through all text items in the document, filtering for those with labels containing header. Each text item has a label attribute that Docling assigns during layout analysis. Common labels include section_header, page_header, title, and regular text. The prov attribute (short for provenance) contains positioning information, including which page the element appears on. We extract the heading text, its page number, and infer its hierarchical level from the label type.
When displaying the outline, the heading level determines indentation. A helper method maps label types to numeric levels:
def _infer_heading_level(self, label: str) -> int:
    if "title" in label.lower():
        return 1
    elif "section" in label.lower():
        return 2
    elif "subsection" in label.lower():
        return 3
    else:
        return 4
This creates a hierarchy where document titles are level 1, section headers are level 2, subsections are level 3, and any other headers default to level 4.
With the document hierarchy extracted, let’s handle tables. Unlike simple text extraction that turns tables into jumbled strings, Docling preserves their structure as one of its most valuable features:
def get_tables_info(self) -> List[Dict[str, Any]]:
    tables_info = []

    if not hasattr(self.doc, "tables") or not self.doc.tables:
        return tables_info

    for i, table in enumerate(self.doc.tables, 1):
        try:
            df = table.export_to_dataframe(doc=self.doc)

            prov = getattr(table, "prov", [])
            page_no = prov[0].page_no if prov else None

            caption_text = getattr(table, "caption_text", None)
            caption = caption_text if caption_text and not callable(caption_text) else None

            tables_info.append({
                "table_number": i,
                "page": page_no,
                "caption": caption,
                "dataframe": df,
                "shape": df.shape,
                "is_empty": df.empty
            })
        except Exception as e:
            print(f"Warning: Could not process table {i}: {e}")
            continue

    return tables_info
The table.export_to_dataframe(doc=self.doc) method converts Docling's table representation to a pandas DataFrame. We extract captions and page numbers when available.
Beyond tables, Docling can extract actual image data from documents. This is a newer feature that goes beyond just tracking image positions — it retrieves the actual image bytes so you can display them. (We enabled this in the document processor’s pipeline options.)
def get_pictures_info(self) -> List[Dict[str, Any]]:
    pictures_info = []

    if not hasattr(self.doc, "pictures") or not self.doc.pictures:
        return pictures_info

    for i, pic in enumerate(self.doc.pictures, 1):
        prov = getattr(pic, "prov", [])

        if prov:
            page_no = prov[0].page_no
            bbox = prov[0].bbox

            caption_text = getattr(pic, "caption_text", None)
            caption = caption_text if caption_text and not callable(caption_text) else None

            pil_image = None
            try:
                if hasattr(pic, "image") and pic.image is not None:
                    if hasattr(pic.image, "pil_image"):
                        pil_image = pic.image.pil_image
            except Exception as e:
                print(f"Warning: Could not extract image {i}: {e}")

            pictures_info.append({
                "picture_number": i,
                "page": page_no,
                "caption": caption,
                "pil_image": pil_image,
                "bounding_box": {
                    "left": bbox.l,
                    "top": bbox.t,
                    "right": bbox.r,
                    "bottom": bbox.b
                } if bbox else None
            })

    return pictures_info
Each picture has provenance information, including its page number and bounding box coordinates. The bounding box defines the image’s position on the page using left, top, right, and bottom coordinates.
When image extraction is enabled, the picture object has an image attribute containing the actual image data. We access the PIL image through picture.image.pil_image, which returns a PIL Image object that Streamlit can display directly with st.image(). The try-except block handles cases where image extraction fails or wasn't enabled, gracefully falling back to just showing metadata.
The visualizer needs one more method: a high-level summary that gives users an overview of the document structure:
def get_document_summary(self) -> Dict[str, Any]:
    pages = getattr(self.doc, "pages", {})
    texts = getattr(self.doc, "texts", [])
    tables = getattr(self.doc, "tables", [])
    pictures = getattr(self.doc, "pictures", [])

    text_types = {}
    for item in texts:
        label = getattr(item, "label", "unknown")
        text_types[label] = text_types.get(label, 0) + 1

    return {
        "name": self.doc.name,
        "num_pages": len(pages) if pages else 0,
        "num_texts": len(texts),
        "num_tables": len(tables),
        "num_pictures": len(pictures),
        "text_types": text_types
    }
We count the number of pages, text elements, tables, and images in the document. The text_types dictionary breaks down text elements by their labels, showing how many titles, headers, paragraphs, and other elements Docling identified. This gives users a quick sense of the document's structure and complexity.
With the visualizer complete, let’s integrate it into Streamlit with four tabs: Summary, Hierarchy, Tables, and Images.
def render_structure_viz():
    st.title("📊 Document Structure")

    if not st.session_state.docling_docs:
        st.info("👈 Please upload and process your documents first!")
        return

    doc_names = [doc["filename"] for doc in st.session_state.docling_docs]
    selected_doc_name = st.selectbox("Select document to analyze:", doc_names)

    selected_doc_data = next(
        (doc for doc in st.session_state.docling_docs if doc["filename"] == selected_doc_name),
        None
    )

    if not selected_doc_data:
        return

    visualizer = DocumentStructureVisualizer(selected_doc_data["doc"])

    tab1, tab2, tab3, tab4 = st.tabs(["📑 Summary", "🏗️ Hierarchy", "📊 Tables", "🖼️ Images"])
We create a dropdown to let users select which document to analyze (useful when multiple files are uploaded). After getting the selected Docling document from session state, we instantiate the visualizer and create four tabs for different views.
with tab1:
    st.subheader("Document Summary")
    summary = visualizer.get_document_summary()

    col1, col2, col3, col4 = st.columns(4)
    with col1:
        st.metric("Pages", summary["num_pages"])
    with col2:
        st.metric("Tables", summary["num_tables"])
    with col3:
        st.metric("Images", summary["num_pictures"])
    with col4:
        st.metric("Text Items", summary["num_texts"])

    st.subheader("Content Types")
    text_types_df = pd.DataFrame([
        {"Type": k, "Count": v}
        for k, v in sorted(summary["text_types"].items(), key=lambda x: -x[1])
    ])
    st.dataframe(text_types_df, use_container_width=True)

with tab2:
    st.subheader("Document Hierarchy")
    hierarchy = visualizer.get_document_hierarchy()

    if hierarchy:
        for item in hierarchy:
            indent = "  " * (item["level"] - 1)
            st.markdown(f"{indent}**{item['text']}** _(Page {item['page']})_")
    else:
        st.info("No hierarchical structure detected")

with tab3:
    st.subheader("Tables")
    tables_info = visualizer.get_tables_info()

    if tables_info:
        for table_data in tables_info:
            st.markdown(f"### Table {table_data['table_number']} (Page {table_data['page']})")

            if table_data["caption"]:
                st.caption(table_data["caption"])

            if not table_data["is_empty"]:
                st.dataframe(table_data["dataframe"], use_container_width=True)
            else:
                st.info("Table is empty")

            st.divider()
    else:
        st.info("No tables found in this document")

with tab4:
    st.subheader("Images")
    pictures_info = visualizer.get_pictures_info()

    if pictures_info:
        for pic_data in pictures_info:
            st.markdown(f"**Image {pic_data['picture_number']}** (Page {pic_data['page']})")

            if pic_data["caption"]:
                st.caption(pic_data["caption"])

            if pic_data["pil_image"] is not None:
                st.image(pic_data["pil_image"], use_container_width=True)
            else:
                st.info("Image data not available")

            if pic_data["bounding_box"]:
                bbox = pic_data["bounding_box"]
                with st.expander("📐 Position Details"):
                    st.text(
                        f"Position: ({bbox['left']:.1f}, {bbox['top']:.1f}) - "
                        f"({bbox['right']:.1f}, {bbox['bottom']:.1f})"
                    )

            st.divider()
    else:
        st.info("No images found in this document")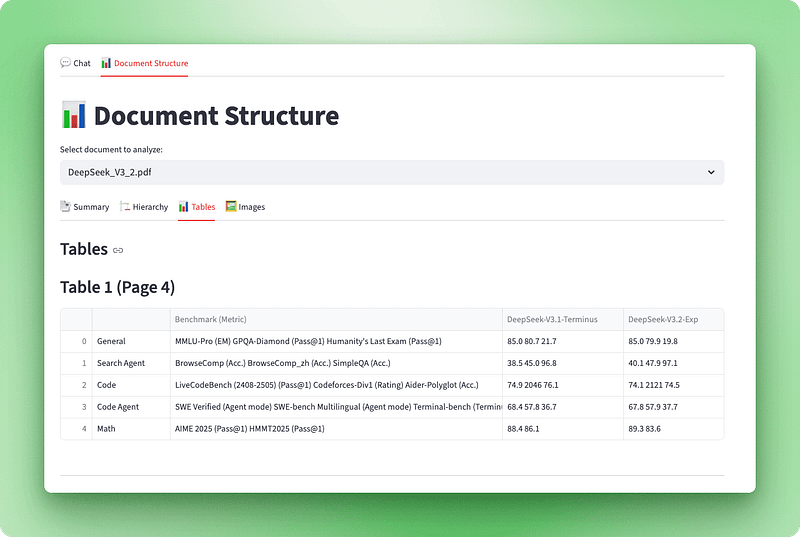
The structure visualizer is complete. Users can upload a document and immediately see its anatomy — how many pages, tables, and images it contains, its hierarchical structure with headings and sections, interactive tables they can explore, and the actual images extracted from the document. This transparency helps users understand what Docling extracted and builds confidence in the system.
With document processing and visualization working, we can build the RAG system that enables question-answering over these processed documents.
📄 Full scripts: src/vectorstore.py | src/tools.py
With document processing and visualization complete, we can build the Q&A capabilities. RAG (Retrieval Augmented Generation) enables users to ask questions about their documents. The system converts documents to embeddings, stores them in a vector database, and retrieves relevant chunks to answer questions.
This section covers two components: a vector store manager that chunks and embeds documents, and a search tool that retrieves relevant information.
The vector store is where document embeddings live. When users ask a question, we search this store for relevant chunks and feed them to the LLM as context.
Create vectorstore.py in your src/ directory:
from typing import List
from langchain_core.documents import Document
from langchain_text_splitters import RecursiveCharacterTextSplitter
from langchain_openai import OpenAIEmbeddings
from langchain_chroma import Chroma
These imports bring in LangChain components for document handling, text splitting, embeddings generation, and ChromaDB vector storage. Here’s how they work together:
class VectorStoreManager:
    def __init__(self):
        self.embeddings = OpenAIEmbeddings(model="text-embedding-3-small")
        self.text_splitter = RecursiveCharacterTextSplitter(
            chunk_size=1000,
            chunk_overlap=100,
            length_function=len,
        )
We initialize two key components. OpenAI’s text-embedding-3-small model converts text to vectors. It's smaller and faster than text-embedding-3-large, which matters when embedding hundreds of chunks. The RecursiveCharacterTextSplitter breaks documents into 1000-character chunks with 100-character overlap, ensuring important information at chunk boundaries doesn't get cut off mid-sentence.
1000 characters balances precision and context — smaller chunks give precise retrieval but lose context, larger chunks preserve context but dilute relevance.
Add the chunking method:
def chunk_documents(self, documents: List[Document]) -> List[Document]:
    """Split documents into smaller chunks for better retrieval."""
    chunks = self.text_splitter.split_documents(documents)
    return chunks
The splitter handles metadata automatically, preserving information from the original documents. Each chunk knows which file it came from, which becomes important when the agent cites sources in its answers.
Now add the method that creates the vector store:
def create_vectorstore(self, chunks: List[Document]) -> Chroma:
    """Create a Chroma vector store from document chunks."""
    vectorstore = Chroma.from_documents(
        documents=chunks,
        embedding=self.embeddings,
        collection_name="documents"
    )
    return vectorstore
ChromaDB handles the heavy lifting. It embeds each chunk using our embeddings model and stores the vectors in memory. When you run a similarity search, ChromaDB computes cosine similarity between the query vector and all document vectors, returning the closest matches.
With the vector store ready to handle embeddings, we need to give the agent a way to query it. Tools are functions the LLM can call when it needs information it doesn’t have.
Create tools.py in your src/ directory:
from typing import Annotated
from langchain_core.tools import tool

def create_search_tool(vectorstore):
    """Create a search tool that has access to the vector store."""
This factory function uses a closure pattern: it receives a vector store and returns a tool that can search it. The tool maintains access to the vector store without needing global variables.
@tool
def search_documents(query: Annotated[str, "The search query or question about the documents"]) -> str:
    """Search the uploaded documents for relevant information."""
The @tool decorator turns this function into a LangChain tool the agent can call. The Annotated type hint describes the parameter, helping the LLM understand what to pass when invoking the tool.
try:
   results = vectorstore.similarity_search(query, k=8)

   if not results:
      return "No relevant information found in the documents for this query."
We retrieve 8 similar chunks (k=8) from the vector store. This gives the LLM enough context without overwhelming it with redundant information. The right number depends on your document type—technical docs with dense information might work better with fewer chunks (k=4-6), while narrative documents might benefit from more (k=10-12).
context_parts = []
for i, doc in enumerate(results, 1):
    source = doc.metadata.get("filename", doc.metadata.get("source", "Unknown source"))
    content = doc.page_content.strip()

    context_parts.append(
        f"[Source {i}: {source}]\n"
        f"Content: {content}\n"
    )

return "\n---\n".join(context_parts)
We format each chunk with its source filename, then join them with separators. The LLM receives this structured context and uses it to generate answers while citing sources.
except Exception as e:
    return f"Error searching documents: {str(e)}"

return search_documents
Error handling ensures the agent receives a clear message if search fails, rather than crashing. The function returns the configured tool ready for the agent to use.
The vector store and search tool are now ready. Next, we’ll build the LangGraph agent that orchestrates retrieval and generation to answer user questions.
📄 Full script: src/agent.py
The search tool can query the vector store, but it needs an intelligent coordinator. The LangGraph agent decides when to search, interprets results, and generates natural language answers. We’ll also implement streaming to show progress in real time.
The agent receives questions, decides when to search documents, and generates answers based on retrieved context.
Create agent.py in your src/ directory:
from typing import List
from langchain_core.tools import BaseTool
from langchain_openai import ChatOpenAI
from langgraph.prebuilt import create_react_agent
from langgraph.checkpoint.memory import MemorySaver
We import components for tool handling, OpenAI’s chat models, LangGraph’s ReAct agent implementation, and conversation memory.
SYSTEM_PROMPT = """You are a helpful document intelligence assistant. You have access to documents that have been uploaded and processed.

GUIDELINES:
- Use the search_documents tool to find relevant information
- Keep it simple: one well-crafted search is usually sufficient
- Only search again if the first results are clearly incomplete
- Provide clear, accurate answers based on the document contents
- Always cite your sources with filenames
- If information isn't found, say so clearly
- Be concise but thorough

When answering:
1. Search the documents with a focused query
2. Synthesize a clear answer from the results
3. Include source citations (filenames)
4. Only search again if absolutely necessary
"""

def create_documentation_agent(tools: List[BaseTool], model_name: str = "gpt-4o-mini"):
    """Create a document intelligence assistant agent using LangGraph."""
    llm = ChatOpenAI(model=model_name, temperature=0)
    memory = MemorySaver()
We use gpt-4o-mini instead of gpt-5 because it's faster and cheaper while still handling document Q&A well. Temperature is set to 0 for consistent, factual responses. The MemorySaver gives the agent conversation memory, so it remembers previous exchanges within a session.
agent = create_react_agent(
    llm,
    tools=tools,
    prompt=SYSTEM_PROMPT,
    checkpointer=memory
)

return agent
LangGraph’s create_react_agent implements the ReAct pattern (Reasoning + Acting). The agent reasons about what it needs to do, takes action using tools, observes results, and repeats until it has an answer. This pattern works well for RAG because the agent can decide when to search and how to use the retrieved context.
The agent can now search and generate answers, but users shouldn’t wait 10 seconds staring at a blank screen while it works. Streaming shows progress in real time — first a “thinking” indicator appears, then “searching”, then the answer appearing token by token.
Update your render_chat() function in app.py to complete the response handling we marked with TODO earlier:
if prompt:
    st.session_state.messages.append({"role": "user", "content": prompt})
    with st.chat_message("user"):
        st.markdown(prompt)
We append the user’s message to the conversation history and display it in the chat interface.
with st.chat_message("assistant"):
    status_placeholder = st.empty()
    message_placeholder = st.empty()

    try:
        config = {"configurable": {"thread_id": "document_chat"}}
We create placeholders for the status indicator and response message. The config includes a thread ID that LangGraph uses to maintain conversation memory across turns.
def generate_response():
    """Generator that yields tokens from LangGraph stream."""
    status_placeholder.markdown("🤔 **Thinking...**")
    first_content_token = True
    tool_call_detected = False
    final_answer_started = False
This generator function processes LangGraph’s stream output. We track state with flags to show appropriate status messages as the agent progresses through its workflow.
for msg, metadata in st.session_state.agent.stream(
    {"messages": [HumanMessage(content=prompt)]},
    config=config,
    stream_mode="messages",
):
    langgraph_node = metadata.get("langgraph_node", "")
The stream_mode="messages" parameter gives us real LLM tokens as they're generated, not just final outputs. LangGraph emits events throughout the agent's execution—when it starts thinking, when it calls tools, and when it generates text.
if "tools" in langgraph_node.lower() or "tool" in langgraph_node.lower():
    if not tool_call_detected:
        status_placeholder.markdown("🔍 **Searching documents...**")
        tool_call_detected = True
    continue

if "agent" in langgraph_node.lower() and hasattr(msg, "content"):
    content = msg.content

if content:
    if first_content_token:
        status_placeholder.markdown("💬 **Generating answer...**")
        first_content_token = False
        final_answer_started = True

if final_answer_started:
    yield content
When the agent node starts generating the final answer, we update the status and begin yielding content tokens. Each token is immediately displayed, creating a smooth typing effect.
status_placeholder.empty()

with message_placeholder.container():
    full_response = st.write_stream(generate_response())
After streaming completes, we clear the status indicator. Streamlit’s st.write_stream() handles the token-by-token display automatically, accumulating tokens and updating the UI smoothly. The result is a chat experience that feels responsive and gives users confidence the system is working.
st.session_state.messages.append({"role": "assistant", "content": full_response})

except Exception as e:
    st.error(f"Error generating response: {str(e)}")
We save the complete response to the message history and handle any errors that occur during streaming.
The RAG system is complete. Users can now upload documents, process them with Docling, explore their structure, and have natural conversations about the content. The agent searches intelligently, cites sources, and streams answers for a smooth experience.
Your Document Intelligence Assistant is complete. Before deploying or sharing it, you should test the application to verify everything works correctly.
Start the application from your project root:
streamlit run app.pyStreamlit will open a browser window at http://localhost:8501. You should see the sidebar with upload controls and two tabs in the main area.
Upload a sample PDF document with tables and images to test the full processing capabilities:
Watch the processing indicators:
When complete, you’ll see “✅ Ready to chat!” in the status section.
Switch to the “Document Structure” tab to verify Docling extracted everything correctly:
If tables show as empty or images don’t appear, check that you enabled do_table_structure=True and generate_picture_images=True in the pipeline options.
Return to the “Chat” tab and test the agent with these sample questions:
Good starting questions:
Document-specific questions (adjust based on your document):
Follow-up questions to test conversation memory:
Look for direct answers from your document with source citations, smooth streaming tokens, and status indicators (“Thinking…”, “Searching documents…”, “Generating answer…”). Watch for generic responses not from your document, missing source citations, slow responses without status indicators, or errors about missing API keys.
“No module named ‘docling’” error
pip install docling langchain langchain-openai langchain-chroma langgraph streamlit streamlit-extras pandas python-dotenv
“OpenAI API key not found” error
Verify .env file exists with OPENAI_API_KEY=your-key-here
Restart Streamlit
Processing takes longer than 60 seconds
Agent gives generic answers
Tables show as empty DataFrames
Confirm do_table_structure=True in PdfPipelineOptions
Try a different PDF with native tables
The application is now validated and ready for use. You can test it with your own documents or deploy it for others to use.
You now have a working Document Intelligence Assistant that processes PDFs, Word documents, PowerPoint presentations, and HTML files while preserving their structure. Docling extracts text, tables, images, and document hierarchy that users can explore through interactive tabs. The RAG system, combined with ChromaDB and LangGraph, enables conversational Q&A with source citations streamed in real-time. This demonstrates how structure-aware document processing improves retrieval quality compared to basic text extraction. The complete source code is available at the GitHub repository.
This foundation opens multiple directions for extension:
For deeper exploration of RAG systems and LLM applications, our AI Engineering track covers the concepts and patterns you’ve used here.
Learn with DataCamp
Track
Course
Course
Tutorial
Bex Tuychiev
Tutorial
Aashi Dutt
Tutorial
Bhavishya Pandit
Tutorial
Aashi Dutt
code-along
Andrea Valenzuela
code-along
Emmanuel Pire