Most LLM providers like OpenAI and Anthropic offer user-friendly APIs to integrate their models into custom AI applications. But this user-friendliness comes at a cost: you will no longer be able to use familiar web interfaces like ChatGPT or Claude. Your app will be standalone and written in a bunch of scripts.
For this reason, it is crucial to learn how to wrap your application code with a friendly user interface so that external users and stakeholders without technical know-how can interact with it.
In this tutorial, you will learn how to build Streamlit UIs for LLM-based applications built with LangChain. The tutorial will be hands-on: we will use a real-world database of International Football history to build a chatbot that can answer questions about historical matches and international competition details. You can play around with the app or watch it in action below:

Let’s dive in and start building!
Prerequisite Concepts Refresher
We will use a combination of different tools to build the chatbot you saw above, so let’s briefly go over the purposes for each.
Streamlit
The first tool is Streamlit, which is by far the most popular framework to build web applications using only Python. It has over 35k stars and is used by most Fortune 50 companies.
Streamlit offers a rich set of built-in web components to display data and media as well as elements for taking user input. With the rise of LLMs, they now have components to display chat messages produced by both users and LLMs and a text input field for writing prompts, resembling ChatGPT’s interface.
If you are completely new to Streamlit, read our introductory article on the framework.
LangChain
While LLM vendors have developer-friendly APIs, their functionality is not all-encompassing. Integrating them with existing open-source tools requires significant time and effort.
This is why the LangChain framework was born. It brings together nearly all major LLMs under a unified syntax and provides utilities to simplify the process of building complex AI applications. LangChain offers a wide range of tools and components that enable developers to create powerful AI systems with less code and greater flexibility.
Some key features of LangChain include:
- Seamless integration with various LLM providers
- Built-in support for prompt engineering and management
- Tools for memory and state management in conversational AI
- Utilities for data loading, transformation, and vectorization
- Components for building chains and agents for complex task automation
In the tutorial, we will use LangChain to integrate with OpenAI’s GPT models, manage our conversation history, and construct our retrieval pipeline for accessing the football database.
Read our beginner’s guide on LangChain for the basics.
Graph databases, Neo4j, and AuraDB
The second most popular database structure (after tabular) is a graph. Graph databases are always increasing in terms of adoption for their innate ability to store interconnected information. Our International Football database is a perfect example.
Graph databases are made up of nodes and the relationships between them. For example, if we consider key football terms as nodes of a graph, how they relate to each other represents node relationships. In that case, nodes are players, matches, teams, competitions, and so on. The relationships would be:
- Player PLAYS IN a match
- Teams PARTICIPATE IN a match
- Match is PART OF a competition
Then, nodes and relationships could have properties such as:
- Player: age, position, nationality
- Match: home team, away team, score, venue
- PLAYS IN (relationship): number of goals scored, number of minutes played
and so on.
Neo4j is the most popular management system for such graph databases. Its query language, Cypher, is very similar to SQL but specifically designed to traverse complex graph structures. LangChain will use Neo4j’s official Python client under the hood to generate and run Cypher queries against our graph database. Check out our Neo4j tutorial to learn more.
Speaking of which, our database is hosted on a cloud instance of Aura DB. Aura DB is part of Neo4j and provides a secure platform to manage graph databases on the cloud.
Retrieval Augmented Generation
LLMs are trained on vast amounts of data but they don’t have access to private databases owned by companies. For this reason, the most popular use case of LLMs in the enterprise is Retrieval Augmented Generation (RAG).
In RAG, the LLM is augmented with relevant information retrieved from a knowledge base or database before generating a response. This process typically involves the following steps:
- Query understanding: The system analyzes the user’s query to understand its intent and key elements.
- Information retrieval: Based on the query analysis, relevant information is retrieved from the connected database or knowledge base.
- Context augmentation: The retrieved information is added to the prompt sent to the LLM, providing it with specific, up-to-date, and relevant context.
- Response generation: The LLM generates a response based on both its pre-trained knowledge and the additional context provided.
- Output refinement: The generated response may be further processed or filtered to ensure accuracy and relevance.
RAG allows LLMs to access and utilize specific, current, and proprietary information, making them more useful for specialized applications while maintaining their general language understanding capabilities.
In our case, we’ll use RAG to augment our LLM with information from our football database, allowing it to answer specific questions about players, matches, and competitions that it wouldn’t otherwise have access to.
You can gain hands-on experience in implementing RAG using our guided project on building a RAG chatbot for technical documentation.
Understanding The Data
Let’s take a closer look at our graph database before we start building. Below is the graph schema visualized:

The graph has six node types: player, team, match, tournament, city, and country. These nodes are connected by several relationships, such as Team PLAYED_HOME in a match or Player SCORED_FOR a Team. This schema is based on the data available in the following Kaggle dataset:
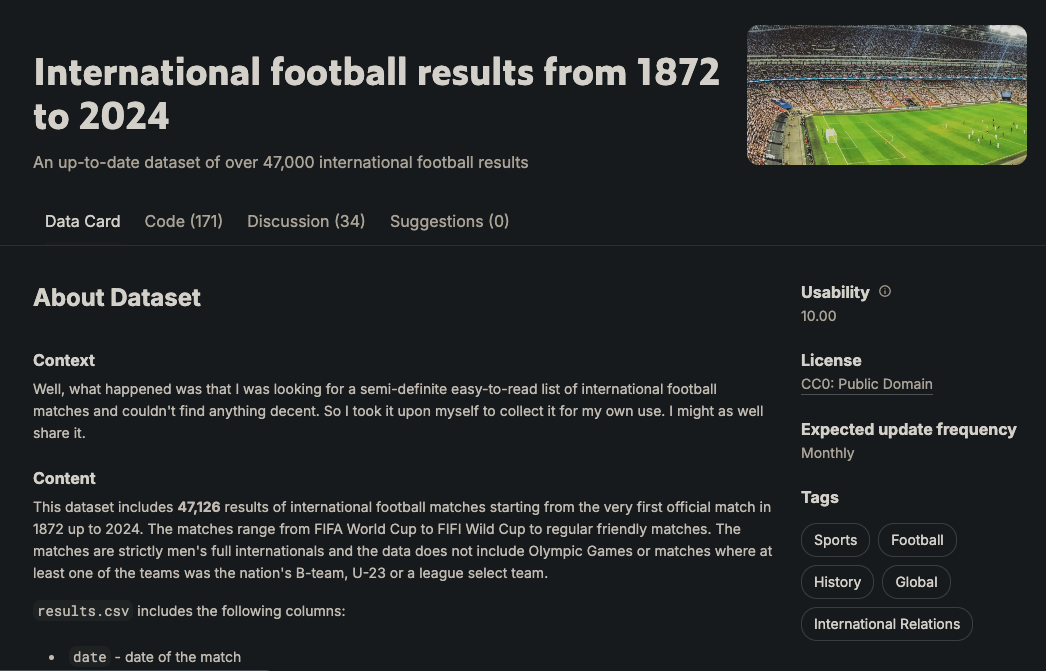
It contains more than 47k matches, their outcomes, the goals scored in each match, who scored them, and some additional properties like goal minutes, own goals, and match venues.
The data is originally in CSV format, but I was able to ingest it into an Aura DB instance using the Neo4j Python driver and Cypher queries (see the code in our Neo4j tutorial).
The goal for our app (pun intended) is to generate Cypher queries based on user input, run the queries against our graph database, and present the results in a human-readable format.
So, let’s finally build it.
Building a Graph RAG Chatbot in LangChain
We will approach this problem step-by-step, from creating a working environment to deploying the app using Streamlit Cloud.
1. Set up the environment
Let’s start by creating a new Conda environment with Python 3.9 and activate it:
$ conda create -n football_chatbot python=3.9 -y
$ conda activate football_chatbot
We will need to install the following libraries:
$ pip install streamlit langchain langchain-openai langchain_community neo4jNow, let’s create our working directory and populate its structure:
$ mkdir football_chatbot; cd football_chatbot
$ mkdir .streamlit
$ touch {.streamlit/secrets.toml,app.py}
We will write our application inside app.py while secrets.toml inside .streamlit directory will serve as our credentials file. Open it and paste the following three secrets:
NEO4J_URI = "neo4j+s://eed9dd8f.databases.neo4j.io"
NEO4J_USER = "neo4j"
NEO4J_PASSWORD = "ivbSF02UWzHeHuzBIePyOH5cQ4LdyRxLeNbWvdpPA4k"
These credentials give you access to the Aura DB instance that stores the football database. If you wish to create your own instance with the same data, refer to our tutorial on Neo4j, which covers that exact step.
2. Import libraries and load the secrets
Now, let’s work on the app.py file. At the top, import the necessary modules, packages and load the secrets using st.secrets:
import streamlit as st
from langchain.chains import GraphCypherQAChain
from langchain_community.graphs import Neo4jGraph
from langchain_openai import ChatOpenAI
# Load secrets
neo4j_uri = st.secrets["NEO4J_URI"]
neo4j_user = st.secrets["NEO4J_USER"]
neo4j_password = st.secrets["NEO4J_PASSWORD"]
Here is what each class does:
Neo4jGraph: A shorthand class to connect to existing Neo4j databases and query them with Cypher.GraphCypherQAChain: an all-encompassing class to perform graph RAG on graph databases. By passing our graph loaded with Neo4jGraph, we can generate Cypher queries using natural language using this class.ChatOpenAI: Gives access to the Chat Completions API of OpenAI.
3. Add authentication
To prevent malicious usage and high costs, we should add an authentication that asks user’s OpenAI API token. This can be achieved by adding a password form to the left sidebar using the st.sidebar element:
# Set the app title
st.title("Football Memoirs - an AI for Hardcore Football Fans")
# Sidebar for API key input
with st.sidebar:
   openai_api_key = st.text_input("Enter your OpenAI API Key", type="password")
   st.warning("Please enter your OpenAI API key to use the chatbot.")
As soon as the user loads our app, they will be presented with the input field and nothing else will be shown (except the app title) until they provide their key.
4. Connect to the Neo4j database and initialize a QA chain
After retrieving the user’s OpenAI API key, we can initialize our resources: the Neo4j graph and the QA chain class:
# Initialize connections and models
@st.cache_resource(show_spinner=False)
def init_resources(api_key):
   graph = Neo4jGraph(
       url=neo4j_uri,
       username=neo4j_user,
       password=neo4j_password,
       enhanced_schema=True,
   )
   graph.refresh_schema()
   chain = GraphCypherQAChain.from_llm(
       ChatOpenAI(api_key=api_key, model="gpt-4o"),
       graph=graph,
       verbose=True,
       show_intermediate_steps=True,
       allow_dangerous_requests=True,
   )
   return graph, chain
The init_resources() function accepts the API key as an argument and establishes a connection with the graph database. Then, it refreshes the graph schema (structure) so that the LLM can have up-to-date information about the database structure when formulating Cypher queries. Finally, it initializes the GraphCypherQAChain with the graph and OpenAI model, returning both the graph and chain objects for further use in the application.
It’s worth noting the use of the st.cache_resource() decorator. This decorator caches the graph and chain instances, which improves performance. We don't need to create new instances every time a user loads the app, so caching them is an efficient approach.
Let’s run the initializer with an API key check:
# Initialize resources only if API key is provided
if openai_api_key:
   with st.spinner("Initializing resources..."):
       graph, chain = init_resources(openai_api_key)
       st.success("Resources initialized successfully!", icon="🚀")
5. Add message history to Streamlit
As soon as the resources are available, we need to enable message history by using Streamlit’s session state. We also want to display an initial AI message informing the user about what the bot does.
To do so, we create a new messages key in st.session_state and set its value to a list with a single element. The element is a dictionary with two keys:
role: To whom the message belongscontent: The message content
# Initialize message history
if "messages" not in st.session_state:
   st.session_state.messages = [
       {
           "role": "assistant",
           "content": "Hello! Ask me anything about International Football from 1872 to (the almost) present day!",
       }
   ]
In case there is already existing message history inside st.session_state.messages, we display them with st.chat_message and st.markdown components:
# Display chat history
for message in st.session_state.messages:
   with st.chat_message(message["role"]):
       st.markdown(message["content"])
6. Display chat components
Now, we define a function, query_graph, that will execute the chain using a prompt provided by the user. The chain's .invoke() method accepts a dictionary with query-prompt key value pair and returns another dictionary as an output. We want its result key:
def query_graph(query):
   try:
       result = chain.invoke({"query": query})["result"]
       return result
   except Exception as e:
       st.error(f"An error occurred: {str(e)}")
       return "I'm sorry, I encountered an error while processing your request."
Now, let’s display an input field at the bottom of the page using the st.chat_input component:
# Accept user input
if prompt := st.chat_input("Your question..."):
   st.session_state.messages.append({"role": "user", "content": prompt})
   with st.chat_message("user"):
       st.markdown(prompt)
As soon as the prompt is provided, we store it as a user message in message history and display it on the screen. Then, with another API key check, we run the query_graph function, passing the prompt:
if prompt := st.chat_input("Your question..."):
   ...
   # Generate answer if API key is provided
   if openai_api_key:
       with st.spinner("Thinking..."):
           response = query_graph(prompt)
       with st.chat_message("assistant"):
           st.markdown(response)
       st.session_state.messages.append({"role": "assistant", "content": response})
   else:
       st.error("Please enter your OpenAI API key in the sidebar to use the chatbot.")
We add a spinner widget while the Cypher query and the final response is being generated. Then, we display the message and append it to the message history.
That’s it! The app is now ready:

7. Optimize and organize the code
The app is ready, but it is written in a single file without any optimized structure. Let’s revamp and make it modular:
$ cd football_chatbot
$ rm -rf .  # Start from scratch
$ mkdir .streamlit
$ touch {.streamlit/secrets.toml,.gitignore,app.py,chat_utils.py,graph_utils.py,README.MD,requirements.txt}
This time, our directory structure contains a few more files:
.
├── .git
├── .gitignore
├── .streamlit
├── README.md
├── app.py
├── chat_utils.py
├── graph_utils.py
├── requirements.txt
Now, inside graph_utils.py, paste the following organized code:
# graph_utils.py
import streamlit as st
from langchain.chains import GraphCypherQAChain
from langchain_community.graphs import Neo4jGraph
from langchain_openai import ChatOpenAI
@st.cache_resource(show_spinner=False)
def init_resources(api_key):
   graph = Neo4jGraph(
       url=st.secrets["NEO4J_URI"],
       username=st.secrets["NEO4J_USER"],
       password=st.secrets["NEO4J_PASSWORD"],
       enhanced_schema=True,
   )
   graph.refresh_schema()
   chain = GraphCypherQAChain.from_llm(
       ChatOpenAI(api_key=api_key, model="gpt-4o"),
       graph=graph,
       verbose=True,
       show_intermediate_steps=True,
       allow_dangerous_requests=True,
   )
   return graph, chain
def query_graph(chain, query):
   result = chain.invoke({"query": query})["result"]
   return result
Here, the difference is in the query_graph function. Specifically, it doesn't have error handling and display using the st.error function. We will move that part to the main app.py file.
Now, let’s work on the chat_utils.py file:
# chat_utils.py
import streamlit as st
def initialize_chat_history():
   if "messages" not in st.session_state:
       st.session_state.messages = [
           {
               "role": "assistant",
               "content": "Hello! Ask me anything about International Football from 1872 to (the almost) present day!",
           }
       ]
def display_chat_history():
   for message in st.session_state.messages:
       with st.chat_message(message["role"]):
           st.markdown(message["content"])
First, we create two functions:
initialize_chat_history: Enable message history with a default message if it isn't already available.display_chat_history: Show all messages in the message history.
We create another function to handle prompts and answer generation:
# chat_utils.py
def handle_user_input(openai_api_key, query_graph_func, chain):
   if prompt := st.chat_input("Your question..."):
       st.session_state.messages.append({"role": "user", "content": prompt})
       with st.chat_message("user"):
           st.markdown(prompt)
       if openai_api_key:
           with st.spinner("Thinking..."):
               try:
                   response = query_graph_func(chain=chain, query=prompt)
               except Exception as e:
                   st.error(f"An error occurred: {str(e)}")
                   response = "I'm sorry, I encountered an error while processing your request."
           with st.chat_message("assistant"):
               st.markdown(response)
           st.session_state.messages.append({"role": "assistant", "content": response})
       else:
           st.error(
               "Please enter your OpenAI API key in the sidebar to use the chatbot."
           )
The difference here is the usage of a try-except block around query_graph_func to catch and display errors. The rest of the functionality is the same.
Finally, inside app.py, we put everything together:
import streamlit as st
from graph_utils import init_resources, query_graph
from chat_utils import initialize_chat_history, display_chat_history, handle_user_input
st.title("Football Memoirs - an AI for Hardcore Football Fans")
# Sidebar for API key input
with st.sidebar:
   openai_api_key = st.text_input("Enter your OpenAI API Key", type="password")
   st.warning("Please enter your OpenAI API key to use the chatbot.")
We import the functions from other files, set the app title, and add the API key input field to the left sidebar. Then, under an API key check, we initialize the resources, and display chat message history and components:
# Initialize resources only if the API key is provided
if openai_api_key:
   with st.spinner("Initializing resources..."):
       graph, chain = init_resources(openai_api_key)
       st.success("Resources initialized successfully!", icon="🚀")
   # Initialize and display chat history
   initialize_chat_history()
   display_chat_history()
   # Handle user input
   handle_user_input(
       openai_api_key=openai_api_key, query_graph_func=query_graph, chain=chain
   )
Now, the app is ready for deployment!
8. Deploy the app to Streamlit Cloud
The easiest and most hassle-free method for deploying Streamlit apps is by using Streamlit Cloud. All apps hosted on Streamlit Cloud are free as long as you use the default hardware.
But first, let’s add these two lines to our .gitignore file so that our app secrets aren't shown on GitHub:
*.toml
__pycache__
Also, every (good) repository needs a README file. So, let’s write ours:
# Football Memoirs - AI for Hardcore Football Fans
This Streamlit app uses a Neo4j graph database and OpenAI's GPT-4o model to answer questions about international football history from 1872 to the present day.
## Setup
1. Clone this repository
2. Install dependencies: pip install -r requirements.txt
3. Set up your .streamlit/secrets.toml file with the following keys:
  - NEO4J_URI
  - NEO4J_USER
  - NEO4J_PASSWORD
4. Run the app: streamlit run app.py
## Deployment
To deploy this app on Streamlit Cloud:
1. Push your code to a GitHub repository
2. Connect your GitHub account to Streamlit Cloud
3. Create a new app in Streamlit Cloud and select your repository
4. Add your secrets in the Streamlit Cloud dashboard under the "Secrets" section
5. Deploy your app
Streamlit Cloud apps need a requirements.txt file to populate environments with dependencies. Add these to yours:
streamlit
langchain
langchain-community
langchain-openai
neo4j
Now, we initialize git, make our first commit, and push it to the remote repository you should have created for the project:
$ git init
$ git add .
$ git commit -m "Initial commit"
$ git remote add origin https://github.com/Username/repository.git
$ git push --set-upstream origin main
Then, sign up for Streamlit Cloud, visit your dashboard, and click on “Create app”:

You will be presented with the following options:
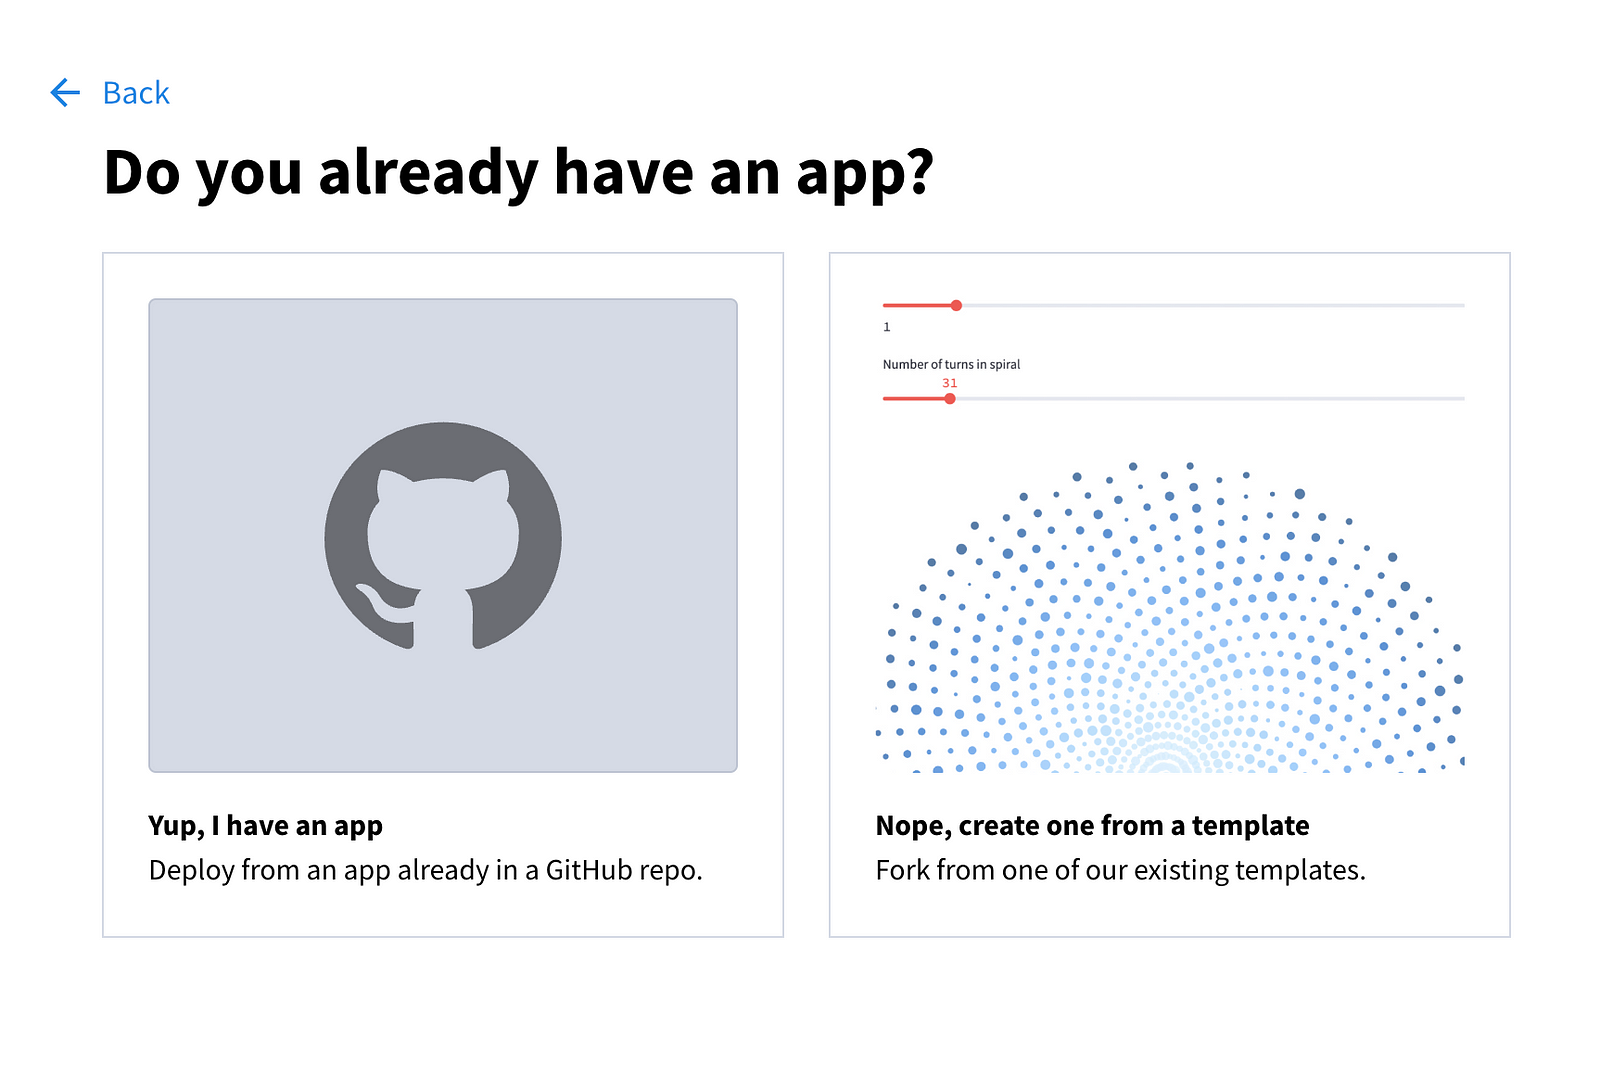
Choose the first option and fill out the fields on the next page.
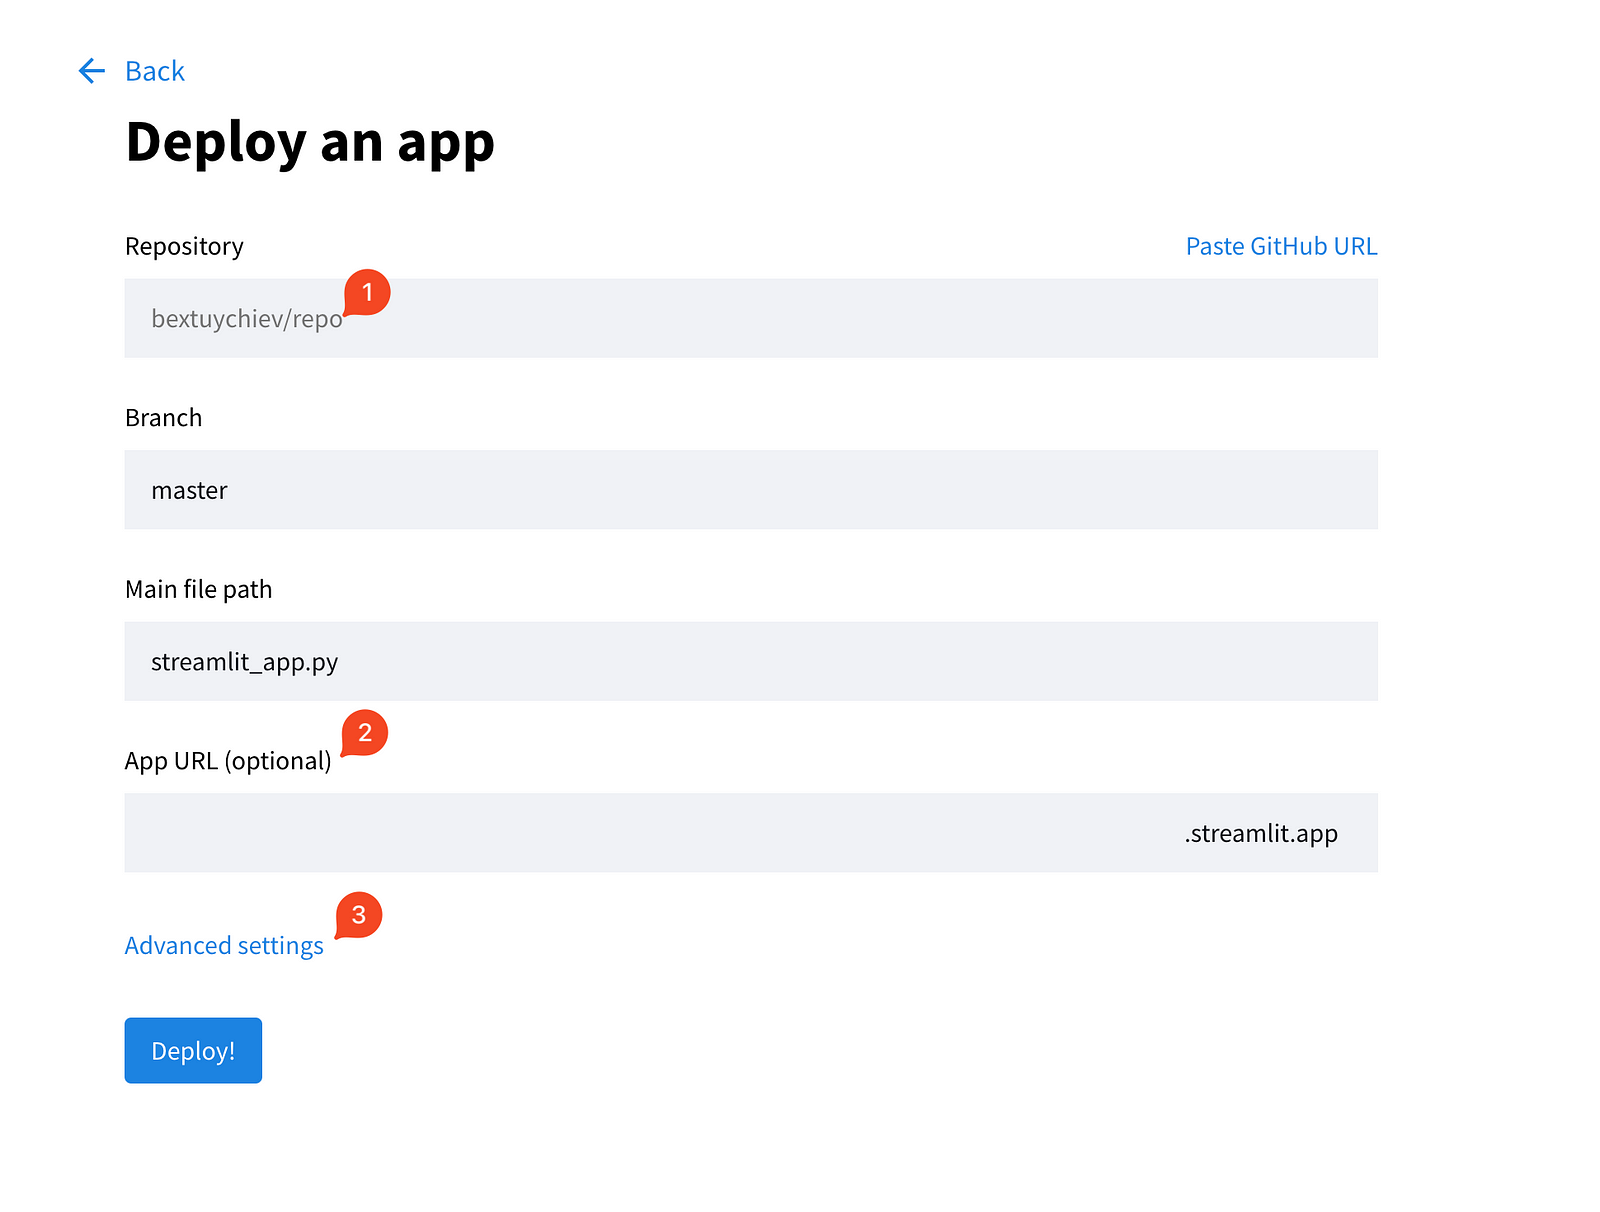
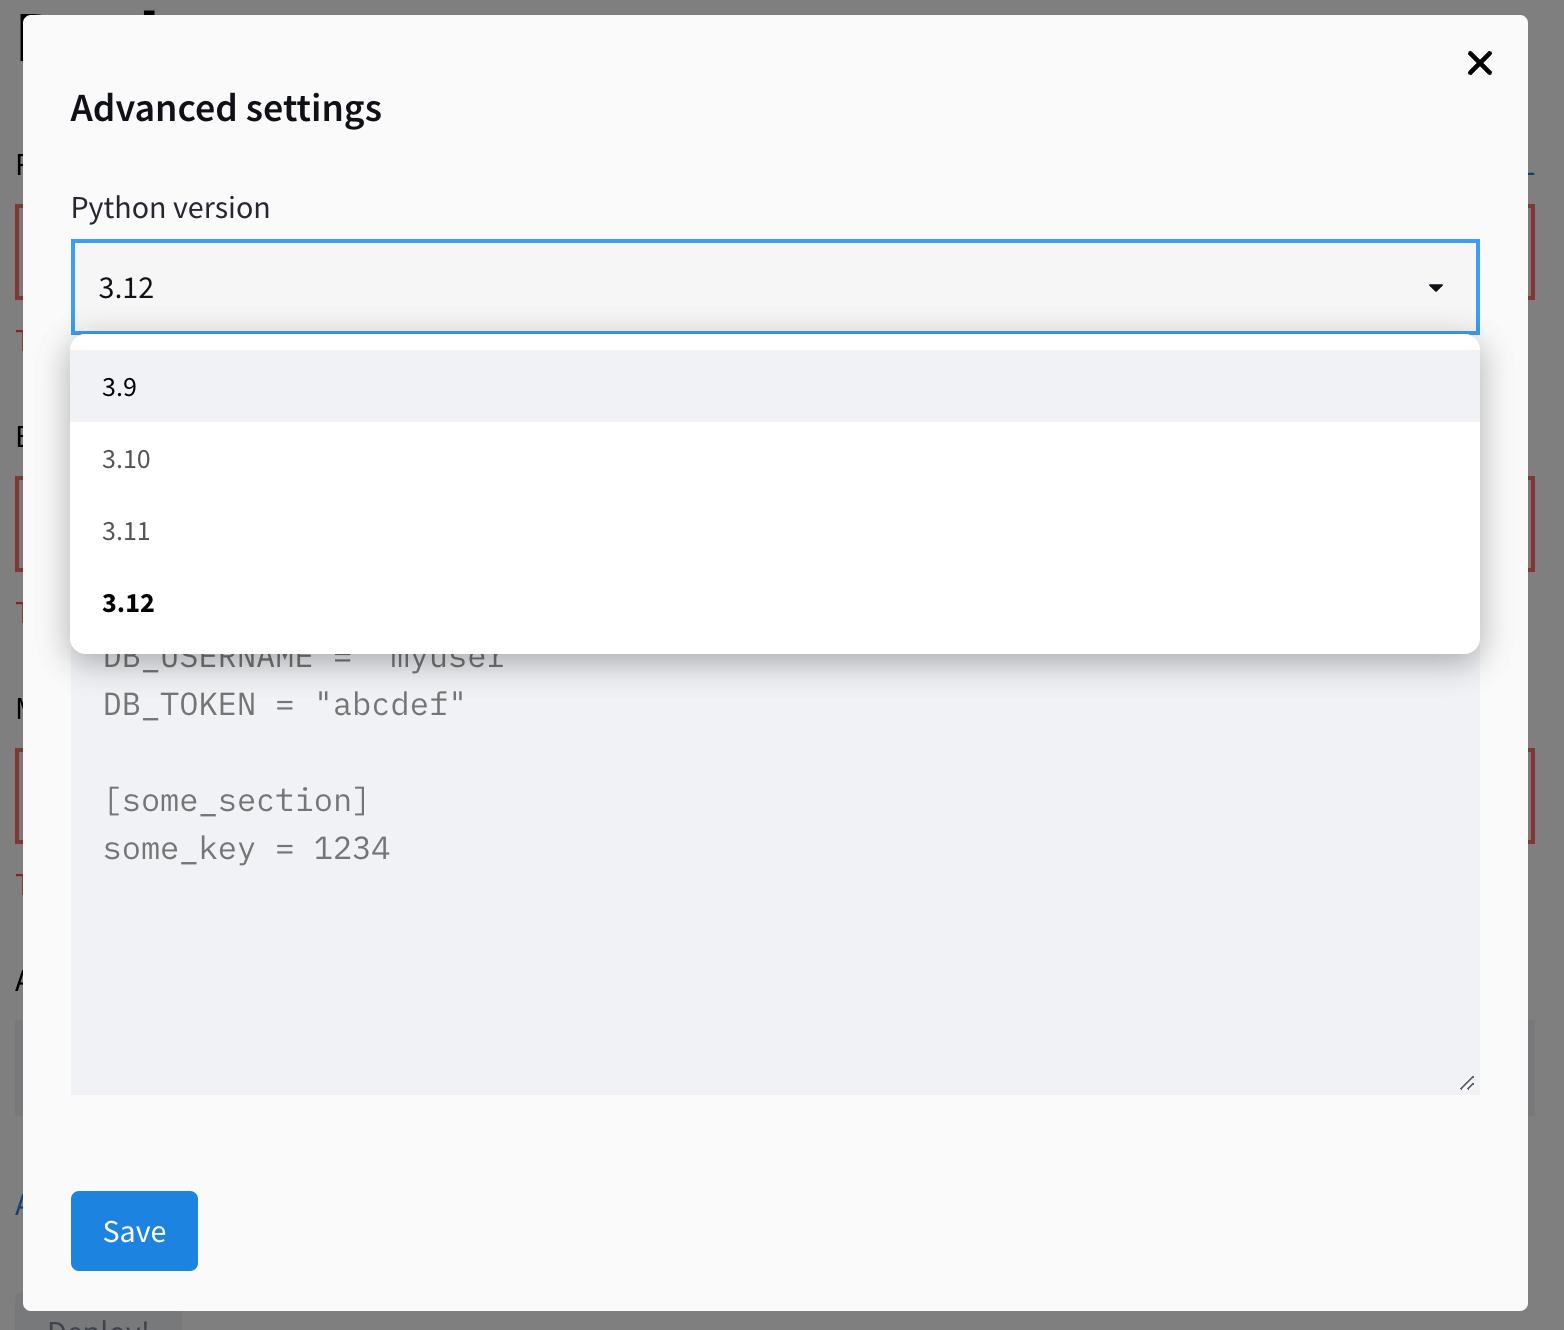
Also, expand the advanced settings, which give you two fields for choosing the Python version and pasting any credentials your app needs. This is where you copy/paste the contents of the local secrets.toml file:
Save the secrets and click “Deploy!”. The app should be operational within a couple of minutes!
Conclusion
In this tutorial, we’ve built an AI chatbot that answers questions about international football history using Streamlit, LangChain, and a Neo4j graph database. We’ve covered:
- Creating a user-friendly web interface with Streamlit
- Integrating OpenAI’s GPT models with a graph database using LangChain
- Implementing Retrieval Augmented Generation (RAG)
- Building a modular codebase
- Deploying to Streamlit Cloud
This project serves as a template for creating chat AI user interfaces. While the app logic is different in each project, the UI components we have used today will be used in most of them in some way.
Also, note that the UI building is the easiest part of building AI applications. The majority of your time will be spent on refining the app's performance. For instance, our Cypher generation pipeline still needs a significant amount of work. Due to a lack of examples, vague graph structure, and limitations of the LLMs, the accuracy of our app is not acceptable for production. Keep these aspects in mind while building your apps.
If you’re interested in learning more about developing large language models, check out our skill track, which covers how to build LLMs with PyTorch and Hugging Face, using the latest deep learning and NLP techniques.