Track
Before we get started, just a note: when approaching AI use cases in healthcare, it's extremely important to be mindful of potentially harmful outcomes for patients. The below example, while comprehensive, is purely meant to illustrate fine-tuning on a real-world dataset. If you are pursuing AI use-cases in healthcare or other sensitive domains, we highly recommend reading our guide to AI Ethics.
In this tutorial, we will learn about the Llama 3.1 models and fine-tune the Llama-3.1-8b-It model on the sentiment analysis for the mental health dataset. Our goal is to customize the model so that it can predict the patient's mental health status based on the text. We will also merge the adapter with the based model and save the full model on the Hugging Face hub.
We will learn about Llama 3.1 models, how to access them on Kaggle, and how to use the Transformer library to run the model inference. We’ll also fine-tune the Llama-3.1-8b-It model on the mental health dataset classification dataset. Finally, we’ll merge the saved adapter with the base model and push the full model to the Hugging Face Hub.
If you’re new to the subject, you can learn about the theory behind fine-tuning by reading our article, An Introductory Guide to Fine-Tuning LLMs.

Image by Author
Introducing Llama 3.1
Llama 3.1 is the latest series of multilingual large language models (LLMs) developed by Meta AI, which are pushing the boundaries of language understanding and generation. It comes in three sizes: 8B, 70B, and 405B parameters.
Llama 3.1 models are built on an auto-regressive language model architecture with optimized transformers and can be fine-tuned for various natural language processing tasks and datasets. They are trained on a diverse dataset of publicly available online data, support eight languages (English, German, French, Italian, Portuguese, Hindi, Spanish, and Thai), and come with a context length of 128k.
Llama 3.1 models are available for everyone under custom commercial licenses and require minimal information about the individual to download the model weights.
Llama 3.1 is optimized for multilingual dialogue and has outperformed Gemma 2, GPT 3.5 turbo, and GPT-4o on various benchmarks, including general chat, coding, math, reasoning, and more. It is by far the fastest and most accurate open-source model available.
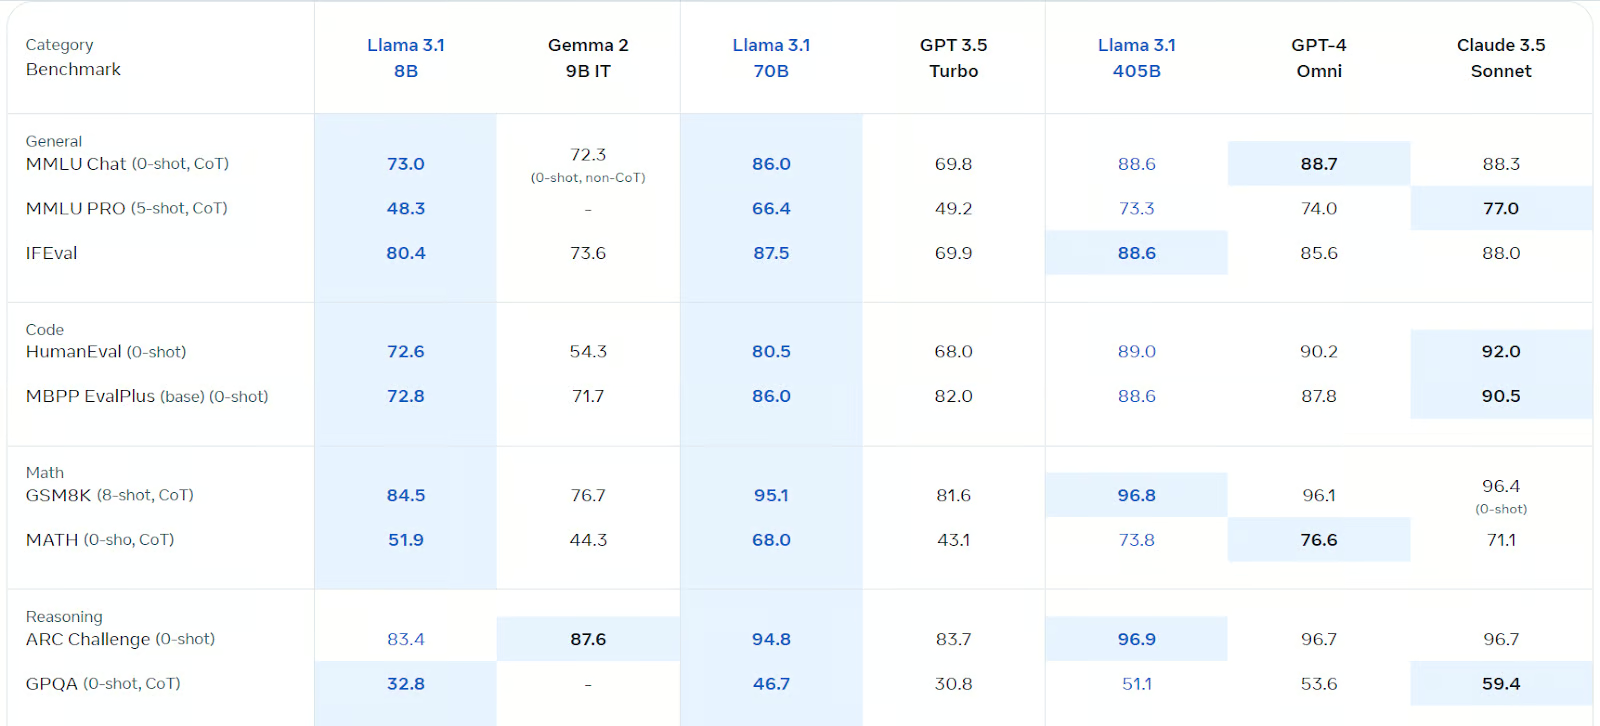
Source: Llama 3.1 (meta.com)
You can learn more about the Llama 3.1 model by reading What Is Meta's Llama 3.1 405B? How It Works, Use Cases & More.
Getting Started with Llama 3.1
For this tutorial, we will use Kaggle Notebook as a developer environment as it offers free GPUs and TPUs. To use the Llama 3.1 model on Kaggle notebook, follow these steps:
1. Fill out the form on meta.com with the same email address as your Kaggle account.
2. Access the Meta | Llama 3.1 model repository on Kaggle and click on the "access the model" button. Accept all the terms, and after a few seconds, you will gain access to the model.
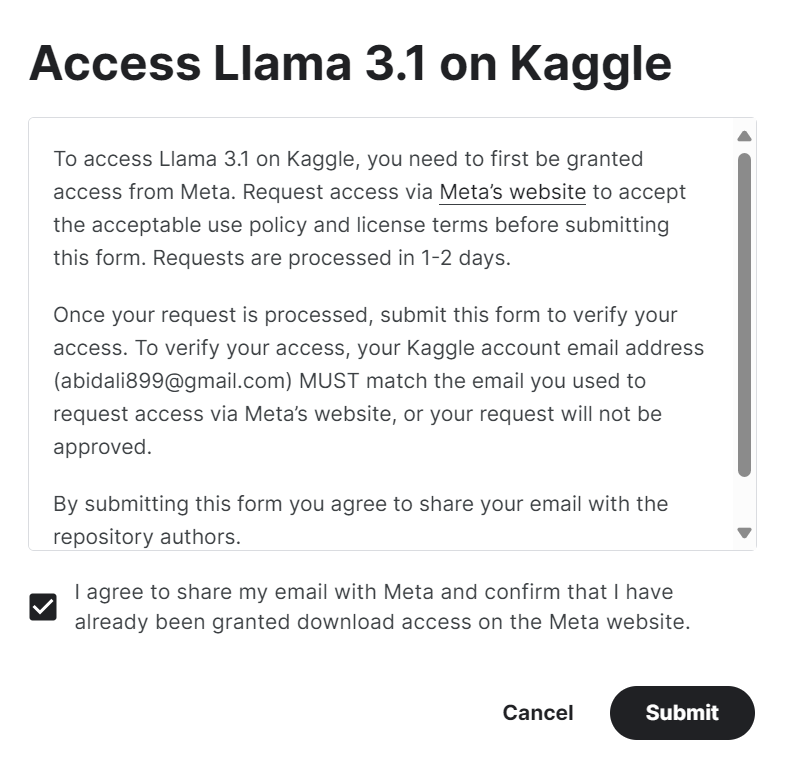
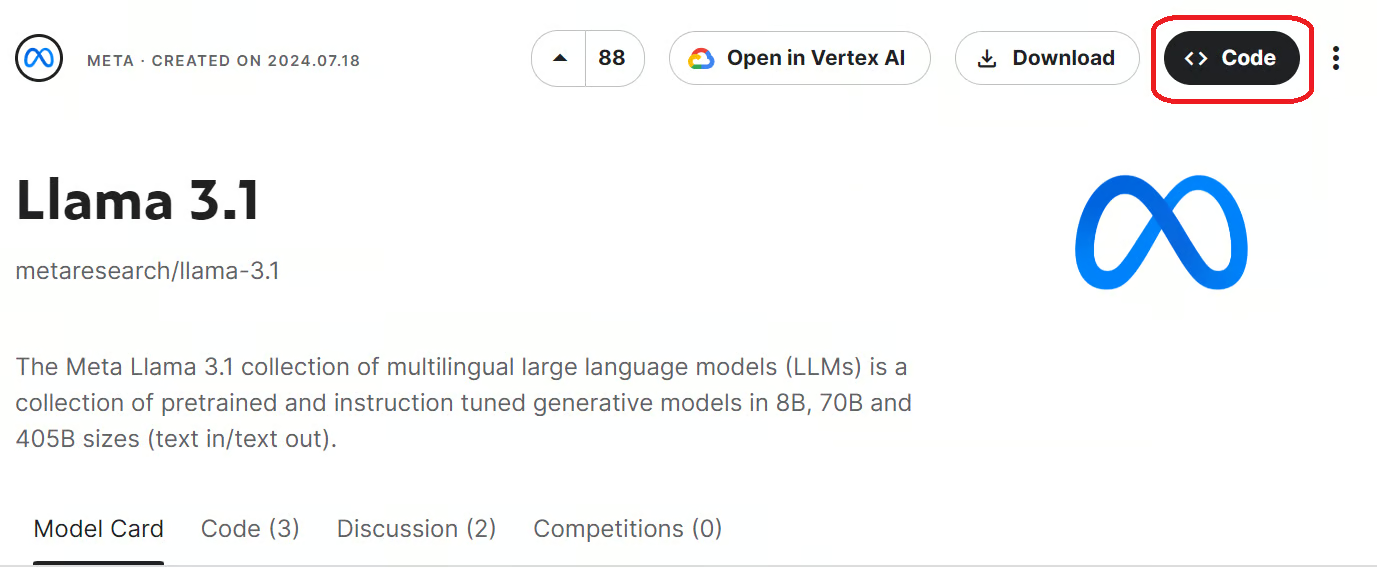
3. Initiate the Kaggle notebook with Llama 3.1 models by clicking on the "Code" button available at the top right of the model page.
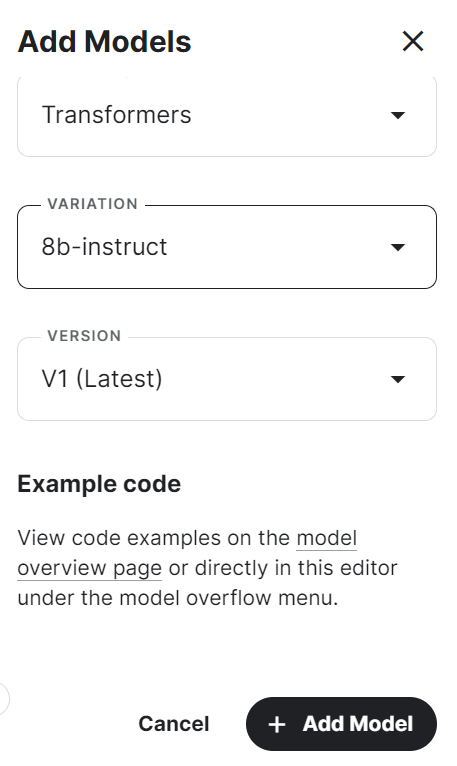
4. Select the framework, variation, and version, and press the "Add Model" button.
5. Install the necessary Python packages in the Kaggle notebook using the following command:
%pip install -U transformers accelerate6. Load the model and tokenizer using the Transformers library from the local directory.
7. Create the text generation pipeline with the model, tokenizer, torch type, and device map.
from transformers import AutoTokenizer,AutoModelForCausalLM,pipeline
import torch

base_model = "/kaggle/input/llama-3.1/transformers/8b-instruct/1"

tokenizer = AutoTokenizer.from_pretrained(base_model)

model = AutoModelForCausalLM.from_pretrained(
        base_model,
        return_dict=True,
        low_cpu_mem_usage=True,
        torch_dtype=torch.float16,
        device_map="auto",
        trust_remote_code=True,
)
pipe = pipeline(
    "text-generation",
    model=model,
    tokenizer=tokenizer,
    torch_dtype=torch.float16,
    device_map="auto",
)
8. Write the message and convert it into the proper prompt using the chat template.
9. Run the pipeline using the prompt and print out the generated output.
messages = [{"role": "user", "content": "What is the tallest building in the world?"}]

prompt = tokenizer.apply_chat_template(messages, tokenize=False, add_generation_prompt=True)
outputs = pipe(prompt, max_new_tokens=120, do_sample=True)
print(outputs[0]["generated_text"])
The answer is accurate and detailed.
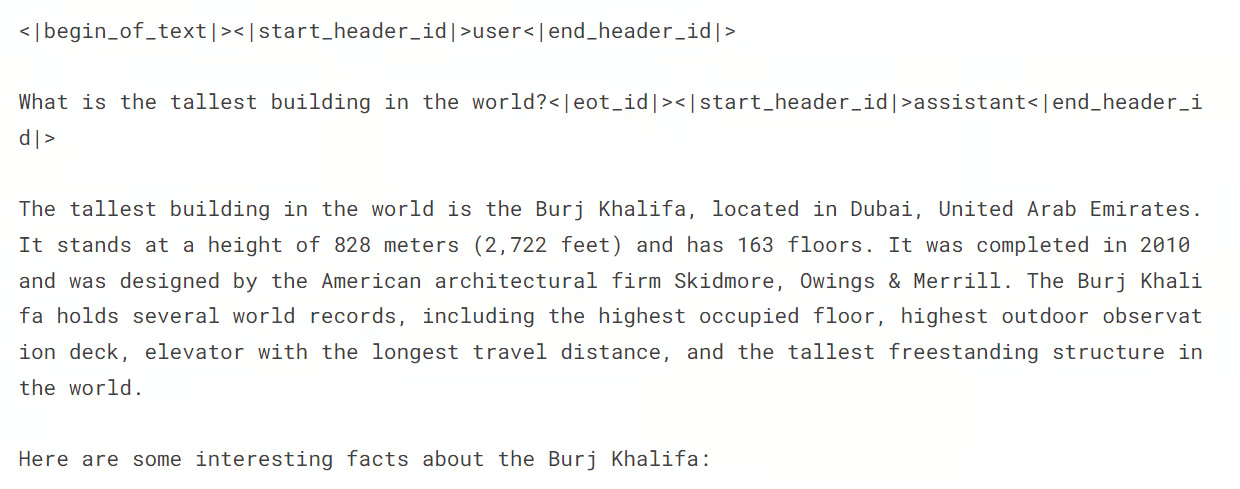
If you encounter difficulties in running the model inference, please refer to the Kaggle Notebook at Llama 3.1 Simple Model Inference.
Fine-tuning Llama 3.1 on Mental Health Disorder Classification
Now, we must load the dataset, process it, and fine-tune the Llama 3.1 model. We will also compare the model's performance before and after fine-tuning.
If you are new to LLMs, I recommend you take the Master Large Language Models (LLMs) Concepts course before diving into the fine-tuning part of the tutorial.
1. Setting up
First, we’ll start the new Kaggle notebook and Llama 3.1 model just like we did in the previous section.
We will then install the necessary Python packages as outlined below:
%%capture
%pip install -U bitsandbytes
%pip install -U transformers
%pip install -U accelerate
%pip install -U peft
%pip install -U trl
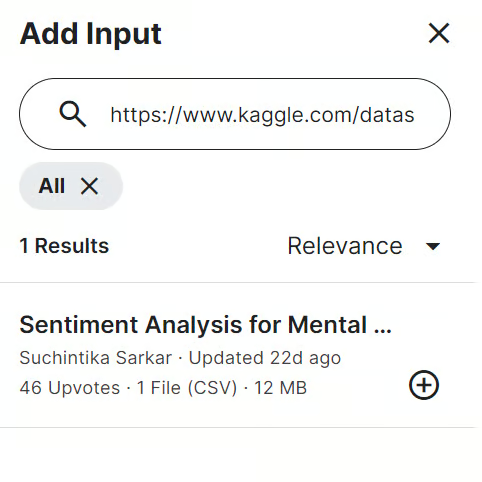
Next, we add the Sentiment Analysis for Mental Health data into the Kaggle notebook. To do this, click on the “Add Input” button located on the top right and paste the model link into the search bar. Then, to add the model, simply click on the plus (+) button.
We will be tracking the model's performance using the Weights and Biases API. To access the API, we need the API key. Set up the API key in the Kaggle using Secrets and activate it, as shown below.
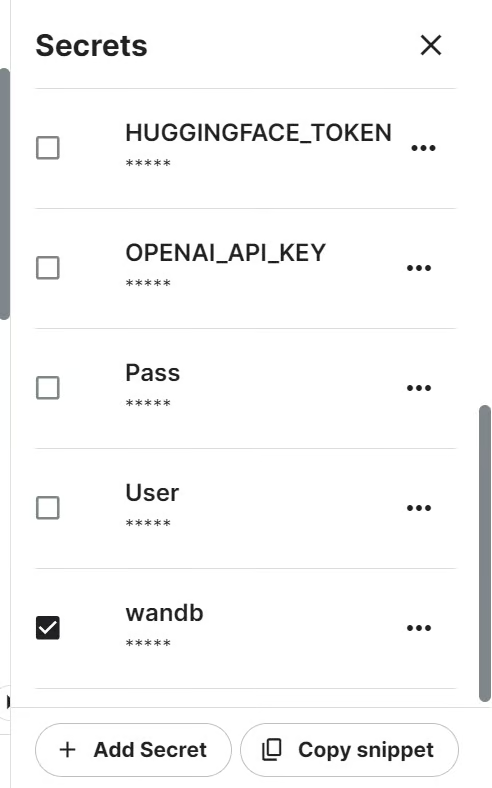
We can then initiate the Weights and Biases project by using the API key.
import wandb

from kaggle_secrets import UserSecretsClient
user_secrets = UserSecretsClient()

wb_token = user_secrets.get_secret("wandb")

wandb.login(key=wb_token)
run = wandb.init(
    project='Fine-tune llama-3.1-8b-it on Sentiment Analysis Dataset',
    job_type="training",
    anonymous="allow"
)
Next, we need to import all the necessary Python packages and functions.
import numpy as np
import pandas as pd
import os
from tqdm import tqdm
import bitsandbytes as bnb
import torch
import torch.nn as nn
import transformers
from datasets import Dataset
from peft import LoraConfig, PeftConfig
from trl import SFTTrainer
from trl import setup_chat_format
from transformers import (AutoModelForCausalLM,
                          AutoTokenizer,
                          BitsAndBytesConfig,
                          TrainingArguments,
                          pipeline,
                          logging)
from sklearn.metrics import (accuracy_score,
                             classification_report,
                             confusion_matrix)
from sklearn.model_selection import train_test_split
2. Loading and processing the dataset
Now it’s time for us to load the dataset, perform data cleaning, and drop three ambiguous categories.
To simplify things, we will be dropping the "Suicidal" category because Llama 3.1 has safety mechanisms to prevent certain triggering words. "Stress" is not considered a mental disorder, and "Personality Disorder" has a lot of overlap with "Bipolar Disorder."
As a result, we will be left with only four categories: "Normal," "Depression," "Anxiety," and "Bipolar."
df = pd.read_csv("/kaggle/input/sentiment-analysis-for-mental-health/Combined Data.csv",index_col = "Unnamed: 0")
df.loc[:,'status'] = df.loc[:,'status'].str.replace('Bi-Polar','Bipolar')
df = df[(df.status != "Personality disorder") & (df.status != "Stress") & (df.status != "Suicidal")]
df.head()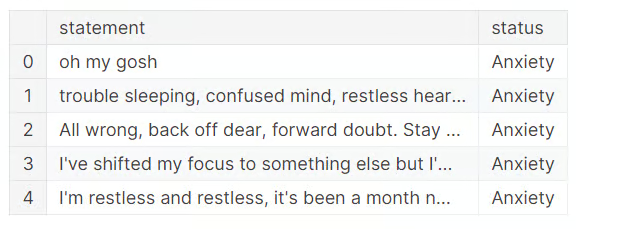
To save training time, we will fine-tune the model on only 3000 samples. For that, we will shuffle the dataset and select 3000 rows.
We will then split the dataset into the train, eval, and test sets for model training and testing.
We also want to create the “text” column in train and eval sets using the generate_prompt function, which combines the data from the “statement” and “status” columns.
Finally, we’ll create the “text” column in the test set using the generate_test_prompt function and the y_true using the “status” column. We will use it to generate the model evaluation report, as shown below.
# Shuffle the DataFrame and select only 3000 rows
df = df.sample(frac=1, random_state=85).reset_index(drop=True).head(3000)

# Split the DataFrame
train_size = 0.8
eval_size = 0.1

# Calculate sizes
train_end = int(train_size * len(df))
eval_end = train_end + int(eval_size * len(df))

# Split the data
X_train = df[:train_end]
X_eval = df[train_end:eval_end]
X_test = df[eval_end:]

# Define the prompt generation functions
def generate_prompt(data_point):
    return f"""
            Classify the text into Normal, Depression, Anxiety, Bipolar, and return the answer as the corresponding mental health disorder label.
text: {data_point["statement"]}
label: {data_point["status"]}""".strip()

def generate_test_prompt(data_point):
    return f"""
            Classify the text into Normal, Depression, Anxiety, Bipolar, and return the answer as the corresponding mental health disorder label.
text: {data_point["statement"]}
label: """.strip()

# Generate prompts for training and evaluation data
X_train.loc[:,'text'] = X_train.apply(generate_prompt, axis=1)
X_eval.loc[:,'text'] = X_eval.apply(generate_prompt, axis=1)

# Generate test prompts and extract true labels
y_true = X_test.loc[:,'status']
X_test = pd.DataFrame(X_test.apply(generate_test_prompt, axis=1), columns=["text"])
At this point, we want to check the distribution of categories in the train set.
X_train.status.value_counts()You can see below that we have almost an equal distribution of "Normal" and "Depression" categories. The rest of the labels are in the minority. This means our dataset is unbalanced, and the model will be better at predicting majority labels compared to minority ones.
We can balance the dataset, but that is not the goal of this tutorial.
status
Normal        1028
Depression     938
Anxiety        258
Bipolar        176
Name: count, dtype: int64
So, next, we want to convert the train and eval set into the Hugging Face datasets.
# Convert to datasets
train_data = Dataset.from_pandas(X_train[["text"]])
eval_data = Dataset.from_pandas(X_eval[["text"]])
Then, we display the 4th sample from the “text” column.
train_data['text'][3]We see that the “text” column has a system prompt, the statement, and the statuses as labels.

3. Loading the model and tokenizer
Next, we want to load the Llama-3.1-8b-instruct model in 4-bit quantization to save the GPU memory.
We will then load the tokenizer and set the pad token id.
base_model_name = "/kaggle/input/llama-3.1/transformers/8b-instruct/1"

bnb_config = BitsAndBytesConfig(
    load_in_4bit=True,
    bnb_4bit_use_double_quant=False,
    bnb_4bit_quant_type="nf4",
    bnb_4bit_compute_dtype="float16",
)

model = AutoModelForCausalLM.from_pretrained(
    base_model_name,
    device_map="auto",
    torch_dtype="float16",
    quantization_config=bnb_config,
)

model.config.use_cache = False
model.config.pretraining_tp = 1

tokenizer = AutoTokenizer.from_pretrained(base_model_name)

tokenizer.pad_token_id = tokenizer.eos_token_id
4. Model evaluation before fine-tuning
Here, we create the predict function, which will use the text generation pipeline to predict labels from the “text” column. Running the function will return a list of mental disorder categories based on various samples in the testing set.
def predict(test, model, tokenizer):
    y_pred = []
    categories = ["Normal", "Depression", "Anxiety", "Bipolar"]

    for i in tqdm(range(len(test))):
        prompt = test.iloc[i]["text"]
        pipe = pipeline(task="text-generation",
                        model=model,
                        tokenizer=tokenizer,
                        max_new_tokens=2,
                        temperature=0.1)

        result = pipe(prompt)
        answer = result[0]['generated_text'].split("label:")[-1].strip()

        # Determine the predicted category
        for category in categories:
            if category.lower() in answer.lower():
                y_pred.append(category)
                break
        else:
            y_pred.append("none")

    return y_pred

y_pred = predict(X_test, model, tokenizer)
100%|██████████| 300/300 [02:54<00:00, 1.72it/s]After, we create the evaluate function that will use the predicted labels and true labels to calculate the overall accuracy of the model and the accuracy per category, generate a classification report, and print out a confusion matrix. Running the function will give us a detailed model evaluation summary.
def evaluate(y_true, y_pred):
    labels = ["Normal", "Depression", "Anxiety", "Bipolar"]
    mapping = {label: idx for idx, label in enumerate(labels)}

    def map_func(x):
        return mapping.get(x, -1)  # Map to -1 if not found, but should not occur with correct data

    y_true_mapped = np.vectorize(map_func)(y_true)
    y_pred_mapped = np.vectorize(map_func)(y_pred)

    # Calculate accuracy
    accuracy = accuracy_score(y_true=y_true_mapped, y_pred=y_pred_mapped)
    print(f'Accuracy: {accuracy:.3f}')

    # Generate accuracy report
    unique_labels = set(y_true_mapped)  # Get unique labels

    for label in unique_labels:
        label_indices = [i for i in range(len(y_true_mapped)) if y_true_mapped[i] == label]
        label_y_true = [y_true_mapped[i] for i in label_indices]
        label_y_pred = [y_pred_mapped[i] for i in label_indices]
        label_accuracy = accuracy_score(label_y_true, label_y_pred)
        print(f'Accuracy for label {labels[label]}: {label_accuracy:.3f}')

    # Generate classification report
    class_report = classification_report(y_true=y_true_mapped, y_pred=y_pred_mapped, target_names=labels, labels=list(range(len(labels))))
    print('\nClassification Report:')
    print(class_report)

    # Generate confusion matrix
    conf_matrix = confusion_matrix(y_true=y_true_mapped, y_pred=y_pred_mapped, labels=list(range(len(labels))))
    print('\nConfusion Matrix:')
    print(conf_matrix)

evaluate(y_true, y_pred)
Llama 3.1 has performed exceptionally, even without fine-tuning. 79% accuracy is good enough. Let’s see how our model improves when we fine-tuned it on the dataset.
Accuracy: 0.790
Accuracy for label Normal: 0.741
Accuracy for label Depression: 0.939
Accuracy for label Anxiety: 0.556
Accuracy for label Bipolar: 0.533

Classification Report:
              precision    recall  f1-score   support

      Normal       0.92      0.74      0.82       143
  Depression       0.70      0.94      0.80       115
     Anxiety       0.68      0.56      0.61        27
     Bipolar       0.89      0.53      0.67        15

    accuracy                           0.79       300
   macro avg       0.80      0.69      0.73       300
weighted avg       0.81      0.79      0.79       300


Confusion Matrix:
[[106  33   4   0]
 [  3 108   3   1]
 [  4   8  15   0]
 [  2   5   0   8]]
5. Building the model
When building the model, we start by extracting the linear module names from the model using the bits and bytes library.
We then configure LoRA using the target modules, task type, and other arguments before setting up training arguments. These training arguments are optimized for the Kaggle notebook. You might need to change them if you are using them locally.
We will then create the model trainer using training arguments, a model, a tokenizer, a LoRA configuration, and a dataset.
import bitsandbytes as bnb

def find_all_linear_names(model):
    cls = bnb.nn.Linear4bit
    lora_module_names = set()
    for name, module in model.named_modules():
        if isinstance(module, cls):
            names = name.split('.')
            lora_module_names.add(names[0] if len(names) == 1 else names[-1])
    if 'lm_head' in lora_module_names:  # needed for 16 bit
        lora_module_names.remove('lm_head')
    return list(lora_module_names)
modules = find_all_linear_names(model)
modules
['down_proj', 'gate_proj', 'o_proj', 'v_proj', 'up_proj', 'q_proj', 'k_proj']output_dir="llama-3.1-fine-tuned-model"
peft_config = LoraConfig(
lora_alpha=16,
lora_dropout=0,
r=64,
bias="none",
task_type="CAUSAL_LM",
target_modules=modules,
)
training_arguments = TrainingArguments(
output_dir=output_dir, # directory to save and repository id
num_train_epochs=1, # number of training epochs
per_device_train_batch_size=1, # batch size per device during training
gradient_accumulation_steps=8, # number of steps before performing a backward/update pass
gradient_checkpointing=True, # use gradient checkpointing to save memory
optim="paged_adamw_32bit",
logging_steps=1,
learning_rate=2e-4, # learning rate, based on QLoRA paper
weight_decay=0.001,
fp16=True,
bf16=False,
max_grad_norm=0.3, # max gradient norm based on QLoRA paper
max_steps=-1,
warmup_ratio=0.03, # warmup ratio based on QLoRA paper
group_by_length=False,
lr_scheduler_type="cosine", # use cosine learning rate scheduler
report_to="wandb", # report metrics to w&b
eval_strategy="steps", # save checkpoint every epoch
eval_steps = 0.2
)
trainer = SFTTrainer(
model=model,
args=training_arguments,
train_dataset=train_data,
eval_dataset=eval_data,
peft_config=peft_config,
dataset_text_field="text",
tokenizer=tokenizer,
max_seq_length=512,
packing=False,
dataset_kwargs={
"add_special_tokens": False,
"append_concat_token": False,
}
)6. Model training
It’s now time to initiate the model training:
trainer.train()It took 1.5 hours to fine-tune the model, and our validation loss has gradually decreased. For even better performance, try training the model on the full dataset for at least five epochs.

Next, we finish the weights and biases run.
wandb.finish()
model.config.use_cache = True
We will be able to view the run summary, including all the necessary metrics for model performance.
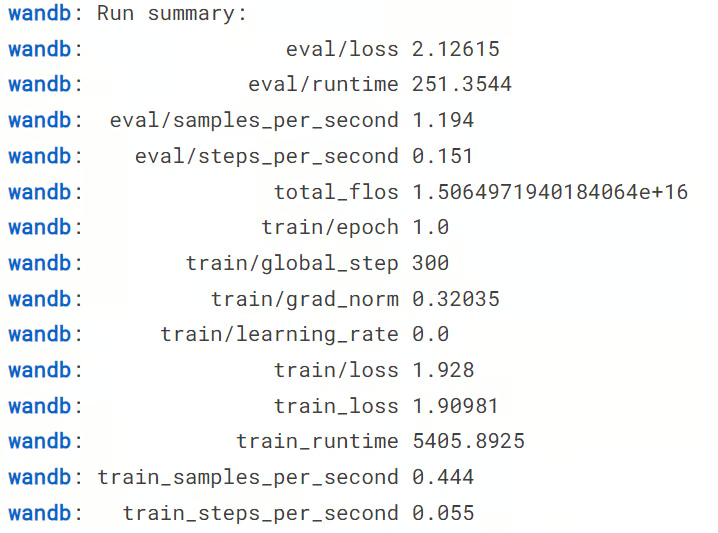
To view a detailed summary, go to your Weights and Biases account and view the run in your browser. It comes with interactive visualizations.

We can then save both the model adapter and tokenizer locally. In the next section, we will use this to merge the adopter with the base model.
# Save trained model and tokenizer
trainer.save_model(output_dir)
tokenizer.save_pretrained(output_dir)
7. Testing model after fine-tuning
Now comes the most crucial part. Will our model perform better after fine-tuning it, or will it get worse? To find out, we must run the 'predict' function on the test set and then the 'evaluate' function to generate a model evaluation report.
y_pred = predict(X_test, model, tokenizer)
evaluate(y_true, y_pred)
As you can see from the results below, this is a huge improvement in model performance, from 79% to 91.3% accuracy. Even F1 scores are looking good.
100%|██████████| 300/300 [03:24<00:00,  1.47it/s]
Accuracy: 0.913
Accuracy for label Normal: 0.972
Accuracy for label Depression: 0.913
Accuracy for label Anxiety: 0.667
Accuracy for label Bipolar: 0.800

Classification Report:
              precision    recall  f1-score   support

      Normal       0.92      0.97      0.95       143
  Depression       0.93      0.91      0.92       115
     Anxiety       0.75      0.67      0.71        27
     Bipolar       1.00      0.80      0.89        15

    accuracy                           0.91       300
   macro avg       0.90      0.84      0.87       300
weighted avg       0.91      0.91      0.91       300


Confusion Matrix:
[[139   3   1   0]
 [  5 105   5   0]
 [  6   3  18   0]
 [  1   2   0  12]]
We can now save the Kaggle notebook to save the results and the model files. To do that, we click on the “Save Version” button at the top right, select the version type “Quick Save,” and select the save output type “Always save output when creating a Quick Save.”
If you are having trouble fine-tuning the model, please refer to the Kaggle notebook for further assistance.
You can also learn how to fine-tune Llama 3.0 models by following our guide, Fine-Tuning Llama 3 and Using It Locally.
Merging and Saving the Fine-Tuned Llama 3.1 Model
In this section, we will merge the adapter with the base model and save the full version on the Hugging Face hub.
First, we launch a new Kaggle notebook with GPU acceleration and add the saved notebook to access the model files. We can also include other Kaggle notebooks as input, similar to adding a dataset.
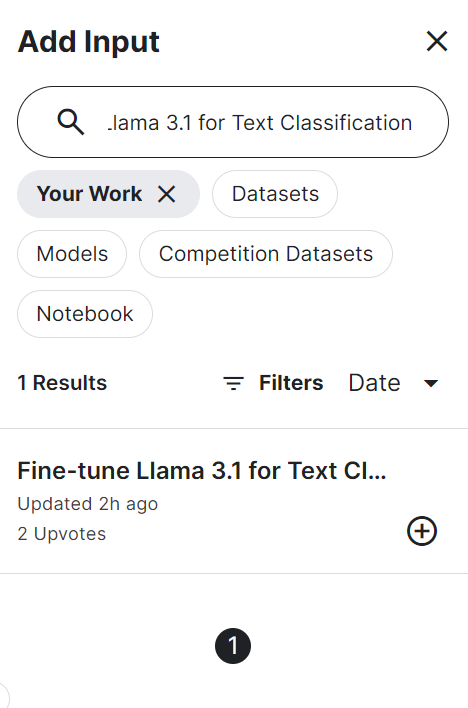
We can then install the necessary Python packages.
%%capture
%pip install -U bitsandbytes
%pip install -U transformers
%pip install -U accelerate
%pip install -U peft
Next, we log in to the Hugging Face hub API using the API key to push our model files into the Hugging Face model repository.
from huggingface_hub import login
from kaggle_secrets import UserSecretsClient
user_secrets = UserSecretsClient()

hf_token = user_secrets.get_secret("HUGGINGFACE_TOKEN")
login(token = hf_token)
We can then set the directory of the base model and the fine-tuned model.
base_model = "/kaggle/input/llama-3.1/transformers/8b-instruct/1"
fine_tuned_model = "/kaggle/input/fine-tune-llama-3-1-for-text-classification/llama-3.1-fine-tuned-model/"
Then, load the tokenizer and base model.
from transformers import AutoModelForCausalLM, AutoTokenizer, pipeline
from peft import PeftModel
import torch


# Reload tokenizer and model
tokenizer = AutoTokenizer.from_pretrained(base_model)

base_model_reload = AutoModelForCausalLM.from_pretrained(
        base_model,
        return_dict=True,
        low_cpu_mem_usage=True,
        torch_dtype=torch.float16,
        device_map="auto",
        trust_remote_code=True,
)
We merge the base model with the fine-tuned adapter, as seen below.
# Merge adapter with base model
model = PeftModel.from_pretrained(base_model_reload, fine_tuned_model)
model = model.merge_and_unload()
Before we save our model, let's check if it is working correctly. Create a text generation pipeline with the model and tokenizer and provide it with the sample prompt.
text = "I'm trapped in a storm of emotions that I can't control, and it feels like no one understands the chaos inside me"
prompt = f"""Classify the text into Normal, Depression, Anxiety, Bipolar, and return the answer as the corresponding mental health disorder label.
text: {text}
label: """.strip()

pipe = pipeline(
    "text-generation",
    model=model,
    tokenizer=tokenizer,
    torch_dtype=torch.float16,
    device_map="auto",
)

outputs = pipe(prompt, max_new_tokens=2, do_sample=True, temperature=0.1)
print(outputs[0]["generated_text"].split("label: ")[-1].strip())
Our model is working perfectly.
DepressionWe can now save the model and tokenizer locally.
model_dir = "Llama-3.1-8B-Instruct-Mental-Health-Classification"
model.save_pretrained(model_dir)
tokenizer.save_pretrained(model_dir)
And then push the model and tokenizer to the Hugging Face Hub.
model.push_to_hub(model_dir, use_temp_dir=False)
tokenizer.push_to_hub(model_dir, use_temp_dir=False)
This will create the repository on Hugging Face and push all the model and tokenizer files.
CommitInfo(commit_url='https://huggingface.co/kingabzpro/Llama-3.1-8B-Instruct-Mental-Health-Classification/commit/e1244abeaac159e0a48439095200a4190c2b493c', commit_message='Upload tokenizer', commit_description='', oid='e1244abeaac159e0a48439095200a4190c2b493c', pr_url=None, pr_revision=None, pr_num=None)We can view all the model files by visiting the Hugging Face website.
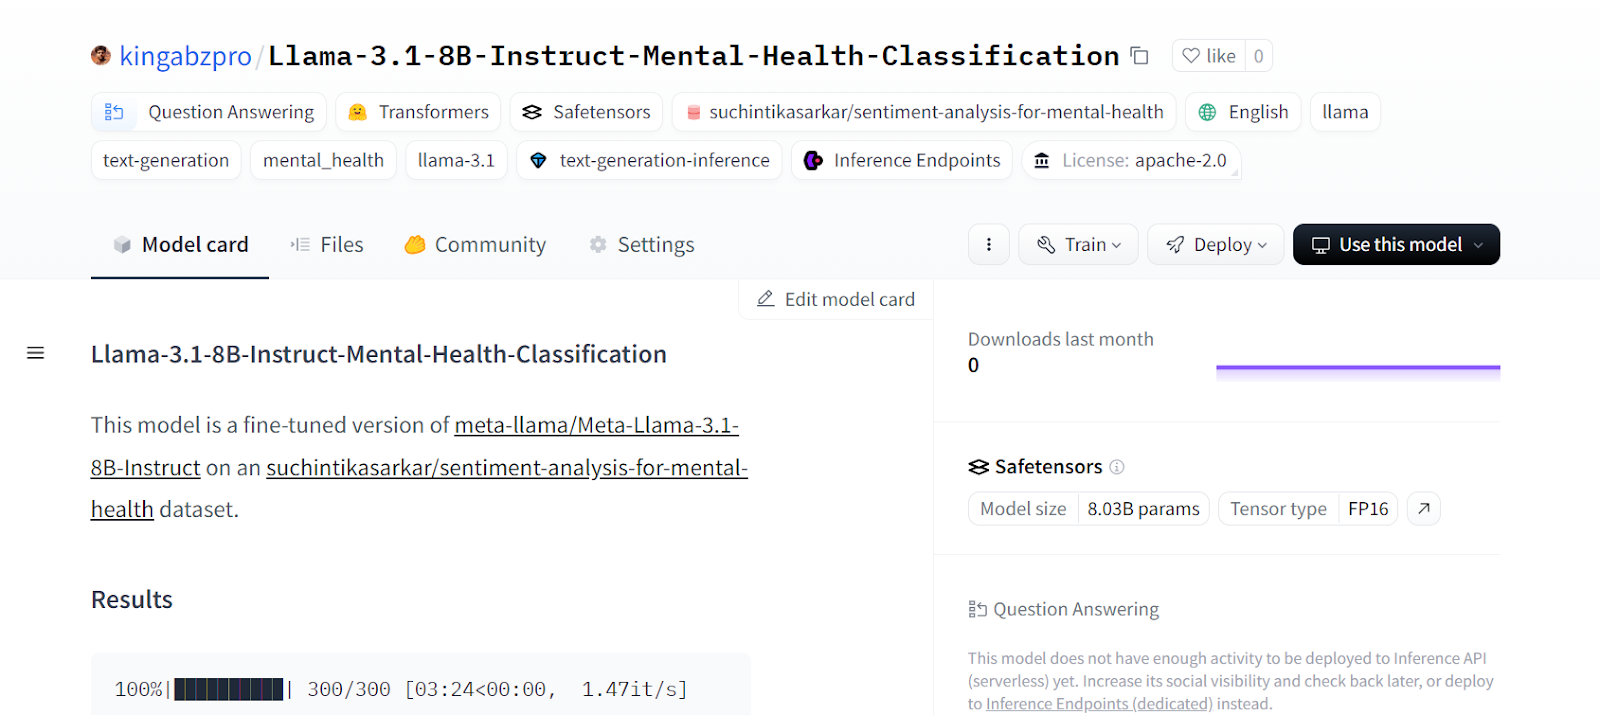
Source: kingabzpro/Llama-3.1-8B-Instruct-Mental-Health-Classification · Hugging Face
If you are facing issues in merging the adapter with the base model, please refer to the Kaggle notebook.
If you find fine-tuning the LLMs difficult, you can follow the Fine-Tuning OpenAI's GPT-4: A Step-by-Step Guide tutorial to learn an easier way of using the OpenAI API to fine-tune the model on any dataset with just a few lines of code.
Final Thoughts
Fine-tuning the model is not limited to customization based on the dataset. We can fine-tune large language models on various natural language tasks such as machine translation, clustering, classification, question and answers, embedding, and more.
In this tutorial, we have learned to fine-tune the Llama 3.1 model on a mental health classification dataset. This model can be used to identify patients and even employees who are facing challenges in their day-to-day lives.
If you are wondering how you can get started with LLMs and begin fine-tuning models on your own, then you should consider taking the Developing Large Language Models skill track. With this series of courses, you will build a strong foundation in LLMs, propelling you into the new AI-powered landscape.

As a certified data scientist, I am passionate about leveraging cutting-edge technology to create innovative machine learning applications. With a strong background in speech recognition, data analysis and reporting, MLOps, conversational AI, and NLP, I have honed my skills in developing intelligent systems that can make a real impact. In addition to my technical expertise, I am also a skilled communicator with a talent for distilling complex concepts into clear and concise language. As a result, I have become a sought-after blogger on data science, sharing my insights and experiences with a growing community of fellow data professionals. Currently, I am focusing on content creation and editing, working with large language models to develop powerful and engaging content that can help businesses and individuals alike make the most of their data.


