Track
AI Fundamentals
10 hr
Meta has released a new series of large language models (LLMs) called Llama 3, a collection of pre-trained and instruction-tuned text-to-text models.
Llama 3 is an auto-regressive language model that uses an optimized transformer architecture. Both pre-trained and instruction-tuned models come with 8B and 70B parameters with a context length of 8K tokens.
Llama 3 8B is the most liked LLM on Hugging Face. Its instruction-tuned version is better than Google’s Gemma 7B-It and Mistral 7B Instruct on various performance metrics. The 70B instruction-tuned version has surpassed Gemini Pro 1.5 and Claude Sonnet on most performance metrics:
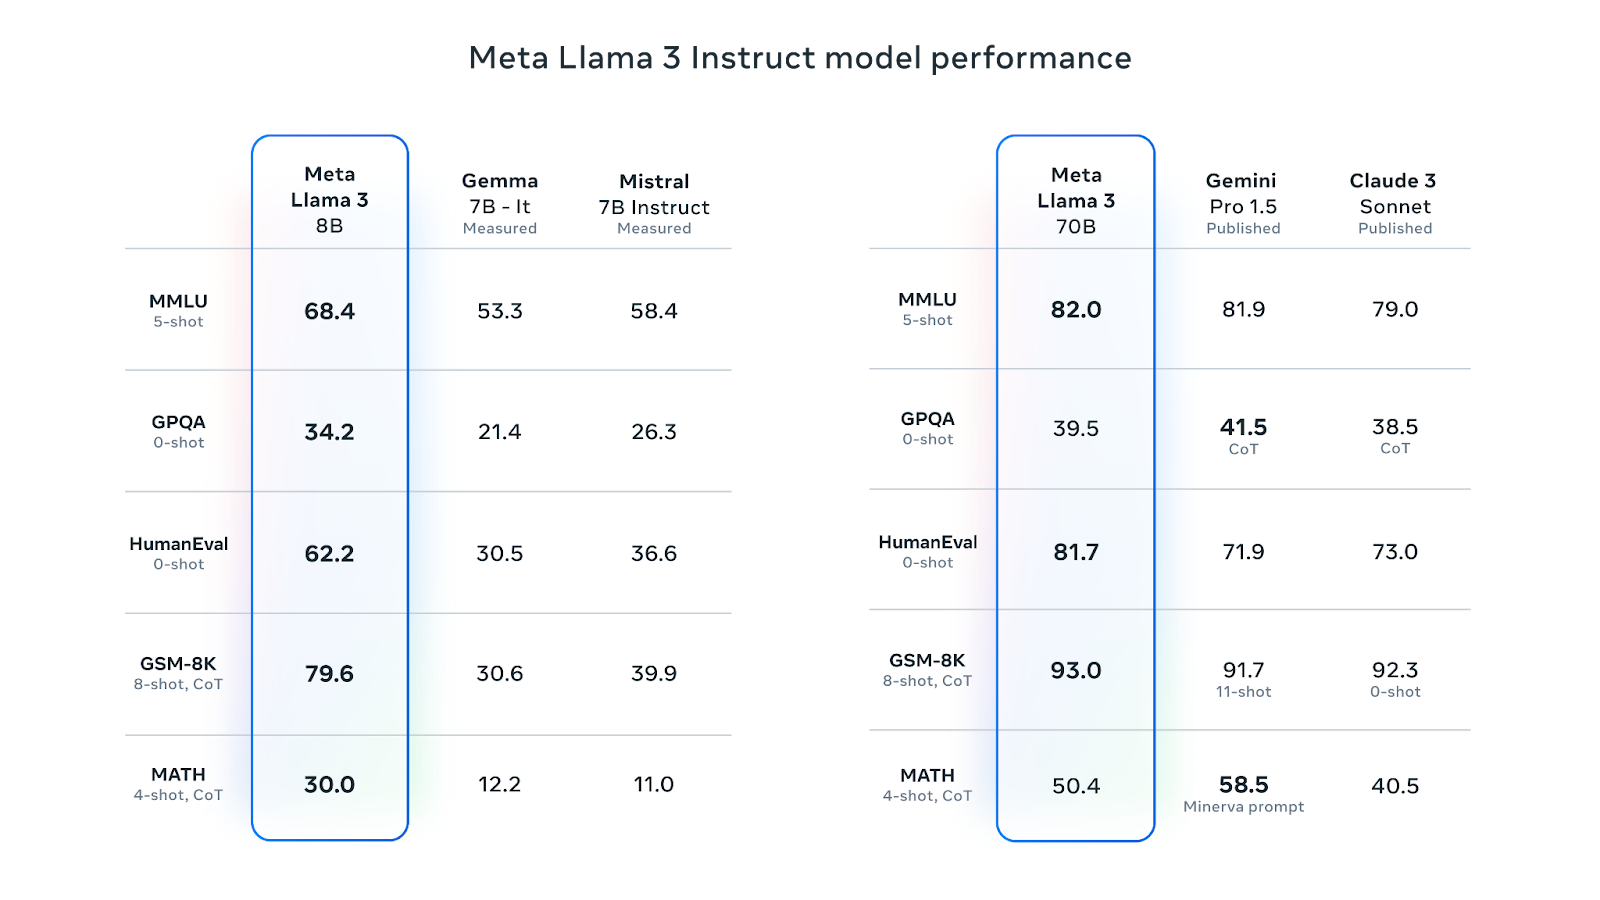
Source: Meta Llama 3
Meta trained Llama 3 on a new mix of publicly available online data, with a token count of over 15 trillion tokens. The 8B model has a knowledge cutoff of March 2023, while the 70B model has a cutoff of December 2023. The models use Grouped-Query Attention (GQA), which reduces memory bandwidth and improves efficiency.
The Llama 3 models have been released under a custom commercial license. To access the model, you need to fill out the form with your name, affiliation, and email and accept the terms and conditions. If you use different email addresses for different platforms like Kaggle and Hugging Face, you may need to fill out the form multiple times.
You can learn more about Llama 3 from this article on What is Llama 3?.
For this tutorial, we’ll fine-tune the Llama 3 8B-Chat model using the ruslanmv/ai-medical-chatbot dataset. The dataset contains 250k dialogues between a patient and a doctor. We’ll use the Kaggle Notebook to access this model and free GPUs.
Before we launch the Kaggle Notebook, fill out the Meta download form with your Kaggle email address, then go to the Llama 3 model page on Kaggle and accept the agreement. The approval process may take one to two days.
Let’s now take the following steps:
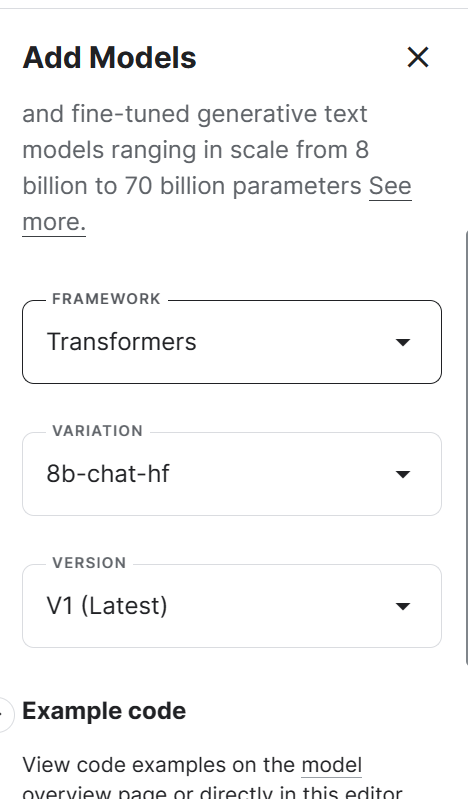
1. Launch the new Notebook on Kaggle, and add the Llama 3 model by clicking the + Add Input button, selecting the Models option, and clicking on the plus + button beside the Llama 3 model. After that, select the right framework, variation, and version, and add the model.
2. Go to the Session options and select the GPU P100 as an accelerator.

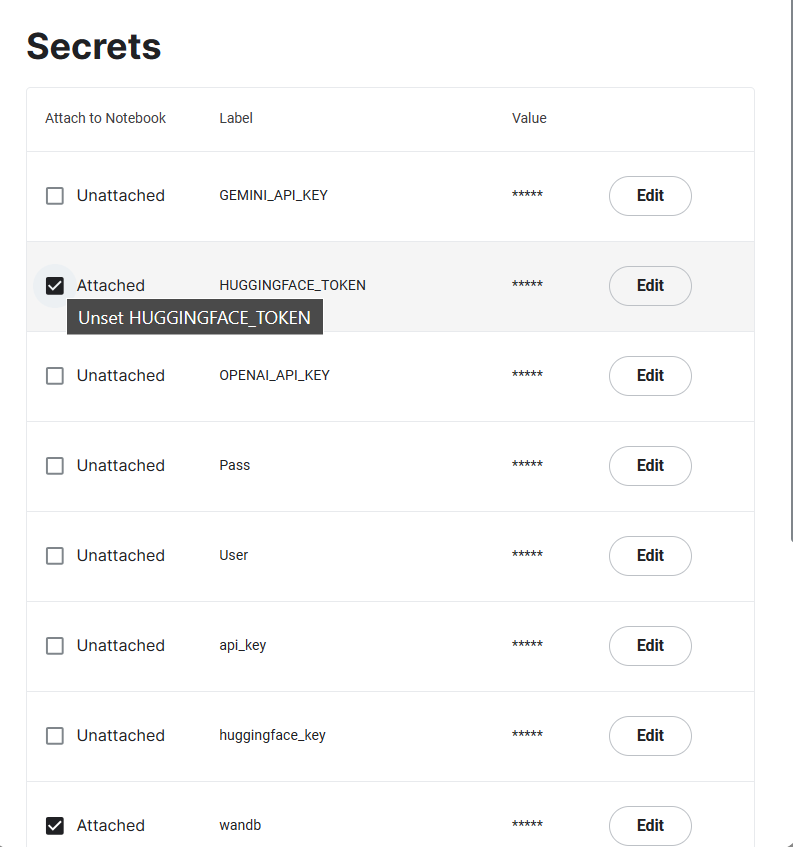
3. Generate the Hugging Face and Weights & Biases token, and create the Kaggle Secrets. You can create and activate the Kaggle Secrets by going to Add-ons > Secrets > Add a new secret.
4. Initiate the Kaggle session by installing all the necessary Python packages.
%%capture
%pip install -U transformers
%pip install -U datasets
%pip install -U accelerate
%pip install -U peft
%pip install -U trl
%pip install -U bitsandbytes
%pip install -U wandb
5. Import the necessary Python pages for loading the dataset, model, and tokenizer and fine-tuning.
from transformers import (
    AutoModelForCausalLM,
    AutoTokenizer,
    BitsAndBytesConfig,
    HfArgumentParser,
    TrainingArguments,
    pipeline,
    logging,
)
from peft import (
    LoraConfig,
    PeftModel,
    prepare_model_for_kbit_training,
    get_peft_model,
)
import os, torch, wandb
from datasets import load_dataset
from trl import SFTTrainer, setup_chat_format
6. We’ll be tracking the training process using the Weights & Biases and then saving the fine-tuned model on Hugging Face, and for that, we have to log in to both Hugging Face Hub and Weights & Biases using the API key.
from huggingface_hub import login
from kaggle_secrets import UserSecretsClient
user_secrets = UserSecretsClient()

hf_token = user_secrets.get_secret("HUGGINGFACE_TOKEN")

login(token = hf_token)

wb_token = user_secrets.get_secret("wandb")

wandb.login(key=wb_token)
run = wandb.init(
    project='Fine-tune Llama 3 8B on Medical Dataset',
    job_type="training",
    anonymous="allow"
)
7. Set the base model, dataset, and new model variable. We’ll load the base model from Kaggle and the dataset from the HugginFace Hub and then save the new model.
base_model = "/kaggle/input/llama-3/transformers/8b-chat-hf/1"
dataset_name = "ruslanmv/ai-medical-chatbot"
new_model = "llama-3-8b-chat-doctor"
8. Set the data type and attention implementation.
torch_dtype = torch.float16
attn_implementation = "eager"In this part, we’ll load the model from Kaggle. However, due to memory constraints, we’re unable to load the full model. Therefore, we’re loading the model using 4-bit precision.
Our goal in this project is to reduce memory usage and speed up the fine-tuning process.
# QLoRA config
bnb_config = BitsAndBytesConfig(
    load_in_4bit=True,
    bnb_4bit_quant_type="nf4",
    bnb_4bit_compute_dtype=torch_dtype,
    bnb_4bit_use_double_quant=True,
)

# Load model
model = AutoModelForCausalLM.from_pretrained(
    base_model,
    quantization_config=bnb_config,
    device_map="auto",
    attn_implementation=attn_implementation
)
Load the tokenizer and then set up a model and tokenizer for conversational AI tasks. By default, it uses the chatml template from OpenAI, which will convert the input text into a chat-like format.
# Load tokenizer
tokenizer = AutoTokenizer.from_pretrained(base_model)
model, tokenizer = setup_chat_format(model, tokenizer)Fine-tuning the full model will take a lot of time, so to improve the training time, we’ll attach the adapter layer with a few parameters, making the entire process faster and more memory-efficient.
# LoRA config
peft_config = LoraConfig(
    r=16,
    lora_alpha=32,
    lora_dropout=0.05,
    bias="none",
    task_type="CAUSAL_LM",
    target_modules=['up_proj', 'down_proj', 'gate_proj', 'k_proj', 'q_proj', 'v_proj', 'o_proj']
)
model = get_peft_model(model, peft_config)To load and pre-process our dataset, we:
1. Load the ruslanmv/ai-medical-chatbot dataset, shuffle it, and select only the top 1000 rows. This will significantly reduce the training time.
2. Format the chat template to make it conversational. Combine the patient questions and doctor responses into a "text" column.
3. Display a sample from the text column (the “text” column has a chat-like format with special tokens).
#Importing the dataset
dataset = load_dataset(dataset_name, split="all")
dataset = dataset.shuffle(seed=65).select(range(1000)) # Only use 1000 samples for quick demo

def format_chat_template(row):
    row_json = [{"role": "user", "content": row["Patient"]},
               {"role": "assistant", "content": row["Doctor"]}]
    row["text"] = tokenizer.apply_chat_template(row_json, tokenize=False)
    return row

dataset = dataset.map(
    format_chat_template,
    num_proc=4,
)

dataset['text'][3]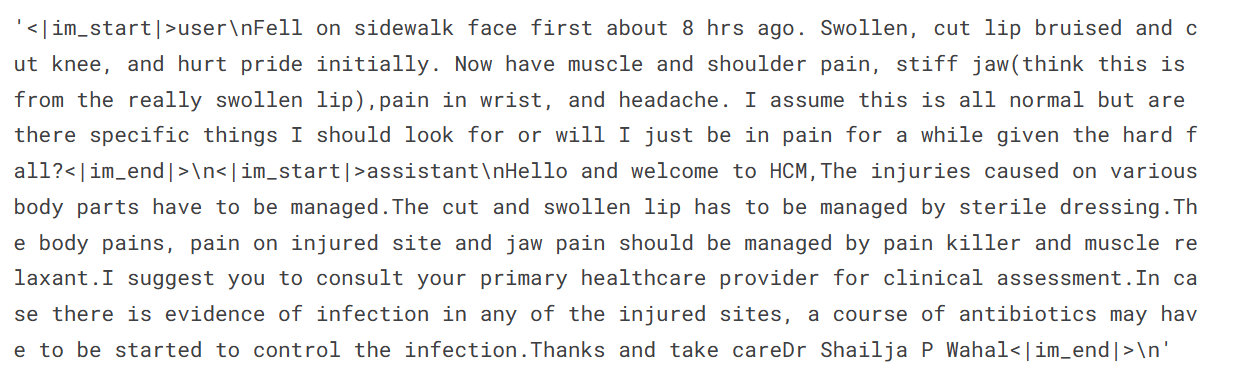
4. Split the dataset into a training and validation set.
dataset = dataset.train_test_split(test_size=0.1)We are setting the model hyperparameters so that we can run it on the Kaggle. You can learn about each hyperparameter by reading the Fine-Tuning Llama 2 tutorial.
We are fine-tuning the model for one epoch and logging the metrics using the Weights and Biases.
training_arguments = TrainingArguments(
    output_dir=new_model,
    per_device_train_batch_size=1,
    per_device_eval_batch_size=1,
    gradient_accumulation_steps=2,
    optim="paged_adamw_32bit",
    num_train_epochs=1,
    evaluation_strategy="steps",
    eval_steps=0.2,
    logging_steps=1,
    warmup_steps=10,
    logging_strategy="steps",
    learning_rate=2e-4,
    fp16=False,
    bf16=False,
    group_by_length=True,
    report_to="wandb"
)
We’ll now set up a supervised fine-tuning (SFT) trainer and provide a train and evaluation dataset, LoRA configuration, training argument, tokenizer, and model. We’re keeping the max_seq_length to 512 to avoid exceeding GPU memory during training.
trainer = SFTTrainer(
    model=model,
    train_dataset=dataset["train"],
    eval_dataset=dataset["test"],
    peft_config=peft_config,
    max_seq_length=512,
    dataset_text_field="text",
    tokenizer=tokenizer,
    args=training_arguments,
    packing= False,
)
We’ll start the fine-tuning process by running the following code.
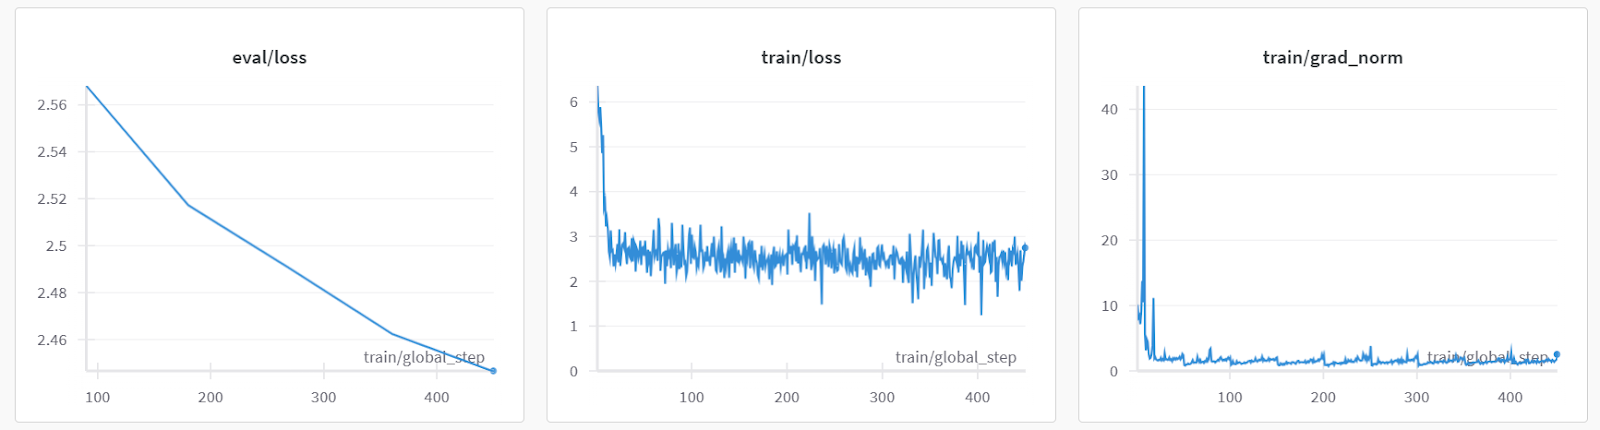
trainer.train()Both training and validation losses have decreased. Consider training the model for three epochs on the full dataset for better results.
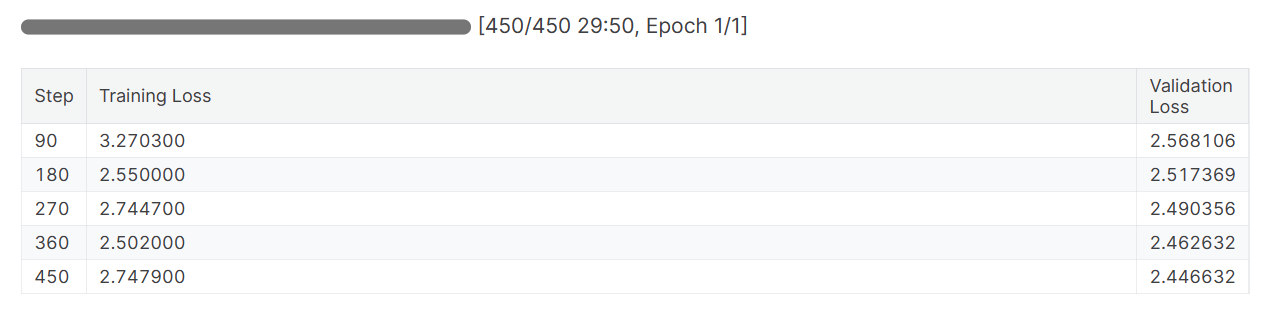
When you finish the Weights & Biases session, it’ll generate the run history and summary.
wandb.finish()
model.config.use_cache = True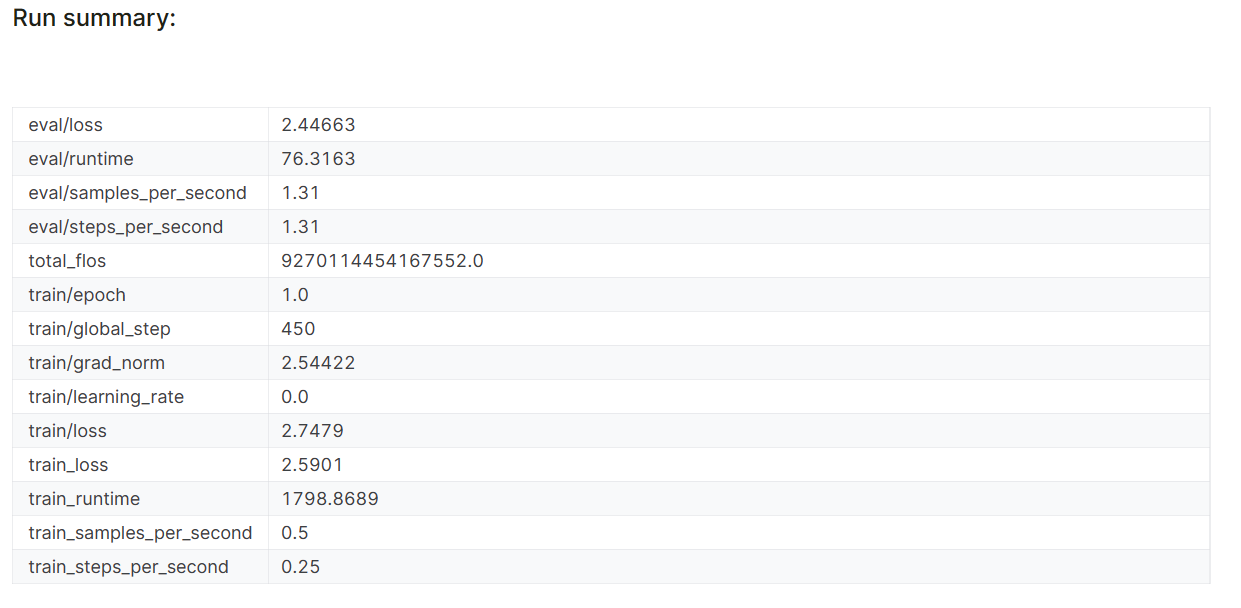
The model performance metrics are also stored under the specific project name on your Weights & Biases account.
Let’s evaluate the model on a sample patient query to check if it’s properly fine-tuned.
To generate a response, we need to convert messages into chat format, pass them through the tokenizer, input the result into the model, and then decode the generated token to display the text.
messages = [
    {
        "role": "user",
        "content": "Hello doctor, I have bad acne. How do I get rid of it?"
    }
]

prompt = tokenizer.apply_chat_template(messages, tokenize=False,
                                       add_generation_prompt=True)

inputs = tokenizer(prompt, return_tensors='pt', padding=True,
                   truncation=True).to("cuda")

outputs = model.generate(**inputs, max_length=150,
                         num_return_sequences=1)

text = tokenizer.decode(outputs[0], skip_special_tokens=True)

print(text.split("assistant")[1])
It turns out we can get average results even with one epoch.
We’ll now save the fine-tuned adapter and push it to the Hugging Face Hub. The Hub API will automatically create the repository and store the adapter file.
trainer.model.save_pretrained(new_model)
trainer.model.push_to_hub(new_model, use_temp_dir=False)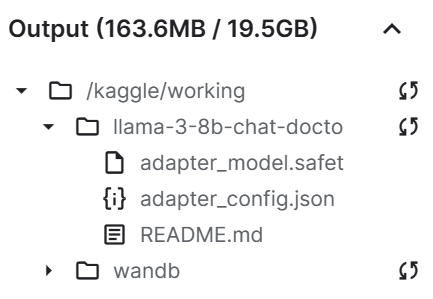
As we can see, our save adapter file is significantly smaller than the base model.
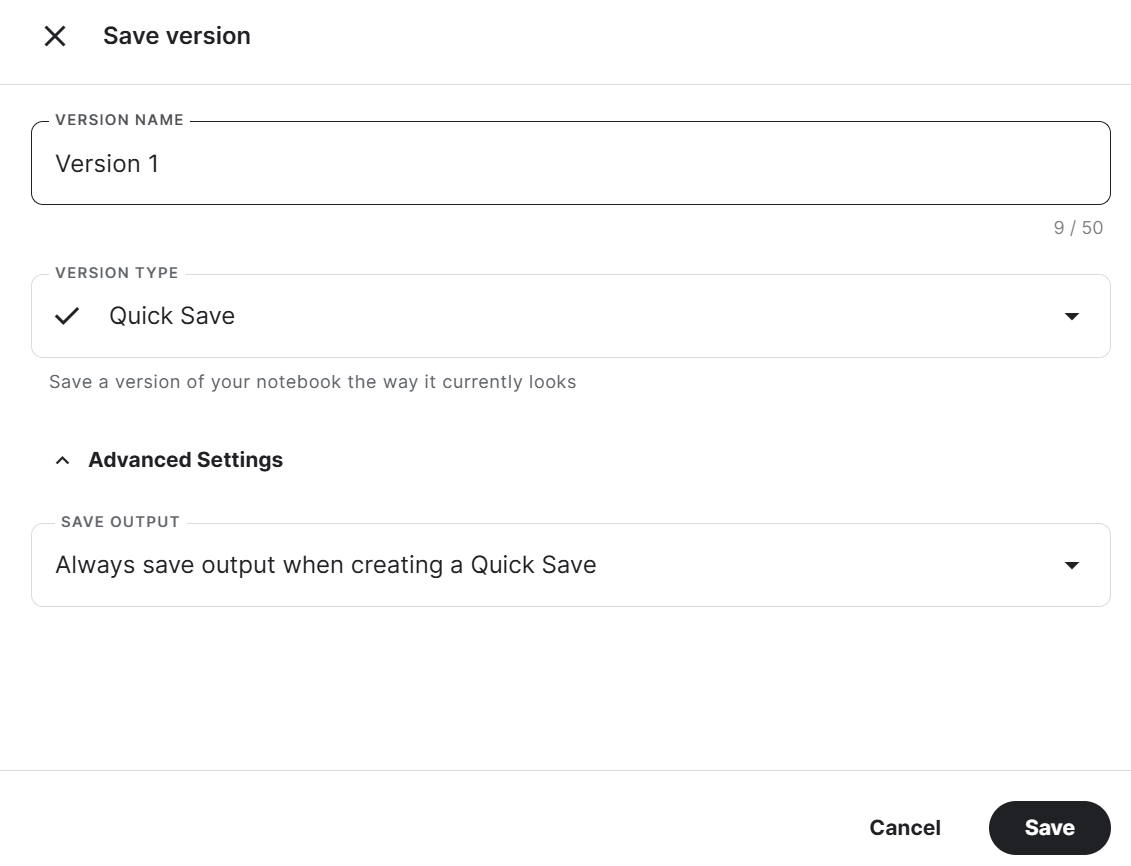
Ultimately, we’ll save the notebook with the adapter file to merge it with the base model in the new notebook.
To save the Kaggle Notebook, click the Save Version button at the top right, select the version type as Quick Save, open the advanced setting, select Always save output when creating a Quick Save, and then press the Save button.
If you are facing an issue while running the code, refer to this Kaggle Notebook: Fine-tune Llama 3 8B on Medical Dataset.
We have fine-tuned our model using the GPU. You can also learn to fine-tune LLMs using the TPUs by following the tutorial Fine-Tune and Run Inference on Google's Gemma Model Using TPUs.
If you want to learn how to fine-tune other models, check out this Mistral 7B Tutorial: A Step-by-Step Guide to Using and Fine-Tuning Mistral 7B.
To use the fine-tuned model locally, we have to first merge the adapter with the base model and then save the full model.
Let’s take the following steps:
1. Create a new Kaggle Notebook and install all the necessary Python packages. Make sure you are using the GPU as an accelerator.
%%capture
%pip install -U bitsandbytes
%pip install -U transformers
%pip install -U accelerate
%pip install -U peft
%pip install -U trl
2. Log in to the Hugging Face Hub using the Kaggle Secrets. It will help us easily upload the full fine-tuned model.
from huggingface_hub import login
from kaggle_secrets import UserSecretsClient
user_secrets = UserSecretsClient()
hf_token = user_secrets.get_secret("HUGGINGFACE_TOKEN")
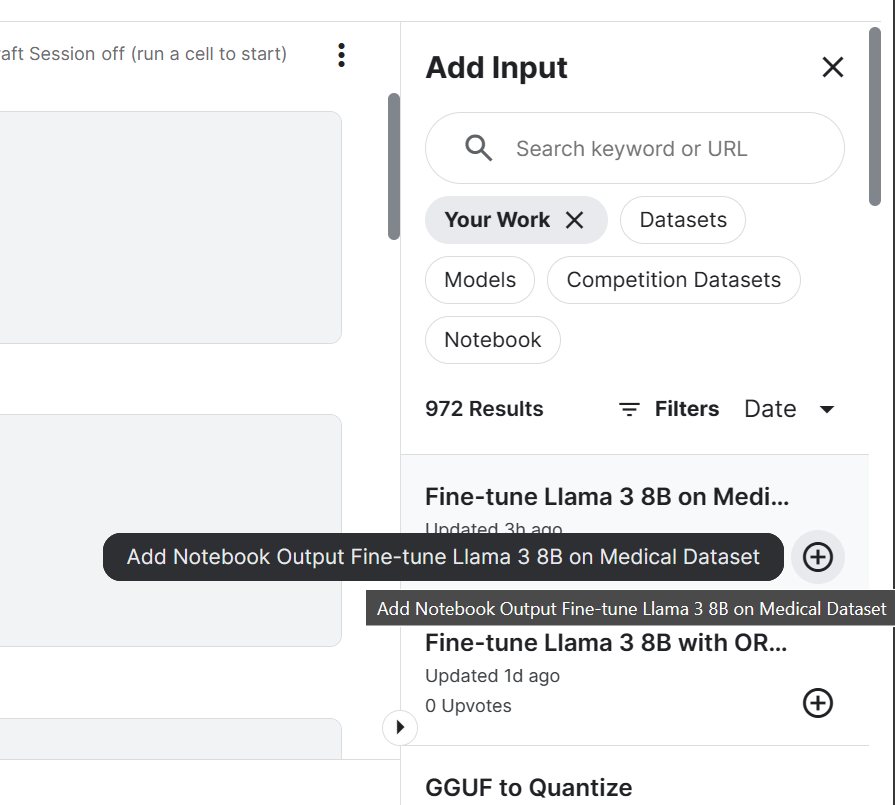
login(token = hf_token)3. Add the Llama 3 8B Chat model and a fine-tuned Kaggle Notebook we recently saved. We can add the Notebooks in the current session just like you add a dataset and models.
Adding Notebook to the Kaggle session will allow us to access the output files. In our case, it’s a model adapter file.
4. Setting the variable with the location of the base model and adapter.
base_model = "/kaggle/input/llama-3/transformers/8b-chat-hf/1"
new_model = "/kaggle/input/fine-tune-llama-3-8b-on-medical-dataset/llama-3-8b-chat-doctor/"We’ll first load the tokenizer and base model using the transformers library. Then, we’ll set up the chat format using the trl library. Finally, we’ll load and merge the adapter to the base model using the PEFT library.
The merge_and_unload() function will help us merge the adapter weights with the base model and use it as a standalone model.
from transformers import AutoModelForCausalLM, AutoTokenizer, pipeline
from peft import PeftModel
import torch
from trl import setup_chat_format
# Reload tokenizer and model
tokenizer = AutoTokenizer.from_pretrained(base_model)

base_model_reload = AutoModelForCausalLM.from_pretrained(
        base_model,
        return_dict=True,
        low_cpu_mem_usage=True,
        torch_dtype=torch.float16,
        device_map="auto",
        trust_remote_code=True,
)

base_model_reload, tokenizer = setup_chat_format(base_model_reload, tokenizer)

# Merge adapter with base model
model = PeftModel.from_pretrained(base_model_reload, new_model)

model = model.merge_and_unload()To verify if our model has been merged correctly, we'll perform a simple inference using pipeline from the transformers library. We'll convert the message using the chat template and then provide a prompt to the pipeline. The pipeline was initialized using the model, tokenizer, and task type.
As a side note, you can set device_map to "auto" if you want to use multiple GPUs.
messages = [{"role": "user", "content": "Hello doctor, I have bad acne. How do I get rid of it?"}]

prompt = tokenizer.apply_chat_template(messages, tokenize=False, add_generation_prompt=True)
pipe = pipeline(
    "text-generation",
    model=model,
    tokenizer=tokenizer,
    torch_dtype=torch.float16,
    device_map="auto",
)

outputs = pipe(prompt, max_new_tokens=120, do_sample=True, temperature=0.7, top_k=50, top_p=0.95)
print(outputs[0]["generated_text"])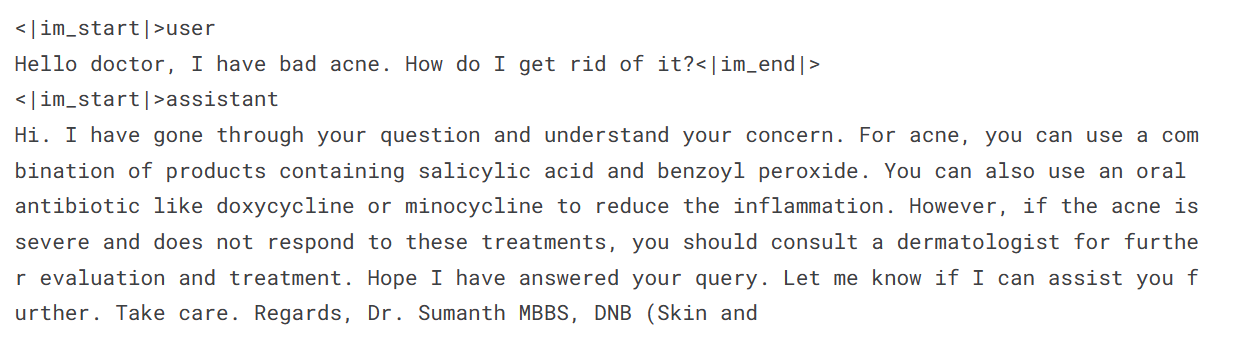
Our fine-tuned model is working as expected after being merged.
We'll now save a tokenizer and model using the save_pretrained() function.
model.save_pretrained("llama-3-8b-chat-doctor")
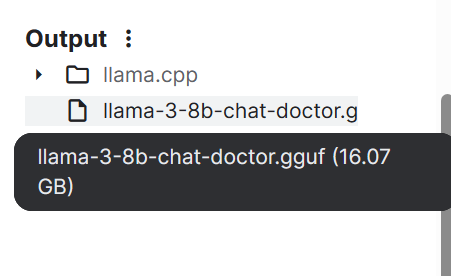
tokenizer.save_pretrained("llama-3-8b-chat-doctor")The model files are stored in the safetensors format, and the total size of the model is around 16 GB.

We can push all the files to the Hugging Face Hub using the push_to_hub() function.
model.push_to_hub("llama-3-8b-chat-doctor", use_temp_dir=False)
tokenizer.push_to_hub("llama-3-8b-chat-doctor", use_temp_dir=False)
In the end, we can save the Kaggle Notebook just like we did previously.
Using the Fine Tuned Adapter to fully model Kaggle Notebook will help you resolve any issue related to running the code on your own.
We can’t use the safetensors files locally as most local AI chatbots don’t support them. Instead, we'll convert it into the llama.cpp GGUF file format.
Start the new Kaggle Notebook session and add the Fine Tuned Adapter to the full model Notebook.
Clone the llama.cpp repository and install the llama.cpp framework using the make command as shown below.
As a side note, the command below works only for the Kaggle Notebook. You might have to change a few things to run it on other platforms or locally.
%cd /kaggle/working
!git clone --depth=1 https://github.com/ggerganov/llama.cpp.git
%cd /kaggle/working/llama.cpp
!sed -i 's|MK_LDFLAGS   += -lcuda|MK_LDFLAGS   += -L/usr/local/nvidia/lib64 -lcuda|' Makefile
!LLAMA_CUDA=1 conda run -n base make -j > /dev/nullRun the following command in the Kaggle Notebook cell to convert the model into the GGUF format.
The convert-hf-to-gguf.py requires an input model directory, output file directory, and out type.
!python convert-hf-to-gguf.py /kaggle/input/fine-tuned-adapter-to-full-model/llama-3-8b-chat-doctor/ \
    --outfile /kaggle/working/llama-3-8b-chat-doctor.gguf \
    --outtype f16
Within a few minutes, the model is converted and saved locally. We can then save the notebook to save the file.
If you face issues running the above code, consult the HF LLM to GGUF Kaggle Notebook.
Regular laptops don’t have enough RAM and GPU memory to load the entire model, so we have to quantify the GGUF model, reducing the 16 GB model to around 4-5 GB.
Start the new Kaggle Notebook session and add the HF LLM to GGUF Notebook.
Then, install the llama.cpp by running the following command in the Kaggle Notebook cell.
%cd /kaggle/working
!git clone --depth=1 https://github.com/ggerganov/llama.cpp.git
%cd /kaggle/working/llama.cpp
!sed -i 's|MK_LDFLAGS   += -lcuda|MK_LDFLAGS   += -L/usr/local/nvidia/lib64 -lcuda|' Makefile
!LLAMA_CUDA=1 conda run -n base make -j > /dev/nullThe quantize script requires a GGUF model directory, output file directory, and quantization method. We are converting the model using the Q4_K_M method.
%cd /kaggle/working/

!./llama.cpp/llama-quantize /kaggle/input/hf-llm-to-gguf/llama-3-8b-chat-doctor.gguf llama-3-8b-chat-doctor-Q4_K_M.gguf Q4_K_M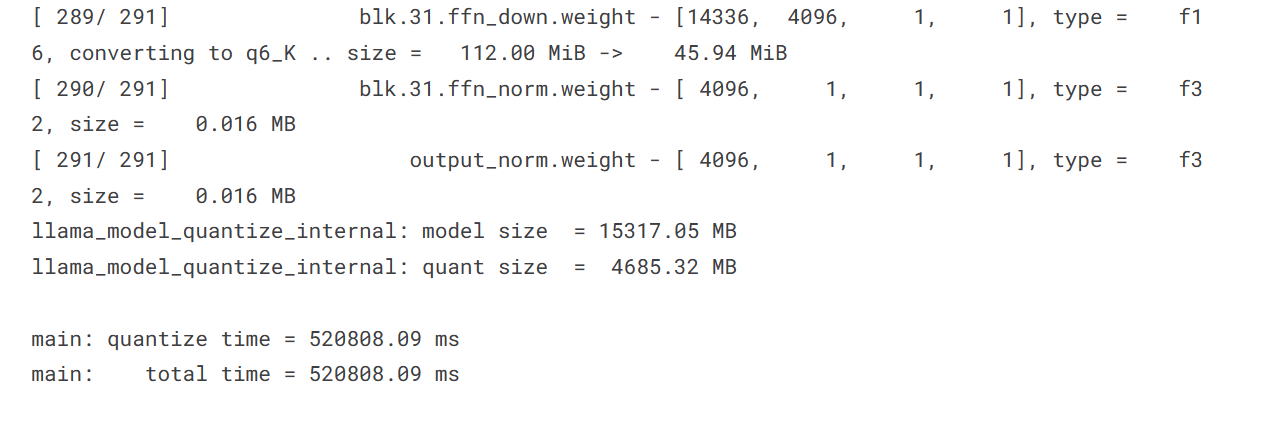
Our model size has significantly decreased from 15317.05 MB to 4685.32 MB.
To push the single file to the Hugging Face Hub, we'll:
from huggingface_hub import login
from kaggle_secrets import UserSecretsClient
from huggingface_hub import HfApi
user_secrets = UserSecretsClient()
hf_token = user_secrets.get_secret("HUGGINGFACE_TOKEN")
login(token = hf_token)

api = HfApi()
api.upload_file(
    path_or_fileobj="/kaggle/working/llama-3-8b-chat-doctor-Q4_K_M.gguf",
    path_in_repo="llama-3-8b-chat-doctor-Q4_K_M.gguf",
    repo_id="kingabzpro/llama-3-8b-chat-doctor",
    repo_type="model",
)
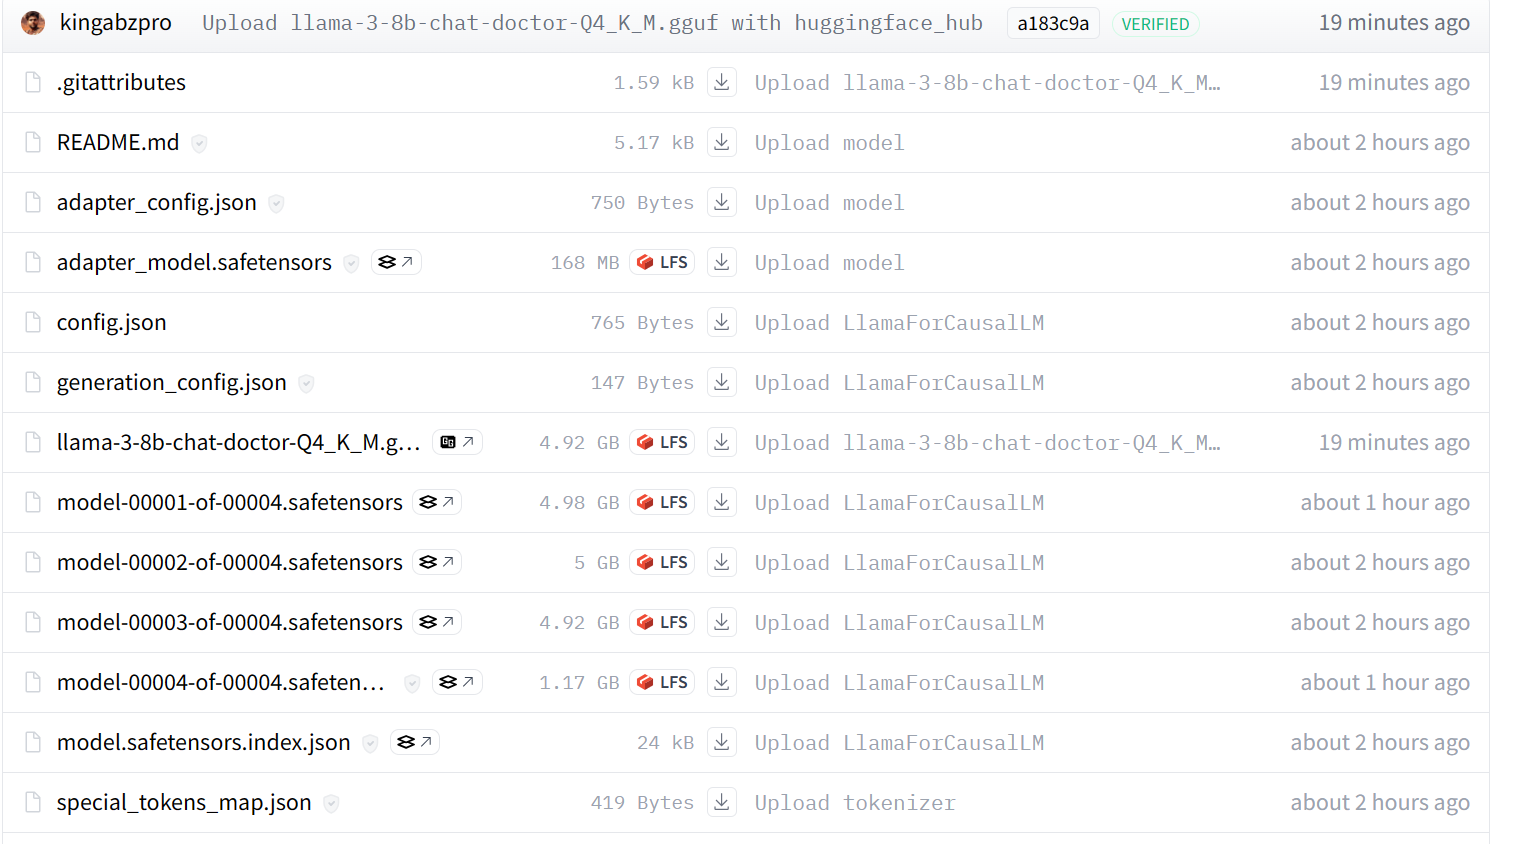
Our model is successfully pushed to the remote server, as shown below.
If you’re still experiencing problems, please refer to the GGUF to Quantize Kaggle Notebook, which contains all the code and output.
If you’re looking for a simpler way to convert and quantize your model, visit this Hugging Face Space and provide it with the Hub Model Id.
To use the GGUF model locally, you must download and import it into the Jan application.
To download the model, we need to:
1. Go to our Hugging Face repository.
2. Click the Files tab.
3. Click on the quantized model file with the GGUF extension.

4. Click the download button.
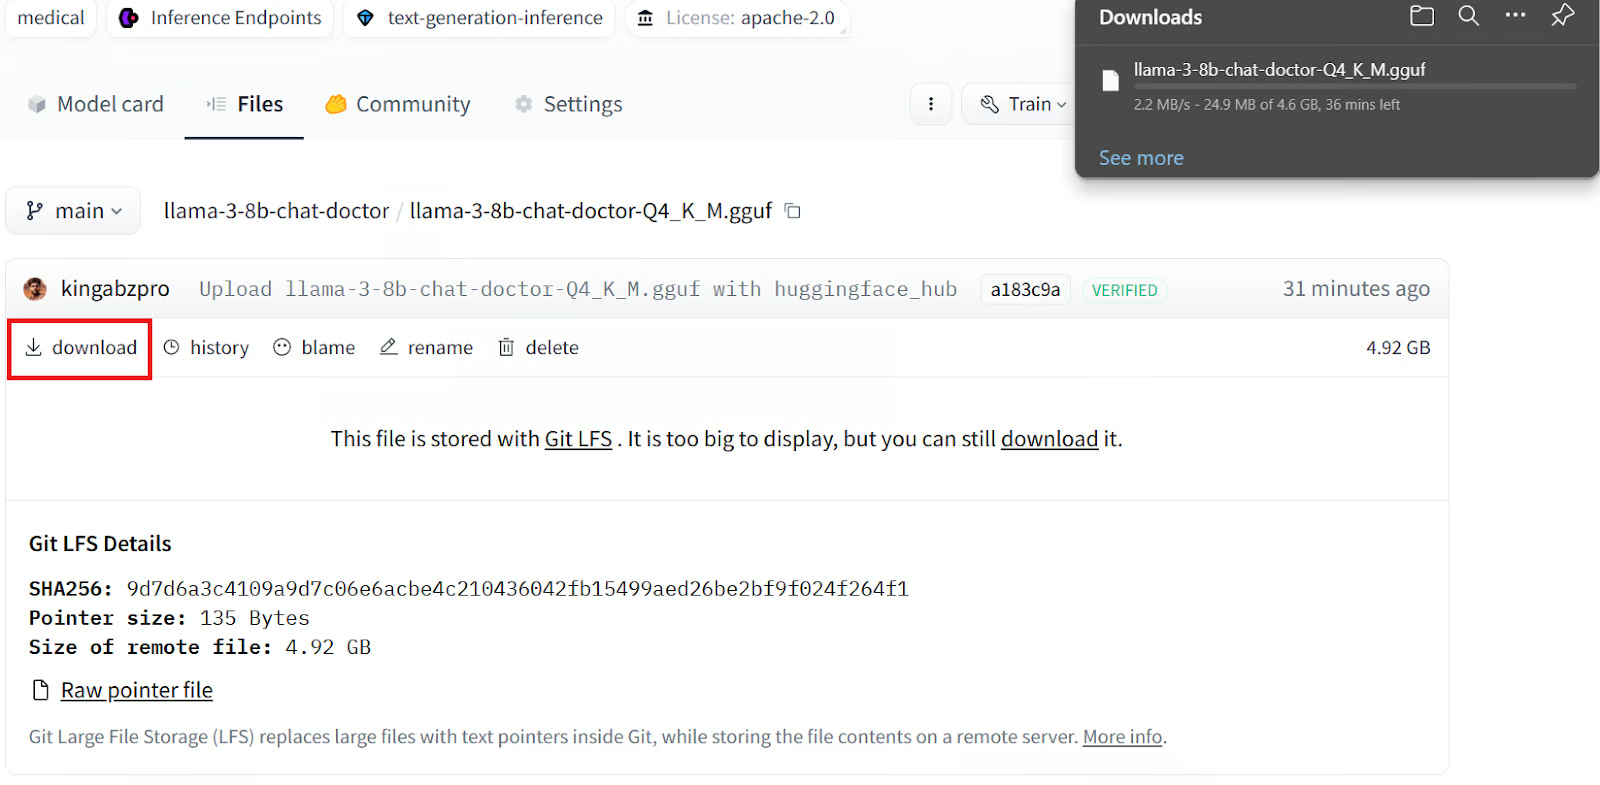
It will take several minutes to download the file locally.
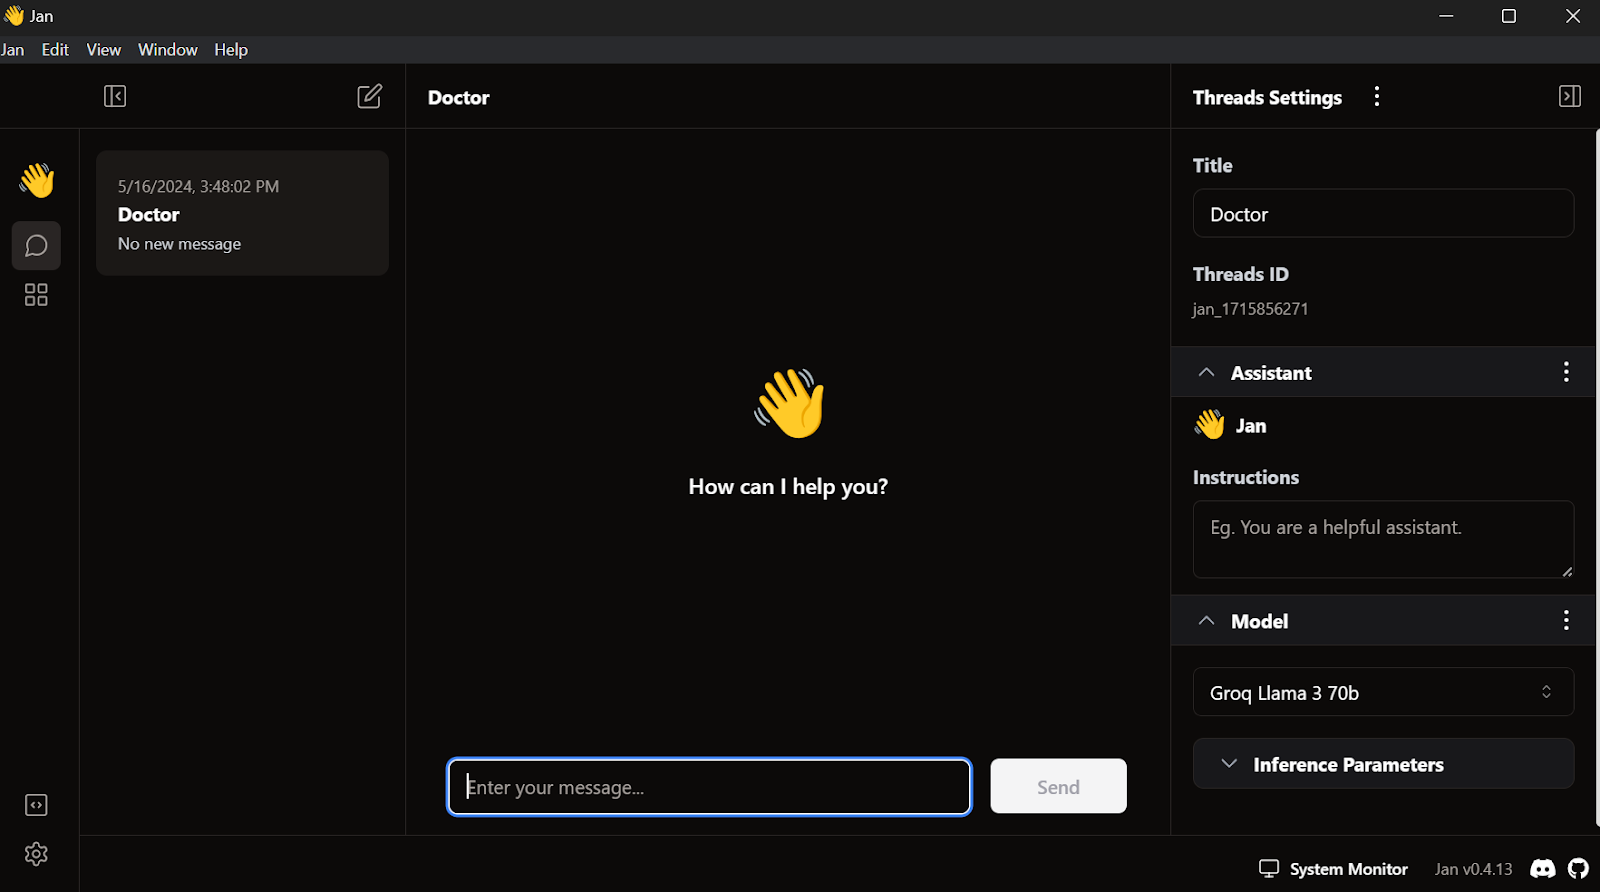
Download and install the Jan application from Jan AI.
This is how it looks when you launch the Jan window application:
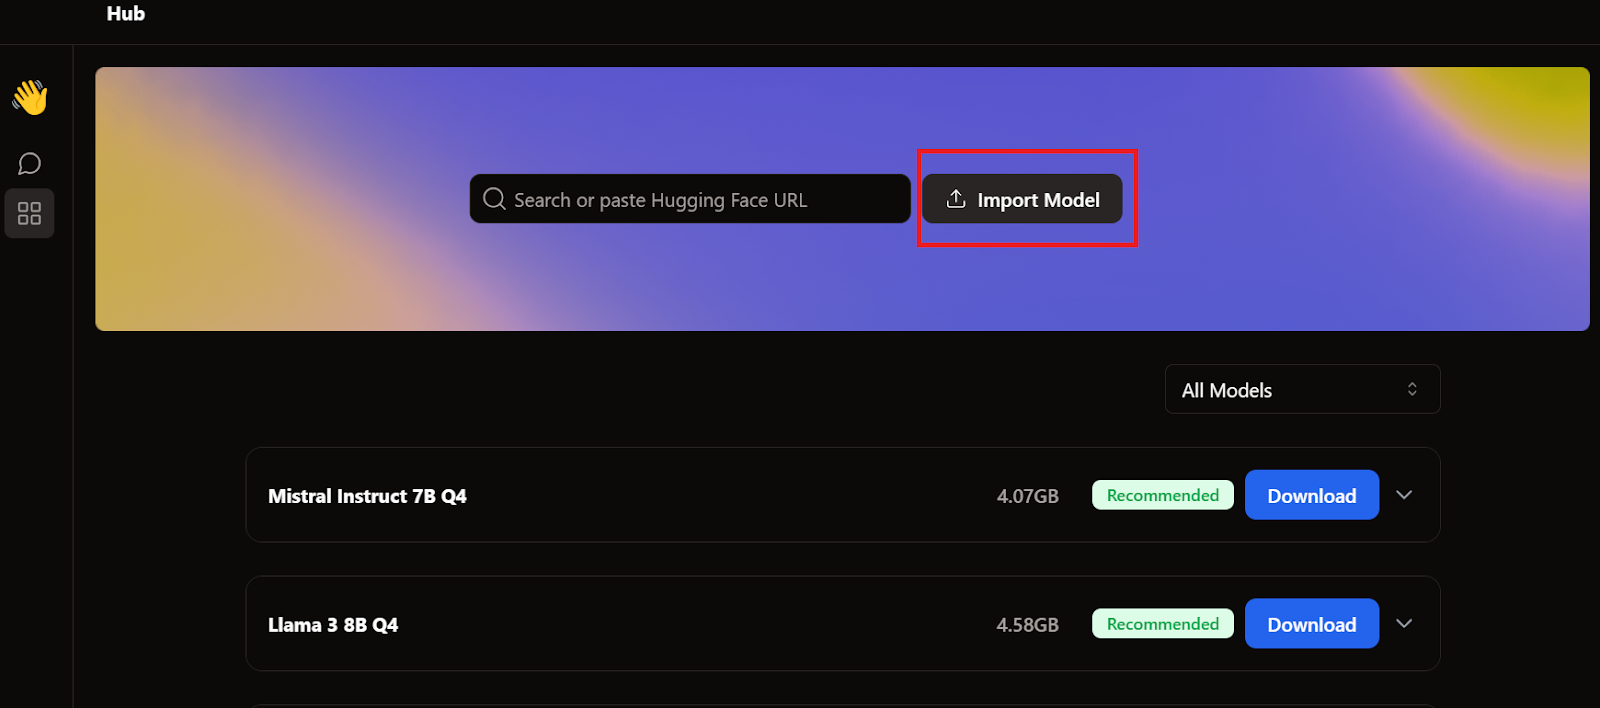
To add the model to the Jan application, we have to import the quantized GGUF file.
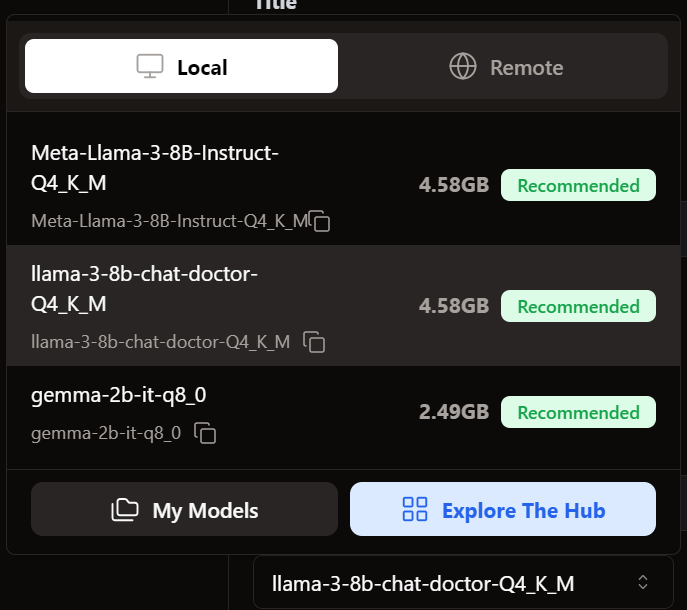
We need to go to the Hub menu and click Import Model, as shown below. We provide the location of the recently downloaded file, and that's it.
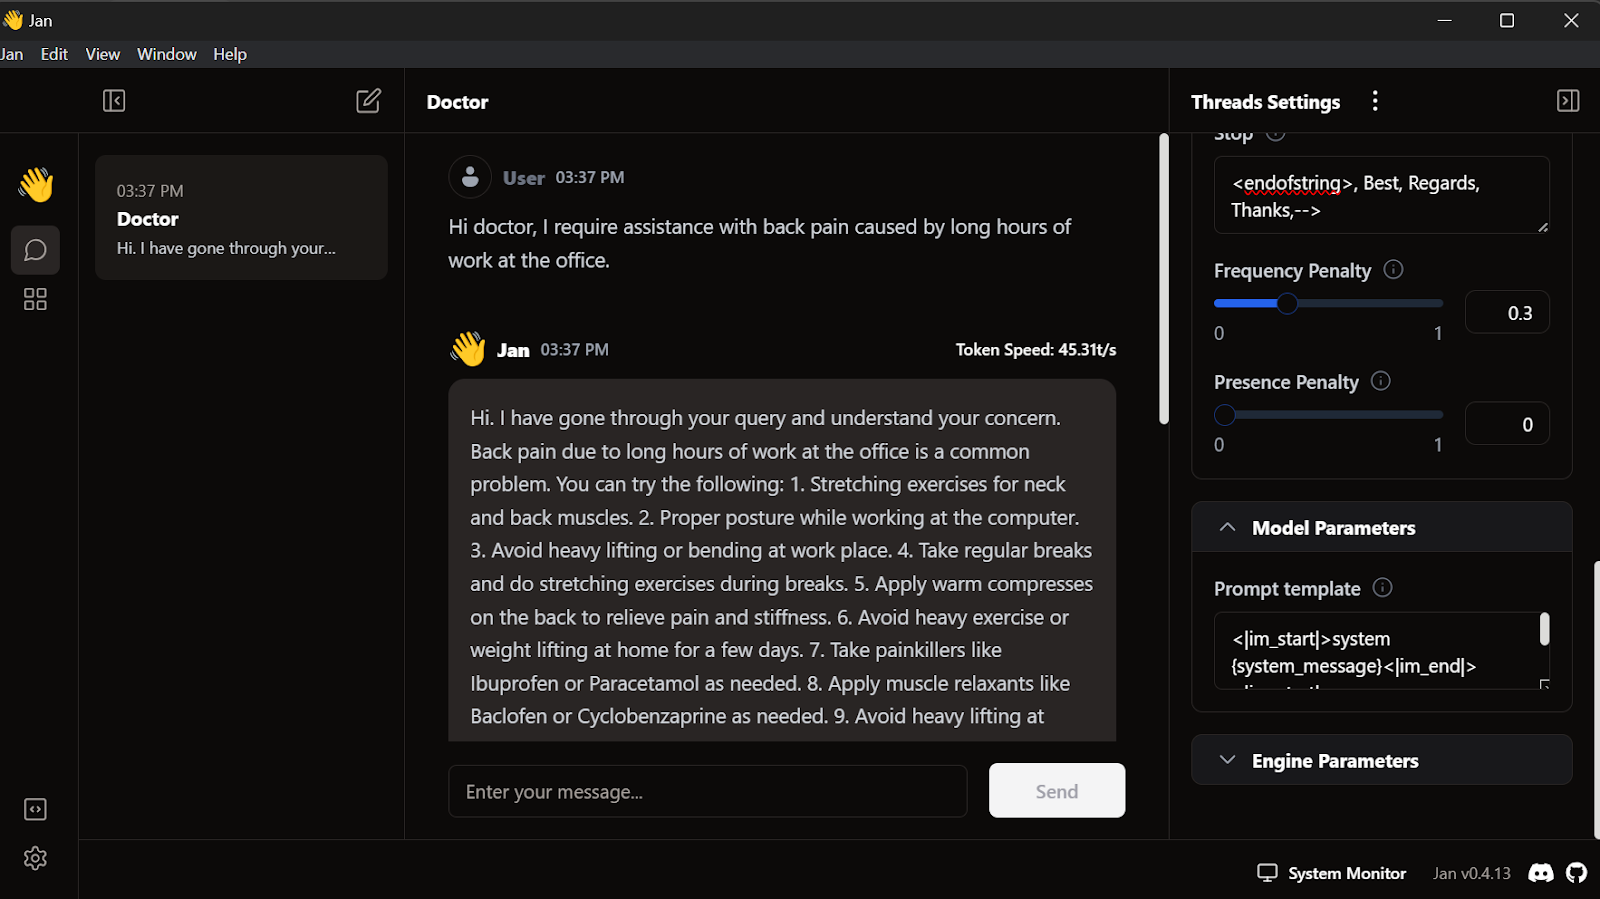
We go to the Thread menu and select the fine-tuned model.
Before using the model, we need to customize it to display the response correctly. First, we modify the Prompt template in the Model Parameters section.
<|im_start|>system
{system_message}<|im_end|>
<|im_start|>user
{prompt}<|im_end|>
<|im_start|>assistant
We add the Stop token and change the max token to 512 in the inference parameters.
<endofstring>, Best, Regards, Thanks,-->We start writing the queries, and the doctor will respond accordingly.
Our fine-tuned model is working perfectly locally.
This model works with GPT4ALL, Llama.cpp, Ollama, and many other local AI applications. To learn how to use each, check out this tutorial on how to run LLMs locally.
Fine-tuning the Llama 3 model on a custom dataset and using it locally has opened up many possibilities for building innovative applications. The potential use cases range from private and customized conversational AI solutions to domain-specific chatbots, text classification, language translation, question-answering personalized recommendation systems, and even healthcare and marketing automation applications.
With the Ollama and Langchain frameworks, building your own AI application is now more accessible than ever, requiring only a few lines of code. To do that, follow the LlamaIndex: A Data Framework for Large Language Models (LLMs)- based applications tutorial.
In this tutorial, we learned to fine-tune the Llama 3 8B Chat on a medical dataset. We went through the process of merging the adapter with the base model, converting it to the GGUF format, and quantizing it for local use on a Jan chatbot application.
If you want to learn more, check out this four-course skill track on Developing Large Language Models.
Learn AI with these courses!
Track
Track
Track
Tutorial
Abid Ali Awan
Tutorial
Abid Ali Awan
Tutorial
Abid Ali Awan
Tutorial
Abid Ali Awan
code-along
Maxime Labonne
code-along
Maxime Labonne