
Track
Git Fundamentals
7 hr
If you have ever worked on more than one feature at the same time, this situation may sound familiar: you run a Git command, and now you’re no longer sure where your work from last week actually lives.
This problem becomes more common as projects grow. Early on, a repository might only have a main branch. Over time, however, teams create branches for new features, bug fixes, experiments, releases, and emergency hotfixes.
This is where listing branches in Git becomes essential. It helps answer practical questions:
In this guide, we’ll look at the basics of listing branches in Git, how you can do it, and how to troubleshoot common issues.
If Git is completely new to you, I recommend taking our Introduction to Git course to help you build confidence before diving into more detailed branch management topics.
Before we start listing them, let's break down what Git branches are.
A common misconception is that Git branches are separate folders or full copies of a codebase, but in reality, a Git branch is just a lightweight pointer to a specific commit.
You can think of it as a parallel timeline where you can build features or experiment in isolation without affecting your stable main code. This architecture makes creating and merging branches incredibly fast and efficient.
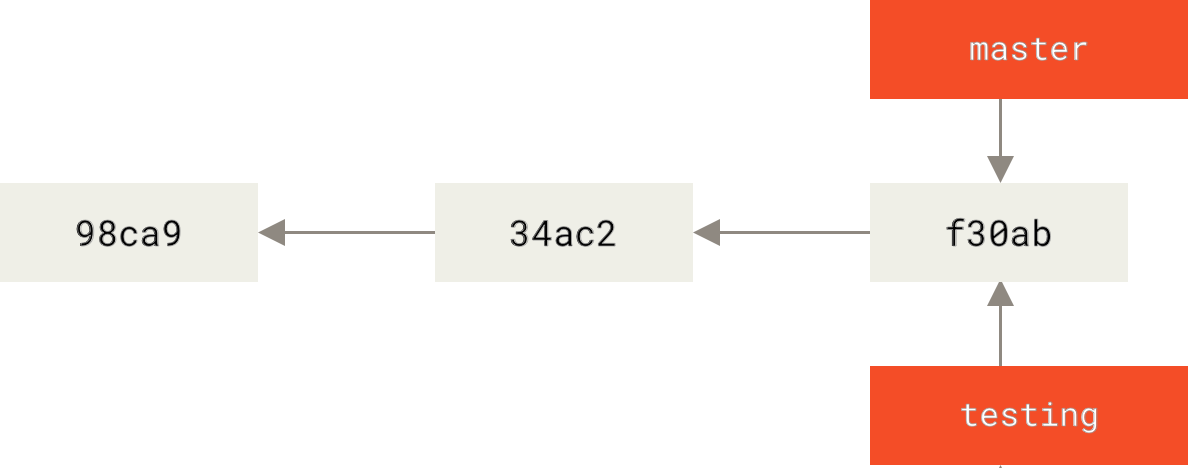
Source: Git
Git tracks your current position in these timelines using a special reference called HEAD, which always points to the branch you are currently working on. Because branches are just pointers, switching contexts is instantaneous and doesn't require moving heavy files around.
For more details, check out our tutorial on Git branches or consult our Git cheat sheet.
With that conceptual foundation set, let’s look at how to list local branches in your repository.
A local branch is a branch that exists on your computer. It lives inside your repository’s .git folder and represents a movable pointer to a series of commits. You can switch to a local branch, make changes, and create new commits on it.
It helps to think of local branches this way:
The most common and fundamental command for listing local branches is quite straightforward:
git branchWhen you run this command without any additional options, Git shows you all local branches.
Important things to remember about git branch:
Because it is safe and fast, many developers run git branch as a habit before starting new work or switching context.
Here is an example of what git branch might show:
 bugfix/login-timeout
  feature/payment-refactor
* main
Even though this output looks simple, there are a few important details hidden in it.
First, the asterisk (*) indicates the currently checked-out branch. This is the branch your working directory is tied to right now. Any new commits you create will go onto this branch.
Second, Git usually highlights the current branch in green. This is just visual help from the terminal and does not change Git’s behavior.
Third, notice what is not shown:
This is intentional. Git keeps the default output short, so it is easy to scan and combine with other commands.
Beginner tip: If your terminal ever looks "stuck" after running a Git command, try pressing q. Git often uses a pager to display long output, and this is a normal way to exit it.
Sometimes, listing all branches is unnecessary. You may only want to know which branch you are currently on. Git provides a dedicated command for this:
git branch --show-currentThe output is just the branch name:
mainCommon situations where this is useful include:
If Git is in a detached HEAD state, this command returns nothing. While that may seem strange at first, it is actually helpful when writing scripts that need to detect whether a branch is checked out.
Common mistake: Some users think Git is "broken" when no branch name appears. In most cases, this simply means you are not currently on a branch but on a specific commit.
Listing remote or even all branches in Git works very similarly to listing local ones.
Remote repositories, such as those on GitHub or GitLab, have their own branches. To view them, add the -r flag:
git branch -r origin/HEAD -> origin/main
origin/bugfix/login-timeout
origin/feature/payment-refactor
origin/mainThis example output can be confusing at first, so let us break it down.
What you are seeing here are remote-tracking branches. These are local references that Git uses to remember the last known state of the remote repository.
Key points to understand:
Beginner tip: Think of remote-tracking branches as Git’s notebook. Git writes down what the remote looked like the last time you checked, but it will not update that notebook unless you explicitly fetch.
To see both local branches and remote-tracking branches together, use the -a flag:
git branch -a* main
feature/payment-refactor
remotes/origin/bugfix/login-timeout
remotes/origin/mainThis combined view helps you understand how your local branches relate to the remote ones.
Naming patterns to watch for:
Local branches appear as simple names like main
Remote-tracking branches appear under remotes/origin/
This view is especially useful when deciding whether to create a new local branch that tracks an existing remote branch. If you need to clone a repository and work on a specific branch, check out our guide on how to clone a specific branch in Git.
If a teammate pushes a new branch and you cannot see it, the most common reason is that your local cache is outdated.
The solution is to fetch:
git fetchWhat git fetch does:
This command is safe to run at any time. It does not merge code or overwrite your work. Many teams treat git fetch as a routine step before inspecting branches.
Common mistake: Beginners often confuse git fetch with git pull. Fetch only updates branch information, while pull also merges changes into your current branch.
Sometimes, branch names are not enough. If you want to see additional details, there are a few helpful flags that can help you out.
To see what each branch actually contains, use:
git branch -vThe output might look like this:
* main   a1b2c3d Fix typo in README
  feature/payment-refactor e4f5g6h Refactor payment service
As you can see, the -v flag adds important context:
This is one of the easiest ways to understand what a branch is for without checking it out.
Beginner tip: If you are unsure whether a branch is safe to delete, checking its last commit message is a good first clue. For a complete guide on removing branches, see our tutorial on how to delete Git branches.
Local branches often track a corresponding remote branch. To see this relationship, run:
git branch -vv* main a1b2c3d [origin/main] Fix typo in README
feature/payment-refactor e4f5g6h [origin/feature/payment-refactor] Refactor payment serviceThis output tells you:
Which remote branch is your local branch linked to
Where git pull will pull from
Where git push will push to
If a branch has no upstream, it will not show anything in brackets. This often explains push or pull errors.
Common mistake: Trying to run git pull on a branch with no upstream will usually fail. In that case, you need to set an upstream branch first or push the branch for the first time.
To find recently active branches, you can sort by commit date:
git branch --sort=-committerdateThis places the most recently updated branches at the top and older branches at the bottom.
For repositories with versioned branches, semantic sorting is more useful:
git branch --sort=v:refnameThis respects version numbers and avoids confusing alphabetical order.
If you are searching for a specific branch, filtering can be very helpful. I’ll show you how to do it using a few important flags.
Especially in large repositories, filtering by name can save you a lot of time in finding the right branch. You can filter by name using the --list flag along with your search term:
git branch --list 'feature/*'Notice how the * is used as a wildcard: The result here only shows branches that match the pattern, so those that start with feature. Teams often use prefixes such as feature/, bugfix/, or hotfix/ to keep things organized. Think of them as folders for your branches.
Two very important filters are:
git branch --merged
git branch --no-merged
These commands compare other branches against your current branch.
--merged shows branches whose work is already included (learn more about Git merge)
--no-merged shows branches that still contain unique commits
Safety reminder: Always double-check that you are on the correct base branch (often main or develop) before using --merged. The results depend on your current branch.
If you know a commit hash and want to find where it exists, use this command:
git branch --contains <commit-hash>This is useful when tracking bugs or verifying that a fix has been merged.
For example, when a coworker tells you this: "I found a bug in this commit hash; which branches are affected by it?" You can use this command to pinpoint the exact location of the bug.
The filters I showed you can be combined to narrow results further. Let’s see one example:
git branch --list 'feature/*' --no-mergedThe result of this command quickly shows all unmerged feature/ branches and helps the team stay organized.
If you run into problems, don’t worry; the most common issues are quite easy to fix.
If you cannot see a branch that someone else pushed, the most likely reason is that you simply forgot to fetch. To troubleshoot:
Run git fetch
Then list the branches again
If the missing fetch was the problem, this quick fix updates your local view immediately.
Sometimes, the git branch output looks like this:
* (HEAD detached at a1b2c3d)This means you are not on a branch. You are viewing a specific commit directly.
Being in a detached HEAD state is not dangerous by itself, but any new commits you make can be hard to find later unless you create a branch.
To return to normal work, switch to an existing branch:
git checkout <branch-name>Modern alternative: Since Git 2.23+, you can use git switch <branch-name> which is a cleaner and safer command designed specifically for switching branches.
You can also create a new branch from your current position using the -b flag:
git checkout -b <new-branch-name>If remote branches still appear after deletion on the server, you can clean their local reference by using the following command:
git remote prune originThis cleans up stale references and keeps your repository tidy.
Pro tip: As an alternative, you can also use git fetch --prune every time you fetch, so the repo is updated and cleaned in a single step.
Listing branches in Git is a key skill that helps you understand your repository. The commands and flags covered in this tutorial will help you avoid mistakes and work confidently with others.
When starting a new project, it is usually worth it to think about what kind of branch structure you will need. For some advice, check out this guide on Git branching strategy.
Ready to move beyond the basics? The Git Fundamentals skill track offers the concepts and hands-on experience needed to go from beginner to pro.
Git Courses
Track
Course
Course
Tutorial
Oluseye Jeremiah
Tutorial
Mark Pedigo
Tutorial
François Aubry
Tutorial
Ashlyn Brooks
Tutorial
Patrick Brus
Tutorial
Srujana Maddula