Course
Developing LLM Applications with LangChain
3 hr
46.2K
OpenAI's o3 model is capable of solving complex multi-step problems, blending visual and textual input, and using tools like Python, search, or image inspection to enhance its answers.
In this tutorial, I’ll explain step-by-step how to use o3 via API, what makes o3 different from generalist models like GPT-4o, and how to manage reasoning costs effectively.
We keep our readers updated on the latest in AI by sending out The Median, our free Friday newsletter that breaks down the week’s key stories. Subscribe and stay sharp in just a few minutes a week:
OpenAI’s o3 model is designed for advanced, complex tasks requiring deep reasoning and autonomy. It’s particularly effective for intricate problem-solving in areas like software development, mathematics, scientific research, and visual data interpretation.
The model’s agentic capabilities allow it to autonomously utilize tools such as web search, Python, and image generation, making it ideal for tasks that demand multi-step analysis and dynamic decision-making.
You should consider using the o3 model via API when your projects involve complex, multi-modal reasoning tasks that benefit from its high autonomy and advanced analytical skills.
Let’s see a quick comparison between o3, o4-mini, and GPT-4o:

Source: OpenAI
Pricing is also an important factor to consider when using the API:

Source: OpenAI
Before you can start using o3’s advanced reasoning capabilities, you need to set up access to the OpenAI API. In this section, I'll walk you through:
To access the OpenAI API, you need a valid API key, which you can obtain from the OpenAI API Keys page, and make sure your billing is enabled.
Note: To use o3, you must first verify your OpenAI organization here. Verification may take up to 15 minutes to activate.
openai libraryWe start by installing and upgrading the openai library to access the O3 model via API. Run the following command:
pip install --upgrade openaiOnce installed, we import the OpenAI class from the openai library:
from openai import OpenAITo interact with OpenAI’s API, we authenticate by setting our secret API key, allowing us to make authorized requests to models like o3.
client = OpenAI(api_key=YOUR_API_KEY)Now that the setup is complete, let's make our first API call to o3 and see how it handles a simple multi-step reasoning task through the Responses API.
Let’s understand the o3 API call with a simple prompt example.
response = client.responses.create(
    model="o3",
    input=[{"role": "user", "content": "What’s the difference between inductive and deductive reasoning?"}]
)
print(response.output_text)
This example sends a natural language question directly to the o3 model without using any tools or special reasoning parameters.
model="o3" tells the API to use the o3 reasoning model.input=[{"role": "user", "content": "..."}] defines a single user message asking for a conceptual explanation.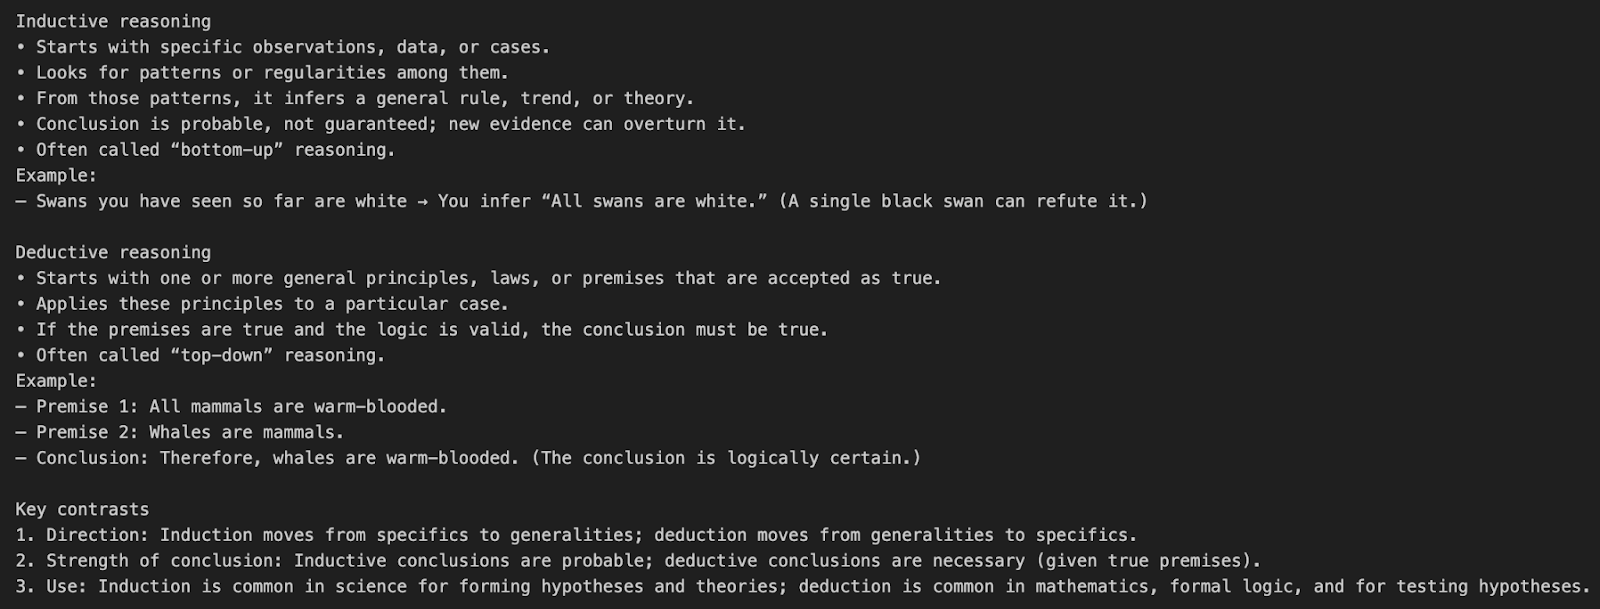
These are the tokens that will count towards our final cost:
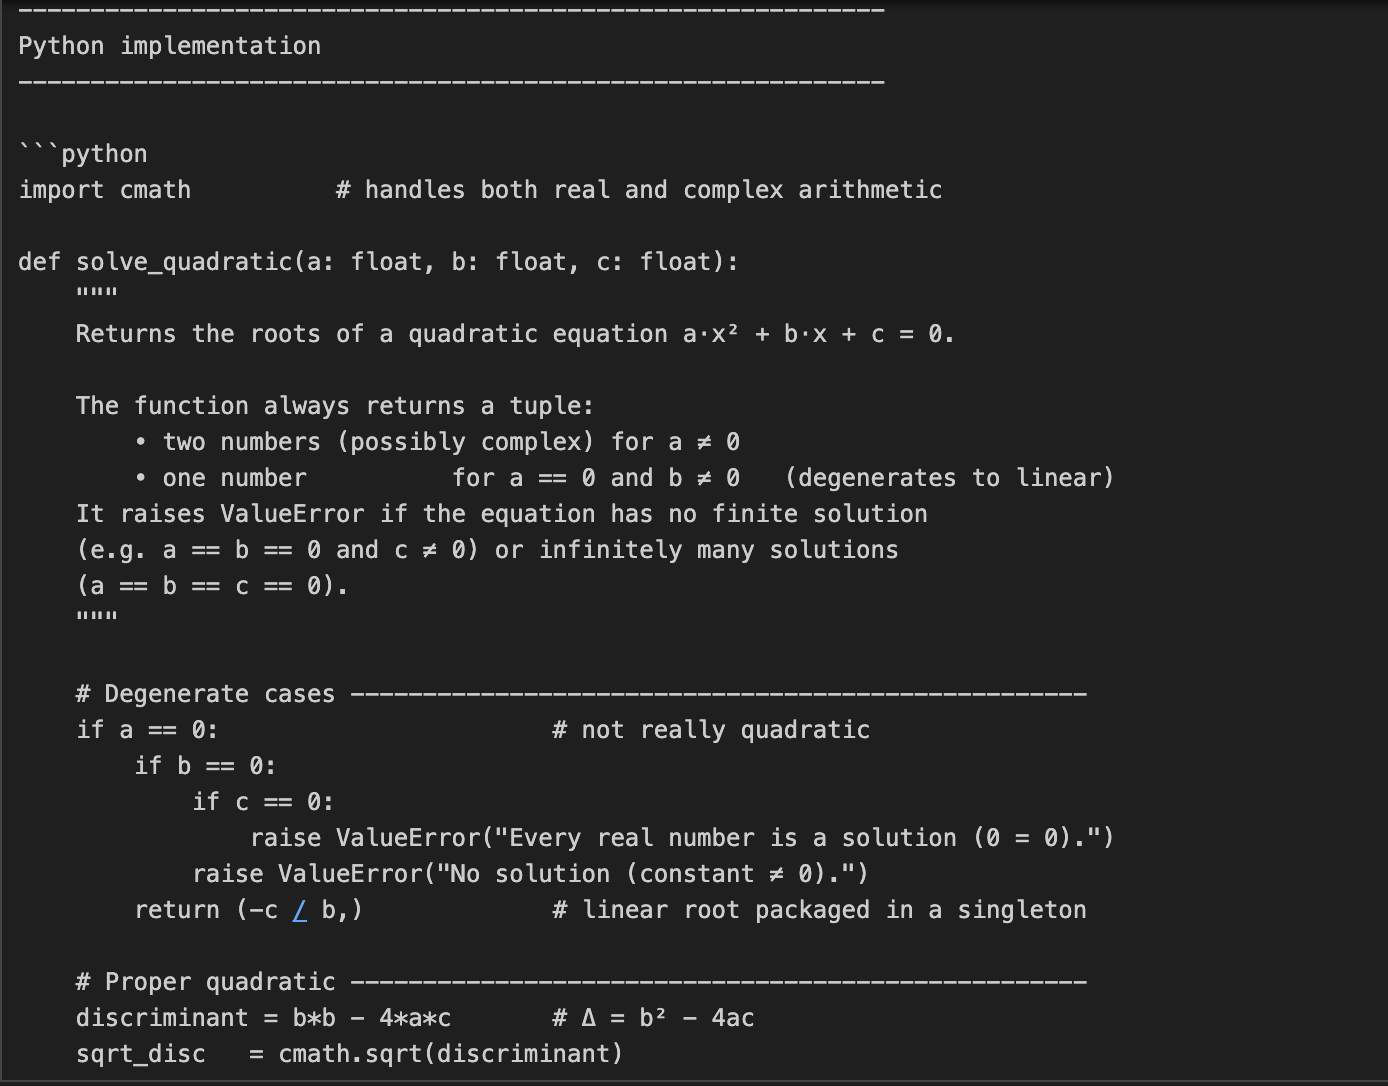
In this example, we ask o3 to both code and explain the math behind solving quadratic equations. This is a two-part task, requiring not just coding but a detailed mathematical explanation.
prompt = "Write a Python function that solves quadratic equations and also explain the math behind it."
response = client.responses.create(
model="o3",
reasoning={"effort": "high"},
input=[{"role": "user", "content": prompt}]
)
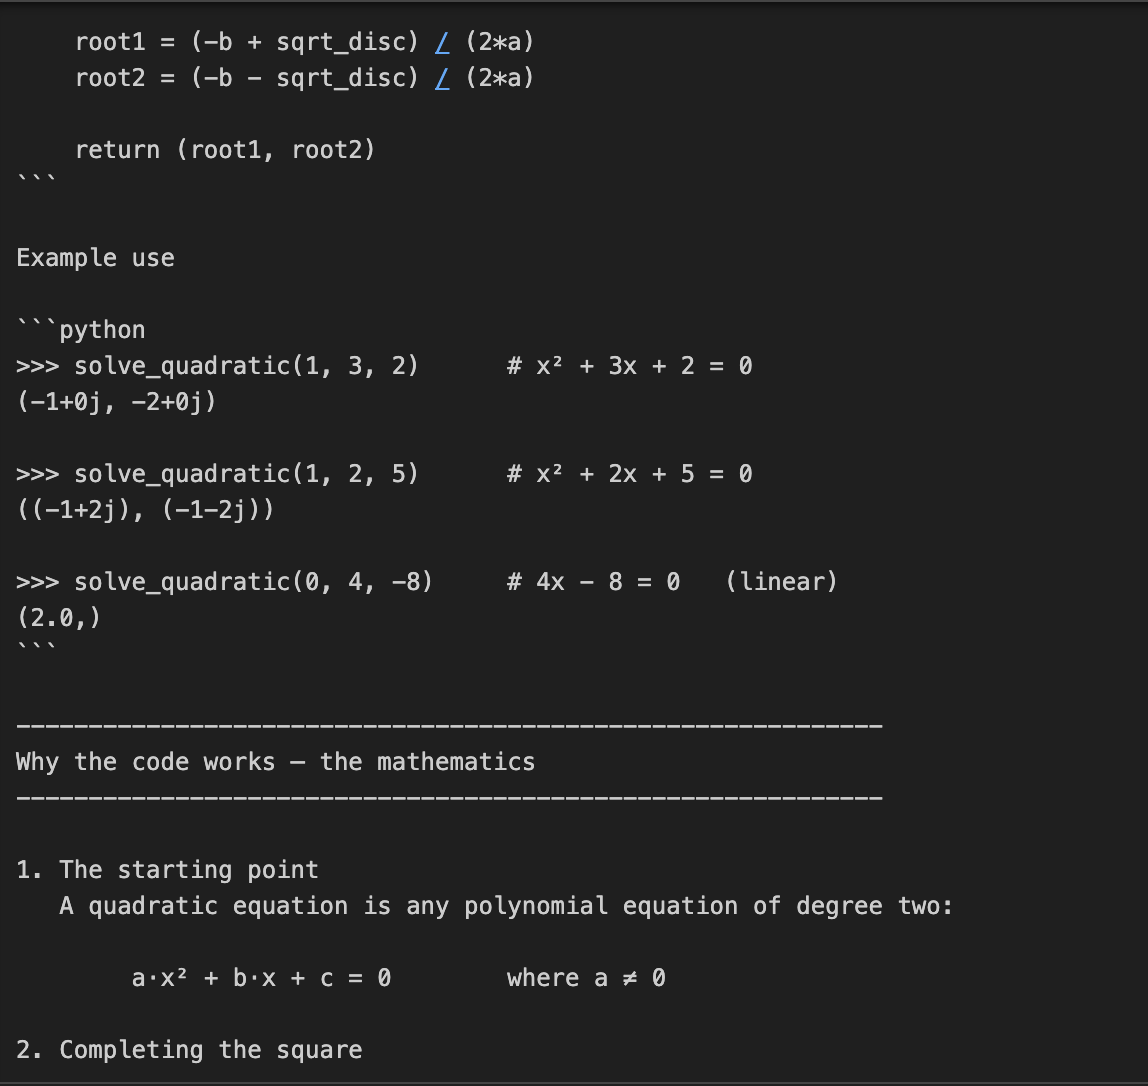
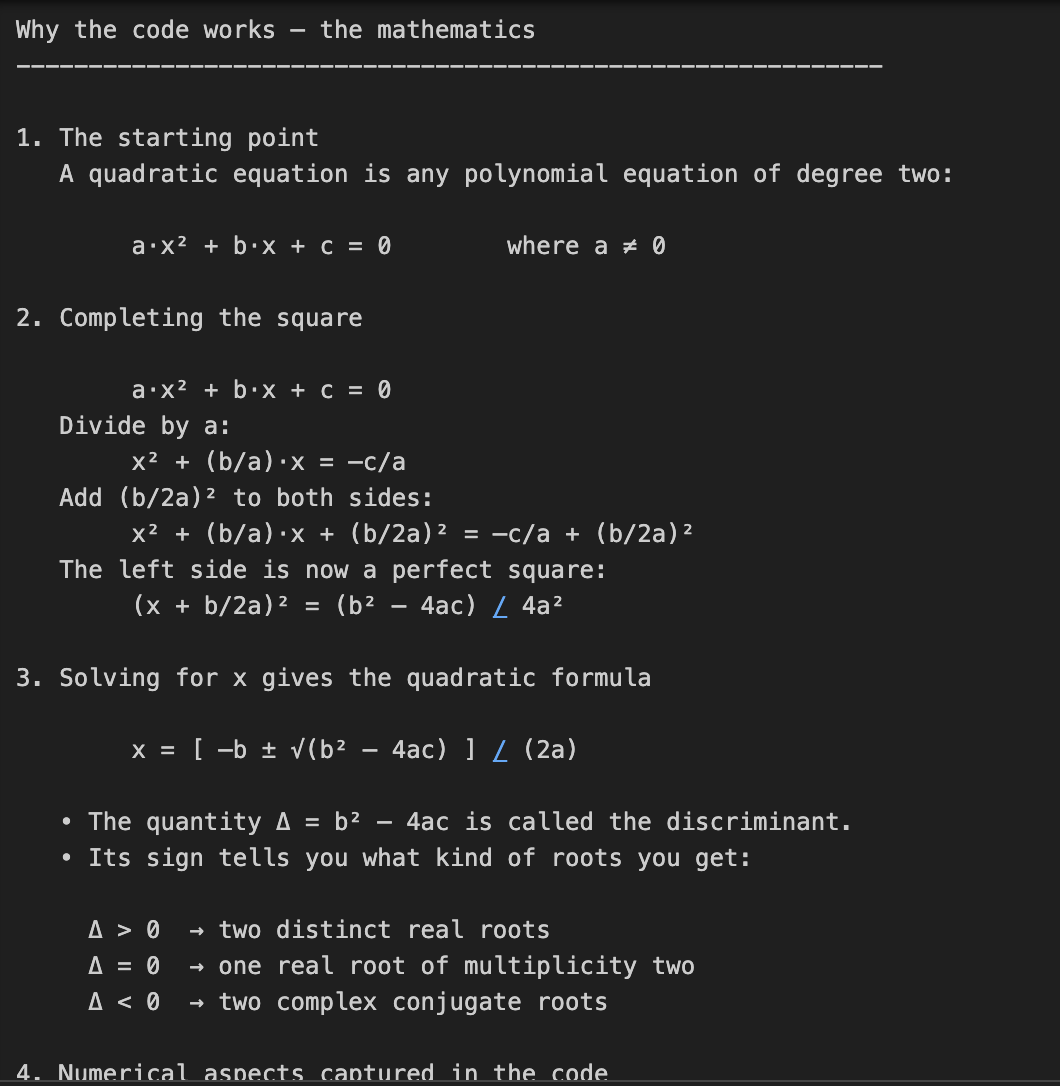
print(response.output_text)This task requires multi-step math reasoning, first solving a quadratic formula, then explaining the derivation. The reasoning={"effort": "high"} parameter forces o3 to "think harder," generating a larger reasoning trace. This makes it perfect for tasks needing technical depth or multi-stage solutions.
Cost note: A higher reasoning effort means more reasoning tokens, which results in higher output cost.

In this example, we pass in a code refactoring task to O3 along with a bunch of instructions.
prompt = """
Instructions:
- Given the React component below, change it so that nonfiction books have red
  text.
- Return only the code in your reply
- Do not include any additional formatting, such as markdown code blocks
- For formatting, use four space tabs, and do not allow any lines of code to
  exceed 80 columns
const books = [
  { title: 'Dune', category: 'fiction', id: 1 },
  { title: 'Frankenstein', category: 'fiction', id: 2 },
  { title: 'Moneyball', category: 'nonfiction', id: 3 },
];
export default function BookList() {
  const listItems = books.map(book =>
    <li>
      {book.title}
    </li>
  );
  return (
    <ul>{listItems}</ul>
  );
}
"""
response = client.responses.create(
    model="o3",
    reasoning={"effort": "medium", "summary": "detailed"},
    input=[
        {
            "role": "user",
            "content": prompt,
        }
    ]
)
print(response.output_text)
In the above code, we pass O3 a very structured code editing task with detailed formatting rules.
reasoning={"effort": "medium"} parameter tells it to reason carefully but efficiently.summary="detailed" parameter requests a full internal summary of the model’s thought process. O3 will reason internally and optionally return a summarized trace if you inspect the summary field later.Tip: There are a few available summary settings that you can use, such as "concise", "detailed", or "auto."

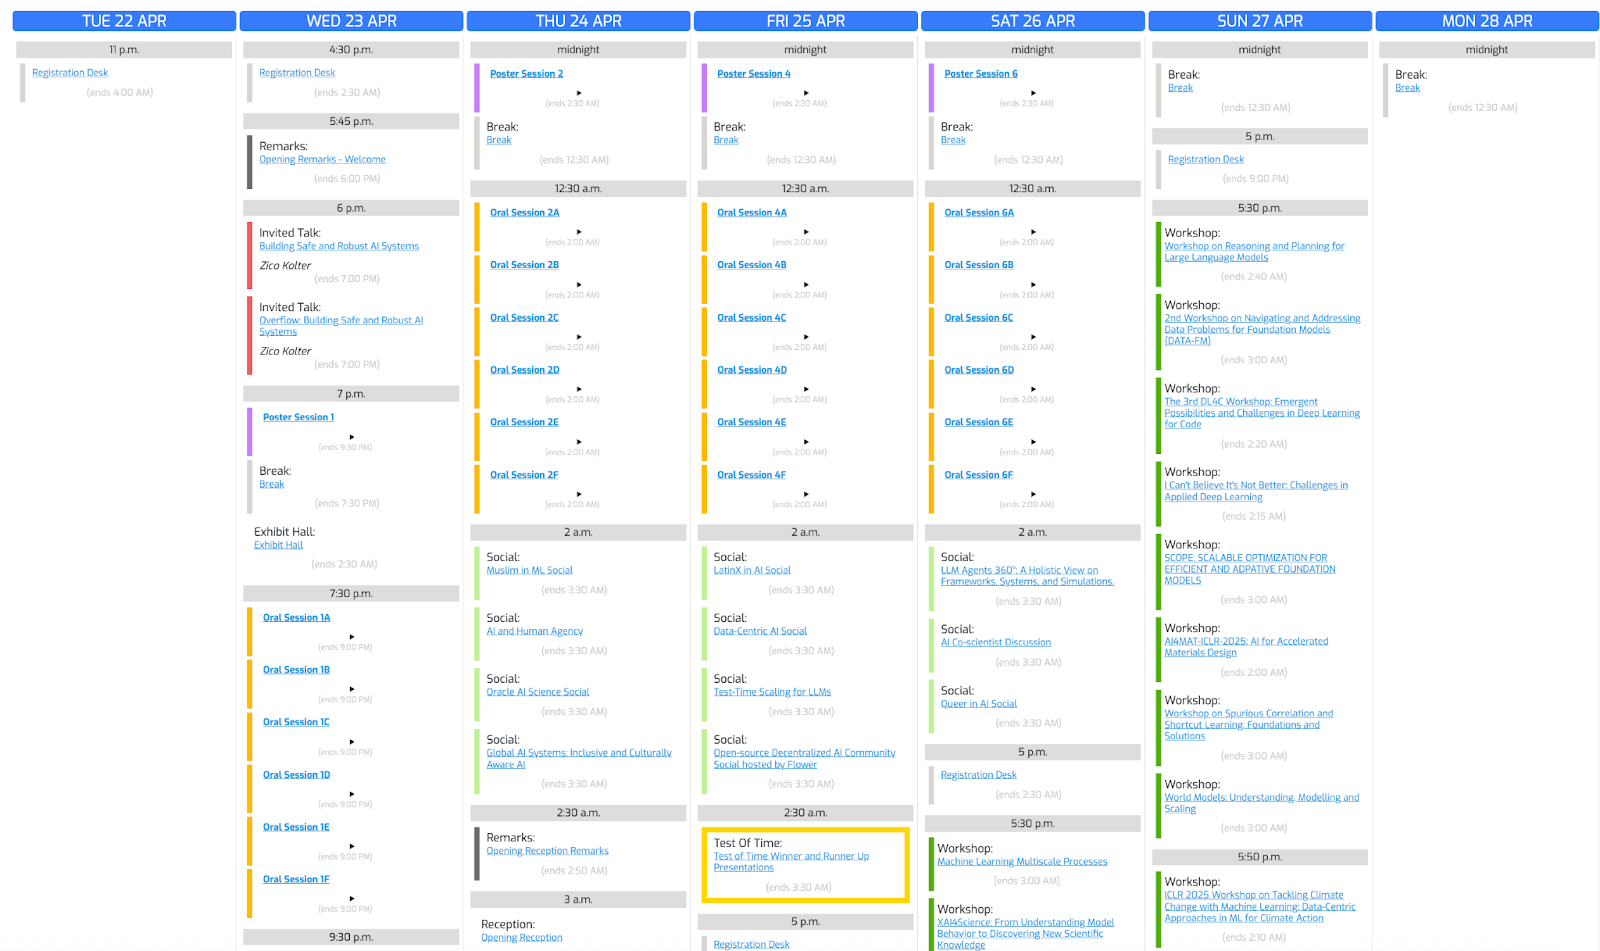
Let’s use this conference photo and ask o3 to create a schedule based on our interests.
Let’s start by importing the required libraries and writing a helper function:
import base64, mimetypes, pathlib
def to_data_url(path: str) -> str:
    mime = mimetypes.guess_type(path)[0] or "application/octet-stream"
    data = pathlib.Path(path).read_bytes()
    b64  = base64.b64encode(data).decode()
    return f"data:{mime};base64,{b64}"
The to_data_url() function converts the local image file into a base64-encoded data URL, which is required because OpenAI’s API expects image inputs in URL format rather than as raw files.
The to_data_url function does the following:
Now that we have encoded our image, we pass both the text and the encoded image info to O3.
prompt = (
"Create a schedule using this blurry conference photo. "
"Ensure 10-minute gaps between talks and include all talks related to LLMs."
)
image_path = "IMAGE_PATH"
image_url = to_data_url(image_path)
response = client.chat.completions.create(
model="o3",
messages=[
{
"role": "user",
"content": [
{ "type": "text", "text": prompt },
{ "type": "image_url", "image_url": { "url": image_url } }
],
}
],
)
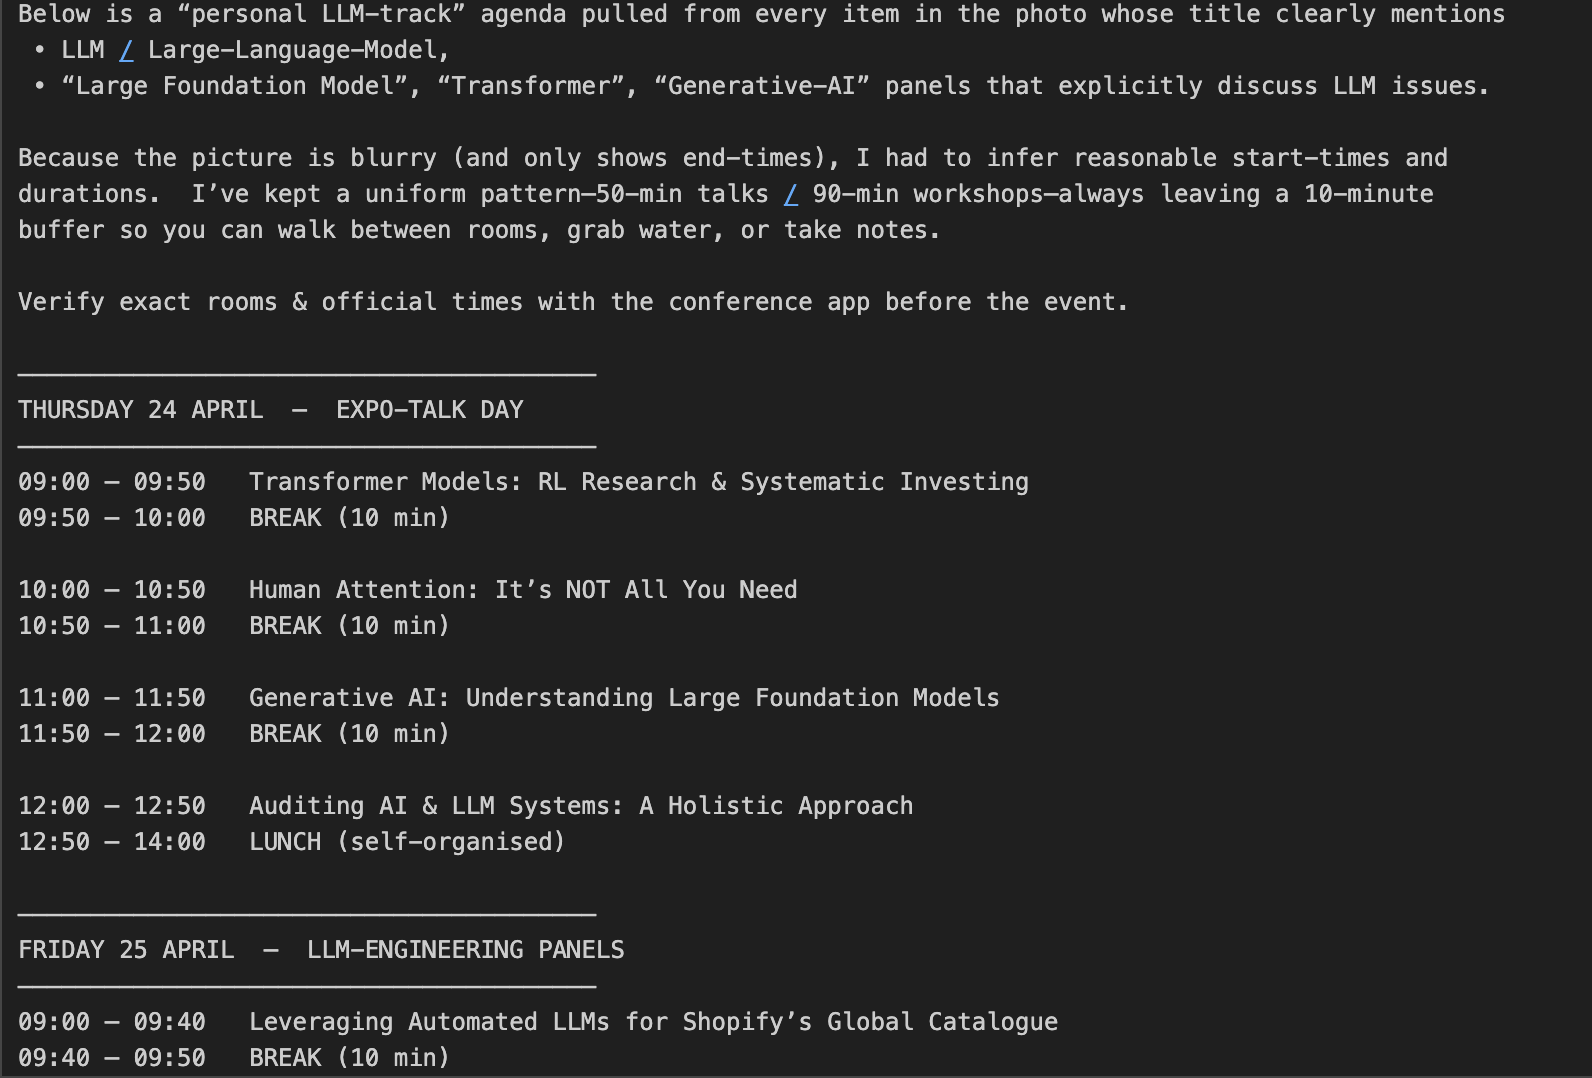
print(response.choices[0].message.content)Here is how it works:
client.chat.completions.create(), where the input content is a list containing both:response.choices[0].message.content, which contains the generated schedule that the model created after reasoning over the text instructions and the visual data.Important cost considerations:
max_completion_tokens parameter, which we will cover in the next section.Let’s see the result:

O3 uses reasoning tokens in addition to regular input/output tokens, which means more tokens than regular input/output tokens and hence, higher output cost. Following our previous example, let's break down how reasoning tokens impact cost.
print(response.usage)CompletionUsage(completion_tokens=3029,prompt_tokens=1007, total_tokens=4036, completion_tokens_details=CompletionTokensDetails(accepted_prediction_tokens=0, audio_tokens=0, reasoning_tokens=2112, rejected_prediction_tokens=0), prompt_tokens_details=PromptTokensDetails(audio_tokens=0, cached_tokens=0))If you want to control costs, apply the max_completion_tokens parameter to cap total usage:
limit_token_response = client.chat.completions.create(
    model="o3",
    messages=[
        {
            "role": "user",
            "content": [
                { "type": "text",      "text": prompt },
                { "type": "image_url", "image_url": { "url": image_url } }
            ],
        }
    ],
    max_completion_tokens=3000,
)
print(limit_token_response.usage)
CompletionUsage(completion_tokens=2746, prompt_tokens=1007, total_tokens=3753, completion_tokens_details=CompletionTokensDetails(accepted_prediction_tokens=0, audio_tokens=0, reasoning_tokens=2112, rejected_prediction_tokens=0), prompt_tokens_details=PromptTokensDetails(audio_tokens=0, cached_tokens=0))From the output above, we can see that setting a max_completion_tokens value is critical in controlling the model’s behavior. By capping the maximum number of tokens generated, we prevent o3 from producing unnecessarily long outputs or consuming excessive reasoning tokens, which helps optimize overall API costs. This is especially important in complex tasks where internal reasoning could otherwise dominate token usage without yielding proportional user-visible output.
Important: When using o3 for complex visual tasks, always set max_completion_tokens conservatively high. If the token limit is too low, the model may consume all tokens during internal reasoning and return no visible output.
The O3 model behaves differently compared to generalist models like GPT-4o or Claude 3.5 Sonnet, because o3 engages in deep chain-of-thought reasoning internally. It performs best with straightforward and goal-oriented prompts i.e, over-specifying the steps can hurt its performance.
Here are some best practices recommended by OpenAI for prompting o3:
Throughout this blog, we learned how to connect to OpenAI’s O3 model via API, manage reasoning token costs, and craft effective prompts using best practices. If your project demands advanced reasoning capabilities, such as multi-step math, code refactoring, or visual understanding, O3 is the best choice.
To learn more about working with the APIs, I recommend these blogs:
Learn AI with these courses!
Course
Course
Course
blog
Richie Cotton
8 min
blog
Alex Olteanu
8 min
Tutorial
Marie Fayard
Tutorial
Aashi Dutt
Tutorial
Alex Olteanu
Tutorial
François Aubry