Course
Large Language Models (LLMs) Concepts
2 hr
111.3K
A circuit schematic is a diagram that shows how electronic parts connect. Reviewing one means checking whether the parts and their values meet the design requirements. Can the power supply provide enough current? Can the processor read the sensor's full output? The answers come from the schematic, the component datasheets, and a few calculations.
I wanted to see whether Grok 4.7 could complete that whole review. The Grok 4.7 guide says the model was trained for longer tasks and to check its own work more carefully. A circuit also gives us numbers that ordinary Python code can check, so we do not need another AI model to judge the result.
For the experiment, I built EnviroNode Rev A, a small USB-powered sensor board, and planted three faults in its design. Grok is not told how many faults exist. It has to find them, support each finding with component documentation, propose corrections, and submit the corrected values to Python checks.
You do not need an electrical engineering background to follow along. I explain each circuit rule when it first appears. You'll learn how to:
Send a schematic image to Grok 4.7 through the Responses API
Attach datasheets with the Files API and let Grok search them
Check calculations with code execution and limits with web search
Give Grok a local verify_design() function that decides pass or fail
Keep a long, document-heavy conversation inside the model's context limit
Return a consistent review format, then compare reasoning levels
The same board stays in view from the first image review to the final Python check.
Grok 4.7 identified every planted fault once it had the datasheets, and the corrected design passed the Python checks. That says something about these three faults, not circuit review in general.
This is one small board, not a benchmark. A board with a dozen datasheets will create a larger context and may produce different results.
The Grok 4.7 API gives Python apps text and image input, text output, and a 500,000-token context window through the model ID grok-4.7. The official guide lists low, medium, high (the default), and xhigh reasoning levels; reasoning can't be turned off. The API also supports function calling, structured outputs, web search, X search, and code execution.

Our Grok 4.7 overview covers the launch and benchmarks. SpaceXAI labels Chat Completions as legacy, so every example here uses the Responses API.
Below 200,000 prompt tokens, Grok 4.7 costs $2 per million input tokens, $0.50 per million cached input tokens, and $6 per million output tokens. Once a prompt reaches 200,000 tokens, every token in that request is billed at $4, $1, and $12.
Server-side tools have separate fees: the pricing page charges $5 per 1,000 web search or code execution calls. Searches of attached documents cost one cent each, and stored documents also carry a daily per-GiB charge. Use a stable prompt_cache_key for related requests, but budget for uncached input.
Read billed cost from usage.cost_in_usd_ticks. The cost tracking docs say it includes caching and tool charges. Divide the value by 10^10 for dollars.
Circuit design tests document reading, calculations, tool use, and verification in one task. SpaceXAI reports 64.0% for Grok 4.7 on EEBench. The EEBench methodology uses simulations and bill of materials (BOM) checks rather than a large language model (LLM) judge, and EnviroNode follows the same rule.
EnviroNode Rev A is a USB-powered sensor node. You can download the complete project from GitHub.
The schematic carries every component value Grok needs for the review. Each requirement has an ID such as PWR-002 or BW-001, so every finding can point back to one rule.
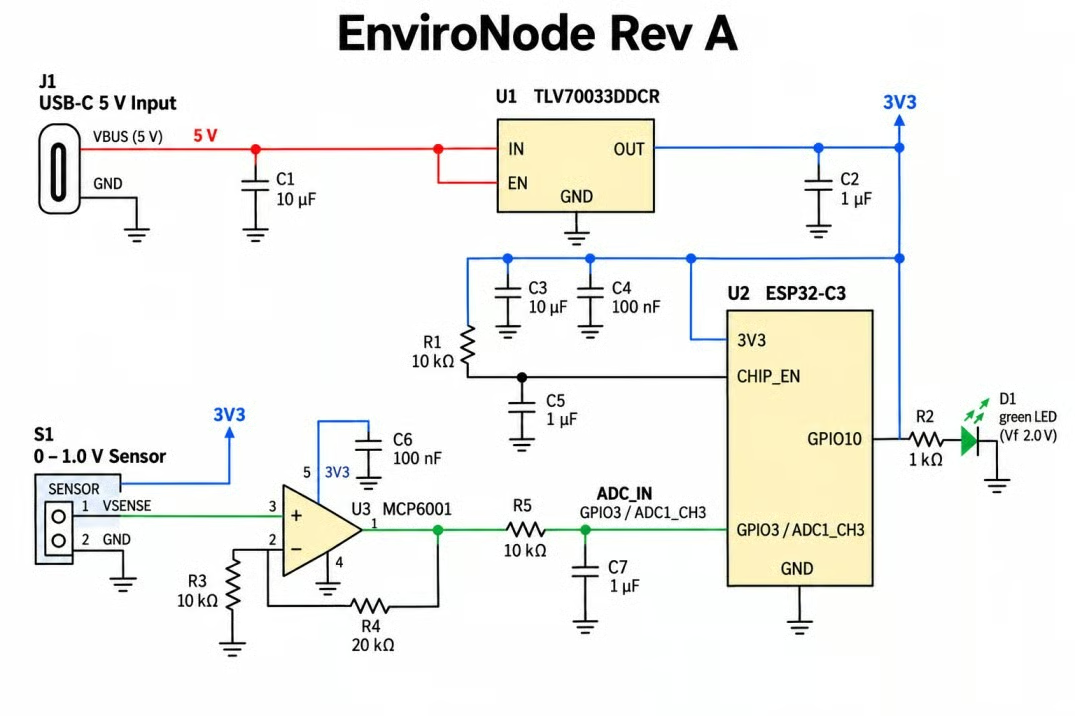
EnviroNode Rev A schematic with values. Image by Author.
Before Grok reviews the board, expose every rule that the verifier will use. The function returns five pass-or-fail checks built from these eight requirements:
The model receives the same requirement set. No verifier limit appears only after Grok proposes a fix.
Three faults can be checked with numbers. Their count stays out of the prompt.
Regulator too small (PWR-002): the TI TLV700 is rated for 200 mA, while the ESP32-C3 datasheet lists a 335 mA Wi-Fi transmit peak and Espressif's schematic checklist asks for at least 500 mA.
ADC over range (ADC-001): a gain of 3 puts 3.0 V at the ADC, but the datasheet's effective range tops out at 2,500 mV, and the requirement allows 90% of that.
Filter too slow (BW-001): 10 kΩ and 1 µF give a 15.9 Hz cutoff, while signals up to 100 Hz may lose at most 1 dB.
The ADC defect concerns measurement range, not pin damage. Correct choices, such as the LED resistor and CHIP_EN delay, make false positives measurable.
The review needs a clear boundary: Grok proposes changes, while Python owns pass or fail. The diagram shows where documents and tools enter that loop.
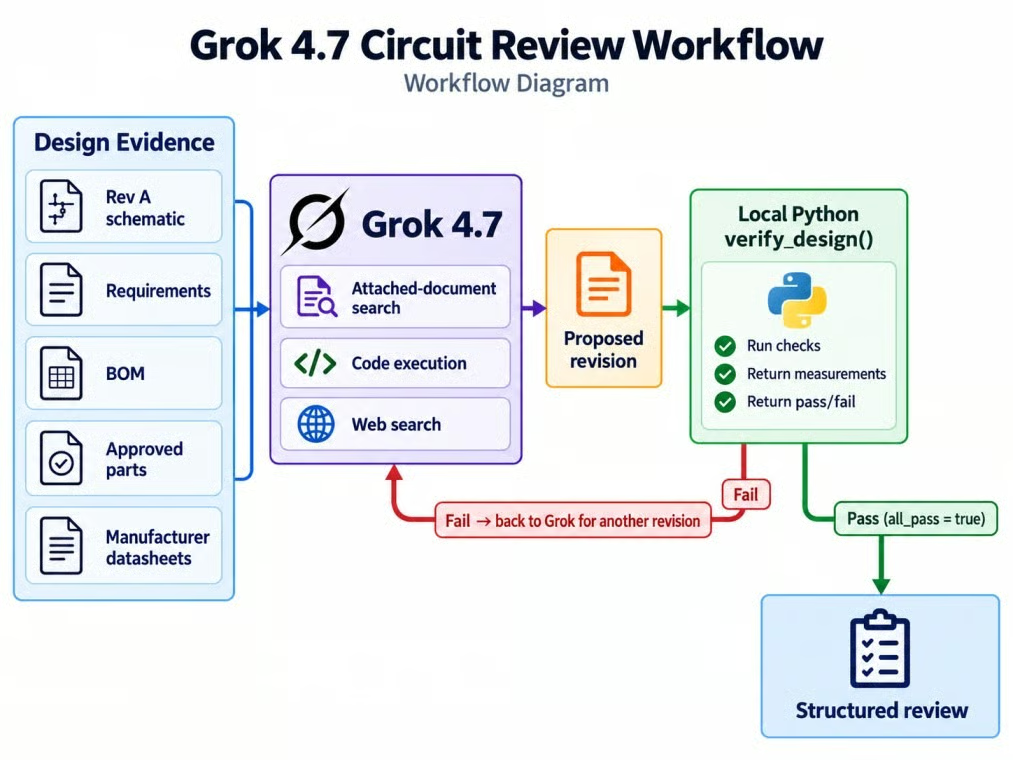
Review loop separates proposal from verification. Image by Author.
Define success before the first API call. Count a defect only when Grok connects it to a requirement and supporting evidence. Count a fix only when verify_design() returns all_pass = true.
You'll need an xAI API key with prepaid credits, Python 3.10 or newer, and the OpenAI Python software development kit (SDK) pointed at xAI's base URL. Create the key in the xAI Console, then install the packages used below.
python -m venv .venv
source .venv/bin/activate        # Windows: .venv\Scripts\activate
pip install openai python-dotenv pydantic httpx streamlit
pip install matplotlib schemdraw pytest  # Optional diagrams and verifier tests
The API examples use the first package group; the second supports repository diagrams and tests. I tested them with Python 3.11.9, openai 3.19.2, pydantic 2.13.5, streamlit 1.64.0, and httpx 0.28.1. Save the key as the XAI_API_KEY environment variable, and load it with python-dotenv instead of placing it in source code; our virtual environment guide explains the setup if it is new to you.
If your key already works with the Responses API, skip to Step 1. Otherwise, this request checks the key, the base URL, and the model ID in one go.
import os
import httpx
from dotenv import load_dotenv
from openai import OpenAI

load_dotenv()
client = OpenAI(api_key=os.environ["XAI_API_KEY"], base_url="https://api.x.ai/v1",
                timeout=httpx.Timeout(3600.0))

response = client.responses.create(
    model="grok-4.7",
    reasoning={"effort": "low"},
    input="In one sentence, what does a low-dropout regulator do?",
)
print(response.output_text)
A one-sentence answer means the setup works. The long timeout matters later, because requests that use reasoning and tools can take several minutes.
Yes, Grok 4.7 can review a schematic from an image alone, as long as the prompt says plainly that no tools are coming. The baseline sends the PNG as a base64 data URL together with the requirements text.
image = {
    "type": "input_image",
    "image_url": f"data:image/png;base64,{SCHEMATIC_B64}",
    "detail": "high",
}
response = client.responses.create(
    model="grok-4.7",
    input=[{"role": "user", "content": [
        image,
        {"type": "input_text", "text": REVIEW_PROMPT},
    ]}],
)
The prompt asks for three sections: confirmed, needs more evidence, and checked and acceptable. It does not mention a defect count or a suspect part.
Tell the model explicitly when no tools or datasheets are available. Otherwise, it may end the response after saying it will look up a specification that it cannot access.
As noted in the TL;DR, Grok confirmed the filter defect with a 15.9 Hz cutoff and 16.1 dB of loss at 100 Hz. It placed the regulator and ADC under "needs more evidence" instead of guessing their limits.
Attached documents turn a vague concern into a claim backed by numbers. Upload each document once and reference it by file_id.
with open(DATASHEET_PATH, "rb") as datasheet:
    uploaded = client.files.create(
        file=datasheet,
        purpose="assistants",
        expires_after={"anchor": "created_at", "seconds": 7 * 24 * 3600},
    )
content = [image, *[{"type": "input_file", "file_id": fid} for fid in file_ids],
           {"type": "input_text", "text": EVIDENCE_PROMPT}]
Because this tutorial sets expires_after to seven days, cached IDs are valid only within that window. Without expires_after, xAI keeps uploaded files until you delete them.
In the OpenAI SDK responses captured here, attachment search appeared as custom_tool_call items named pdf_search and pdf_browse, while usage counted them under document_search_calls. That is observed behavior, not the general tool-type contract, so the loop also checks the documented usage counter.
The documents resolved the two open questions from Step 1 and supported the power, ADC, and filter findings. The regulator finding cited the TLV700's 200 mA rating, the ESP32-C3's 335 mA transmit peak, and the 500 mA supply recommendation.
For the filter, Grok worked out which capacitor values would satisfy both bandwidth rules with R5 unchanged: roughly 32 to 81 nF. Every decoy landed under "checked and acceptable" with a reason.
Code execution is xAI's server-side Python sandbox, added to tools as {"type": "code_interpreter"} when you use the OpenAI client. The prompt adds one rule: every claim with a number must be computed before it counts as confirmed.
The code execution guide linked earlier says the sandbox has no network access and keeps no state between requests. For a few datasheet numbers, that's fine.
Ask Grok to check the power budget, ADC range, and filter bandwidth in one script. If circuits aren't your thing, skip the output below; the takeaway follows it.
f=  100.0 Hz  |H|=0.157177  attenuation=16.0722 dB
fc required for <= 1 dB at 100 Hz: fc >= 196.5227 Hz
V_adc_fs = 3.0000 V
90% limit = 2.2500 V
required rating = max(headroom, mcu min) = 500.00 mA
The 196.5 Hz minimum cutoff is the number the filter fix depends on, and code calculates it instead of leaving it to the model's arithmetic. Even the least-attenuation tolerance corner loses more than 15 dB at 100 Hz, so the verdict holds.
Yes. Web search checks whether the attached documents are still current, since manufacturers revise datasheets after a model's training cutoff. Restrict it to official domains so the evidence stays first-party.
tools = [
    {"type": "code_interpreter"},
    {"type": "web_search", "filters": {"allowed_domains": ["ti.com", "espressif.com"]}},
]
The web search guide linked earlier allows up to five allowed_domains, including subdomains such as docs.espressif.com. I would keep this step even when the attached datasheets are current, because it can catch a revision published after your upload.
Grok should cite the current TI product page, the ESP32-C3 documentation, the hardware checklist, and any relevant errata. Treat those citations as evidence of the source, not proof that the engineering conclusion is correct.
Domain filters can still return an irrelevant page. Check that every citation supports the exact component and limit used in the calculation.

Grok searches files, computes, checks sources. Image by Author.
verify_design() is a plain Python function that runs on your machine, and it is the only judge of whether a revision passes. Grok proposes design values through function calling, and the function checks them against fixed limits.
VERIFY_DESIGN_TOOL = {
    "type": "function",
    "name": "verify_design",
    "description": "Deterministically check an EnviroNode revision against EN-REQ-001...",
    "parameters": {
        "type": "object",
        "properties": {
            "revision": {"type": "string"},
            "regulator_part": {"type": "string"},
            "gain_rf_ohm": {"type": "number"},
            "gain_rg_ohm": {"type": "number"},
            "filter_r_ohm": {"type": "number"},
            "filter_c_nf": {"type": "number"},
        },
        "required": ["revision", "regulator_part", "gain_rf_ohm",
                     "gain_rg_ohm", "filter_r_ohm", "filter_c_nf"],
    },
}
Power capacity must meet max((335 + 10) mA × 1.25, 500 mA). For the ADC, 1.0 V × (1 + Rf/Rg) must stay between 1,500 and 2,250 mV. Filter checks measure loss at 100 Hz and cap the cutoff at 500 Hz; each check returns a value, a limit, and pass or fail.
The tool schema only tells Grok what values to send. The core pass-or-fail logic is ordinary Python:
import math

part = PARTS.get(regulator_part.strip().upper())
required_ma = max((335 + 10) * 1.25, 500)
power_ok = (
    part is not None
    and float(part["rated_iout_ma"]) >= required_ma
    and float(part["vin_max_v"]) >= 5.25
    and float(part["vout_v"]) == 3.3
)

gain = 1 + gain_rf_ohm / gain_rg_ohm
adc_mv = gain * 1000

fc = 1 / (2 * math.pi * filter_r_ohm * filter_c_nf * 1e-9)
loss_db = 10 * math.log10(1 + (100 / fc) ** 2)

checks = {
    "PWR-002": power_ok,
    "ADC-001": adc_mv <= 2250,
    "ADC-002": adc_mv >= 1500,
    "BW-001": loss_db <= 1.0,
    "BW-002": fc <= 500,
}
return {"all_pass": all(checks.values()), "checks": checks}
The full function also rejects invalid values and returns measurements with each result. Test it with a known-good design, a known-bad design, an unknown component, and a near miss.
Keep component ratings outside the model's control. I would not let the model supply its own current rating. Grok sends a part number, and the function looks up the rating in the application's catalog.
An agent should not both propose a solution and decide whether it is correct when code can check the answer. Replace verify_design() with a test suite or schema check when the task changes. Writing the verifier takes extra work, but its pass or fail result does not depend on the model's opinion.
Give Grok one goal: fix every confirmed violation with the smallest reasonable set of changes, and don't call the design complete until the check defined earlier passes. Provide the evidence and tools from Steps 3 to 5, then set a request limit.
This is where the context warning from the TL;DR matters. Solve it before adding more turns.
A continued request includes earlier tool results, and document searches can return a lot of text. In the failed prototype, the next continuation reached 1,116,321 tokens and exceeded Grok 4.7's 500,000-token window.
Context compaction cannot rescue a request that is already over the limit. The corrected loop compacts each successful document-search turn before sending the next request.
details = (response.usage.model_extra or {}).get(
    "server_side_tool_usage_details", {}
)
observed_attachment_call = any(
    item.type == "custom_tool_call"
    and item.name in {"pdf_search", "pdf_browse"}
    for item in response.output
)
used_documents = (
    details.get("document_search_calls", 0) > 0
    or observed_attachment_call
)

if used_documents:
    compacted = client.responses.compact(
        model="grok-4.7", input=history + list(response.output) + follow_up)
    history = list(compacted.output)  # pass the compaction item back unchanged
    # Compaction drops tool output, so restate the verifier's verdict ourselves.
    history.append({"role": "user", "content":
                    "verify_design results, exactly as returned: " + json.dumps(results)})
else:
    history = history + list(response.output) + follow_up
response = client.responses.create(model="grok-4.7", input=history, tools=TOOLS,
                                   store=False, prompt_cache_key=cache_key)
Keep that last append. Compaction drops verbose tool output, so restating the verifier result helps the next response avoid invented or confused checks. Compacting after each document-heavy turn is a conservative cadence; a larger system can use an input-token threshold instead.
Yes. Grok changed one part in each failing subsystem: power, ADC gain, and filter bandwidth. The diagram shows the exact Rev A and Rev B values.
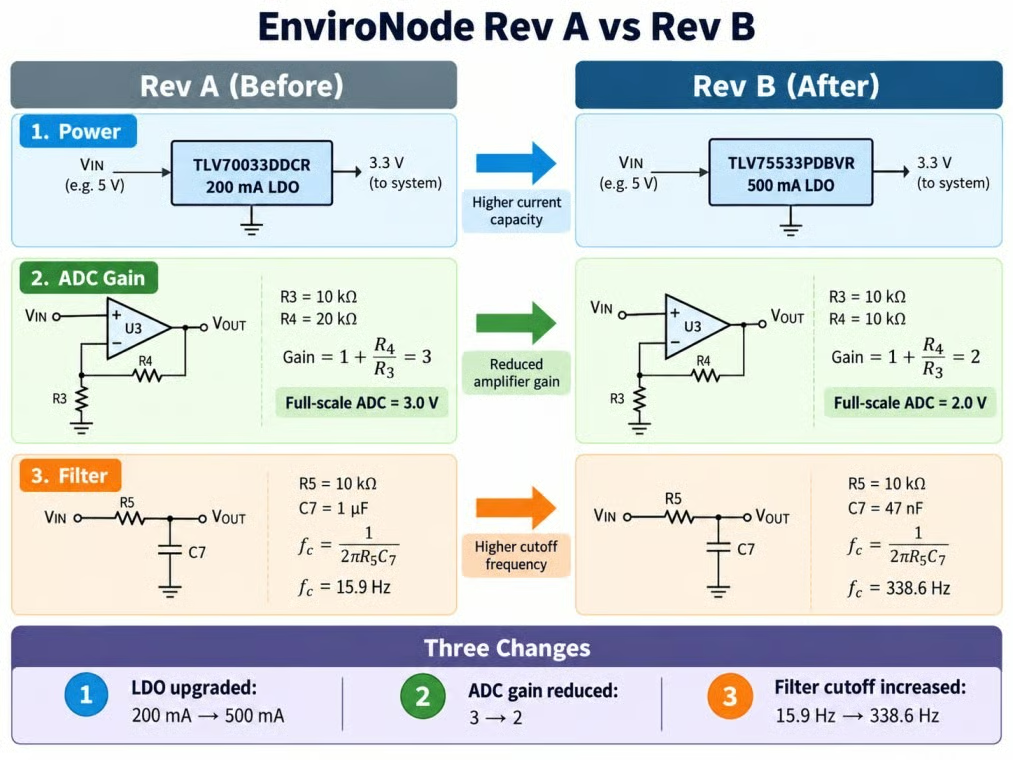
Three component changes correct Rev A. Image by Author.
The revised values then go to verify_design(). It returns one result for each requirement.

Revised design passes all verification checks. Image by Author.
A failing result goes back as a function_call_output, so Grok can revise the design until the checks pass or the request limit is reached.
Structured outputs return an object that matches a schema instead of prose you'd have to parse. Call client.responses.parse() with a Pydantic model in the same conversation, with tool calls switched off.
class Finding(BaseModel):
    violated_requirement: str
    severity: Literal["blocker", "major", "minor"]
    evidence: list[str]
    recommended_change: str
    verifier_result: Literal["pass", "fail", "not_verified"]

parsed = client.responses.parse(
    model="grok-4.7", input=history + [REPORT_REQUEST],
    text_format=DesignReview, tools=TOOLS, tool_choice="none", store=False,
)
A valid schema isn't proof that the content is right, so include the verifier results and tell Grok to base verifier_result on them. The JSON can then feed an issue tracker or a human approval queue.
The structured report should mark each original defect as resolved, cite the measured value returned by the verifier, and keep untested concerns under open_risks. For this design, those concerns include a regulator that sits exactly on the 500 mA floor and an ADC capacitor that differs from Espressif's recommendation.
Higher effort did not improve the verifier score, but it changed the quality of the filter fix. Each level received the same schematic, prompt, tools, and request limit.
|
Effort |
Defects / false positives |
Verifier calls |
Input / cached |
Output / reasoning |
Tools |
Time |
Cost |
|
|
3/3, 0; PASS |
1 |
256,006 / 197,120 |
7,950 / 2,323 |
7 |
111.2 s |
$0.2990 |
|
|
3/3, 0; PASS |
1 |
364,611 / 131,456 |
21,904 / 14,268 |
15 |
292.8 s |
$0.7385 |
|
|
3/3, 0; PASS |
2 |
413,071 / 336,896 |
19,685 / 14,800 |
17 |
277.8 s |
$0.5239 |
low reduced the resistor and kept the 1 µF capacitor, leaving capacitive-load and settling behavior outside the verifier. Microchip's capacitive-load guidance says a series resistor can improve stability, so this result does not prove the fix is unstable; it calls for frequency-response, step-response, or bench testing. high changed the capacitor instead, while xhigh chose the same final values as high after an extra verifier call.
For this single comparison, high gave the better balance. It avoided the unmodeled load concern without the extra verifier call made by xhigh. One execution per level cannot establish a general ranking.
The answer to the opening question is yes, within the verifier's five checks. The table condenses the earlier findings into one view.
Grok fixed the encoded requirements. It did not prove that the revised board was electrically complete or ready for production.
Documents decide whether a concern has evidence. Python decides whether a revision passes. Fluent prose cannot substitute for either.
Our Streamlit guide explains the interface used here. It uses streaming to show tool calls as they arrive, then shows the verifier checks and final report.
Learn AI with DataCamp
Course
Course
Course
Tutorial
Abid Ali Awan
9 min
Tutorial
Khalid Abdelaty
15 min
Tutorial
Tom Farnschläder
12 min
Tutorial
Tom Farnschläder
12 min
Tutorial
Khalid Abdelaty
11 min
Tutorial
Khalid Abdelaty
15 min