
Track
Git Fundamentals
7 hr
Removing files in Git isn’t always as simple as it seems. You delete a file from your system, but it doesn’t mean it’s gone from the repository. It may still exist in your history, or worse, get committed by accident, like a config file or an API key.
In this guide, you’ll learn how to remove files from Git. We’ll start with basic commands like git rm, then go into more advanced methods like cleaning untracked files and editing your commit history.
Before we remove files with Git, let’s make sure everything is set up.
First, check if Git is installed. Open your terminal and run:
git --versionIf you see a version number, you’re good to go.
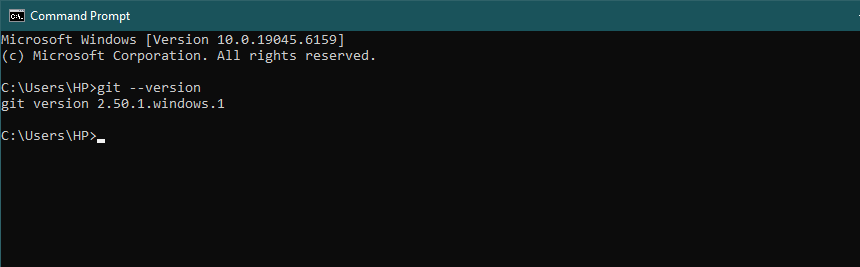
If you see a version number, you’re good to go.
You can also install a Git GUI like GitHub Desktop, Sourcetree, or GitKraken if you prefer a visual interface. But in this guide, I’ll use the command line (Git Bash).
Make sure you have permission to make changes in the repository, especially if you’re part of a team or working with a remote repo like GitHub or GitLab.
Note: Some file removal actions can't be undone. So, it’s a good idea to back up your project or at least double-check the state of your repo before running any commands that delete files.
Once that’s done, let’s get started.
There are a few different ways to remove files in Git, depending on what you want to do. Let’s see some common options:
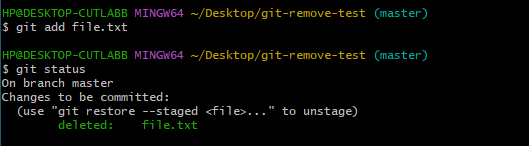
The git rm command removes files from your Git repository. When you run it, two things happen:
But Git doesn’t only delete the file. It tracks the deletion in your history. Once you commit, the file is officially removed from the project.
git rm file1.txt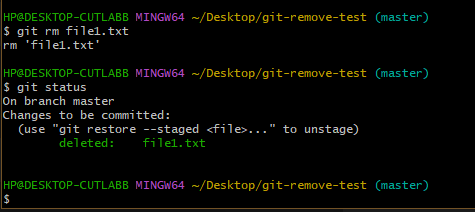
You can remove one file, many files, or a group of files using wildcards.
For example, to remove all log files:
git rm *.logThis tells Git to remove every file in the folder that ends in .log. You can confirm the change using:
git status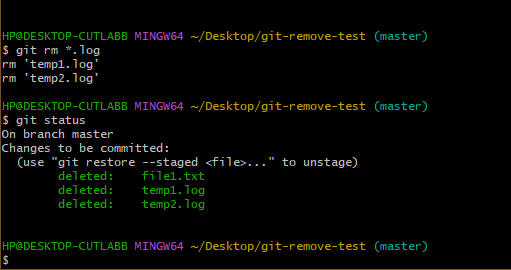
Delete multiple files with one git rm command. Image by Author.
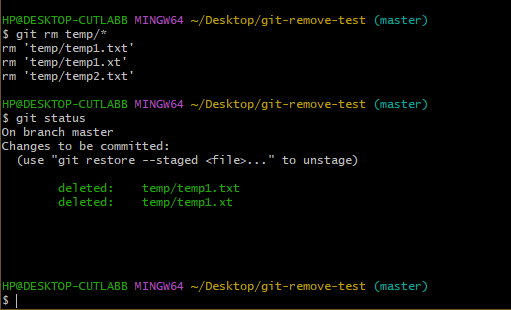
Want to remove all files inside a folder but not the folder itself? Use:
git rm temp/*This deletes every file inside the temp folder without deleting the folder itself.
Git also adds some safety checks. If a file has changes that aren’t committed yet, Git won’t delete it unless you force it. So use this only if you’re sure those changes can be discarded:
git rm -f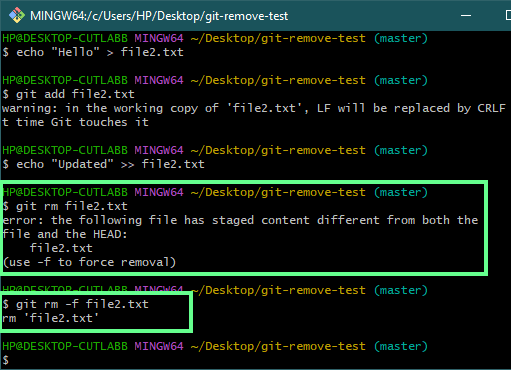
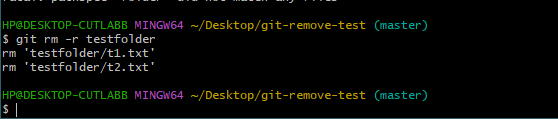
To remove a full folder and everything in it, add the -r flag:
git rm -r testfolderThis removes testfolder and all files inside it.
Now, to commit the change, run the following command:
git commit -m "removed log files”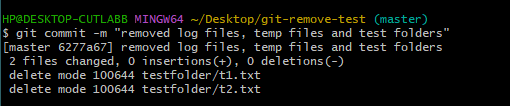
Here are the most common options you’ll use with git rm:
This is the basic usage. Just list the files you want to remove:
git rm file1.txt file2.txtYou can also use a wildcard to remove multiple files of the same type. For example, to remove all .txt files:
git rm *.txt(Here, * means all. It matches any filename that ends in .txt.)
This removes the file from the repository but keeps it on your computer. Let’s say I accidentally added a sensitive file like config.env. I don’t want it in the repo, but I still need it on my machine. So I’d run:
git rm --cached config.envHere, git rm will delete it from the repository and working directory. And --cached untracks it from Git (so it won't be pushed), but leaves it physically in place.
To prevent it from being added again, add it to .gitignore:
echo config.env >> .gitignore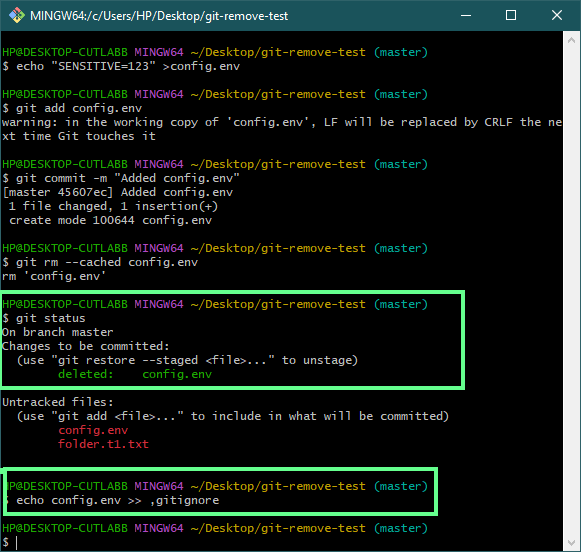
It stands for recursive. Instead of one file, this recursively deletes the directory and its contents. Without this, Git will give you an error if you try to remove a folder.
git rm -r <folder-name>Here, I created a folder named testfolder and two files inside it: a.txt and b.txt. Next, I run the following command:
git rm -r testfolderThis removed the folder along with all the contents and files inside it

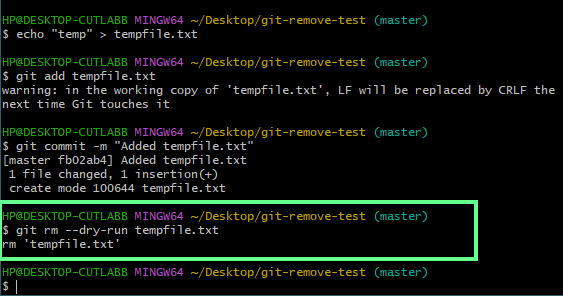
--dry-runIf you’re not sure what will happen if you remove a file, use git rm with --dry-run option like this:
git rm --dry-run <filename>This is a safe way to preview what will be removed.
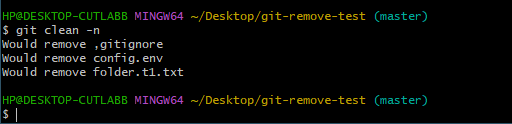
Or if you’re cleaning up untracked files and want to double-check what’ll be removed, use:
git clean -nThis will only show what this command will delete.
There’s more than one way to remove a file in Git. The methods might seem the same, but they don’t behave the same.
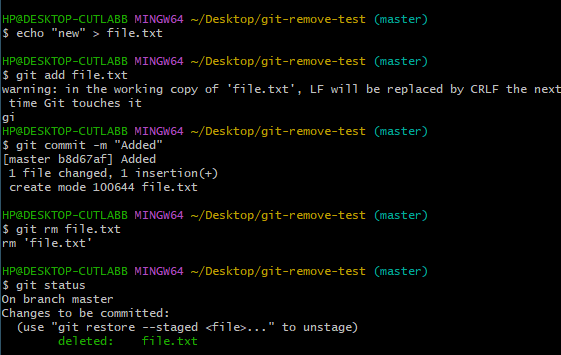
Let’s take a file called file.txt. Say I don’t need it anymore.
One way to remove it is to delete it directly from the system.
On Linux, macOS, or Git Bash:
rm file.txtOn Windows (command prompt):
del file.txt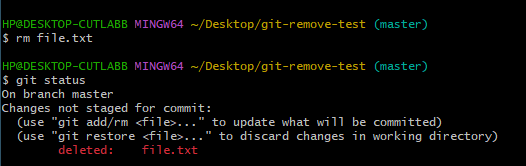
This deletes the file from your folder. But Git doesn’t know that yet. So you have to manually tell Git that the file was removed:
git add file.txtThis stages the deletion so it’s included in the next commit.
If you deleted several files and don’t remember all of them, you can run:
git add -uThis stages all tracked files that were changed or deleted. It won’t include untracked files.
Now you commit the change:
git commit -m "Remove file.txt"If you use git rm, it handles everything in one step. It deletes the file and stages the change right away:
git rm file.txtgit commit -m "Remove file.txt"No need to run git add separately. It’s cleaner and you won’t forget to stage the deletion.
In short:
git rm is cleaner and safer when you're intentionally removing tracked files.What if you delete a file and later realize you still need it? No problem. Git gives you a few ways to bring it back depending on when you notice the mistake.
If you haven’t committed yet:
Let’s say you deleted the file but haven’t committed the change. You can restore it from the last commit like this:
git restore file.txtThis brings the file back into your working directory from the latest commit.
If you already committed the deletion:
That’s fine too. First, find the last commit where the file still existed:
git log -- file.txtLook through the log and copy the commit hash where the file was still there. Then run:
git checkout <commit hash> -- file.txtIn older versions of Git, you could use the above command. This command restores a file from a specific commit, but could also switch branches.
Starting from Git 2.23, this was split into two clearer commands:
git switch (for switching branches)git restore (for restoring files)If you only want to restore a file from a commit, use:
git restore --source=<commit-hash> --file.txtThis pulls the file from that commit and puts it back in your working directory.
If you’re not sure when the file was deleted:
Maybe you’ve made a bunch of changes and don’t remember when the file went missing. In that case, use git reflog or reference log:
git reflogThis shows a complete history of your Git commits, checkouts, resets, and everything.
But git reflog is local only and won’t work on remotes. If you’re working with a remote repo, it’s better to use git log -- file.txt to track the history of that file.
Once you find the point where the file still existed, restore it using either git checkout or git restore like before.
Sometimes files get deleted directly from the system—maybe through a file explorer, a terminal rm command, or even by accident. When this happens, Git doesn’t automatically clean things up. Instead, it marks those files as missing and waits for you to handle the removal properly.
Let’s see how you should deal with such a situation, step by step.
Run this in your project folder:
git status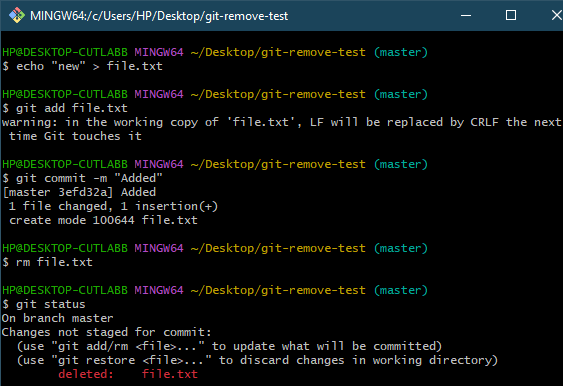
If Git says a file is deleted, that means it’s gone from your system, but the change hasn’t been staged yet.
To tell Git to stage all changes (including deleted files), run:
git add -AThis stages all file changes: new, modified, and deleted. Then commit the update:
git commit -m "Removed missing files"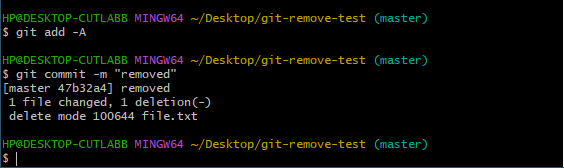
This is the safest way to clean up because it catches every change in one go.
If you’re working with a remote repository, push the commit:
git push origin <branch-name>Replace <branch-name> with the working branch, like main or dev.
Let’s say you’ve deleted a bunch of files manually, maybe by accident, or while cleaning up. Git still thinks those files exist until you tell it otherwise.
If you don’t want to remove each one with git rm, there’s a faster way to clean things up.
Run this command in your terminal:
git ls-files --deleted -z | xargs -0 git rmHere’s what it does:
git ls-files --deleted lists all files that Git is tracking but that are now missing.xargs -0 git rm passes those file names to git rm and removes them from Git’s index.This is quite helpful when you’re working on a big project and want to clean things up quickly.

Note: I got this message because there are no tracked files that are currently missing from your disk.
Now that we've covered the basics, let’s look at more advanced situations where removing a file from Git isn't as simple as running git rm. These are cases where either sensitive data is involved or untracked files need to be cleaned up carefully.
Sometimes a file with private data, such as API keys or passwords, is accidentally committed. Deleting it normally won’t help. Because Git keeps a complete history, and the file still exists in earlier commits.
To erase it completely, you can use the git filter-repo command: git filter-repo (recommended)
This is a newer and better alternative to filter-branch. It’s faster, safer, and easier to use.
First, install it (you’ll need Python and pip):
pip install git-filter-repoThen run:
git filter-repo --path hide.txt --invert-pathsThis removes the hide.txt file from every commit in your repo’s history.
To confirm, run:
git log --all -- supersecrets.txtIf the file is gone, add it to .gitignore so it doesn’t get tracked again:
echo hide.txt >> .gitignoreIf you're working with a team, clean the rewrite history and force-push the changes:
git push origin --force --allThen let your teammates know. They’ll need to re-clone or reset their local copies to avoid errors.
Let’s break it down:
git rm, then commit.To delete untracked files or folders, use git clean.
Here are the most useful options:
git clean -n # Show which untracked files will be removedgit clean -nd # Show which untracked folders will be removedgit clean -fd # Delete all untracked files and folders. It is destructive.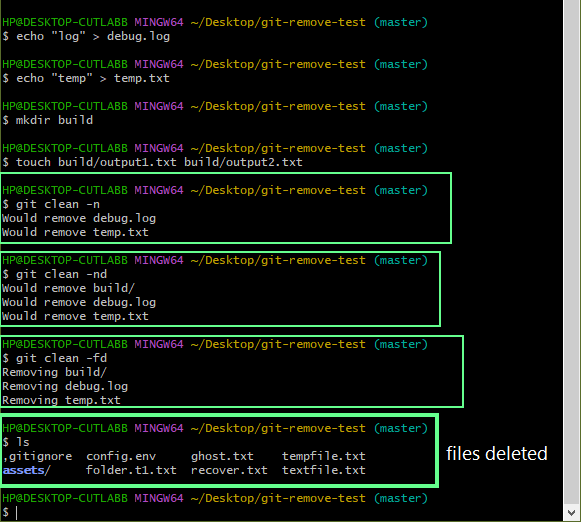
Here:
-n means preview only.-f means force delete.-d includes folders in the cleanup.Note: git clean won’t touch tracked files. But it will delete anything untracked, even files you meant to keep. So, always use -n first to see what it will remove.
Most of what we’ve covered so far uses the command line. But not everyone works that way and that’s totally fine. Some developers use visual tools when working directly in GitHub.
So let’s see how deleting files works in GitHub’s web interface and other GUI tools, and how that compares to the command line.
If you're working in GitHub’s browser interface, you can delete files without using the terminal.
Here’s how it works in the 2025 interface:
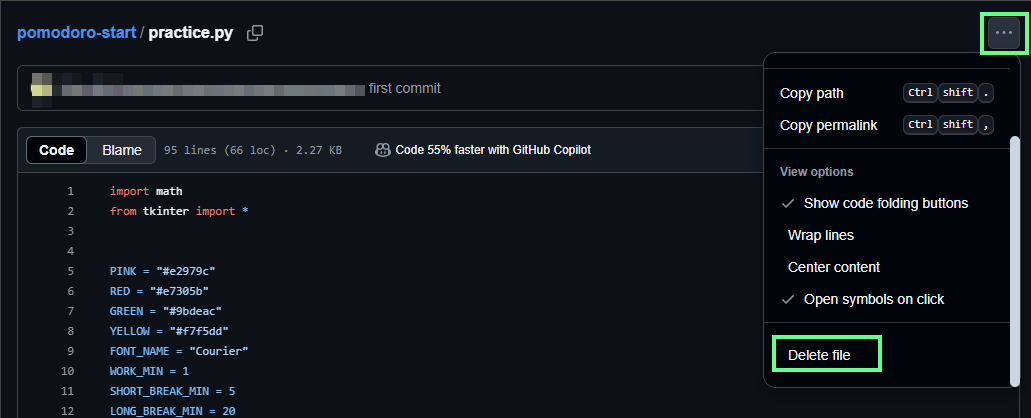
GitHub will then show a commit message box. Add a short message like:
Delete practice.pyYou can also write an optional description.
Next, choose how to save the change:
main branchClick Commit changes, and GitHub will remove the file and save the deletion as a commit, just like git rm does from the command line.
If you use a Git GUI like GitHub Desktop, Sourcetree, or Tower, the process is also simple:
Each tool looks a bit different, but the workflow is similar: You track changes visually, and commit when you’re ready.
Here’s a quick look at how file deletion works across different platforms, and when each one is most useful:
Removing files in Git might look simple, but one wrong step can break your code. Here are some practical tips I use to make sure deletions are safe and controlled, especially on shared or long-term projects.
Before removing a file, take a minute to confirm what it’s doing:
git status to see if it’s staged or modified.git log -- <filename> to check its commit history.This quick check saves me hours of recovery work later.
An atomic commit means one commit per logical change.
For example, if I’m deleting unused files, I commit only those deletions, separate from code edits.
Here’s why it’s quite helpful:
git bisect work better when commits are small and focused.Rewriting history with tools like git filter-repo affects everyone on your team. To avoid chaos:
git push --force carefully as it rewrites remote history.Before running a command that deletes files, always test it:
git clean -nThis shows what would be deleted without deleting anything. Here’s why I think you should always do this:
If you accidentally commit something that shouldn’t be in the repo (like a config file or logs), fix it in two steps:
git rm --cached <filename>This tells Git to stop tracking the file but leaves it on your computer.
gitignore:echo <filename> >> .gitignoreHere’s why it’s helpful:
.env, .log, or node_modules) out of the repo.Sometimes file removal doesn’t go as expected. You may stage the wrong file or run into issues with empty folders.
Here’s how I handle common edge cases.
Let’s say I run git add . and accidentally stage a file I didn’t mean to. I don’t want to lose my changes—I just want to unstage it.
To fix that, I run:
git reset HEAD <filename>This unstages the file but keeps the edits in place.
To confirm, I use:
git statusNow the file should show as "modified" instead of "staged."
By default, Git ignores empty folders. If I try to commit a folder with no files inside, Git skips it.
But sometimes I want to keep that folder in the repo either for future logs or uploads. The usual fix is to add a placeholder file called .gitkeep.
Here’s how:
touch logs/.gitkeepgit add logs/.gitkeepgit commit -m "Keep logs folder in the repo"This makes the folder "non-empty," so Git tracks it.
Note: .gitkeep isn’t built into Git. It’s just a convention. You can name the file anything, but .gitkeep tells others what it’s for.
Here are a few common problems I’ve run into when removing files in Git and how to fix them.
You deleted the file, committed the change, but it’s still on the remote repo. Maybe you forgot to push.
So make sure to run:
git push origin <branch-name>Also check:
Submodules are Git repositories inside other Git repositories. They don’t behave like normal folders.
If you're deleting files inside a submodule:
If you're removing the submodule entirely:
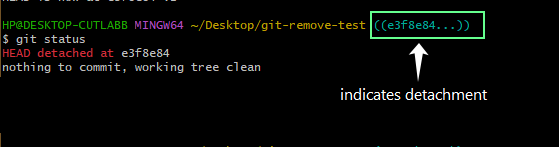
.gitmodules and .git/configIn Git, HEAD usually points to the current branch. But sometimes it points to a specific commit instead, that’s called a detached HEAD.
This happens if you:
Check your status:
git statusIf you see:
HEAD detached at <commit-hash>You’re not on a branch, and any new changes may be lost when you switch away.
Here’s how you can fix it:
If you’ve made changes and want to keep them, run this:
git checkout -b <new-branch-name>This puts your work on a new branch and saves it.
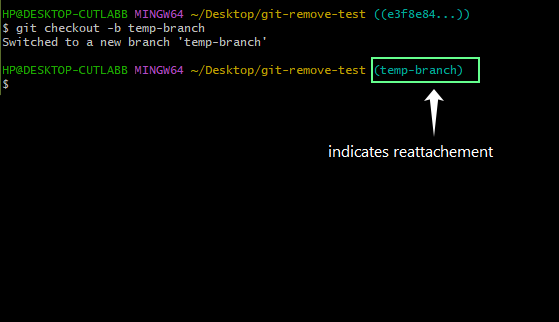
If you’ve already committed the changes and want to move them to another branch later, do this:
git checkout -b temp-branch # from detached HEADgit checkout main # or another target branchgit merge temp-branchIf you didn’t make any changes and just want to get out of detached HEAD, run this:
git checkout <branch-name> That’s it. Your HEAD is now reattached, and everything is back to normal.
Sometimes Git won’t delete a file usually on Windows. This can happen if:
Here’s how to fix this:
If you see errors like:
You’re likely in the middle of a merge or rebase.
To finish a rebase after resolving conflicts:
git rebase --continueTo cancel the rebase or merge entirely:
git reset --mergeThis restores your repo to how it was before the merge started.
Want to throw away all local changes and reset your working directory?
Try this:
git restore .This puts all files back to their last committed state.
When you’re removing files in Git, it’s easy to mess up if you’re not paying attention. One small mistake can lead to bigger problems: broken code, lost work, or confusion in your team. That’s why, take a second to double-check what you’re doing.
Use the right command for the situation. If you’re not sure what something will do, test it with a dry run first. And if you’re working with others, make sure everyone’s on the same page.
There’s a lot more Git can do beyond deleting files. You can delete branches, undo mistakes using reset and revert, or see exactly what changed with git diff. The more you learn, the smoother your workflow gets.
Take it one step at a time. That’s how you get good at this stuff.
Top DataCamp Courses
Track
Course
Course
Tutorial
Allan Ouko
Tutorial
Ashlyn Brooks
Tutorial
François Aubry
Tutorial
Mark Pedigo
Tutorial
Kurtis Pykes
Tutorial
Khalid Abdelaty