Track
Containerization and Virtualization with Docker and Kubernetes
13 hr
If you want to stop saying, "it works on my machine," containerization is the way to go.
Put simply, containerization allows you to package your applications into lightweight, isolated environments called containers. These containers include everything needed to run the application, such as code and dependencies, but nothing unnecessary. A containerized application will run consistently across different environments, whether on your laptop, a testing server, or in production.
Docker remains the go-to platform for containerizing applications in 2025. It can run on any operating system, but as with most development tools, UNIX-based systems are preferred.
In this article, you'll learn how to install Docker on Ubuntu, start your first container, and manage and monitor running containers.
The setup is straightforward but involves a few steps. Let's dive in!
Is Docker the same as Kubernetes? Here are all the differences every developer should know.
Before installing Docker on Ubuntu, there are a few housekeeping tasks to take care of. You'll handle all of them in this section.
To start, make sure you're running an Ubuntu system, either the Desktop or Server version. We're using Ubuntu Server 24.04:
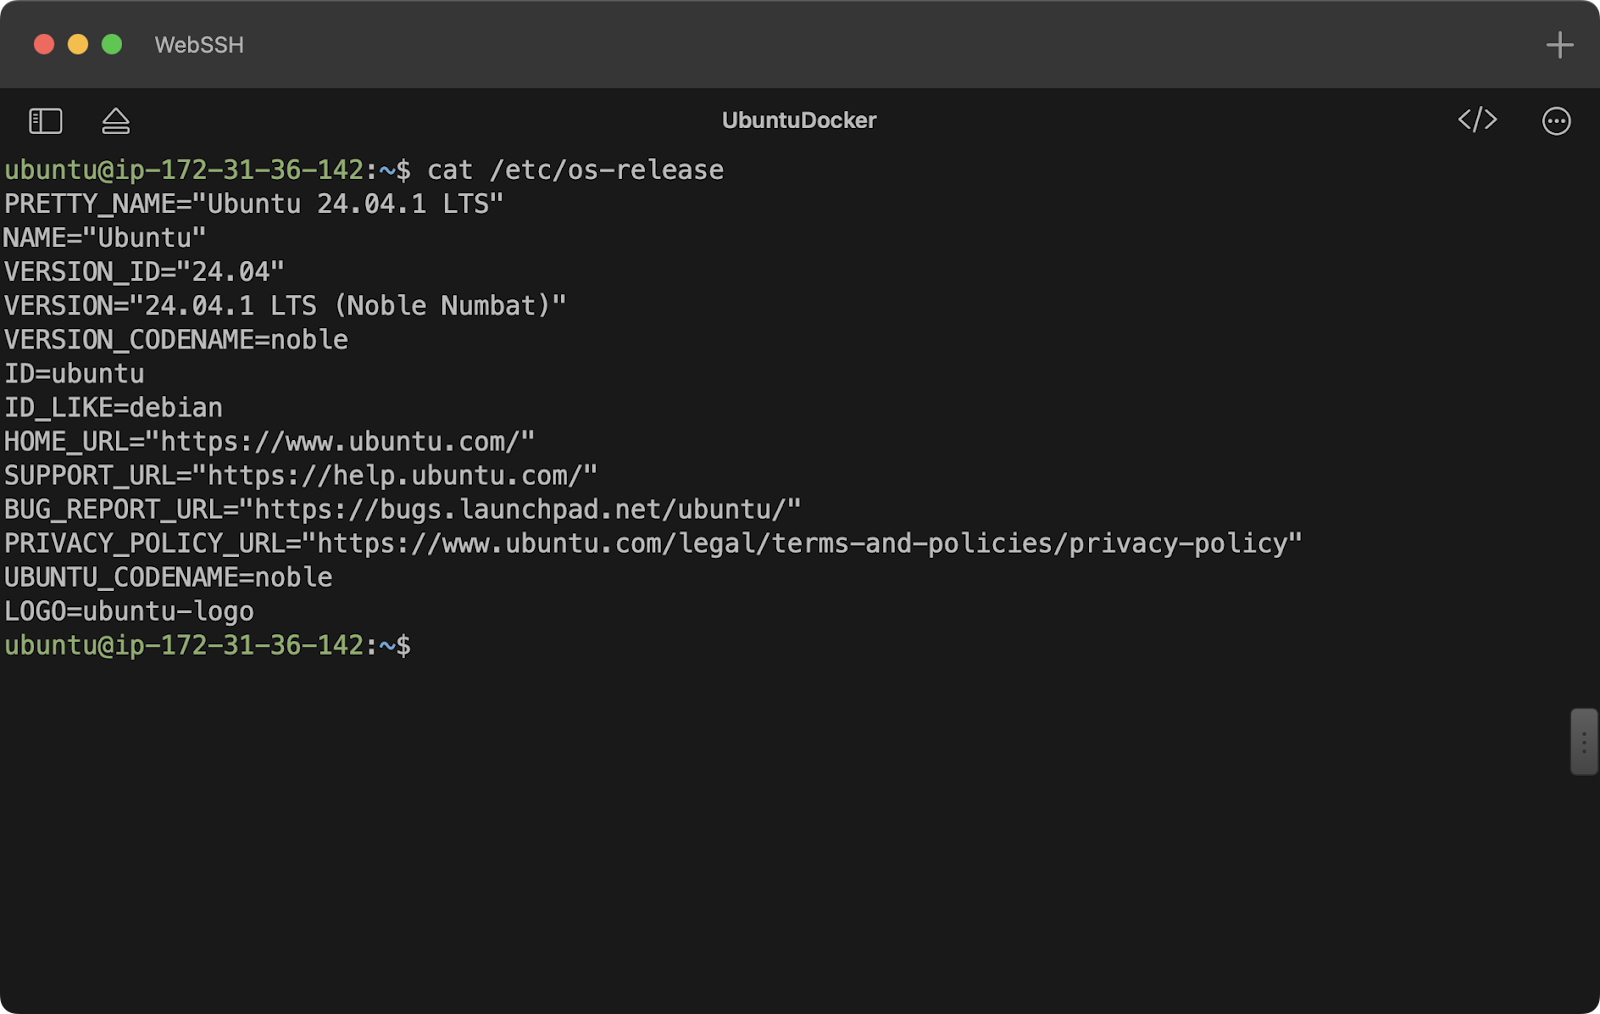
Image 1 - Operating system details
If you see a similar output to the one shown in the image above, you're good to go.
Before installing Docker, ensure your system has enough resources to run it.
While Docker doesn't specify minimum requirements on its website (apart from compatible CPU architectures), we've found the following to be sufficient for running Docker itself:
A machine with these specifications will allow you to run Docker, but not much else. Don't expect to run complex containers or multi-container applications.
If you plan to do more, aim for at least 2 GB of RAM, 25 GB of storage, and a modern CPU.
We're running Docker on a fresh Ubuntu Server instance, so we'll provide all the necessary commands to set up Docker prerequisites.
First, update your system's package list and upgrade existing packages by running the following command:
sudo apt update && sudo apt upgrade -yThis process may take a few minutes, but it ensures your package manager retrieves the latest package versions and security updates.
Docker requires a few dependencies to install and function properly. Run this command to install them:
sudo apt install -y apt-transport-https ca-certificates curl software-properties-commonIn short, the above command enables package downloads over HTTPS and installs the tools necessary to fetch Docker GPG keys (which we’ll discuss later).
And that’s it—your system is now ready to install Docker!
Once the system prerequisites are taken care of, installing Docker on Ubuntu is a four-step process.
Docker's GPG (GNU Privacy Guard) key is used to sign Docker packages and repositories, ensuring the integrity and authenticity of Docker images and packages.
Start by running the appropriate shell command to download the key and store a converted version compatible with APT in /usr/share/keyrings.
curl -fsSL https://download.docker.com/linux/ubuntu/gpg | sudo gpg --dearmor -o /usr/share/keyrings/docker-archive-keyring.gpgNow, add the official Docker repository to your system.
The next command uses the previously stored GPG key to verify the repository's authenticity and then adds it to the system package sources:
echo "deb [arch=$(dpkg --print-architecture) signed-by=/usr/share/keyrings/docker-archive-keyring.gpg] https://download.docker.com/linux/ubuntu $(lsb_release -cs) stable" | sudo tee /etc/apt/sources.list.d/docker.list > /dev/nullAfter that, update your system’s package list to include the new repository:
sudo apt updateNow that the repository is configured, you're ready to install Docker on Ubuntu.
The installation command will install the core Docker engine, its command-line interface, and the runtime for managing container execution:
sudo apt install -y docker-ce docker-ce-cli containerd.ioOnce the installation is complete, you should see an output confirming the successful installation:
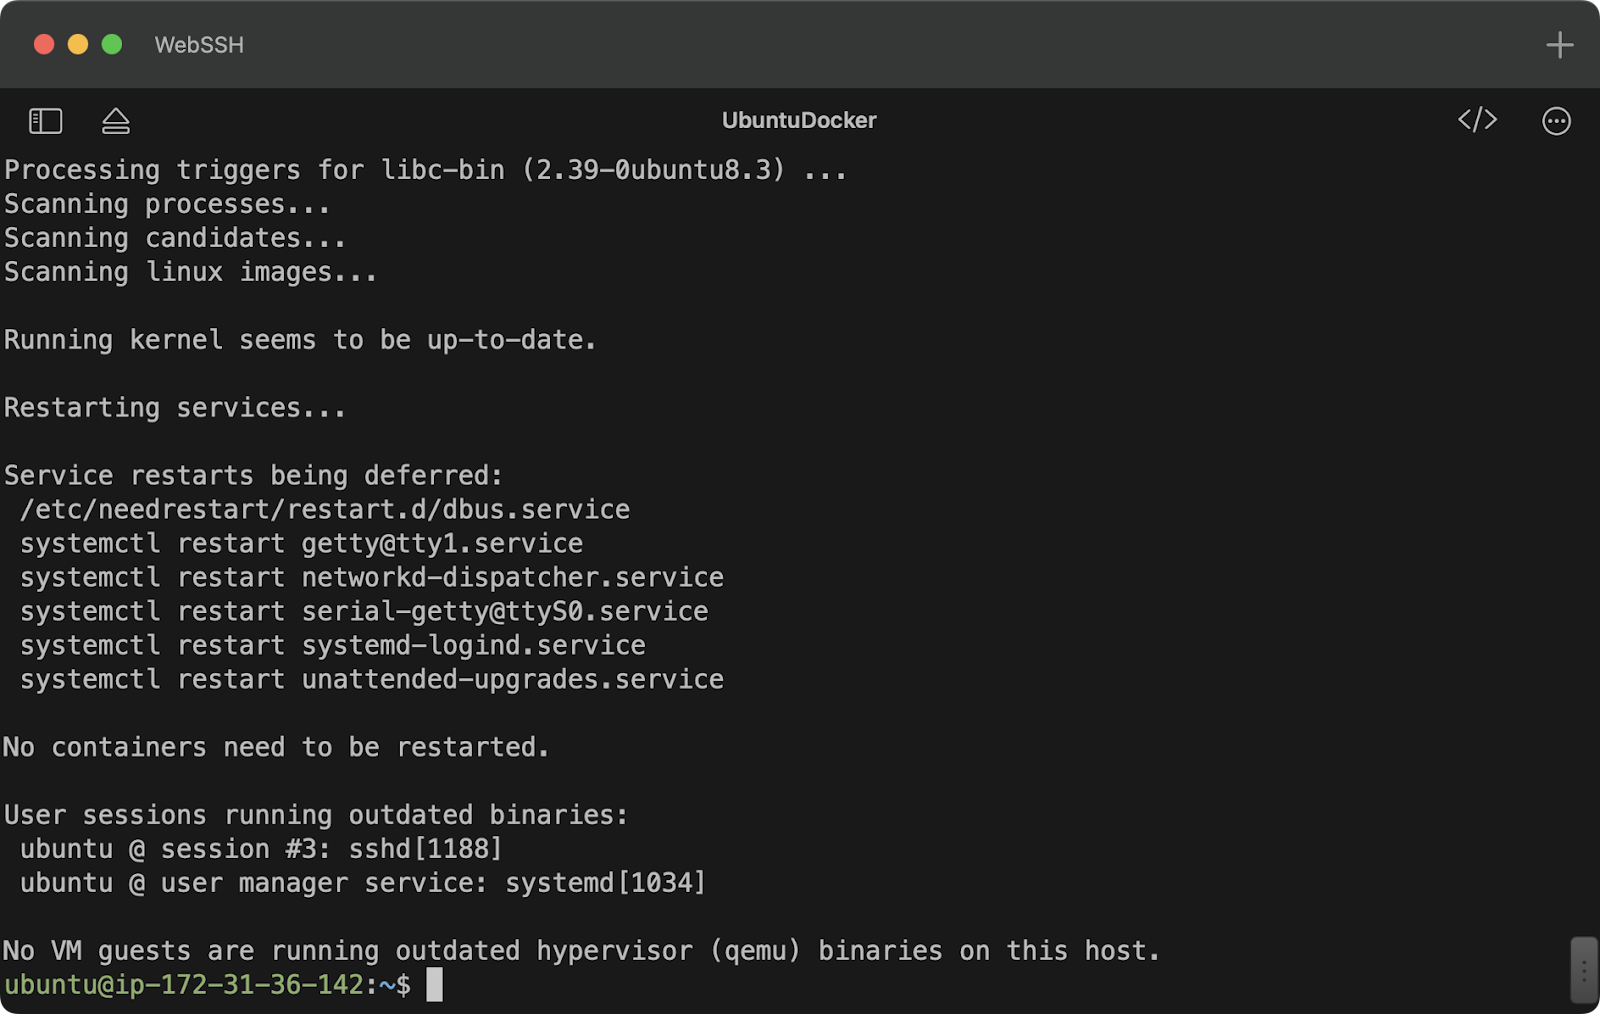
Image 2 - Docker installation results
Docker should now be installed on your system.
To verify, print the Docker version to the console. If the installation was successful, you should see a version number displayed:
docker --version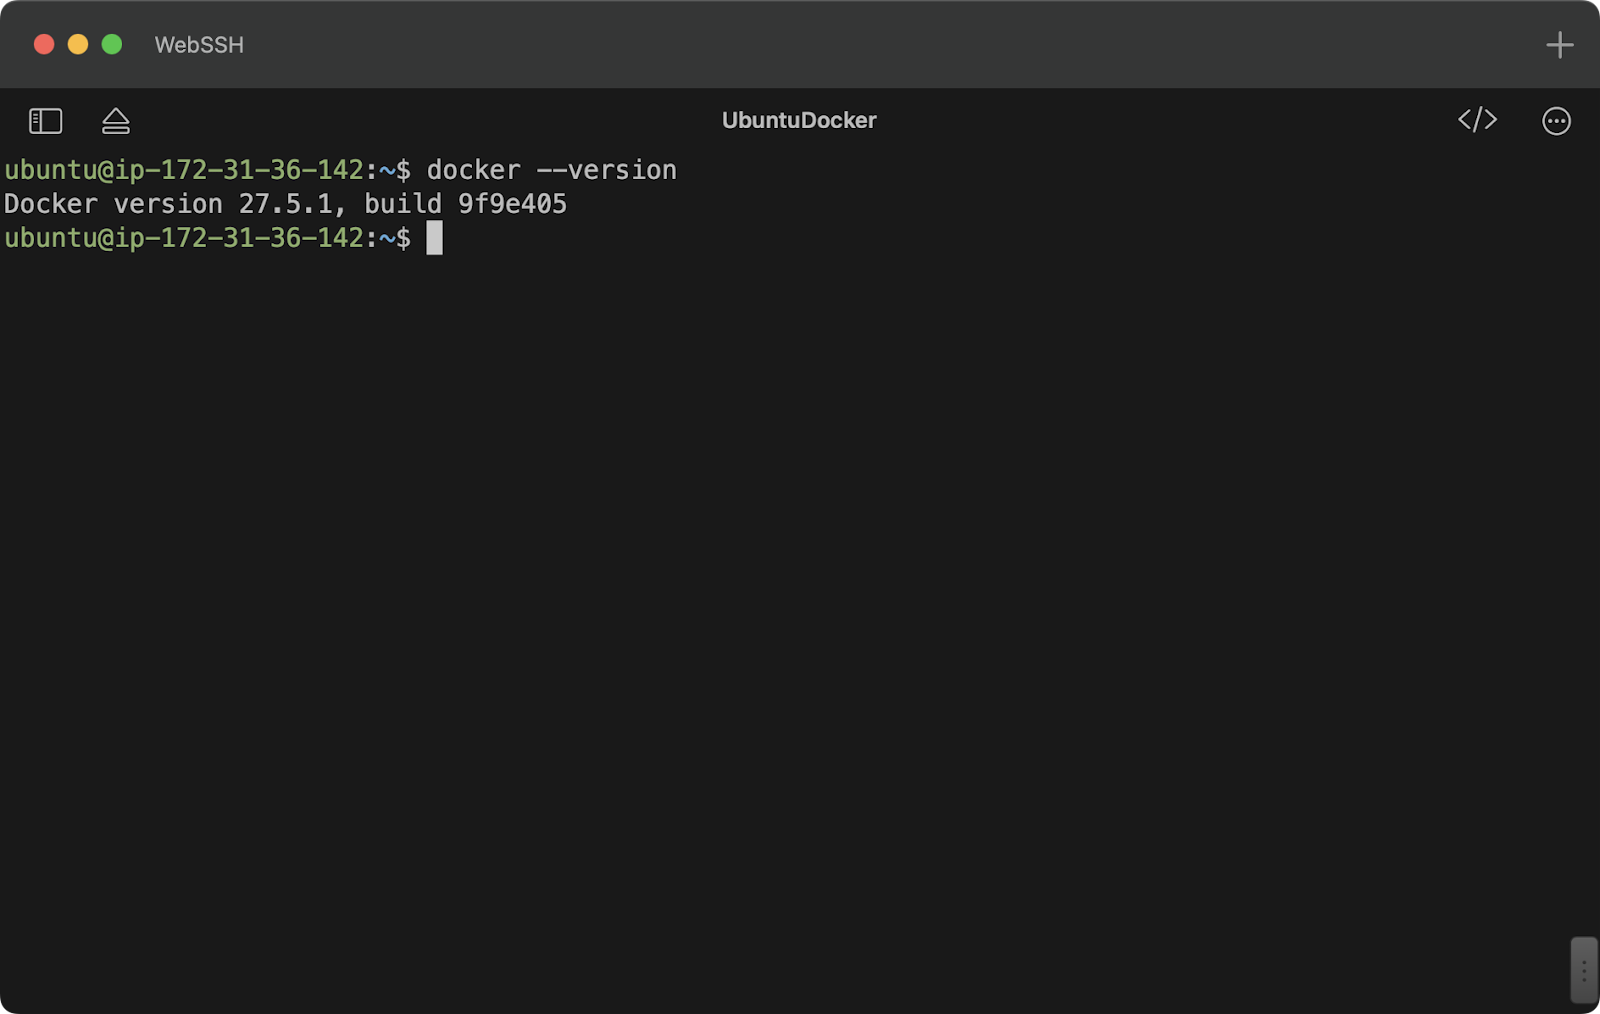
Image 3 - Installed Docker version
As of late January 2025, Docker version 27.5.1 is the latest, and we have it successfully running on Ubuntu Server.
You now have Docker installed and are ready to start containerizing your applications.
But what is containerization? Our course in Containerization and Virtualization concepts will teach you the basics.
Before doing so, we recommend going through three additional configuration steps to get the most out of it. This section is for you if you want to run Docker on system boot or manage images and containers as a non-root user.
The Docker service is currently running on your system, but it won’t start automatically after a reboot.
To ensure Docker starts automatically on boot, use systemctl to enable the service:
sudo systemctl enable dockerYou should see an output similar to ours:
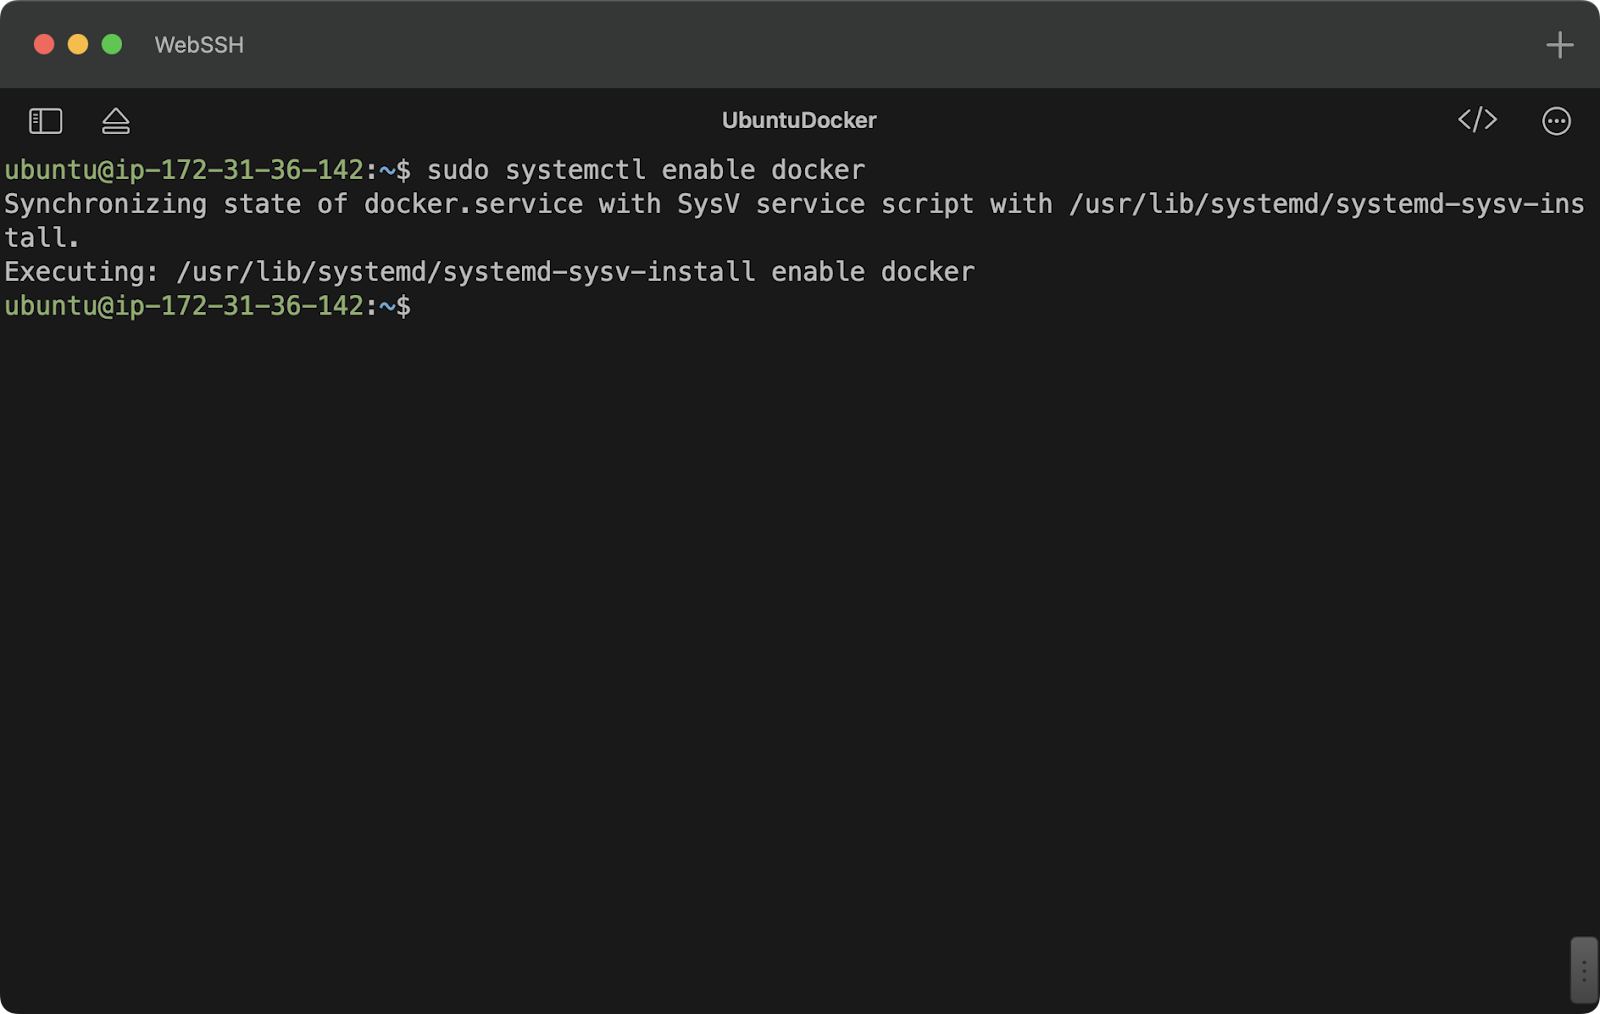
Image 4 - Enabling Docker service on boot
In the future, if you ever see a message indicating that Docker isn't running (which shouldn’t happen), you can start Docker manually using the following command:
sudo systemctl start dockerDocker will now remain up and running as long as your system is powered on.
There are a few additional systemctl commands you can use to manage the Docker service.
For example, the status command shows the state of a service, which is most commonly active, inactive, or failed. Although there are more possible states, these three are the most frequent:
sudo systemctl status docker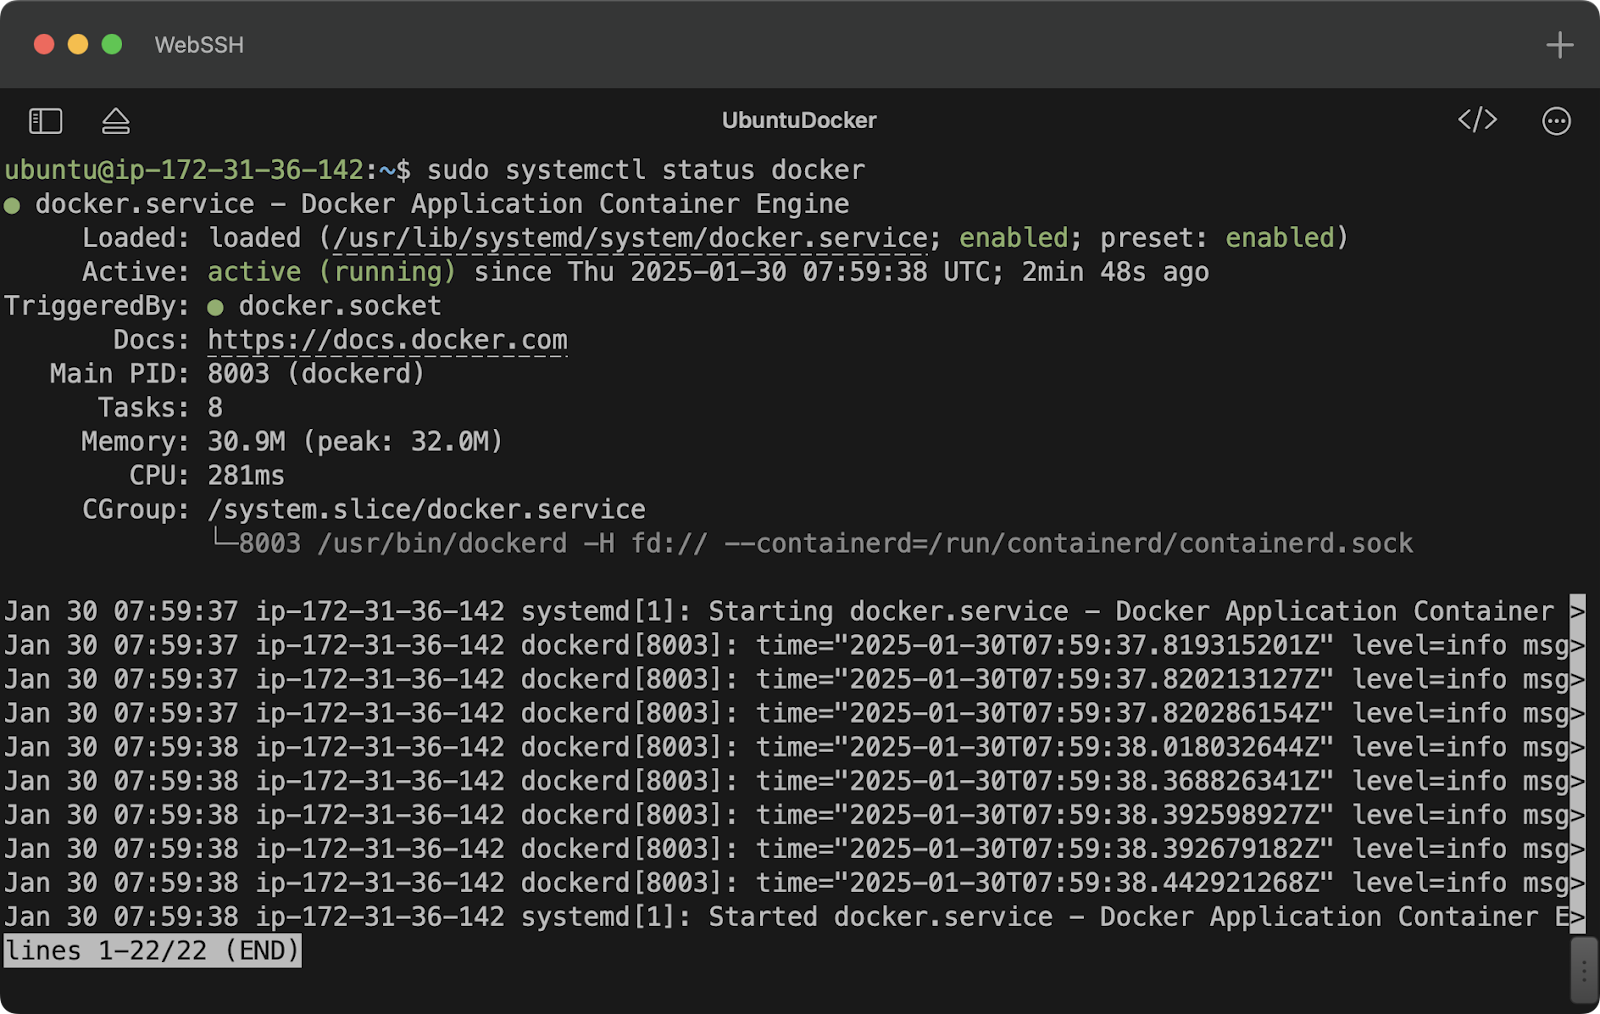
Image 5 - Docker service status
If your Docker service is active, all systems are running correctly.
If you see a different state for Docker or any other service, restarting it should resolve the issue:
sudo systemctl restart dockerOnce restarted, you can check the status again to confirm that the service is running.
By default, running Docker commands requires sudo, which can be inconvenient. This means you must type sudo before any docker command.
Luckily, there’s an easy way to allow non-root users to run Docker commands—by adding the current user to the docker group:
sudo usermod -aG docker $USERAfter running the above command, log out and log back in for the change to take effect. You should now be able to run Docker commands without superuser privileges.
We’ll verify that in the next section.
Docker is now installed and configured. It also runs automatically on boot and allows your user to run commands directly.
In this section, we'll wrap things up by running two containers—one for a simple "Hello, World!" example and another for a Python script.
Docker provides a simple test image called hello-world, which is used solely to confirm that Docker is working properly.
Run the following command to start the image:
docker run hello-worldSince the image is not found locally, Docker will automatically download it from the web. After a few moments, you should see an output similar to this:
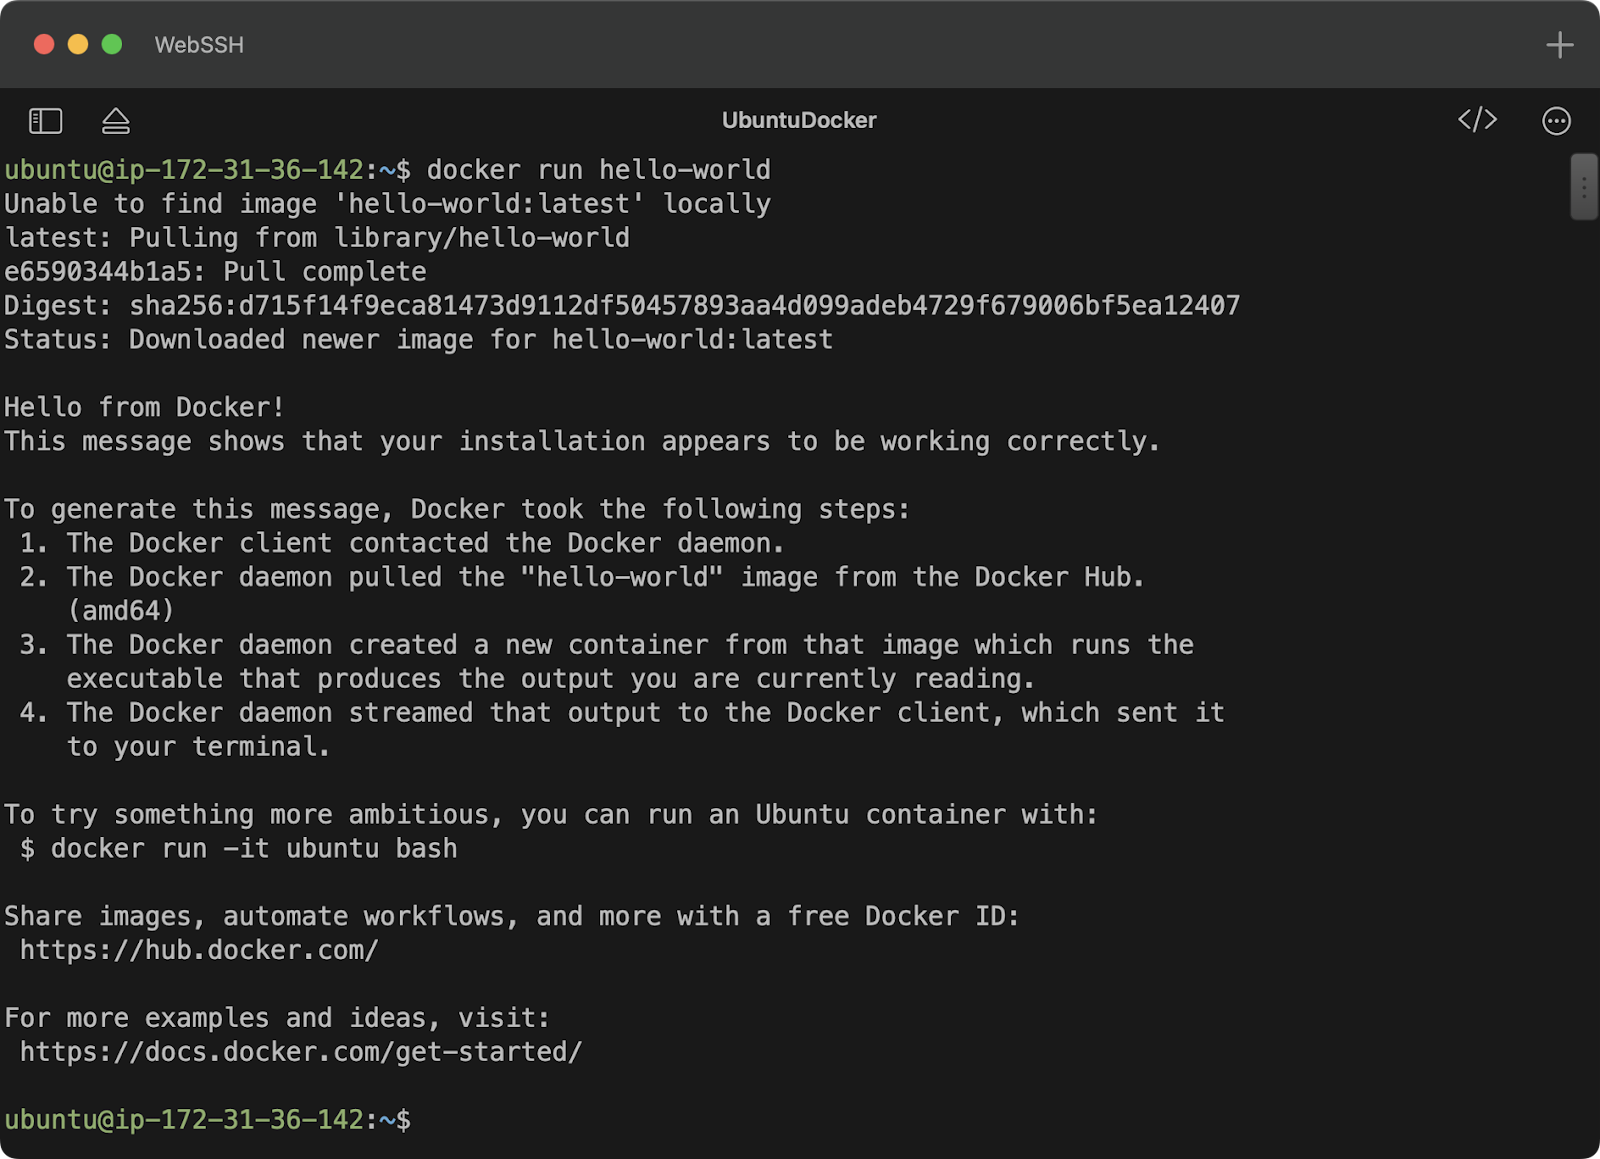
Image 6 - Docker hello world example
In short, this confirms that Docker is installed correctly, the Docker daemon is running, and your system can pull images from Docker Hub.
If you want to build images from scratch, this section is for you.
We'll build a simple image running Python 3.9 that, when launched, executes a custom Python script.
Start by creating a dedicated folder and an app.py file that will be executed:
mkdir python-docker-test && cd python-docker-test
nano app.py
The file contains only a simple print() command, but of course, you can expand it to include more complex logic:
print("Hello from Docker running on Ubuntu!")In the same folder, create a Dockerfile, which tells Docker how to build the image step by step:
nano DockerfileThese three lines are all you need:
FROM python:3.9-slim
COPY app.py /app.py
CMD ["python", "/app.py"]
In essence, Docker is instructed to fetch the python:3.9-slim image from Docker Hub, copy the app.py script to the container, and then run the script.
By now, you should have the following files in your working directory:
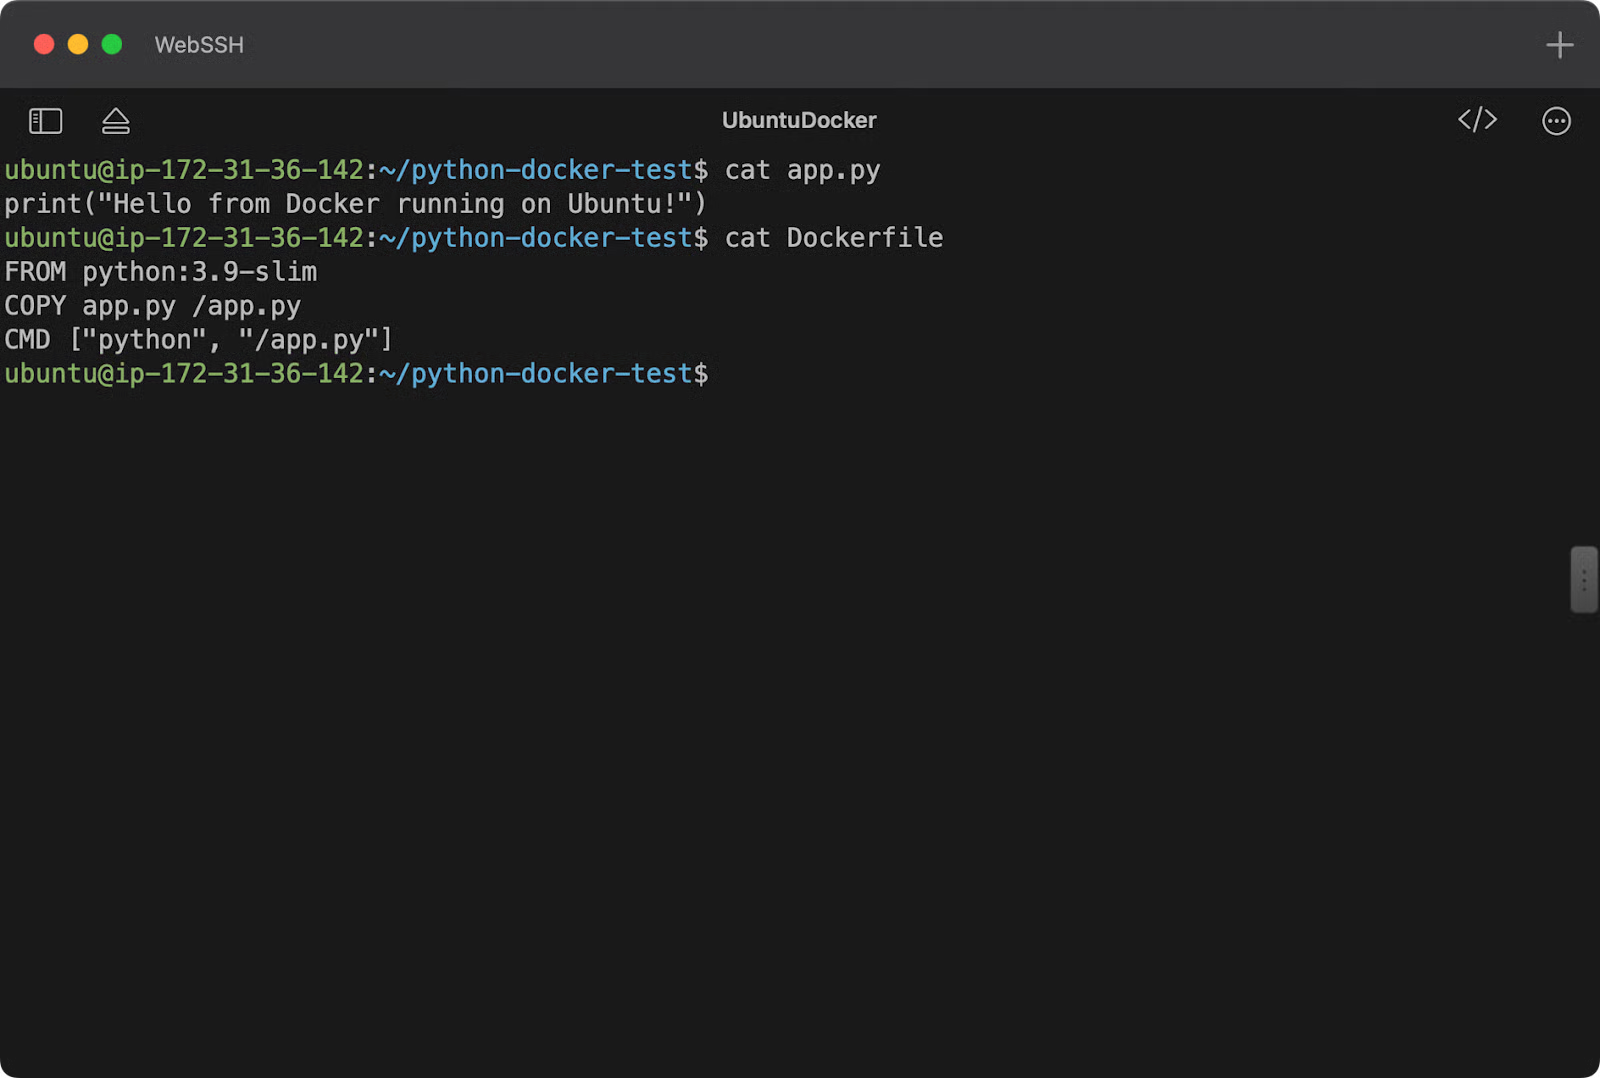
Image 7 - Demo Python application contents
To build the image, run the following command:
docker build -t python-hello .The command above creates a new image in the current directory (.) and assigns it the tag python-hello.
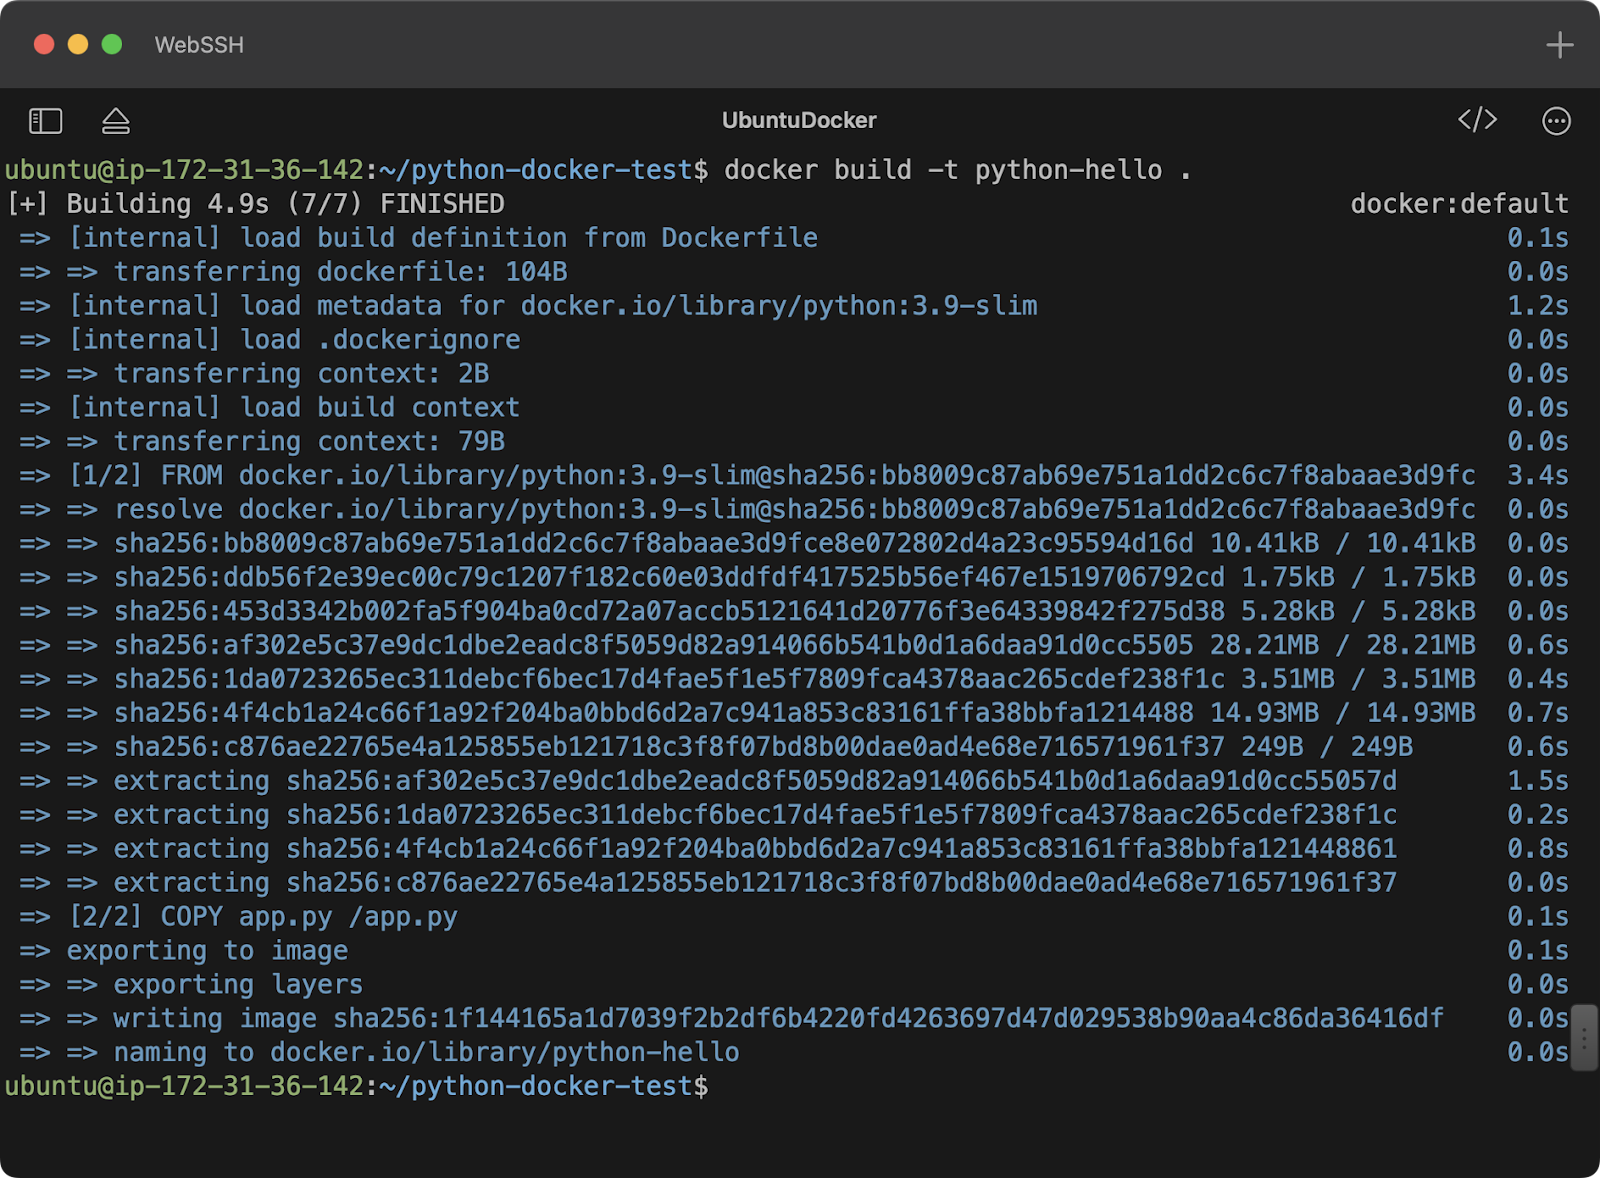
Image 8 - Building a Docker image
To run the image, use the docker run command followed by the image tag. The optional --rm flag ensures the container is removed after it exits, which happens immediately after the Python script finishes execution:
docker run --rm python-hello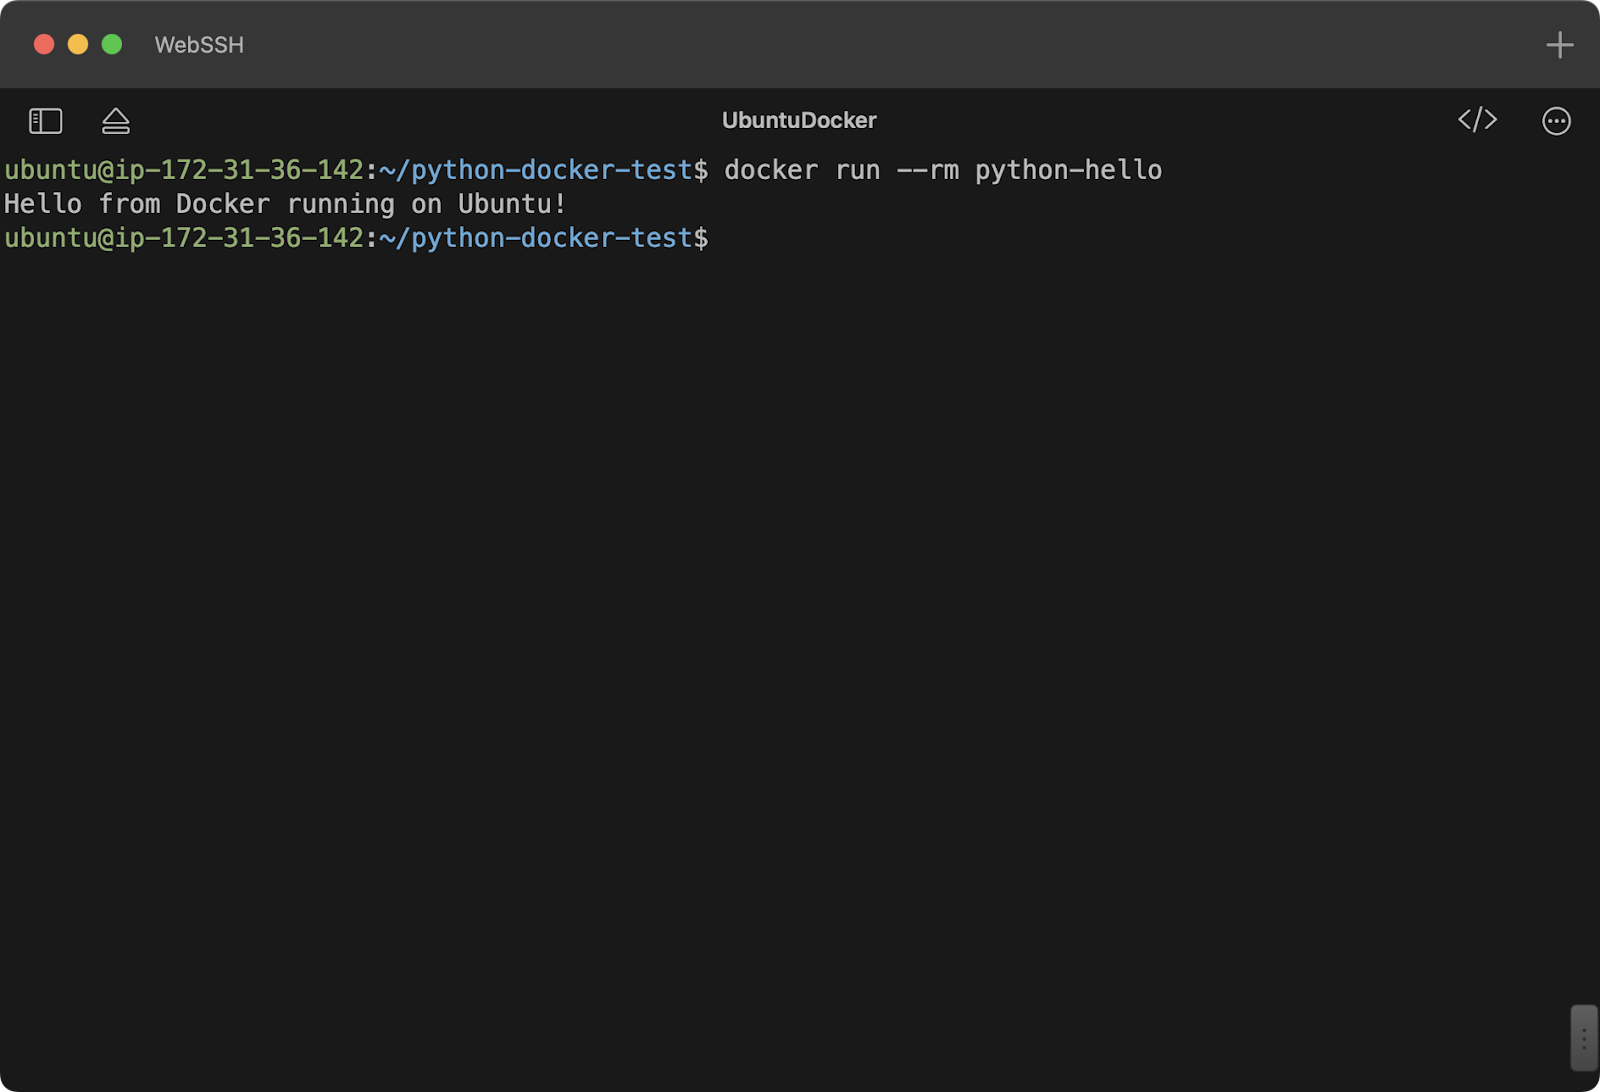
Image 9 - Running a Python script in Docker
And just like that, you've successfully containerized your first Python application with Docker running on Ubuntu!
If you're looking for a machine learning application of Docker, DataCamp's Containerization: Docker and Kubernetes for Machine Learning is a recommended follow-up read.
Running Docker in your own environment gives you full control but also makes you responsible for keeping up with the latest updates, new features, and security patches.
This section explains how to perform basic tasks such as updating Docker and completely removing it from your system.
Updating Docker comes down to two main steps:
Run the following commands in the terminal to update Docker on Ubuntu:
sudo apt update
sudo apt upgrade -y docker-ce docker-ce-cli containerd.io
docker --version
The docker -- version command displays the currently installed version. This is the easiest way to verify whether Docker has been updated successfully.
If you need to remove Docker from your system, you should start by uninstalling Docker and related packages and removing any remaining Docker-related files and configurations.
Additionally, you can optionally remove the Docker repository from APT sources.
The following four commands will uninstall Docker from your Ubuntu system, but keep in mind that only the first three are required:
sudo apt remove -y docker-ce docker-ce-cli containerd.io
sudo rm -rf /var/lib/docker
sudo rm -rf /var/lib/containerd

# Optional
sudo rm /etc/apt/sources.list.d/docker.list
After running these commands, issuing docker --version should return an error indicating that Docker is no longer installed.
Managing Docker requires ongoing maintenance, as it's your responsibility to remove unused resources and monitor performance.
In this section, we'll cover two essential housekeeping tasks you should perform regularly while running Docker on Ubuntu.
Over time, unused Docker images, containers, networks, and volumes can accumulate, consuming significant disk space.
Cleaning up these resources is known as pruning, though a detailed explanation is outside the scope of this article.
Just remember this command — it will remove all unused containers, images, volumes, and networks at once:
docker system prune -a -f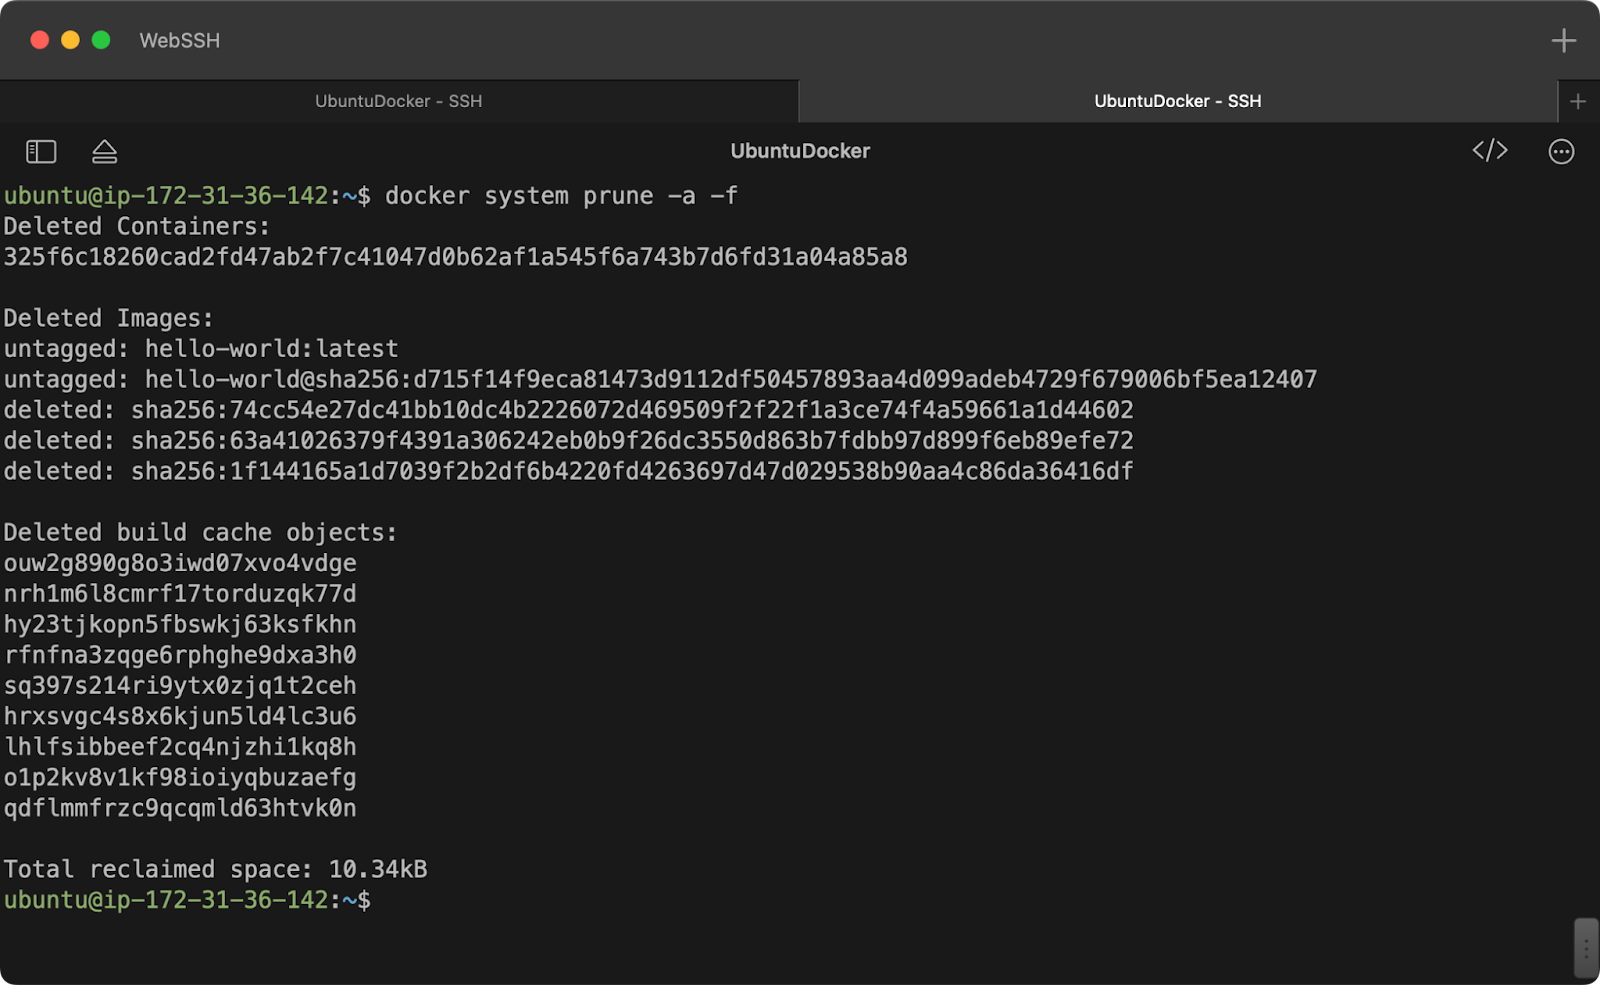
Image 10 - Resource pruning
We've only reclaimed 10 kB, but in a more “serious” environment, this command can often free up tens of gigabytes of disk space.
We've already covered two important security topics — keeping Docker updated and managing superuser permissions.
In addition to these, here are a few more steps to enhance Docker security on Ubuntu:
--privileged flag whenever possible, as it disables many security checks that isolate containers from the host system.The Docker CLI includes powerful tools to help you monitor container performance and identify potential issues.
Before diving into them, let's modify the app.py file to keep it running after the container starts:
import time

time.sleep(10000)
print("Hello from Docker running on Ubuntu!")
The reason is simple — we need a running container to monitor its performance.
Let's start with the ps command. Simply put, it lists all currently running containers:
docker ps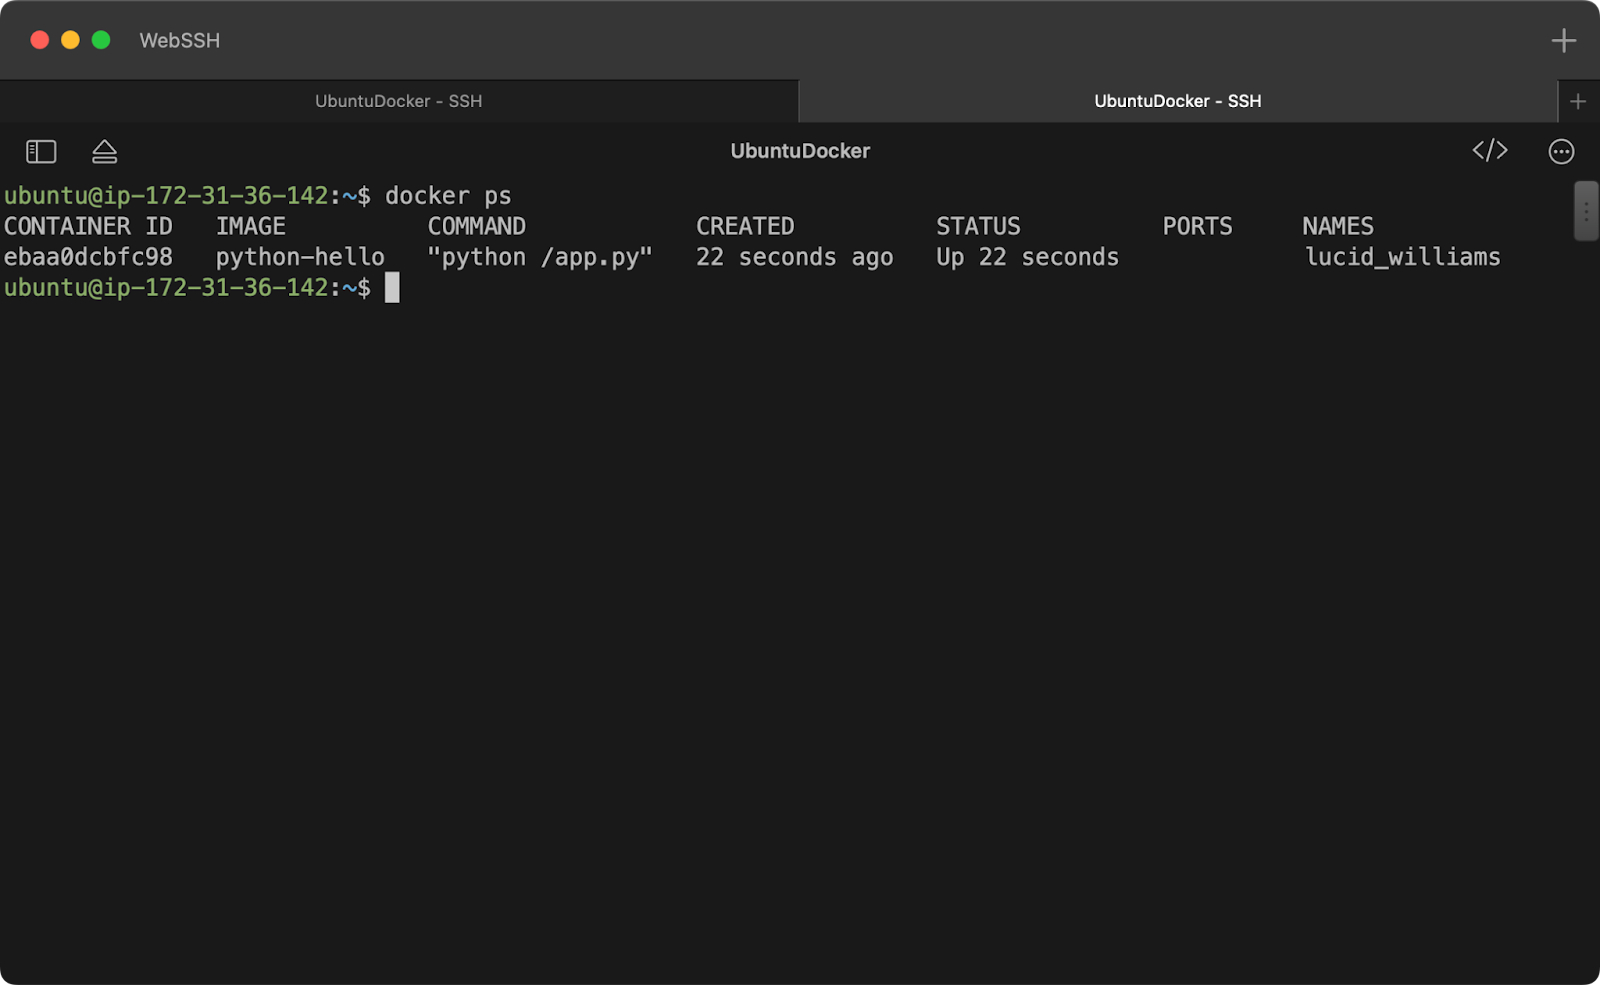
Image 11 - Running Docker containers
While the output doesn't reveal much, the CONTAINER ID field is crucial for further inspection.
Now, let's explore the stats command, which displays real-time resource usage, including CPU, memory, and network consumption for all running containers:
docker stats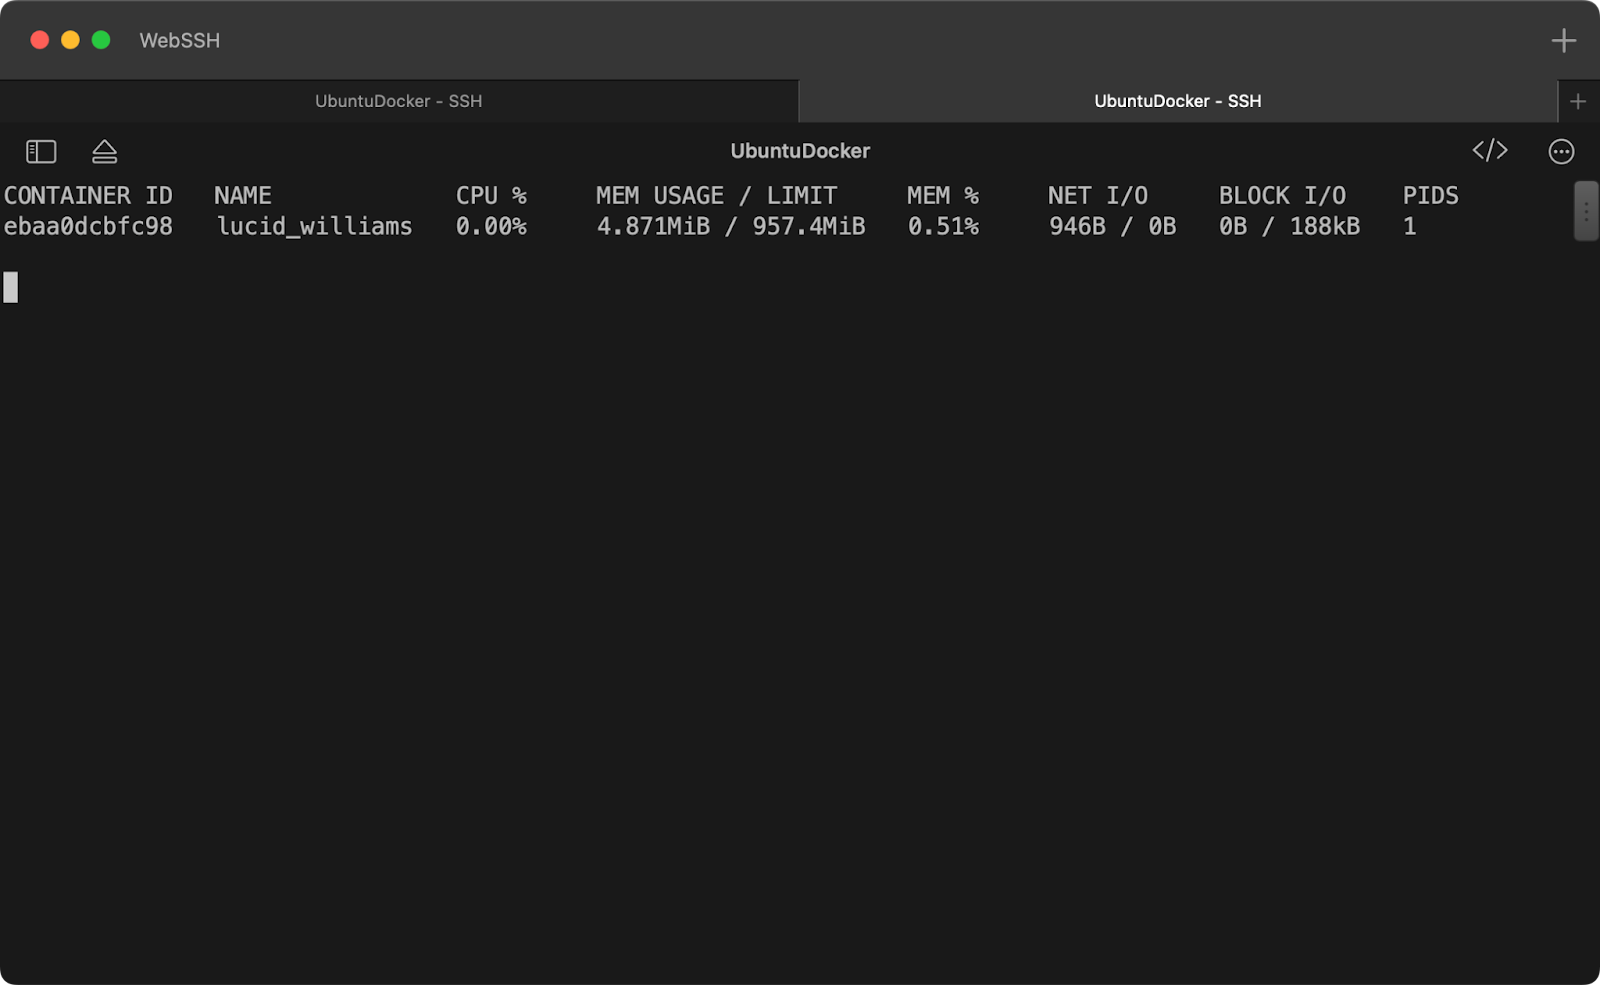
Image 12 - Container stats
If you need a detailed breakdown of a container's resource usage and configuration, use the inspect command.
Just provide the container ID:
docker inspect <container_id>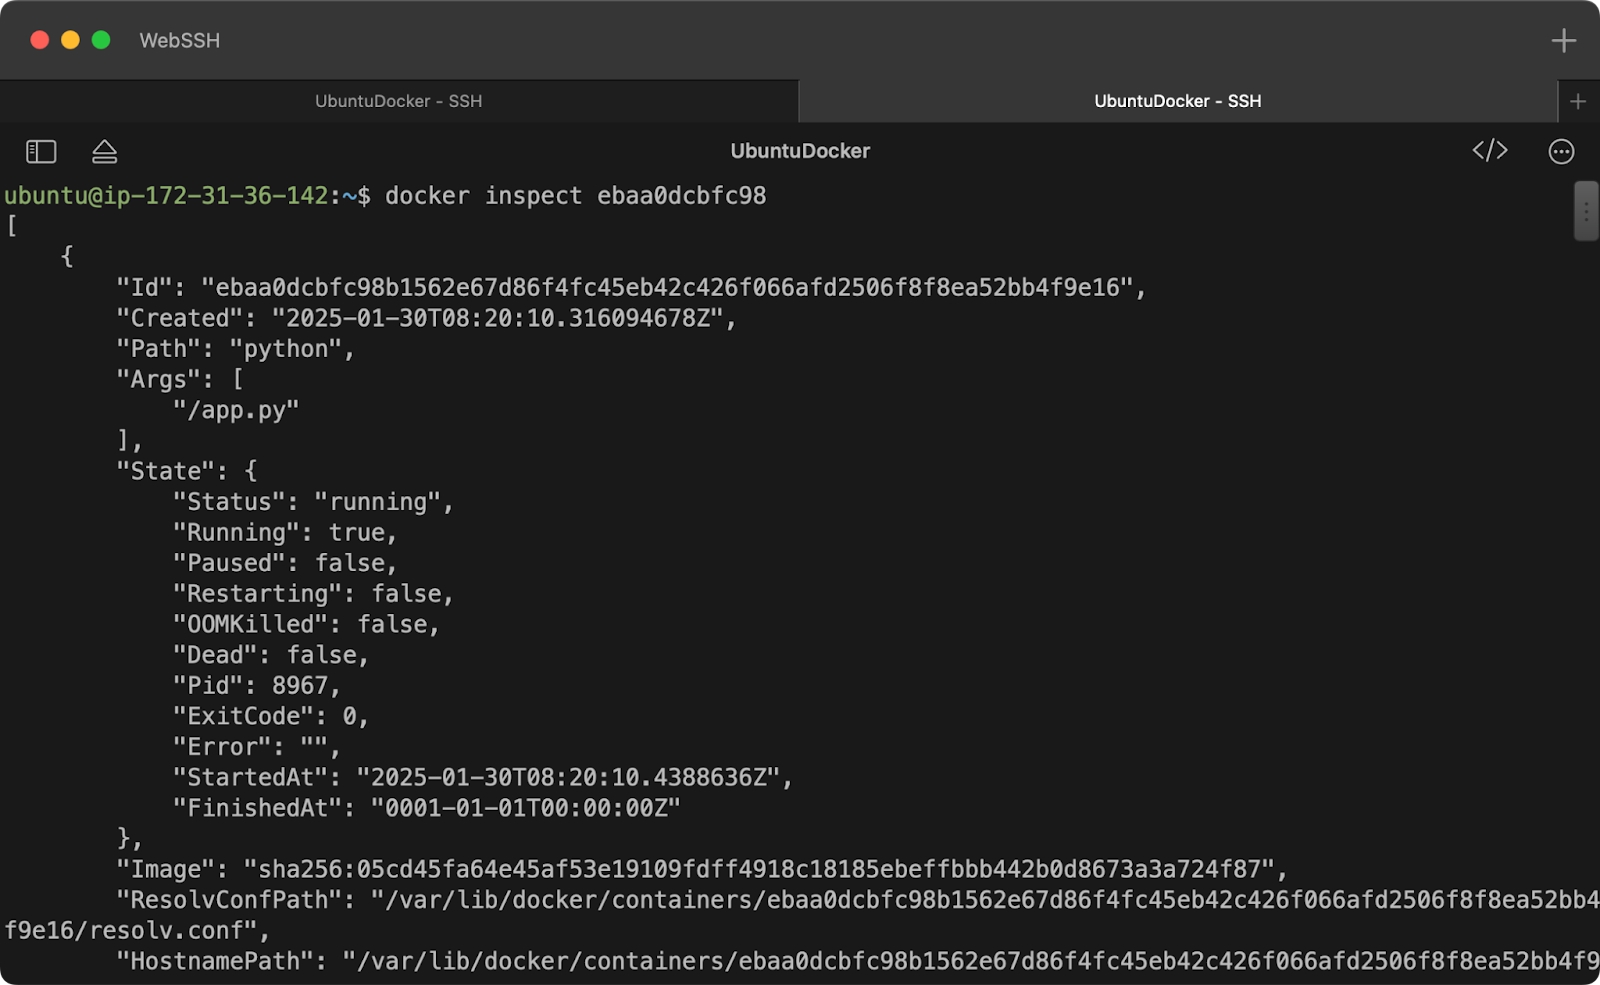
Image 13 - Container details
If you're experiencing issues with a Docker container, the logs command can help diagnose the problem and potentially identify its cause.
It also requires the container ID:
docker logs <container_id>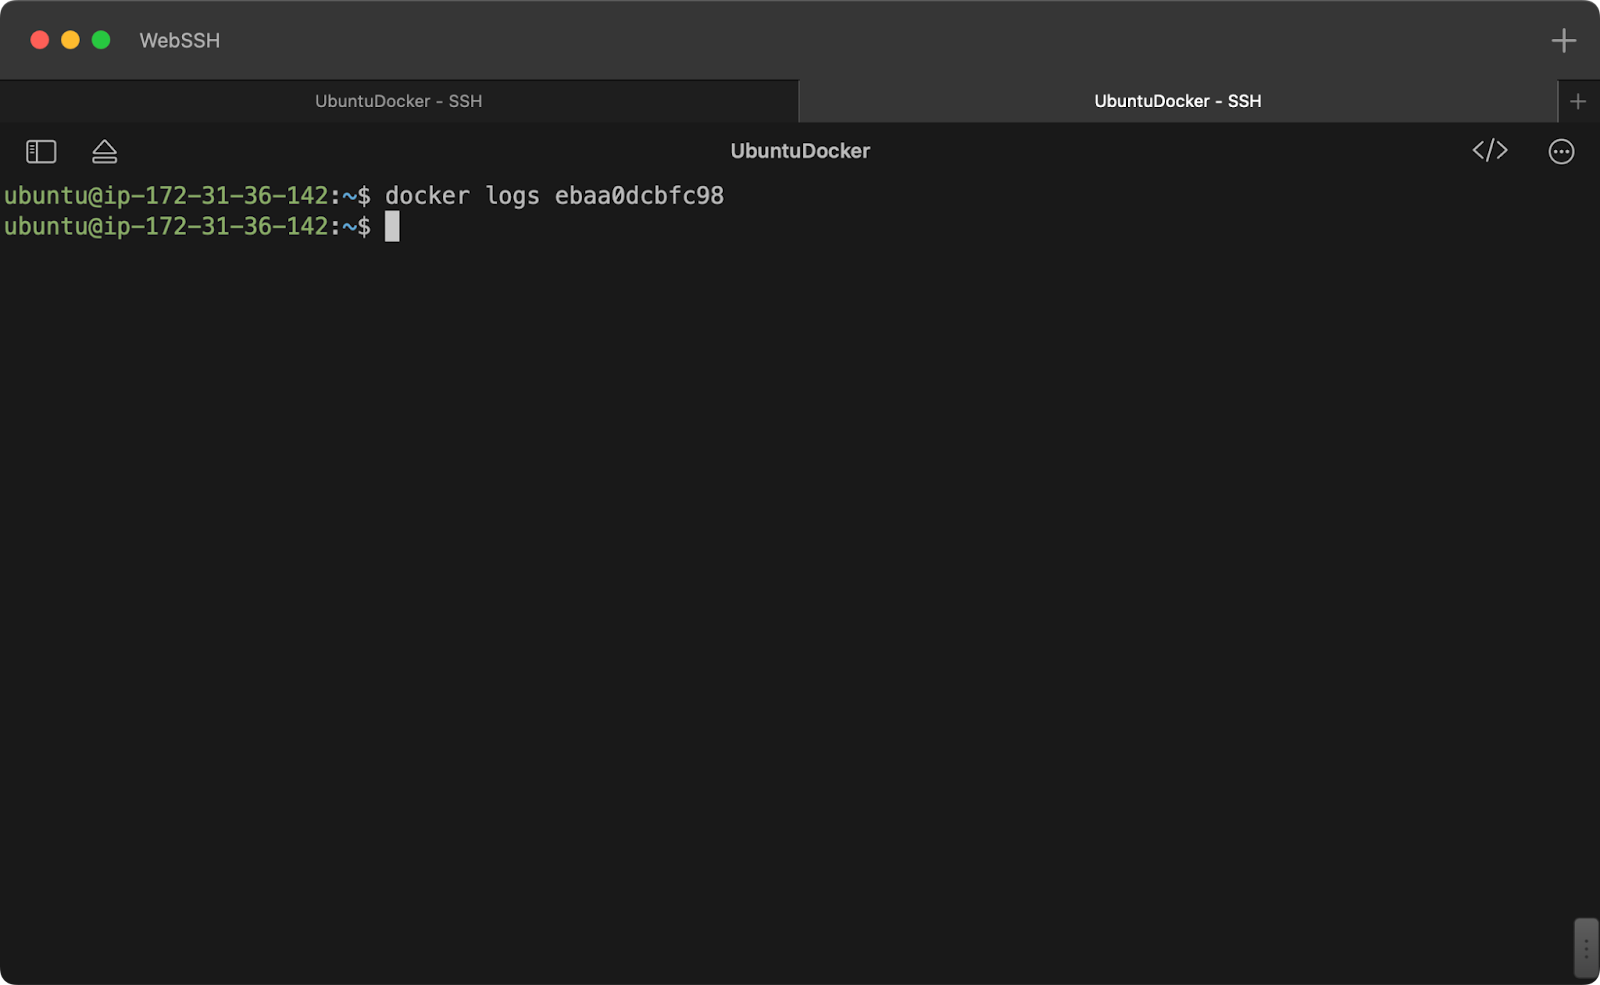
Image 14 - Container logs
Sometimes, you may need to connect directly to a running container. If you know the container ID, this is straightforward:
docker exec -it <container_id> bash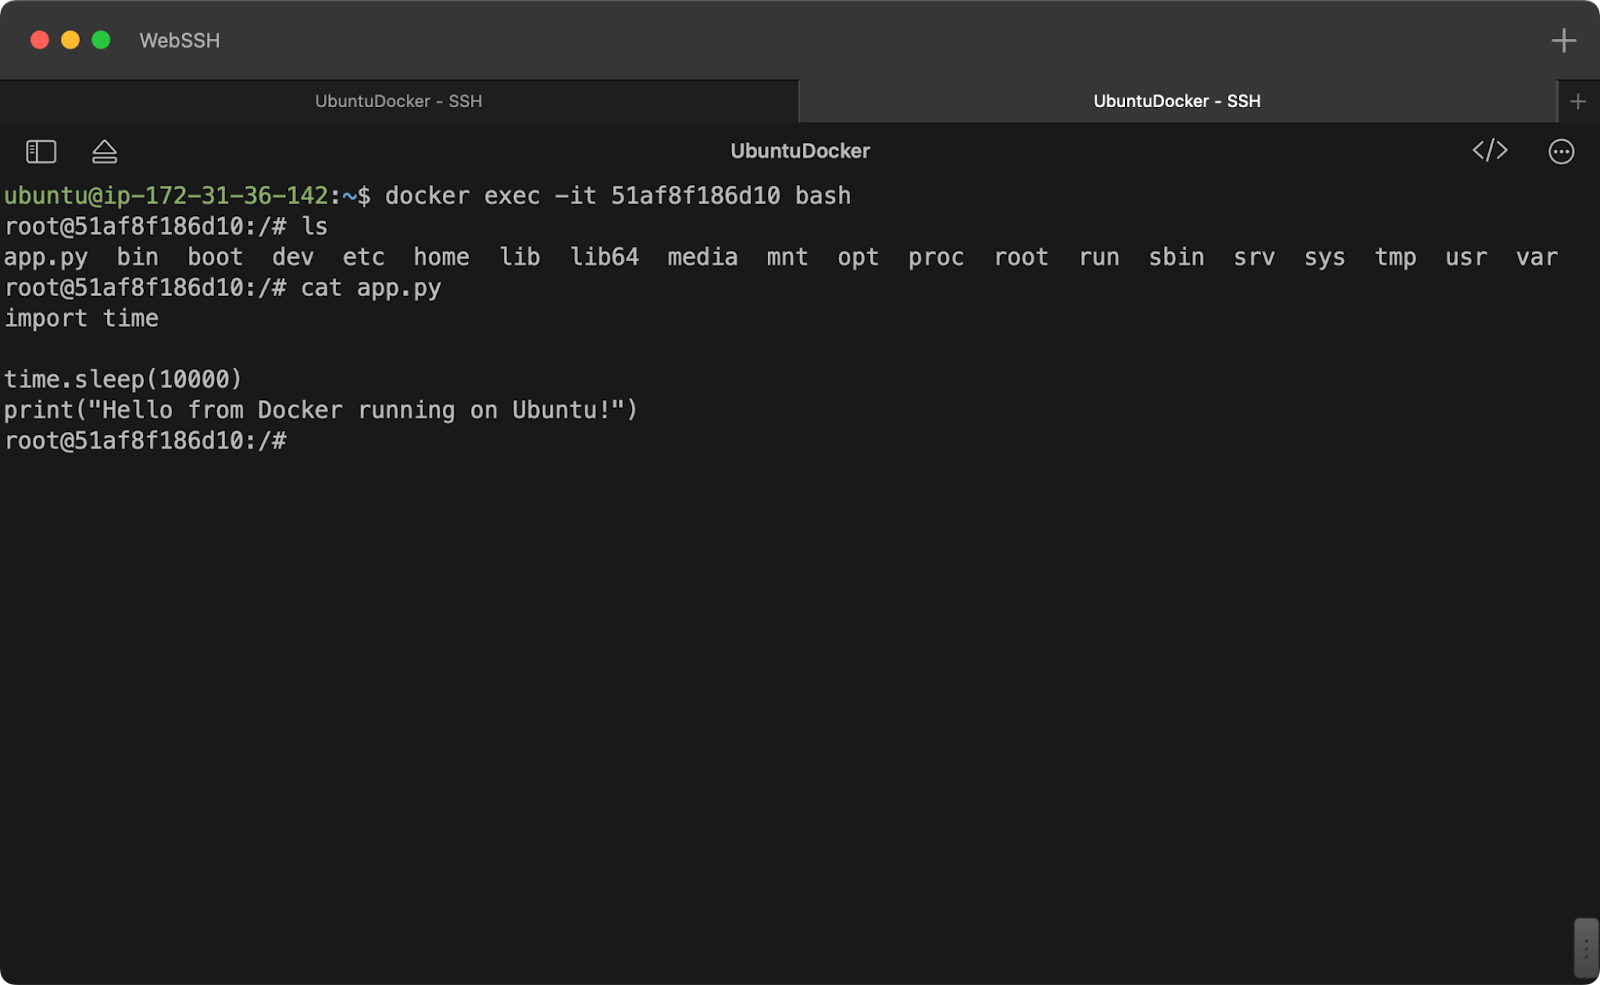
Image 15 - Container logs
The previous command opens a shell inside the specified Docker container, allowing you to access or modify files directly.
Today, you've learned how to install, configure, and manage Docker on Ubuntu.
If you've followed every step, you will have Docker running on your system, which starts automatically on boot and doesn't require superuser permissions to manage containers. You've also learned how to verify Docker installation, run test containers, and even build your first custom Python containerized application.
It's a lot, but it's only just the beginning. There's much more to this whole containerization story, and we highly recommend checking out our official resources to get proficient in Docker:
Learn more about Docker with these courses!
Track
Course
Course
blog
Joel Wembo
14 min
cheat-sheet
Richie Cotton
Tutorial
Arunn Thevapalan
Tutorial
Bex Tuychiev
Tutorial
Dario Radečić
Tutorial
Abid Ali Awan