
Track
Data Engineer in Python
40 hr
A best practice when setting up a new Python project is to do so in a virtual environment. I’ll show you how to go about it with conda and venv.
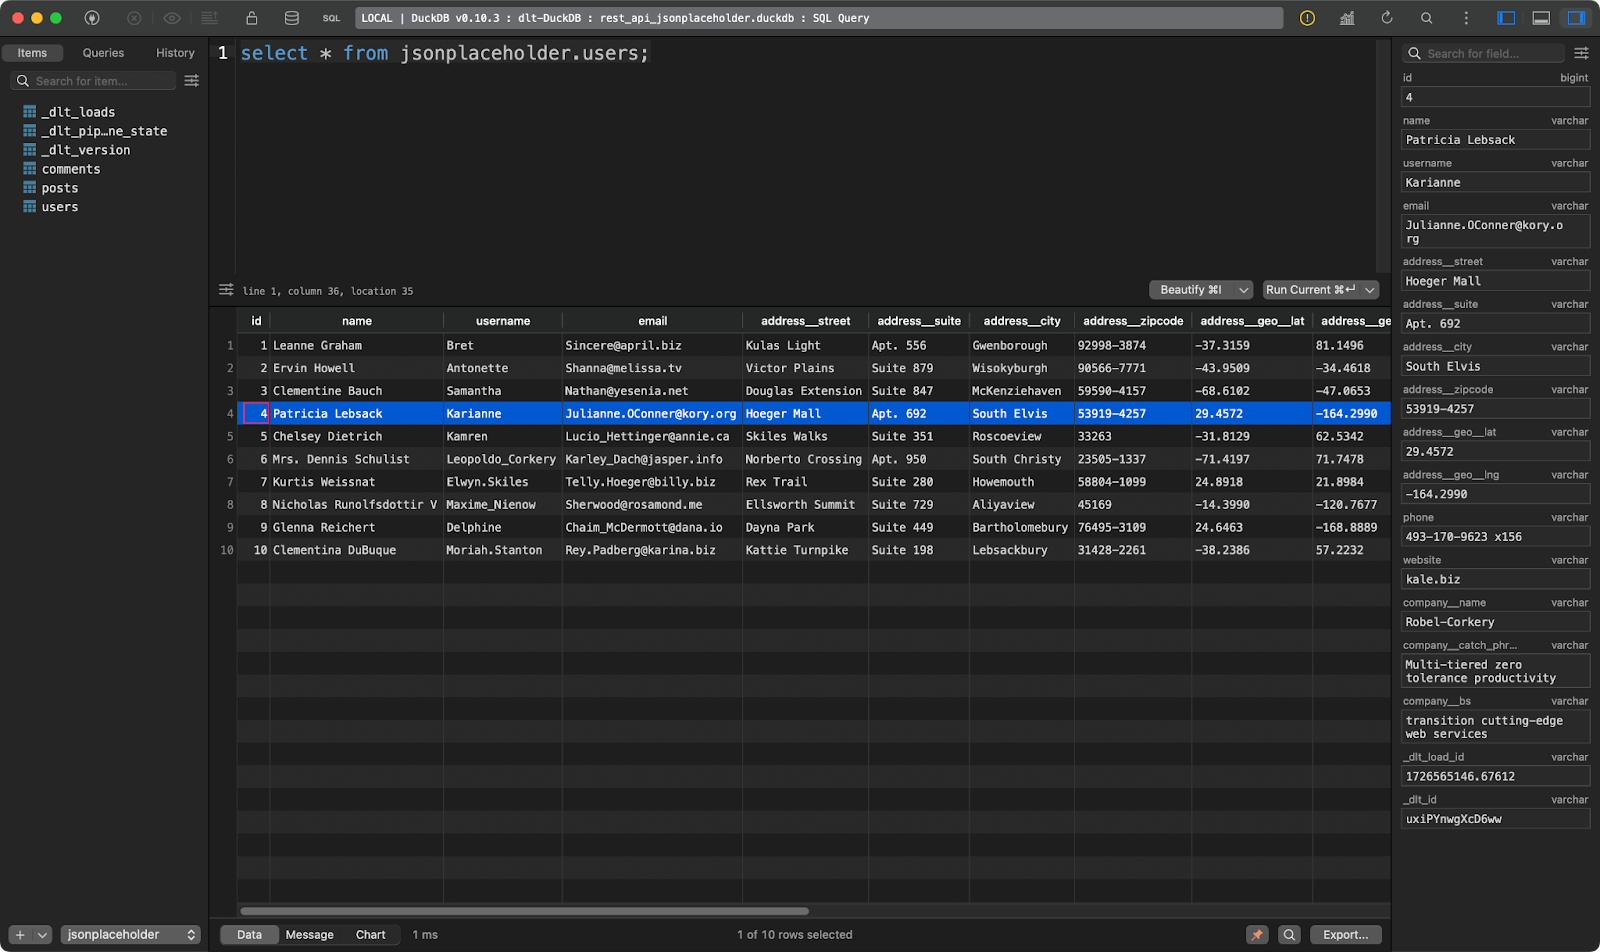
I’m using Anaconda to manage environments and dependencies. If you do as well, run the following snippet to create a new virtual environment named dlt_env based on Python 3.12:
conda create --name dlt_env python=3.12 -y
conda activate dlt_env
You should see an output similar to this one in your terminal:
Conda environment setup
On the other hand, if you’re not using Anaconda, run the following command to create and activate a new Python environment:
python -m venv ./env
source ./env/bin/activate
You’re now ready to install dlt.
Before proceeding, you should have a virtual environment created and activated
To install dlt, run the following inside the environment:
pip install dlt
dlt version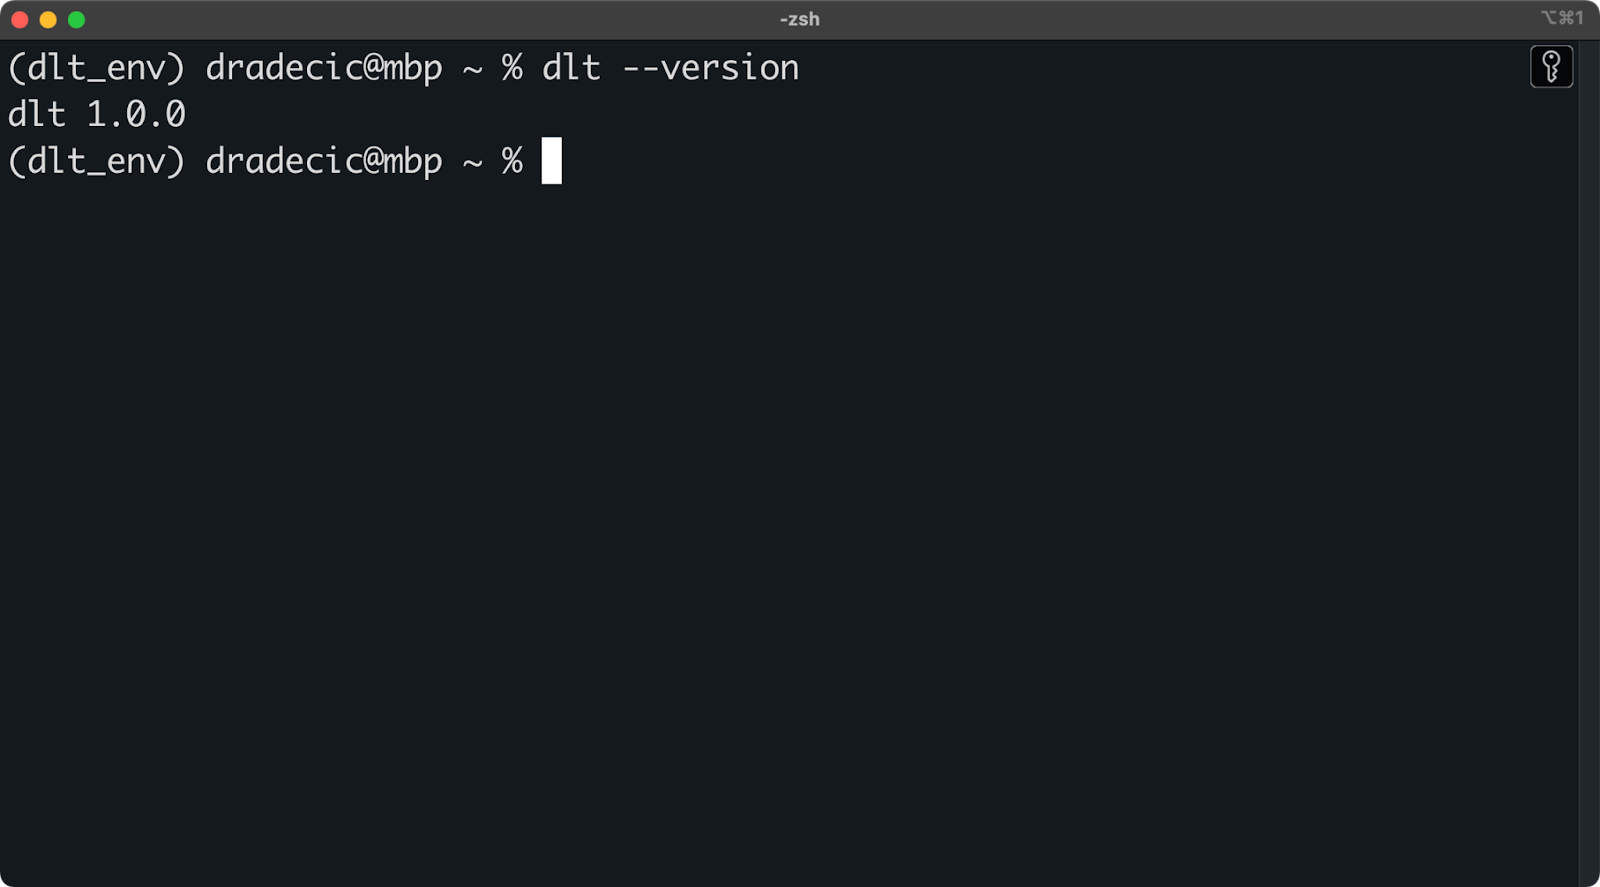
Installed dlt version
As long as you don’t get an error message or a message showing you that dlt is not recognized, you’re good to go!
You can now use the dlt command line interface to create new projects from a template.
This is done through the dlt init <source type> <destination type> command. In the following snippet, I show you how to create a pipeline that uses a REST API as a data source and DuckDB as a destination (target):
dlt init rest_api_test duckdb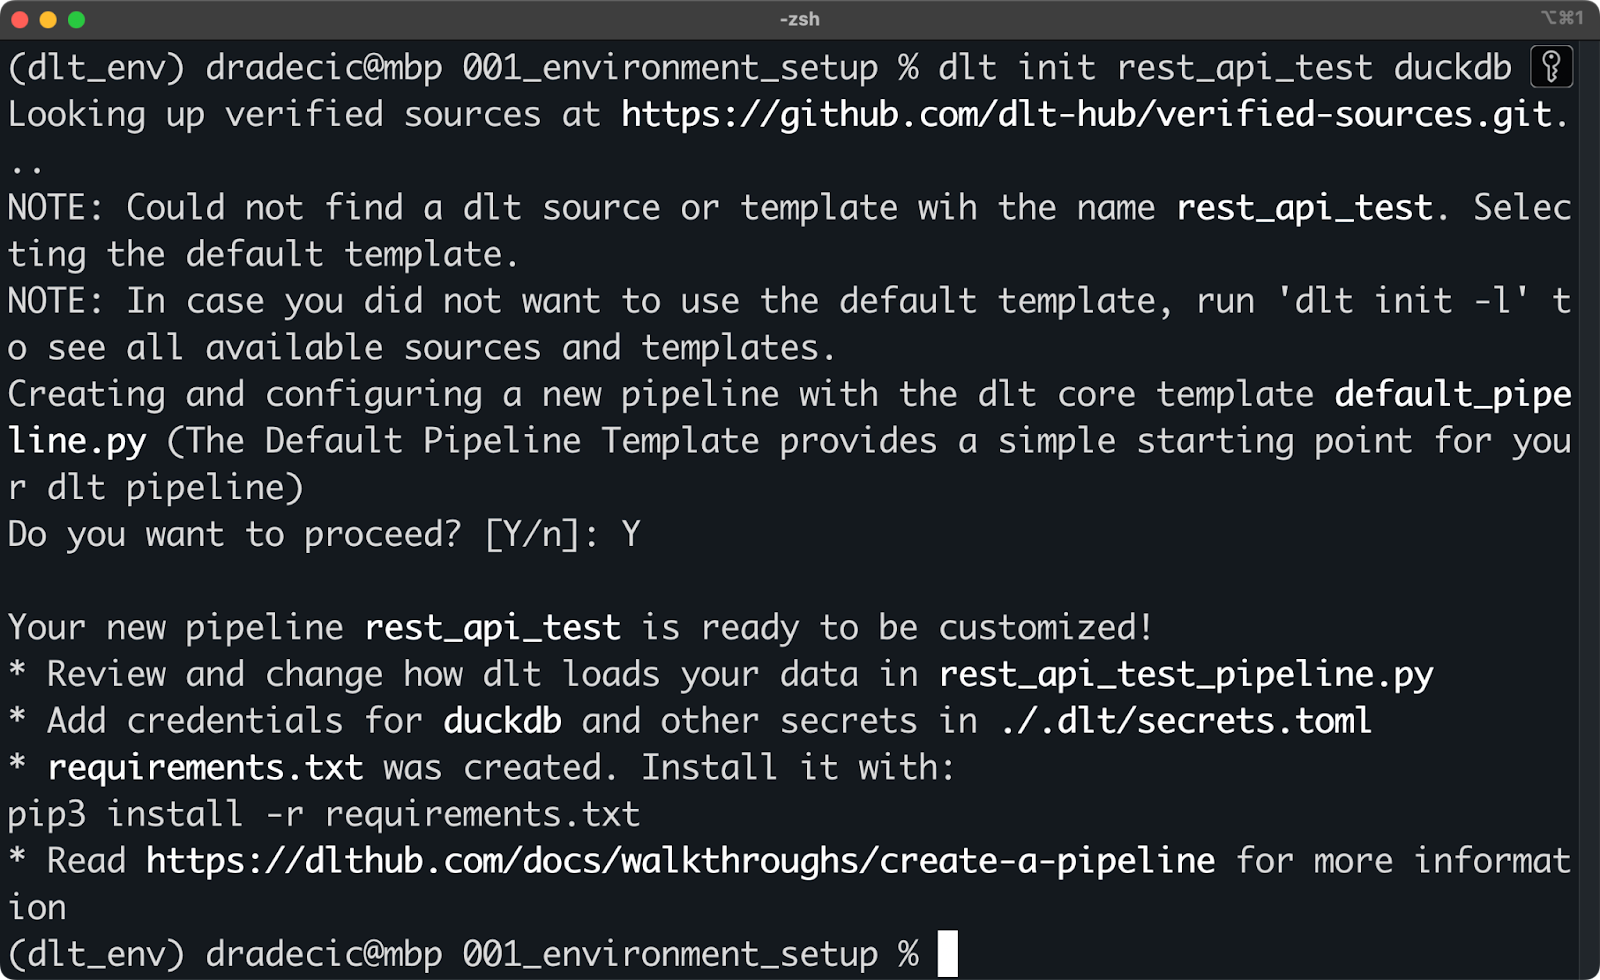
Initializing a new dlt project with DuckDB
There’s no one stopping you from creating the files manually - just make sure your folder structure resembles the one dlt CLI creates. For example, this is what the previous shell command created on my system:
.
├── requirements.txt
├── rest_api_test_pipeline.py
├── .dlt
│   ├── config.toml
│   ├── secrets.toml
The magic happens in the .dlt folder. It contains two files that cover everything regarding pipeline configuration and data sources and destinations, such as API keys and database credentials.
The rest_api_test_pipeline.py is an automatically generated Python file that shows you a couple of ways to connect a REST API with DuckDB.
For starters, you’ll want to install everything listed in requirements.txt. Do so by running the following command:
pip install -r requirements.txtOnce installed, you’re ready to run your first dlt pipeline!
Here are the contents of the rest_api_test_pipeline.py file:
"""The Default Pipeline Template provides a simple starting point for your dlt pipeline"""
# mypy: disable-error-code="no-untyped-def,arg-type"

import dlt
from dlt.common import Decimal

@dlt.resource(name="customers", primary_key="id")
def rest_api_test_customers():
    """Load customer data from a simple python list."""
    yield [
        {"id": 1, "name": "simon", "city": "berlin"},
        {"id": 2, "name": "violet", "city": "london"},
        {"id": 3, "name": "tammo", "city": "new york"},
    ]

@dlt.resource(name="inventory", primary_key="id")
def rest_api_test_inventory():
    """Load inventory data from a simple python list."""
    yield [
        {"id": 1, "name": "apple", "price": Decimal("1.50")},
        {"id": 2, "name": "banana", "price": Decimal("1.70")},
        {"id": 3, "name": "pear", "price": Decimal("2.50")},
    ]

@dlt.source(name="my_fruitshop")
def rest_api_test_source():
    """A source function groups all resources into one schema."""
    return rest_api_test_customers(), rest_api_test_inventory()

def load_stuff() -> None:
    # specify the pipeline name, destination and dataset name when configuring pipeline,
    # otherwise the defaults will be used that are derived from the current script name
    p = dlt.pipeline(
        pipeline_name='rest_api_test',
        destination='duckdb',
        dataset_name='rest_api_test_data',
    )
    load_info = p.run(rest_api_test_source())
    # pretty print the information on data that was loaded
    print(load_info)  # noqa: T201

if __name__ == "__main__":
    load_stuff()
Let me explain the decorators first, as you surely haven’t seen them before:
@dlt.resource: Used to create a generic resource, for example, a database table with a name and primary key column name. You’ll want to yield a dataset (e.g., a Python list, a pandas DataFrame) instead of returning it.@dlt.source: Used to group multiple resources, for example, multiple tables into a single database schema. The function must return function calls to your resources.Python functions in this file are pretty straightforward, but let me explain the logic:
rest_api_test_customers(): Generates random data on customer name and city.rest_api_test_inventory(): Generates random data on product name and price.rest_api_test_source(): Groups the previous two resources together into one schema.load_stuff(): Creates and runs a pipeline that moves dummy Python data into a DuckDB database.Note that the data isn’t actually fetched from a REST API, but its structure looks exactly like JSON that any REST API would return. Later in the article, I’ll show you how to work with actual APIs.
For now, run the pipeline with the following shell command:
python rest_api_test_pipeline.py
Running the pipeline
If you see a message similar to the one above, the pipeline execution was successful.
You can connect to the local DuckDB file through any database tool (I’m using TablePlus). Once there, your data will be inside a schema specified under the dataset_name parameter in dlt.pipeline().
The customers table shows data generated with Python, with the addition of two data lineage columns:
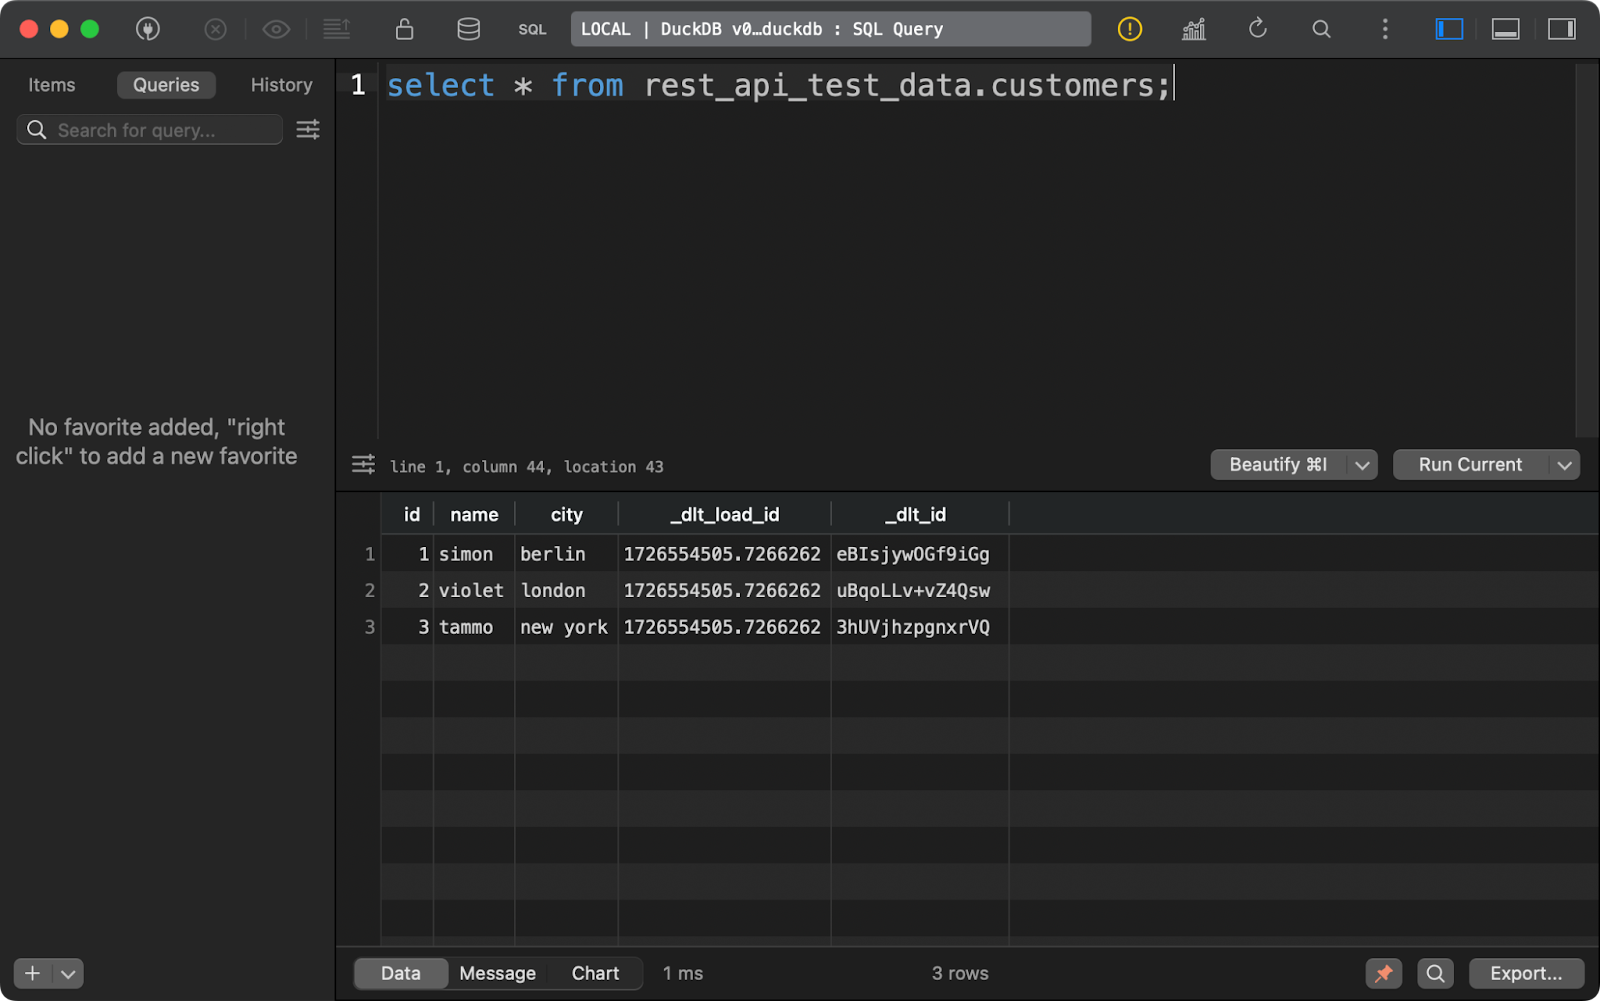
Customers table contents
The same holds for the inventory table. Note that the price column contains NULLs. There’s likely a problem with the Decimal data type that dlt used by default in this example:
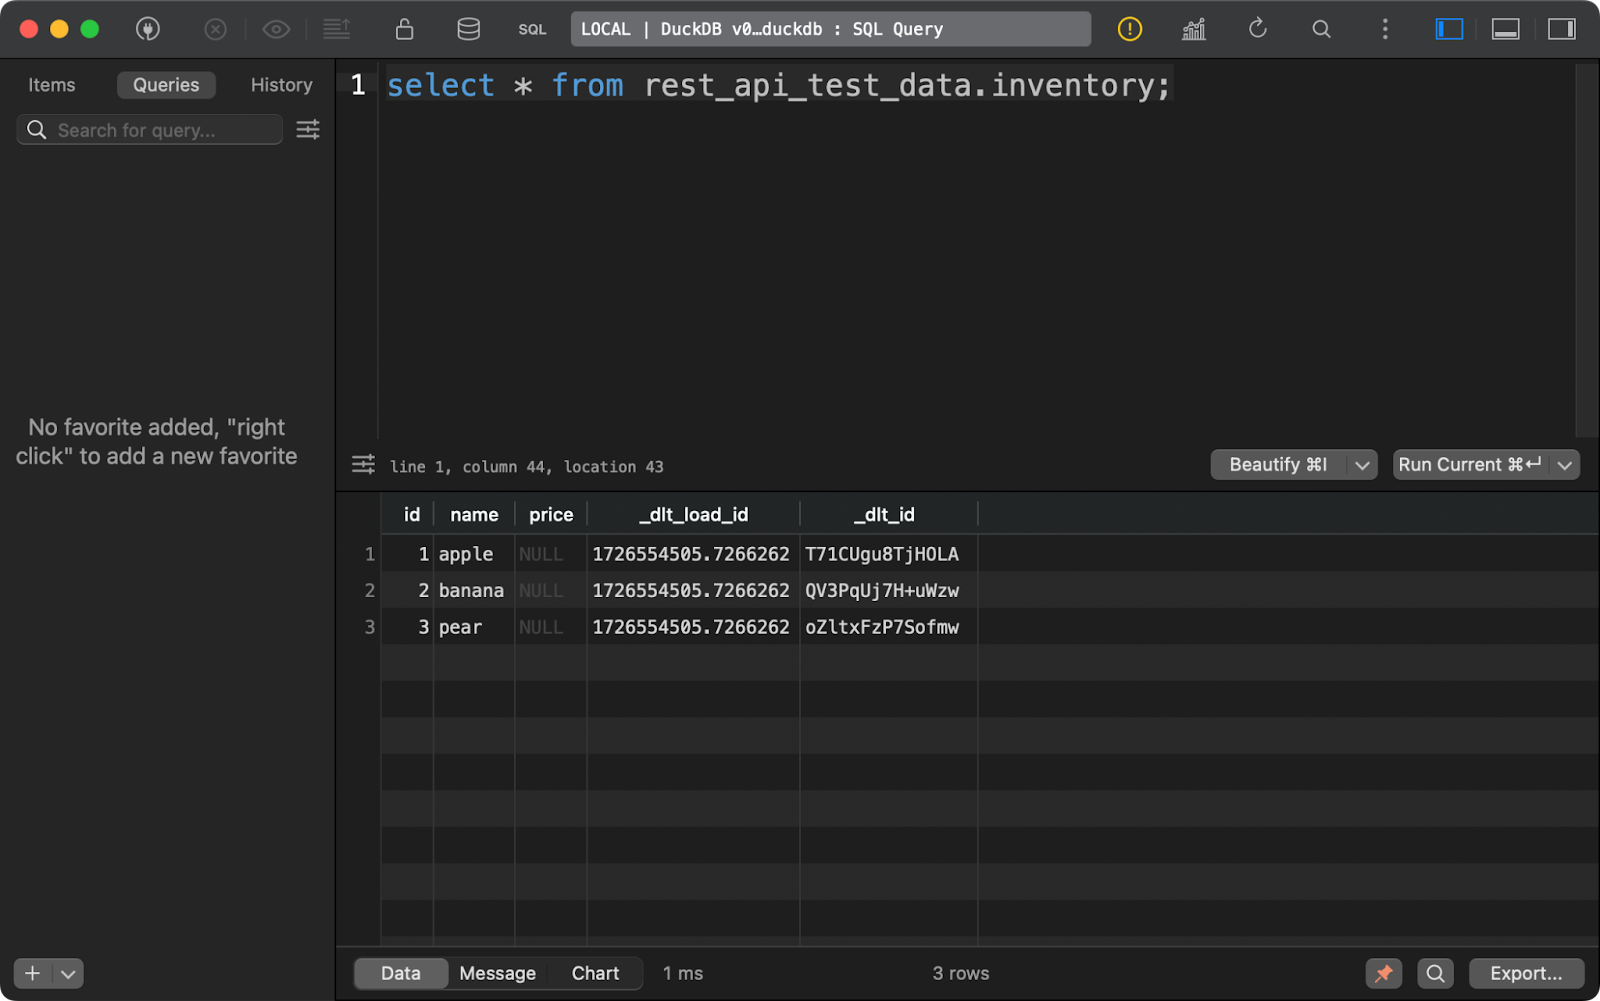
Inventory table content
Any time you run a pipeline, dlt will create (or append to) three metadata tables.
The first one, _dlt_loads, tracks the history of data loads performed by the pipeline. It shows the name of the schema, load status, and time of the load, among other things:
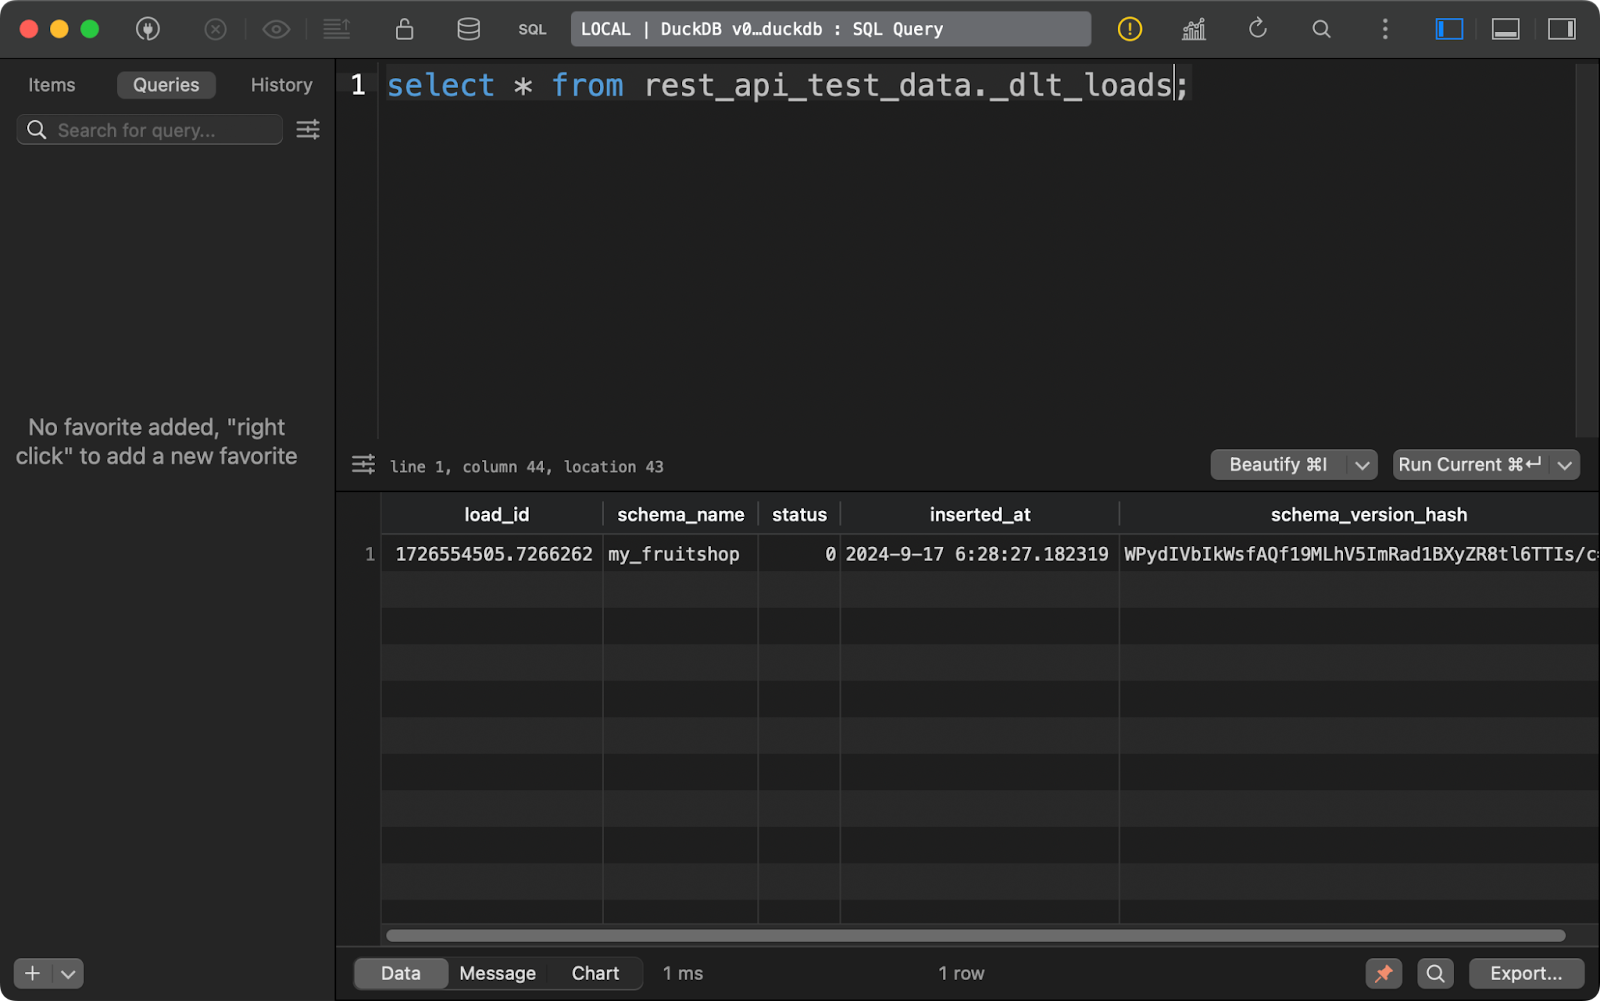
History of data loads
The _dlt_pipeline_state table shows details on the pipeline’s configuration, checkpoints, and progress. It’s also helpful for cases when your pipeline stops for whatever reason, as the data from this table can resume it from where it left off:
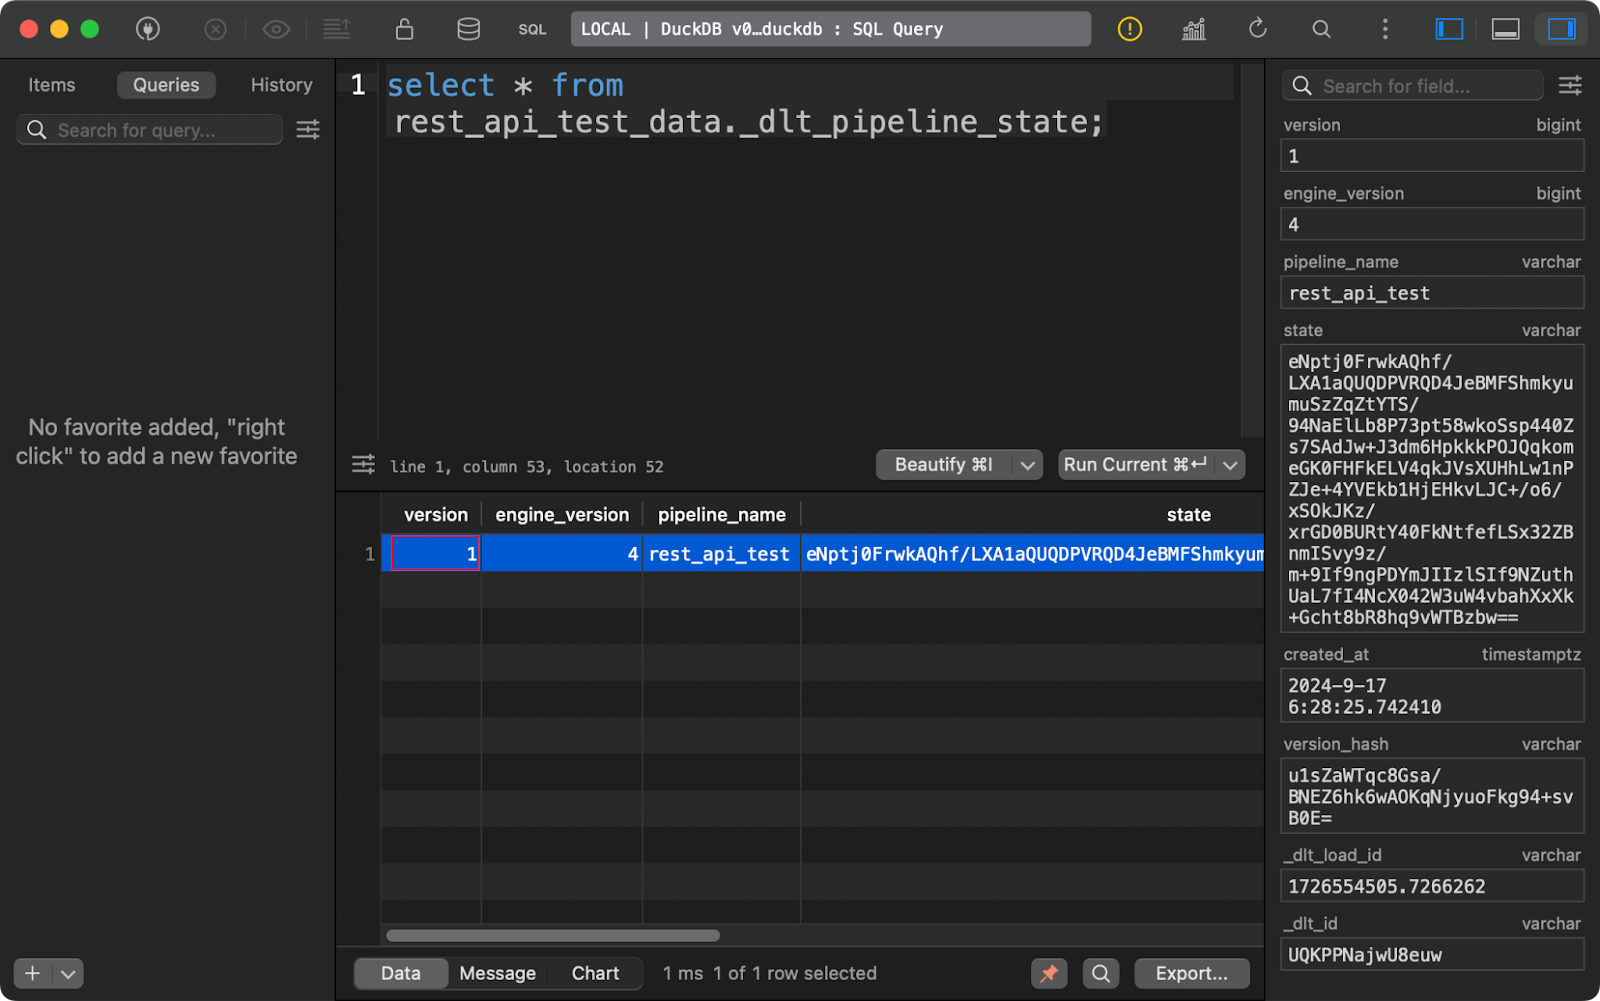
Pipeline state table
Finally, the _dlt_version table stores information about the library itself to ensure compatibility:
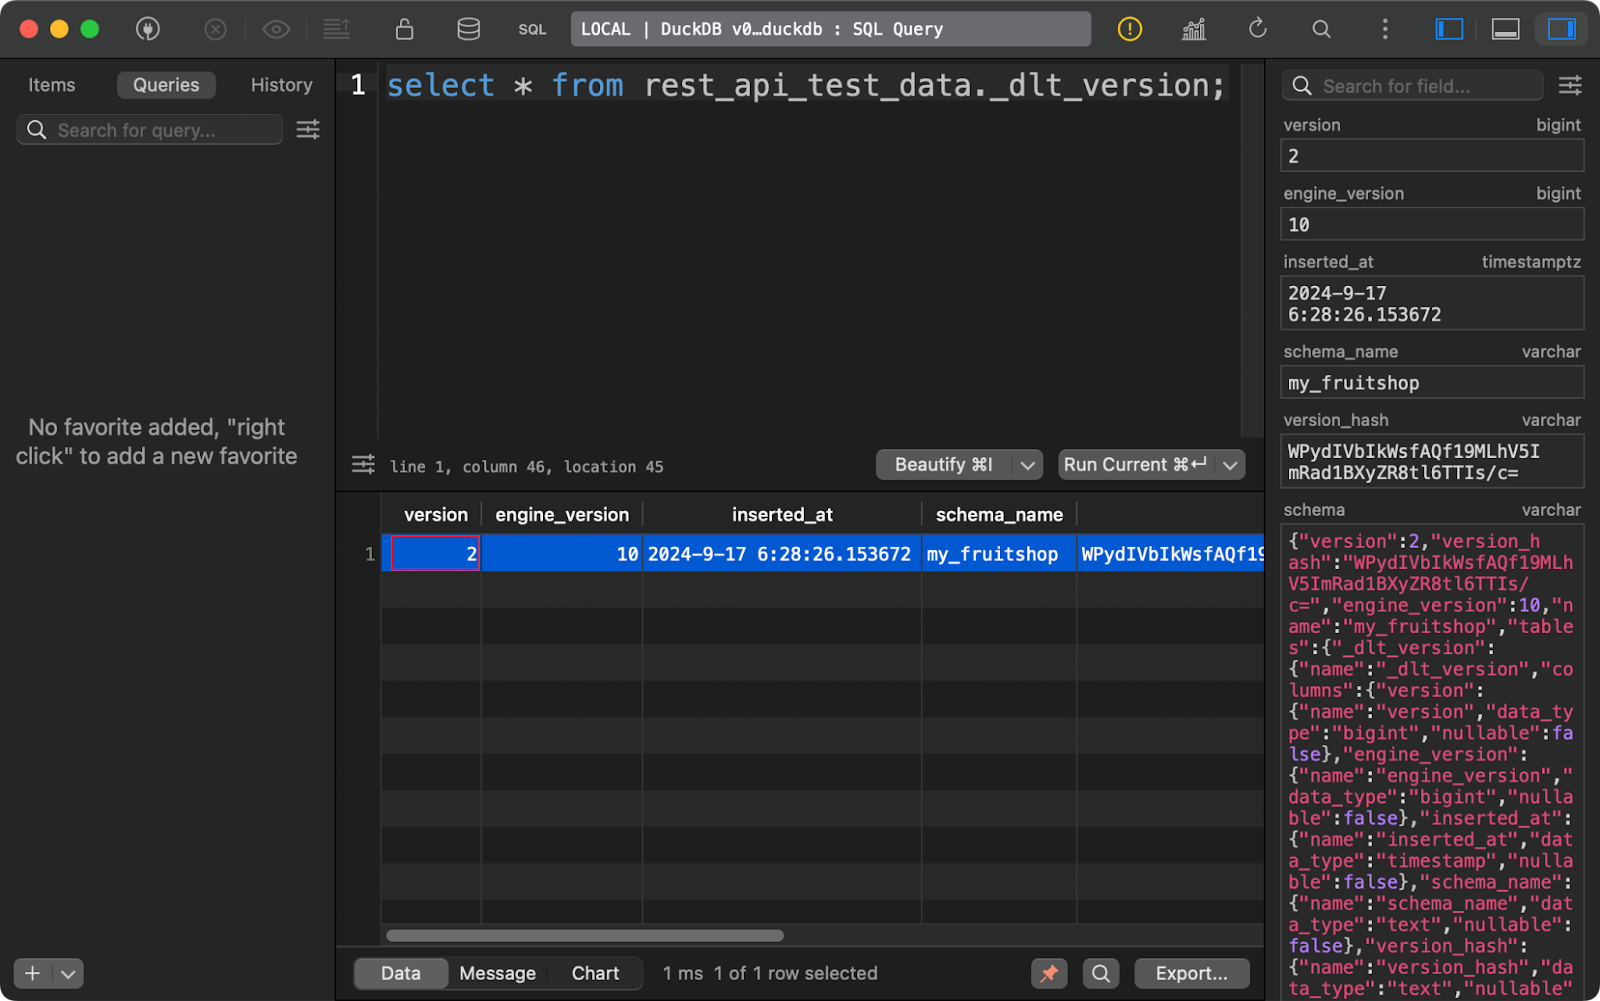
dlt version table
When combined, these three metadata tables provide all the details you want to track over time to manage your data pipelines effectively.
You now have a high-level overview of how dlt works. Next, I’ll show you how to extract data from different sources.
I will cover four types of data sources in this section: REST APIs, databases, cloud storage, and local file system.
REST APIs are at the core when it comes to sources for data pipelines. The dlt library makes working with them feel effortless.
For demonstration, I’ll use the JSONPlaceholder API that has endpoints for fetching posts, comments, and users, among other things. As for the data destination, I’ll go with DuckDB since it doesn’t require any configuration.
To connect to a REST API, use the rest_api_source() function. You can pass in a dictionary providing the base API URL and the pagination rules. You can add other properties, e.g., for authentication, but my API of choice is publicly accessible so it’s not needed.
The interesting part comes from the resources property. Here, you’ll provide a list of endpoints from which dlt should fetch the data. For example, the posts resource will connect to https://jsonplaceholder.typicode.com/posts. You can tweak individual resources in much more depth, but I’ll leave that up to you.
The rest of this Python file remains more or less unchanged:
import dlt
from dlt.sources.rest_api import rest_api_source

def load_rest_api_data() -> None:
    data_source = rest_api_source({
        "client": {
            "base_url": "https://jsonplaceholder.typicode.com/",
            "paginator": {
                "type": "json_response",
                "next_url_path": "paging.next"
            }
        },
        "resources": [
            "posts",
            "comments",
            "users"
        ]
    })
    pipeline = dlt.pipeline(
        pipeline_name="rest_api_jsonplaceholder",
        destination="duckdb",
        dataset_name="jsonplaceholder"
    )
    load_info = pipeline.run(data_source)
    print(load_info)

if __name__ == "__main__":
    load_rest_api_data()
After running the pipeline, you’ll see three data tables, one for each specified resource.
The first one shows dummy posts:
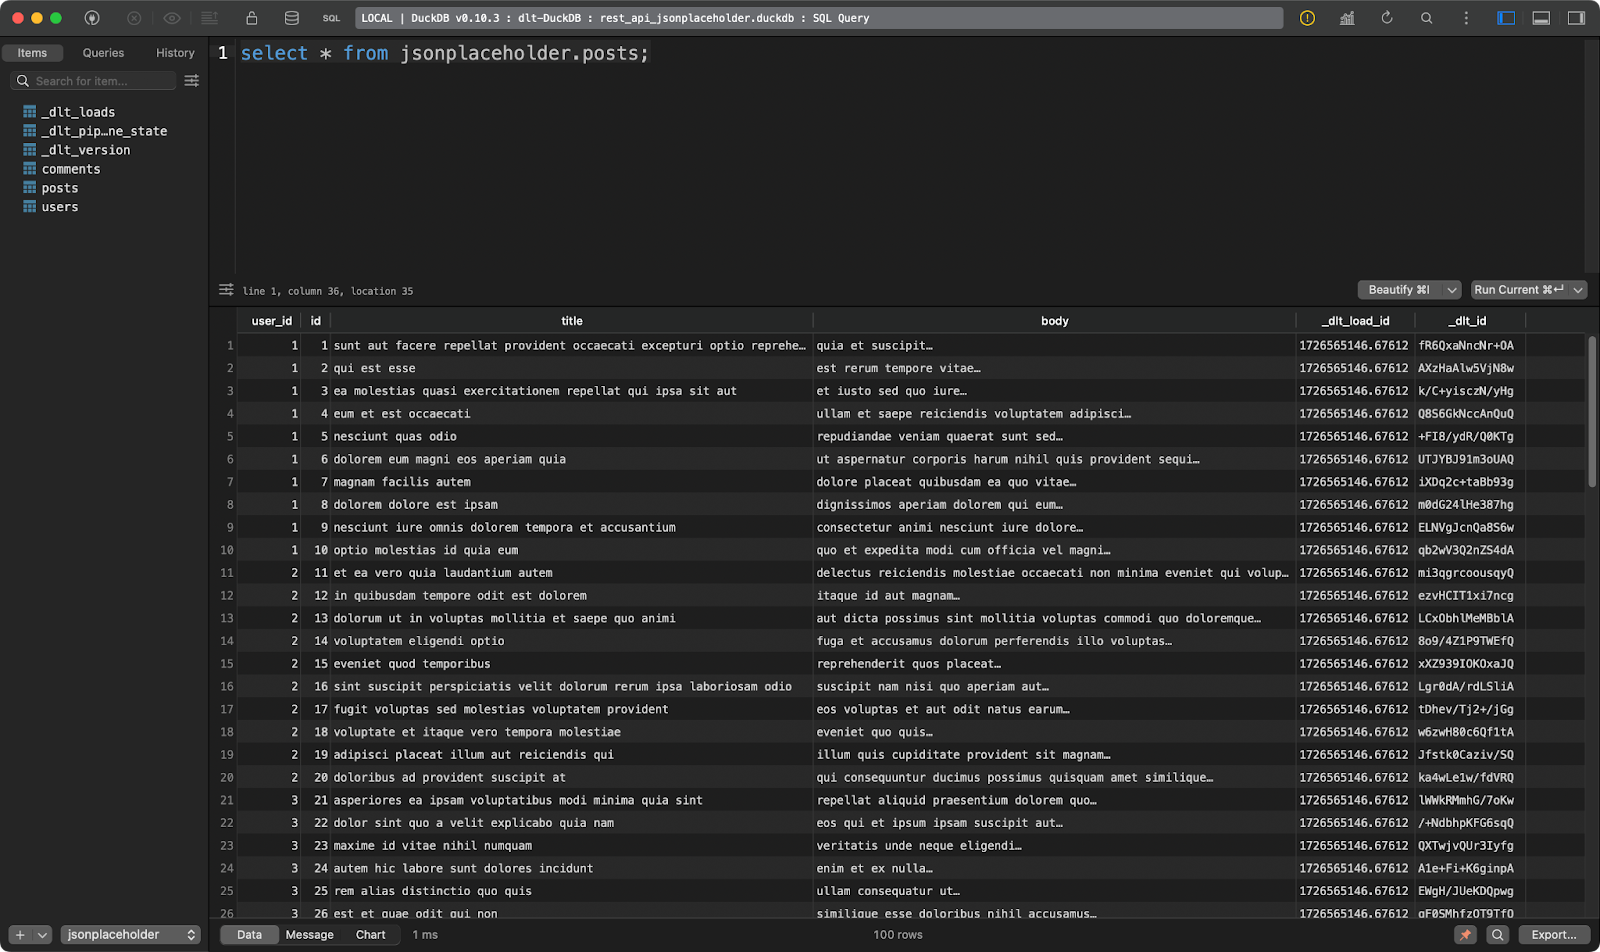
Posts table
The second one shows post comments:
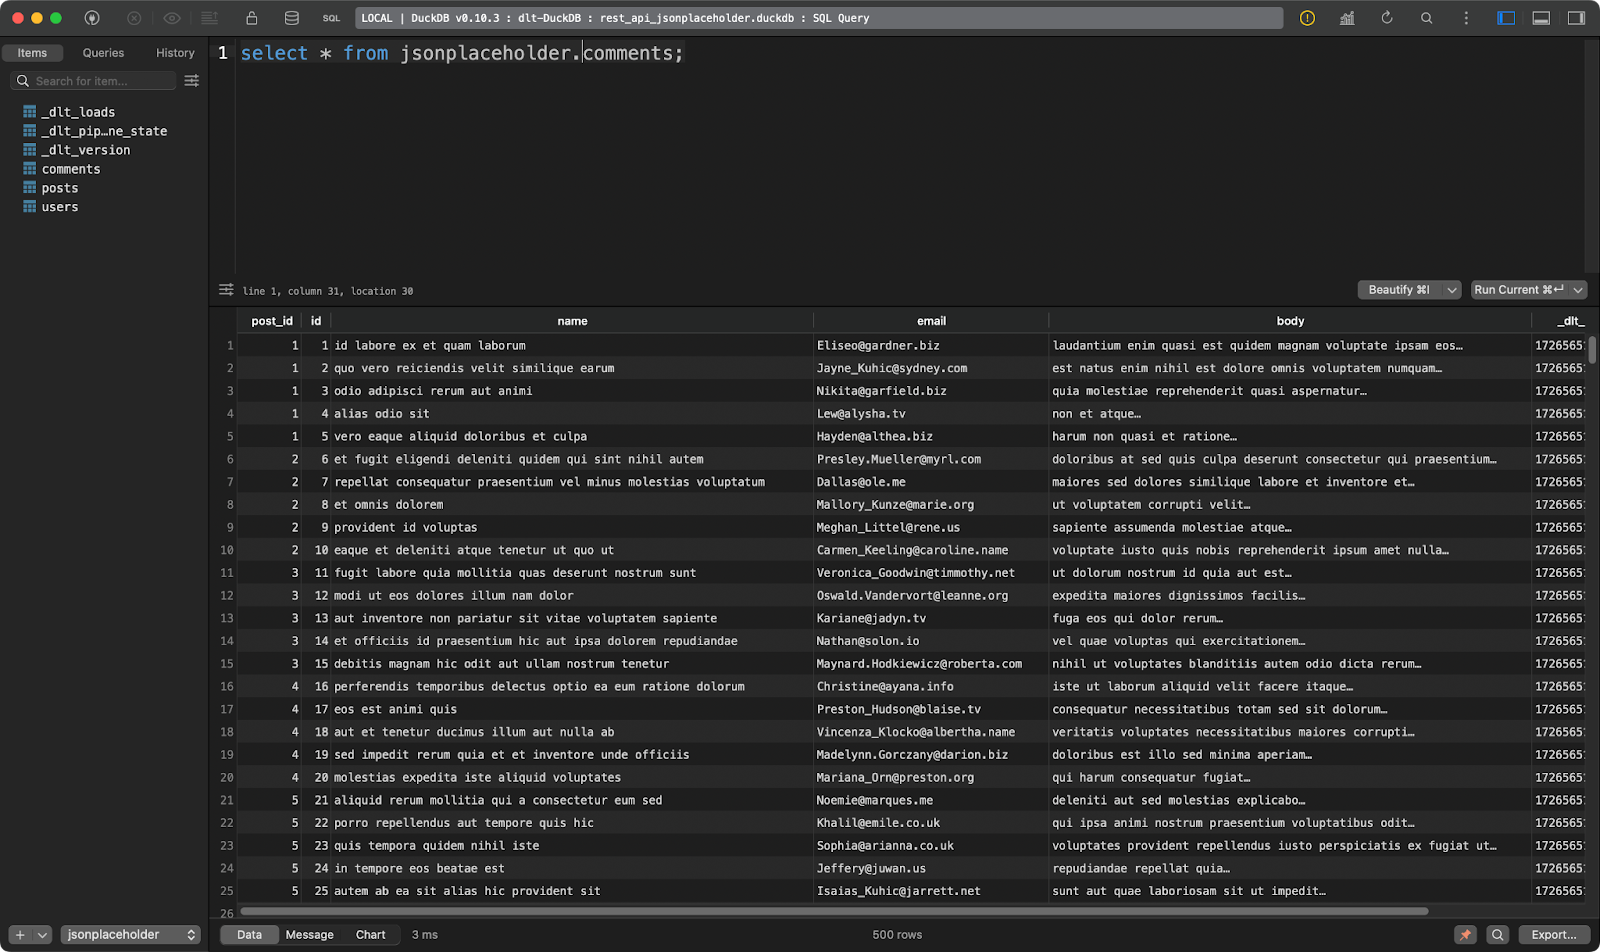
Comments table
And the third shows users. This one is interesting because it contains nested JSON data. The dlt library flattened it, so it can be stored without issues in a single table:
users table
Neat, right? You no longer have to parse JSON manually.
If there’s one data source more commonly used than REST APIs, it has to be a relational database.
For the sake of demonstration, I’ve provisioned a free-tier Postgres database on AWS:
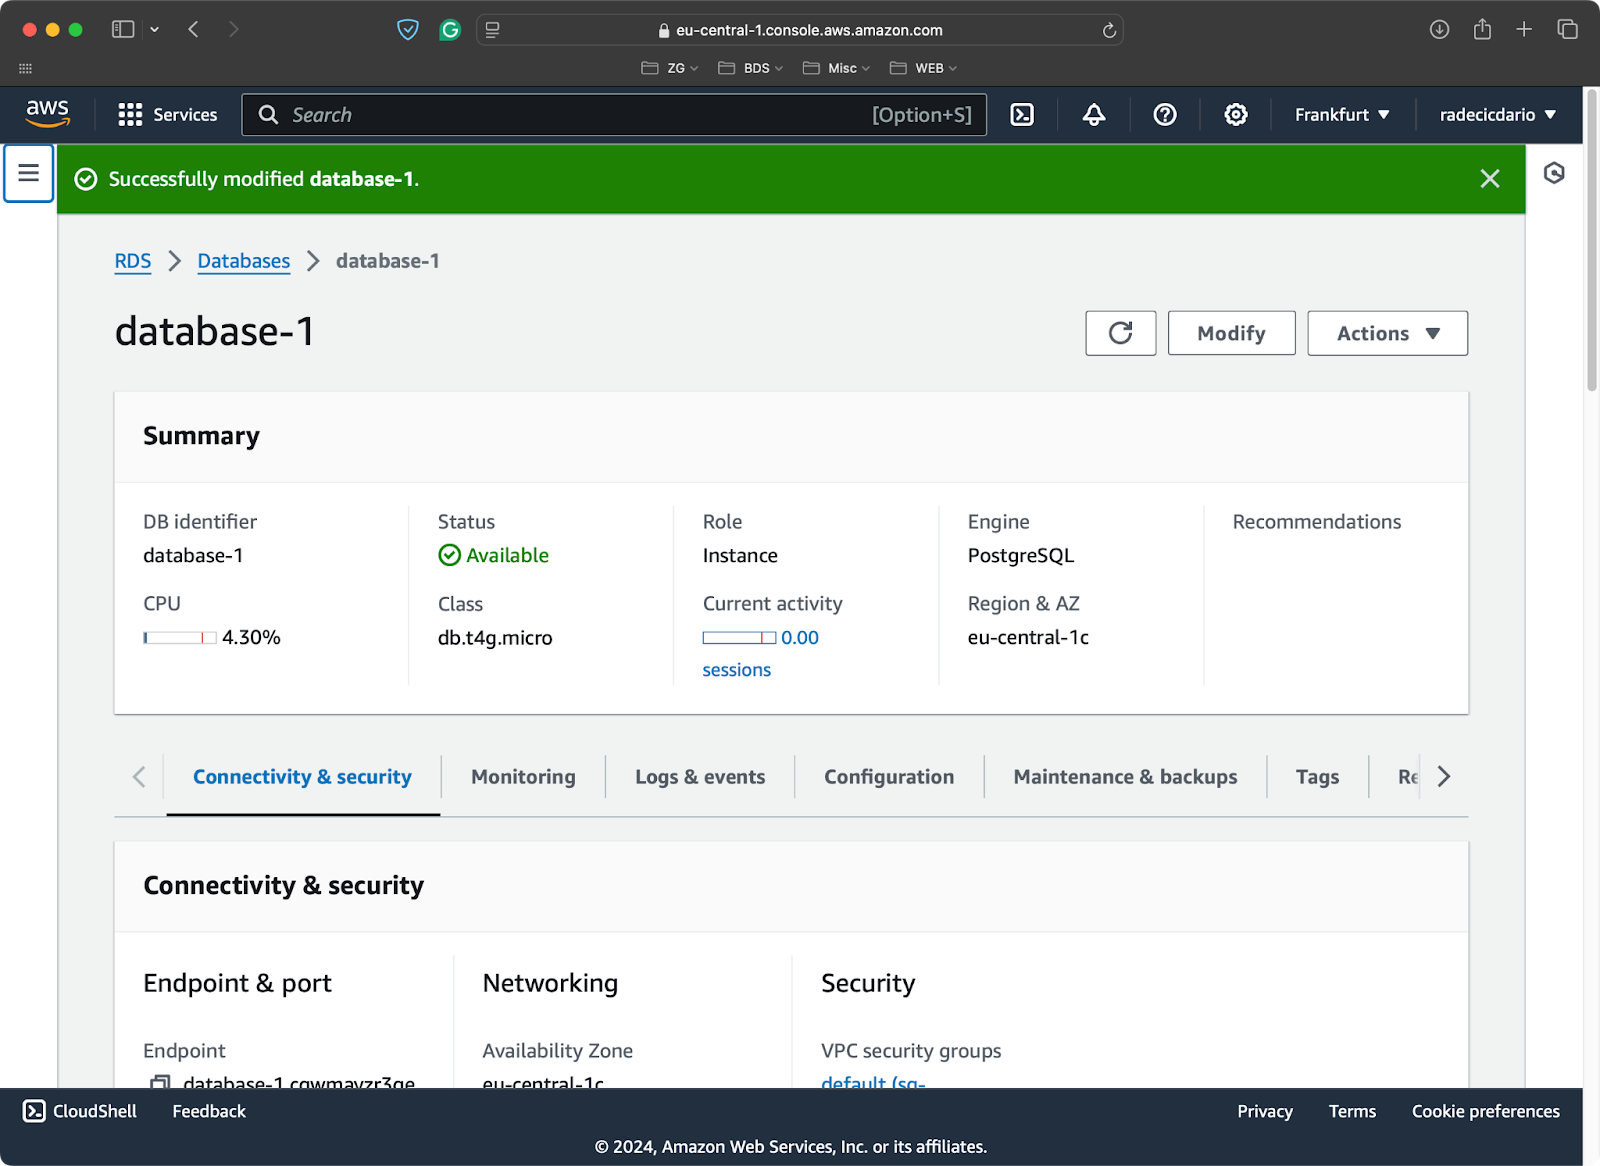
PostgreSQL database on AWS
And loaded the well-known Iris dataset into it as a table:
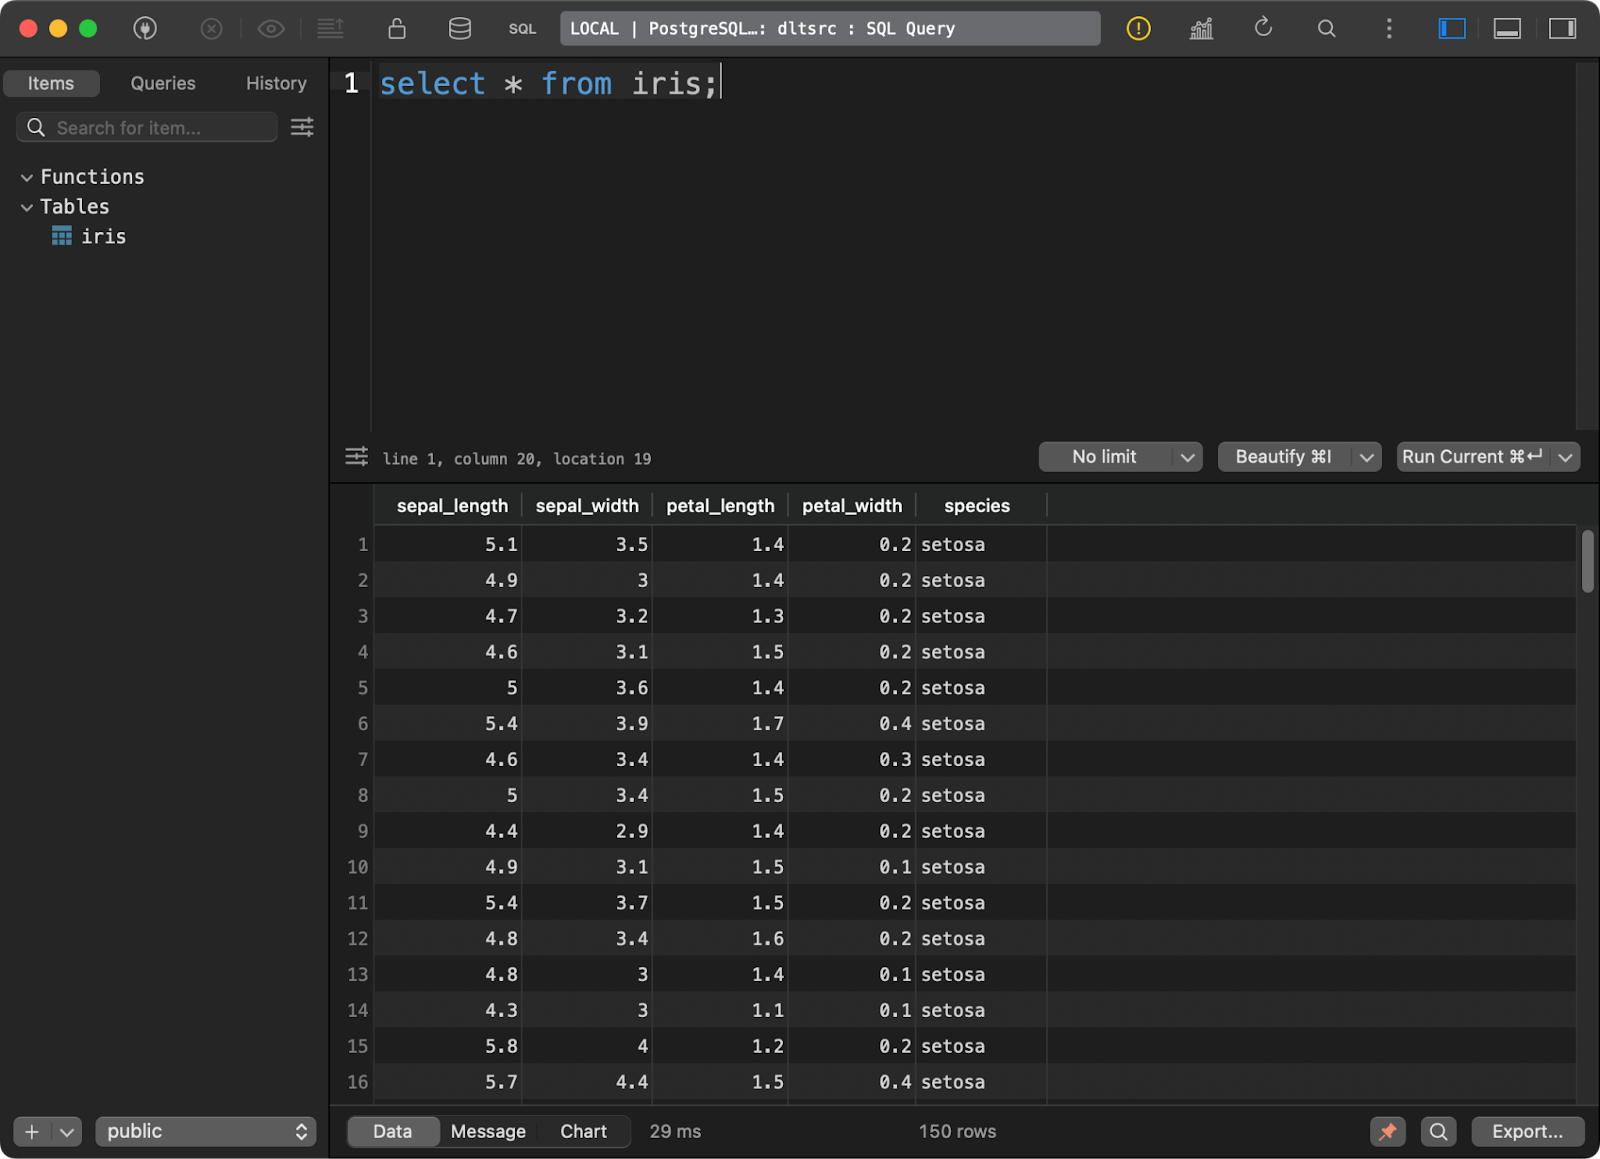
Data in the Postgres database
I’ll now show you how to connect to a Postgres source from dlt. It’s a more involved process than you might initially think.
First, start by installing a submodule for working with SQL databases:
pip install "dlt[sql_database]"Then, initialize a pipeline that uses a generic SQL database as a source and DuckDB as a destination:
dlt init sql_database duckdbThis is the first time you’ll play around with the files in the .dtl folder. Inside config.toml, specify the source table name from which you want to extract the data:
[sources.sql_database]
table = "table" # please set me up!
[runtime]
dlthub_telemetry = true
Replace ”table” with “iris” and you’ll be good to go.
Inside secrets.toml, you’ll want to specify connection parameters for connecting to the source database. Note that you absolutely must add [sources.sql_database.credentials] name before specifying connection parameters. Otherwise, dlt won’t know what they refer to:
[sources.sql_database.credentials]
drivername = "drivername" # please set me up!
database = "database" # please set me up!
password = "password" # please set me up!
username = "username" # please set me up!
host = "host" # please set me up!
port = 0 # please set me up!
And that’s it regarding configuration. You can now switch to the Python pipeline file.
Long story short, you only need to call the sql_database() function to connect to the database and extract source data. Every configuration detail is specified in the TOML files, so you can call this function without any parameters.
The rest of the script introduces nothing new:
import dlt
from dlt.sources.sql_database import sql_database

def load_database_data() -> None:
    source = sql_database()
    pipeline = dlt.pipeline(
        pipeline_name="postgres_to_duckdb_pipeline",
        destination="duckdb",
        dataset_name="iris_from_postgres"
    )

    load_info = pipeline.run(source)
    print(load_info)

if __name__ == "__main__":
    load_database_data()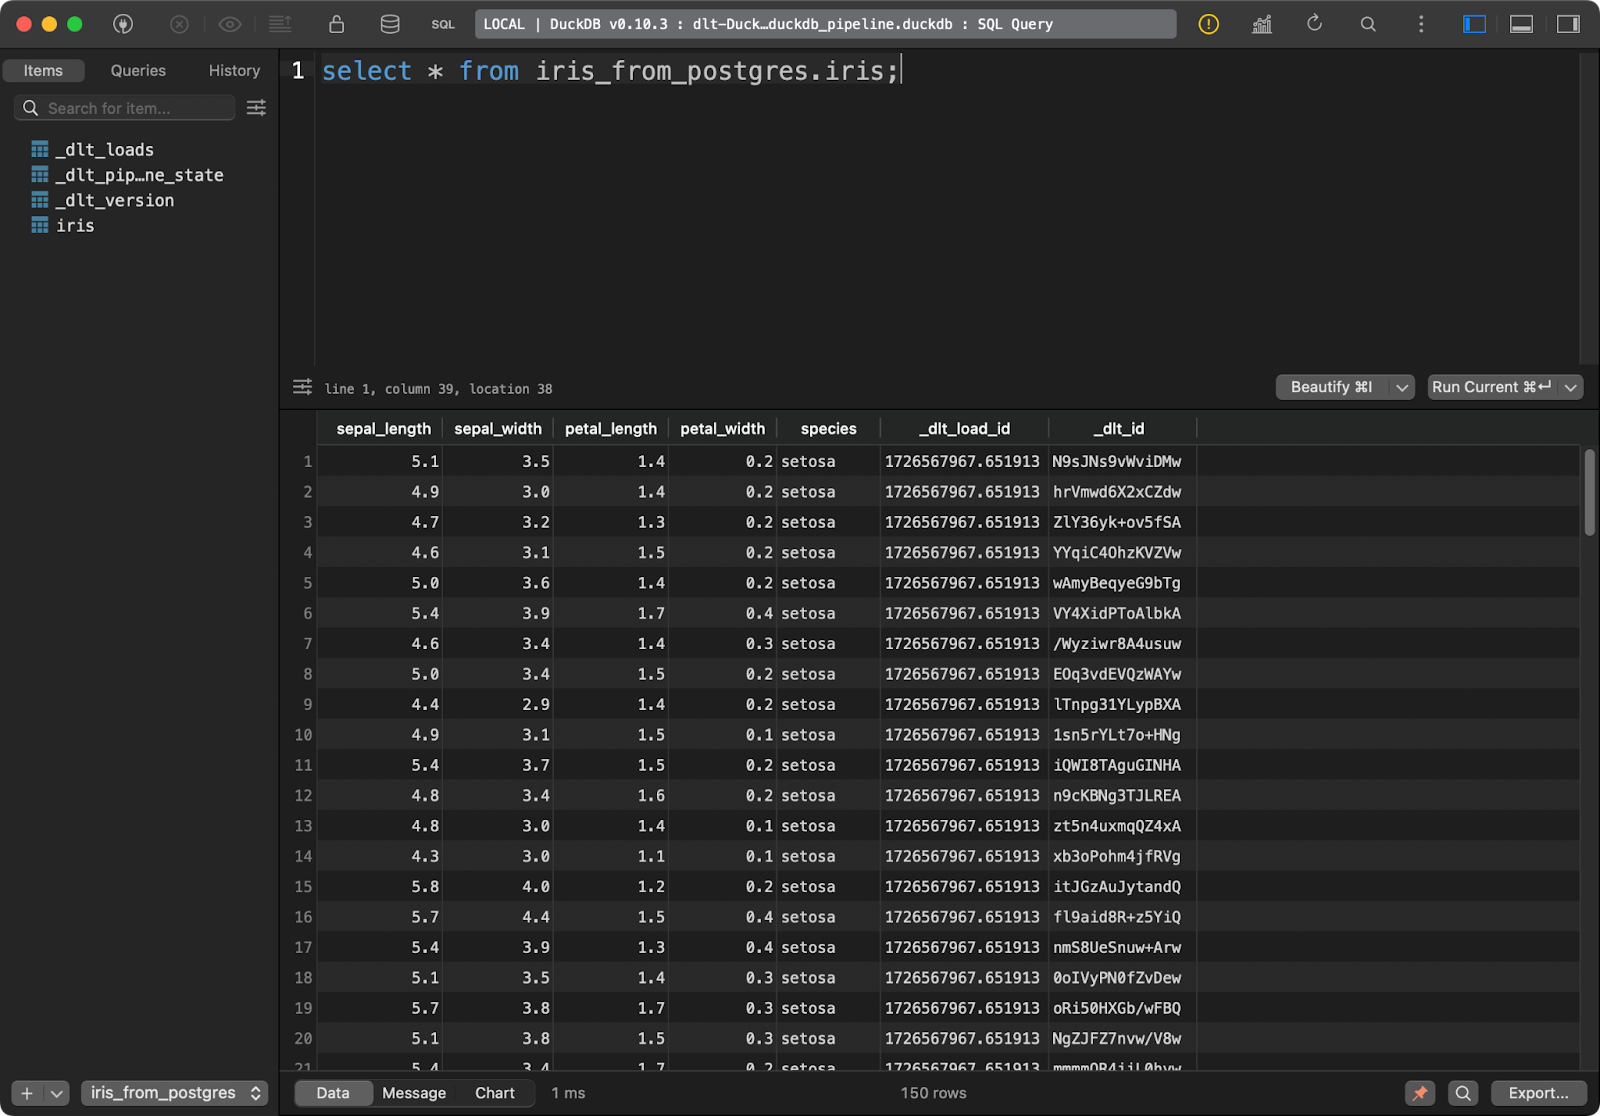
Iris table
The target table in DuckDB has all the Iris data with the additional two data lineage columns.
More often than not, you’ll want your pipelines to connect to cloud storage, such as AWS S3 buckets.
I’ve created an S3 bucket for the sake of this article and uploaded a single Parquet file with datasets from the NYC taxi rides:

S3 bucket with a single Parquet file
To connect a local or remote file system to dlt, you’ll want to install an additional submodule:
pip install "dlt[filesystem]"You can now initialize a new pipeline that uses a file system as a source and DuckDB as a destination:
dlt init filesystem duckdbThe first order of business is to fill in the configuration files. The config.toml file needs the full URL of your S3 bucket:
[sources.filesystem]
bucket_url = "bucket_url" # please set me up!
[runtime]
dlthub_telemetry = true
And the secrets.toml file needs info on your IAM role (access key and secret access key), along with the region in which your bucket is provisioned:
[sources.filesystem.credentials]
aws_access_key_id = "aws_access_key_id" # please set me up!
aws_secret_access_key = "aws_secret_access_key" # please set me up!
region_name = "region_name" # please set me up!
Onto the pipeline code.
Use the readers() function to read data from your configured source. The file_glob parameter controls which files should be read. I’ve set it up in a way to return all Parquet files. Then, simply chain the read_parquet() function to read the data:
import dlt
from dlt.sources.filesystem import readers, read_parquet

def load_s3_data() -> None:
    source = readers(file_glob="*.parquet").read_parquet()
    pipeline = dlt.pipeline(
        pipeline_name="s3_to_duckdb_pipeline",
        destination="duckdb",
        dataset_name="nyc_data_from_s3"
    )
    load_info = pipeline.run(source.with_name("nyc_taxi_data"))
    print(load_info)

if __name__ == "__main__":
    load_s3_data()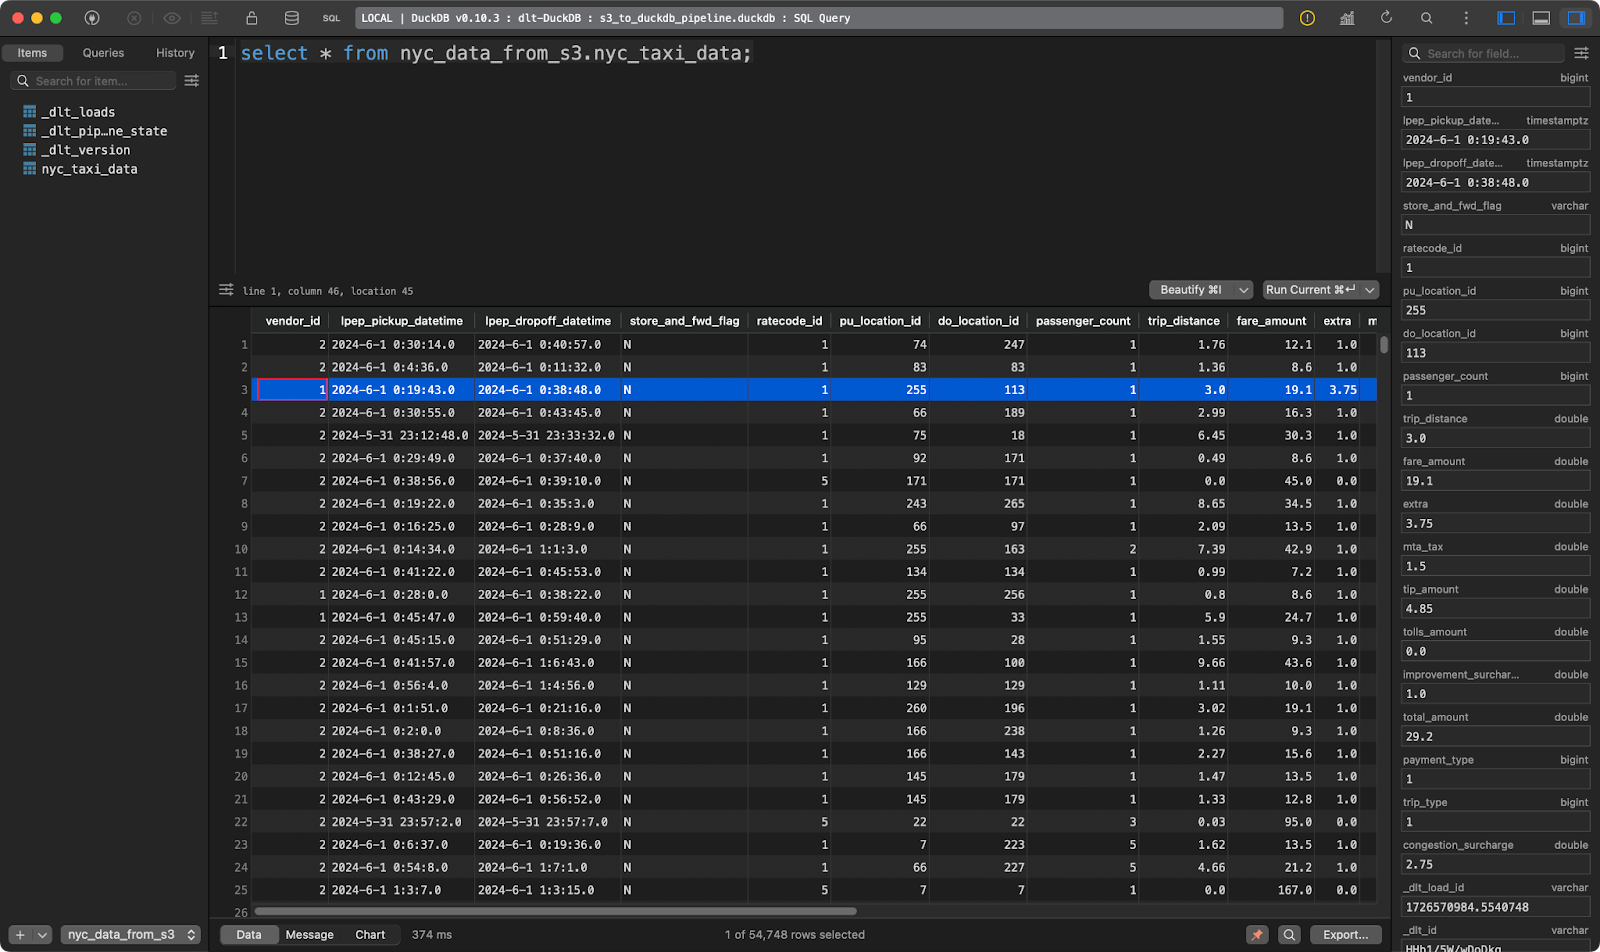
NYC taxi rides table
And there you have it - tens of thousands of records loaded within seconds!
Reading data from a local file system is almost identical to reading data from S3.
This time, I’m using the mtcars dataset saved locally into a localbucket folder:
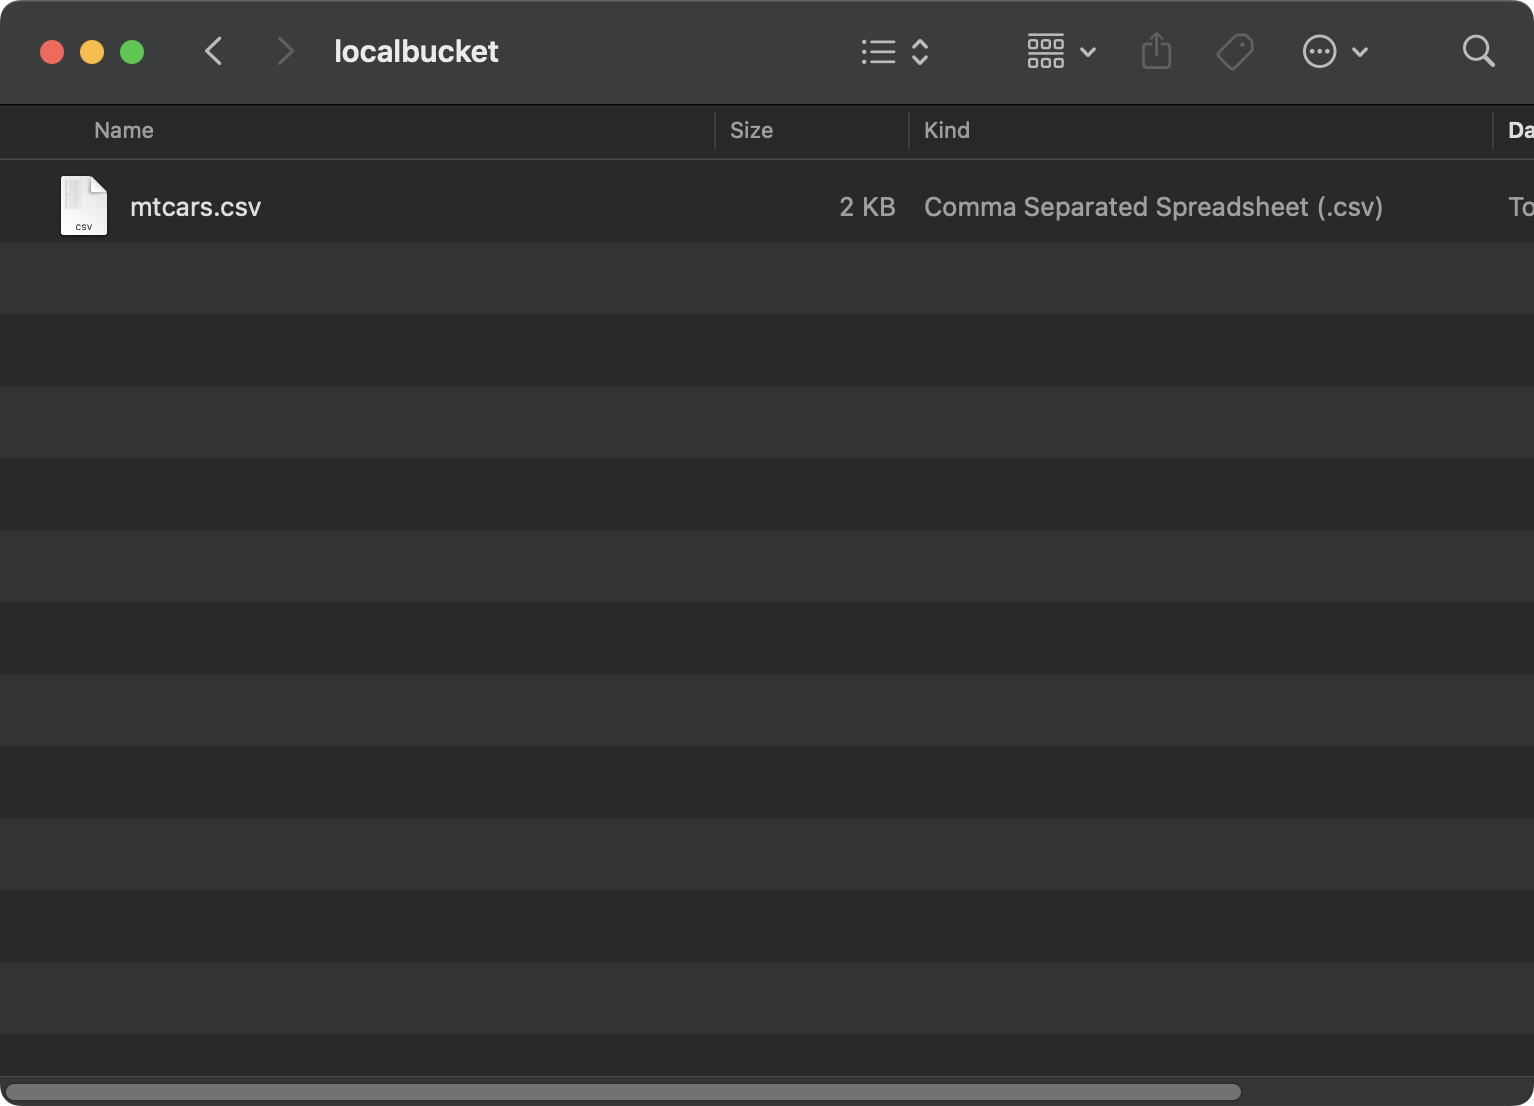
File on a local system
Now in your config.toml file, provide an absolute path to your local folder. It’s important to prefix the path with file:///. That’s three slashes:
[sources.filesystem]
bucket_url = "file:///absolute/path/to/local/folder"
[runtime]
dlthub_telemetry = true
Since you’re not connecting to S3 anymore, you can delete the contents of secrets.toml.
The actual pipeline code will look almost identical to the one from the previous section. The only change is that in file_glob you’re now providing a file name, and using a different function for reading the data (CSV format):
import dlt
from dlt.sources.filesystem import filesystem, read_csv_duckdb

def load_local_data() -> None:
    source = filesystem(file_glob="mtcars.csv") | read_csv_duckdb()
    pipeline = dlt.pipeline(
        pipeline_name="local_filesystem_to_duckdb_pipeline",
        destination="duckdb",
        dataset_name="mtcars_data_from_local_disk"
    )
    load_info = pipeline.run(source.with_name("mtcars"))
    print(load_info)

if __name__ == "__main__":
    load_local_data()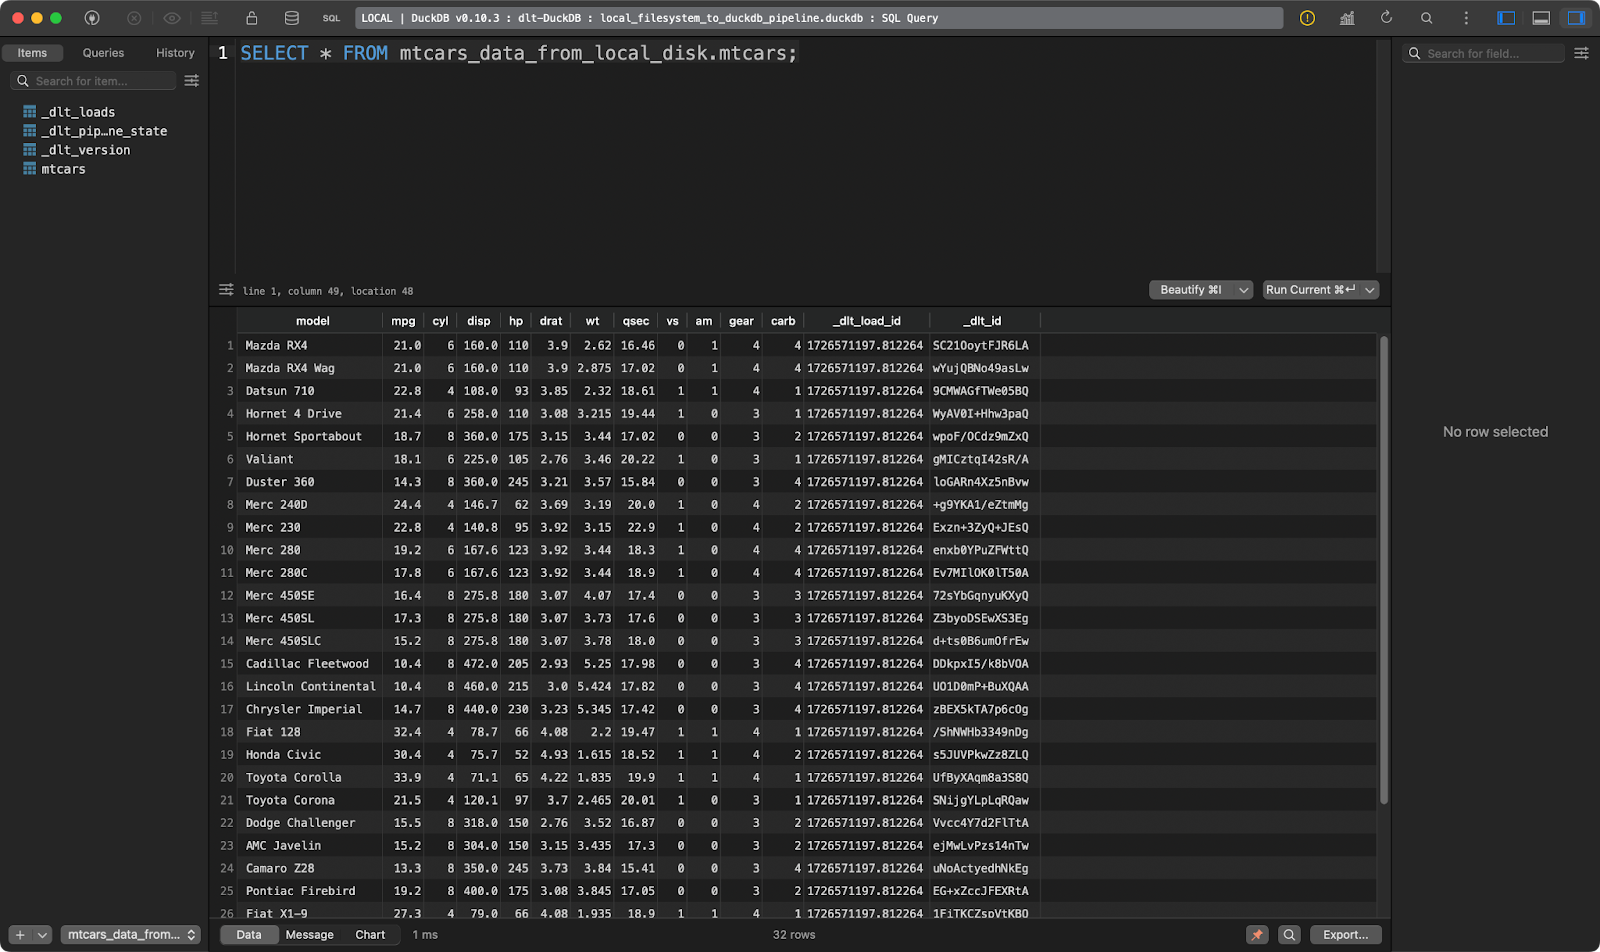
The mtcars table
Works like a charm!
That’s all I want to showcase regarding data sources. You can find many additional ones to suit your specific needs on the dlt documentation page for data sources.
There’s no point in just moving data from point A to point B. You typically want to apply transformation before writing data to the destination (ETL) or after (ELT).
If the acronyms ETL and ELT don’t ring a bell, we recommend going through our data pipeline course with Python.
In this section, I’ll show you how to apply transformations to your data with SQL and Python.
Data engineers live and breathe SQL. In this section, I’ll show you how to load a local file into a Postgres database, transform it, and write it yet again into another table (ELT).
Start by tweaking the secrets.toml file to include database connection details for source and destination. The values will be identical, you just need to specify them two times:
[sources.sql_database.credentials]
drivername = "drivername" # please set me up!
database = "database" # please set me up!
password = "password" # please set me up!
username = "username" # please set me up!
host = "host" # please set me up!
port = 0 # please set me up!

[destinations.sql_database.credentials]
drivername = "drivername" # please set me up!
database = "database" # please set me up!
password = "password" # please set me up!
username = "username" # please set me up!
host = "host" # please set me up!
port = 0 # please set me up!
Inside config.toml, write an absolute path to a folder located on your file system:
[sources.filesystem]
bucket_url = "file:///absolute/path/to/local/folder"
[runtime]
dlthub_telemetry = true
The Python pipeline file will have two functions:
load_source_data(): It loads a local CSV file and saves it into a table in a Postgres database.transform_data(): It extracts data from a Postgres table and creates a new table based on the original one. I’ll only add a couple of columns to prove a point. The target table is first deleted if it exists.You’ll want to call the functions one after the other:
import dlt
from dlt.sources.filesystem import filesystem, read_csv

def load_source_data() -> None:
    source = filesystem(file_glob="iris.csv") | read_csv()
    pipeline = dlt.pipeline(
        pipeline_name="load_source_data",
        destination="postgres",
        dataset_name="data"
    )
    load_info = pipeline.run(source.with_name("iris_src"), write_disposition="replace")
    print(load_info)

def transform_data() -> None:
    pipeline = dlt.pipeline(
        pipeline_name="transform_data",
        destination="postgres",
        dataset_name="data"
    )
    try:
        with pipeline.sql_client() as client:
            client.execute_sql("""
                DROP TABLE iris_tgt;
            """)
            print(f"Table iris_tgt deleted!")
    except Exception as e:
        print(f"Table iris_tgt does not exists, proceeding!")
    try:
        with pipeline.sql_client() as client:
            client.execute_sql("""
                CREATE TABLE iris_tgt AS (
                    SELECT
                        sepal_length,
                        sepal_width,
                        petal_length,
                        petal_width,
                        sepal_length + sepal_width AS total_sepal,
                        petal_length + petal_width AS total_petal,
                        UPPER(species) AS species_upper
                    FROM iris_src
                );
            """)
            print(f"Table iris_tgt created and filled!")
    except Exception as e:
        print(f"Unable to transform data! Error: {str(e)}")

if __name__ == "__main__":
    load_source_data()
    transform_data()
The source table contains the Iris dataset with two additional data lineage columns:
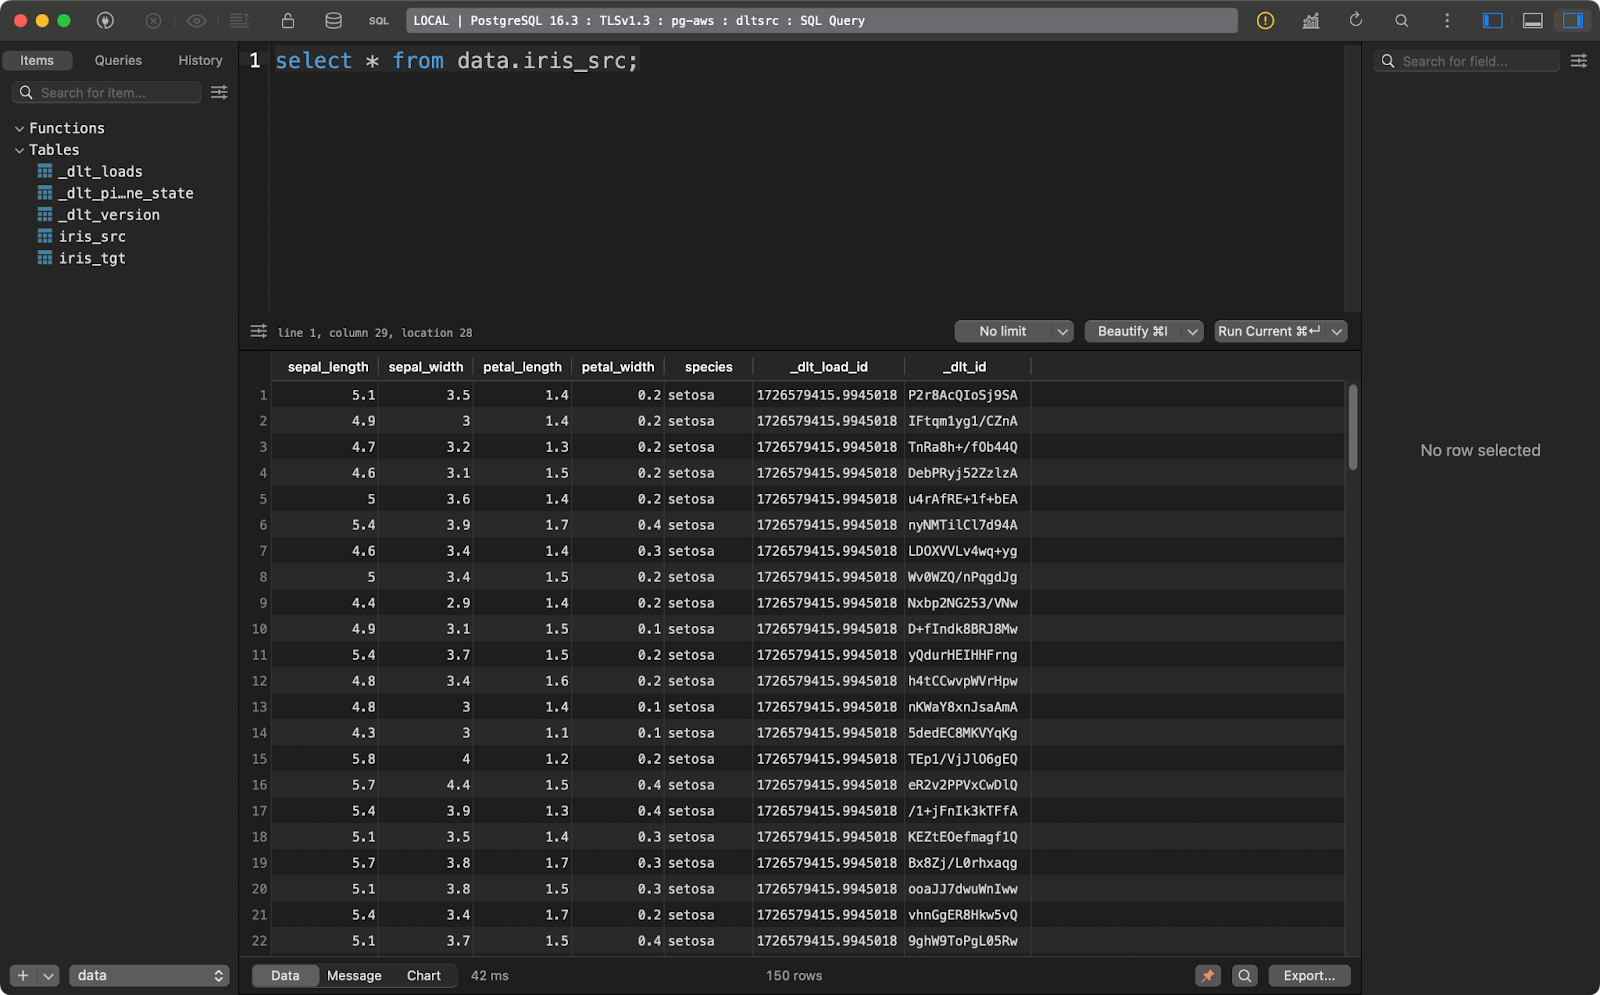
Iris source table
And the target table contains the transformed version of the Iris dataset:
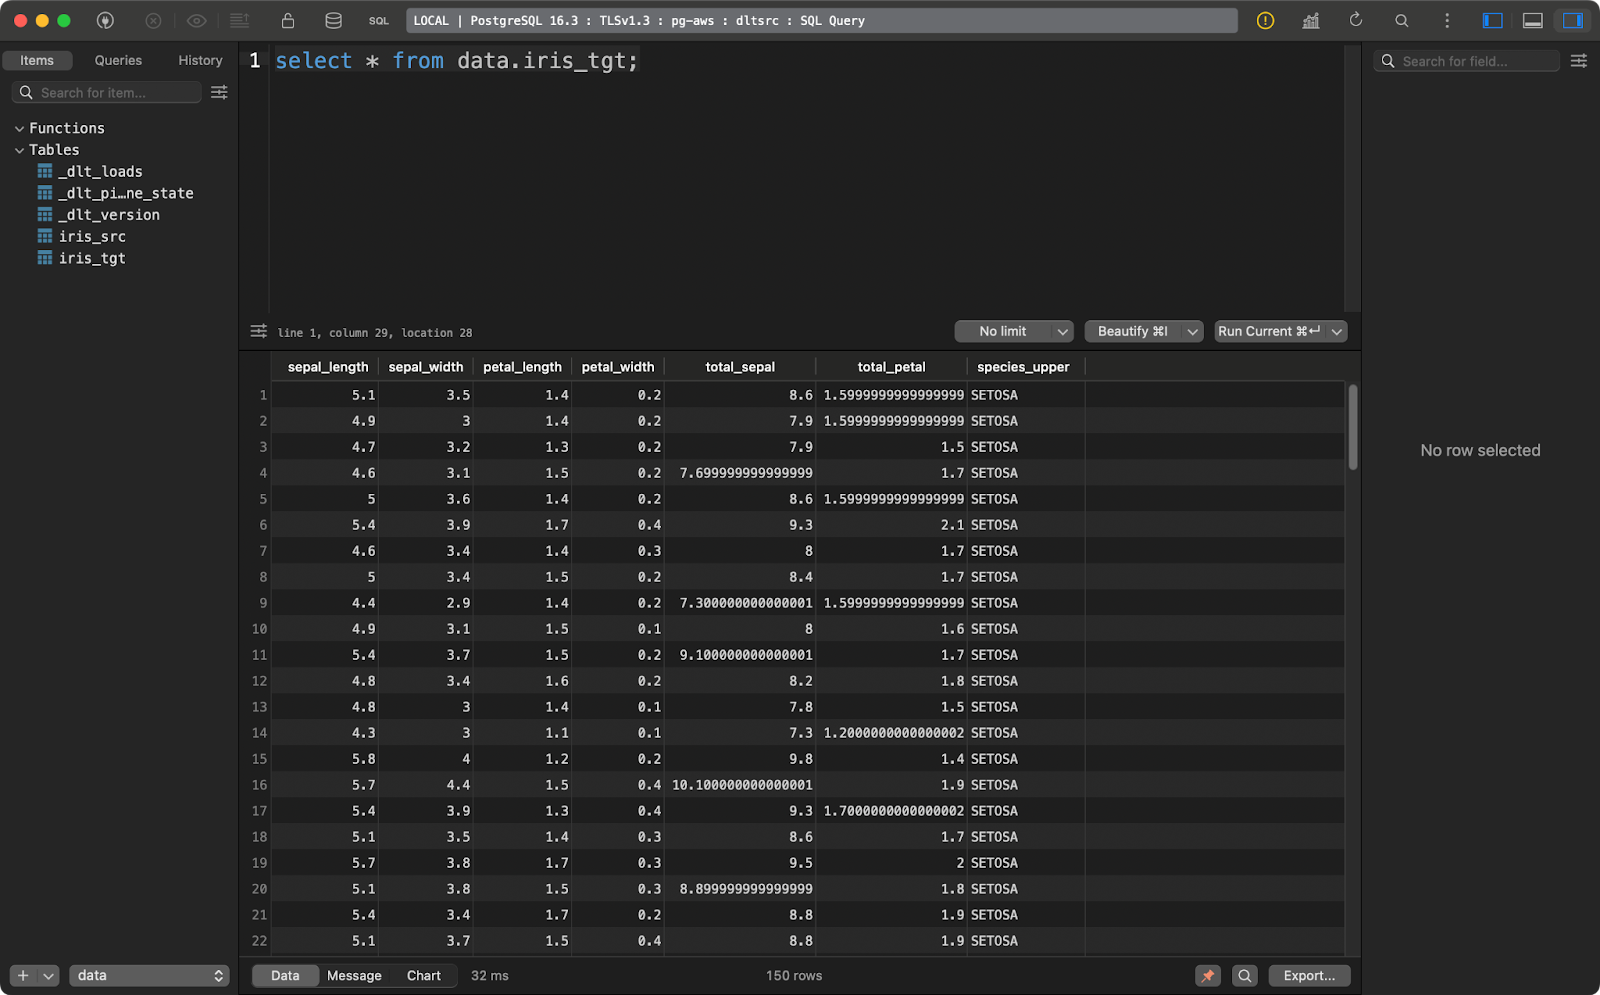
Iris target table
This transformation example is pretty basic but explains how to transform your data when it’s already loaded to the destination.
What if you want to transform the data before writing it to the database? In other words, if you don’t want to save raw and transformed data? That’s basically a description of an ETL pipeline. I’ll show you how to implement one with pandas.
Your TOML files remain unchanged.
In the pipeline code, you’ll now need to implement a couple of additional functions:
extract_data(): Uses pandas to read a local CSV file.transform_data(): Applies data transformations using pandas rather than SQL.data(): A function decorated with @dlt.resource that yields the transformed dataset.load_data(): Loads the dlt.resource into the iris_tgt table.The code of this pipeline will feel familiar if you’re experienced with pandas:
import dlt
import pandas as pd

def extract_data() -> pd.DataFrame:
    return pd.read_csv("iris.csv")

def transform_data(df: pd.DataFrame) -> pd.DataFrame:
    df["sepal_sum"] = df["sepal_length"] + df["sepal_width"]
    df["petal_sum"] = df["petal_length"] + df["petal_width"]
    df = df.drop(["sepal_length", "sepal_width", "petal_length", "petal_width"], axis=1)
    return df

@dlt.resource
def data():
    yield transform_data(df=extract_data())

def load_data() -> None:
    pipeline = dlt.pipeline(
        pipeline_name="pandas_etl_pipeline",
        destination="duckdb",
        dataset_name="data"
    )
    load_info = pipeline.run(data(), table_name="iris_tgt")
    print(load_info)

if __name__ == "__main__":
    load_data()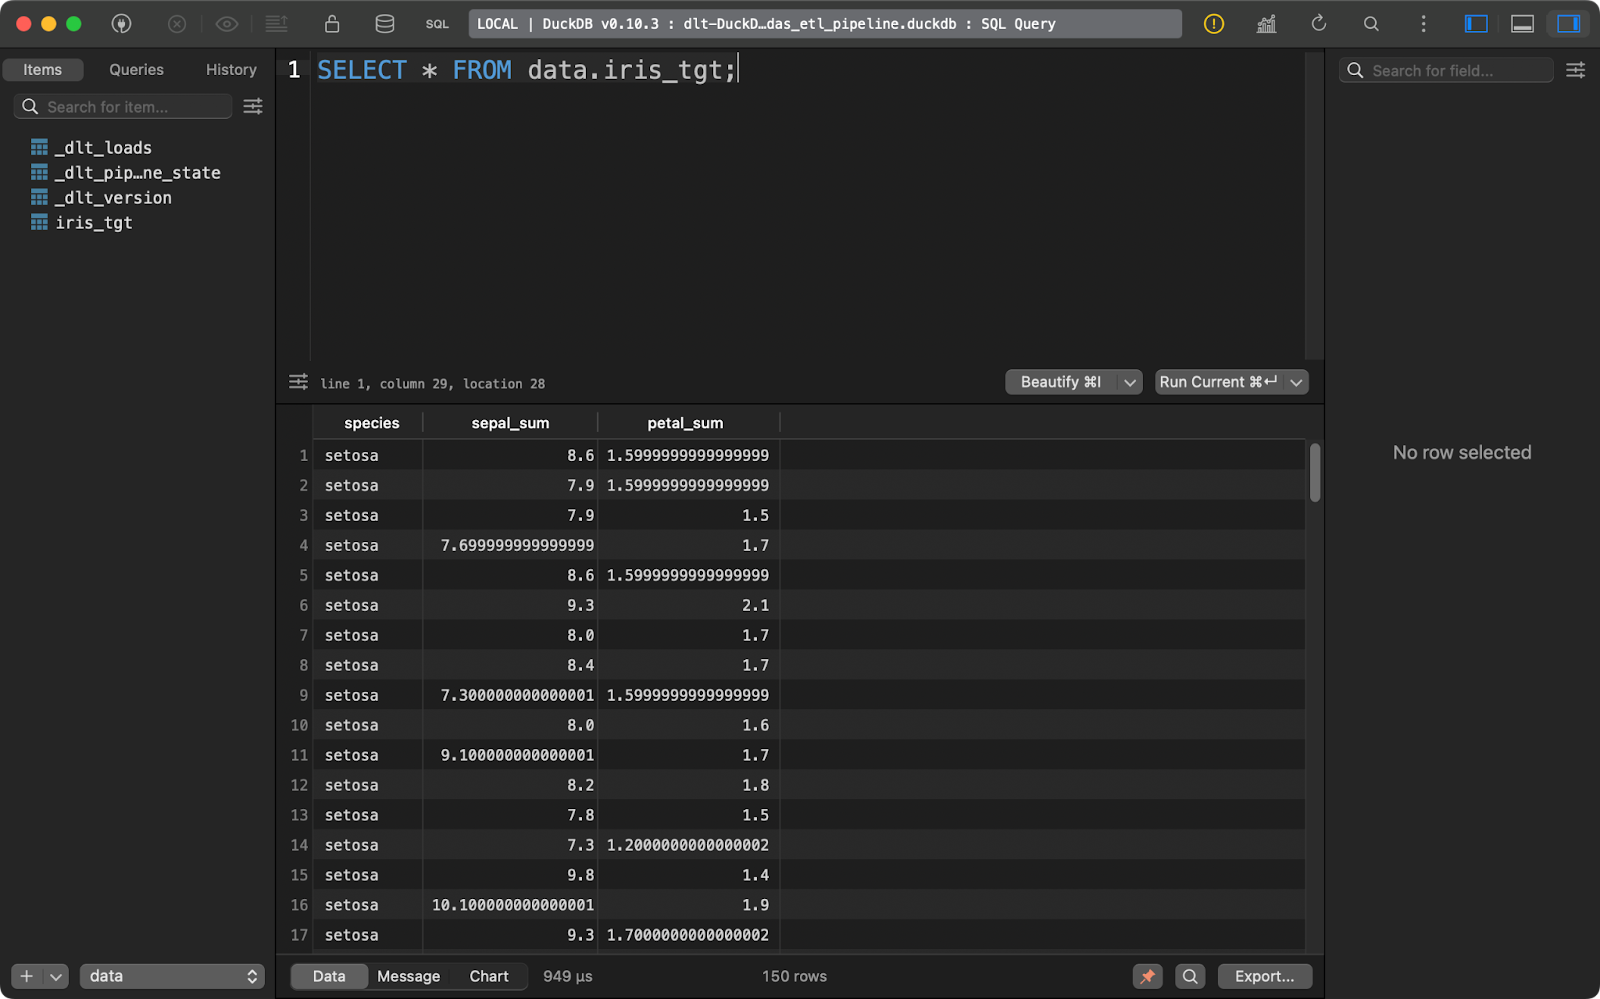
Iris target table
Once again, dlt was designed with ELT in mind, but ETL workflows don’t require too many code changes.
Both SQL and pandas are easy ways to transform data before and after loading to the destination.
Authors of dlt recommend that you use Python’s dbt instead. It’s a far better and more versatile option, but it’s too complex of a tool for us to cover in a single article. If you or your team are already using dbt, then using it in dlt pipelines will feel like a natural extension.
If you want to learn more about dbt in Python, we have a full 4-module long course available.
On the other hand, if you’re a beginner with basic SQL and pandas knowledge, the two transformation approaches I’ve shown are enough to get you started.
So far, I’ve used DuckDB as a destination of choice because it’s simple and requires no setup. In this section, I’ll show you how to work with a couple of more destinations, including a local file system, cloud storage, and databases.
Sometimes, you want to save the result of a data pipeline to disk. Now, dlt isn’t the perfect candidate for the job as it also stores a lot of metadata, but you can use it if you absolutely need to.
Start by tweaking the config.toml file. Provide paths to source and destination folders on your local system:
[sources.filesystem]
bucket_url = "file:///path/to/source/folder"
[destination.filesystem]
bucket_url = "file:///path/to/target/folder"
[runtime]
dlthub_telemetry = true
Now in the Python file, simply load the source file from a file system and run it through the pipeline. I haven’t applied any data transformations for the sake of simplicity:
import dlt
from dlt.sources.filesystem import filesystem, read_csv

def load_local_data() -> None:
    source = filesystem(file_glob="iris.csv") | read_csv()
    pipeline = dlt.pipeline(
        pipeline_name="local_to_local",
        destination="filesystem",
        dataset_name="data"
    )
    load_info = pipeline.run(source.with_name("iris"), loader_file_format="csv")
    print(load_info)

if __name__ == "__main__":
    load_local_data()
This is the content of the target folder:
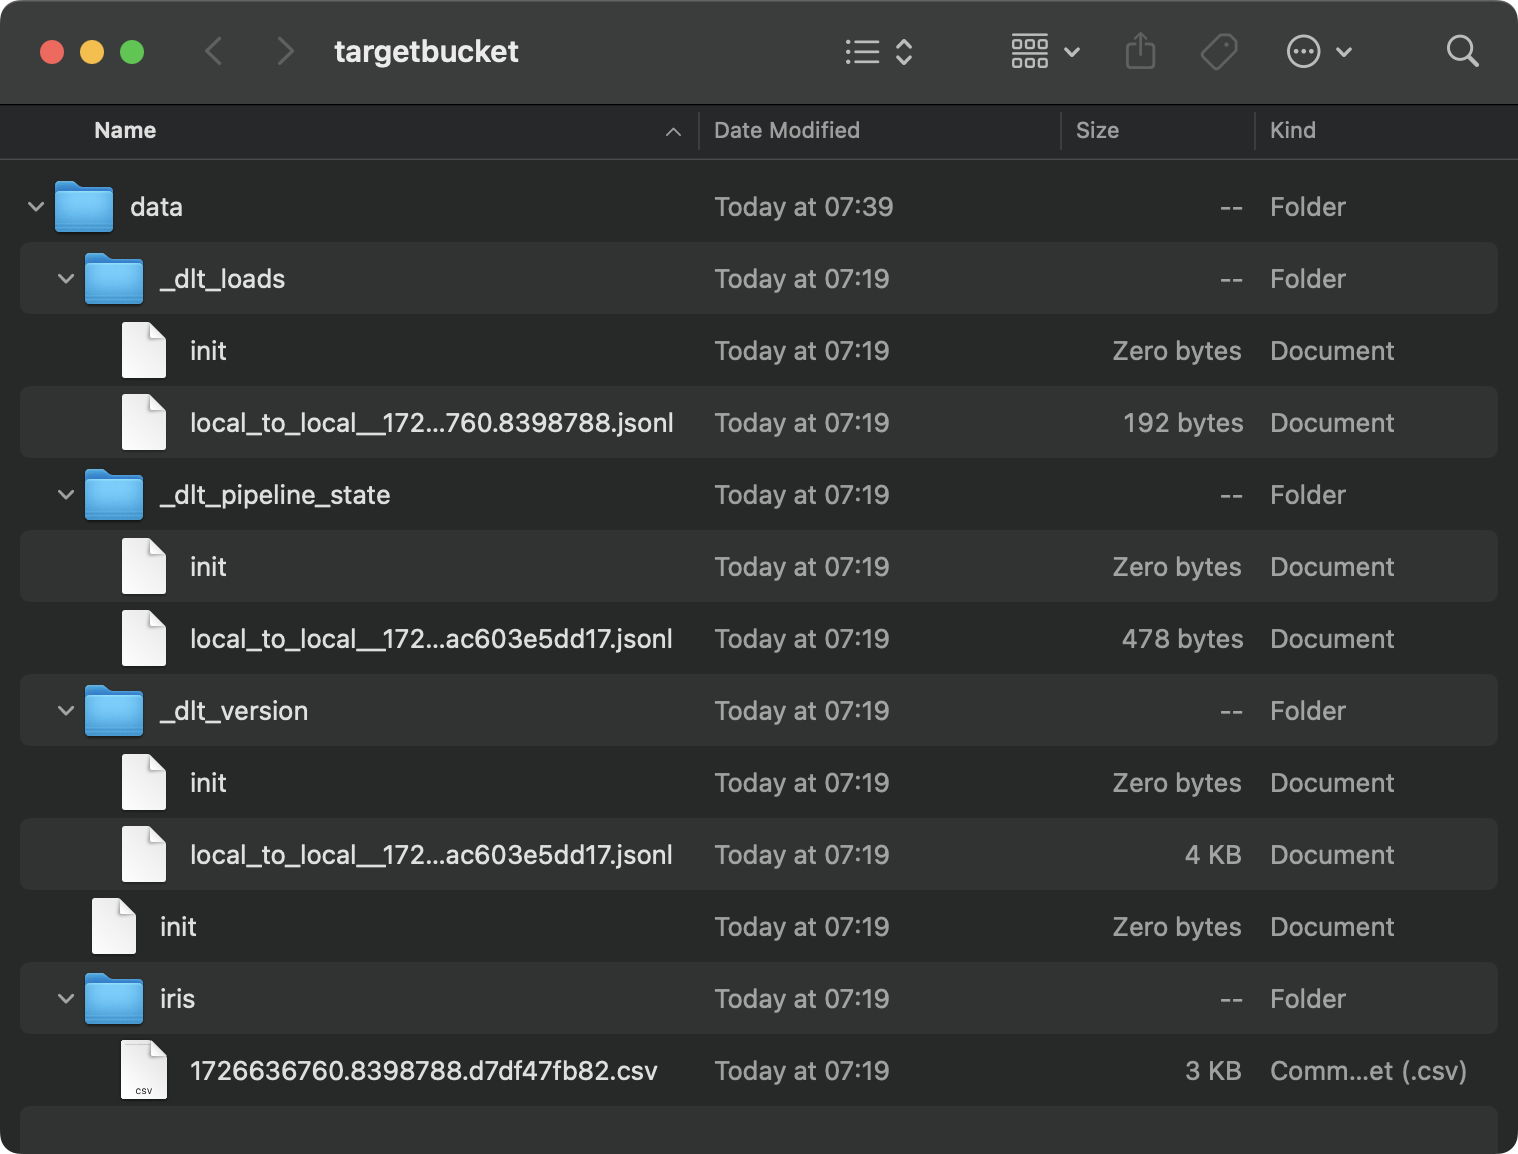
Local folder contents
It’s a mess, and that’s just the result of a single pipeline. Imagine you had dozens of them.
Databases are more natural places to store this information.
I’m using a Postgres database provisioned on AWS, but you don’t have to. Feel free to use any other database and cloud vendors.
Inside config.toml, you’ll want to provide a path to the folder on your local file system:
[sources.filesystem]
bucket_url = "file:///your-local-bucket"
[runtime]
dlthub_telemetry = true
And in secrets.toml, write the database connection details:
[destination.postgres.credentials]
drivername = "drivername" # please set me up!
database = "database" # please set me up!
password = "password" # please set me up!
username = "username" # please set me up!
host = "host" # please set me up!
port = 0 # please set me up!
Loading source data into the database now boils down to changing the value for the destination parameter in dlt.pipeline(). The with_name() function called on the data source controls how the database table will be named:
import dlt
from dlt.sources.filesystem import filesystem, read_csv

def load_to_database() -> None:
    source = filesystem(file_glob="iris.csv") | read_csv()
    pipeline = dlt.pipeline(
        pipeline_name="local_to_db",
        destination="postgres",
        dataset_name="local_load"
    )

    load_info = pipeline.run(source.with_name("iris_from_local"))
    print(load_info)

if __name__ == "__main__":
    load_to_database()
Loaded iris data
Let’s explore one more destination option before discussing more advanced dlt stuff.
Just like with your local file system, cloud storage (e.g., S3) will also store metadata in separate files and folders.
If you want to try it, start by adjusting the config.toml file to include paths to a local folder and the S3 bucket:
[sources.filesystem]
bucket_url = "file:///path/to/local/folder"
[destination.filesystem]
bucket_url = "s3://bucket-name"
[runtime]
dlthub_telemetry = true
As for the secrets.toml, enter your IAM credentials and S3 bucket region name:
[destination.filesystem.credentials]
aws_access_key_id = "aws_access_key_id" # please set me up!
aws_secret_access_key = "aws_secret_access_key" # please set me up!
region_name = "region_name" # please set me up!
Running the pipeline will transfer the local CSV file to S3, and store it in JSONL (JSON lines) format:
import dlt
from dlt.sources.filesystem import filesystem, read_csv

def load_to_s3() -> None:
    source = filesystem(file_glob="iris.csv") | read_csv()
    pipeline = dlt.pipeline(
        pipeline_name="local_to_db",
        destination="filesystem",
        dataset_name="iris_data"
    )

    load_info = pipeline.run(source.with_name("iris"))
    print(load_info)

if __name__ == "__main__":
    load_to_s3()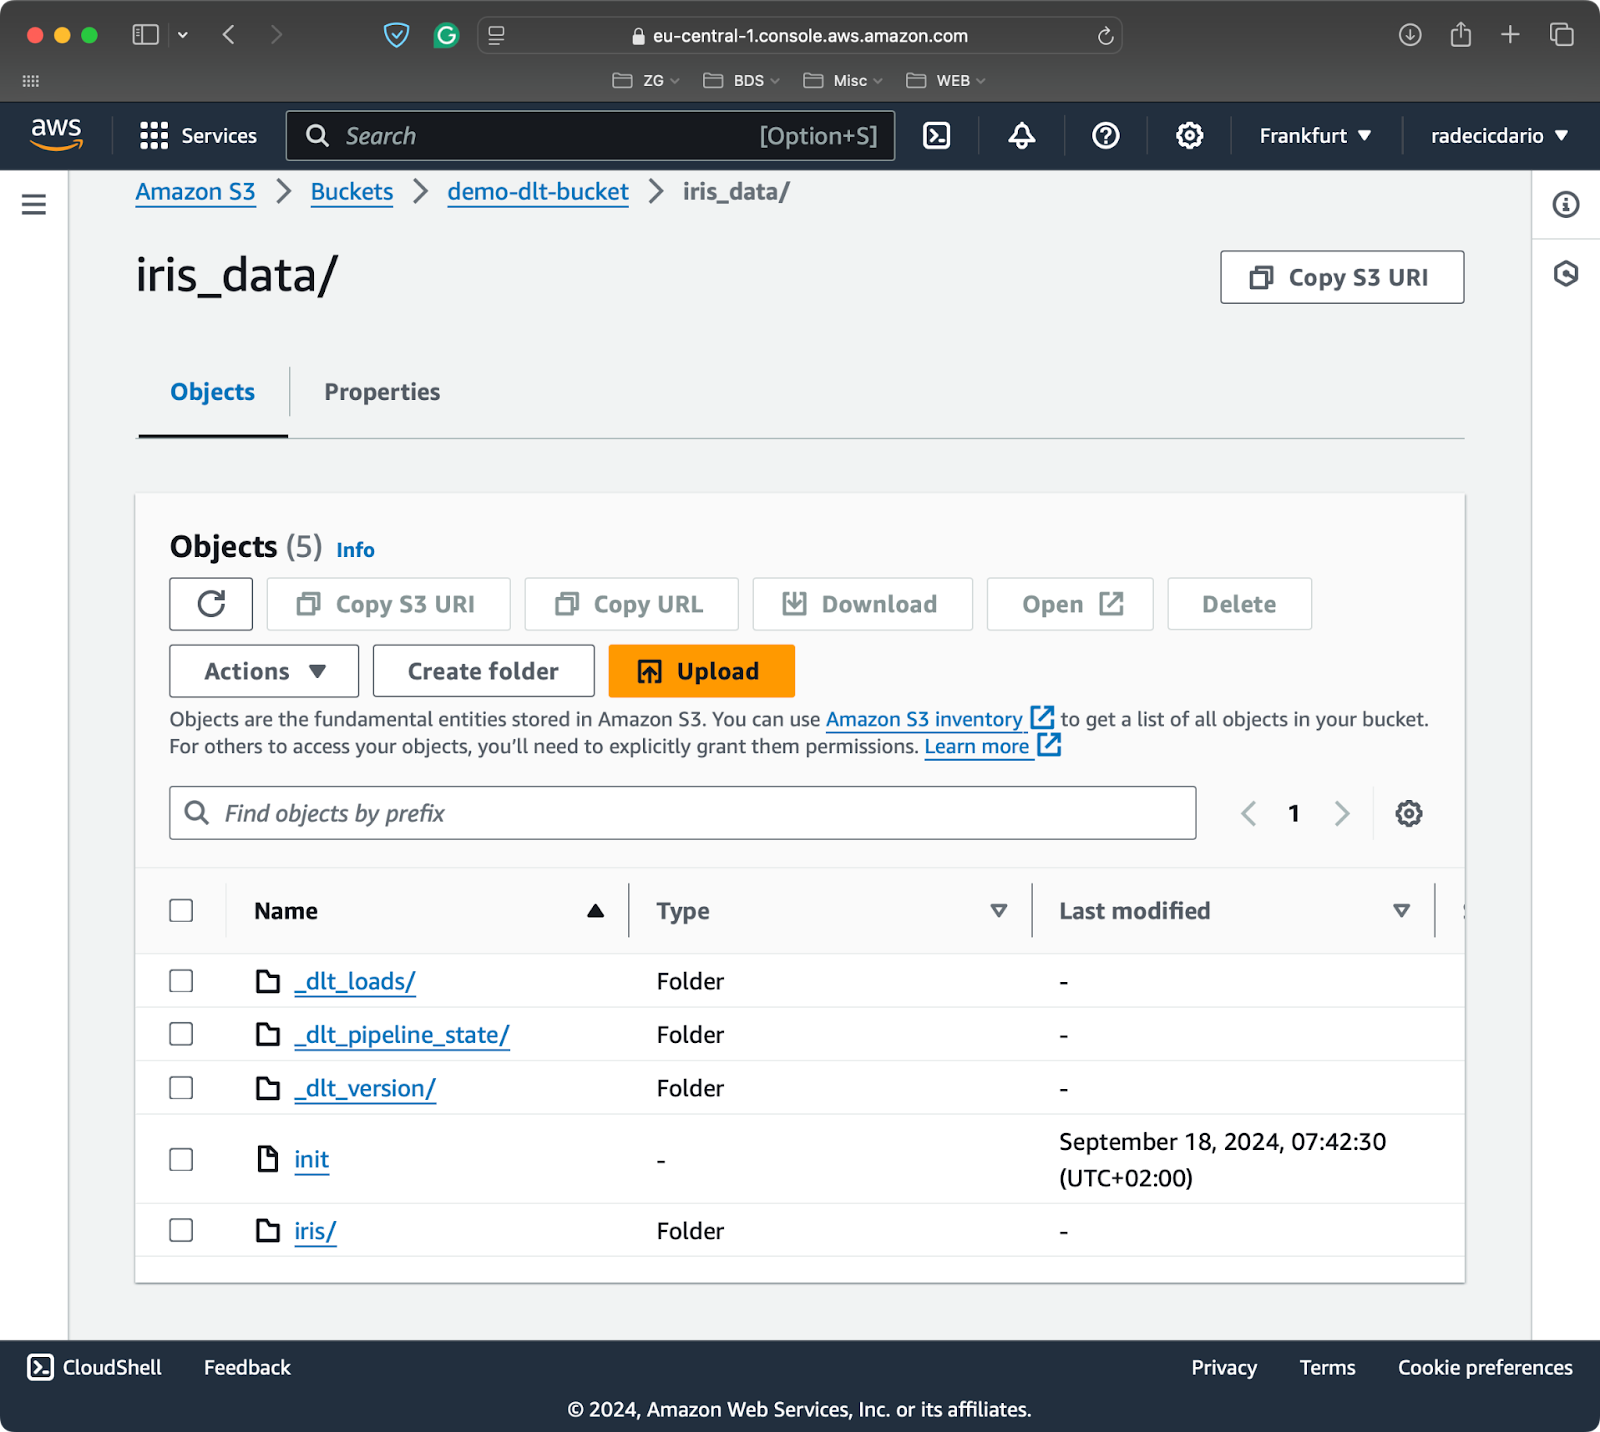
S3 bucket contents
You now know the basics of moving data around and transforming it along the way. But what happens when you run the pipeline multiple times? That’s what I’ll discuss next.
You’ll almost never run the pipeline just once. It’s more typical to schedule pipeline runs, for example, to run once a day or once every week.
If that’s the case, you’ll probably want to take more control of how new data is inserted, and how the existing data is updated.
Every time you run your pipeline, new data will be appended to your table of choice.
Let me demonstrate that by writing a simple pipeline that inserts a dummy pandas DataFrame into a DuckDB table:
import dlt
import pandas as pd

@dlt.resource(primary_key="index")
def data():
    data = pd.DataFrame({
        "index": [1, 2, 3, 4, 5],
        "a": [10, 15, 20, 25, 30],
        "b": [22.5, 30.5, 35.5, 50.5, 10.5],
        "c": ["row 1", "row 2", "row 3", "row 4", "row 5"]
    })
    yield data

def load_local_data() -> None:
    pipeline = dlt.pipeline(
        pipeline_name="pipeline_incremental_load",
        destination="duckdb",
        dataset_name="data"
    )
    load_info = pipeline.run(data=data(), table_name="dataset")
    print(load_info)

if __name__ == "__main__":
    load_local_data()
Running the pipeline once will insert five rows of data:
First append run
And running it again inserts the same five rows:
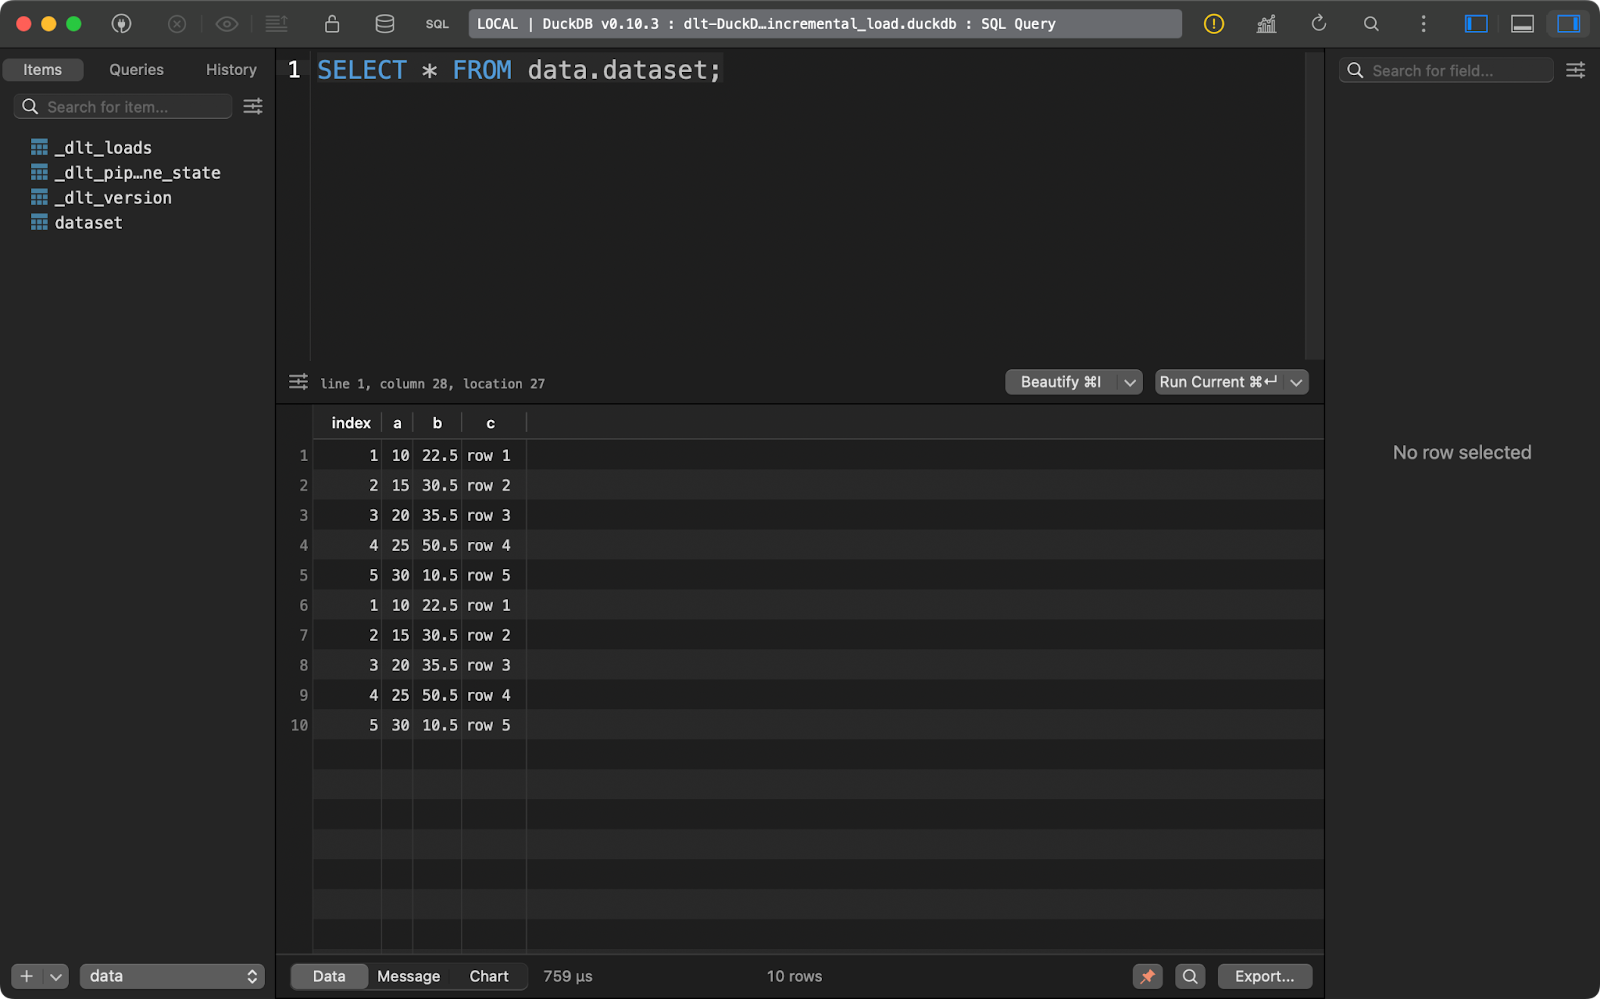
Second append run
With this sort of data it’s easy to conclude one thing - it’s duplicated. Let me show you what you can do about it.
If you want to delete existing records and replace them with new ones, add write_disposition=”replace” to pipeline.run():
load_info = pipeline.run(data=data(), table_name="dataset", write_disposition="replace")After doing this, I’ve run the pipeline four times, as you can see from the _dlt_loads metadata table:
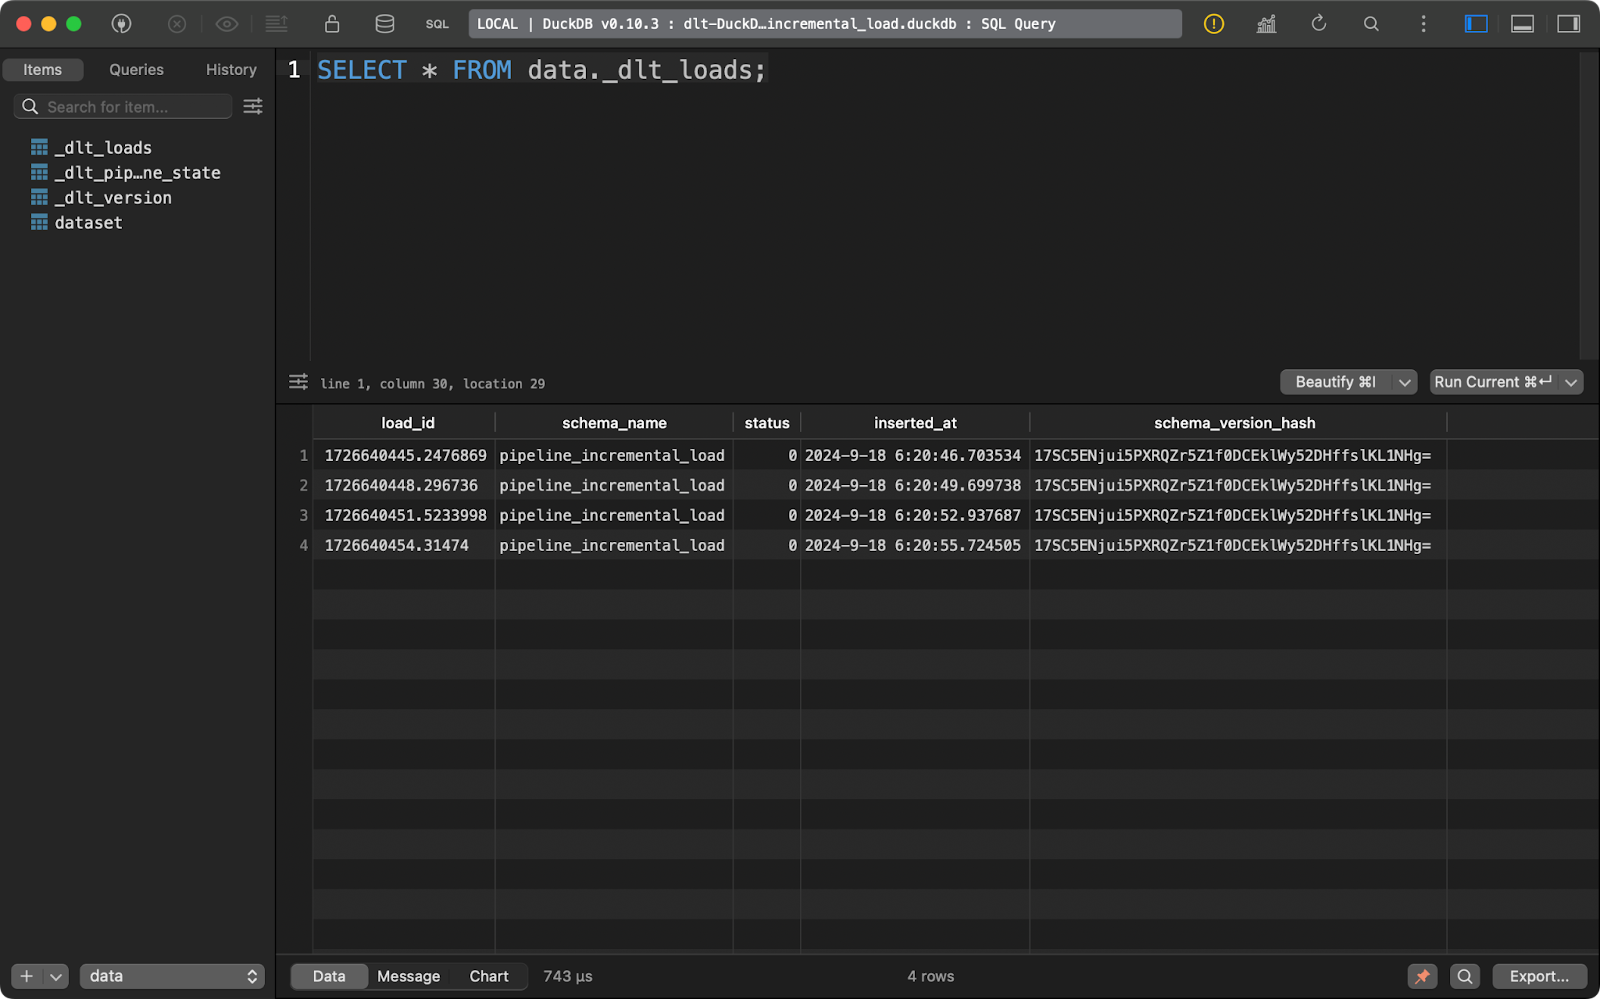
Running the pipeline multiple times
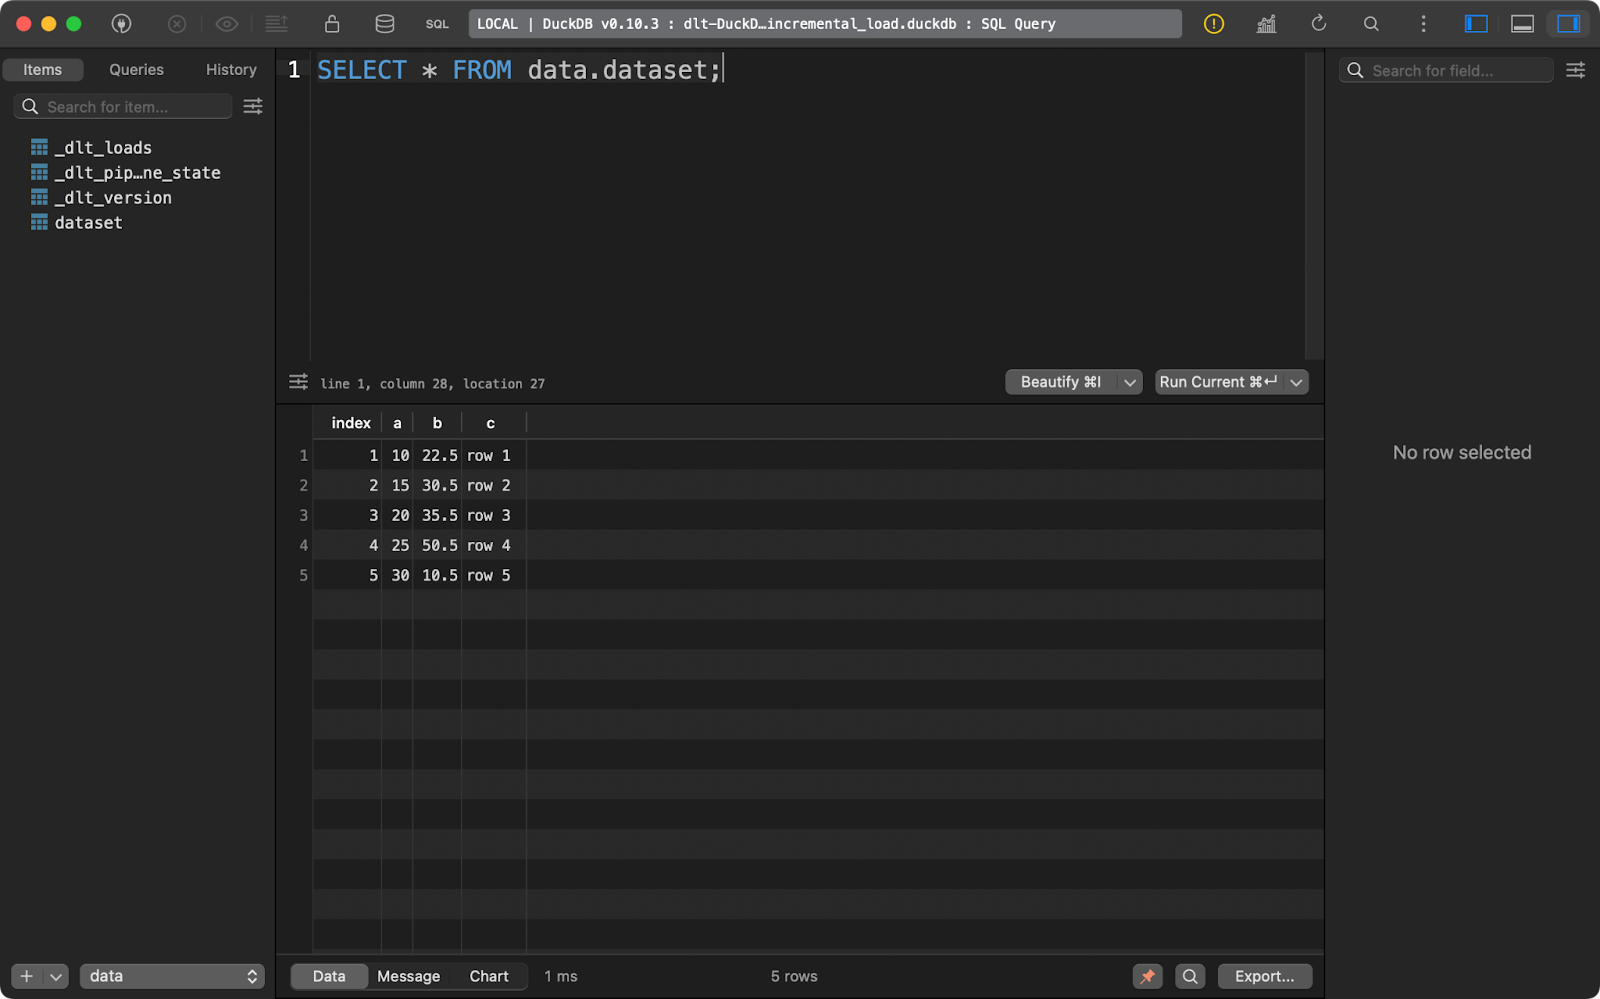
And the dataset table contains only 5 records:
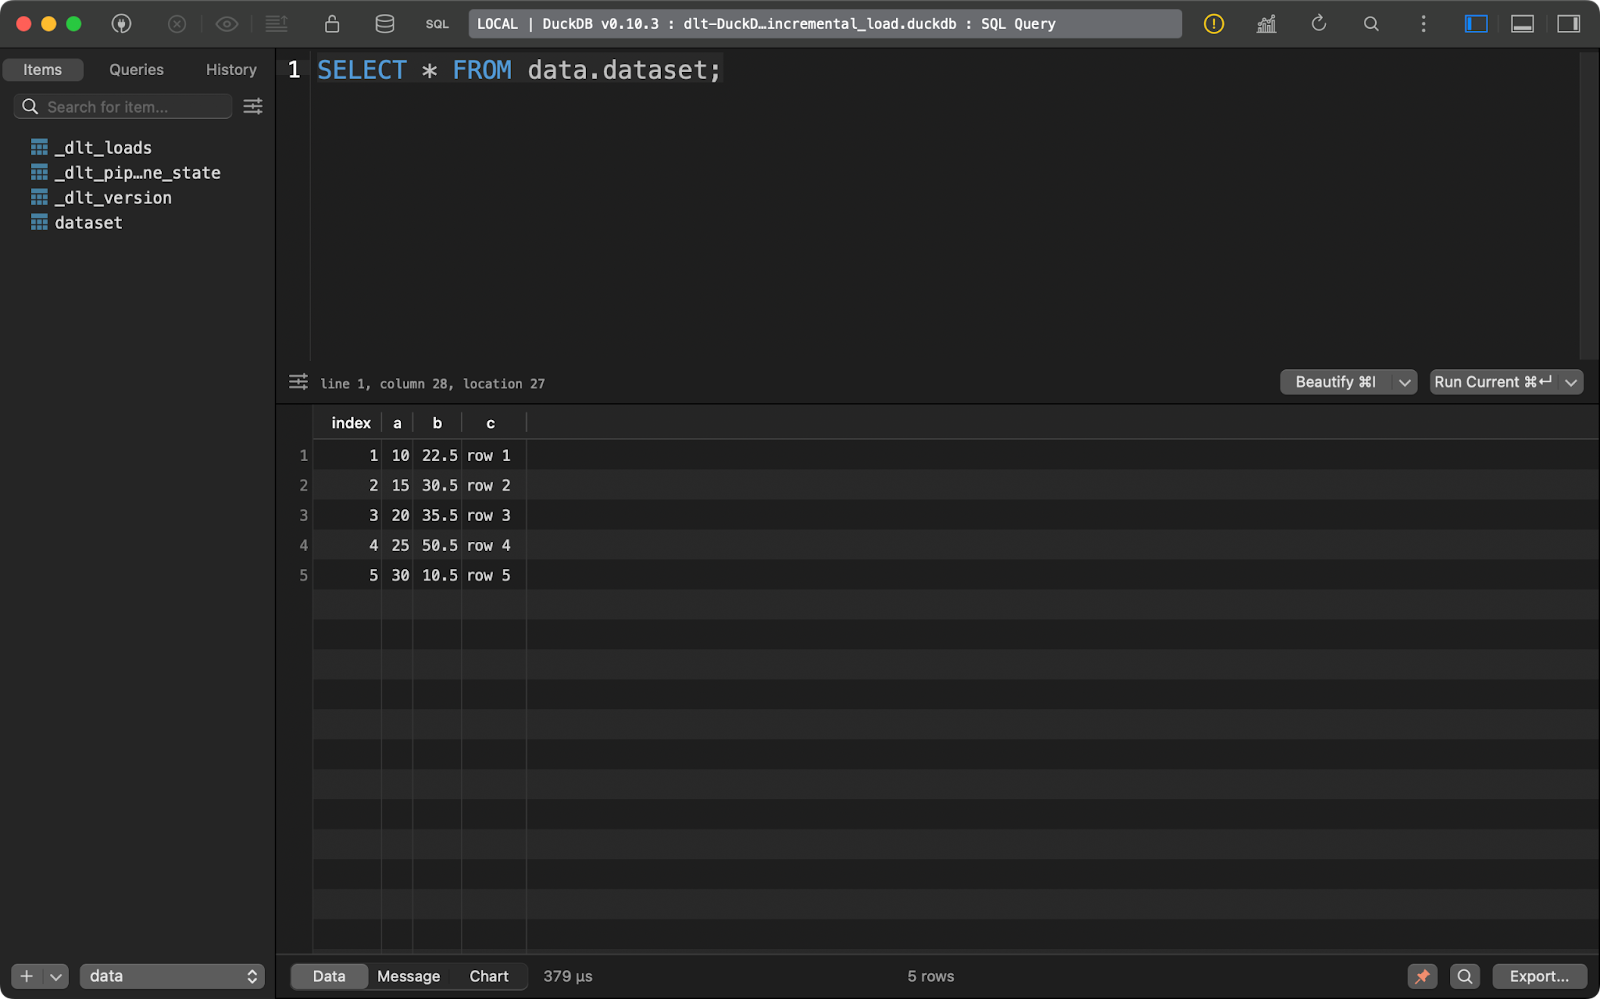
dataset table contents
In short, this approach will always replace the existing data.
But what if you have a mix of new and updated data? That’s where the upsert operation comes in. It’s implemented through the merge write disposition in dlt.
For reference, I’ve run the pipeline once more with the data from the previous section to ensure there are 5 rows present.
Then, I updated the data to add one more row and to change the values for some records with the existing index values.
The dlt package will look at the primary_key column you’ve specified and compare it to the data present on the destination system. Records with the existing primary key column will be updated, and the new ones will be inserted:
import dlt
import pandas as pd

@dlt.resource(primary_key="index")
def data():
    data = pd.DataFrame({
        "index": [1, 2, 3, 4, 5, 6],
        "a": [10, 15, 200000, 25, -3000, 50],
        "b": [22.5, 30.5, 3555555.5, 50.5, -100.5, 15.5],
        "c": ["row 1", "row 2", "row 3 updated", "row 4", "row 5 updated", "row 6 new"]
    })
    yield data

def load_local_data() -> None:
    pipeline = dlt.pipeline(
        pipeline_name="pipeline_incremental_load",
        destination="duckdb",
        dataset_name="data"
    )
    load_info = pipeline.run(data=data(), table_name="dataset", write_disposition="merge")
    print(load_info)

if __name__ == "__main__":
    load_local_data()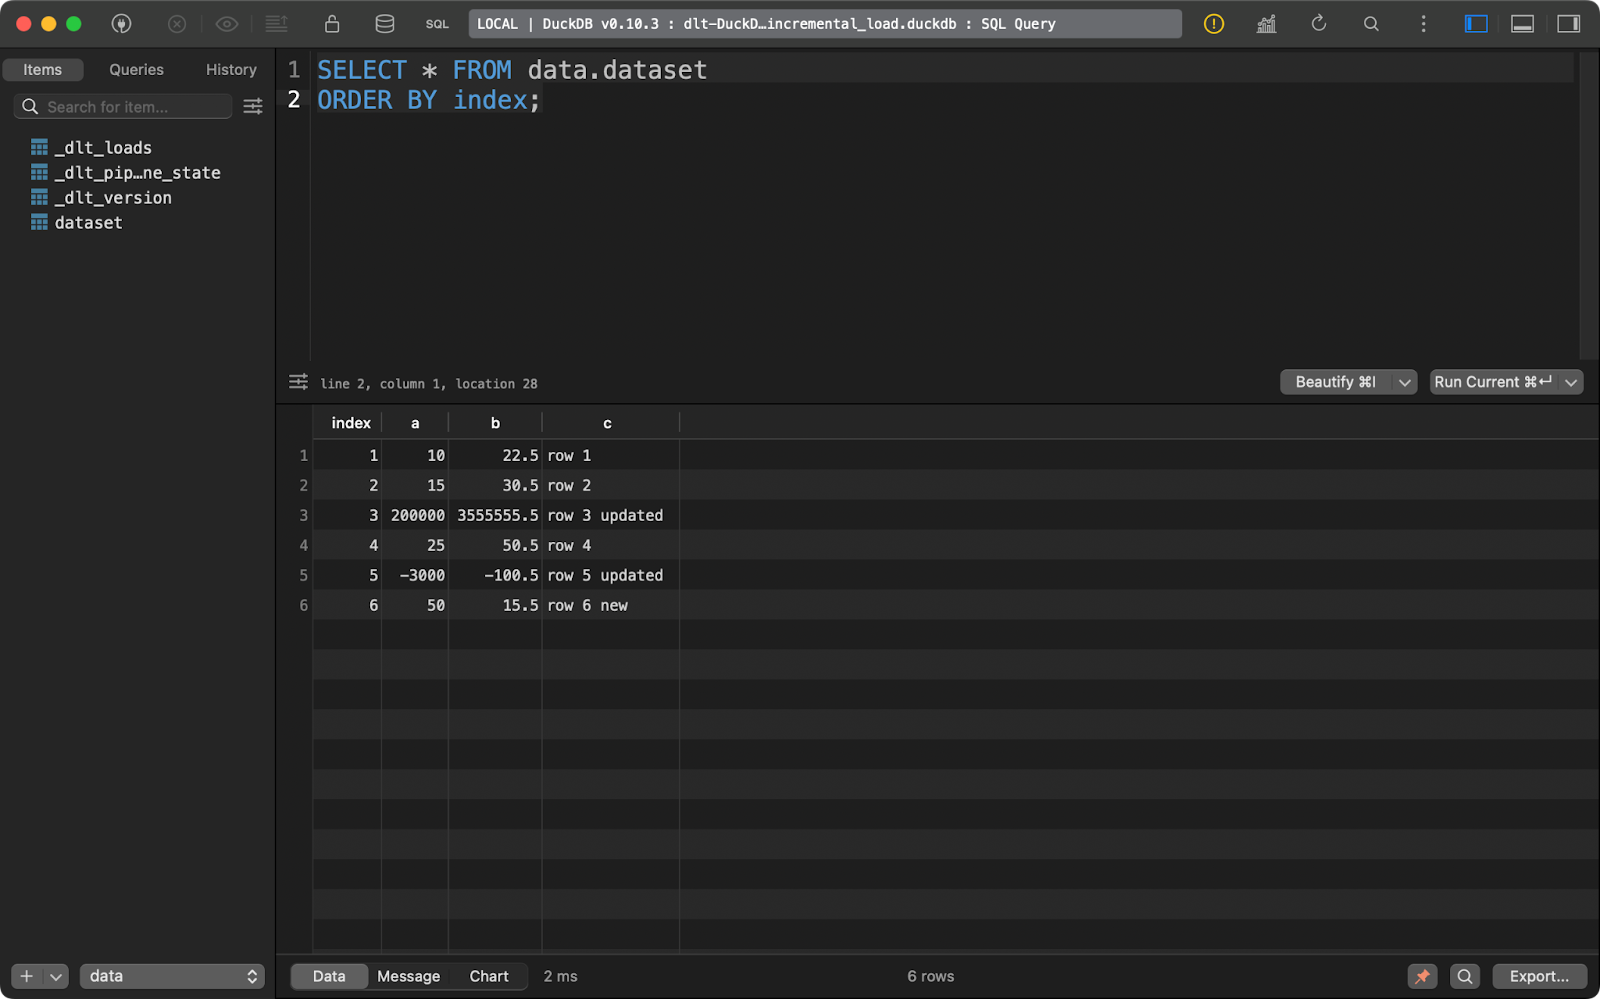
Dataset after the upsert operation
In short, you end up with one new row and two updated ones.
This is probably the behavior you want for most of your pipelines, especially when you want to avoid data duplication.
To conclude, there’s more to data engineering than meets the eye. Data movement is just one part. Nevertheless, it’s a vital part and most other aspects of data engineering revolve around it.
If you’re already familiar with Python, you probably aren’t looking to learn a GUI tool for data moving from scratch, or migrate to a new language entirely. You want to stick to a familiar environment. Python’s dlt library is all you and your team need to modernize legacy systems and reduce cloud costs. It’s tried and tested by many big players, such as Hugging Face, Taktile, Untitled Data Company, and Harness, so I believe it will suit your needs as well.
That being said, dlt likely isn’t the only tool you need to implement efficient data pipelines. You’ll want to learn additional data tools such as dbt to take data processing to the next level.
If you’re looking to start a career as a data engineer, our 3-module course is the perfect way to get started.
Our certification programs help you stand out and prove your skills are job-ready to potential employers.
Learn more about data engineering with these courses!
Track
Course
Course
blog
Oluseye Jeremiah
6 min
blog
Austin Chia
7 min
Tutorial
Dario Radečić
Tutorial
Jake Roach
code-along
Jake Roach
code-along
Blenda Guedes