
Lernpfad
Associate AI Engineer für Entwickler
26 Std.
The biggest hurdle in building sophisticated AI agents today isn't the model, but the integration. If you want an agent to access ten different enterprise tools, you usually have to write ten different API wrappers. In my experience, this creates wrapper fatigue and a massive maintenance burden. Every time an API changes, your agent breaks.
The solution lies in the partnership between the Google Agent Development Kit (ADK) and the Model Context Protocol (MCP). If we think of the AI as a worker, the ADK is the "brain" (orchestrating logic and memory), while MCP represents the "hands" (a standardized way to pick up and use any tool).
In this tutorial, we will build a real logistics recovery agent using ADK. The agent will:
All of this happens without writing a single line of custom API code. The agent automatically discovers and uses the tools.
New to Google Cloud? I recommend starting with the free Introduction to GCP course to cover billing, projects, and basic services.
The Google Agent Development Kit (ADK) is Google's open-source, code-first framework for building, testing, and deploying AI agents. While frameworks like LangChain focus on chains, ADK is built for execution. It provides a standardized structure for how agents think, use toolsets, and run in production environments.
Here are the key concepts:
Using this code-first approach lets us use version control, testing, and CI/CD just as we do with regular software. It also offers deep Google integration, meaning managed MCP servers require almost no deployment for BigQuery or Maps.
For a comparison of the “big three” cloud providers and their services, make sure to check out our guide on AWS vs. Azure vs. Google Cloud.
Our logistics recovery agent follows a clear reasoning path to solve a business problem. Understanding the flow helps when you start writing the prompt instructions later.
The reasoning loop follows these steps:
The agent calls the BigQuery MCP to find rows where status='Delayed' and priority='High'.
For each returned order, the agent extracts the warehouse and customer addresses.
The agent calls the Google Maps MCP for each order to calculate the drive distance.
The agent applies business logic (e.g., a distance of over 500 miles means air shipping) and presents a markdown table of recommendations.
Before we can start coding, we need to prepare the underlying cloud infrastructure and get the MCP servers ready. In my experience, getting the IAM permissions right is the most important part of this phase.
Make sure you have the Google Cloud CLI installed first. To begin, open your terminal and run the following command to link your local environment to your Google account:
gcloud initOnce you run this, a browser window will automatically open. You will be prompted to sign in with your Google account. After signing in, click Allow to give the CLI permission to manage your resources.
Back in your terminal, the prompt will ask you to select a default project. If you have created one already, choose the ID of the project, or create a new project in the terminal.
To use the API services, you need to set up billing. That being said, Google Cloud gives you $300 in free credit for 90 days to try services like Compute, GKE, and Maps, and those free credits are more than enough for the example in this tutorial. You’re only charged if you turn on pay‑as‑you‑go or prepay. To set up billing:
Go to the Google Console billing page and sign in with the account you use for gcloud.
Create a billing account if you don’t have one (adding a payment method is required, but free credit is applied first).
Link the billing account to your project: Billing → Link a project → select your project, or run:
gcloud billing projects link YOUR_PROJECT_ID --billing-account=BILLING_ACCOUNT_IDNext, we need to enable the primary product APIs. These allow the agent to reach the raw data services like BigQuery and Maps.
gcloud services enable bigquery.googleapis.com
gcloud services enable compute.googleapis.com
gcloud services enable container.googleapis.com
gcloud services enable mapstools.googleapis.com
Now, we must enable the Managed MCP Endpoints. I found it helpful to think of these as the translator interfaces that sit on top of the regular APIs.
First, let's store your project ID and account email in environment variables. This prevents us from having to type them manually for every subsequent command:
export PROJECT_ID=$(gcloud config get-value project)
export USER_EMAIL=$(gcloud config get-value account)
With those variables set, run the following commands to turn on the beta MCP features for your specific project. These commands tell Google to prepare the remote MCP endpoints for your agent to call:
gcloud beta services mcp enable bigquery.googleapis.com --project=$PROJECT_ID
gcloud beta services mcp enable mapstools.googleapis.com --project=$PROJECT_ID
gcloud beta services mcp enable container.googleapis.com --project=$PROJECT_ID
gcloud beta services mcp enable compute.googleapis.com --project=$PROJECT_IDMCP uses a "dual-layer" security model. You need permission to talk to the MCP server itself and separate permission to access the actual data (like rows in a table). You can do it using the gcloud CLI or the Google Cloud Console UI.
To grant your account permission to use MCP and interact with BigQuery, run these three commands:
# Permission to talk to the MCP Translator
gcloud projects add-iam-policy-binding $PROJECT_ID --member="user:$USER_EMAIL" --role="roles/mcp.toolUser"

# Permissions to run BigQuery jobs and view data
gcloud projects add-iam-policy-binding $PROJECT_ID --member="user:$USER_EMAIL" --role="roles/bigquery.jobUser"
gcloud projects add-iam-policy-binding $PROJECT_ID --member="user:$USER_EMAIL" --role="roles/bigquery.dataViewer"If you prefer a visual interface, you can follow these steps in the browser:
Finally, create a Maps API key. Unlike BigQuery, which uses your login credentials, the Maps MCP server uses this key for billing and quota tracking:
gcloud alpha services api-keys create --display-name="Maps-MCP-Key"Before we write our Python code, we should perform a sanity check using the MCP Inspector. We will use the npx command, which is a tool that comes with Node.js.
Its purpose is to let you run a package (like the inspector) immediately without having to permanently install it on your computer. Run this in your terminal:
npx @modelcontextprotocol/inspectorThis will launch a web interface in your browser (usually at http://localhost:3000). I made specific choices in the setup list below to ensure we are testing the Remote Managed version of Google's servers, not a local mock:
Transport type: Streamable HTTP. We choose this because it is the production-standard protocol Google uses for managed cloud servers.
URL: Enter https://mapstools.googleapis.com/mcp. This is the direct front door to Google’s Maps MCP.
Connection Type: via Proxy. This is a critical choice. By selecting "Proxy," the inspector will use your local gcloud login to handle all the complex security handshakes automatically.
Custom Headers: Add X-Goog-Api-Key and paste your key from Step 3.
Click Connect.
You should now see a green Connected status. Click the List Tools button to see a list of every capability the server offers. If you see compute_routes in that list, your infrastructure is perfectly configured.
For a deeper understanding of how to use BigQuery, Maps, and other Google services for your agents, make sure to check out this tutorial on Google MCP Servers.
With the infrastructure ready, we can now move to our local development environment. We will start by organizing our project files.
To get started, create a folder for your project and set up a virtual environment.
mkdir my-agents
cd my-agents
python -m venv .venv
source .venv/bin/activate
The final command above is for macOS or Linux users; if you are using Windows, use .venv\Scripts\activate instead.
Next, you can install the google-adk package along with its supporting libraries.
pip install google-adk google-generativeai python-dotenv httpx google-authOne more thing you need to do is create a .env file in your root folder to store your PROJECT_ID and the MAPS_API_KEY you generated in the previous step.
In a script named tools.py, we aren't writing code to "get data." Instead, we’re writing code to connect to a server that knows how to get data.
I found that separating the tools from the logic makes the project much easier to debug. Because we are talking to remote Google Cloud endpoints, we use StreamableHTTPConnectionParams to handle the authentication headers.
import os
import google.auth
import google.auth.transport.requests
from google.adk.tools.mcp_tool.mcp_toolset import MCPToolset
from google.adk.tools.mcp_tool.mcp_session_manager import StreamableHTTPConnectionParams

# --- BigQuery Toolset ---
def get_bigquery_mcp_toolset():
    credentials, project_id = google.auth.default(
        scopes=["https://www.googleapis.com/auth/bigquery"]
    )
    credentials.refresh(google.auth.transport.requests.Request())

    return MCPToolset(
        connection_params=StreamableHTTPConnectionParams(
            url="https://bigquery.googleapis.com/mcp",
            headers={
                "Authorization": f"Bearer {credentials.token}",
                # 'x-goog-user-project' is vital for BigQuery billing
                "x-goog-user-project": project_id,
                "Content-Type": "application/json"
            }
        )
    )

# --- Maps Toolset ---
def get_maps_mcp_toolset():
    maps_api_key = os.getenv('MAPS_API_KEY')

    return MCPToolset(
        connection_params=StreamableHTTPConnectionParams(
            url="https://mapstools.googleapis.com/mcp",
            headers={
                "X-Goog-Api-Key": maps_api_key,
                "Content-Type": "application/json"
            }
        )
)Now we build the "brain." In my experience, using one of the Gemini Flash models is the best choice here because they are incredibly fast at tool-calling.
We provide the agent with a standard operating procedure via the instructions in the agent.py file. Notice how we use a clear, four-step pipeline to prevent the agent from getting confused.
from .tools import get_maps_mcp_toolset, get_bigquery_mcp_toolset
from google.adk.agents import LlmAgent

# We're giving the agent a very structured 'Instruction' set.
# Think of this as the SOP (Standard Operating Procedure) for your agent.
root_agent = LlmAgent(
    model='gemini-2.0-flash',
    name='logistics_recovery_agent',
    instruction="""
      You are an expert Retail Operations Recovery Agent.
      Your job is to find high-priority problems and solve them using the tools provided.

      Step 1: Use 'execute_sql' to find orders where status is 'Delayed' and priority is 'High'.
      Step 2: For every result, pull the warehouse and customer addresses.
      Step 3: Call the Maps 'compute_routes' tool to find the exact drive distance.
      Step 4: Use this logic: If distance > 500 miles, recommend 'Air Shipping'.
            Otherwise, recommend 'Regional Express Ground'.

      Output the final result as a clean Markdown table.
    """,
    # We simply drop our toolsets here.
    # ADK handles the complexity of deciding which tool to call when.
    tools=[get_maps_mcp_toolset(), get_bigquery_mcp_toolset()]
)To run the agent, we use the runner. This component keeps track of the conversation state so the agent knows what it has already accomplished and what it needs to do next.
from google.adk.runners import Runner
from google.genai import types

async def main():
    # The Runner acts as the host for our agent.
    runner = Runner(app_name="logistics_app", agent=root_agent)

    # Wrap the user input in the standard GenAI Content format
    user_input = "Identify high-priority delayed orders and suggest recovery shipping methods."
    content = types.Content(role="user", parts=[types.Part(text=user_input)])

    print("--- Starting Smart Logistics Agent ---")

    # We use run_async to stream the 'events' (Thoughts and Tool Calls)
    async for event in runner.run_async(user_id="admin_user", new_message=content):
        # We only want to print the text part of the response to the console
        if hasattr(event, 'content') and event.content.parts:
print(event.content.parts[0].text)When you call runner.run_async, the ADK starts an iterative loop:
Gemini thinks: "I need to see the delayed orders first."
ADK acts: It calls the execute_sql tool from your BigQuery MCP toolset.
Observation: The tool returns the order data.
Gemini thinks: "Now I need distances for these two orders."
ADK acts: It calls the Maps MCP tool twice.
Final Response: Gemini sees all the data, applies your "500-mile" logic, and formats the table.
While the terminal is great for logs, ADK includes a built-in web console that visualizes the agent's internal reasoning. I found this to be the most helpful tool for debugging.
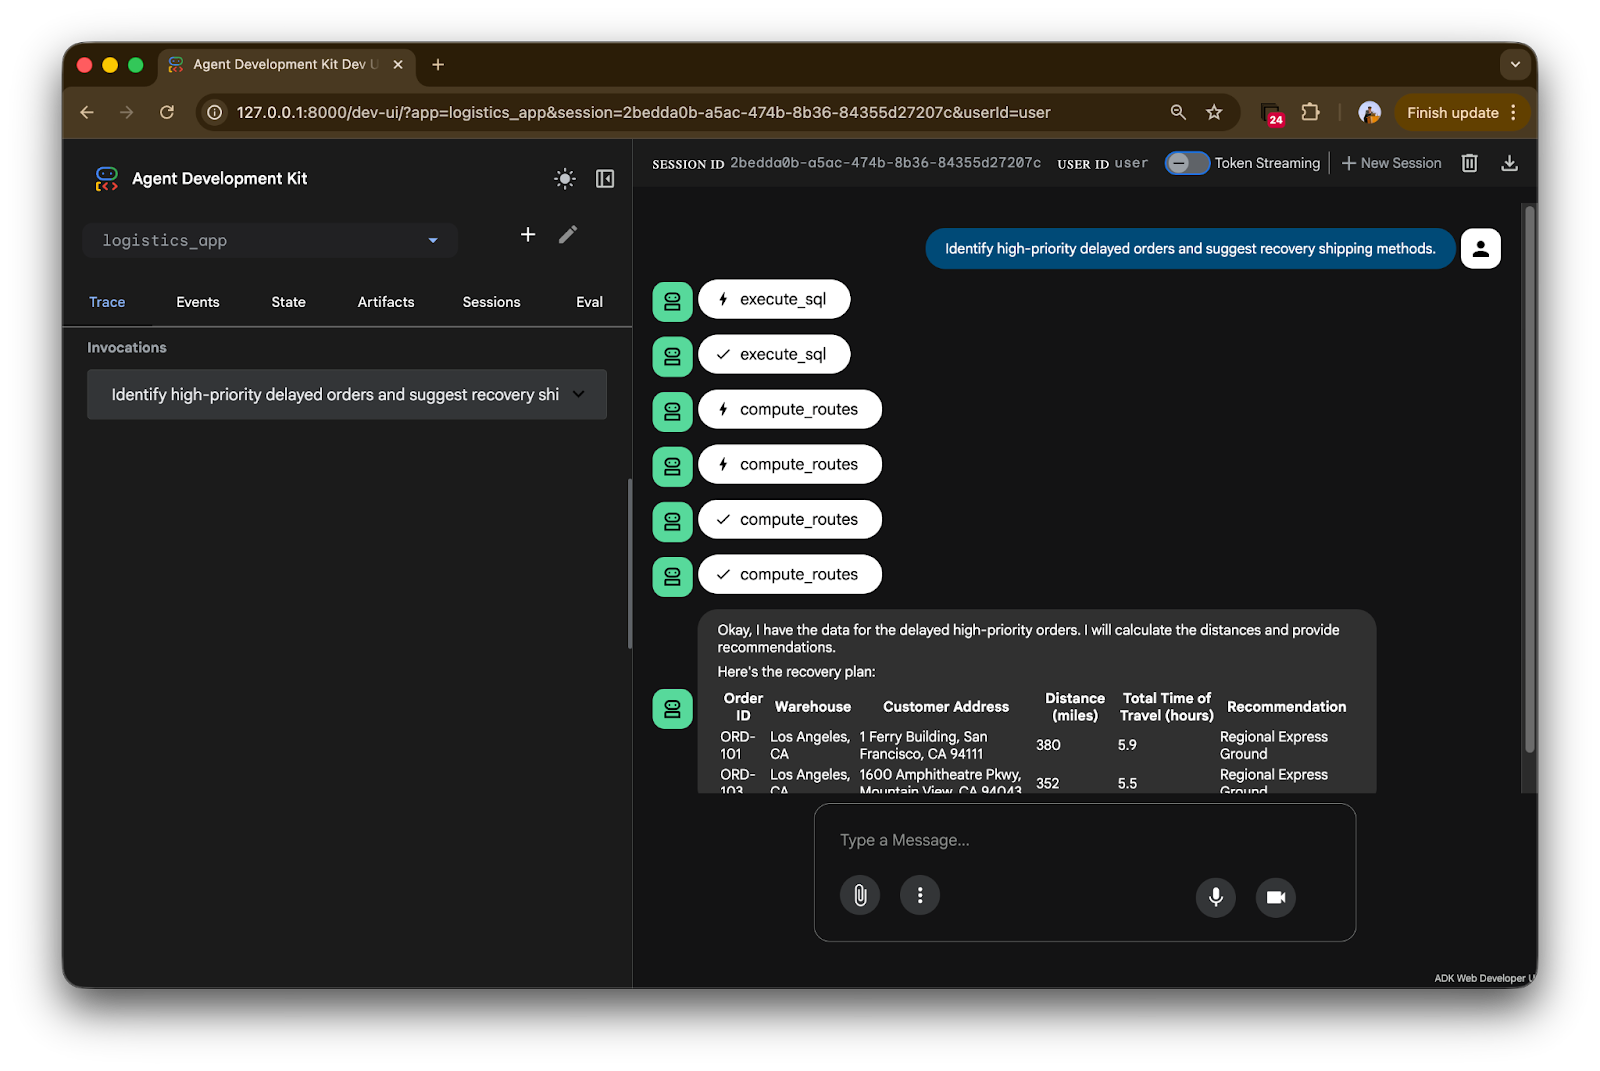
Launch the interface by running adk web. Once the server starts, open your browser to http://127.0.0.1:8000. You’ll see a clean, chat-like interface where you can send the command: "Identify high-priority delayed orders and suggest recovery shipping methods."
The ADK console provides a transparent "trace" of exactly how the agent is interacting with your cloud infrastructure.
Let’s break it down step by step:
Tool handshakes: Notice the icons labeled execute_sql and compute_routes. In the trace, the lightning bolt indicates a tool invocation. The agent didn't just guess; it physically reached out to the BigQuery MCP server to run a specific SQL query against your orders table.
Sequential logic: The trace shows a clear order of operations. First, it fetches the data via BigQuery (the first checkmark). Once it has the warehouse and customer addresses, you see multiple compute_routes calls. The agent is intelligently "looping" through the delayed orders to get real-world distance data from the Maps MCP server.
Final synthesis: The bottom of the trace shows the final response.
Look at the data:
Because we gave the agent the logic: "If distance > 500 miles, recommend Air Shipping, otherwise Regional Express Ground," the agent correctly applied this business rule to both orders and formatted them into a beautiful Markdown table.
We just built a functional Logistics Agent without writing a single line of custom API code for BigQuery or Google Maps. By using ADK and MCP, we’ve created an architecture that is modular, secure, and developer-first.
The future of AI isn't just about chatbots that talk, but about agents that take action. With these tools, we are finally moving toward that reality.
This tutorial can serve as a great starting point for your experimentation with the Google ADK and MCP servers:
If you want to learn more about agent orchestration, I highly recommend enrolling in our Associate AI Engineer for Developers career track.
GCP and AI Agent Courses
Lernpfad
Lernpfad
Kurs
Blog
Abid Ali Awan
6 Min.
Tutorial
Aryan Irani
Tutorial
Aashi Dutt
Tutorial
Aashi Dutt
Tutorial
Aashi Dutt
Tutorial
Bex Tuychiev