LangChain vs LangGraph vs LangSmith vs LangFlow: Key Differences Explained
Compare LangChain, LangGraph, LangSmith, and LangFlow. Learn their roles, strengths, and when to use each for building production-ready AI applications.
This article gives a formal, side-by-side comparison of LangChain vs LangGraph, as well as where LangSmith and LangFlow fit. We will be building on concepts covered in other DataCamp articles and we will discuss when to choose each framework to ship production-ready, agentic AI systems. If you’re looking for a practical start to LangChain, I recommend the Developing LLM Applications with LangChain course.
TL;DR
Before diving into the details, here’s a quick overview of how LangChain, LangGraph, LangSmith, and LangFlow fit together and when you might choose each.
LangChain: The foundation, build modular LLM workflows (prompts, tools, memory, retrievers) using simple APIs like LCEL. Best for prototyping and linear apps.
LangGraph: The orchestrator, manage complex, stateful, branching workflows with retries, loops, and persistence. Best for resilient, production-ready, multi-agent systems.
LangSmith: The observer, framework-agnostic tracing, evaluation, and monitoring of LLM apps. Best for debugging, regression testing, and quality tracking.
LangFlow: The visual builder, drag-and-drop interface for quickly prototyping flows and exporting them to code. Best for teams, workshops, and non-coders.
Quick heuristic: Start with LangChain, move to LangGraph as workflows grow, add LangSmith for observability, use LangFlow when you need fast iteration or collaboration.
Introduction to LangChain and LangGraph
Large language models (LLMs) are great at single prompts. This is pretty much common knowledge at this point, seeing as we use these models so often nowadays.
However, real applications need workflows: fetch data, reason, call tools, ask a follow‑up, retry on failure, and sometimes pause for a human. Thus, there are two such frameworks you will hear again and again: LangChain and LangGraph. They live in the same ecosystem and often work together, but they solve different parts of the problem:
LangChain helps us build the steps
LangGraph helps us orchestrate these steps when things get complex.
Speaking of ecosystem, we will also be discussing LangSmith (which is for observability/evaluation tasks) and LangFlow (which is a drag‑and‑drop visual builder), since they are also part of this ecosystem.
A Brief History of the LangChain Ecosystem (2022–2025)
I believe it makes sense to start with a bit of history around the LangChain ecosystem; it’s become the go-to framework for agentic AI, and knowing how it got here will make it easier to see why LangGraph, LangSmith, and LangFlow matter.
2022 — LangChain is born: LangChain was launched as an open‑source project in Oct 2022 by Harrison Chase and team. It quickly became the go-to framework for composing LLM apps and, therefore, attracting a fast‑growing community and integrations.
2023 — Popularity to Platform: LangChain formalized core abstractions and added LCEL (LangChain Expression Language) for pipe‑style composition. A new way to deploy chains as productions via API was also created, called LangServe. The company behind LangChain raised funding to accelerate ecosystem work.
2023–2024 — Observability arrives with LangSmith: In the middle of 2023, and later generally available by early 2024, LangSmith introduced unified tracing, evaluation, and monitoring so teams could debug and test chains/agents and track quality over time.
2024 — Orchestration with LangGraph: To support long‑running, multi‑step/agent apps, LangGraph introduced a graph runtime with explicit state, routers/branches, loops, retries, and checkpointers for persistence. This was a vital framework since it laid the foundation for durable, production‑ready agents. Subsequent updates expanded customization and integrations with different LLM providers, including Ollama (open-source models).
2024–2025 — Visual building with LangFlow. The LangFlow visual editor evolved rapidly (major releases through late 2024 and a Launch Week in 2025), letting teams drag‑and‑drop LLM components, iterate quickly, and export flows to code. This was an important step because it started to allow non-coders the ability to build robust AI Agents as well.
2025 — Toward managed agent platforms. LangChain announced major milestones: a Functional API for LangGraph, prebuilt agent templates, and a LangGraph Platform to deploy and manage stateful agents at scale. This is also quite pivotal, because it allowed us developers to operate reliable agents in production.
Brief introduction to LangChain and LangGraph
Let’s now start to dive deep into the core ecosystem, starting off with LangChain and LangGraph.
LangChain is a modular framework for building LLM‑powered applications. It gives us building blocks - prompts, models, memory, tools, retrievers - and a simple way to chain them into a pipeline using its Runnable/LCEL APIs (we will discuss this shortly). I like to think of it as a kit of Lego bricks for common LLM patterns such as RAG, question‑answering, chatbots, and tools‑using agents.
LangGraph is a newer, graph‑based orchestration layer built on LangChain components. Instead of one straight line of steps, the app is modelled as nodes (i.e., the actions) and edges (i.e., the transitions), with an explicit state object flowing through the graph. We will discuss this in more depth, but for now, remember that this design makes it natural to branch (take different paths), loop (ask clarifying questions until confident), retry (on tool/model errors), and pause for human review; exactly what we need for long‑running, production‑grade agents.
Now you can have a question here:
“Why even compare them?”
Here is the thing: although they share components, they target different complexity levels:
LangChain excels at quick, linear workflows. Example: Load PDF → chunk → embed → retrieve → answer. You can prototype this in minutes.
LangGraph excels when logic must adapt. Example: If confidence < 0.7 → ask a clarifying question (loop); if payment fails → retry with backoff; if request looks risky → pause for human. These behaviors are first‑class in a graph.
In practice, many developers start with LangChain to validate an idea, then upgrade to LangGraph as they add branching, error handling, multi‑agent coordination, or durability.
What is LangChain?
Now, we are going to go in-depth into LangChain, understand its usage, and code applications in it. Once again, note that LangChain is a library that allows us to build a foundation for sequential LLM workflows.
LCEL
To start, I want to explain what LCEL is. LCEL or LangChain Expression Language is just a way to connect blocks together with pipes (|). Each block can be a prompt, a model, a retriever or a parser. When we join them, we get a chain that we can run again and again, making writing code much more efficient.
Let’s go through some examples.
from langchain_openai import ChatOpenAI
from langchain_core.prompts import ChatPromptTemplate
from langchain_core.output_parsers import StrOutputParser
llm = ChatOpenAI(model="gpt-4o-mini")
prompt = ChatPromptTemplate.from_messages([("system","You are concise."),("human","{question}")])
chain = prompt | llm | StrOutputParser()# This is our chainprint(chain.invoke({"question":"Give me 3 focus tips."}))# making a single call
qs =[{"question": q}for q in["One tactic for RAG?","Explain LCEL in 1 line."]]print(chain.batch(qs))# many calls at oncePowered by
In my opinion, the above code cell shows the simplest way to use LCEL. We first made a prompt template that always includes a system message (“you are concise”) and leaves space for a human question. The system message is like an instruction to the LLM which tells it to respond/act in a specific way. We then connected this template to an OpenAI model - GPT-4o-mini.
Lastly, I added an output parser, which basically converts the response into plain text.
Now here comes the most important part: The | operator is what glues these blocks together into one pipeline.
I also want to talk about invoke() and batch(). When we call chain.invoke(...), the pipeline runs once, meaning the template fills in the question, the model generates an answer, and the parser returns clean text.
However, when we call chain.batch(...), the same chain runs on many inputs at once, which is much faster than looping one by one. In practice, this makes it easy to go from a simple, single call to handling whole datasets with almost no extra code.
I want to showcase another example here:
from langchain_core.prompts import ChatPromptTemplate
from langchain_openai import ChatOpenAI
from langchain_core.output_parsers import StrOutputParser
stream_chain =(ChatPromptTemplate.from_template("{topic}")| ChatOpenAI(model="gpt-4o-mini")| StrOutputParser())# Simple streamfor chunk in stream_chain.stream({"topic":"Explain PID in 2 lines"}):print(chunk, end="")Powered by
This code is quite similar to the first once but instead of just calling it once, we use streaming. With .stream(...), the model does not wait until the whole answer is ready. Instead, it sends chunks of text as they are generated, and we print them in real time.
The main thing I want you to take away from this subsection is that LCEL is the simple “pipes and blocks” system that lets us snap prompts, models, tools, and parsers together and instantly gives us a chain we can run, batch, or stream without extra code.
Structured outputs using Pydantic
Structured outputs is a vital component of AI agents. It means that instead of our agent giving a long messy text, it gives the answer in a clear format like JSON, tables or lists. This makes it easier for computers and people to read, use and connect with other tools.
One of the main frameworks which are used in industry for this is Pydantic.
from pydantic import BaseModel, Field
from typing import List
from langchain_openai import ChatOpenAI
classTaskPlan(BaseModel):
title:str
steps: List[str]= Field(..., min_items=3, description="actionable steps")
structured = ChatOpenAI(model="gpt-4o-mini").with_structured_output(TaskPlan)
plan = structured.invoke("Plan a 20-minute deep-work session for AI Agent notes.")print(plan.model_dump())Powered by
In this example, the method .with_structured_output() is the important part, as it tells the LLM to give the output in the Pydantic model form we had created. Behind the scenes, LangChain makes sure our agent’s answer is real JSON that matches the form, and then turns it into a Python object you can use straight away.
So instead of messy text, we get something like TaskPlan(title="...", steps=["...", "...", "..."]). This is especially useful when we use Tools.
Tool calling in LangChain
Tools are important because they extend our LLM’s capability by being able to complete tasks that it was incapable of doing before, such as searching the internet.
The thing I like most about tools, however, is that Langchain (and many of these agentic frameworks) provide ready-made tools called Built-In Tools that are quite easy to use. Moreover, we can also create our own tools by using a decorator @tool, which tells LangChain that this function is a special kind of function.
from langchain_core.tools import tool
from langchain_openai import ChatOpenAI
@tooldefmultiply(a:int, b:int)->int:"""This tool multiplies two numbers."""return a * b
llm = ChatOpenAI(model="gpt-4o-mini")
llm_tools = llm.bind_tools([multiply])# exposing the tools to the model
resp = llm_tools.invoke("What is 9*5? If needed, use a tool.")print(resp.tool_calls or resp.content)# model may emit a tool call with argumentsPowered by
In the above code cell, you can see that I have created a very simple tool, which takes in two numbers and returns their product. To give the internal model (in this case GPT-4o-mini) access to such tools, we use the method llm.bind_tools() and pass in the list of tools, exposing the tools to the model.
Conversational memory
Memory is also quite vital when building AI agents. AI agents with memory can remember things from past conversations, like what we asked before, our preferences, or what worked or didn’t work. Without memory, every time feels like meeting someone brand new — we would have to repeat basic context again and again, which is quite cumbersome.
In LangChain, memory means saving past messages or facts in a store (in memory, database, or vector store). Then when the agent runs again, it can pull in that memory so the responses feel consistent and smarter.
There are two main kinds: short-term memory (recent messages in the same chat) and long-term memory (facts or preferences remembered across many sessions). Note that a session is a single conversation or interaction window, where our agent keeps track of what has been said until it ends.
Short-term keeps context during a single conversation, while long-term makes the agent feel more personal and helpful over time.
from langchain_openai import ChatOpenAI
from langchain_core.prompts import ChatPromptTemplate, MessagesPlaceholder
from langchain_core.runnables.history import RunnableWithMessageHistory
from langchain_core.chat_history import InMemoryChatMessageHistory
prompt = ChatPromptTemplate.from_messages([("system","Be brief"),
MessagesPlaceholder(variable_name="history"),("human","{input}")])
chain = prompt | ChatOpenAI(model="gpt-4o")
store ={}# session_id -> historydefget_history(session_id:str):if session_id notin store:
store[session_id]= InMemoryChatMessageHistory()return store[session_id]
with_history = RunnableWithMessageHistory(
chain,lambda cfg: get_history(cfg["configurable"]["session_id"]),
input_messages_key="input",
history_messages_key="history",)
cfg ={"configurable":{"session_id":"u1"}}print(with_history.invoke({"input":"My name is Vaibhav."}, config=cfg))print(with_history.invoke({"input":"What is my name?"}, config=cfg))Powered by
In the above cell, the code first creates a chat chain that can remember past messages in a session. The prompt has a history placeholder, and RunnableWithMessageHistory automatically fills it with the right conversation each time. The store keeps histories for different sessions.
It is important to note, we should use memory carefully. We need to decide and write code for what is worth keeping, when to store it, and how much to pass back into the prompt. Here’s the thing, too much memory can slow things down or overflow limits, but the right balance makes our agents much more useful.
What is LangGraph?
We now move to the other agentic framework - LangGraph.
To explain LangGraph simply, I am going to use an analogy: the Backpack Flowchart Analogy.
We can think of LangGraph as a small flowchart for our AI app. Each box (called a node) is just a tiny Python function that does one job. The arrows (edges) say which box runs next. A little backpack of data (the “state”) moves through the flowchart, so each node can read it and add to it. For example, in a chat app, the backpack is usually the running list of messages.
Fundamental graph
This will make more sense if we go through an example together:
from typing import TypedDict, Annotated, List
from langgraph.graph import StateGraph, START, END
from langgraph.graph.message import add_messages
from langchain_openai import ChatOpenAI
from langchain_core.messages import HumanMessage
# This is the backpack that moves through the graph.classState(TypedDict):# To add messages to the state
messages: Annotated[List, add_messages]
llm = ChatOpenAI(model="gpt-4o")# This is a node that asks the model and adds the reply to the backpack.defmodel_node(state: State):
reply = llm.invoke(state["messages"])return{"messages":[reply]}# Building the graph
graph = StateGraph(State)
graph.add_node("model", model_node)
graph.add_edge(START,"model")
graph.add_edge("model", END)# Building and running once
app = graph.compile()
result = app.invoke({"messages":[HumanMessage(content="Explain LangGraph in one sentence.")]})print(result["messages"][-1].content)Powered by
Let’s walk through the code now. Here, we are building the simplest possible LangGraph app. The state is like a backpack, carrying messages through the graph. We define it with State, which tells LangGraph to always keep a running list of chat messages.
Then comes the node, that is just a single function here, model_node, which looks inside the backpack, sends the messages to the LLM, and returns the reply. LangGraph then automatically adds this reply back into the backpack.
The graph itself is a tiny flowchart: START → model → END. When we compile it, LangGraph turns this drawing into a runnable app.
Finally, we run the app (not the graph - but rather the compiled graph) with a backpack that already contains a human message.
To help build your visual understanding, we can run this code to view the graph:
from IPython.display import Image, display
display(Image(app.get_graph().draw_mermaid_png()))Powered by
Please note, though, just because the visualization is produced, does not mean that the graph will run! There might be some logical errors which need to be taken care of first.
Branching graph
Let’s advance further, towards Branching, an important (but easy) component of any robust Agentic system. It allows our agents more freedom to make choices, turning it from a workflow to an agentic system.
Let’s look at the code now:
from typing import TypedDict, Annotated, List
from langgraph.graph import StateGraph, START, END
from langgraph.graph.message import add_messages
from langchain_openai import ChatOpenAI
from langchain_core.messages import HumanMessage, AIMessage
# Defining the stateclassState(TypedDict):
messages: Annotated[List, add_messages]
llm = ChatOpenAI(model="gpt-4o-mini")defanswer_node(state: State):# Normal answer using the whole chat history.return{"messages":[llm.invoke(state["messages"])]}defclarify_node(state: State):# LLm asking for a short follow-up to get enough detail (clarifying)return{"messages":[AIMessage(content="Could you share a bit more so I can be precise?")]}# Router functiondefroute(state: State):# Look for the latest human message and count words.
last_human =next((m for m inreversed(state["messages"])if m.type=="human"),None)ifnot last_human:return"clarify"
words =len(str(last_human.content).split())return"answer"if words >=3else"clarify"
graph = StateGraph(State)
graph.add_node("answer", answer_node)
graph.add_node("clarify", clarify_node)# Adding a conditional edge to connect the router function
graph.add_conditional_edges(START, route,{"answer":"answer","clarify":"clarify"})
graph.add_edge("answer", END)
graph.add_edge("clarify", END)
app = graph.compile()# Compiling the graphPowered by
Most of this is similar to the first agent, except for the conditional edge. This allows us to provide the system with different potential routes based on the LLM’s judgment. Visually speaking, the system looks like this:
With the power of conditional edges, we can build pretty robust agentic systems with our current knowledge. If you want a more comprehensive tutorial, I recommend checking out my LangGraph video tutorial.
Recently, there has also been this new addition to LangGraph called LangGraph Studio, and I highly recommend this LangGraph Studio guide on it.
What is LangFlow?
Although LangChain and LangGraph are the two libraries most developers reach for in the Lang family, I believe it is worth briefly discussing LangFlow as well.
Think of LangFlow as a drag-and-drop canvas for LLM apps. Each node = one step (prompt, model, tool, retriever, vector DB, file op, etc.). We connect nodes into a flow, then run it, export it, or deploy it. It’s great for quick iteration and especially good for collaborating with non-coders as well as for turning ideas into working agents fast.
Now, yes, it is not as advanced as LangGraph and LangChain when it comes to building agents; however, there are some reasons to use it:
Visual builder to sketch flows quickly
Gives non-coders the ability to create agentic systems
Runs everywhere: web, and now LangFlow Desktop for local development
Export/import flows as JSON and for serving as APIs
Great for teaching, workshops, and quick prototypes without heavy coding
Export to code: hand off to engineers when stable.
I am going to assume that you are in fact a non-coder, so really, you should use LangFlow when you are exploring architecture options (RAG variants, tool use, etc) and want to compare quickly or you need to communicate designs visually to stakeholders.
To learn more about LangFlow and complete a project such as building a Tutor, I would highly recommend this LangFlow guide with demo project.
What is LangSmith?
The last library I want to cover is LangSmith. LangSmith is the observability + evals layer for LLM apps. It gives us tracing (basically allowing us to see every step, tool call, token, error), evaluation (datasets, automated & human-in-the-loop scoring) and for monitoring/alerts (track drift, regressions). An example of what a trace in LangSmith is can be seen below:
There are lots of reasons why developers might use LangSmith:
Visual prototyping, stakeholder reviews, and exporting to LangChain code
Final Thoughts
Now we have covered and compared these 4 libraries in quite a lot of depth, but obviously there is a lot more to learn to become an advanced AI Engineer with these libraries. Therefore, I highly recommend courses such as RAG Systems with LangChain and building Agentic Systems with LangChain.
LangChain vs LangGraph FAQs
What’s the main difference between LangChain and LangGraph?⌄
LangChain is great for simple linear workflows whereas LangGraph is a graph-based layer for complex, stateful, branching/looping flows with robust control.
Do I need LangChain to use LangGraph?⌄
LangGraph builds on the LangChain ecosystem (models, tools, memory). Typically, we use them together with LangGraph handling orchestration.
When should I add LangSmith?⌄
As soon as we move past quick experiments. LangSmith gives tracing, debugging, evaluation and analytics for both chains and graphs.
Is LangFlow required?⌄
No, it is optional, but it is helpful for visual prototyping and teaching, or for non-coders.
Which is better for multi‑agent systems?⌄
LangGraph. Its state and control-flow ability makes multi‑agent coordination and recovery strategies much easier to manage, although there is a steeper learning curve.
Compare LangChain and LlamaIndex to discover their unique strengths, key features, and best use cases for NLP applications powered by large language models.
LangGraph is a library within the LangChain ecosystem that provides a framework for defining, coordinating, and executing multiple LLM agents (or chains) in a structured and efficient manner.
LangChain is a framework for including AI from large language models inside data pipelines and applications. This tutorial provides an overview of what you can do with LangChain, including the problems that LangChain solves and examples of data use cases.
Learn how CrewAI, LangGraph, and AutoGen approach multi-agent AI. Explore their differences in workflows, memory, scalability, and collaboration to discover which fits your needs best.
LangGraph Studio is a visual development environment for LangChain’s LangGraph framework, simplifying the development of complex agentic applications built with LangChain components.










This article gives a formal, side-by-side comparison of LangChain vs LangGraph, as well as where LangSmith and LangFlow fit. We will be building on concepts covered in other DataCamp articles and we will discuss when to choose each framework to ship production-ready, agentic AI systems. If you’re looking for a practical start to LangChain, I recommend the Developing LLM Applications with LangChain course.
TL;DR
Before diving into the details, here’s a quick overview of how LangChain, LangGraph, LangSmith, and LangFlow fit together and when you might choose each.
Quick heuristic: Start with LangChain, move to LangGraph as workflows grow, add LangSmith for observability, use LangFlow when you need fast iteration or collaboration.
Introduction to LangChain and LangGraph
Large language models (LLMs) are great at single prompts. This is pretty much common knowledge at this point, seeing as we use these models so often nowadays.
However, real applications need workflows: fetch data, reason, call tools, ask a follow‑up, retry on failure, and sometimes pause for a human. Thus, there are two such frameworks you will hear again and again: LangChain and LangGraph. They live in the same ecosystem and often work together, but they solve different parts of the problem:
Speaking of ecosystem, we will also be discussing LangSmith (which is for observability/evaluation tasks) and LangFlow (which is a drag‑and‑drop visual builder), since they are also part of this ecosystem.
A Brief History of the LangChain Ecosystem (2022–2025)
I believe it makes sense to start with a bit of history around the LangChain ecosystem; it’s become the go-to framework for agentic AI, and knowing how it got here will make it easier to see why LangGraph, LangSmith, and LangFlow matter.
Brief introduction to LangChain and LangGraph
Let’s now start to dive deep into the core ecosystem, starting off with LangChain and LangGraph.
LangChain is a modular framework for building LLM‑powered applications. It gives us building blocks - prompts, models, memory, tools, retrievers - and a simple way to chain them into a pipeline using its Runnable/LCEL APIs (we will discuss this shortly). I like to think of it as a kit of Lego bricks for common LLM patterns such as RAG, question‑answering, chatbots, and tools‑using agents.
LangGraph is a newer, graph‑based orchestration layer built on LangChain components. Instead of one straight line of steps, the app is modelled as nodes (i.e., the actions) and edges (i.e., the transitions), with an explicit state object flowing through the graph. We will discuss this in more depth, but for now, remember that this design makes it natural to branch (take different paths), loop (ask clarifying questions until confident), retry (on tool/model errors), and pause for human review; exactly what we need for long‑running, production‑grade agents.
Now you can have a question here:
“Why even compare them?”
Here is the thing: although they share components, they target different complexity levels:
In practice, many developers start with LangChain to validate an idea, then upgrade to LangGraph as they add branching, error handling, multi‑agent coordination, or durability.
What is LangChain?
Now, we are going to go in-depth into LangChain, understand its usage, and code applications in it. Once again, note that LangChain is a library that allows us to build a foundation for sequential LLM workflows.
LCEL
To start, I want to explain what LCEL is. LCEL or LangChain Expression Language is just a way to connect blocks together with pipes (|). Each block can be a prompt, a model, a retriever or a parser. When we join them, we get a chain that we can run again and again, making writing code much more efficient.
Let’s go through some examples.
In my opinion, the above code cell shows the simplest way to use LCEL. We first made a prompt template that always includes a system message (“you are concise”) and leaves space for a human question. The system message is like an instruction to the LLM which tells it to respond/act in a specific way. We then connected this template to an OpenAI model - GPT-4o-mini.
Lastly, I added an output parser, which basically converts the response into plain text.
Now here comes the most important part: The | operator is what glues these blocks together into one pipeline.
I also want to talk about
invoke()andbatch(). When we callchain.invoke(...), the pipeline runs once, meaning the template fills in the question, the model generates an answer, and the parser returns clean text.However, when we call
chain.batch(...), the same chain runs on many inputs at once, which is much faster than looping one by one. In practice, this makes it easy to go from a simple, single call to handling whole datasets with almost no extra code.I want to showcase another example here:
This code is quite similar to the first once but instead of just calling it once, we use streaming. With
.stream(...), the model does not wait until the whole answer is ready. Instead, it sends chunks of text as they are generated, and we print them in real time.The main thing I want you to take away from this subsection is that LCEL is the simple “pipes and blocks” system that lets us snap prompts, models, tools, and parsers together and instantly gives us a chain we can run, batch, or stream without extra code.
Structured outputs using Pydantic
Structured outputs is a vital component of AI agents. It means that instead of our agent giving a long messy text, it gives the answer in a clear format like JSON, tables or lists. This makes it easier for computers and people to read, use and connect with other tools.
One of the main frameworks which are used in industry for this is Pydantic.
In this example, the method
.with_structured_output()is the important part, as it tells the LLM to give the output in the Pydantic model form we had created. Behind the scenes, LangChain makes sure our agent’s answer is real JSON that matches the form, and then turns it into a Python object you can use straight away.So instead of messy text, we get something like
TaskPlan(title="...", steps=["...", "...", "..."]). This is especially useful when we use Tools.Tool calling in LangChain
Tools are important because they extend our LLM’s capability by being able to complete tasks that it was incapable of doing before, such as searching the internet.
The thing I like most about tools, however, is that Langchain (and many of these agentic frameworks) provide ready-made tools called Built-In Tools that are quite easy to use. Moreover, we can also create our own tools by using a decorator
@tool, which tells LangChain that this function is a special kind of function.In the above code cell, you can see that I have created a very simple tool, which takes in two numbers and returns their product. To give the internal model (in this case GPT-4o-mini) access to such tools, we use the method
llm.bind_tools()and pass in the list of tools, exposing the tools to the model.Conversational memory
Memory is also quite vital when building AI agents. AI agents with memory can remember things from past conversations, like what we asked before, our preferences, or what worked or didn’t work. Without memory, every time feels like meeting someone brand new — we would have to repeat basic context again and again, which is quite cumbersome.
In LangChain, memory means saving past messages or facts in a store (in memory, database, or vector store). Then when the agent runs again, it can pull in that memory so the responses feel consistent and smarter.
There are two main kinds: short-term memory (recent messages in the same chat) and long-term memory (facts or preferences remembered across many sessions). Note that a session is a single conversation or interaction window, where our agent keeps track of what has been said until it ends.
Short-term keeps context during a single conversation, while long-term makes the agent feel more personal and helpful over time.
In the above cell, the code first creates a chat chain that can remember past messages in a session. The prompt has a history placeholder, and
RunnableWithMessageHistoryautomatically fills it with the right conversation each time. The store keeps histories for different sessions.It is important to note, we should use memory carefully. We need to decide and write code for what is worth keeping, when to store it, and how much to pass back into the prompt. Here’s the thing, too much memory can slow things down or overflow limits, but the right balance makes our agents much more useful.
What is LangGraph?
We now move to the other agentic framework - LangGraph.
To explain LangGraph simply, I am going to use an analogy: the Backpack Flowchart Analogy.
We can think of LangGraph as a small flowchart for our AI app. Each box (called a node) is just a tiny Python function that does one job. The arrows (edges) say which box runs next. A little backpack of data (the “state”) moves through the flowchart, so each node can read it and add to it. For example, in a chat app, the backpack is usually the running list of messages.
Fundamental graph
This will make more sense if we go through an example together:
Let’s walk through the code now. Here, we are building the simplest possible LangGraph app. The state is like a backpack, carrying messages through the graph. We define it with
State,which tells LangGraph to always keep a running list of chat messages.Then comes the node, that is just a single function here,
model_node, which looks inside the backpack, sends the messages to the LLM, and returns the reply. LangGraph then automatically adds this reply back into the backpack.The graph itself is a tiny flowchart:
START → model → END. When we compile it, LangGraph turns this drawing into a runnable app.Finally, we run the app (not the graph - but rather the compiled graph) with a backpack that already contains a human message.
To help build your visual understanding, we can run this code to view the graph:
Please note, though, just because the visualization is produced, does not mean that the graph will run! There might be some logical errors which need to be taken care of first.
Branching graph
Let’s advance further, towards Branching, an important (but easy) component of any robust Agentic system. It allows our agents more freedom to make choices, turning it from a workflow to an agentic system.
Let’s look at the code now:
Most of this is similar to the first agent, except for the conditional edge. This allows us to provide the system with different potential routes based on the LLM’s judgment. Visually speaking, the system looks like this:
With the power of conditional edges, we can build pretty robust agentic systems with our current knowledge. If you want a more comprehensive tutorial, I recommend checking out my LangGraph video tutorial.
Recently, there has also been this new addition to LangGraph called LangGraph Studio, and I highly recommend this LangGraph Studio guide on it.
What is LangFlow?
Although LangChain and LangGraph are the two libraries most developers reach for in the Lang family, I believe it is worth briefly discussing LangFlow as well.
Think of LangFlow as a drag-and-drop canvas for LLM apps. Each node = one step (prompt, model, tool, retriever, vector DB, file op, etc.). We connect nodes into a flow, then run it, export it, or deploy it. It’s great for quick iteration and especially good for collaborating with non-coders as well as for turning ideas into working agents fast.
Now, yes, it is not as advanced as LangGraph and LangChain when it comes to building agents; however, there are some reasons to use it:
I am going to assume that you are in fact a non-coder, so really, you should use LangFlow when you are exploring architecture options (RAG variants, tool use, etc) and want to compare quickly or you need to communicate designs visually to stakeholders.
To learn more about LangFlow and complete a project such as building a Tutor, I would highly recommend this LangFlow guide with demo project.
What is LangSmith?
The last library I want to cover is LangSmith. LangSmith is the observability + evals layer for LLM apps. It gives us tracing (basically allowing us to see every step, tool call, token, error), evaluation (datasets, automated & human-in-the-loop scoring) and for monitoring/alerts (track drift, regressions). An example of what a trace in LangSmith is can be seen below: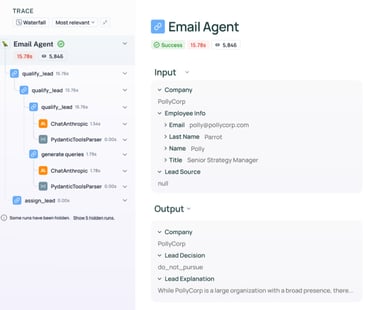
There are lots of reasons why developers might use LangSmith:
For more information about LangSmith, I highly recommend this detailed introduction to LangSmith and the LangSmith Agent Builder tutorial.
LangChain vs LangGraph vs LangSmith vs LangFlow
In this section I want to compare all four of these libraries so you are fully clear as to what they are and when to use them.
What they are
Primary components
Workflow structure
State management
Control flow
Ease of use
Best for
When you use which
Comparison table
In the table below, you can find the comparison of LangChain vs LangGraph vs LangSmith vs LangFlow:
Category
LangChain
LangGraph
LangSmith
LangFlow
What they are
Framework for building LLM apps from modular pieces (prompts, models, tools, memory).
Orchestrator for complex, stateful workflows (branching, looping, persistence) on top of LangChain.
Framework-agnostic observability, evaluation, and testing platform for LLM apps.
Visual drag-and-drop editor to design and prototype flows.
Primary components
Chains, Runnables, LCEL
Nodes, edges, state, routers, checkpointers, tools
Traces, runs, datasets, evaluators, projects
Canvas with components (loaders, LLMs, retrievers, tools) + connections
Workflow structure
Linear or DAG, mostly forward-only
Full graph with cycles, branching, looping, pauses
Not an execution framework; wraps runs for logging & evaluation
Visual graph, exportable to LangChain code
State management
Implicit or component-local
Central, explicit state threaded through nodes; supports persistence & checkpointing (e.g. chat memory).
Stores run metadata, inputs/outputs, metrics, feedback
Component configurations saved in JSON flow
Control flow
Limited branching/retry primitives
First-class support for conditionals, retries, human-in-the-loop
None (focus is on evaluation, not execution)
Visual branching; semantics depend on exported backend
Ease of use
Simple APIs
Steeper learning curve
Very easy to enable (env variables)
Easiest to start visually; team-friendly for workshops & non-coders
Best for
Prototyping, linear logic, quick apps
Resilient, complex, long-running or multi-agent apps
Observability, debugging, regression tests, A/B evaluations
Visual prototyping, stakeholder reviews, and exporting to LangChain code
Final Thoughts
Now we have covered and compared these 4 libraries in quite a lot of depth, but obviously there is a lot more to learn to become an advanced AI Engineer with these libraries. Therefore, I highly recommend courses such as RAG Systems with LangChain and building Agentic Systems with LangChain.