
Kurs
KI-Agenten mit dem Google ADK entwickeln
1 Std.
6.5K
Right now, AI agents browse the web the way a tourist reads a foreign menu: squinting at pixels, guessing what buttons do, and hoping the page doesn't change layout mid-click. Google and Microsoft decided the problem was worth solving properly.
In February 2026, Chrome 146 shipped an early preview of WebMCP, a proposed web standard that lets websites tell agents exactly what they can do and how to do it.
No more screen-scraping.
No more reverse-engineering the DOM.
In this tutorial, I want to walk you through what WebMCP actually is, how to set up your environment, and then build working integrations using both the HTML-based and JavaScript-based approaches.
I will also cover safety tips for handling agent invocations, plus how to test everything with Chrome's debugging tools.
WebMCP (Web Model Context Protocol) is a new browser standard that lets websites declare their capabilities as structured tools that AI agents can call directly. Instead of forcing an AI to "read" and click through a visual interface, WebMCP turns the webpage itself into a clean, client-side API.
Let’s think about what happens when an agent tries to book a flight on a travel site today. It has to figure out which field expects the departure city, guess whether the date format is MM/DD or YYYY-MM-DD, locate the search button, and hope the page does not reload into a layout it has never seen before. If the site could instead publish a tool called searchFlights with typed parameters for origin, destination, dates, and passenger count, all of that guessing disappears.
WebMCP makes that possible. A site registers tools through a browser API called navigator.modelContext, where each tool comes with a name, a natural language description, and a JSON schema for its inputs and outputs. The agent discovers those tools, sends parameters that match the schema, and receives structured data in return.
Engineers at Google and Microsoft built the spec together under the W3C Web Machine Learning community group. The architecture is purely client-side, which sets it apart from typical MCP deployments where a separate backend server handles tool execution. Where standard MCP connects agents to backend servers over JSON-RPC, WebMCP keeps everything in the browser tab.
Tools execute in the page's JavaScript; they share whatever session the user already has, and the browser mediates what the agent is allowed to do. If you have worked with MCP servers before (for instance, in our MCP Model Context Protocol tutorial), the tool registration concepts will look familiar, but the deployment model is quite different.
Two APIs are available, and they serve different purposes:
toolname and tooldescription attributes to a <form> element, along with optional toolparamdescription on individual fields, and the browser generates a JSON schema from the existing form structure. Sites that already have well-built forms need very few changes to become agent-accessible.navigator.modelContext.registerTool() and define the tool name, description, input schema, and an execute callback. This is the path for anything too dynamic for a plain form: multi-step workflows, API calls, computed results, and custom validation logic.Both APIs allow dynamic registration, meaning tools can appear and disappear as the page state changes. Before a user logs in, you might expose only a login tool. After authentication, the account-specific tools get registered.
:tool-form-active to any form that an agent is currently filling, and :tool-submit-active to that form's submit button. The human watching the screen can see exactly which form the agent is working on.There is no built-in discovery mechanism yet. An agent has to visit your page before it can learn what tools you offer. The Chrome team has discussed the idea of a .well-known/webmcp manifest file that would allow pre-visit discovery, but nothing along those lines has been specified.
Because WebMCP is still in early preview, you should expect some rough edges and ongoing changes, especially since the specification has already evolved across versions, including the removal of the provideContext and clearContext methods in March 2026.
Tool discoverability is limited to pages you have already visited, and security concerns like prompt injection and data exfiltration through tool chaining are acknowledged in the spec but not fully resolved yet. You can check the changelog in the Chrome documentation before starting, as the API surface may have shifted since this tutorial was written.
Getting the environment right takes a few minutes, though the wrong Chrome version will waste considerably more time than that.
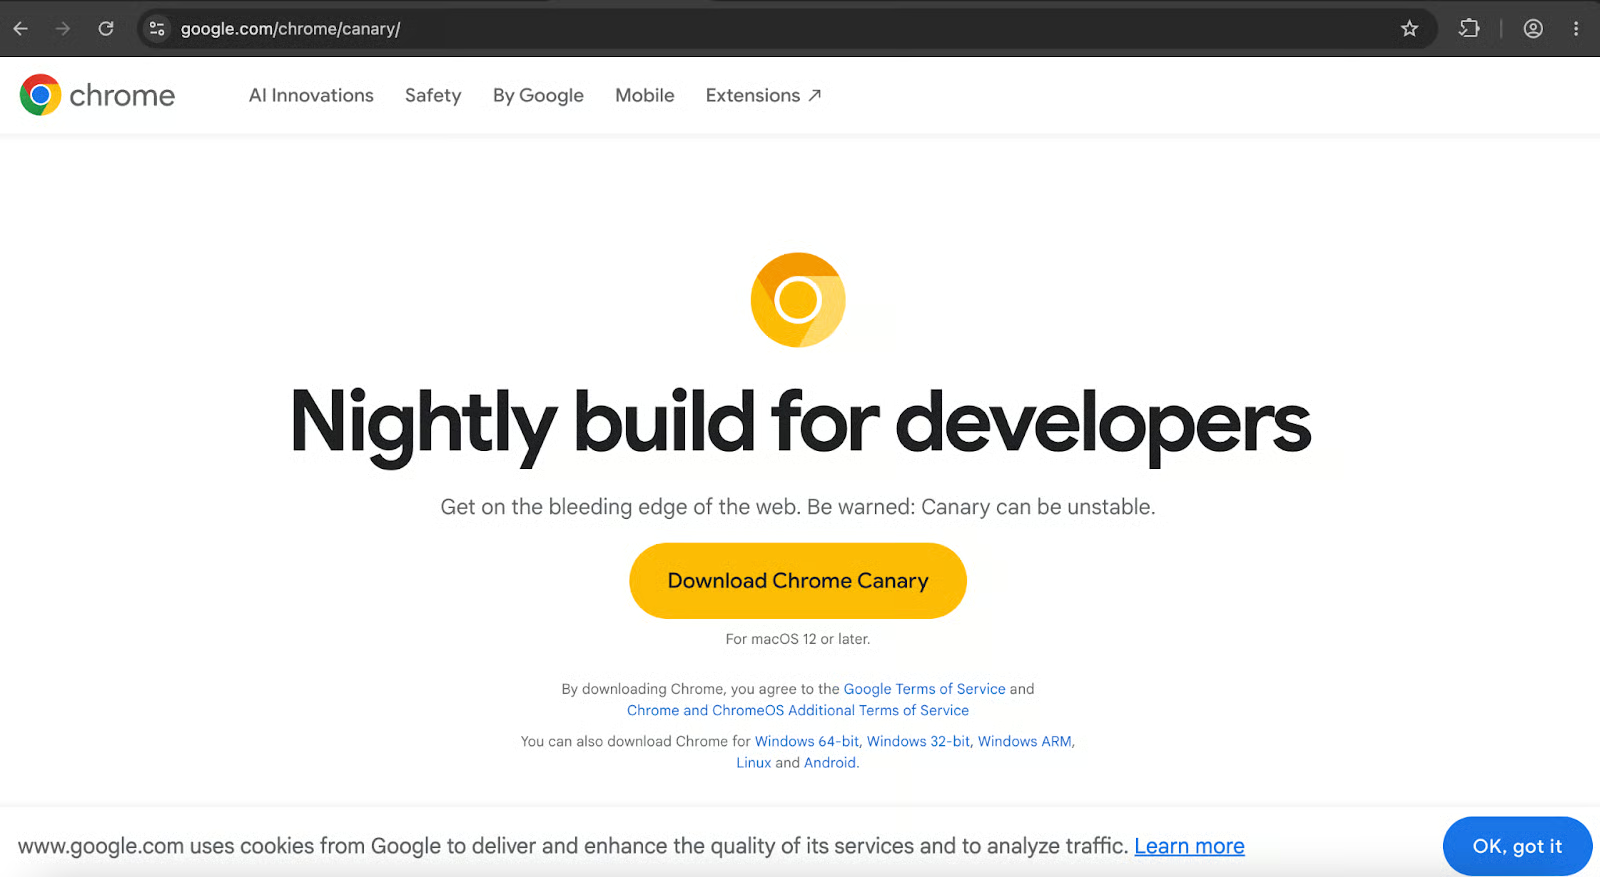
Chrome Canary version 146.0.7672.0 or higher is required. The stable release, Beta, and Dev channels of Chrome do not ship with the WebMCP flag. Several developers in the Chrome forums have written about installing the wrong version and spending time wondering why the flag was missing. Download specifically from the Canary page.
Beyond the browser, you need a working knowledge of HTML forms and JavaScript event handling. If you need a refresher, DataCamp's Introduction to JavaScript course covers the fundamentals.
The Model Context Tool Inspector Extension is not strictly required, but is worth installing. It lists all registered tools on the current page, lets you execute them manually with parameters you type in, and has built-in Gemini API support for testing tool invocation with natural language.
With Chrome Canary installed:
chrome://flags/#enable-webmcp-testing in the address bar.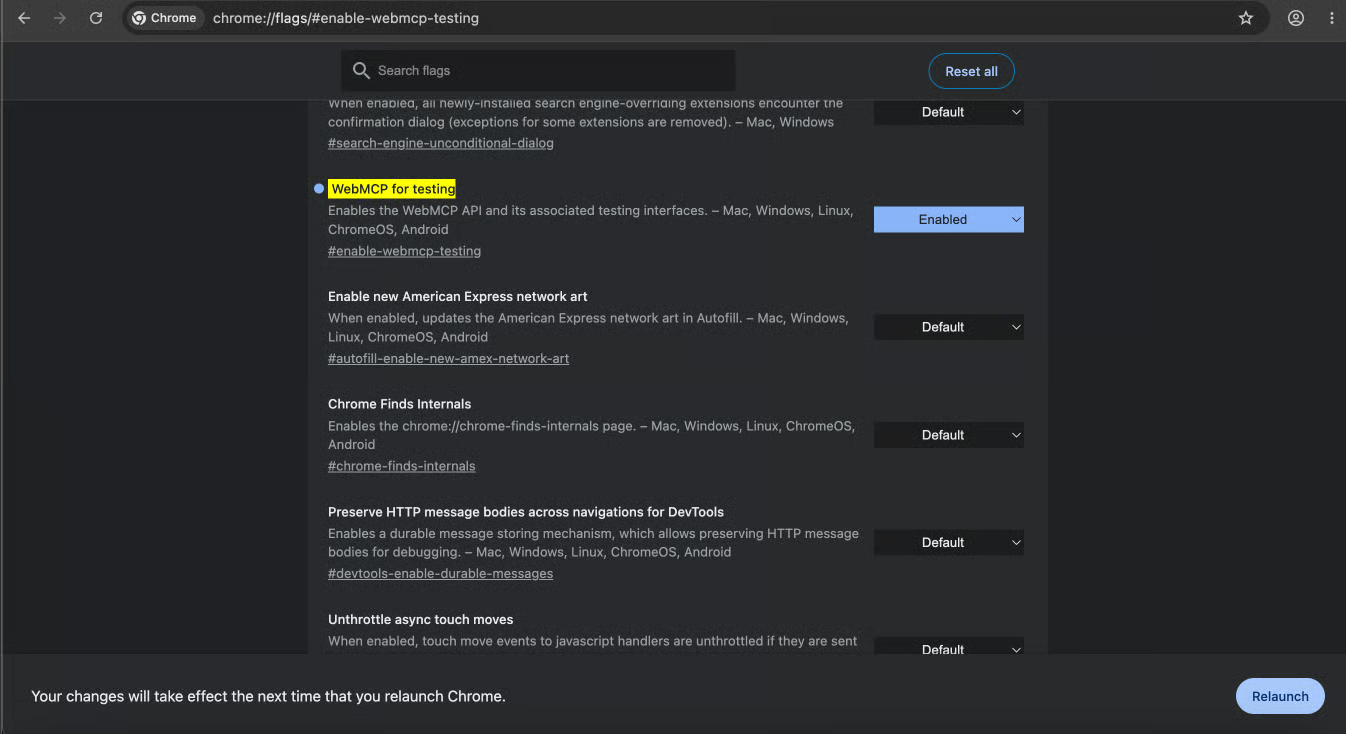
The chrome://flags page with the WebMCP flag highlighted and set to Enabled
After relaunch, open DevTools (F12), go to the Console tab, and run:
console.log(navigator.modelContext);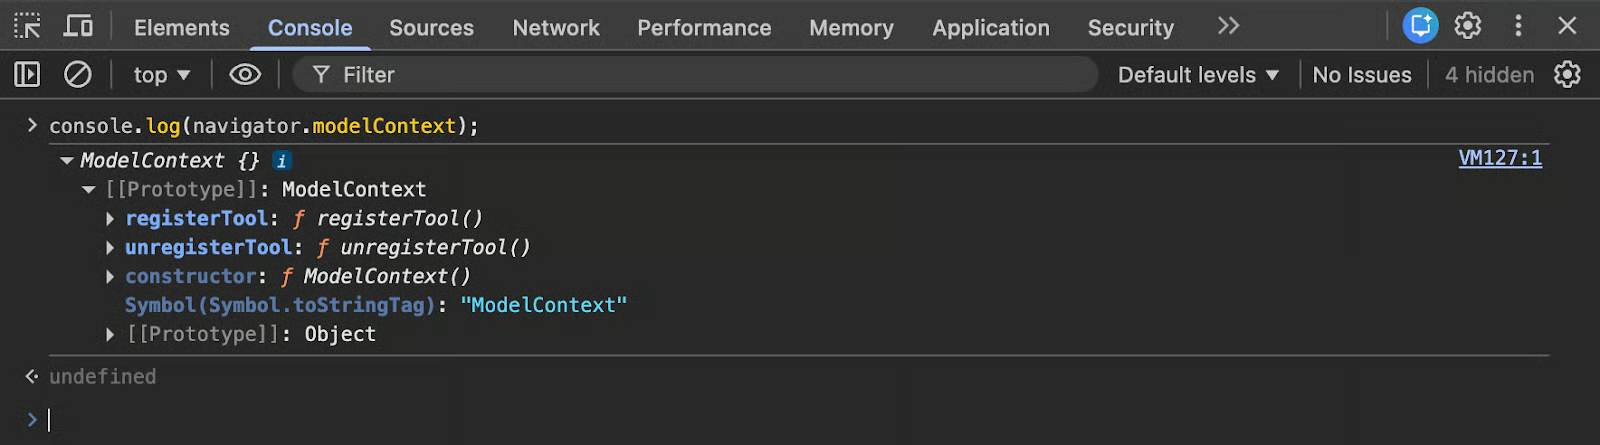
DevTools console showing the navigator.modelContext object.
An object in the output (rather than undefined) confirms the API is available. From here, you can install the Model Context Tool Inspector Extension and open Google's travel demo to see tool registration working on a real page.
There, you can simply launch the extension, and you should see something like the following:
Checking the searchFlights tools using the Model Context Tool Inspector extension from Chrome with the Flight Search demo website from Google.
As you can see, the Model Context Tool Inspector detects the searchFlights tool and exposes its input schema, giving the model a much clearer understanding of how to interact with the page.
There are two ways you can build your first WebMCP integration, and we outline both in the sections below:
The simplest way to register a WebMCP tool is to annotate a form that already exists on your page. Here is a standard product search form with no WebMCP annotations:
<form action="/search" method="GET">
  <label for="query">Search term</label>
  <input type="text" name="query" id="query" required>

  <label for="category">Category</label>
  <select name="category" id="category">
    <option value="all">All categories</option>
    <option value="electronics">Electronics</option>
    <option value="books">Books</option>
    <option value="clothing">Clothing</option>
  </select>

  <button type="submit">Search</button>
</form>
Four attributes turn this into an agent-callable tool. toolname and tooldescription go on the <form> tag itself. On individual fields, toolparamtitle and toolparamdescription override the default labels when those labels are not descriptive enough for an agent to understand:
<form toolname="search_products"
      tooldescription="Search the product catalog by keyword and optional category filter"
      action="/search" method="GET">

  <label for="query">Search term</label>
  <input type="text" name="query" id="query" required
         toolparamdescription="The keyword or phrase to search for in product titles and descriptions">

  <label for="category">Category</label>
  <select name="category" id="category"
          toolparamtitle="Product Category"
          toolparamdescription="Filter results to a specific product category. Use 'all' for no filter.">
    <option value="all">All categories</option>
    <option value="electronics">Electronics</option>
    <option value="books">Books</option>
    <option value="clothing">Clothing</option>
  </select>

  <button type="submit">Search</button>
</form>
What the browser does with those attributes is generate a JSON schema internally. The tool name, the parameter types, the enum values from <select> options, and the required markers from HTML all carry over without any additional configuration.
To test it, create a simple .html file on your local machine with any text editor, paste in the code above, and open it in Chrome using file:///{your_document_path.html}; to make the extension work with the local file, you also need to open the extension settings, go to Details, and enable access to file URLs, as shown in the screenshot below.
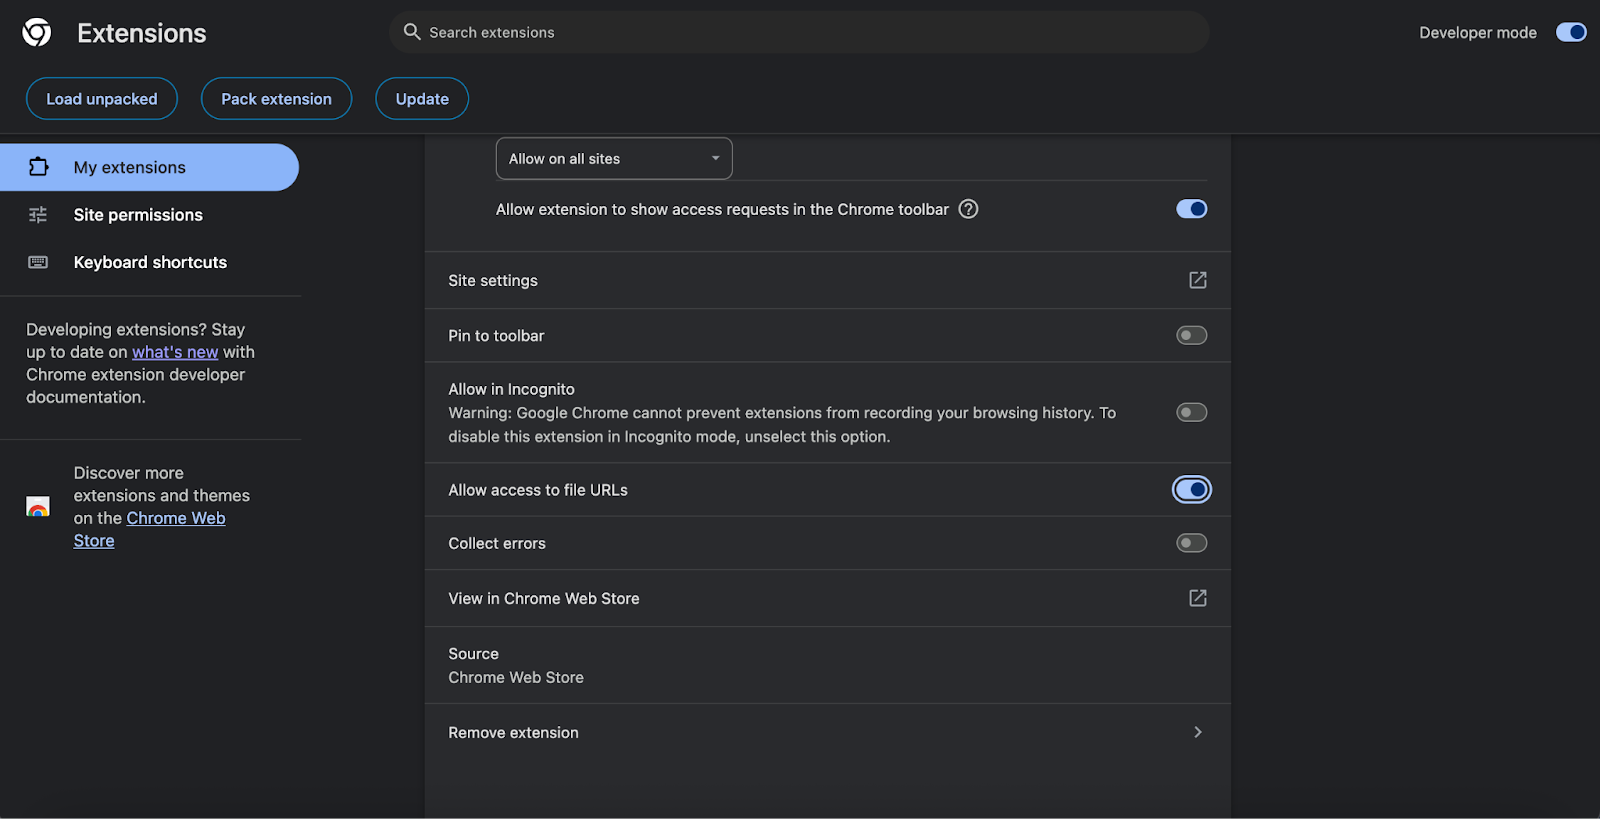
Allowing the extension to access local files.
Otherwise, your browser won’t be able to interact with your local HTML file. Once this is done, if you open the file with your Chrome and check the WebMCP extension, you should see something like the following screenshot.
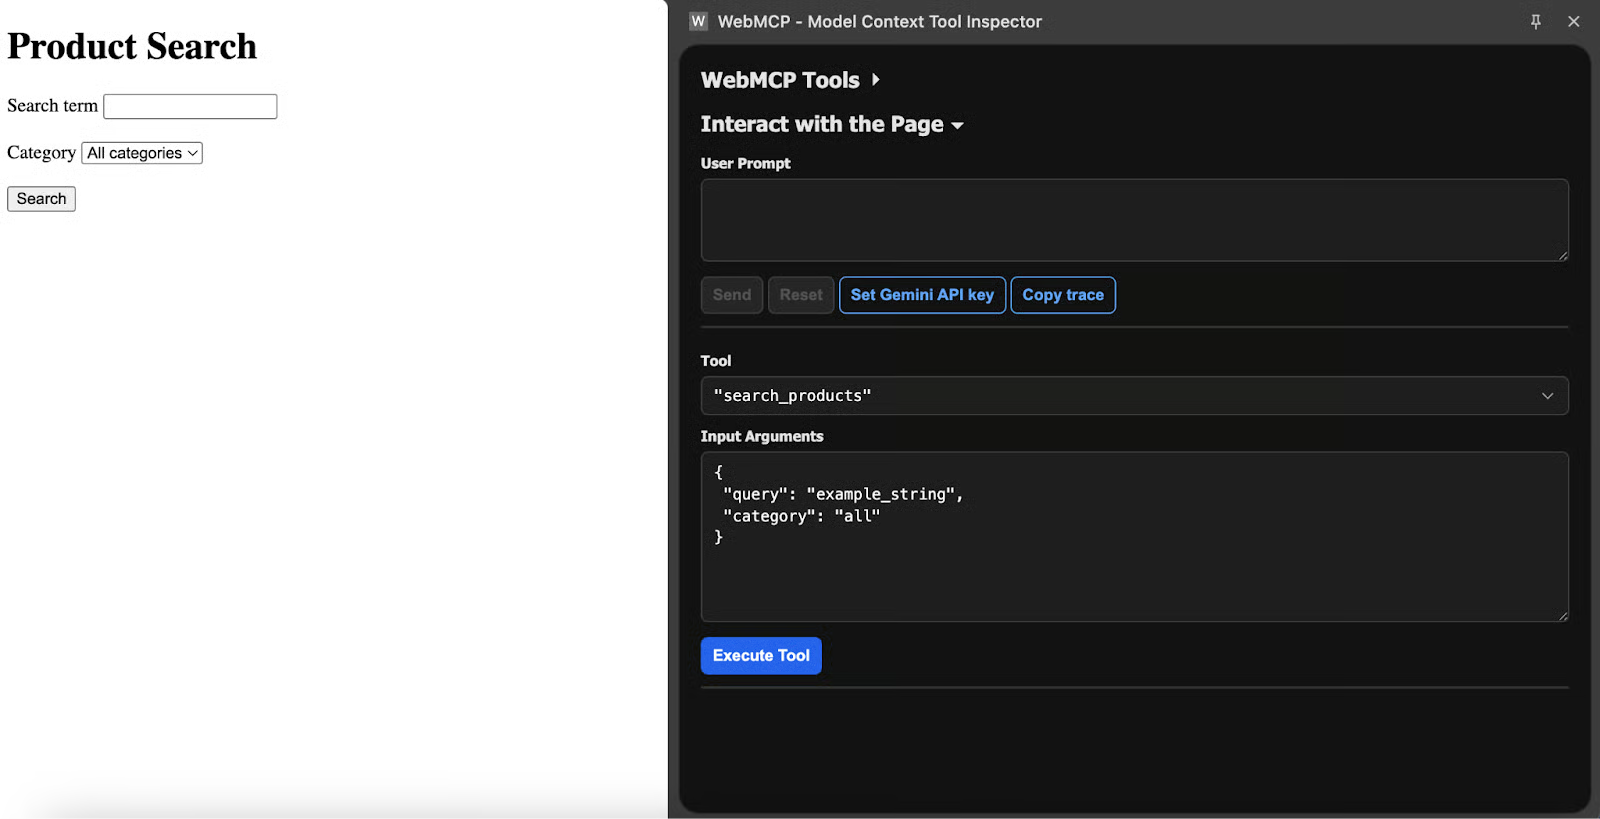
The extension showing the generated schema for the search_products tool after adding the annotations.
So what actually happens when an agent calls this tool?
Chrome focuses the form, populates the fields with whatever values the agent supplied, and stops there. The user still has to click Submit. That default exists by design, because the human should confirm the action before it goes through.
Adding the toolautosubmit attribute to the form tag removes that confirmation step. It makes sense for read-only operations like search queries. For anything that modifies data, triggers a purchase, or changes account settings, leave it off.
There is also a way to intercept the submission and send a structured result back to the agent. The respondWith() method on the submit event takes a promise, and whatever you resolve it with becomes the tool's output:
<form toolname="search_products"
      tooldescription="Search the product catalog"
      toolautosubmit
      action="/search">
  <input type="text" name="query" required>
  <button type="submit">Search</button>
</form>

<script>
  document.querySelector("form").addEventListener("submit", (e) => {
    e.preventDefault();

    const query = new FormData(e.target).get("query");

    if (!query || query.trim().length === 0) {
      if (e.agentInvoked) {
        e.respondWith(Promise.resolve({
          error: "Search query cannot be empty. Please provide a keyword."
        }));
      }
      return;
    }

    const results = performSearch(query);

    if (e.agentInvoked) {
      e.respondWith(Promise.resolve({
        content: [{ type: "text", text: JSON.stringify(results) }]
      }));
    }
  });
</script>
That agentInvoked boolean on the submit event is true when an agent triggered the submission and false for a regular human click. You can use it to branch between agent-specific response formatting and your normal form handling.
When no toolparamdescription is present on a field, the browser pulls the description from the associated <label> element, or failing that, from the aria-description attribute. So accessible markup already provides reasonable parameter descriptions without any extra work.
One current quirk: for a group of <input type="radio"> elements, toolparamdescription has to go on the first radio button in the group, and it applies to the entire parameter.
Forms cover a lot of ground, but some tools need to work with application state, make API calls, or return computed results that do not map to a traditional form submission. Here is a basic tool that adds items to a to-do list:
window.navigator.modelContext.registerTool({
  name: "addTodo",
  description: "Add a new item to the user's to-do list. Use when the user asks to create, add, or remember a task.",
  inputSchema: {
    type: "object",
    properties: {
      text: {
        type: "string",
        description: "The task description"
      },
      priority: {
        type: "string",
        enum: ["low", "medium", "high"],
        description: "Task priority level. Default to 'medium' if not specified by the user."
      }
    },
    required: ["text"]
  },
  execute: ({ text, priority = "medium" }) => {
    const newItem = { id: Date.now(), text, priority, done: false };
    todoApp.addItem(newItem);
    todoApp.renderList();

    return {
      content: [{
        type: "text",
        text: Added task: "${text}" with ${priority} priority. The to-do list now has ${todoApp.getCount()} items.
      }]
    };
  }
});
The execute callback receives the parameters the agent sent (which should match the inputSchema), runs your application logic, and returns a content array.
One detail that matters: update the UI before returning.
Agents sometimes check what the page looks like after a tool call to verify it worked, so if the UI has not changed yet, the agent may assume the call failed. You can register and unregister tools as the page state evolves:
function onUserLogin(user) {
  navigator.modelContext.registerTool({
    name: "viewOrderHistory",
    description: "Show the user's past orders with dates and totals",
    inputSchema: {
      type: "object",
      properties: {
        limit: {
          type: "number",
          description: "Maximum number of orders to return. Defaults to 10."
        }
      }
    },
    execute: async ({ limit = 10 }) => {
      const orders = await fetchOrders(user.id, limit);
      return {
        content: [{ type: "text", text: JSON.stringify(orders) }]
      };
    }
  });
}

function onUserLogout() {
  navigator.modelContext.unregisterTool("viewOrderHistory");
}
A more realistic scenario: a restaurant reservation page that checks table availability. This example also demonstrates in-code validation, which the Chrome documentation recommends because schema constraints are helpful for agents but not enforced by every one of them.
navigator.modelContext.registerTool({
  name: "checkAvailability",
  description: "Check table availability for a given date and party size at this restaurant. Returns available time slots.",
  inputSchema: {
    type: "object",
    properties: {
      date: {
        type: "string",
        description: "The desired reservation date in YYYY-MM-DD format"
      },
      partySize: {
        type: "number",
        description: "Number of guests, between 1 and 12"
      }
    },
    required: ["date", "partySize"]
  },
  execute: async ({ date, partySize }) => {
    if (partySize < 1 || partySize > 12) {
      return {
        content: [{
          type: "text",
          text: "Party size must be between 1 and 12. For larger groups, please call the restaurant directly at (555) 123-4567."
        }]
      };
    }

    const parsedDate = new Date(date);
    if (isNaN(parsedDate.getTime()) || parsedDate < new Date()) {
      return {
        content: [{
          type: "text",
          text: "Please provide a valid future date in YYYY-MM-DD format."
        }]
      };
    }

    const slots = await api.getAvailableSlots(date, partySize);
    renderAvailabilityCalendar(date, slots);

    return {
      content: [{
        type: "text",
        text: JSON.stringify({
          date,
          partySize,
          availableSlots: slots.map(s => s.time),
          message: slots.length > 0
            ? Found ${slots.length} available time slots.
            : "No availability for this date. Try a different date or smaller party."
        })
      }]
    };
  }
});
A few points from the Chrome documentation are worth highlighting. Accept raw user input whenever possible. If someone says "11:00 to 15:00," your tool should take those strings directly rather than requiring the agent to convert them into minutes-from-midnight or some other internal format.
Validate in code, not just in the schema, because schema enforcement varies across agents. And return only after the UI has been updated, since agents may look at the page to confirm the operation went through.
For server-side MCP tools that would complement a client-side WebMCP implementation, our guide on building MCP servers with FastMCP covers the setup in detail.
The WebMCP specification assumes a human is watching. The authors at Google and Microsoft designed it around cooperative workflows, not autonomous operation. The mechanisms below reflect that philosophy.
A new boolean property called agentInvoked appears on the SubmitEvent interface. When an agent triggers a form submission, the property is true. When a person clicks Submit normally, it is false.
document.querySelector("form").addEventListener("submit", (e) => {
  if (e.agentInvoked) {
    console.log("AI agent submitted the form");
    if (!isWithinAgentRateLimit()) {
      e.preventDefault();
      e.respondWith(Promise.resolve({
        error: "Too many requests. Please wait before trying again."
      }));
      return;
    }
  }
});
Beyond form submissions, there are two window-level events that track agent activity. toolactivated fires after an agent invokes a tool, and Chrome pre-fills the associated form fields. toolcancel fires if the user cancels the operation or resets the form.
Neither event is cancelable, but both carry a toolName property so you know which tool was involved.
window.addEventListener("toolactivated", ({ toolName }) => {
  showAgentActivityBanner(toolName);
});

window.addEventListener("toolcancel", ({ toolName }) => {
  hideAgentActivityBanner();
});With declarative tools, the default behavior is that the human has to click Submit after the agent fills in the fields. That default should stay in place for anything with real consequences.
The toolautosubmit attribute removes that step. It belongs on read-only or low-risk tools: search queries, availability lookups, status checks.
Anything that creates, modifies, or deletes data should require a manual click.
You can style the agent interaction state with CSS pseudo-classes:
form:tool-form-active {
  border: 2px solid #2563eb;
  background-color: #eff6ff;
  font-style:normal;font-variant:normal;text-decoration:none;vertical-align:baseline;white-space:pre;white-space:pre-wrap;">1rem;
  border-radius: 8px;
}

form:tool-form-active::before {
  content: "AI agent is filling this form";
  display: block;
  font-size: 0.875rem;
  color: #2563eb;
  font-weight: 600;
  font-style:normal;font-variant:normal;text-decoration:none;vertical-align:baseline;white-space:pre;white-space:pre-wrap;">0.5rem;
}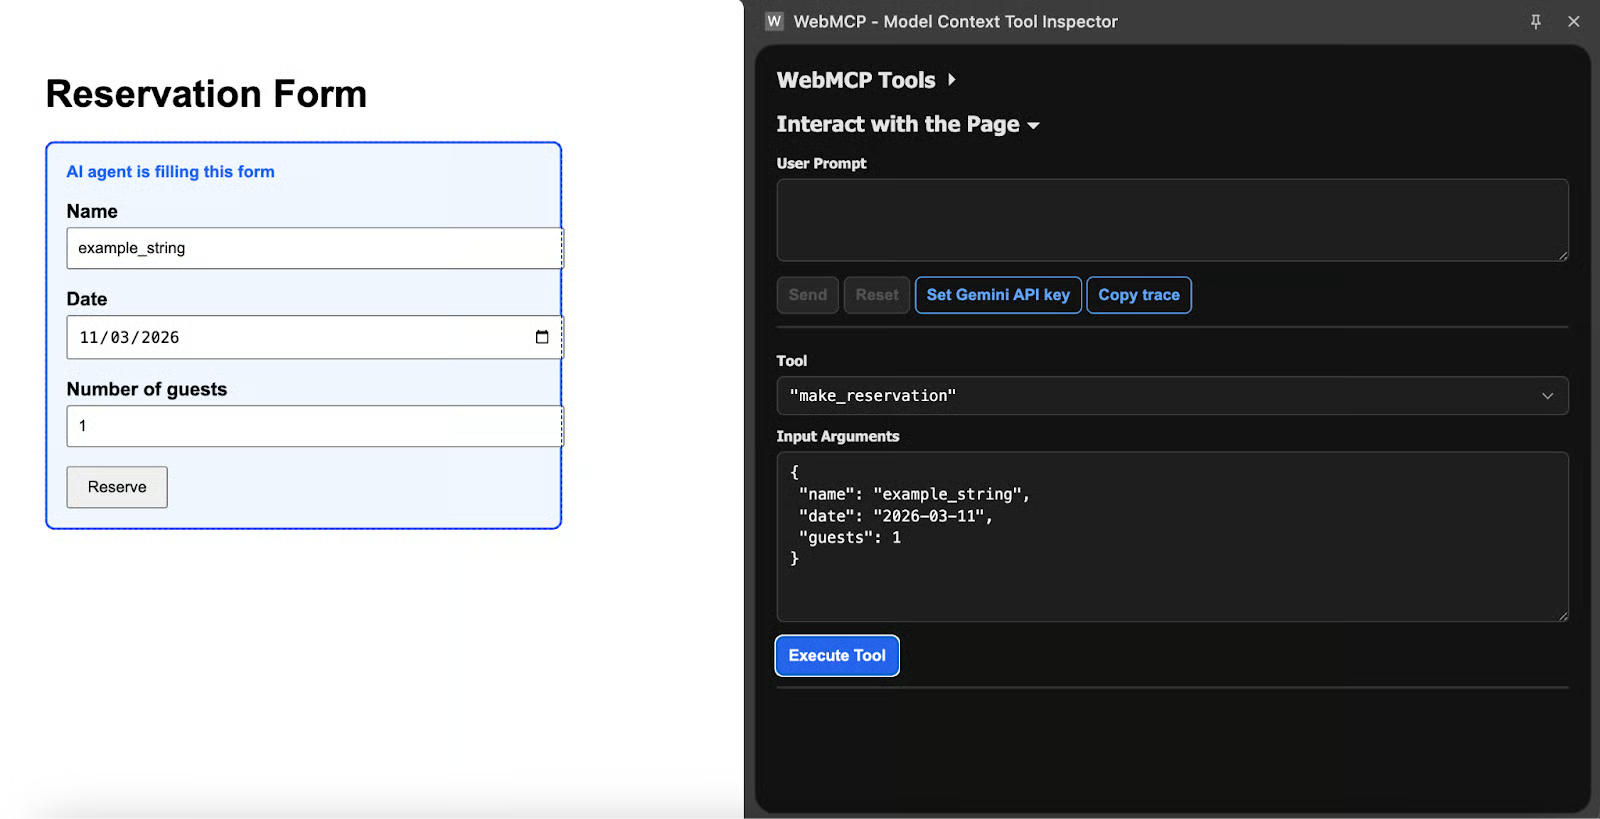
A form with the :tool-form-active styling applied, showing the blue border and "AI agent is filling this form" label.
Imperative tools present a different challenge. There is no form and no submit button, so execution runs immediately when the agent calls the tool.
For any operation that should not happen without human approval, you need to build the confirmation into the tool itself:
navigator.modelContext.registerTool({
  name: "deleteAccount",
  description: "Permanently delete the user's account and all associated data. Cannot be undone.",
  inputSchema: {
    type: "object",
    properties: {
      confirmPhrase: {
        type: "string",
        description: "The user must type 'DELETE MY ACCOUNT' to confirm."
      }
    },
    required: ["confirmPhrase"]
  },
  execute: ({ confirmPhrase }) => {
    if (confirmPhrase !== "DELETE MY ACCOUNT") {
      return {
        content: [{
          type: "text",
          text: "Confirmation phrase does not match. Ask the user to confirm explicitly."
        }]
      };
    }

    return new Promise((resolve) => {
      showConfirmationModal("Are you sure?", {
        onConfirm: async () => {
          await api.deleteAccount();
          resolve({ content: [{ type: "text", text: "Account deleted." }] });
        },
        onCancel: () => {
          resolve({ content: [{ type: "text", text: "Deletion cancelled by user." }] });
        }
      });
    });
  }
});
The pattern across the MCP ecosystem is consistent: the agent expresses intent, the human confirms execution. For a broader view of how this works across different MCP implementations, see our overview of top MCP servers and clients.
Once you have your first WebMCP integration up and running, it’s time to test it.
After installing the Model Context Tool Inspector Extension, a small badge on its icon tells you how many tools the current page has registered. Opening the pop-up shows each tool with its name, description, and input schema. If a tool you registered does not appear here, the registration did not work correctly.
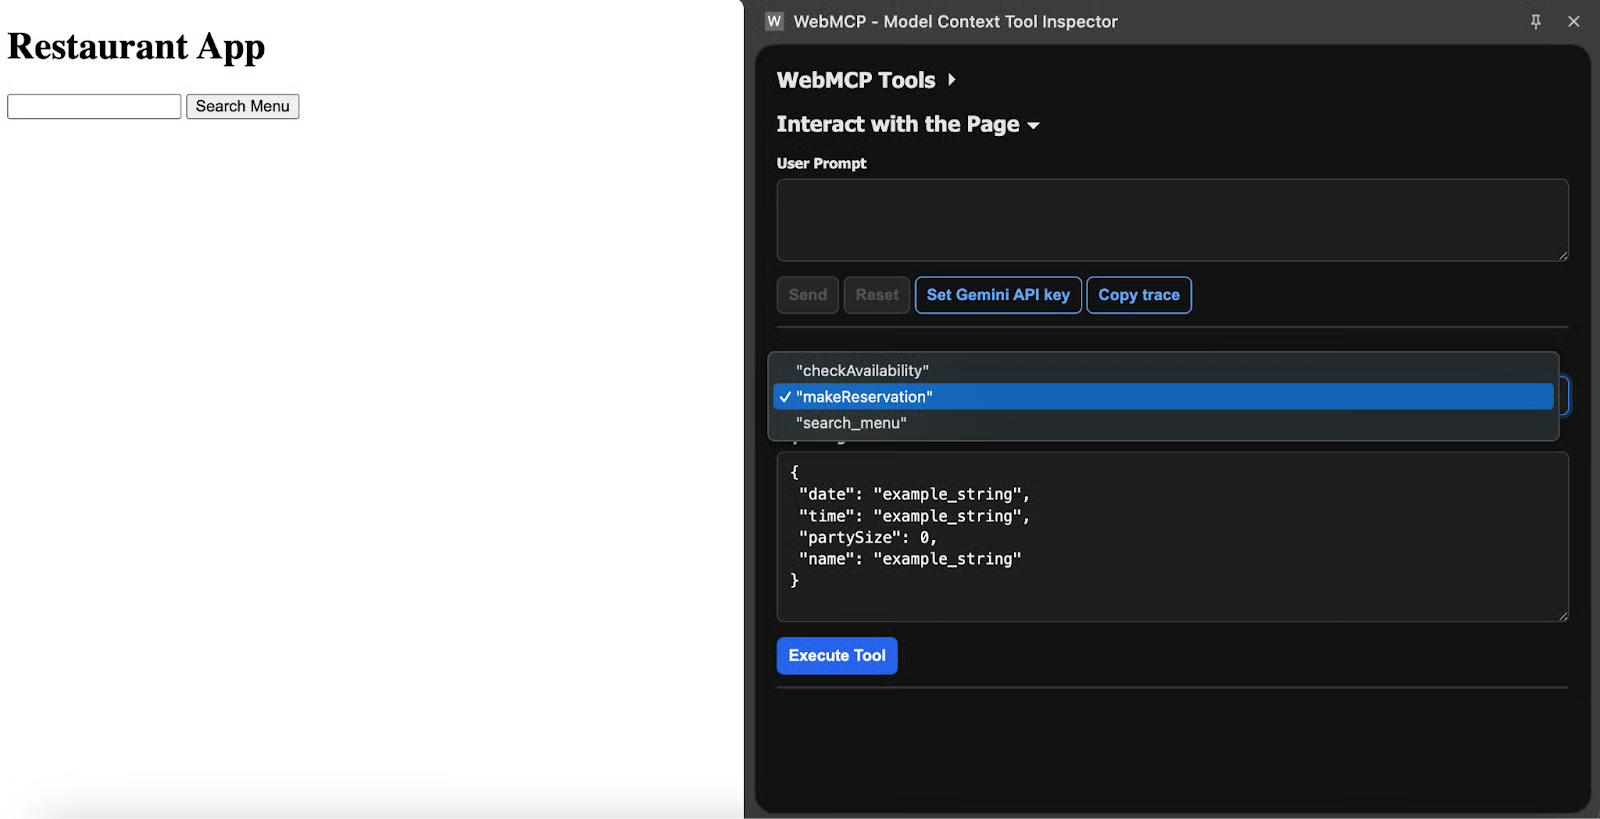
The extension panel showing a list of multiple registered tools with their schemas expanded.
To test out the agent simulator, let’s go back to the Flight Search demo website from Google. Now we can test how to execute this app either manually or using natural language.
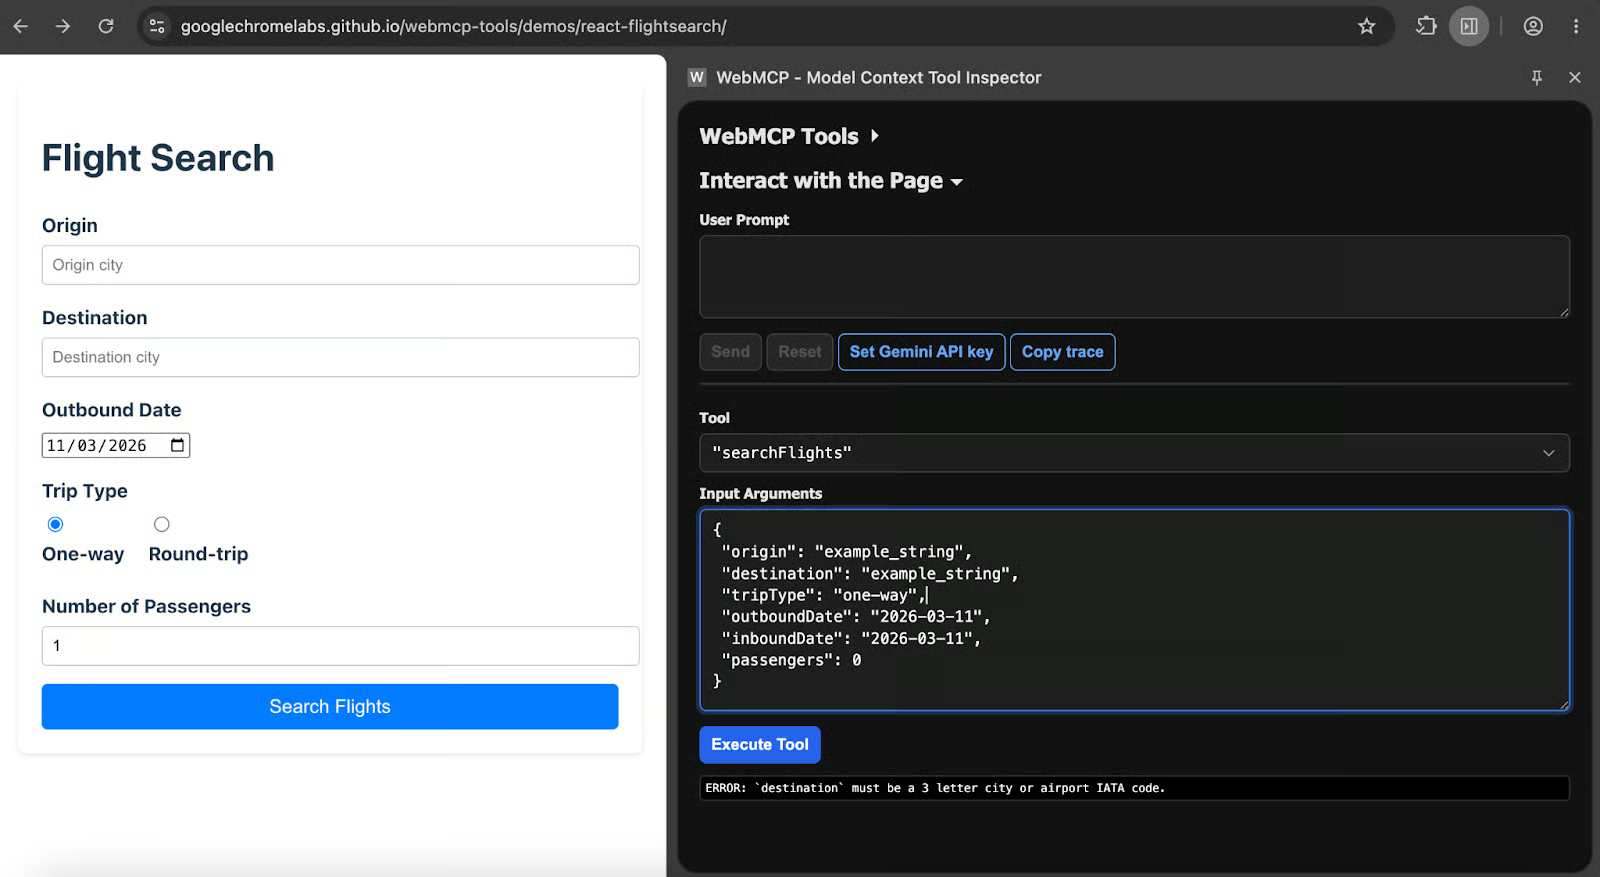
Manual execution removes the non-deterministic element of agent testing. Select a tool from the dropdown in the extension panel, type a JSON object into the "Input Arguments" field, and click "Execute Tool." The extension calls the tool directly using whatever parameters you provided.
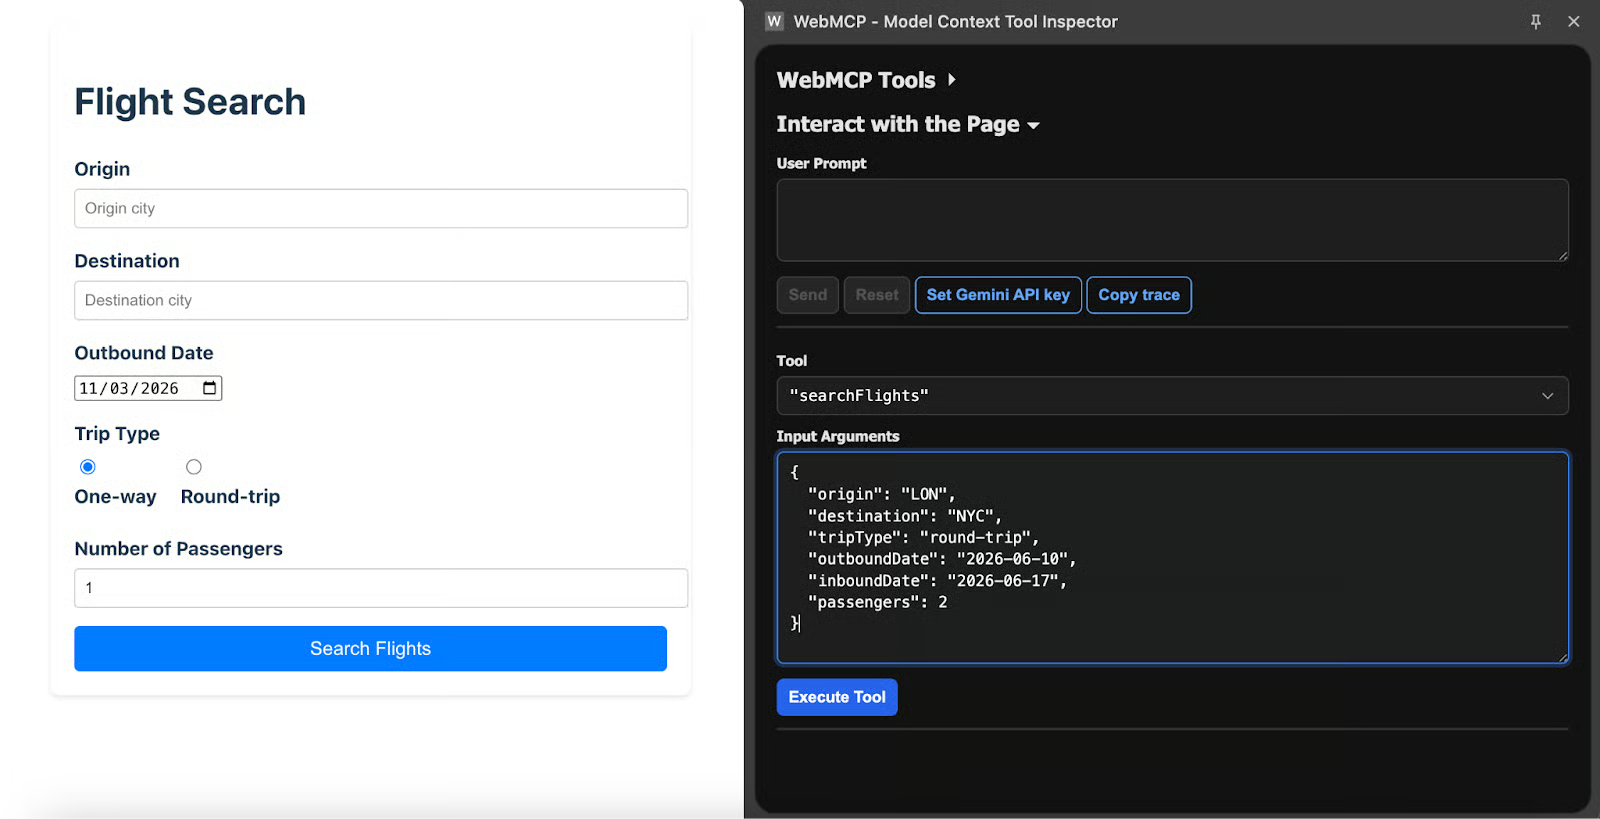
The extension with the searchFlights tool selected, JSON parameters filled in, and the Execute Tool button visible.
This is valuable for isolating problems. When a tool works correctly with hand-written parameters but fails when the agent calls it, you know the issue is in your tool description or schema, not in the execute function. For example, using Google's travel demo:
{
  "origin": "LON",
  "destination": "NYC",
  "tripType": "round-trip",
  "outboundDate": "2026-06-10",
  "inboundDate": "2026-06-17",
  "passengers": 2
}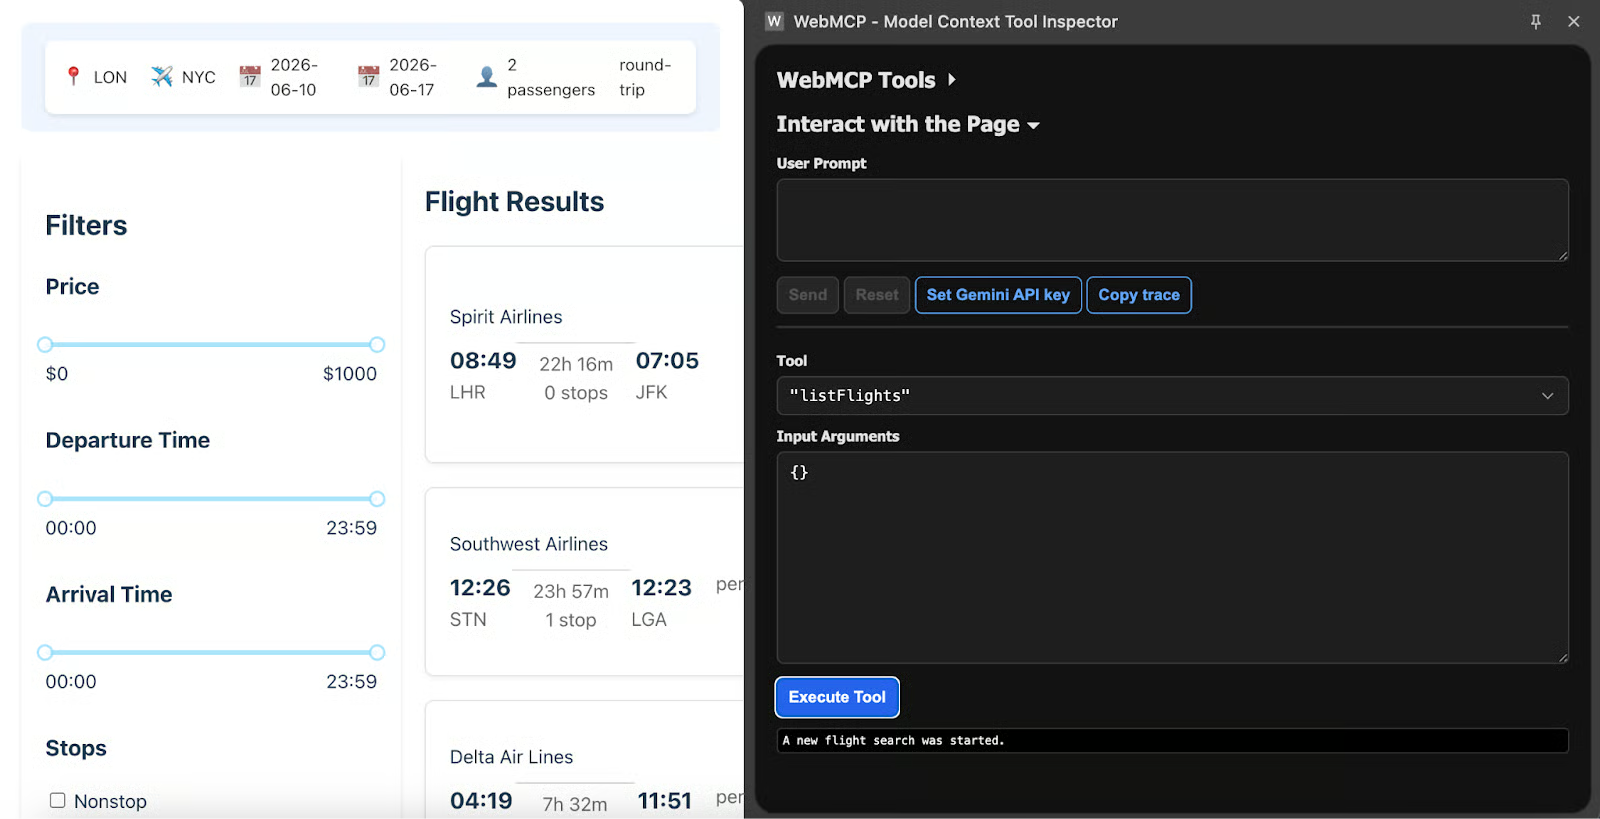
The travel demo page showing search results after the manual tool execution.
Natural language testing uses the Gemini API. Paste a key from AI Studio into the extension's settings, then type a prompt like
Search for round-trip flights from London to New York leaving June 10th, returning June 17th, for 2 passengers.The extension sends that prompt to Gemini 2.5 Flash alongside your tool definitions, and the model decides which tool to invoke and what parameters to pass.
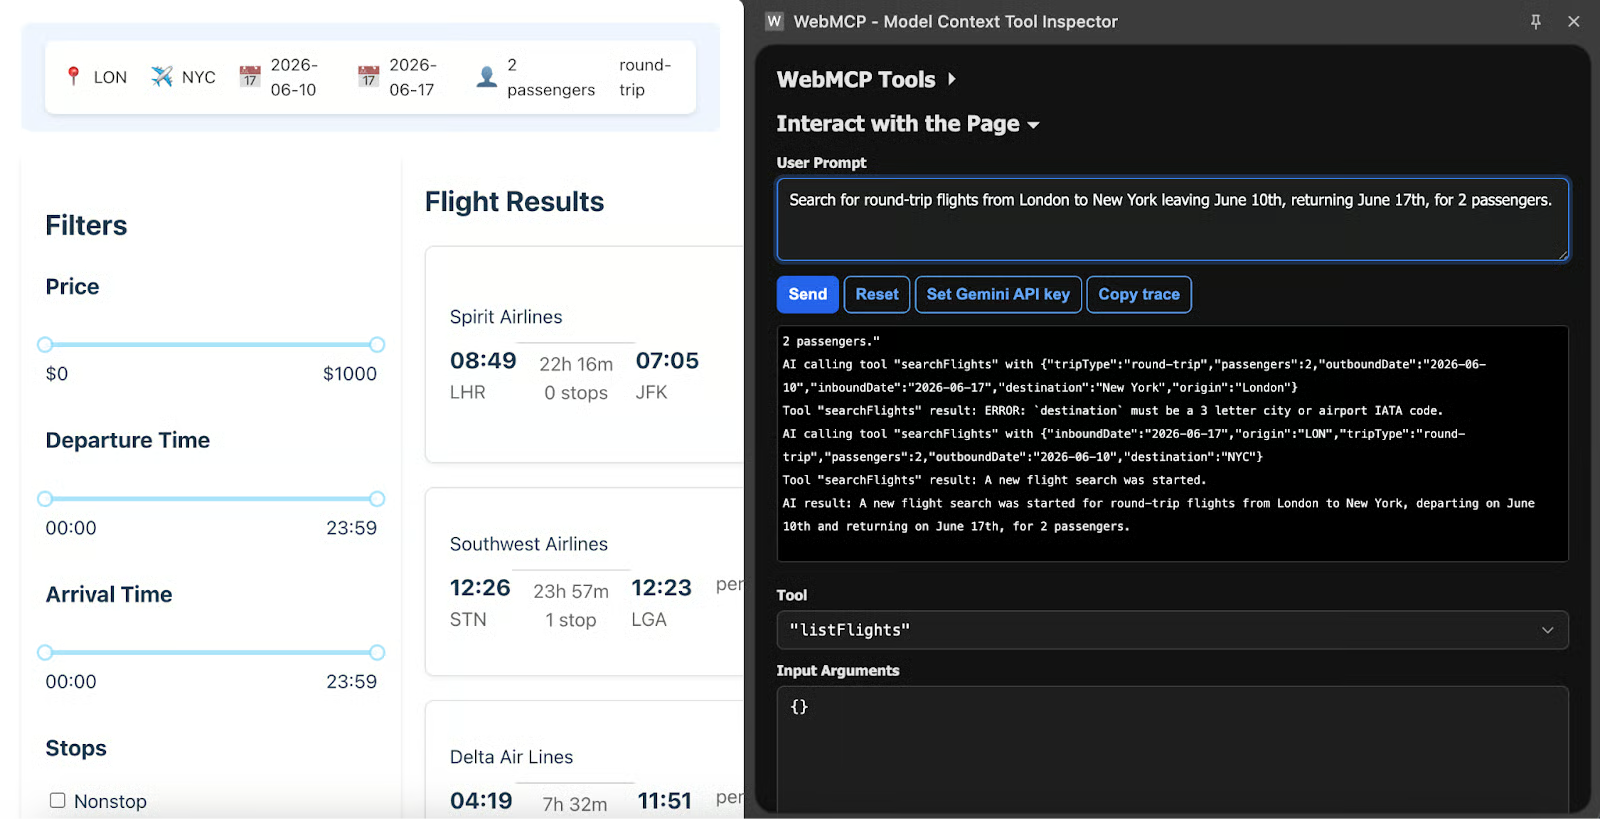
The extension's natural language input field with a prompt typed in and the agent's tool invocation response below.
If the agent picks the wrong tool or maps parameters incorrectly, your tool descriptions probably need to be more specific. Good descriptions explain what the tool does in positive terms ("use this to check flight availability"), not what it should not be used for.
For context on MCP tools within Google's ecosystem specifically, our Google MCP Servers tutorial covers several relevant patterns. And for a broader view of the protocol landscape beyond Chrome, see Top Remote MCP Servers.
WebMCP gives websites a direct communication channel with AI agents. Rather than agents guessing their way through a page, the site publishes structured tool definitions, and the agent calls them with typed parameters. The declarative API turns existing forms into agent-callable tools with a few HTML attributes. The imperative API covers everything more complex. The safety model keeps the human in control of actions that matter.
The spec is still early, available only in Chrome Canary behind a flag, and not suited for production use. But the fact that both Google and Microsoft are authoring it together, with W3C providing governance, suggests it has a real path to becoming a stable web standard. Spending time with the API now means you will already understand the tool design patterns and safety mechanisms when the stable release arrives.
If you want to start preparing now, audit the forms on your existing sites and identify which ones would benefit most from agent access. Search forms and availability checkers are low-risk starting points. Once you are comfortable with the declarative API on those, move to imperative tools for the workflows that need custom logic.
To keep exploring the topic, I recommend:
Top DataCamp Courses
Kurs
Kurs
Kurs
Tutorial
Bex Tuychiev
Tutorial
Aryan Irani
Tutorial
Aryan Irani
Tutorial
Nikhil Adithyan
Tutorial
Khalid Abdelaty
Tutorial
Aashi Dutt