
Lernpfad
KI-Agent-Grundlagen
6 Std.
You may have probably noticed by now that AI coding agents are incredibly useful when you need to write complex functions or debug some tricky errors. But they often hit a wall. They usually stop being helpful the moment you need information that isn’t already sitting right there inside your project files.
But imagine if your coding agent could actually reach outside that environment to pull in live data, look up current documentation, or use various tools on your behalf. That is when these agents can become far more powerful.
In this tutorial, I will walk you through exactly how to achieve that using the Codex CLI and the Model Context Protocol, or MCP. We will cover the fundamentals of how Codex CLI and MCP work together, build a finance dashboard project from scratch using live stock data, cover multi-agent patterns, and discuss security best practices.
To really get the most out of this, I highly encourage you to follow along. Go ahead and create a new Next.js project, make sure you have a working installation of the Codex CLI, and grab a free API key from Alpha Vantage so we are ready to build.
If you are new to agentic AI, I highly recommend enrolling in our AI Agent Fundamentals skill track.
Before we jump into the actual coding, we must understand the tools we are using. Let’s break down exactly what MCP is and how the Codex CLI utilizes it.
So, what is MCP? It stands for the Model Context Protocol. It is an open standard introduced by Anthropic to standardize how AI systems connect to external tools and data sources. Technically speaking, it operates via JSON-RPC 2.0 over STDIO (standard input/output) or HTTP.
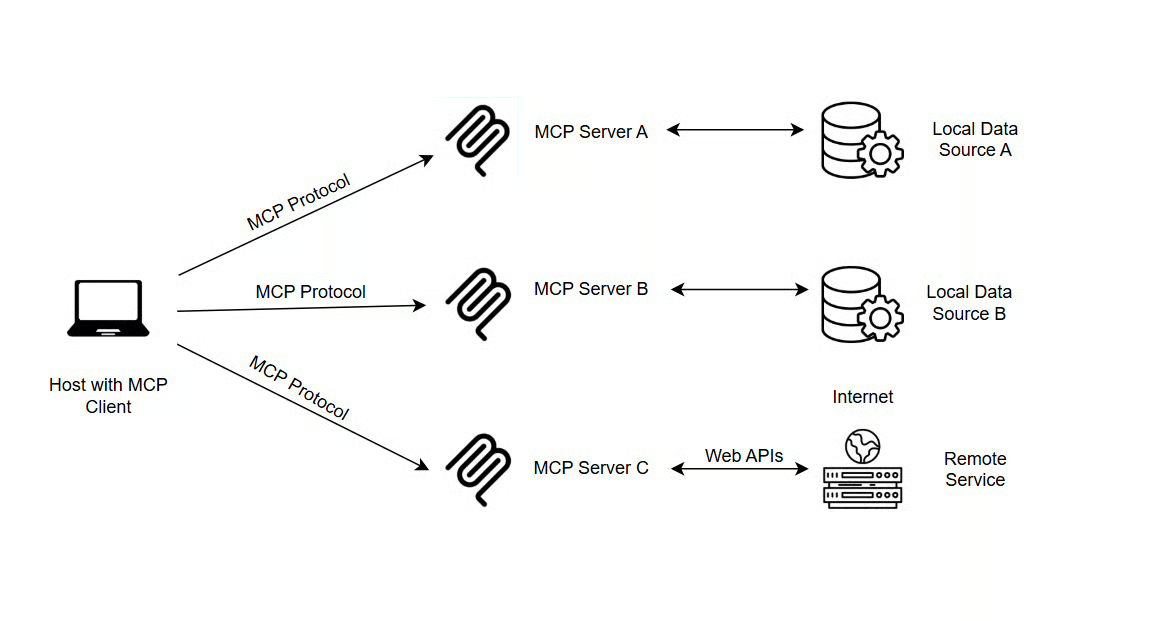
Source: truefoundry
The reason this matters is that it effectively solves a huge problem, what we might call an “integration nightmare”: In the past, if you wanted to connect an LLM to a specific database or tool, you often had to build a custom connector for that specific pair. It was messy, hard to maintain, and less scalable.
With MCP, we now have a single, unified protocol for all LLM tool connections. It simplifies this landscape by replacing custom integrations with a standard interface.
If you want to understand what’s happening under the hood, this walkthrough on building an MCP server and client from scratch is a good companion.
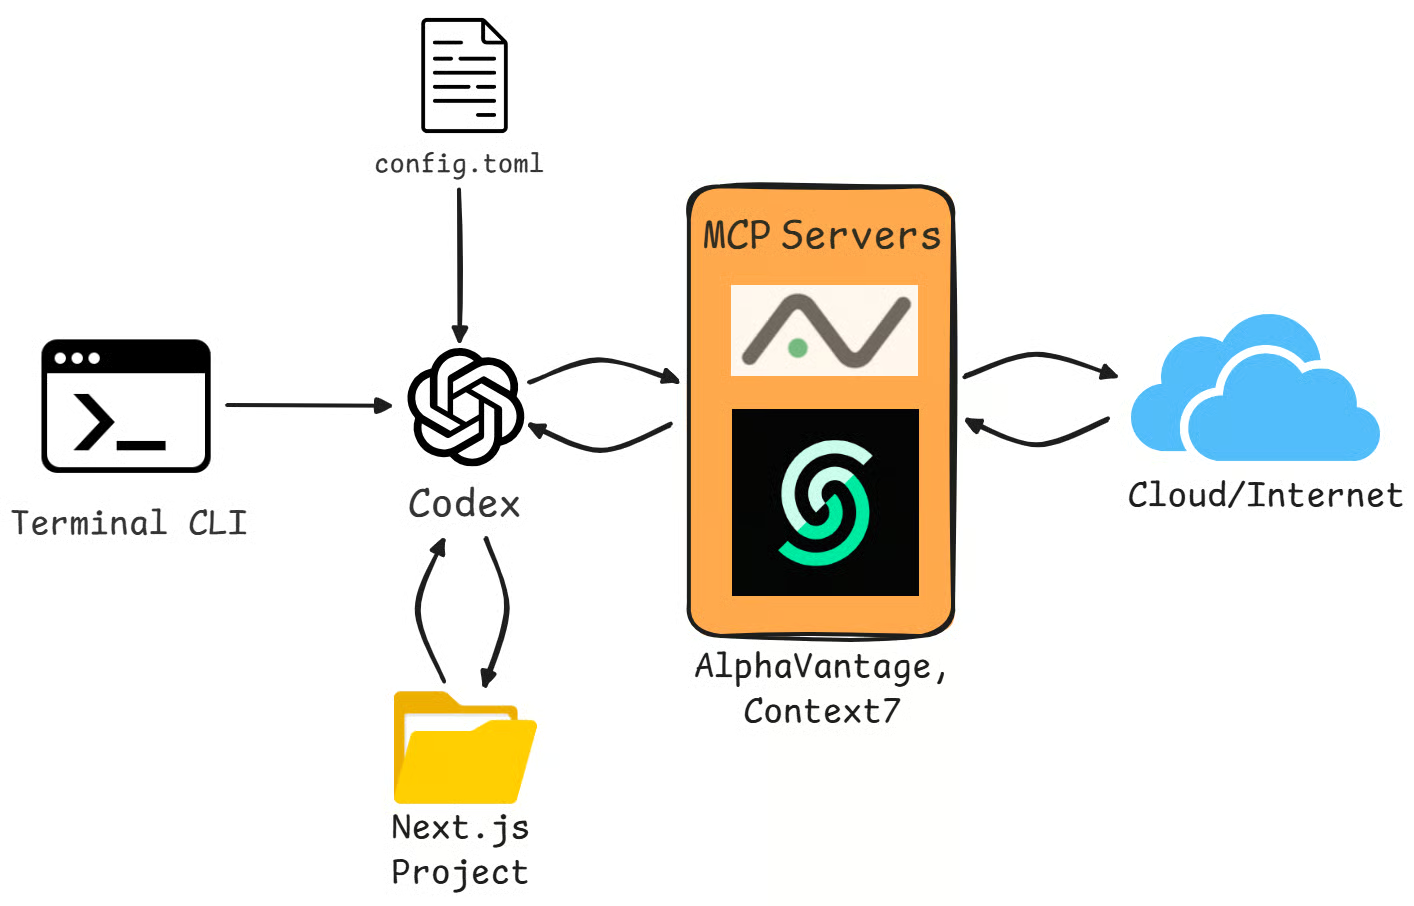
Now, let’s talk about the Codex CLI. It is OpenAI’s lightweight, terminal-based coding agent. Like other AI coding tools, such as Claude Code or Cursor, it is designed to really understand your entire project context, and not just the file you currently have open.
It really brings everything together in one place, combining efficient code indexing, your conversation history, and actual command execution into a single Text User Interface (TUI). Almost all of its behavior can be controlled and customized by editing a config.toml file, which makes it easy to manage.
When it comes to MCP implementation, Codex supports both STDIO servers and Streamable HTTP servers:
One of the really convenient features here is that the Codex CLI and the IDE extension actually share the same config.toml file. This means you get consistent MCP tooling whether you are working in the terminal or your editor; you don’t have to configure them twice, which saves a lot of time.
Codex also handles authentication quite well, supporting OAuth via the codex mcp login <server-name> command. It even gives you fine-grained control over what the agent can do by allowing you to filter specific tools using enabled_tools or disabled_tools settings in your configuration.
Now that we have covered the theory, it is time to actually get our hands dirty and set things up. In this section, we are going to walk through exactly how to configure your MCP servers so they are ready to work for you.
Prerequisites
Before you start wiring Codex into MCP and the Agents SDK, make sure the following are in place:
The Codex CLI is installed on this machine. You can install it globally by simply opening your terminal and running npm install -g @openai/codex. Verify everything is working with codex --version to confirm the installation.
Codex is authenticated on this machine. Run codex login (or codex login --device-auth in headless environments) once, and verify that codex works normally in your terminal.
For the multi-agent workflow, you also need an OpenAI API key. Acquire it in the OpenAI console, and set it in your shell using export OPENAI_API_KEY="sk-...".
Environment variables for external tools are set. For example, Alpha Vantage will read your market data key from ALPHA_VANTAGE_KEY, which you should also export in the same way before running the examples.
To acquire an AlphaVantage API key:
The free tier allows up to 25 API requests per day. For heavier usage, Alpha Vantage offers premium plans.
Next, we’ll add a new server using the command-line interface and the codex mcp add command. This way, you don’t need to mess around with configuration files manually, and Codex does most of the work for you.
For example, if you want to add a server to help with documentation lookups, you can use the Context7 MCP server. To install it, run the following command in your terminal:
codex mcp add context7 -- npx -y @upstash/context7-mcp
While the CLI commands are great for getting started quickly, sometimes you need a little more control, or you just prefer to see exactly what is going on under the hood. In that case, you can edit the configuration file directly.
It is important to know that there are actually two places where this configuration lives, and their scopes differ:
Global configuration file located at ~/.codex/config.toml, which applies to every project you work on
Project-scoped configuration file located at .codex/config.toml inside your specific project folder. Usually, project-scoped settings override global settings when there’s a conflict.
Not all MCP servers ship with a dedicated CLI install command. In those cases, you configure them directly in ~/.codex/config.toml by specifying the command and arguments Codex needs to launch the server process. This gives you full control over how the server is started, whether it runs locally via STDIO or connects remotely via HTTP.
The AlphaVantage MCP server is one of them. Open the config.toml and add the following block:
[mcp_servers.alphavantage]
command = "uvx"
args = ["av-mcp", "<your-key>”]
Disclaimer: Hardcoding an API key directly in config.toml is not a recommended practice for real-world projects. Avoid this in any project that is version-controlled (e.g., on GitHub), shared with other developers, or deployed to a server, as anyone with access to the file can read and misuse your key. For this tutorial, it's acceptable since config.toml lives in your home directory (~/.codex/) and is personal to your machine.
One line that is useful to add to the block is startup_timeout_sec=30 to override the default 10-second timeout, giving the connection enough time to establish itself.
Once you have set up a few servers, you will need to know how to manage them. Codex gives you a suite of commands to keep everything organized.
If you want to see what is currently installed, you can simply run codex mcp list. If you need to check the specific details of a server, like the Alpha Vantage one we just added, you can run codex mcp get alphavantage. And, of course, if you decide you don’t need a server anymore, say for instance the Context7 server, you can remove it by running codex mcp remove context7.
Finally, when you are actually working inside an active Codex session, you can verify that everything is running correctly. You just type /mcp right into the chat interface, and it will show you the status of your connected tools. It should show both alphavantage and context7, each with Status: enabled.
Theory is useful, but the best way to learn is to build something real. In this section, we will build a functional Stock Portfolio Risk Dashboard from scratch, using Codex and MCP to fetch real market data and calculate risk metrics.
To display the dashboard, the project uses TypeScript, a JavaScript-based programming language. For a refresher across different levels, I recommend consulting our TypeScript Interview Questions guide.
Follow the steps described below to set up the project:
Initialize the project: Run the standard Next.js creation command in your terminal: npx create-next-app@latest portfolio-dashboard --typescript
Accept the default prompts to ensure a standard configuration
Navigate to the directory in your new project folder: cd portfolio-dashboard
Prepare the component structure by creating a subdirectory for your UI components: mkdir components
Create the portfolio card element as a .tsx file in the components subfolder: components/PortfolioCard.tsx
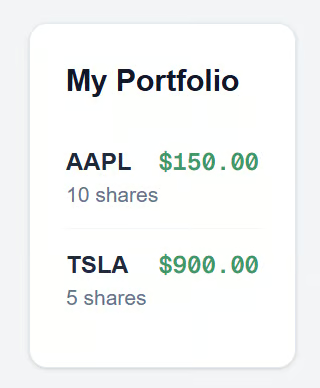
The component defines a PortfolioCard that renders a styled card displaying a list of mock stock positions (AAPL and TSLA), showing each stock's symbol, number of shares, and current price. It uses Tailwind CSS classes for layout and styling, with a white card container and emerald-green price formatting. It should look like this:
// components/PortfolioCard.tsx
import React from 'react';

type Position = {
  symbol: string;
  shares: number;
  price: number;
};

const mockPositions: Position[] = [
  { symbol: 'AAPL', shares: 10, price: 150.00 },
  { symbol: 'TSLA', shares: 5, price: 900.00 },
];

export const PortfolioCard = () => {
  return (
    // Added text-slate-900 to ensure visibility on the white background
    <div className="p-6 border border-slate-200 rounded-xl shadow-sm bg-white text-slate-900">
      <h2 className="text-xl font-bold mb-4">My Portfolio</h2>
      <ul className="divide-y divide-slate-100">
        {mockPositions.map((pos) => (
          <li key={pos.symbol} className="flex justify-between py-3">
            <div className="flex flex-col">
              <span className="font-bold text-slate-800">{pos.symbol}</span>
              <span className="text-sm text-slate-500">{pos.shares} shares</span>
            </div>
            <span className="font-mono font-semibold text-emerald-600">
              ${pos.price.toFixed(2)}
            </span>
          </li>
        ))}
      </ul>
    </div>
  );
};
After saving that file, make sure to import and use <PortfolioCard/> inside your main app/page.tsx file so you can see it in the browser:
// app/page.tsx
import { PortfolioCard } from "../components/PortfolioCard";

export default function Page() {
  return (
    <main className="min-h-screen flex items-center justify-center bg-slate-50">
      <PortfolioCard />
    </main>
  );
}
When you now run npm run dev, you should now see output in your browser that looks something like this:
Before we start coding with AI, we need to ensure our agents are active. Keep the terminal running with npm run dev. In a new terminal window:
Run the MCP configuration commands we discussed earlier, if you haven't already
Export your API key via export ALPHA_VANTAGE_KEY=”<your-key>”
In the same terminal window, start the Codex agent by running codex
Implementing a Sharpe ratio feature
The first feature we will calculate is the Sharpe ratio, a critical metric for assessing the risk-adjusted return of an investment. Usually, looking up the formula and finding the right library to calculate it is a bit tedious. We’ll let Codex handle it.
In your Codex terminal session, type the following prompt:
"Add Sharpe ratio calculation for each position to PortfolioCard.tsx. Use Context7 to check the function signature if needed."
You will see Codex kick into action. First, it might use the Context7 tool to look up documentation for the technical analysis library (ta-lib or a JavaScript equivalent) to ensure it uses the correct inputs. It will then automatically modify your PortfolioCard.tsx file.
It will likely expand the mockPositions and add a helper function to calculate the ratio that looks something like this:
function calculateSharpe(prices: number[]) {
  // Codex implements the logic here using standard deviation and mean returns
  // resulting in a return value like 1.23
}
And it will update your JSX to render the new metric:
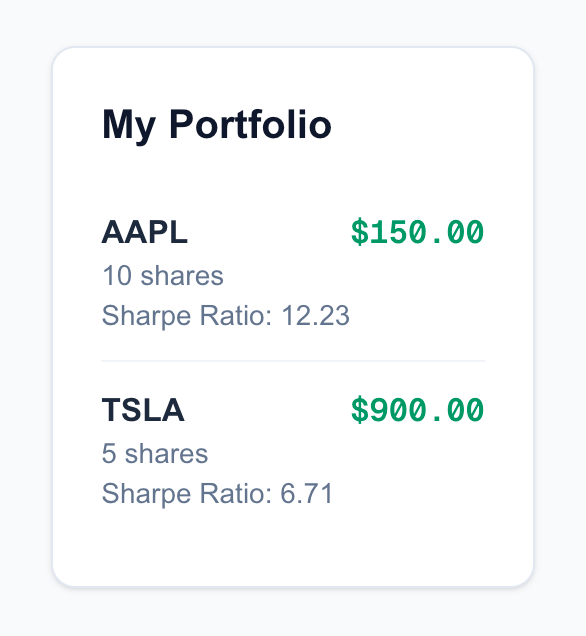
<PortfolioCard sharpe={calculateSharpe(prices)}/>When you check your browser, you should now see a Sharpe ratio (e.g., 1.23) displayed next to your positions, like this:
Now let's make the dashboard reactive and use the actual financial data from AlphaVantage. We want to be alerted if a stock is becoming too volatile. We will define "high volatility" as a 7-day volatility greater than 3%.
In the Codex terminal, enter this prompt:
"Flag positions where 7-day volatility > 2% using Alpha Vantage data. Fetch the price history for the symbols in my list."
This is where MCP shines. Codex will recognize it needs external data. It will call alphavantage.get_price_history("AAPL") and alphavantage.get_price_history("TSLA") to get the real-world data points.
Once it retrieves the data, it will write the logic to compute the standard deviation of those prices. Finally, it will update your component's styling to visually flag the risk as well.
You will see your PortfolioCard code update to include conditional styling. The logic might look like this:
<li className={volatility > 2 ? "text-red-500 font-bold" : "text-green-500"}>
  {pos.symbol}: {volatility}%
</li>
If you look at your running application, you might see AAPL in green (safe) and TSLA in red (volatile), all based on the live market data pulled in by the agent.
The final output should look something like this:
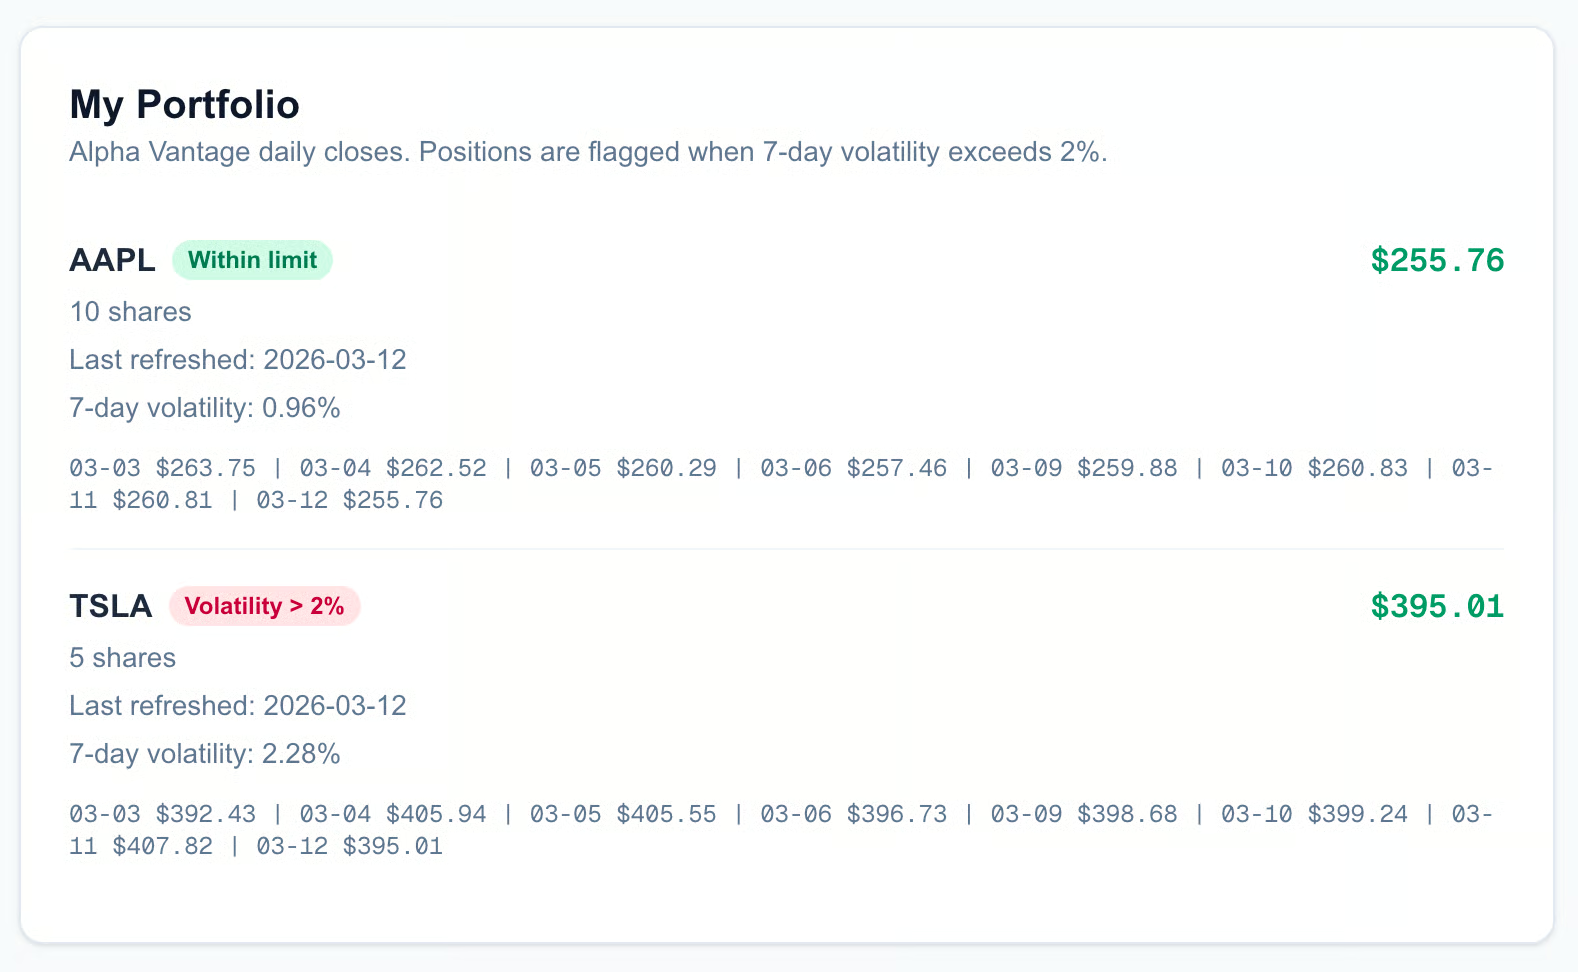
Your final UI can be a bit different from the one pictured above, depending on how Codex structures it. Of course, you can also be more precise in your prompt and tell Codex how the end result should look.
If you want to design larger systems and learn about handoffs, tool boundaries, and evaluation, I recommend taking our Building Scalable Agentic Systems course.
So far, we have been using Codex as the main interface that calls out to other tools. But here is where things get really interesting: Codex can also act as an MCP server itself.
This means you can expose Codex's powerful file editing and command execution capabilities to other MCP clients, effectively allowing other AI agents to use Codex as a tool in their own workflows. The biggest advantage is that it enables parallel execution.
You can design a workflow where you have one agent using Codex to build out your frontend UI, while a completely different agent uses a separate instance of Codex to write your backend API. Because they are running as separate processes, they can work simultaneously, potentially cutting your development time in half.
To put Codex into this mode, we use a specific command: codex mcp-server.
When you run this, Codex stops behaving like a chat interface and starts listening for instructions from another program. It exposes its capabilities over the standard input/output (STDIO) channel.
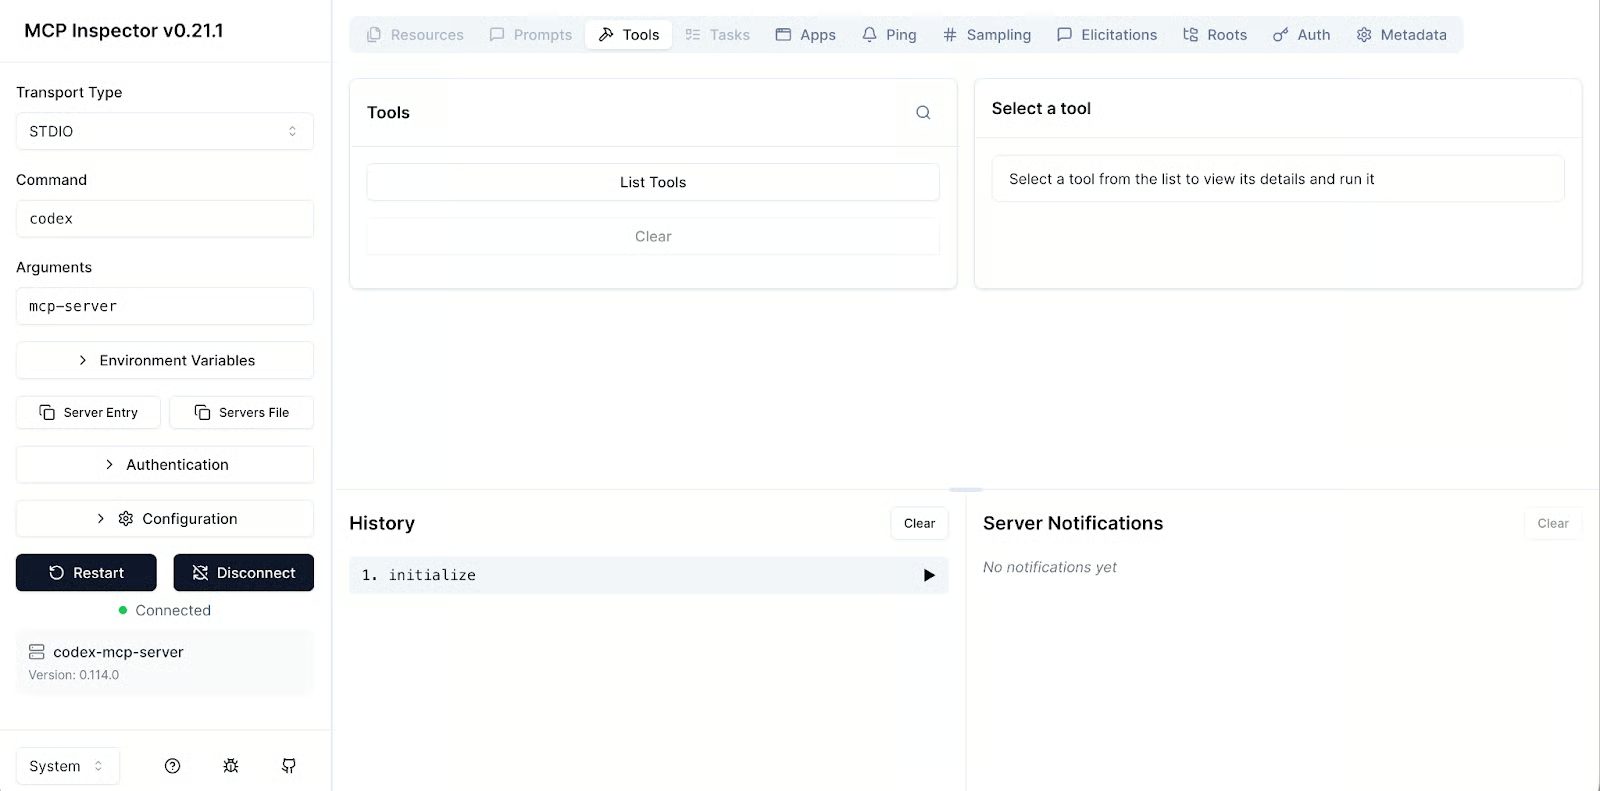
Before you try to integrate this into a complex system, it is always a good idea to test it to ensure it actually works. The Model Context Protocol team provides a handy inspector tool for exactly this purpose. You can run the following command in your terminal to fire up a web interface that connects to your local Codex instance:
npx @modelcontextprotocol/inspector codex mcp-server
This will open a browser window where you can manually send commands to Codex and see exactly how it responds, which is very helpful for debugging. The UI looks like this:
If you are a Python developer, you might want to orchestrate Codex inside a custom script using the OpenAI Agents SDK. This allows you to build a Python program that can "hire" Codex to do specific coding tasks.
Here is a quick example of how you would set that up. You use MCPServerStdio to launch the Codex process:
In your Python virtual environment, install the openai-agents package:
pip install openai-agents
To set up the codex process, create an orchestrator.py file with the following code:
from agents import Agent
from agents.mcp import MCPServerStdio

# initialize connection
codex_server = MCPServerStdio(
    name="Codex CLI",
    params={
        "command": "npx",
        "args": ["-y", "codex", "mcp-server"]
    },
    client_session_timeout_seconds=360000,
)
# create codex agent
agent = Agent(
    name="Lead Developer",
    mcp_servers=[codex_server]
)
In this setup, the Codex MCP server exposes two main tools: codex() and codex-reply(). It is important to understand the difference, since the distinction between them ensures the agent keeps the context of what it is working on.
codex() when you want to start a brand-new session or task. codex-reply() when you want to continue an existing conversation or iterate on the work that was just done. It requires a conversationId parameter to map the request to the right conversation.The client_session_timeout_sessions is the maximum time the client keeps a session with the respective MCP STDIO server open. We keep it very generous at 360,000 seconds (100 hours) for Codex, so long-running workflows can reuse the same MCP session without hitting idle timeouts.
The community has also stepped up to create wrappers that make this even easier. One notable project is the codex-mcp-wrapper repo on GitHub. This wrapper is specifically designed to let you integrate Codex into other environments, like Claude Code.
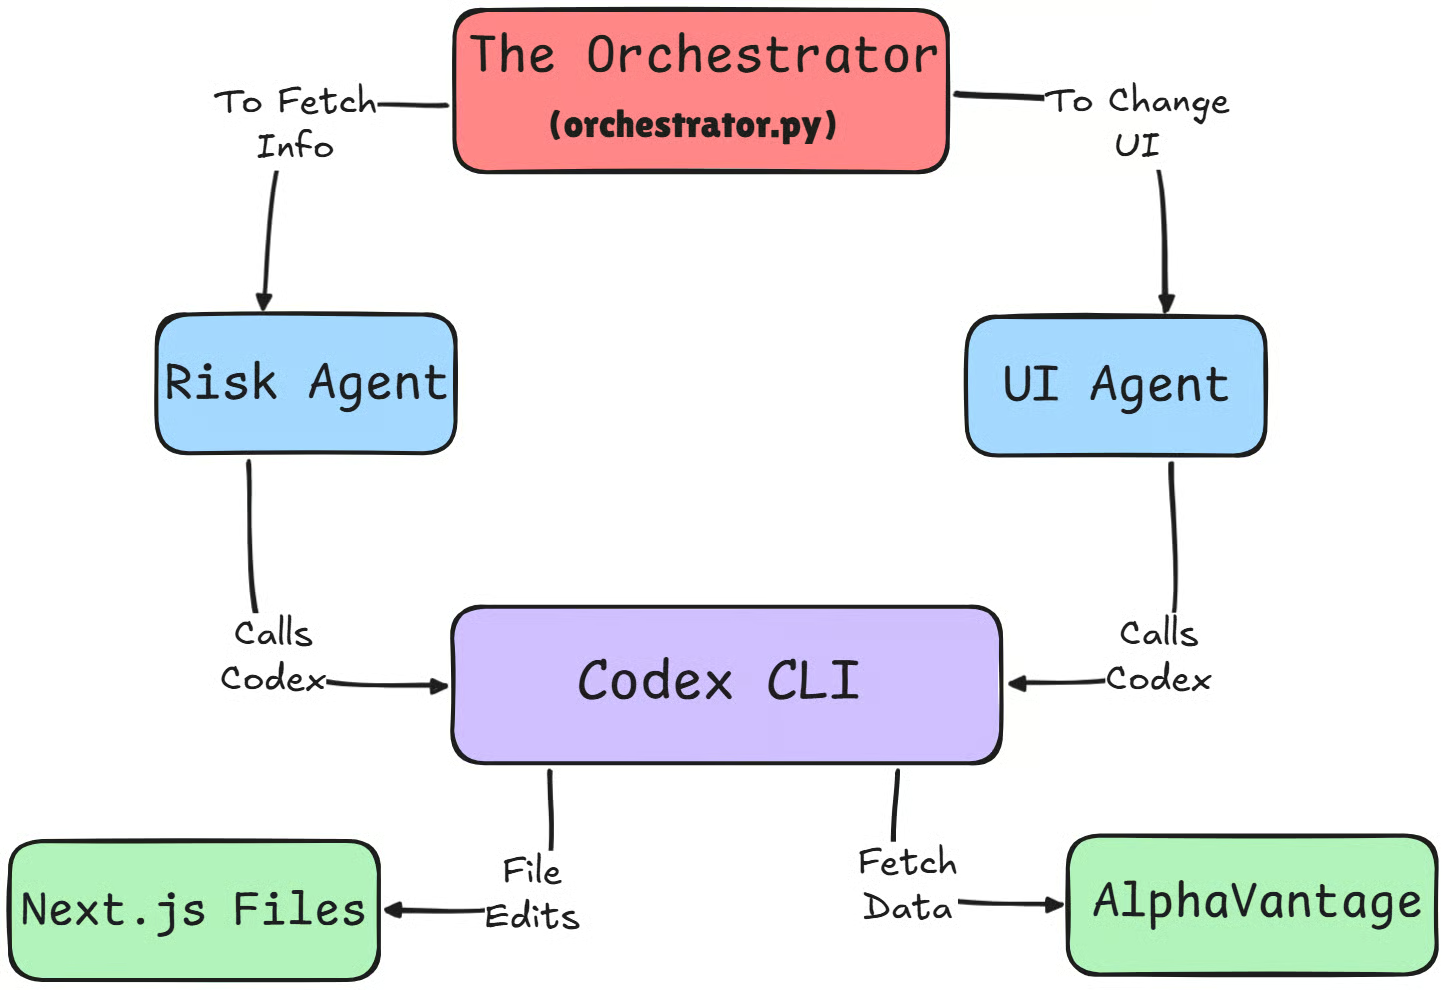
Now that we understand how to run Codex as a server, let's look at a real-world scenario where this becomes powerful. We are going to orchestrate a multi-agent pipeline in which multiple AI agents work together to significantly speed up the upgrade of our finance dashboard compared to a single agent.
If multi-agent design feels abstract, here’s a clear breakdown of common agent architectures and where multi-agent setups actually help.
In this setup, we use a Python script as our orchestrator to manage the workflow. Instead of asking one agent to do everything, we spawn two specialized agents:
Because we’re now running Codex as a headless MCP server from the Agents SDK, both the SDK and the Codex processes need to authenticate against OpenAI, not just the interactive Codex CLI.
To keep things simple and reliable, make sure OPENAI_API_KEY (or optionally CODEX_API_KEY) is set in your environment before running the orchestrator so every part of the chain can talk to the models. Run the following command in a new terminal:
export OPENAI_API_KEY=<your-key>We initialize two independent Codex MCP servers in an async with block to ensure stable, isolated connections (one process per agent), which is what actually enables them to run in parallel. Here is the orchestration script called orchestrator.py:
import os
import asyncio
from dotenv import load_dotenv
from agents import Agent, Runner
from agents.mcp import MCPServerStdio


load_dotenv()


async def main():
    async with MCPServerStdio(
        name="Codex-Risk-Server",
        params={
            "command": "npx",
            "args": ["-y", "codex", "mcp-server"],
            # Codex itself uses your existing auth (codex login / OPENAI_API_KEY)
            "env": {
                # pass through any env you already rely on inside Codex
                "OPENAI_API_KEY": os.getenv("OPENAI_API_KEY", ""),
                "CODEX_API_KEY": os.getenv("CODEX_API_KEY", ""),
            },
        },
        client_session_timeout_seconds=360000,
    ) as codex_risk_server, MCPServerStdio(
        name="Codex-UI-Server",
        params={
            "command": "npx",
            "args": ["-y", "codex", "mcp-server"],
            "env": {
                "OPENAI_API_KEY": os.getenv("OPENAI_API_KEY", ""),
                "CODEX_API_KEY": os.getenv("CODEX_API_KEY", ""),
            },
        },
        client_session_timeout_seconds=360000,
    ) as codex_ui_server:

        # 1. Define specialized agents (both just use the 'codex' tool)
        risk_agent = Agent(
            name="Codex-Risk",
            instructions=(
                "You are a quant analyst. Use the 'codex' tool to compute VaR and "
                "Sharpe ratio for all positions in the portfolio-dashboard project. "
                "Assume Alpha Vantage integration and volatility logic are already implemented "
                "in the code; reuse and extend that code instead of re-calling external APIs."
            ),
            mcp_servers=[codex_risk_server],
        )

        ui_agent = Agent(
            name="Codex-UI",
            instructions=(
                "You are a frontend developer. Use the 'codex' tool to update the UI in "
                "the portfolio-dashboard project. Your job is to add a VaR (95%) column "
                "to the RiskTable / PortfolioCard views, with clear red/green conditional styling."
            ),
            mcp_servers=[codex_ui_server],
        )

        # 2. Run Risk + UI agents concurrently
        risk_task = Runner.run(
            risk_agent,
            "Compute portfolio VaR (95%) for all positions and write the results into the codebase "
            "in a way that the UI can easily consume (e.g., exported constants or helper functions).",
        )
        ui_task = Runner.run(
            ui_agent,
            "Prepare or update the RiskTable / PortfolioCard components to display a VaR (95%) "
            "column, assuming the risk logic already exists in the project.",
        )

        risk_result, ui_result = await asyncio.gather(risk_task, ui_task)

        print("=== Codex-Risk result ===")
        print(risk_result.final_output)
        print("\n=== Codex-UI result ===")
        print(ui_result.final_output)

        # 3. Optional second pass: let UI agent consume the exact risk output
        followup_ui_result = await Runner.run(
            ui_agent,
            (
                "Now update the UI to wire in the actual VaR values. "
                f"Context from the risk agent: {risk_result.final_output}"
            ),
        )

        print("\n=== Codex-UI follow-up ===")
        print(followup_ui_result.final_output)


if __name__ == "__main__":
    asyncio.run(main())
In the same terminal window in which you set your OpenAI API key, run the orchestration script:
python orchestrator.pyThis agents will independently go off, check the Alpha Vantage documentation via MCP, fetch the historical data, and write the Python or TypeScript logic to calculate the Value at Risk for your portfolio.
After the two codex instances make the required changes, you can visualise them by running npm run dev command again to see the final result in the browser. It’ll look something like this:
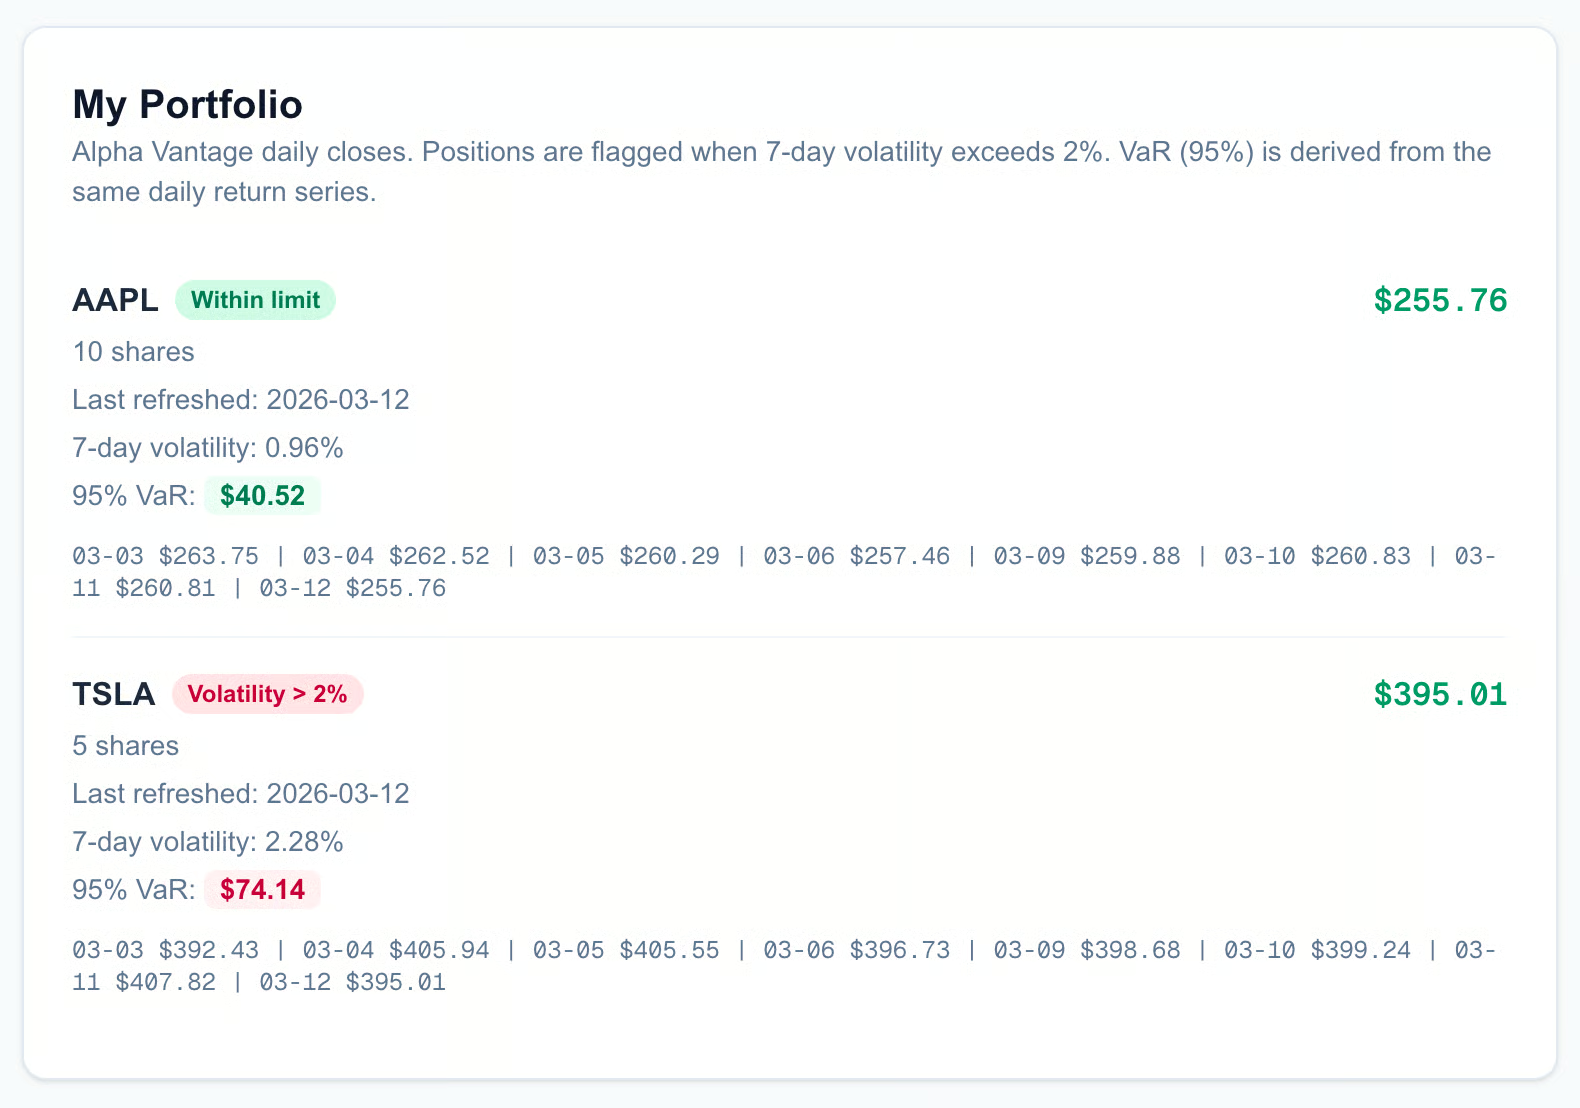
By splitting these concerns, we turn a process that might normally take 20 minutes of back-and-forth chatting into a fully automated pipeline. The Risk Agent handles the math, the UI Agent handles the implementation, and the dashboard is updated in seconds.
The real magic here is in the execution model. In a standard chat interface, tool calls are sequential; that is, you have to wait for the data to be fetched before you can ask for the chart to be updated.
With MCP and this multi-agent approach, we achieve true concurrency. While the Codex-Risk agent is waiting on network requests from the Alpha Vantage API, the Codex-UI agent can already be scaffolding the table columns and setting up the CSS classes.
By splitting these concerns, we turn a process that might take 15 or 20 minutes of back-and-forth chatting into a streamlined pipeline. You go from raw data fetching to complex risk analysis to fully implemented UI features in about 5 minutes.
As with any powerful tool that connects your code to the outside world, we need to talk about safety. While Codex and MCP unlock incredible capabilities, they also introduce new attack surfaces and practical limitations that you need to be aware of before deploying them in a production environment.
The most critical security aspect involves the configuration file itself. In earlier versions of the Codex CLI, there was a known vulnerability where malicious commands could be injected via the config.toml file in combination with an .env file that redirected CODEX_HOME to a local directory. This has been patched, so it is strictly important that you ensure you are running version v0.23.0 or higher.
However, the risk doesn't entirely disappear with software updates. Because Codex respects project-scoped configurations, if you clone a repository that contains a malicious .codex/config.toml file along with an .env file that sets CODEX_HOME=./.codex, running codex inside that folder could execute unexpected commands defined in that file.
Always make it a habit to audit the configuration file of any new project you clone. Treat it with immense caution before running anything.
On the practical side, there are some rough edges you should expect. Currently, there is no built-in "connectivity test" when you launch the CLI. Codex won't automatically tell you if an MCP server is down or unreachable upon startup. You essentially have to prompt the model with something like "Check my tools" so that it can verify that the connection is actually working.
Furthermore, while it is tempting to install every tool available, you have to be selective. If you attach too many MCP servers, the model's performance begins to degrade significantly. The more tools you add, the more "noise" the model has to filter through, which can confuse it or lead to hallucinations. It’s a good practice to just attach the MCP servers that you need.
Finally, it is worth comparing Codex CLI to its close competitor, Claude Code.
If your goal is automation and continuous integration (CI) pipelines, Codex CLI is generally the better choice. It is lightweight, user-friendly, and highly scriptable. Claude Code, on the other hand, shines as an interactive coding environment inside the editor, with strong built-in UX for refactors, test runs, and per-project assistants.
Configuration styles differ as well. Codex relies on TOML files for configuration, with a shared ~/.codex/config.toml that is used by both the CLI and the IDE extension, plus optional project-level overrides via .codex/config.toml inside each repo. This means your environment is shared by default but can be customized per project.
Claude Code typically uses JSON-based settings, with a global config (for example, ~/.claude.json) and additional project-scoped files (such as .mcp.json or project settings) that let each repository define its own MCP servers and behavior, which improves isolation but can mean a bit more per-project setup.
While both tools represent the cutting edge of AI coding agents, the choice between them comes down to your specific workflow; if you think of the agent as something that lives mainly in a terminal or CI job, Codex tends to fit better, whereas if you primarily want an editor-first coding companion, Claude Code often feels more natural.
|
Feature |
Codex CLI |
Claude Code |
|
Primary use case |
CI/CD automation, headless scripts, agent backends |
Editor-first, deep interactive coding sessions inside the IDE |
|
Configuration format |
TOML ( |
JSON-based settings ( |
|
Config scope |
Shared global profile with project overrides |
Global defaults plus strong per-project isolation |
|
Environment |
Terminal- and agent-centric, integrates easily with Agents SDK and CI |
IDE-centric, focused on in-editor UX, refactors, test runs, and MCP-powered tools |
|
Automation |
Highly scriptable, easy to run headless via codex mcp-server |
Supports MCP in projects, but primarily designed for interactive, UI-driven workflows |
|
Setup overhead |
Minimal once |
Slightly more per-project setup, in exchange for fine-grained, repo-local configuration |
For a deeper dive into this comparison, I recommend reading our Codex vs Claude Code guide.
We have covered a lot of ground today, from the basic definitions of MCP to building our own Codex agent. But if you take just one thing away from this tutorial, let it be the power of the workflow itself. The entire process, which consists of configuring your MCP server, running Codex, and watching the tools auto-discover the data they need, lets you build features faster than a human ever could.
If you are just getting started, I highly recommend that you don't overcomplicate things right away. Start with Context7 for documentation and perhaps just one API-based MCP, like the Alpha Vantage setup we built today. Get comfortable with that flow before you try to work with multiple agents.
Once you have that confidence, the sky is the limit. Go ahead and explore other MCPs. Connect Figma to generate UI code directly from designs, or hook up Sentry to have Codex automatically diagnose and fix production bugs. Experiment with Codex subagents and see how much of your routine work you can delegate. The tools are here, they are powerful, and they are ready for you to use.
If you’re interested in developing AI applications, I highly recommend enrolling in our AI Engineering with LangChain skill track. The teaching content is AI-native, which means you get your personal tutor who teaches you the exact skills you need to start from your level to become a real pro at engineering AI workflows.
Agentic AI Courses
Lernpfad
Lernpfad
Kurs
Tutorial
Abid Ali Awan
Tutorial
Aashi Dutt
Tutorial
Abid Ali Awan
Tutorial
Aryan Irani
Tutorial
Abid Ali Awan
Tutorial
Aashi Dutt