Cours
Introduction à MongoDB en Python
3 h
24.1K
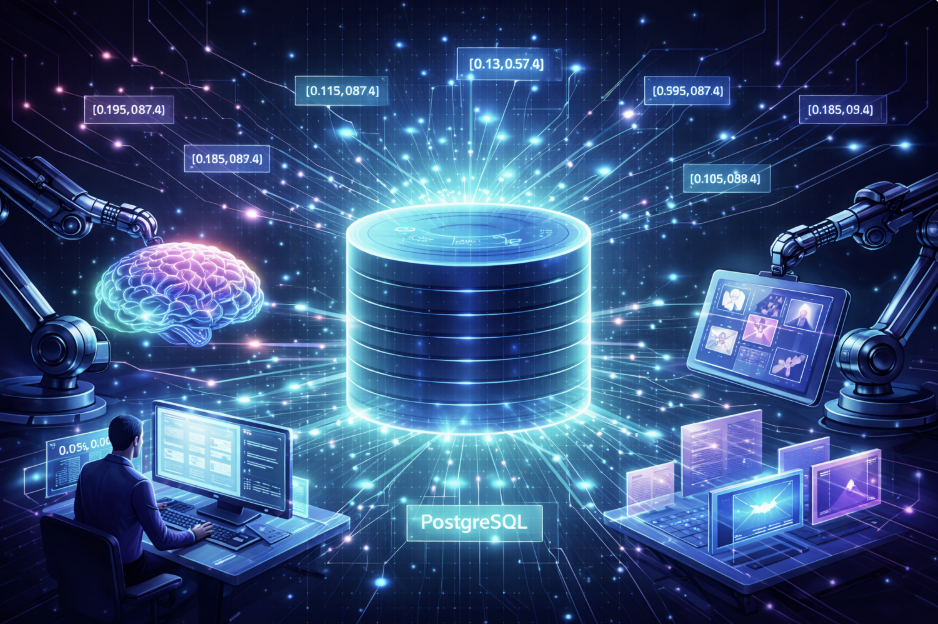
Keyword-based search works well for simple lookups, but it quickly breaks down when we care about meaning rather than exact wording. If one document mentions “boosting response times” and another talks about “improving performance,” a traditional search engine treats them as unrelated, even though they describe the same idea. We lose the semantic relationships simply because the phrasing is different.
Vector search solves this limitation by representing text and images as embeddings: numerical vectors generated by machine learning models that capture context, intent, and semantic similarity. Once we store these embeddings in MongoDB, we can query them to find items that are genuinely related, regardless of the exact terms used.
In this tutorial, we’ll build a practical end-to-end example of this workflow using FastAPI and MongoDB Atlas Vector Search. We’ll generate text embeddings using SentenceTransformers and image embeddings using a CLIP-based model, store both in MongoDB, and run similarity searches across them. By the end, we’ll have a working foundation that can support semantic article search, product recommendations, visual similarity tools, and many other real-world applications.
With that said, let's get started.
Before we start building, we’ll need a few things in place. This tutorial assumes a basic familiarity with Python, FastAPI, and MongoDB, but we won’t rely on anything advanced—everything we use will be introduced as we go.
Here’s what we’ll need:
We’ll install these as part of the setup:
These tools give us everything we need to generate embeddings, store them in MongoDB, and query them efficiently using vector search.
Before we start writing code, it helps to understand what is actually happening underneath the workflow. Vector search isn’t complicated once we break it down, and knowing the fundamentals makes the rest of the tutorial much easier to follow.
An embedding is simply a list of numbers (a vector) that represents the meaning of a piece of data.
For text, the embedding captures things like context and intent. For images, it captures visual patterns and features.
A very simplified example of an embedding looks like this:
[0.21, -0.17, 0.89, ...]Two things that are semantically similar—say, two sentences that describe the same idea, or two images with similar objects—will end up with vectors that are mathematically close to each other. Vector search works by measuring this closeness.
MongoDB itself does not generate embeddings. Instead, it focuses on what it does best:
In other words, our models generate the embeddings, and MongoDB handles the search.
This clean separation makes the system both flexible and scalable.
We can choose any embedding model we prefer, as long as it outputs a numeric vector. Different models specialize in different types of data:
|
Data Type |
Example Model |
Notes |
|
Text |
|
Lightweight and widely used for NLP |
|
Image |
CLIP/OpenCLIP |
Converts images into semantic vectors |
|
Multimodal |
Multimodal |
Handle both text and images together |
This is the workflow we’ll implement using FastAPI and MongoDB Atlas.
Once we set it up, we’ll be able to search text and images by meaning—something traditional keyword search cannot do.
Before we start building the FastAPI application, we need a place to store and query our embeddings. MongoDB Atlas makes this straightforward, and setting up vector indexes only takes a few minutes.
If you don’t already have one, create a new cluster in MongoDB Atlas. A free-tier (M0) cluster works perfectly for this tutorial. Visit the MongoDB documentation for more details on how to create a cluster.
Inside the cluster:
vector_db. For more details on this, check the documentation.texts: where we store text documents and their embeddingsimages: where we store image filenames and image embeddingsVisit the documentation for more details on how to create a collection.
We kept the image collection and the text collection separate because they rely on different embedding models and different vector dimensions.
MongoDB needs a vector index to run fast similarity searches. We’ll create one index for text embeddings and one for image embeddings.
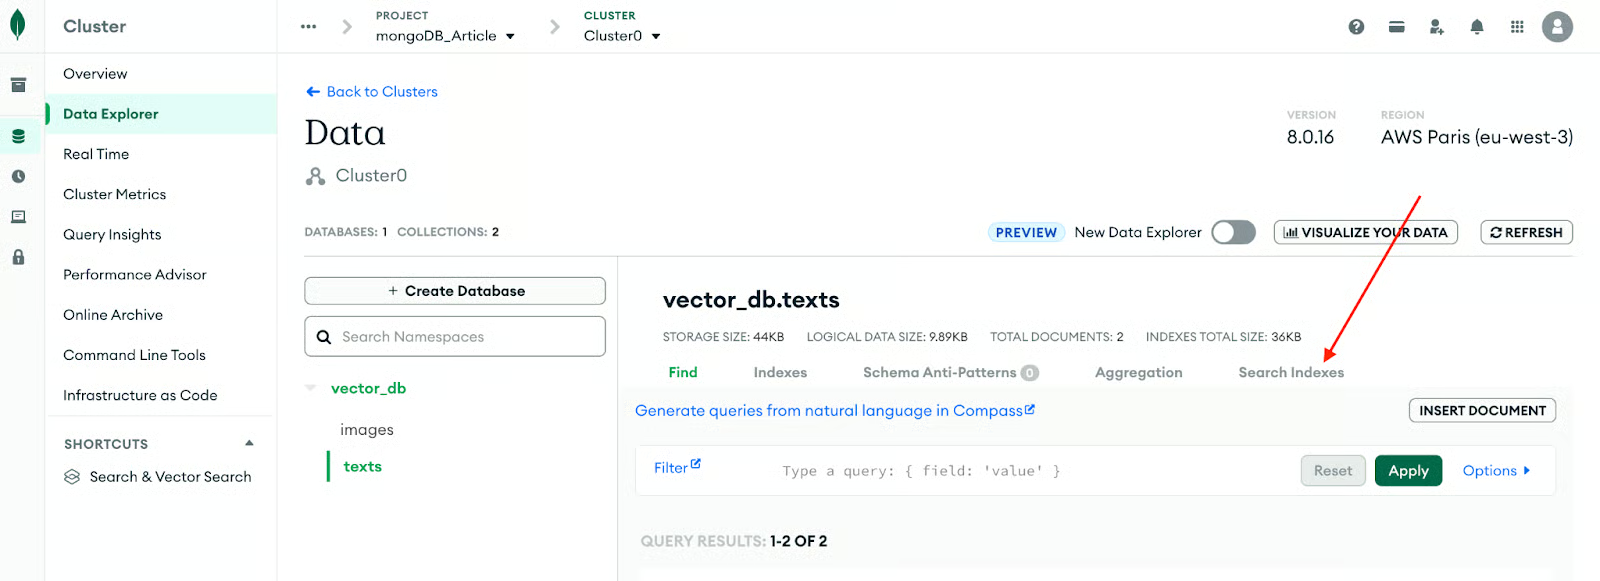
You can create these in Atlas → Collections → Search Indexes. Let's get started setting it up for the text collection.
The following image better explains the process.
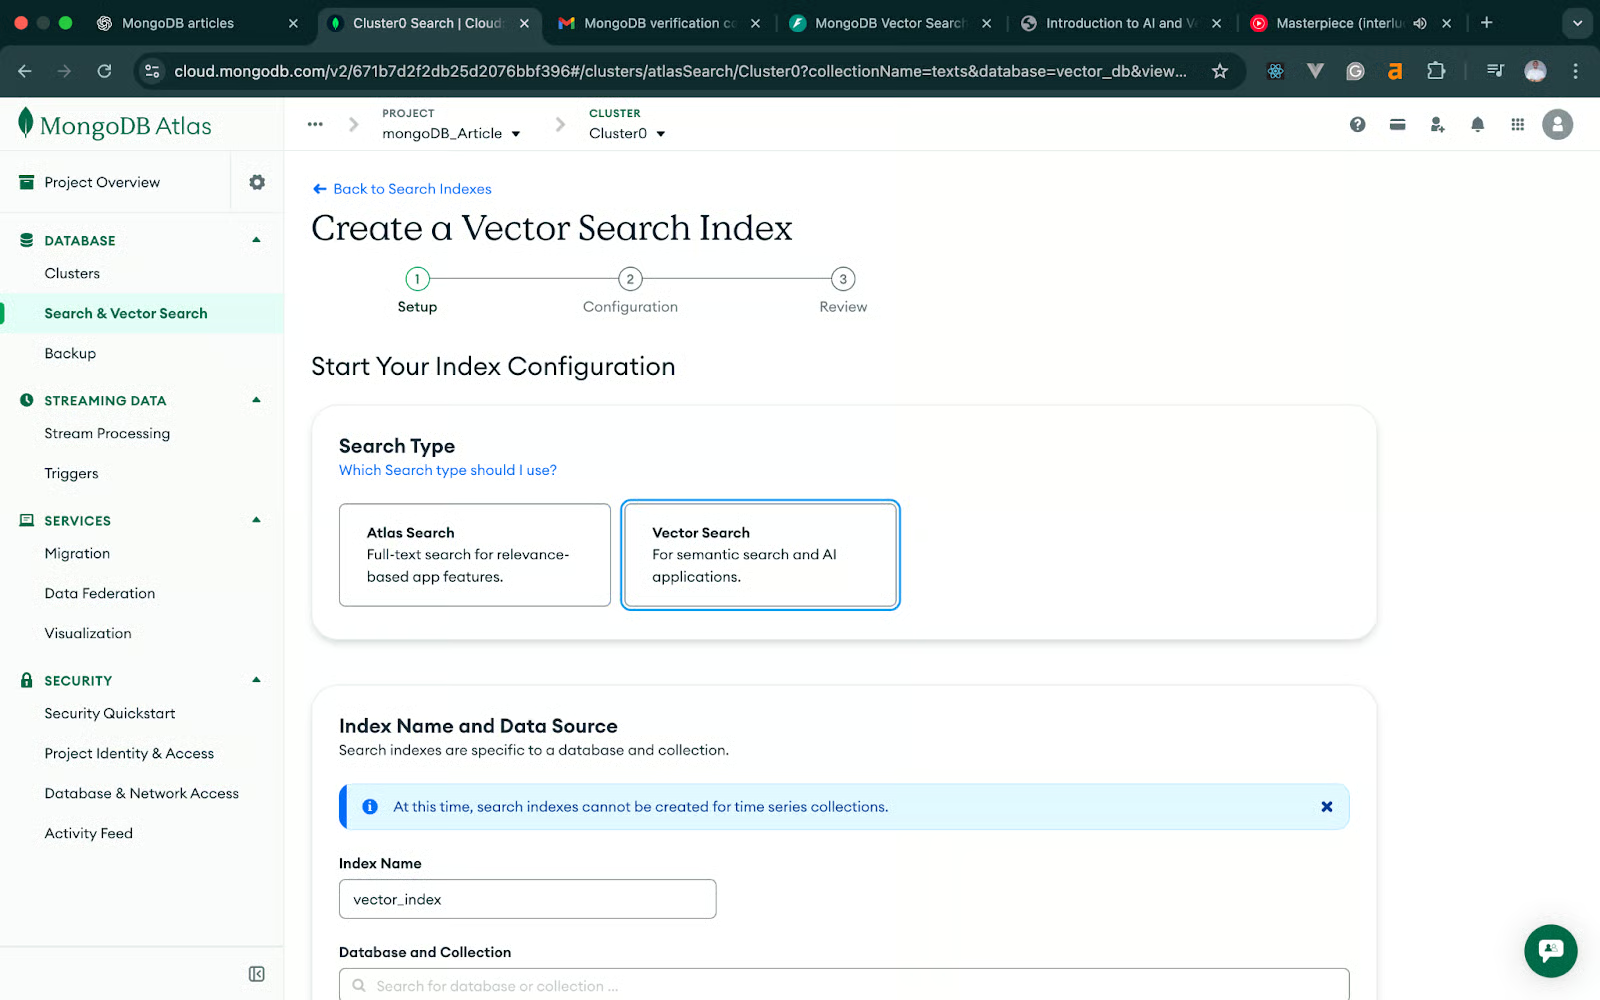
On the next screen, click on Vector Search ->JSON Editor -> Next. The following image should help you understand the process more
In the vector search index, modify the JSON text to match our code.
We’re using the all-MiniLM-L6-v2 model for text, which produces 384-dimensional embeddings.
Here’s the JSON definition:
{
  "fields": [
    {
      "type": "vector",
      "path": "embedding",
      "numDimensions": 384,
      "similarity": "cosine"
    }
  ]
}
Give this index a name: vector_texts_search and save.
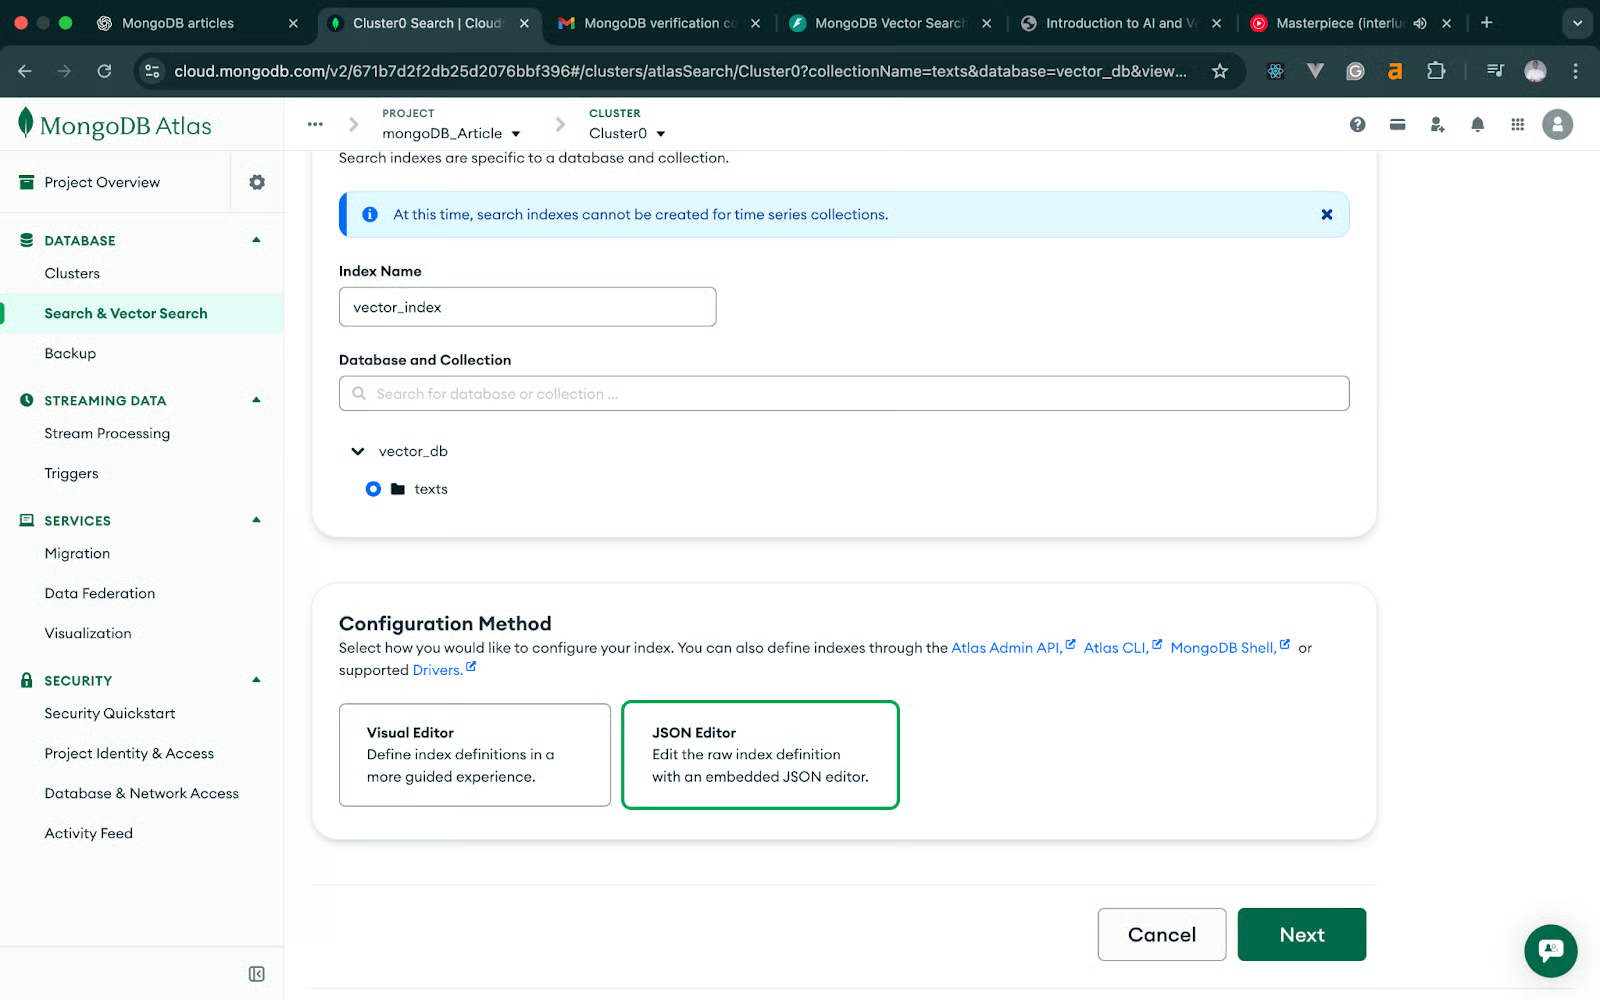
This allows MongoDB to perform cosine similarity searches across text embeddings. The image below illustrates the process in more detail.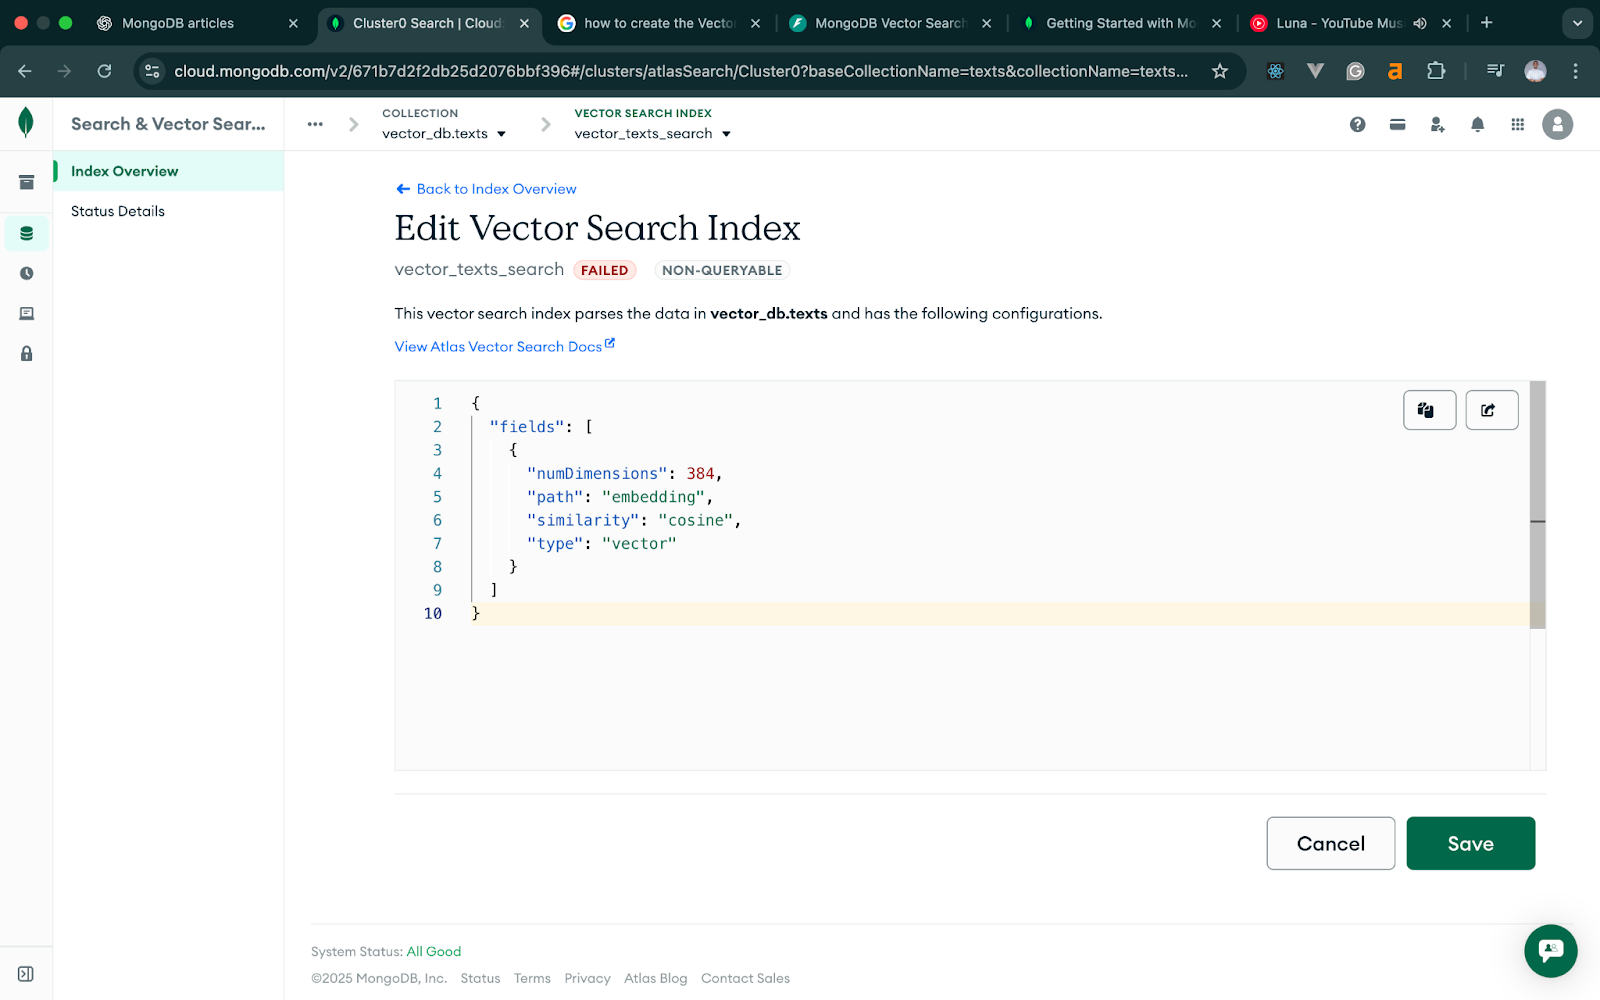
For images, we’re using a CLIP-based model that outputs 512-dimensional vectors, so the image index needs to match that dimension. The JSON definition should match the code below. Apart from that, the rest of the flow is the same.
{
  "fields": [
    {
      "type": "vector",
      "path": "embedding",
      "numDimensions": 512,
      "similarity": "cosine"
    }
  ]
}
Name this index: vector_images_search.
Once both indexes become active, MongoDB Atlas is ready for vector search queries.
Now that our MongoDB Atlas cluster and vector indexes are ready, we can set up the FastAPI application that will generate embeddings and store them in MongoDB. We’ll keep the project structure small and focused since this tutorial is about understanding the workflow rather than building a full production service.
We’ll install FastAPI, Uvicorn, MongoDB’s Python driver, and the libraries needed to generate text and image embeddings. Run:
pip install fastapi uvicorn pymongo python-dotenv sentence-transformers torch pillow open_clip_torch python-multipartA quick breakdown of why we need these:
.envOnce installed, we're ready to lay out the project.
We’ll keep everything in a single Python file, with configuration handled through environment variables:
fastapi-mongodb-vector-search/
│── main.py
│── .env
│── venv/
main.py will contain the entire application: the text endpoints, image endpoints, and MongoDB connection.
MONGODB_URI="your connection string"
DB_NAME="vector_db"
TEXT_COLLECTION="texts"
IMAGE_COLLECTION="images"FastAPI will load these when the application starts, keeping the configuration separate from the code.
With our FastAPI project set up, we can start by building the text-search workflow. This part introduces the core idea behind vector search: We generate embeddings for our text, store them in MongoDB, and query them using the vector index we created earlier.
We’ll take this in two small steps so everything is easy to test and debug as we go.
The first endpoint will accept a title and some text content. We’ll combine both fields into one string, generate an embedding using SentenceTransformers, and save the document together with the embedding vector.
Here’s what this looks like in code:
# main.py (excerpt)

from fastapi import FastAPI, HTTPException
from pydantic import BaseModel
from pymongo import MongoClient
from sentence_transformers import SentenceTransformer
from dotenv import load_dotenv
import os

load_dotenv()

app = FastAPI()

# --- DB setup ---
client = MongoClient(os.getenv("MONGODB_URI"))
db = client[os.getenv("DB_NAME")]
texts_coll = db[os.getenv("TEXT_COLLECTION")]
Images_coll = db[os.getenv("IMAGE_COLLECTION")]


# --- text embedding model ---
MODEL_NAME = "all-MiniLM-L6-v2"
text_model = SentenceTransformer(MODEL_NAME)

# --- request schema ---
class AddTextRequest(BaseModel):
    title: str
    content: str

@app.post("/add-text")
def add_text(payload: AddTextRequest):
    try:
        # Combine fields for richer embeddings
        text = f"{payload.title}\n\n{payload.content}"

        # Generate text embedding
        embedding = text_model.encode(text).tolist()

        # Store document in MongoDB
        doc = {
            "title": payload.title,
            "content": payload.content,
            "embedding": embedding,
            "model": MODEL_NAME,
        }

        result = texts_coll.insert_one(doc)

        return {
            "inserted_id": str(result.inserted_id),
            "title": payload.title
        }
    except Exception as e:
raise HTTPException(status_code=500, detail=str(e))cURL, Postman, and other similar API testing tools can be used to test. For this tutorial, we will test using Postman.
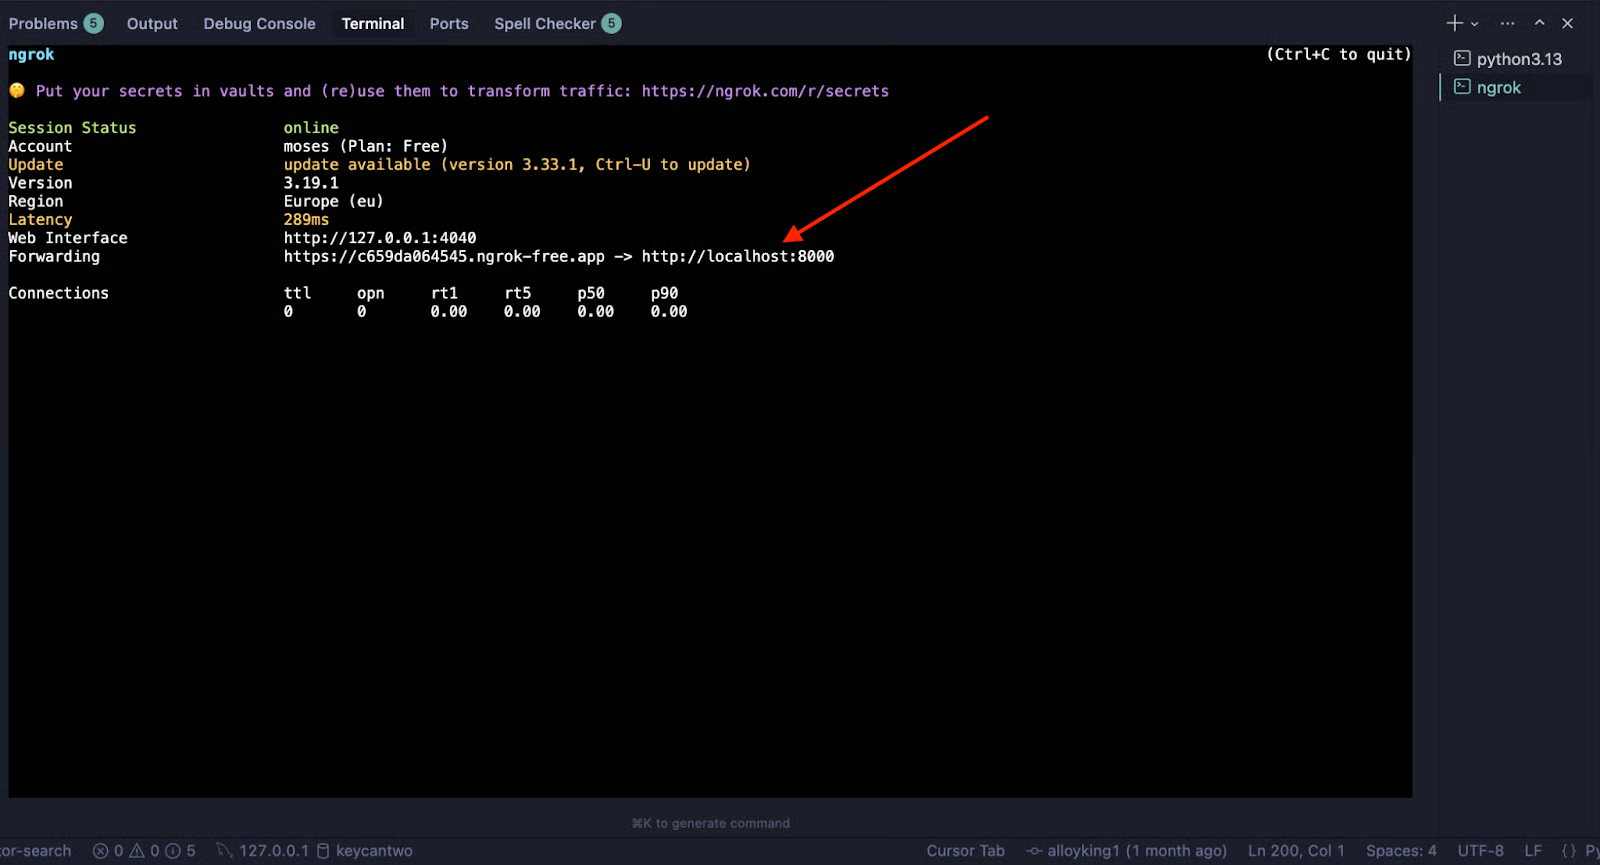
We will also need to expose our FastAPI endpoint to the internet so we can test using Postman on the web. We will use Ngrok for this. If you are new to Ngrok, visit the documentation.T o test, first run the FastAPI code using the command below:
uvicorn main:app --reloadThen, tunnel your localhost to the internet using the Ngrok command below:
Ngrok http 8000This will generate a URL to test with, like the image below:
Send a POST request using Postman to add-text endpoint. The image below further illustrates the process of sending the request and the expected response you should get.
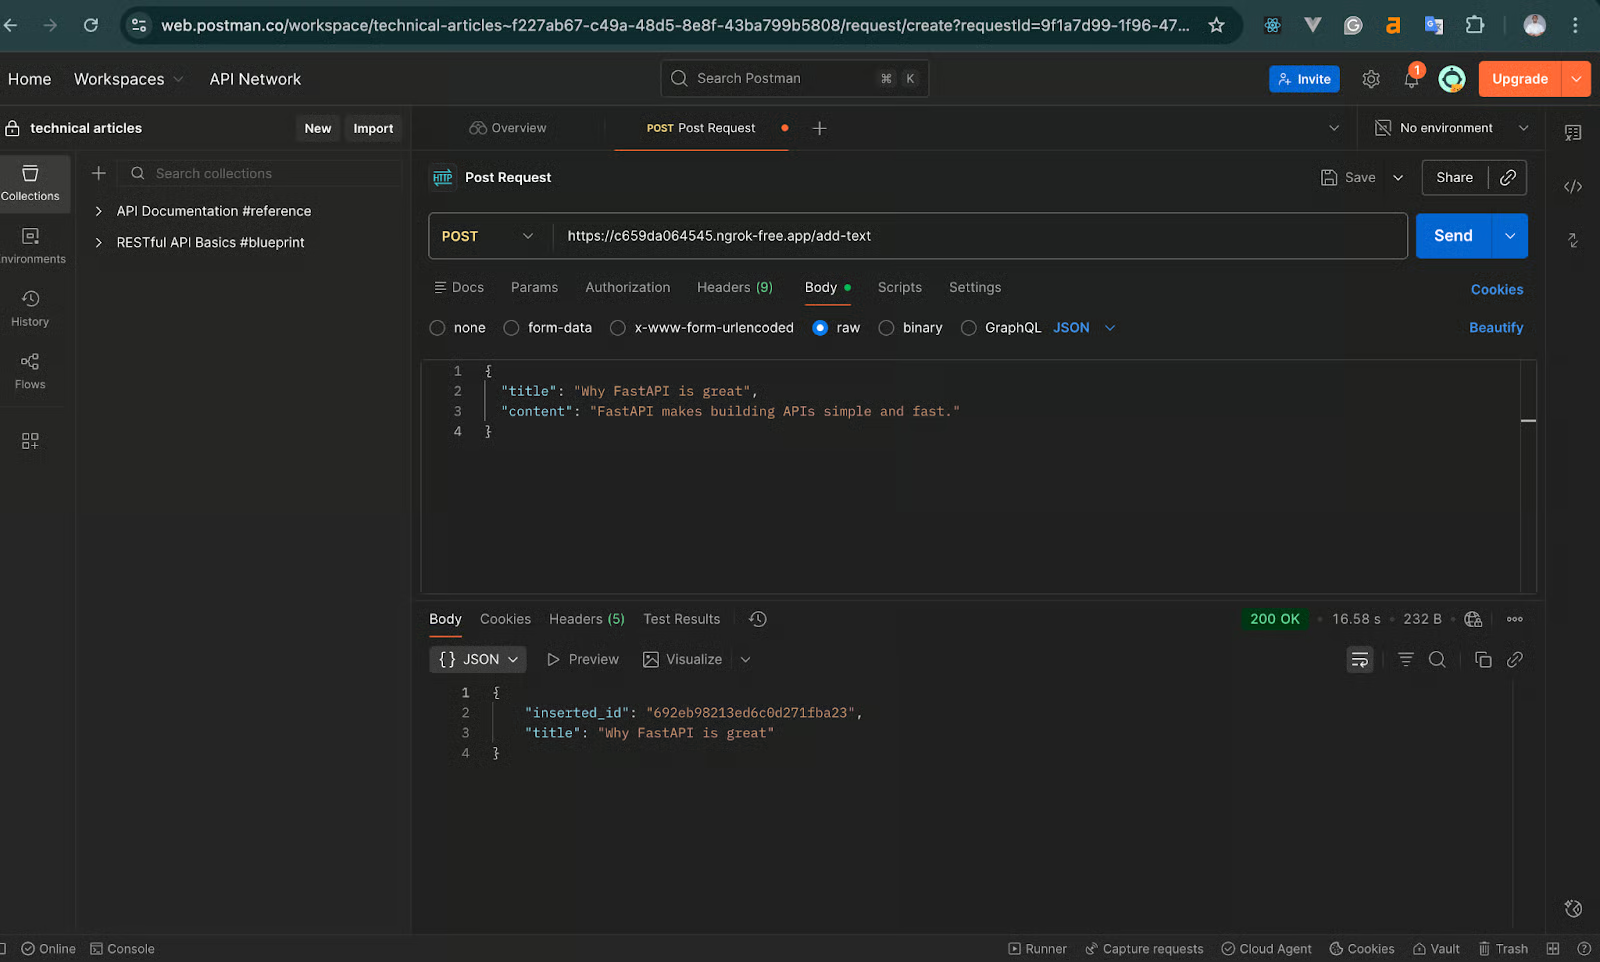
Expected response:
{
  "inserted_id": "65f...",
  "title": "Why FastAPI is great."
}
This confirms your embedding model loaded correctly, and MongoDB stored the vector. If this works, your text pipeline is functioning.
Now that we can add text, the next step is searching it using MongoDB’s $vectorSearch stage. Here, we:
Add the following endpoint to main.py:
class SearchTextRequest(BaseModel):
    query: str
    limit: int = 5

@app.post("/search-text")
def search_text(payload: SearchTextRequest):
    try:
        # Convert search query to embedding
        query_vector = text_model.encode(payload.query).tolist()

        # Vector search pipeline
        pipeline = [
            {
                "$vectorSearch": {
                    "queryVector": query_vector,
                    "path": "embedding",
                    "numCandidates": 100,
                    "limit": payload.limit,
                    "index": "vector_texts_search" # field MUST match the index name in Atlas exactly


                }
            },
            {
                "$project": {
                    "title": 1,
                    "content": 1,
                    "score": {"$meta": "vectorSearchScore"},
                    "_id": 0
                }
            }
        ]

        results = list(texts_coll.aggregate(pipeline))
        return {"results": results}

    except Exception as e:
        raise HTTPException(status_code=500, detail=str(e))
> The numCandidates parameter determines how many potential matches are evaluated before returning the top results.
> Higher values improve accuracy but increase query time. A good rule of thumb is 10-20x your limit.
After adding one or more documents, make a POST request to the /search-text endpoint through Postman using our Ngrok-generated link, like the image below:
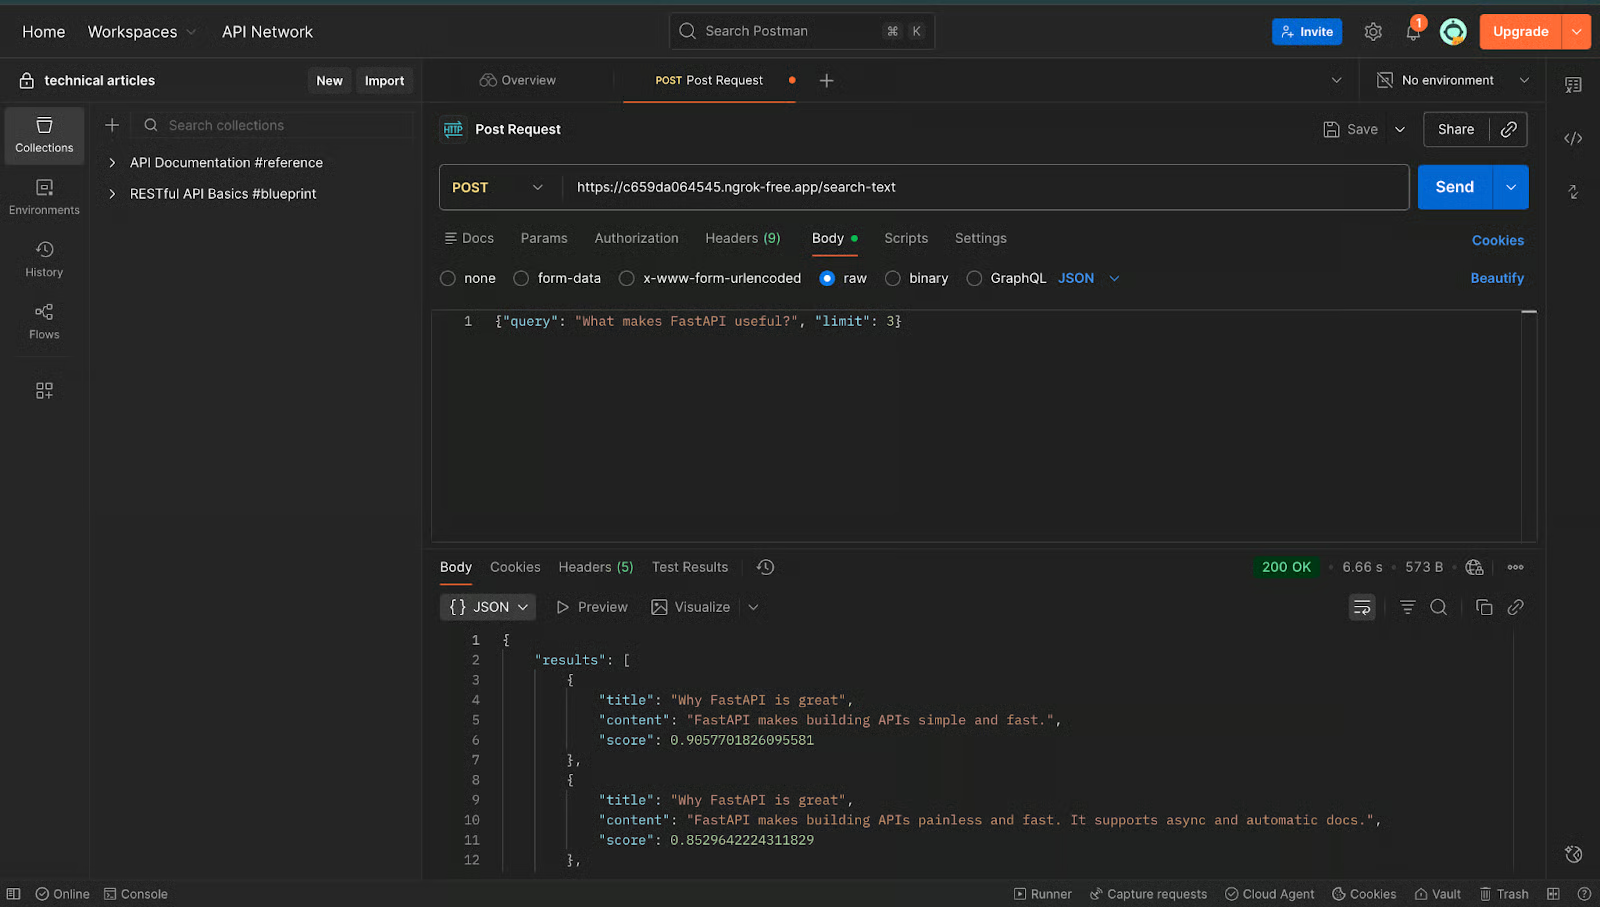
Expected output:
{
  "results": [
    {
      "title": "Why FastAPI is great",
      "content": "FastAPI makes building APIs simple and fast.",
      "score": 0.85
    }
  ]
}
If you see a result with a similarity score, then your text vector search pipeline is working end-to-end. Once this part works reliably, we’re ready to move on to the image workflow.
Now that our text workflow is running smoothly, we can extend the same idea to images. The overall flow is similar—the only major difference is how we generate embeddings. Instead of SentenceTransformers, we’ll use a CLIP-based model, which is designed to convert images into 512-dimensional vectors.
Just like before, we’ll implement this step-by-step so it’s easy to test and debug as we go.
This endpoint accepts an uploaded image file, converts it into a tensor that CLIP can understand, generates a 512-dimensional embedding, and stores it in MongoDB.
Here’s what this looks like:
# --- CLIP model setup ---
import torch
import open_clip
from PIL import Image
import io
from fastapi import UploadFile, File

# Load CLIP model once when the app starts
clip_model, _, preprocess = open_clip.create_model_and_transforms(
    "ViT-B-32",
    pretrained="openai"
)
device = "cuda" if torch.cuda.is_available() else "cpu"
clip_model.to(device)

@app.post("/add-image")
async def add_image(file: UploadFile = File(...)):
    """
    Upload an image, generate its CLIP embedding, and store in MongoDB.
    """
    try:
        # Read file contents
        image_bytes = await file.read()
        image = Image.open(io.BytesIO(image_bytes)).convert("RGB")

        # Preprocess for CLIP and encode
        image_tensor = preprocess(image).unsqueeze(0).to(device)
        with torch.no_grad():
            image_embedding = clip_model.encode_image(image_tensor)

        # Normalize the embedding (important for cosine similarity)
        image_embedding /= image_embedding.norm(dim=-1, keepdim=True)
        vector = image_embedding.cpu().numpy().flatten().tolist()

        # Store in MongoDB
        doc = {
            "filename": file.filename,
            "embedding": vector
        }
        result = images_coll.insert_one(doc)

        return {
            "inserted_id": str(result.inserted_id),
            "filename": file.filename
        }

    except Exception as e:
raise HTTPException(status_code=500, detail=str(e))CLIP embeddings work best with cosine similarity. To make comparisons accurate and stable, we normalize the vectors:
image_embedding /= image_embedding.norm(dim=-1, keepdim=True)This ensures that cosine distance reflects true similarity.
To test this feature in Postman, make a POST request to the /add-image endpoint. Send a form-data as the body of the request with any .jpg or .png image. The image below further demonstrates the process.
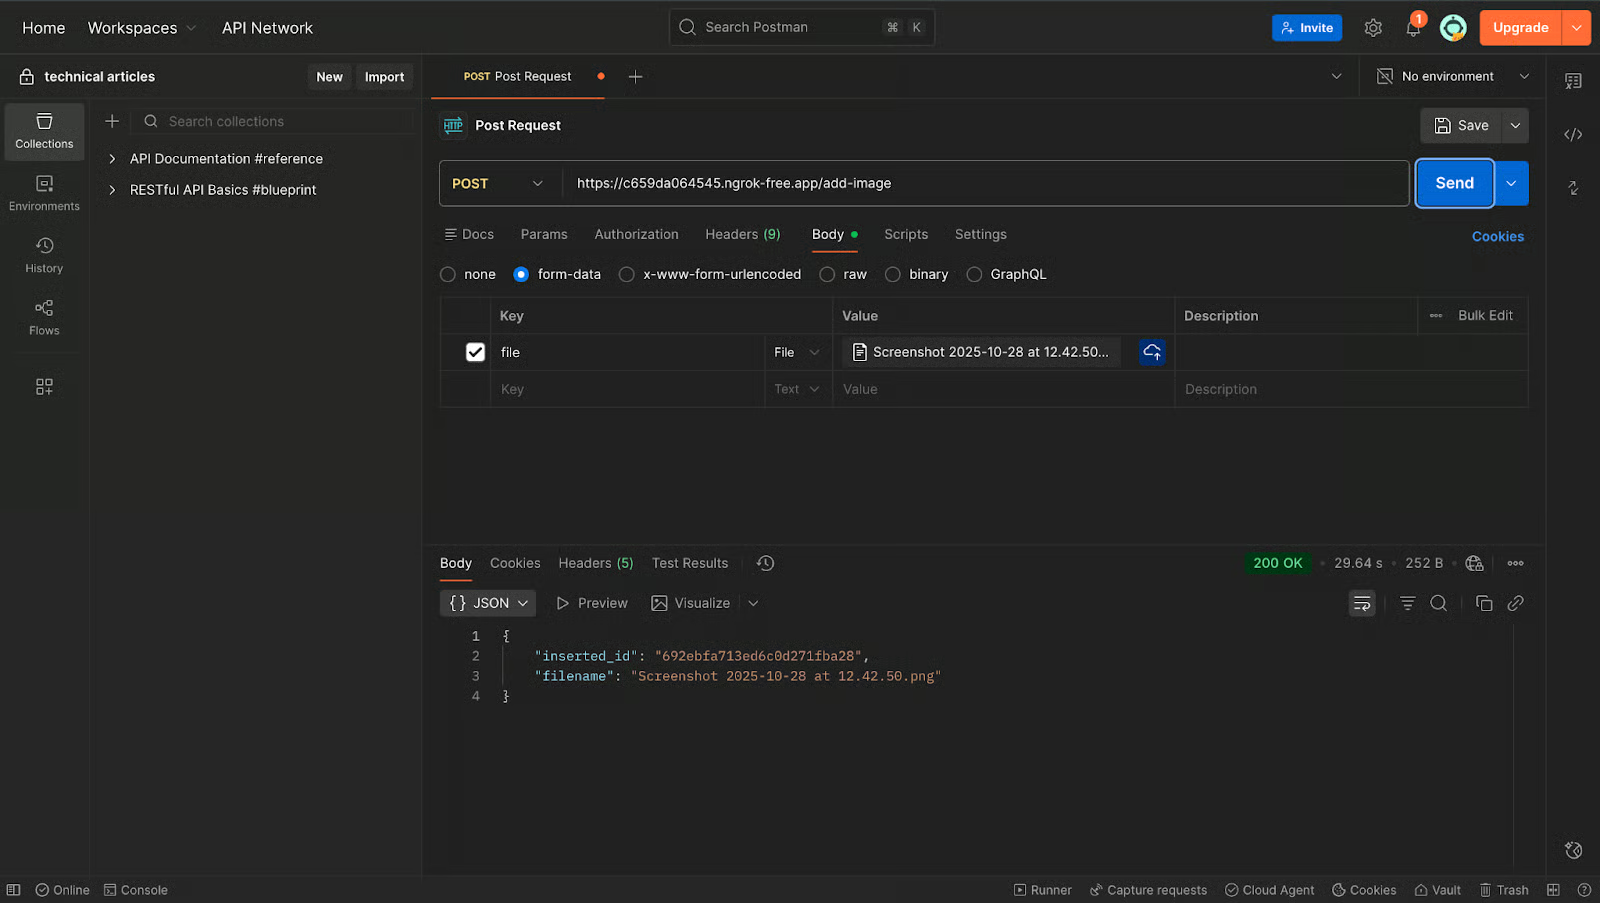
If everything is working, you should get something like:
{
  "inserted_id": "692454f6156fbb762ed865a0",
  "filename": "file-name.png"
}
At this point, your image embeddings are successfully stored in MongoDB.
Now, we can build the endpoint that takes an uploaded query image, converts it into an embedding, and finds the closest stored images using our image vector index.
Add this to main.py:
@app.post("/search-image")
async def search_image(file: UploadFile = File(...)):
    """
    Upload an image and find the most visually similar images in MongoDB.
    """
    try:
        # Read the uploaded file
        image_bytes = await file.read()
        image = Image.open(io.BytesIO(image_bytes)).convert("RGB")

        # Generate embedding for the query image
        image_tensor = preprocess(image).unsqueeze(0).to(device)
        with torch.no_grad():
            query_embedding = clip_model.encode_image(image_tensor)

        query_embedding /= query_embedding.norm(dim=-1, keepdim=True)
        query_vector = query_embedding.cpu().numpy().flatten().tolist()

        # Vector search pipeline
        pipeline = [
            {
                "$vectorSearch": {
                    "queryVector": query_vector,
                    "path": "embedding",
                    "numCandidates": 100,
                    "limit": 5,
                    "index": "vector_images_search"
                }
            },
            {
                "$project": {
                    "filename": 1,
                    "score": {"$meta": "vectorSearchScore"},
                    "_id": 0
                }
            }
        ]

        results = list(images_coll.aggregate(pipeline))
        return {"results": results}

    except Exception as e:
raise HTTPException(status_code=500, detail=str(e))To test this feature in Postman, make a POST request to the /search-image endpoint. Send the form data as the body of the request with any image similar to what you stored earlier. The image below further demonstrates the process.
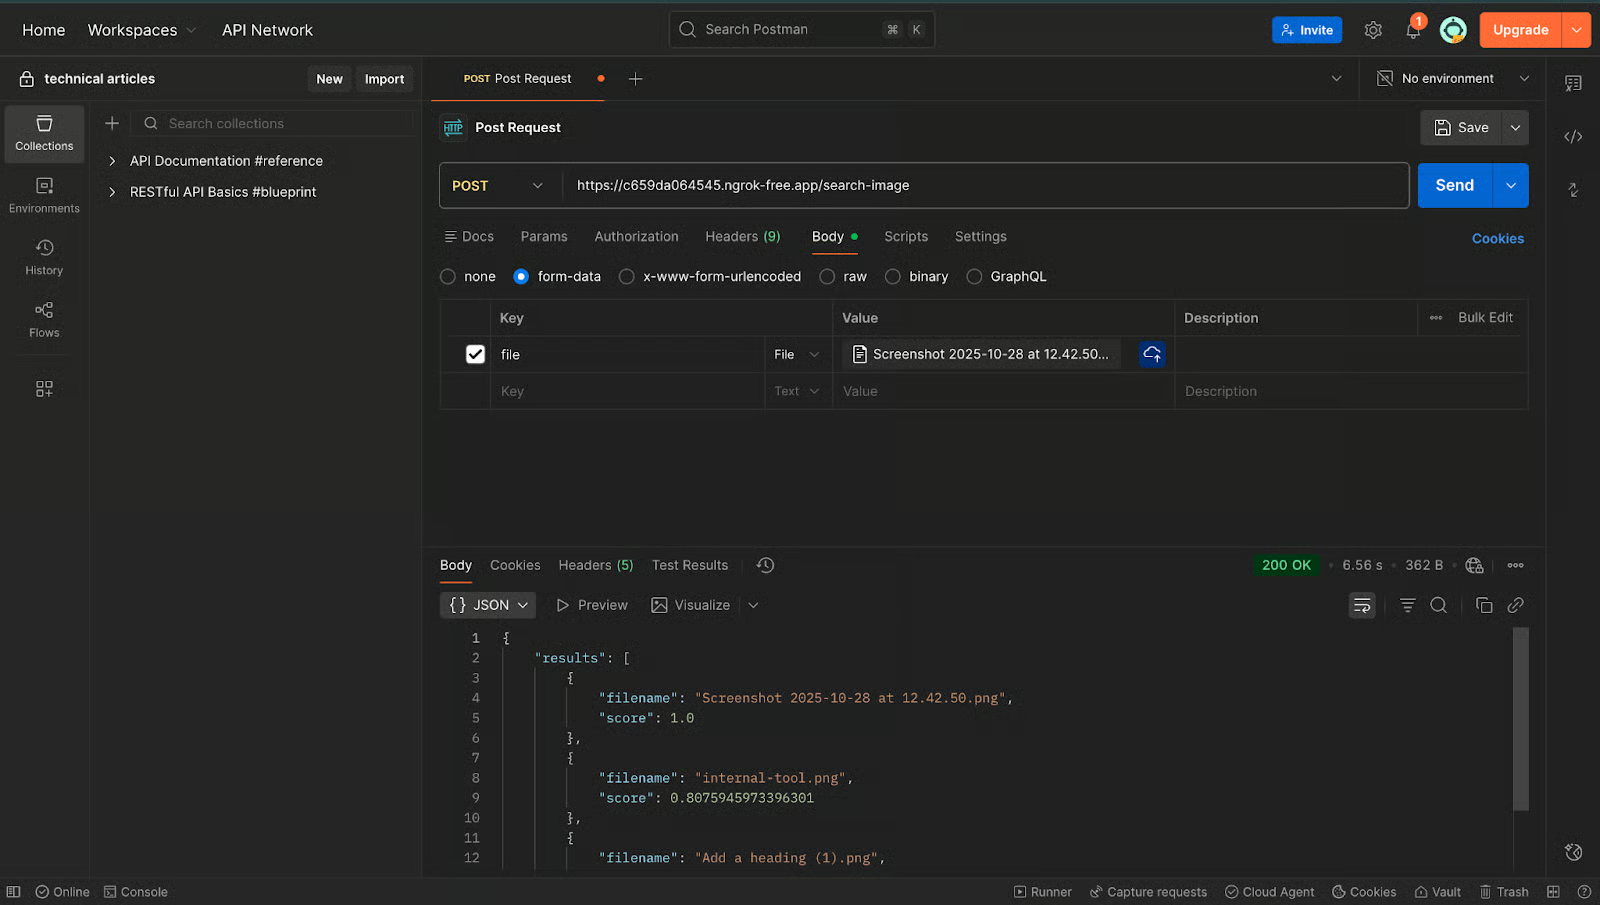
The expected output should look like:
{
  "results": [
    {
      "filename": "image1.png",
      "score": 1.0
    },
    {
      "filename": "image2.png",
      "score": 0.81
    }
  ]
}
A score of 1.0 means it matched the exact same image. Anything close (0.7–0.9) indicates strong visual similarity.
If you see an array with results, your image vector search is now working.
At this point, if everything works, we have a complete semantic search system that works for both text and image.
In this tutorial, we built a complete semantic search workflow using FastAPI and MongoDB Atlas. We generated text embeddings with SentenceTransformers, created image embeddings with a CLIP model, stored everything in MongoDB, and queried them using MongoDB’s Vector Search and Postman. This pattern forms the foundation for applications such as semantic document search, image similarity tools, recommendation systems, and multimodal AI features.
What makes this architecture powerful is its flexibility: MongoDB does not lock you into specific models. As long as the embeddings are numeric vectors and the dimensions match your index configuration, you can plug in any text, image, or multimodal embedding model your use case requires.
With this foundation in place, you can extend the project further—store metadata, build ranking logic, or integrate with user-facing apps. The same workflow also scales effortlessly using MongoDB Atlas’s fully managed services.
You can find the complete working project on GitHub.
Top DataCamp Courses
Cours
Cours
blog
Anaiya Raisinghani
12 min
Tutoriel
Nilesh Soni
Tutoriel
Karen Zhang
Tutoriel
Nilesh Soni
Tutoriel
Anaiya Raisinghani
Tutoriel
Moez Ali