Course
Developing LLM Applications with LangChain
3 hr
46.2K
The AutoGPT Platform is a platform that allows users to create, deploy, and manage continuous AI agents. It uses a low-code UI to allow users to automate thousands of digital processes, with agents running autonomously behind the scenes.
The AutoGPT Platform has two core components: the AutoGPT Server , the main logic and infrastructure, and the AutoGPT Frontend, the UI for building the agents, managing workflows, and implementing recurring schedules.
It is pre-integrated with LLM providers such as OpenAI, Anthropic, Groq, and Llama so that a wide range of tasks like data processing, content creation, or even fun activities can be automated.
In this tutorial, we will guide technical professionals on how to set up AutoGPT platform locally and create their first agent. You can read our full guide on Understanding AI Agents to learn more, and also discover the different types of AI agents in a separate article.
AutoGPT is an AI platform/software that allows users to create, deploy, and manage autonomous AI agents. These agents can perform various tasks with minimal human supervision through a low-code interface that’s installed on the user’s machine.
As of the time of writing, there is an open waitlist for an upcoming cloud version of AutoGPT if you want to avoid the hassle of local setup.
Key features and capabilities of AutGPT include:
The AutoGPT platform consists of two main components:
1. AutoGPT server:
2. AutoGPT frontend:
The backend of AutoGPT uses Python with FastAPI as the web framework and PostgreSQL with Prisma ORM for data storage. It uses websockets for real-time communication and includes managers for execution, scheduling, and notifications.
This design improves scalability and maintenance as the platform grows.
The frontend uses Next.js 14 with TypeScript, Radix components, and Tailwind CSS, with workflow visualization using xyflow. This creates an intuitive low-code interface where users can build AI agents without extensive programming knowledge.
The platform includes these key services:
When it was first announced around 2023, AutoGPT blew up in popularity and was seen as the open-source killer of ChatGPT. Of course, that was just hype driven by social media influencers because it is 2025 now, and ChatGPT is still here. But AutoGPT did signal the shift in focus for the AI community towards AI agents.
The earlier versions of AutoGPT promised fully autonomous agents that could be built on the fly from a single prompt. It would be able to break up the prompt into manageable tasks and piece together a variety of tools, software, and APIs to get the job done all the while having both short-term and long-term memory boosted by self-reflecting feedback loop.
However, along the way, they must have realized the limitations of this approach due to the inherent unpredictability of LLMs in production scenarios.
Today, AutoGPT is not that “prompt-to-agent” platform but something much better — a low-code platform that puts the users in control of how their agents are built. You can see this shift from the original version of AutoGPT to the platform we have in 2025 if you read the posts from 1–2 years ago or watch YouTube videos.
Those posts show completely different setup instructions and workflow examples than what I am about to teach you.
So, without further ado, let’s see how you can set up the platform on your machine.
Setting up AutoGPT locally requires proper configuration of your development environment and an understanding of containerization tools - check out our course on Containerization and Virtualization with Docker and Kubernetes if you need a refresher. This section walks you through the complete process from prerequisites to running the platform for the first time.
Before installing AutoGPT, ensure you have the following prerequisites:
1. Node.js & NPM
brew install nodesudo apt update sudo apt install nodejs npmnode -v npm -v2. Docker & Docker Compose
sudo apt update sudo apt install docker.io docker-compose sudo systemctl enable --now dockerdocker -v docker compose -v3. Git
brew install gitsudo apt update sudo apt install gitgit clone https://github.com/Significant-Gravitas/AutoGPT.gitThese prerequisites are essential for running AutoGPT effectively. Node.js and NPM are required for the frontend application, allowing you to interact with AutoGPT through a user-friendly interface.
Docker and Docker Compose create isolated containers that ensure consistent performance across different systems and simplify the deployment of the backend services. Git enables you to clone the repository and stay updated with the latest improvements.
After this step, you must have the AutoGPT directory on your machine, which contains everything to run the application. The only thing left is configuration.
Docker provides an isolated, consistent environment for running AutoGPT, ensuring all dependencies work correctly regardless of your host system.
cd AutoGPT/autogpt_platform
cp .env.example .env
docker compose up -d --build
The new .env file comes with environment variables populated with sensible defaults. You are not strictly required to configure this file yourself but its presence is a must. It will be used by the fronted application when you supply various keys and secrets while creating your custom agents.
The last docker compose command may take anywhere up to 15 minutes depending on your Internet speed on the first run. It sets up the backend components to which the frontend will connect.
cd frontend
cp .env.example .env
npm install
npm run dev
These commands set up the environment file for the frontend, install its dependencies with Node.js and start up the UI.
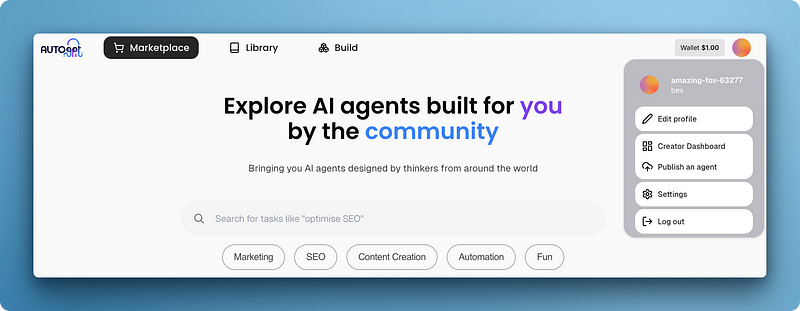
Visiting port 3000 must show you the Marketplace UI, through which you must create your account and log in.
# Generate a new key with Python
from cryptography.fernet import Fernet
Fernet.generate_key().decode()

# Or use the built-in CLI
poetry run cli gen-encrypt-key
Replace the existing key in autogpt_platform/backend/.env with your new key.
Note for Windows users: When using Docker on Windows, select WSL 2 instead of Hyper-V during installation to avoid compatibility issues with Supabase. If you already installed with Hyper-V, you can switch to WSL 2 in Docker Desktop settings.
Before we create a functioning agent, let’s get a feel for the AutGPT’s builder interface.
The interface is a large blank canvas with four main buttons:
Clicking on “Blocks” brings up a menu for AutoGPT’s built-in reusable components grouped into categories.
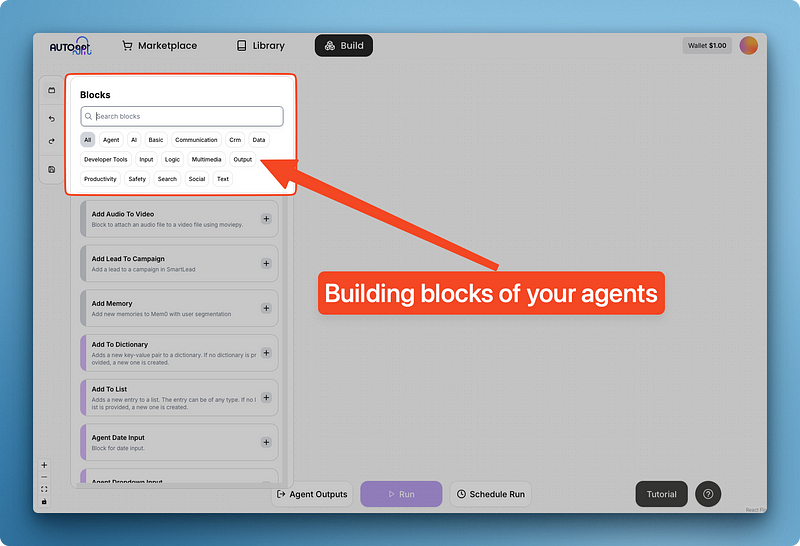
These blocks provide essential tools that can be universally applied in many agent scenarios.
For example, below, I searched and added two blocks — long text input and AI text generator. These two components are enough for me to recreate the basic version of the ChatGPT interface:
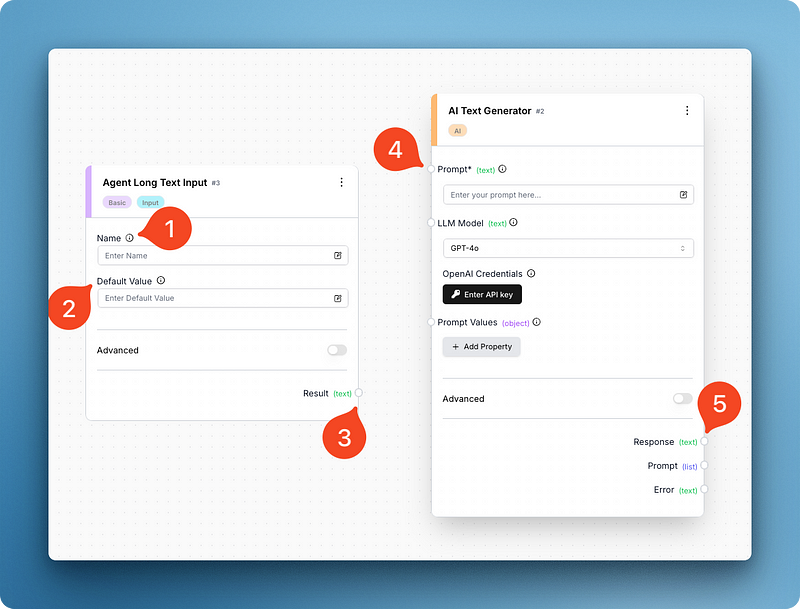
Looking at the image, you can see that each block has different moving parts. The input block has fields for the block name and a default value, while the text generator has a field for the prompt, the model, and prompt variables.
The latter also has a one-time input field for your OpenAI API key, which you must provide before running the agent (do it now). The API key field changes based on the model you choose and AutoGPT supports most major and minor vendors.
If you notice, both blocks have little edges (look at 3 and 5) that allow you to connect them:
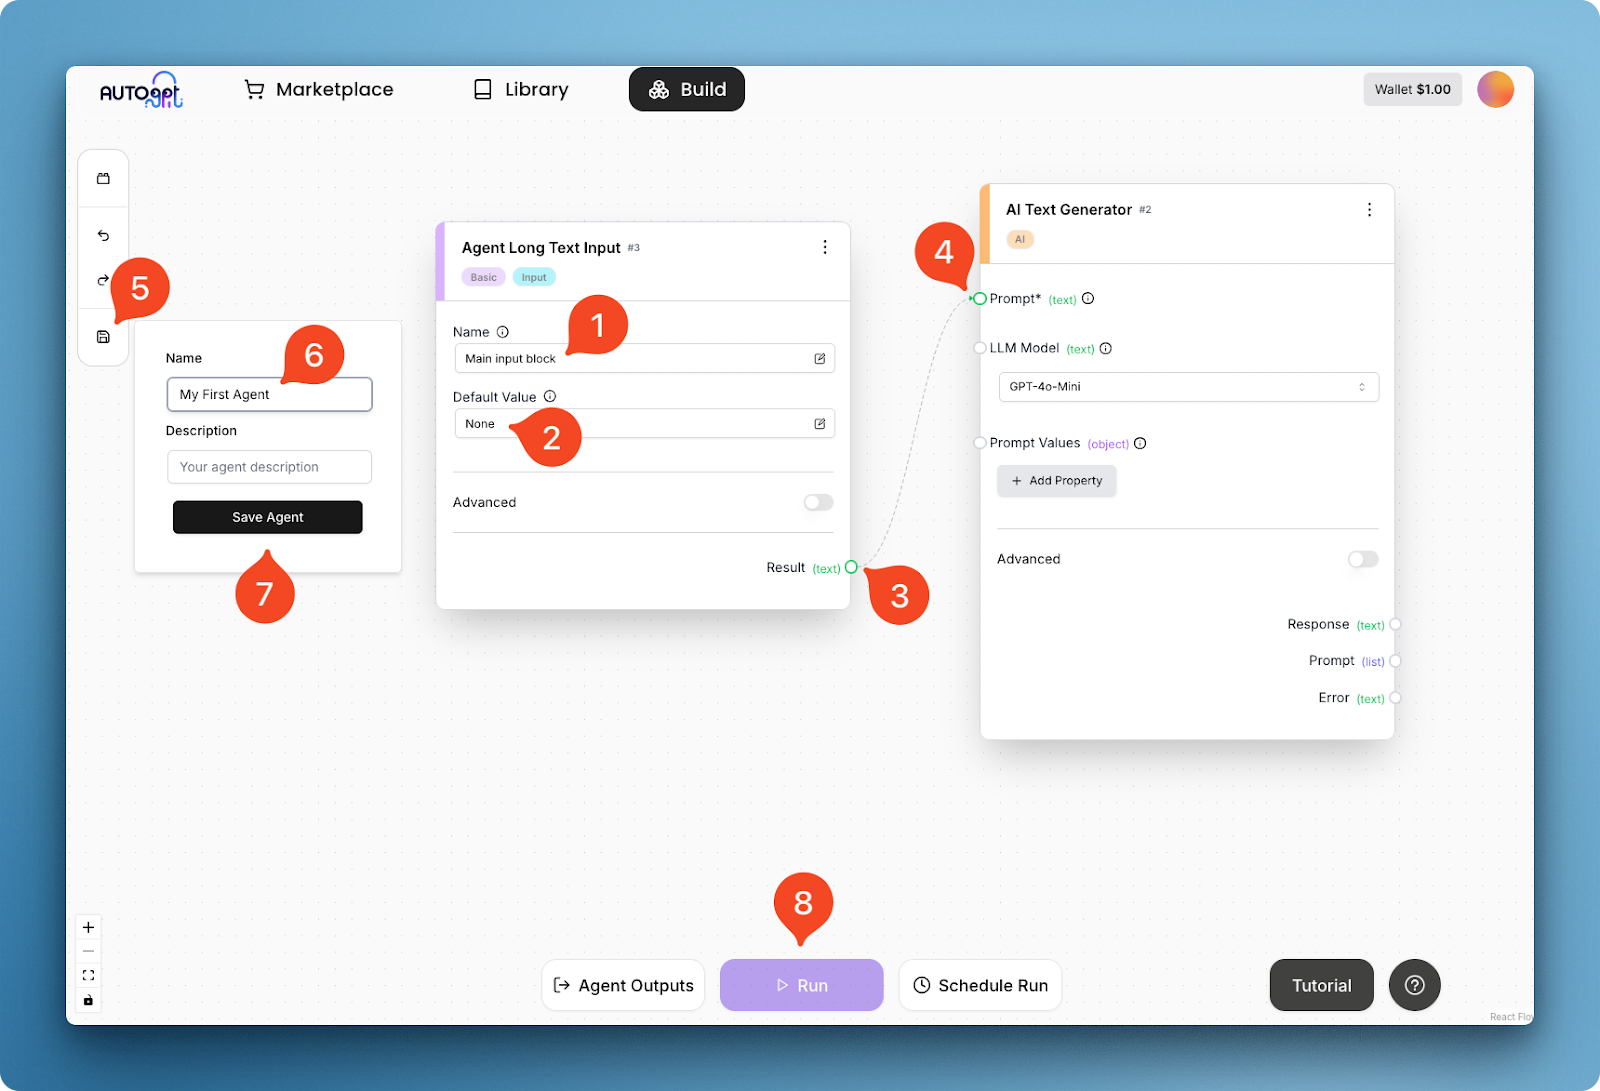
In the image above, I am giving the input block a name (1) and a default value (2), and connecting its text result (3) to the prompt field (4) of the text generator. This connection creates a basic agent workflow, which can be executed after saving the agent itself (steps 5–8).
After clicking run, you will see a “Run settings” menu pop-up for the input field:
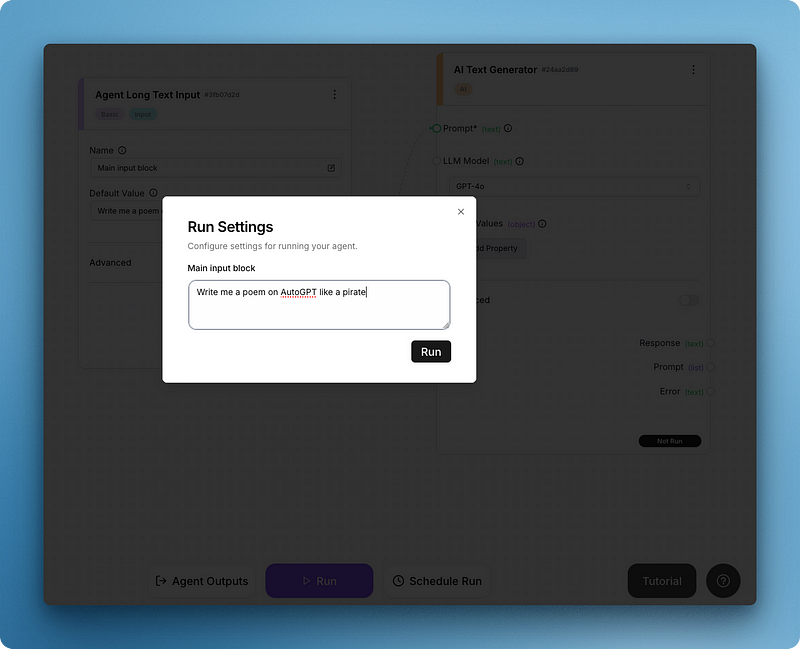
Write your prompt and run the whole thing to get your first output like below:
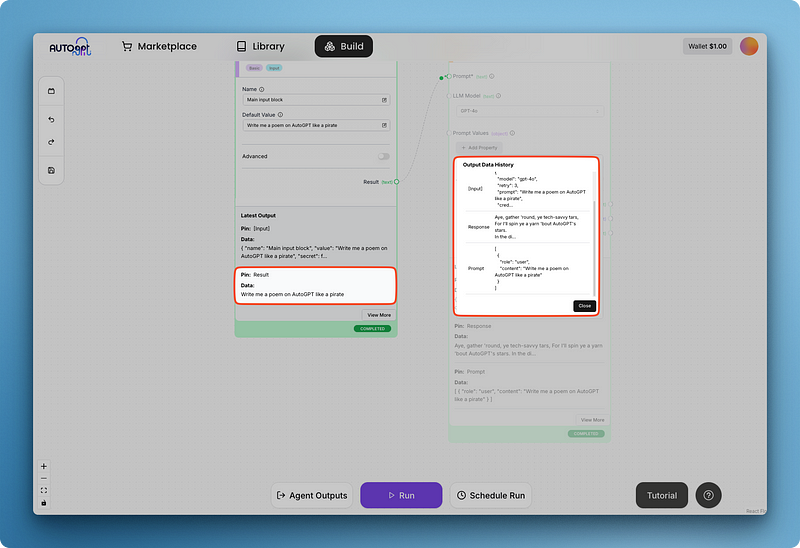
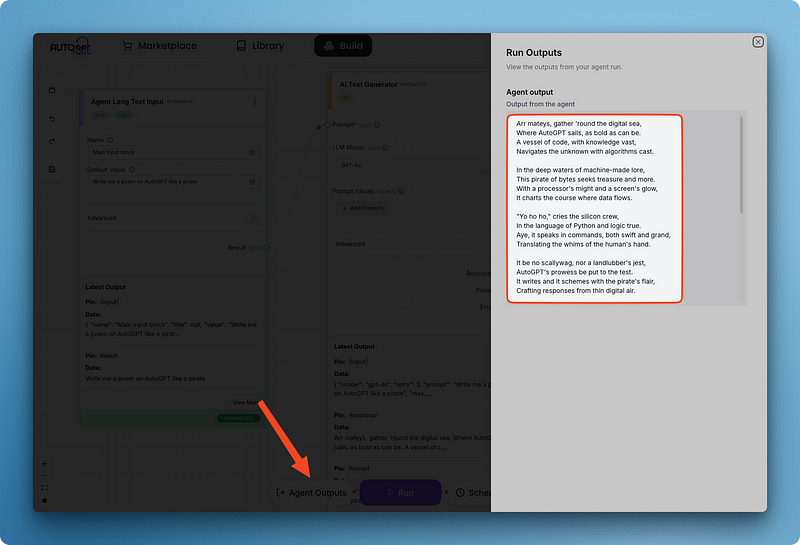
You might notice that the model response is hard to read inside the larger text generation block. That’s why AutoGPT has blocks for agent outputs, which I am adding below:
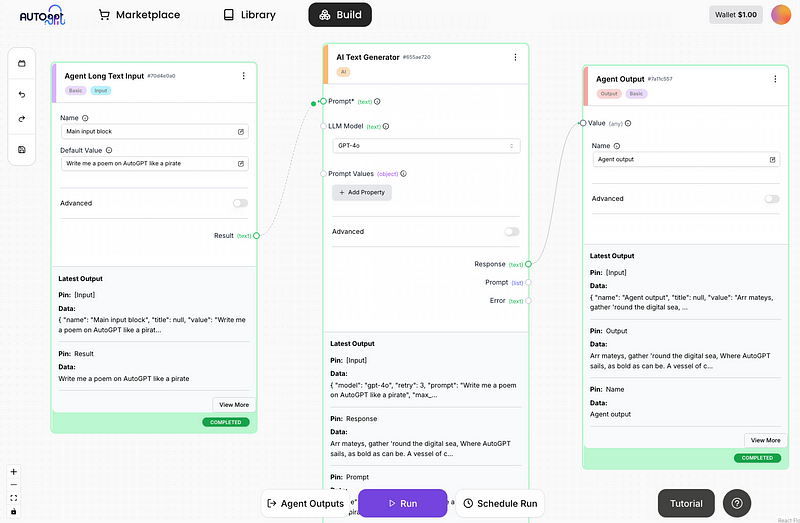
Notice how I connected the response field of the text generator to the value of the agent output block. Adding an output block also enables you to view all agent outputs from different blocks using the “Agent Outputs” pane in one place:
Once you save your agent, it will be saved to your library. Moreover, this entire agent can then be used as a block in other agents you create. This modular approach provides several advantages:
This building-block approach enables you to create increasingly powerful AI systems by layering capabilities on top of each other.
AutoGPT’s power comes from its modular block system. While the platform includes many useful built-in blocks, you can extend its capabilities by creating your own custom blocks in Python. This feature allows you to integrate with any API, service, or tool that can be accessed programmatically.
Creating a custom block involves these essential steps:
autogpt_platform/backend/backend/blocks directory using snake_case namingBlock base classBlockSchema to define the data structure__init__ method with a unique ID and test datarun method containing your block's core logicLet’s break down each component in detail:
Every block must inherit from the Block base class and define its input/output schemas:
from backend.data.block import Block, BlockSchema, BlockOutput

class MyCustomBlock(Block):
   class Input(BlockSchema):
       # Define input fields with types
       field1: str
       field2: int

   class Output(BlockSchema):
       # Define output fields with types
       result: str
       error: str  # Always include an error field

   def __init__(self):
       super().__init__(
           id="xxxxxxxx-xxxx-xxxx-xxxx-xxxxxxxxxxxx",  # Generate proper UUID
           input_schema=MyCustomBlock.Input,
           output_schema=MyCustomBlock.Output,
           test_input={"field1": "test", "field2": 42},
           test_output=("result", "expected output"),
           test_mock=None  # Only needed for external API calls
       )

   def run(self, input_data: Input, **kwargs) -> BlockOutput:
       try:
           # Your block logic here
           result = f"Processed {input_data.field1} and {input_data.field2}"
           yield "result", result
       except Exception as e:
raise RuntimeError(f"Error in block: {str(e)}")yield to output results one at a timeLet’s create a detailed example of a custom block that performs sentiment analysis using the OpenAI API. This demonstrates how to integrate with external AI services and handle API keys securely.
Before using this block, you need to set up your OpenAI API key:
1. Install required packages:
pip install openai python-dotenv2. Create a .env file in the autogpt_platform/backend/blocks directory with your OpenAI API key:
OPENAI_API_KEY=your_api_key_hereNow, let’s create the block:
First, let’s handle imports and environment setup:
# autogpt_platform/backend/blocks/sentiment_analyzer.py
from backend.data.block import Block, BlockSchema, BlockOutput
from typing import Dict, Any, List
import os
from dotenv import load_dotenv
from openai import OpenAI
import json

# Load environment variables from .env file
load_dotenv()
This section imports necessary libraries and loads environment variables from the .env file. The load_dotenv() function ensures that your API key is available through os.getenv().
Next, we define the block class with input and output schemas:
class OpenAISentimentBlock(Block):
   """Block to analyze sentiment of text using OpenAI API"""

   class Input(BlockSchema):
       text: str  # Text to analyze
       model: str = "gpt-3.5-turbo"  # OpenAI model to use
       detailed_analysis: bool = False  # Whether to return detailed analysis

   class Output(BlockSchema):
       sentiment: str  # Positive, Negative, or Neutral
       confidence: float  # Confidence score of the prediction
       explanation: str  # Brief explanation of the sentiment
       detailed_analysis: Dict[str, Any]  # Optional detailed analysis
       error: str  # Error message if analysis fails
The input schema defines three parameters:
text: The content to analyze (required)model: The OpenAI model to use (defaults to "gpt-3.5-turbo")detailed_analysis: Whether to return additional details (defaults to False)The output schema defines the structure of the results, including the sentiment category, confidence score, explanation, and optional detailed analysis.
The __init__ method sets up the block with test data and initializes the OpenAI client:
def __init__(self):
   super().__init__(
       id="8f67d394-9f52-4352-a78b-175d5d1d7182",  # Generated UUID
       input_schema=OpenAISentimentBlock.Input,
       output_schema=OpenAISentimentBlock.Output,
       test_input={
           "text": "I really enjoyed this product, it exceeded my expectations!",
           "detailed_analysis": True
       },
       test_output=[
           ("sentiment", str),
           ("confidence", float),
           ("explanation", str),
           ("detailed_analysis", dict)
       ],
       test_mock={
           "_analyze_sentiment": lambda text, model, detailed: {
               "sentiment": "positive",
               "confidence": 0.92,
               "explanation": "The text expresses clear enjoyment and states that expectations were exceeded.",
               "detailed_analysis": {
                   "emotions": {
                       "joy": "high",
                       "satisfaction": "high",
                       "disappointment": "none"
                   },
                   "key_phrases": ["really enjoyed", "exceeded expectations"],
                   "tone": "enthusiastic"
               }
           }
       }
   )
   # Initialize OpenAI client
   api_key = os.getenv("OPENAI_API_KEY")
   if not api_key:
       raise RuntimeError("OpenAI API key not found. Please set OPENAI_API_KEY in .env file.")
   self.client = OpenAI(api_key=api_key)
This method:
The core functionality is implemented in the _analyze_sentiment method:
@staticmethod
def _analyze_sentiment(self, text: str, model: str, detailed: bool) -> Dict[str, Any]:
   """Analyze sentiment using OpenAI API"""
   # Create prompt based on whether detailed analysis is requested
   if detailed:
       system_prompt = """
       You are a sentiment analysis expert. Analyze the following text and provide:
       1. The overall sentiment (positive, negative, or neutral)
       2. A confidence score from 0.0 to 1.0
       3. A brief explanation of your assessment
       4. A detailed analysis including:
          - Key emotions detected and their intensity
          - Key phrases that influenced your assessment
          - Overall tone of the text

       Format your response as a JSON object with the following structure:
       {
           "sentiment": "positive|negative|neutral",
           "confidence": 0.0-1.0,
           "explanation": "brief explanation",
           "detailed_analysis": {
               "emotions": {"emotion1": "intensity", "emotion2": "intensity"},
               "key_phrases": ["phrase1", "phrase2"],
               "tone": "description of tone"
           }
       }
       """
   else:
       system_prompt = """
       You are a sentiment analysis expert. Analyze the following text and provide:
       1. The overall sentiment (positive, negative, or neutral)
       2. A confidence score from 0.0 to 1.0
       3. A brief explanation of your assessment

       Format your response as a JSON object with the following structure:
       {
           "sentiment": "positive|negative|neutral",
           "confidence": 0.0-1.0,
           "explanation": "brief explanation"
       }
       """

   try:
       # Make API call using the latest OpenAI API syntax
       response = self.client.chat.completions.create(
           model=model,
           response_format={"type": "json_object"},
           messages=[
               {"role": "system", "content": system_prompt},
               {"role": "user", "content": text}
           ],
           temperature=0.2  # Low temperature for more consistent results
       )

       # Extract and parse JSON response
       content = response.choices[0].message.content
       result = json.loads(content)

       return result

   except Exception as e:
       raise RuntimeError(f"OpenAI API error: {str(e)}")
This method:
Finally, the run method ties everything together:
def run(self, input_data: Input, **kwargs) -> BlockOutput:
   try:
       # Validate input
       if not input_data.text or not isinstance(input_data.text, str):
           raise ValueError("Text must be a non-empty string")

       # Process through OpenAI
       results = self._analyze_sentiment(
           input_data.text,
           input_data.model,
           input_data.detailed_analysis
       )

       # Yield the results
       yield "sentiment", results["sentiment"]
       yield "confidence", results["confidence"]
       yield "explanation", results["explanation"]

       # Only return detailed analysis if requested and available
       if input_data.detailed_analysis and "detailed_analysis" in results:
           yield "detailed_analysis", results["detailed_analysis"]

   except ValueError as e:
       raise RuntimeError(f"Input validation error: {str(e)}")
   except Exception as e:
       raise RuntimeError(f"Sentiment analysis failed: {str(e)}")
This method:
dotenvThis block demonstrates how to integrate with state-of-the-art AI services to enhance your agents’ capabilities. The OpenAI integration enables sophisticated text analysis that would be difficult to implement with simple rule-based approaches.
When writing your own blocks, always consider:
For more detailed information on creating custom blocks, including field types, authentication, webhook integration, and best practices, see the official AutoGPT Block documentation.
AutoGPT offers a powerful platform for creating and deploying autonomous AI agents through its intuitive block-based interface. This tutorial has guided you through the entire process , from local installation and configuration to understanding the UI, creating basic agents, and extending functionality with custom blocks.
By embracing AutoGPT’s modular architecture, technical professionals can automate complex workflows without extensive coding knowledge while still having the flexibility to add custom capabilities when needed.
For those looking to build on this foundation and explore AI agents further, the official AutoGPT documentation provides comprehensive guidance, while DataCamp offers complementary resources like Understanding AI Agents and ChatGPT Fundamentals.
The Introduction to GPTs course can help solidify your understanding of large language models, while Building RAG Chatbots for Technical Documentation demonstrates another practical application of AI agents. As you continue experimenting with AI agents, you might also want to check out new tools like Mistral Agents API, Dify AI, and Langflow.
Top DataCamp Courses
Course
Course
Course
blog
Sandra Kublik
15 min
blog
François Aubry
6 min
Tutorial
Richie Cotton
Tutorial
Abid Ali Awan
Tutorial
François Aubry
code-along
Richie Cotton