
Track
Llama Fundamentals
4 hr
Langflow is a low-code tool that allows us to create AI agent workflows and automate tasks by using various APIs.
In this article, I will explain step by step how to use Langflow to create custom AI Agent workflows using Python. I will show you how to build an AI agent that helps the user practice their reading skills when learning a new language.
Langflow enables us to automate workflows by connecting various components, without having to write any code. Each component receives outputs from other components, performs a specific action, and then provides new data as output.
For instance, when building an AI chatbot, we can connect a chat input component to a language model (LLM). The output from the LLM component can then be linked to another chat output component.
On top of the large collection of predefined components, we can build custom ones using Python. At a high level, a custom component is a Python function that receives some inputs and outputs some data.
We are going to learn how to use custom components to build an AI language tutor using Python. If you're interested in building these kinds of workflows without any code, I recommend checking out this n8n tutorial (n8n is a similar tool, and in that tutorial I explain how to take a no-code approach to build an AI agent that automatically processes bills from your email inbox).
We can use Langflow for free, either on their official website through their web UI or by installing it locally.
In this tutorial, we'll use a local setup with Docker. You don't need to know Docker to follow this tutorial. But if you want to learn more, check out this Docker guide for beginners and this Docker course.
Docker is a tool that allows us to run applications in isolated environments called containers, making it easy to develop, test, and deploy software consistently. In our case, we use Docker because it offers more flexibility for building custom components with Python, as we'll be able to use a local database and not need to connect to an external service.
Langflow provides a pre-built example ready to run, so we won't have to set it up ourselves.
To run Langflow locally with Docker, follow these steps:
docker_example folder.docker compose up.Now, Langflow should be running on our local machine. We should see this message in the terminal:
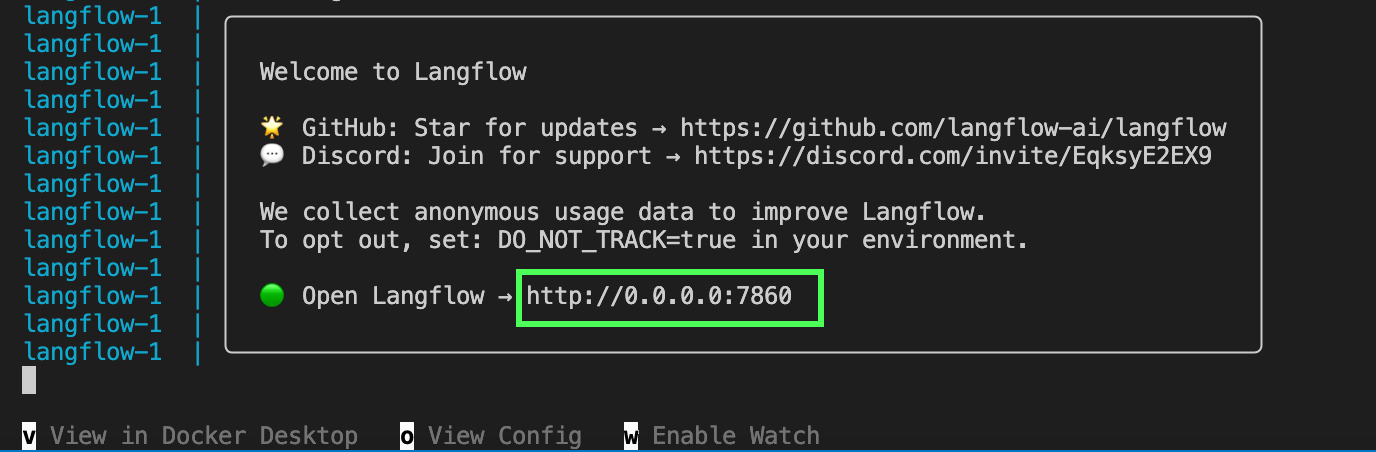
We can open the application by visiting the URL shown in the terminal, http://0.0.0.0:7860 in the above example.
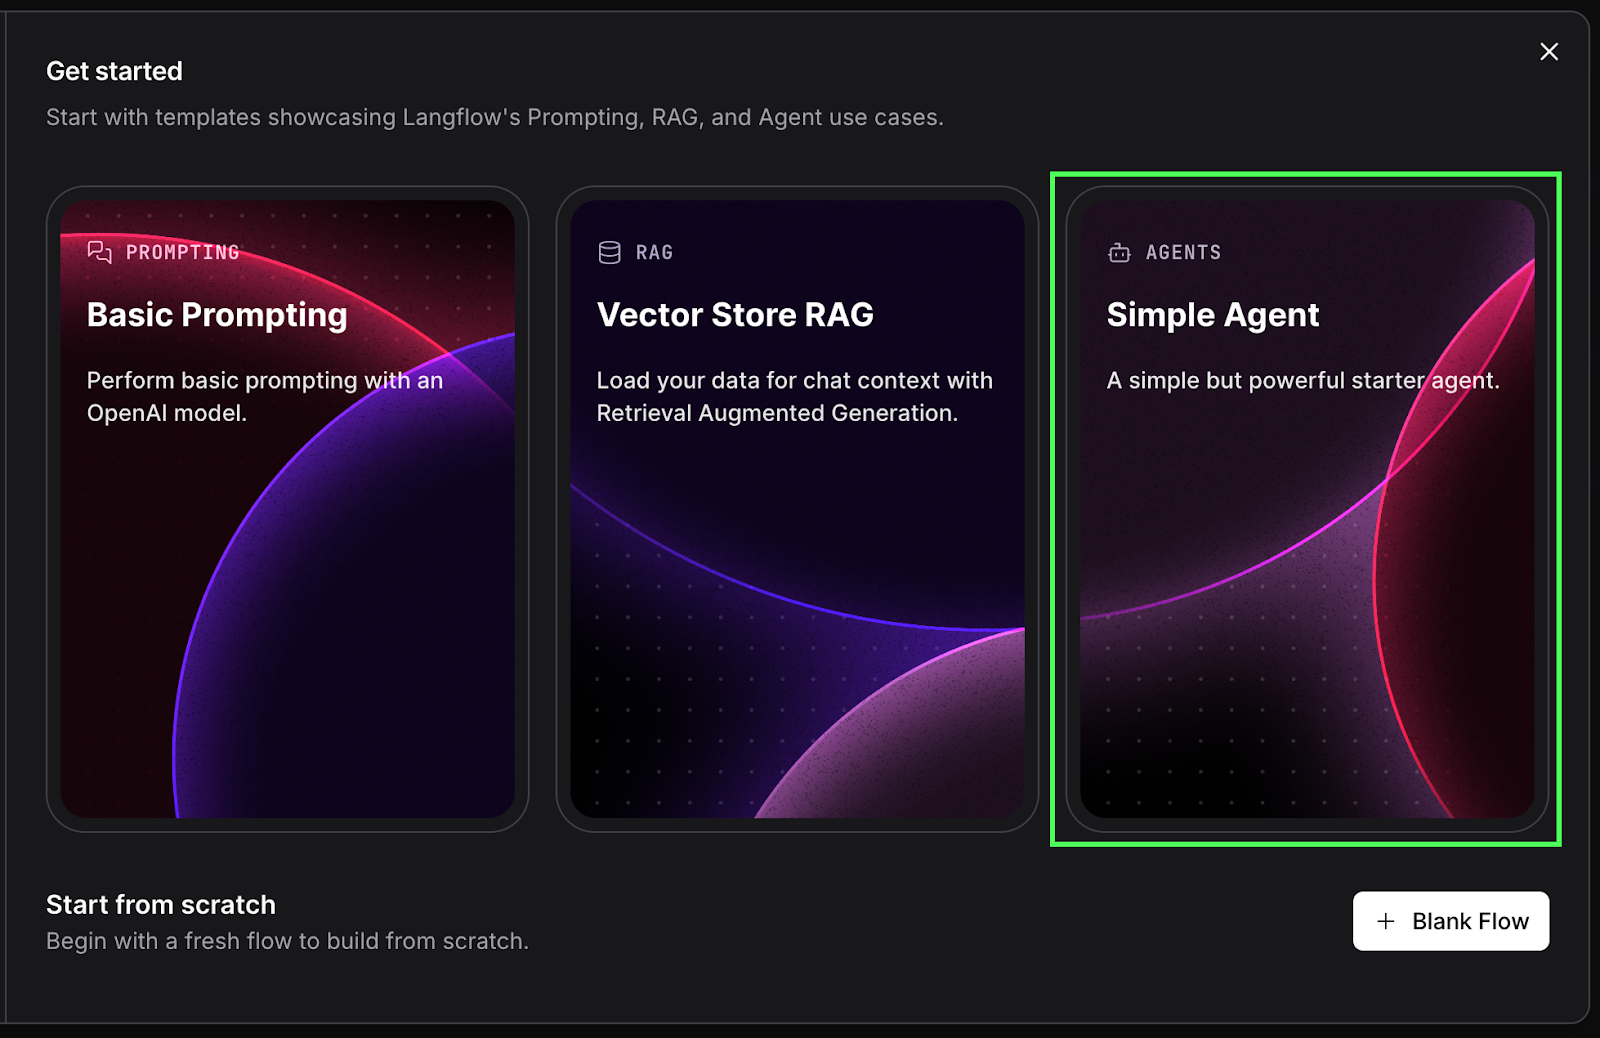
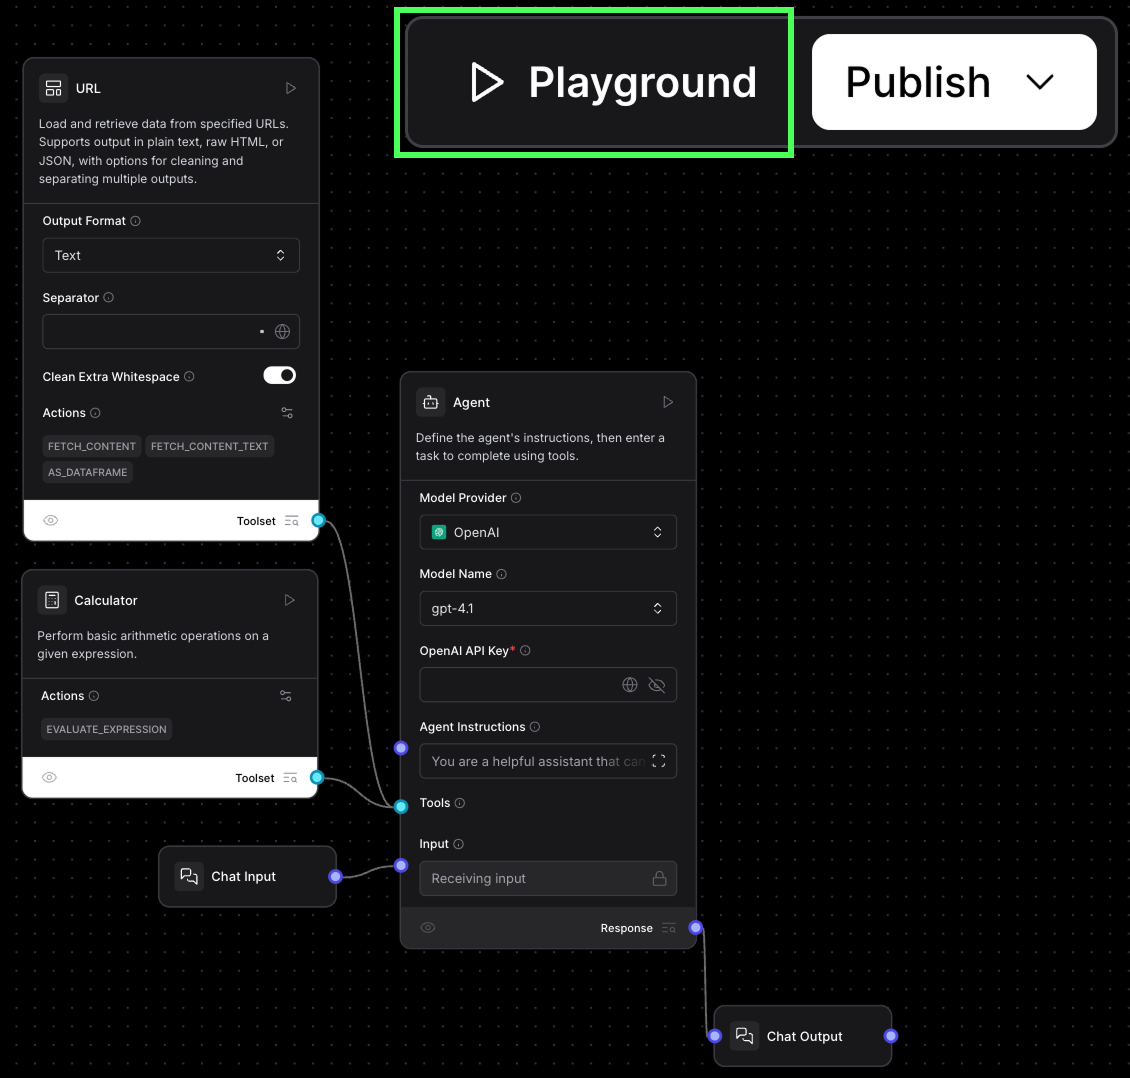
In this section, we explore how Langflow works by examining Langflow's simple AI agent template. To do so, we select "Simple Agent" on the first screen.
This will create an agent workflow like this one:
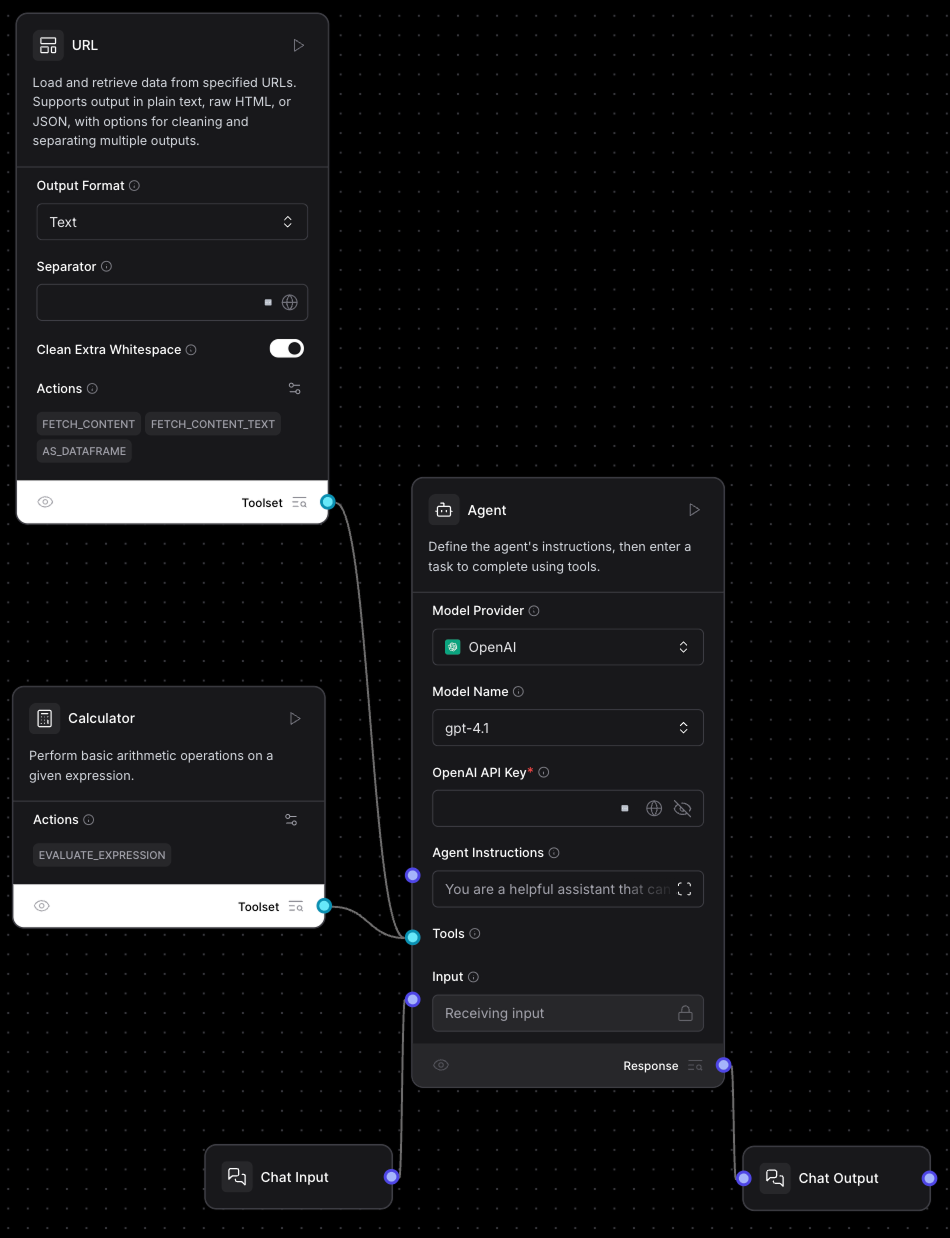
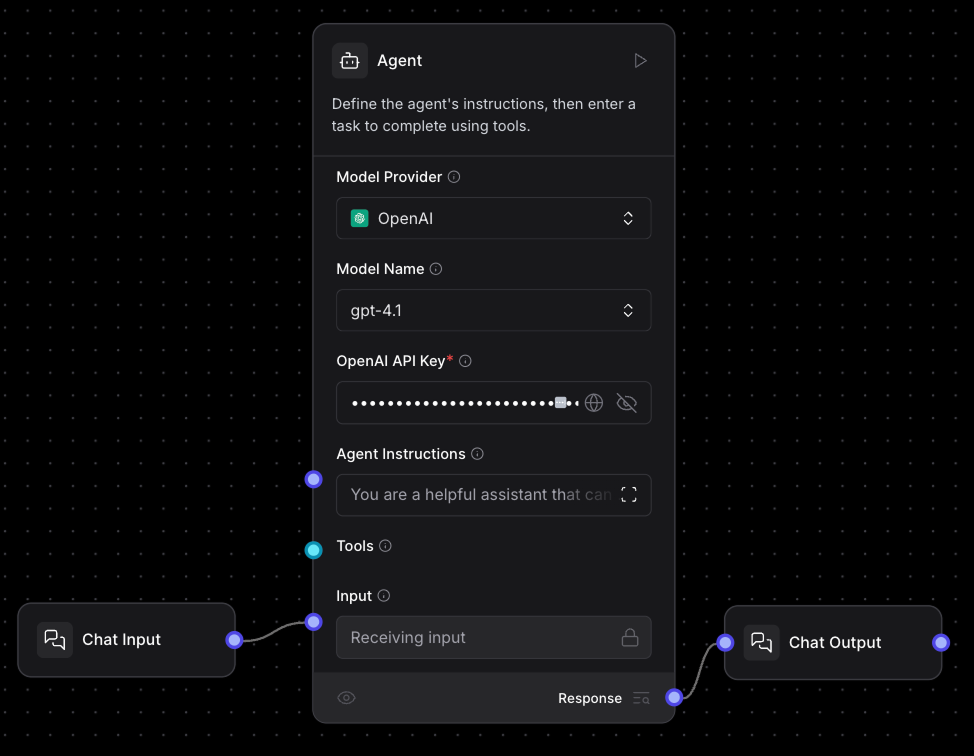
The main component in this workflow is the "Agent" component in the middle:
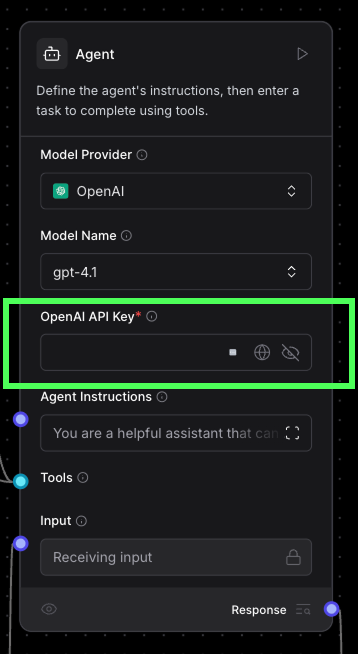
This agent component is using OpenAI's gpt-4.1 model. To use it, we need to paste an OpenAI API key. If you don't have one yet, you can create one here.
On the left of the agent component, we see the inputs and tools available to it (see the image below). In this case, it has two tools and one input:
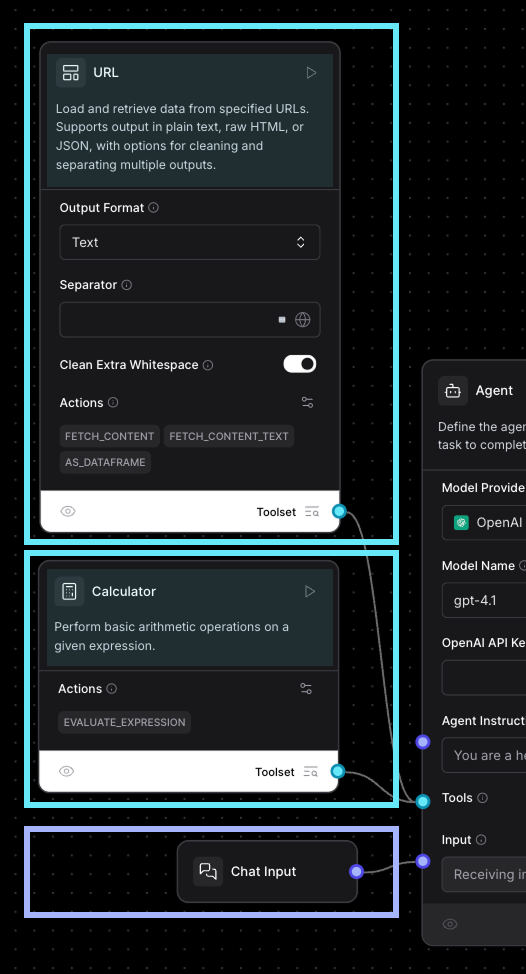
The chat input means that when we execute the workflow, we can use Langflow's built-in chat interface to send messages to the model. At the top of each tool, we see a description. The model uses this information to decide whether or not to call each tool.
On the right, we see the outputs. In this case, there's a single output component, which is a Chat Output component, indicating that the Agent's answer should be sent to the chat.
Before we run the simple Agent, let's use the URL component to understand how components work in general. Let's create a copy of it to experiment.
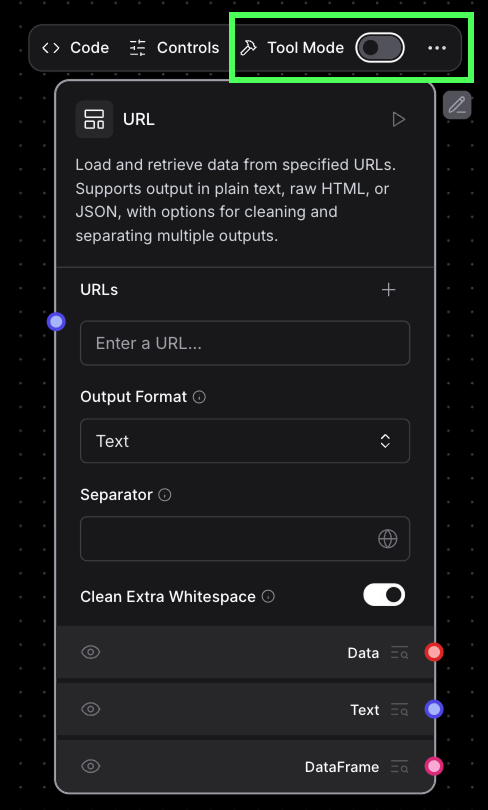
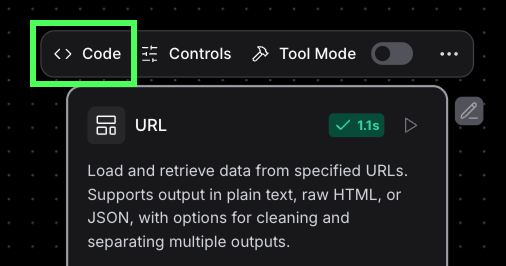
At the top of the new component, there's a "Tool Mode" switch; turn it off.
In the URLs field, put, for example, https://en.wikipedia.org/wiki/Data_science, the Wikipedia page for Data Science. Execute the component by clicking the run arrow in the top-right corner.
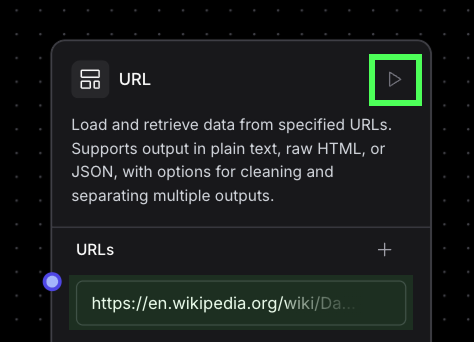
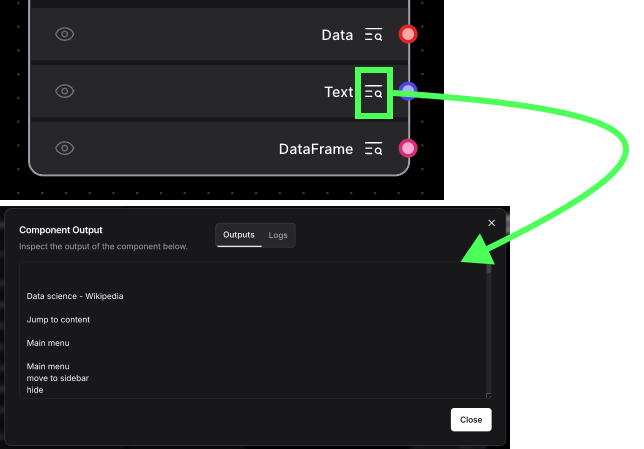
The component will execute and load the content from the URL we provided. We can see it by clicking the inspector next to the output links. Each represents a different output format.
Behind the scenes, each node is a Python script. We'll learn more about this when we build custom nodes later on. We can inspect the code by clicking the "Code" button at the top:
In the original Simple Agent workflow, the URL node is configured to be a tool. This means that it is meant to be used by an Agent. In this case, the URLs aren't given explicitly. Instead, the agent will provide the URLs itself.
Back to the Simple Agent, we can execute it by clicking the "Playground" button in the top-right corner. This opens the chat interface, letting us chat with the Agent.
Let's ask it to summarize the Data Science Wikipedia page:
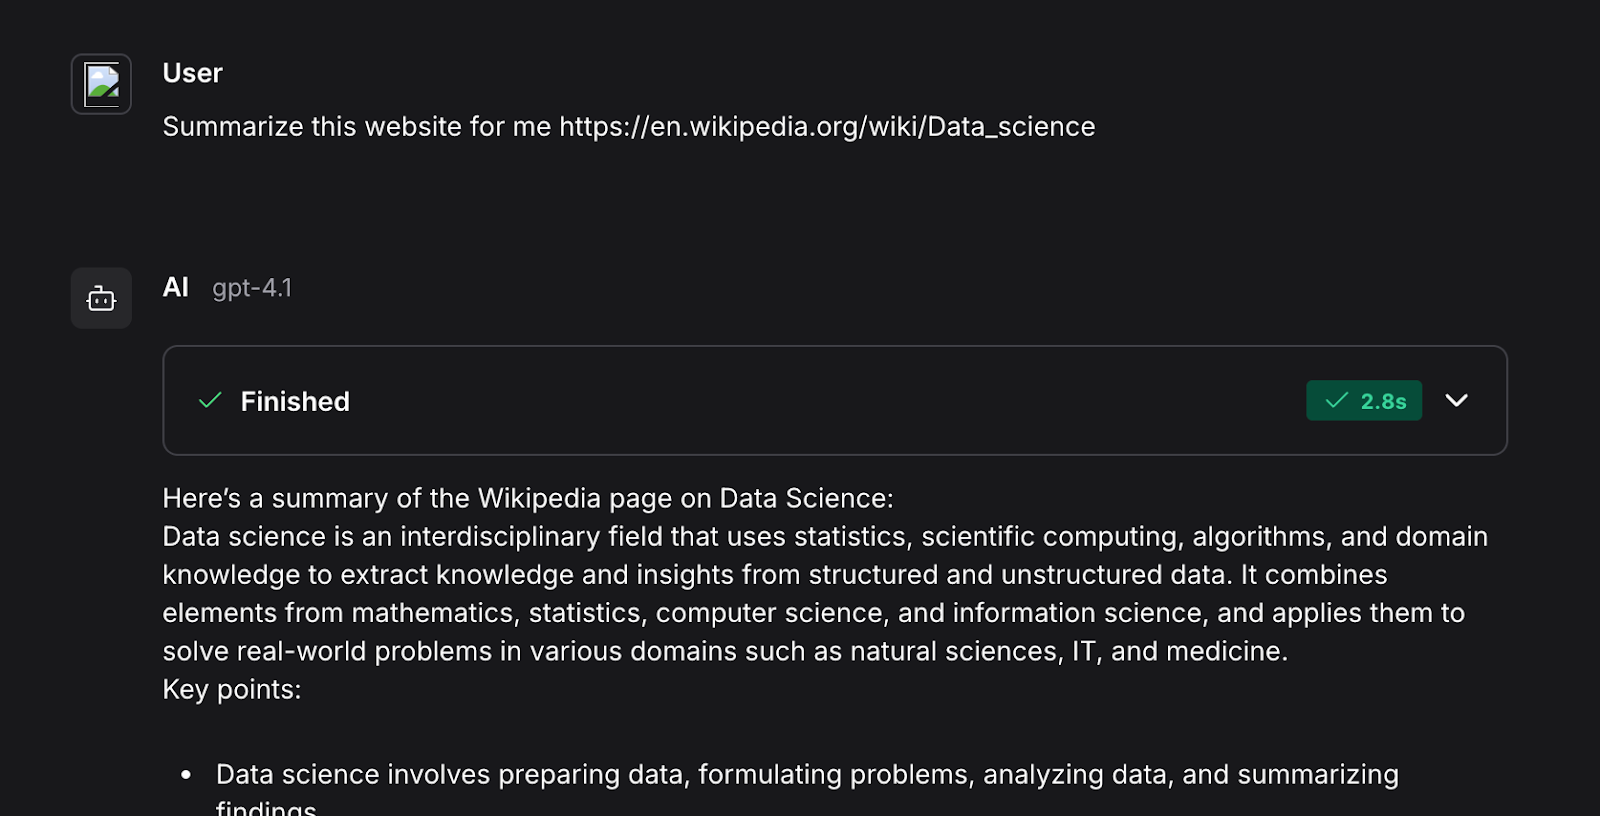
If we expand the box at the top of the answer, we will see the steps that were executed in the workflow.
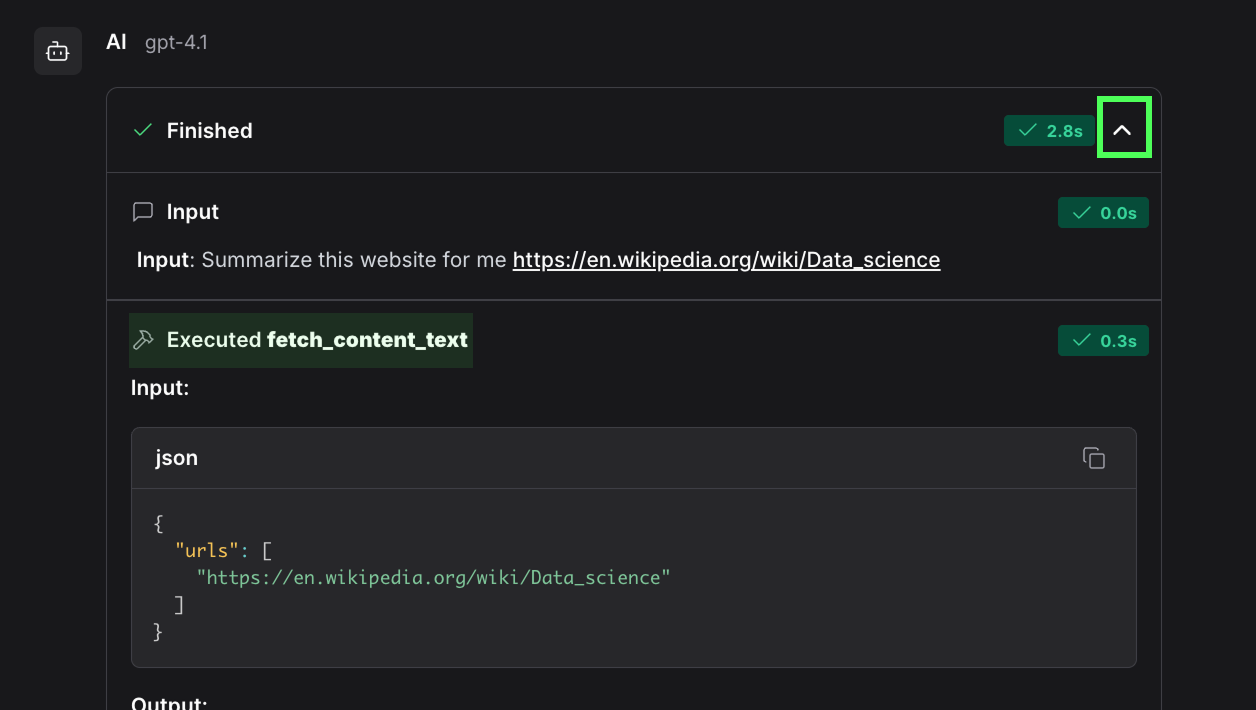
Here we see, for example, that it uses the fetch_content_text() function, which is defined in the URL tool we provided to the agent.
We can test its use of the Calculation tool by asking it to perform a calculation. The expression will be parsed and sent to the tool for evaluation. This provides a more reliable answer than strictly relying on the LLM.
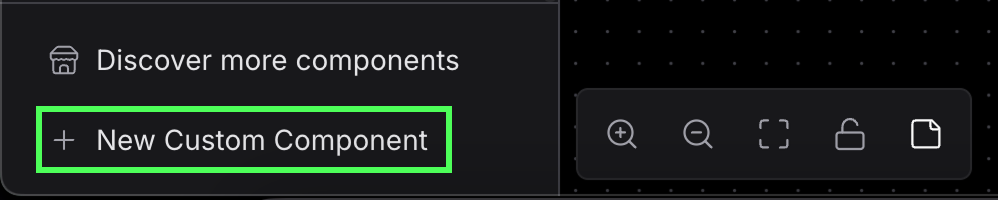
In this section, we learn how to create custom components. To start, click the "New Custom Component" button at the bottom left:
By default, this creates a component that takes a text value as input and outputs that same text. The default input is "Hello, World!" and if we execute it and inspect the output, we see that's exactly what we get.
By inspecting the code, we see the following:

inputs list specifies the types of inputs available to the component. In this case, it includes a single MessageTextInput class input named input_value, which corresponds to the text field. The name must be a valid Python variable name because it becomes an attribute of the class. When a component is set as a tool, these inputs are automatically filled by the AI agent. It uses the info field to determine what the input should be. Langflow supports several types of inputs. Here's a full list of supported inputs.method field specifies the function that is executed to generate the output. The function has access to the input via self. For example, the input in this instance is named input_value, so we can access it using self.input_value. The return value should be a class from the supported output classes.For more information on creating a custom component, check Langflow's component official documentation.
Here's an example of how we can make a component that adds two numbers:
from langflow.custom import Component
from langflow.io import MessageTextInput, Output
from langflow.schema import Data

class AddNumbers(Component):
    display_name = "Add Numbers"
    description = "This component adds two numbers together"
    icon = "code"
    name = "AddNumbers"

    inputs = [
        IntInput(
            name="number1",
            display_name="First Number",
            info="The first number to add",
        ),
        IntInput(
            name="number2",
            display_name="Second Number",
            info="The second number to add",
        ),
    ]

    outputs = [
        Output(display_name="Output", name="output", method="add_numbers"),
    ]

    def add_numbers(self) -> Data:
        result = self.number1 + self.number2
        data = Data(value=result)
return dataLet's build an AI agent to help us practice our reading skills when learning a new language.
In my experience, when learning a new language, one of the ways to improve your skills is to read. Of course, at the start, you only know a few words, so reading a book is impossible. Therefore, we want to have reading materials that focus on the vocabulary we currently know.
We will use an LLM to generate small stories for us to read. However, to have a personalized learning experience, we want the stories it generates to focus on the vocabulary we already know.
Here's a breakdown of what we need:
When we use Docker to run Langflow, it spins up a Postgres database. We can access it using the psycopg2 package. To learn more about Postgres, check out this PostgreSQL tutorial.
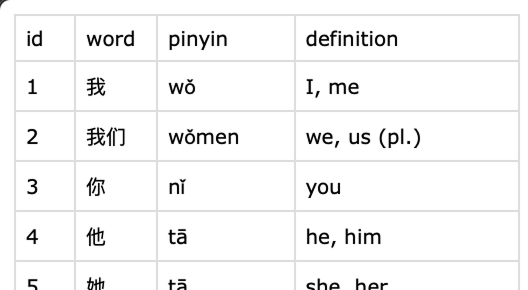
We are going to create a node where we can upload a CSV file with known words to initialize the database. My CSV file looks like this:
I created a component with two inputs.
Here's the component code:
from langflow.custom import Component
from langflow.io import MessageTextInput, Output
from langflow.schema import Message
import psycopg2
import csv

def connect_to_database():
    # Connect to the Postgres database provided by the Docker setup
    conn = psycopg2.connect(
        dbname="langflow",
        user="langflow",
        password="langflow",
        host="postgres",
        port="5432"
    )
    conn.autocommit = True
    return conn.cursor()

def add_word(cursor, word):
    # Add a word to the database
    cursor.execute(
        "INSERT INTO words (word) VALUES (%s) ON CONFLICT (word) DO NOTHING;",
        (word,)
    )

def initialize_database(cursor):
    # Initialize the database by creating the word table if it doesn't yet exist
    create_table_query = """
        CREATE TABLE IF NOT EXISTS words (
            word TEXT PRIMARY KEY
        );
    """
    cursor.execute(create_table_query)

class UploadWordFile(Component):
    display_name = "Upload Word File"
    description = "Upload a CSV file of words to the database."
    icon = "code"
    name = "UploadWordFile"

    inputs = [
        StrInput(
            name="column_name",
            display_name="Column Name",
            info="The name of the column containing the words",
        ),
        FileInput(
            name="csv_file",
            display_name="CSV file",
            info="CSV input file",
            file_types=["csv"]
        ),
    ]

    outputs = [
        Output(display_name="Output", name="output", method="load_words_into_database"),
    ]

    def load_words_into_database(self) -> Message:
        try:
            cursor = connect_to_database()
            initialize_database(cursor)
            with open(self.csv_file, "rt") as f:
                rows = list(csv.reader(f))
            headers = list(map(lambda header: header.lower(), rows[0]))
            column_index = headers.index(self.column_name)
            for row in rows[1:]:
                add_word(cursor, row[column_index])
            return "Success"
        except Exception as e:
            return f"Error: {str(e)}"
The component looks like this:
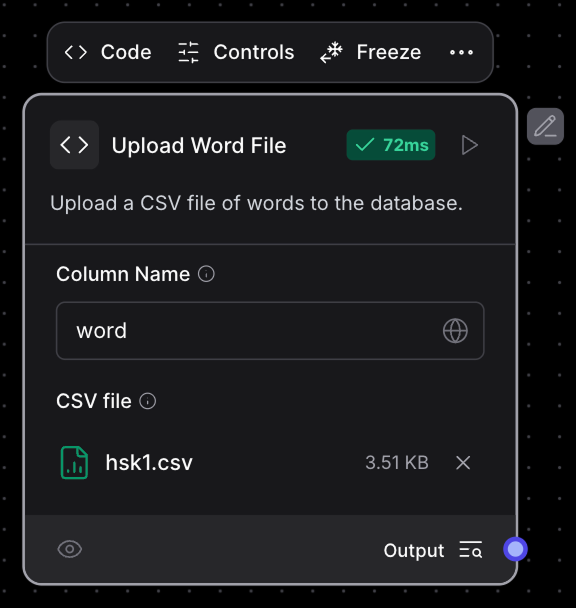
It is designed to be used alone and not connected to any other component. We can use it to manually upload words to the database.
Here we create a tool that the AI agent can use to add new words to the database. In this way, the user can easily add new words by sending a message to the agent.
This code reuses the connect_to_database() and add_word() functions from the previous node. With a better Docker setup, we can avoid repeating the code, but for this tutorial,l we'll keep it simple.
Here's the code for this tool:
# from langflow.field_typing import Data
from langflow.custom import Component
from langflow.io import MessageTextInput, Output
from langflow.schema import Message
def connect_to_database():
# Connect to the Postgres database provided by the Docker setup
conn = psycopg2.connect(
dbname="langflow",
user="langflow",
password="langflow",
host="postgres",
port="5432"
)
conn.autocommit = True
return conn.cursor()
def add_word(cursor, word):
# Add a word to the database
cursor.execute(
"INSERT INTO words (word) VALUES (%s) ON CONFLICT (word) DO NOTHING;",
(word,)
)
class AddWordTool(Component):
display_name = "Add word tool"
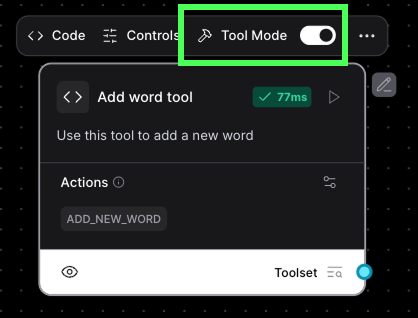
description = "Use this tool to add a new word"
icon = "code"
name = "AddWordTool"
inputs = [
MessageTextInput(
name="word",
display_name="Word",
info="The word to add",
tool_mode=True,
),
]
outputs = [
Output(display_name="Output", name="output", method="add_new_word"),
]
def add_new_word(self) -> Message:
cursor = connect_to_database()
add_word(cursor, self.word)
return f"Added word: {self.word}"Note that this tool assumes that the database was created beforehand. It won't work without first running the previous component at least once.
Remember to set it to tool mode:
To create a story, we use an AI agent component. Here’s the structure:
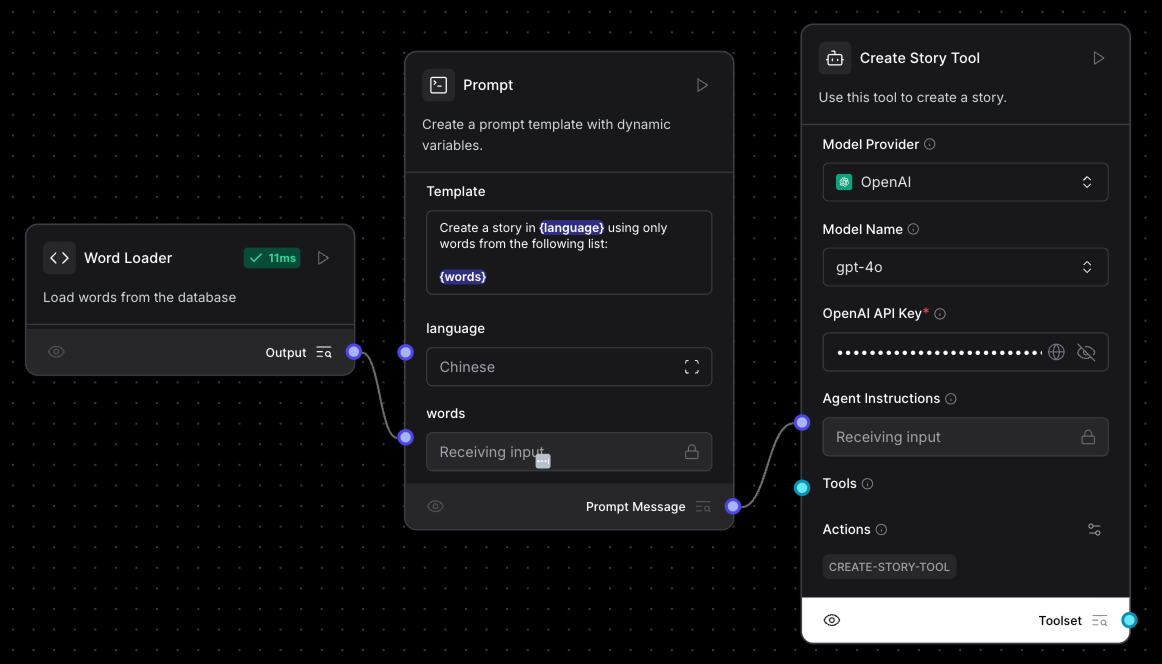
In the agent instructions, instead of adding the prompt directly in the component, we used a Prompt component because this allows us to add parameters to the prompt. This is the prompt we used:
Create a story in {language} using only words from the following list:

{words}
The prompt has two parameters, {language} and {words}. When adding parameters like this, it adds a field for each of them to the component.

For the language value, we simply set it into the text box. The words need to be loaded from the database, so we created a custom component that loads all words from the database, and connected the output of that node to the words field.

Here’s the code of the word loader component:
from langflow.custom import Component
from langflow.io import MessageTextInput, Output
from langflow.schema import Message
import psycopg2
def load_words():
conn = psycopg2.connect(
dbname="langflow",
user="langflow",
password="langflow",
host="postgres",
port="5432"
)
cursor = conn.cursor()
cursor.execute("""
SELECT * FROM words;
""")
rows = cursor.fetchall()
return map(lambda row: row[0], rows)
class WordLoader(Component):
display_name = "Word Loader"
description = "Load words from the database"
icon = "code"
name = "WordLoader"
outputs = [
Output(display_name="Output", name="output", method="build_output"),
]
def build_output(self) -> Message:
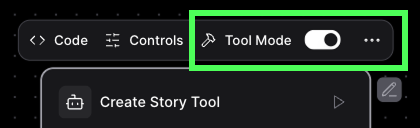
return str(", ".join(load_words()))Next, we set the agent to be a tool. This way, the main agent (which we created next) will be able to use this one to generate a story when needed.
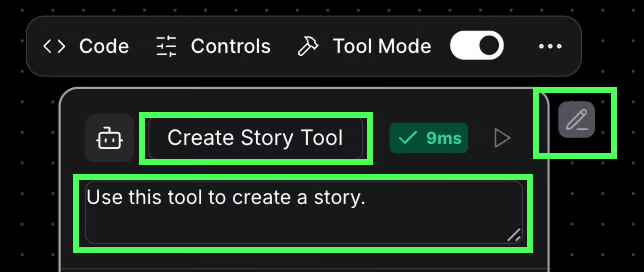
Finally, we rename the agent and change the tool description to let the AI know when to use this tool:
For the main agent, we use a regular AI agent node component linked to the two tools we’ve created. This agent uses a chat input and a chat output component so that we can interact with it using the chat interface.
Here’s the final architecture:
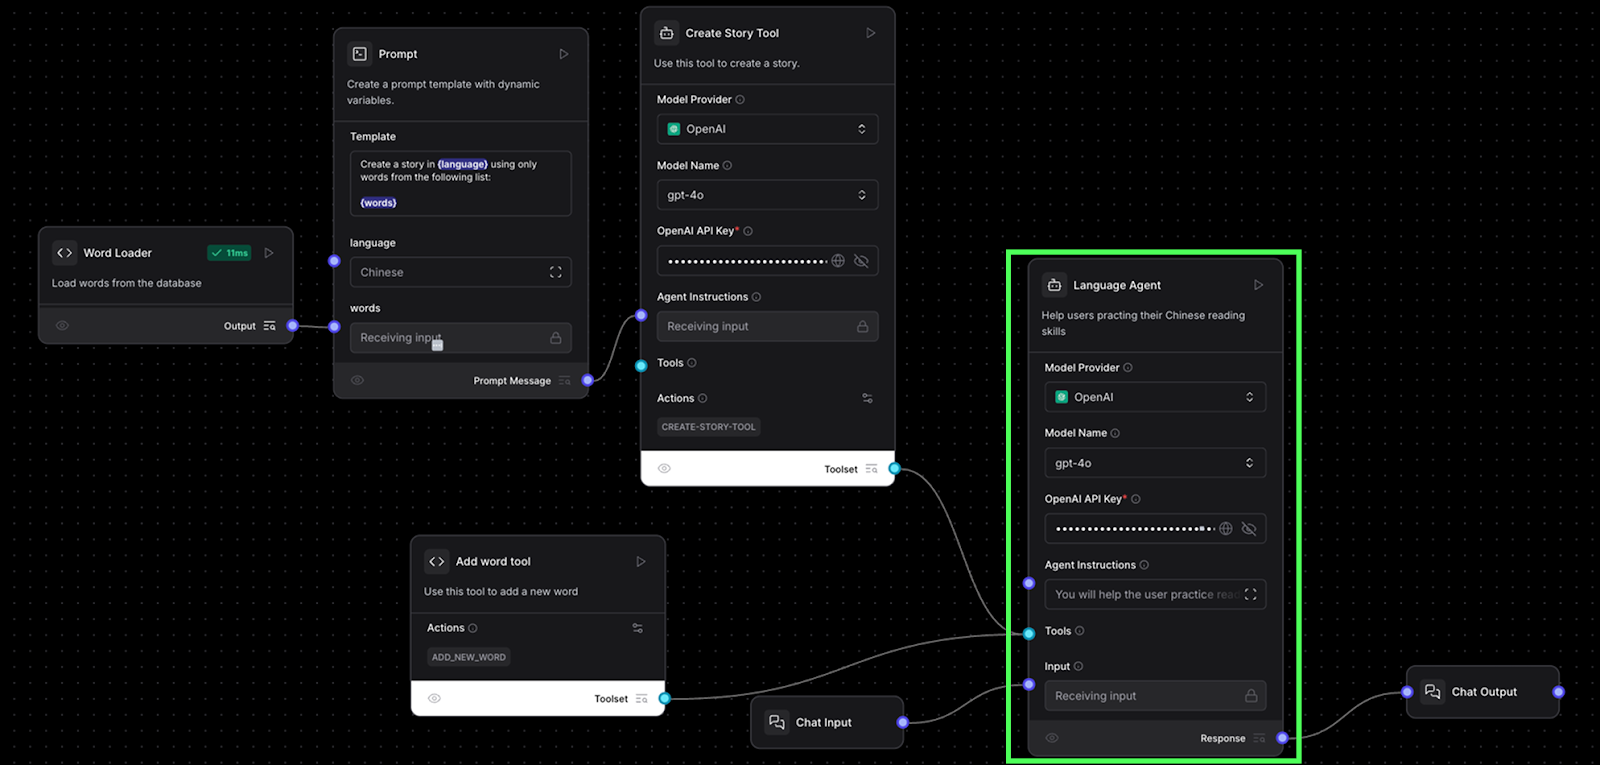
The prompt we used was:
You will help the user practice their language skills. You will either be asked to create a story or to add a new word to the vocabulary.
- If the user asks you to create a story, use the story generation tool.
- If the user asks you to add a word, use the word add tool.
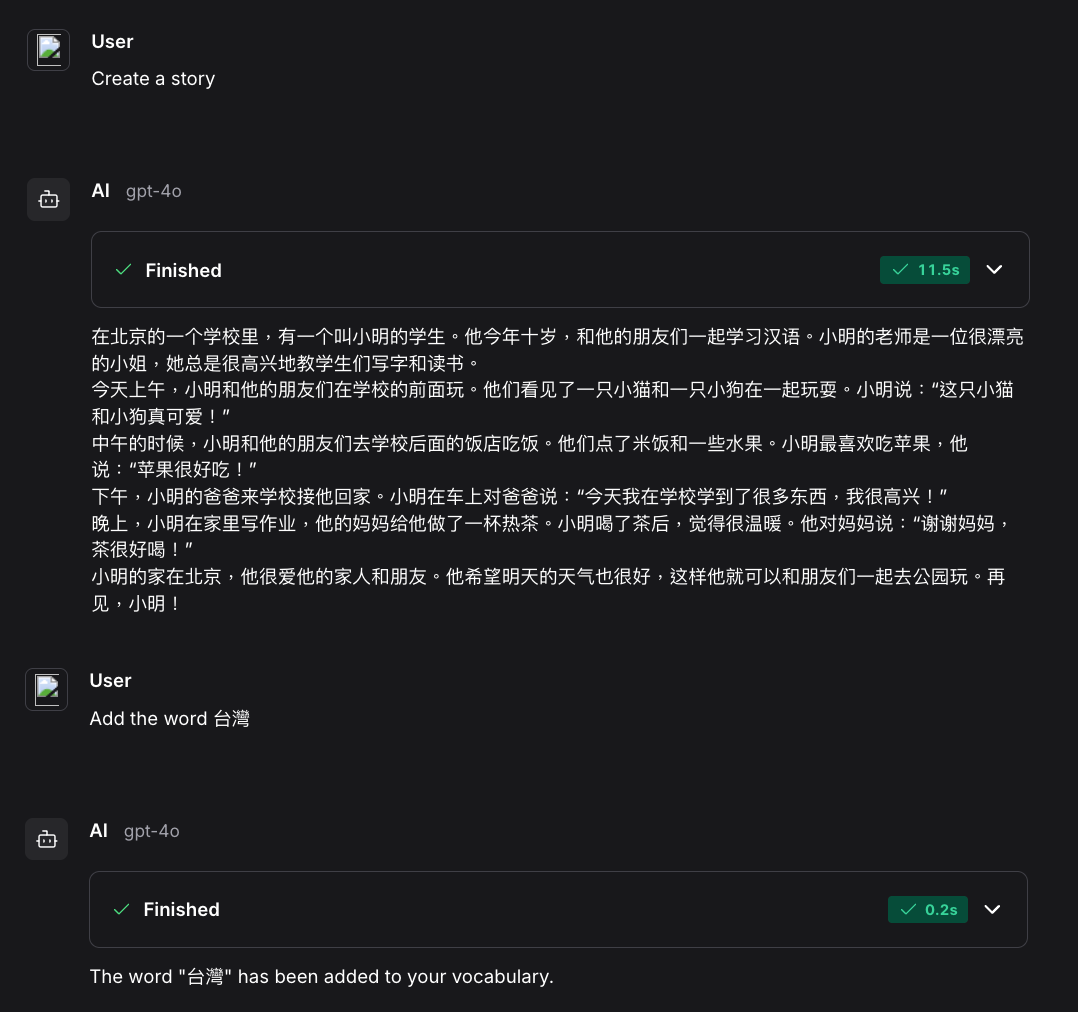
When using a tool, your answer should just be the result from the tool and nothing else.We can execute the full workflow by clicking the “Playground” button. Here’s a sample interaction:
We explored the fundamental aspects of Langflow and how it can be used to build an AI agent workflow that helps users in practicing their reading skills. By using Python to create custom components, we unlock more possibilities.
This hybrid approach merges the best of both worlds: the flexibility of Python scripts, which enable the execution of any desired task, and the intuitive graphical interface of Langflow, which simplifies workflow construction without the need to dive into complex code.
To learn more about AI agents, I recommend reading these blogs:
Learn AI with these courses!
Track
Course
Course
Tutorial
François Aubry
Tutorial
François Aubry
Tutorial
François Aubry
Tutorial
François Aubry
Tutorial
Moez Ali
Tutorial
Dr Ana Rojo-Echeburúa