Track
AI for Software Engineering
7 hr
Vanilla Claude Code is already useful out of the box. You install it, you prompt it, and it builds whatever you want. That's most people's vibe-coding setup, and it works.
The version of Claude Code that someone with a customized terminal is using is a different tool. They've pre-approved the bash commands they trust, so Claude almost never asks for permissions. A CLAUDE.md sits in their project root, so Claude already knows their conventions the moment a session opens. And when a session starts to feel confused, the command they reach for isn't a restart.
This article is the gap between those two Claude Code setups, in seven upgrades. None of them takes more than ten minutes to set up, and each one pays back inside a week.
If you've never opened Claude Code before, our main Claude Code guide is a better starting point. Everything below assumes you can already prompt and accept tool calls.
Out of the box, every new tool invocation asks you for approval. Fine the first time you run pytest. Annoying by the third. By the tenth, you're hammering Enter without reading the prompt. That's the worst of both worlds: you've trained yourself to ignore the safety check, and it's still slowing you down.
Of course, there is the "dangerously bypass permissions" mode or "auto mode." We covered their trade-offs extensively in my tutorial on Claude Code Auto Mode and Channels.
The fix is a .claude/settings.json file in your project root, with a permissions block that pre-approves the patterns you trust and blocks the ones you don't:
{
  "permissions": {
	"allow": [
  	"Bash(pytest *)",
  	"Bash(uv run *)",
  	"Bash(ruff check *)",
  	"Read(~/.zshrc)"
	],
	"deny": [
  	"Bash(curl *)",
  	"Read(./.env)",
  	"Read(./.env.*)",
  	"Read(./secrets/**)"
	]
  }
}
Rules evaluate in a fixed order: deny first, then ask, then allow. The first match wins, so a deny rule always beats a later allow.
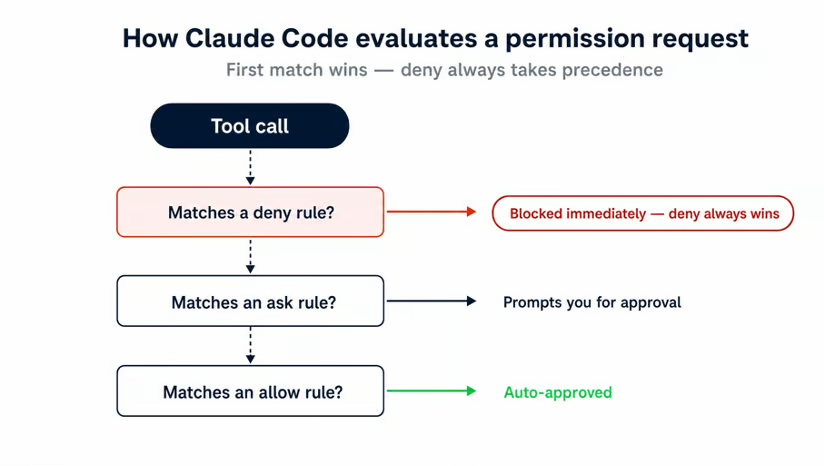
Three things trip people up the first time they write one of these.
The first is scope. A project .claude/settings.json overrides your global ~/.claude/settings.json, so if you've allowed Bash(rm *) globally and a project denies it, the project wins. That's the right default, but it surprises people who expect global allows to be sticky.
The second is wildcards on network commands. Bash(curl http://github.com/ *) looks restrictive but doesn't catch https://, options before the URL, redirects, or shell variable expansion. The pattern the docs recommend is to deny Bash(curl *) outright. Then use the WebFetch tool with WebFetch(domain:github.com) for the domains you actually want to allow.
The third is whitespace. Bash(ls *) matches ls -la but not lsof. Bash(ls*) matches both. The space before the asterisk is doing real work, and it's worth being deliberate about which one you wrote.
A few keybindings sit alongside permissions in the same "stop fighting the terminal" category and are worth learning on day one:
Shift+Tab cycles permission modes (default, auto-accept, plan)
Esc+Esc opens the rewind picker (more on this in #3)
Ctrl+R reverse-searches your prompt history, the same way it does in bash and zsh
Ctrl+U deletes from the cursor to the line start
Shift+Enter adds a new line inside the prompt
Most of these keybindings work out of the box in terminals. If they don't, run /terminal-setup slash command once to install everything.
Each session starts with a fresh context window.
By default, Claude doesn't remember that you use uv instead of pip. It doesn't remember that your tests live in tests/ and not test/. And the API conventions you spent ten turns explaining yesterday are gone too. The fix is a CLAUDE.md file at your project root. Launch Claude Code from that directory (or any subdirectory), and the file gets loaded into context automatically before your first prompt.
The fastest way to start is /init. Run it inside the project. Claude reads the codebase and writes a starter CLAUDE.md with the build commands, test instructions, and conventions it can infer. You'll edit it after, since /init gets you a working baseline rather than a finished file.
There are three places Claude looks for context, stacked on top of each other:
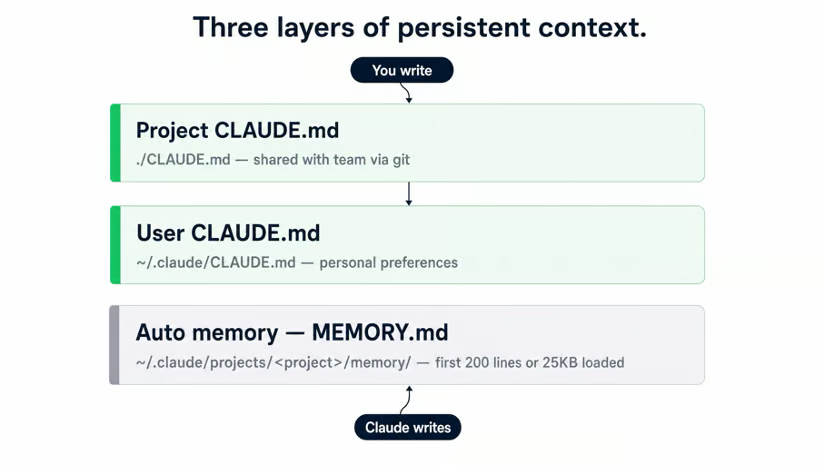
Project CLAUDE.md at ./CLAUDE.md ships with the repo. It's the same for every contributor, so put project-specific facts here:
User CLAUDE.md at ~/.claude/CLAUDE.md follows you across every project on your machine. It's where personal preferences go: your coding style, the way you like docstrings written, the languages you reach for first. Don't put project facts here, because they'll bleed into every other repo you open.
Auto-memory is the third layer, and Claude writes it itself. When you correct it during a session ("we use snake_case here, not camelCase"), it logs the correction to ~/.claude/projects/<project>/memory/MEMORY.md. The first 200 lines or 25KB of that file load at the start of every conversation in the same project. You can see what's loaded with /memory, which also lets you toggle auto-memory on or off.
One sizing rule: keep each CLAUDE.md under 200 lines. Past that, the file starts eating noticeable context on every turn, and Claude follows long files less reliably than short ones. If yours is creeping over, split it into .claude/rules/ with path scopes. For a deeper take on what actually belongs inside a CLAUDE.md file, see my guide on writing the best CLAUDE.md tutorial.
The instinct, when a session starts to feel off, is to /clear and start over. It's the wrong instinct most of the time. Restarting throws away the file paths Claude has been editing, the failing test it was tracking, or the constraints you spelled out at the beginning. A fresh session has to re-learn all of that, and you pay for the re-learning in tokens and time.
The first thing to learn is the symptom. Context rot like this has a few obvious signals:
Once you see those, you have four options, and they aren't interchangeable:
|
Situation |
Use this |
Why |
|
Context bar is filling up, current task still going |
|
Summarizes earlier turns, keeps the session and task context alive |
|
Switching to an unrelated task |
|
Empty context, fresh thread. Previous conversation stays in |
|
Claude is repeating mistakes you already corrected |
|
Context is degraded. A clean session with a better prompt beats patching a bad one |
|
You went down a bad path and want to undo it |
Esc+Esc → Restore code and conversation |
Jumps back to a prompt checkpoint and restores file state |
/compact isn't as bad as some users claim it to be.
Your project CLAUDE.md survives it. Claude re-reads the file from disk after compaction and re-injects it, so your conventions don't get lost. You can also pass focus instructions to direct the summary, like /compact keep the auth refactor decisions, drop the failed test runs. That's the difference between a useful summary and a generic one.
The Esc+Esc rewind picker is the one most people don't know exists. It opens a list of every prompt checkpoint in the session. Once you pick one, it offers three options: restore the conversation only, the code only, or both.
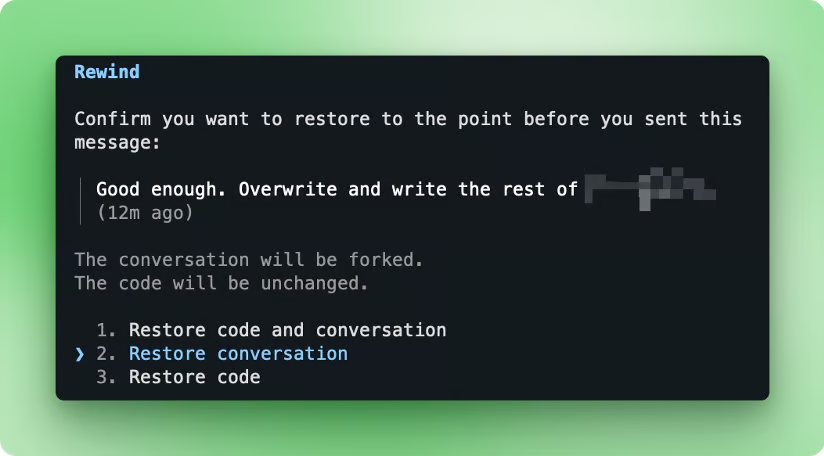
"Restore code and conversation" is what most people want. A half-hour of bad turns can vanish without you opening git. It's the closest thing Claude Code has to undo for an entire session.
Once you stop restarting, the next problem is finding sessions again.
claude -n <name> (or --name) starts a named session, and the name shows up in /resume and the terminal title. When you've got three things going on in the same repo (an experiment branch, a refactor, a debug pass), names are how you tell them apart. /rename changes the name mid-session if your scope shifts.
Pro tip: Use /color to further distinguish sessions when running multiple in the same terminal window.
Reopening a session goes through one of two flags. claude --continue (or -c) loads the most recent conversation in the current directory. Use it when you were just here and want to pick it up.
claude --resume opens an interactive picker, and claude --resume <name-or-id> jumps straight to a specific session. Treat sessions like git branches: different workstreams deserve their own.
The single biggest cost on a customized setup isn't the editor or the keybindings. It's matching the amount of compute you're spending to the difficulty of the task in front of you. Three tools work together on this: plan mode, /effort, and /model.
Plan mode tells Claude to think through an approach before touching files. It writes the plan, you read it, you approve it or push back, and only then does it execute.
A trick I use to make my plans rock solid is a simple prompt I often use:
Red-team this plan from multiple angles using as many Opus 4.7 agents as you need.This will launch multiple subagents to review the plan from multiple aspects and suggest fixes. It is a good practice when dealing with a plan file over 500 lines long.
The cost is that planning plus red-teaming adds two turns before any code lands, so for anything less than a significant feature or bug fix, it is overkill.
There are five ways to enter plan mode:
|
Method |
Where you enter it |
Best when |
|
Shift+Tab (twice) |
Mid-session, any time |
Hands-on keyboard toggle without typing a command |
|
|
Mid-session prompt |
No task in mind yet, you'll type it after |
|
|
Mid-session prompt |
The task is clear, skip the two-step |
|
|
CLI launch flag |
One session where you want plan mode from the start |
|
|
Project or user settings |
Every session in this project defaults to plan mode |
The inline form (/plan refactor the auth module to use JWT) is the one most people miss. It sets the mode and the task in one keystroke instead of two. For a deeper walkthrough of review-first plan workflows, my Claude Code plan mode tutorial goes step by step.
Effort is the next thing to learn. It controls how much extended thinking Claude does on each turn. Higher effort means deeper reasoning, more tokens, and a slower response.
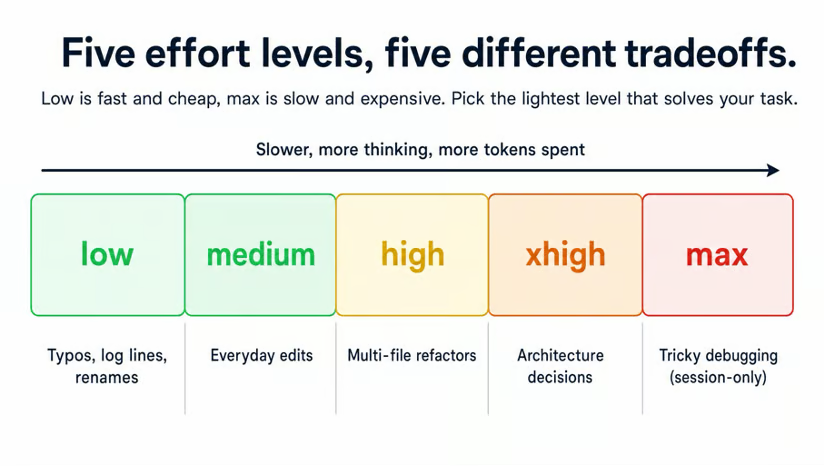
/effort <level> and the --effort <level> CLI flag both accept all five values. Low, medium, high, and xhigh persist across sessions. Max is session-only because it removes the token-spend constraint, so you set it deliberately each time. The right default for everyday work is low or medium. Reserve high or xhigh for the genuinely hard problems, and max for moments where you'd rather burn tokens than be wrong.
One counterpoint worth keeping in mind: a model on low with great context often beats the same model on max with poor context. Cleaning up your prompt is usually a bigger win than dialing up the effort.
Model selection is where the real cost savings happen. /model switches mid-session, and Option+P (macOS) / Alt+P (Win/Linux) swaps without clearing whatever you've already typed. The aliases worth knowing:
sonnet is the daily-driver default
opus is for the hardest problems (the best alias also resolves to opus)
haiku is for when you want speed
sonnet[1m] and opus[1m] are the 1M-context variants
opusplan runs Opus in plan mode and Sonnet in execution
default clears any override and reverts to the recommended model
If you're defaulting to Opus for everything, switching to Sonnet for the bulk of your day is the single biggest spend cut available to you.
Opus is the right call when you're stuck on something hard, and you want the smartest model on it. Sonnet handles almost everything else. The cost gap between them is large enough that "I'll just use Opus to be safe" is the most expensive habit you can leave on autopilot.
Once the friction sources are gone, the next layer is the work you still do by hand.
It's easier than figuring out how not to. Two features cover most of it: /loop for recurring checks you'd babysit otherwise, and hooks for guarantees you can't get from a CLAUDE.md instruction.
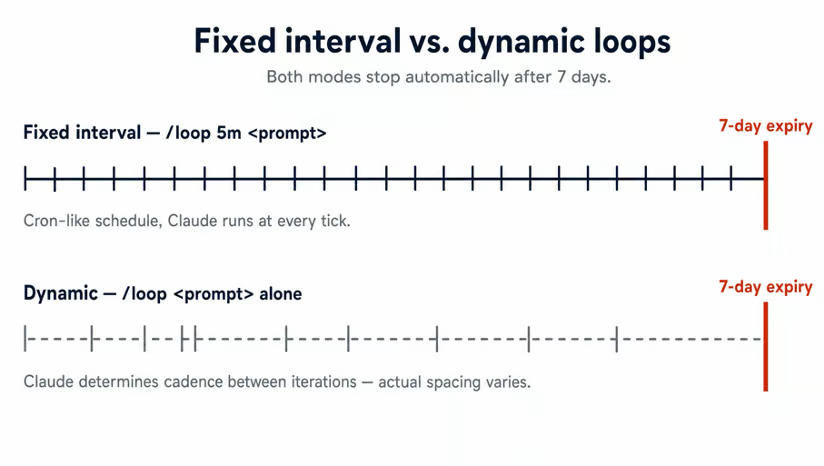
/loop re-runs a prompt or slash command on a recurring schedule. The syntax has two shapes:
/loop 5m <prompt> runs the prompt every 5 minutes
/loop <prompt> alone hands cadence to the model, which decides when to run again
Interval units are s, m, h, and d, with a one-minute minimum. You'll need Claude Code v2.1.72 or later.
For example, you can set up a test watcher: /loop 2m run the test suite and report failures. Instead of remembering to run tests after each change (and forgetting half the time), Claude catches a broken test on the next 2-minute tick.
The same pattern works for a staging deploy poll (/loop 10m check if the staging deploy is green) or a log tail during a flaky incident (/loop 1m tail the last 50 lines of app.log and flag errors).
Loops live for 7 days.
The task fires one final time on day seven and deletes itself. They're session-scoped, so --continue or --resume brings them back if you close and reopen. To stop a loop early, press Esc. If you need scheduling that survives session close (a nightly check, a weekly digest), use Routines via /schedule instead.
Hooks are the other half. They run shell commands at specific points in Claude's workflow, configured in .claude/settings.json.
The reason to reach for a hook instead of a CLAUDE.md instruction is one thing: CLAUDE.md is advisory, and hooks are guaranteed to run. The classic case is the "always run the linter after editing" rule that Claude skips half the time. A hook closes that gap.
Six events cover most cases:
|
Event |
Fires when |
Example use |
|
|
A session begins |
Print a banner with the active git branch and last commit |
|
|
You submit a prompt before Claude sees it |
Inject project context or block prompts containing secrets |
|
|
Claude is about to call a tool |
Block writes to |
|
|
Claude finishes a tool call |
Run a linter or formatter after every |
|
|
Context is about to be compacted |
Dump the transcript to a file for later review |
|
|
Claude finishes its response |
Run the test suite and append results to the session |
A minimal PostToolUse hook that lints after every file edit:
{
  "hooks": {
	"PostToolUse": [
  	{
    	"matcher": "Edit|Write",
    	"hooks": [
      	{ "type": "command", "command": "/path/to/lint-check.sh" }
    	]
  	}
	]
  }
}
One gotcha worth memorizing: only exit code 2 actually blocks Claude. Exit 1 is treated as a non-blocking error, and Claude proceeds anyway, even though 1 is the usual Unix failure code. If your hook is meant to enforce a rule, return 2.
You don't have to write hooks by hand either.
Prompt Claude with "write a hook that runs ruff after every file edit" and it drafts the JSON for you. /hooks lists every active hook configuration, so you don't have to grep settings files when something fires unexpectedly. For the full event catalog and stdin/stdout JSON schemas, see my Claude Code hooks tutorial.
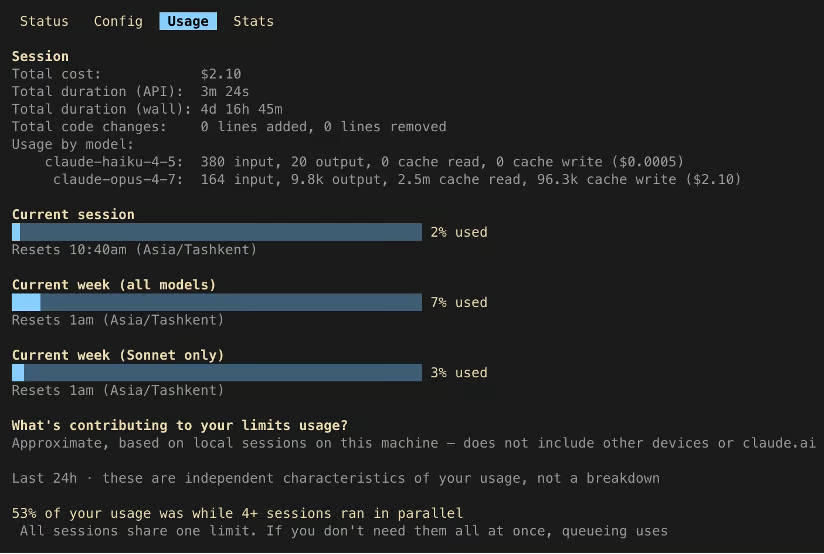
Loops, long sessions, and Opus-by-default all burn tokens. Three commands make spending visible enough to manage, and the habit you want is glancing at them, not configuring them.
/usage shows your plan tier, session totals, per-model cost breakdowns, and progress bars for the 5-hour and weekly rate-limit windows.
/context visualizes the current context window as a colored grid, with capacity warnings and suggestions for which tools or files are eating space. Use it when a session feels heavy, and you're deciding between /compact and /clear.
/statusline configures a persistent bar at the bottom of your terminal. It can show the model, context percentage, the rate-limit windows, and anything else you can read from the session JSON. It's the one that shifts the most behavior, because it puts the cost-relevant numbers in your peripheral vision while you work.
You can run /statusline and describe in plain language what you want shown, and Claude generates the script and updates settings. The other option is to write a shell script yourself and point at it from ~/.claude/settings.json:
{
  "statusLine": {
	"type": "command",
	"command": "~/.claude/statusline.sh"
  }
}
For longer-term tracking across sessions, npx ccusage is a community tool that aggregates token burn over time. It's third-party, not Anthropic-built, but it fills the gap between session-scoped /usage and your monthly bill.
The six upgrades above are the ones I reach for every day. The three below are real features I use less often, but that you should know exist, so you can pull them out the day you need them.
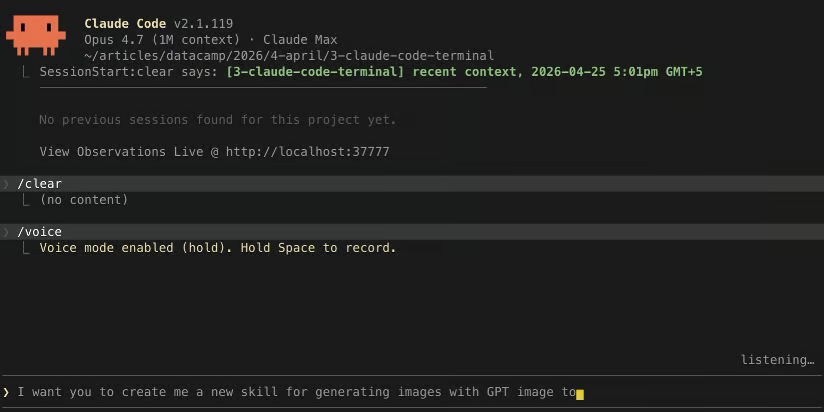
/voice turns on push-to-talk dictation. Hold Space, speak, release, and the transcribed text lands in your prompt input. You need v2.1.69 or later, and twenty languages are supported.
Voice tends to beat typing when you're walking and thinking out loud or dictating intent at the start of a task before the wording is settled. It's worse for line-level edits, where "change line 47 to..." is easier to type.
/teleport (alias /tp) pulls a cloud session into your local terminal. Say you started a long task on the web app or the iOS app, and now you're back at your laptop. Run claude --teleport to open a picker and land that session in your terminal with the right branch already checked out.
A few requirements need to line up:
Don't confuse --teleport with --resume. The latter only reopens local sessions from this machine's history. For a deeper walkthrough, our Claude Code remote control tutorial covers the rest.
/btw is for the quick question you want to ask without breaking the flow.
Imagine Claude is mid-task. You've already kicked off a long edit or a tool call, and you suddenly need to know the regex for matching IPs or which flag does X.
You can just type /btw <question>, and the answer pops up in a dismissible overlay. The in-flight task keeps running, the answer never enters conversation history, so you don't need to spawn a new session for a one-off lookup and don’t pollute your current one.
The fastest way to backslide on everything in this article is to try it all in a single day. Pick two or three, build muscle memory for those, and add the rest later when the first set is automatic.
Three to start with, each one for a different part of the day, so they don't crowd each other out:
A tight project CLAUDE.md plus two or three wildcard permission rules in .claude/settings.json for the bash commands you re-approve every session. This is the morning setup habit, and you only feel it when the interruptions stop.
The /compact versus /clear call and the Esc+Esc rewind picker. This is the mid-session habit, and the cue is the moment Claude re-asks for a file path that it knew an hour ago.
One /loop for a recurring check that already takes you time. This is the background habit, and once it's running, it pays back on its own.
If the difference between Sonnet, Opus, and Haiku is still hazy, our Introduction to Claude Models course walks through when each model fits. That makes the /effort and /model calls a lot easier.
Learn AI with DataCamp!
Track
Course
Course
Tutorial
Vikash Singh
Tutorial
Aashi Dutt
Tutorial
Bex Tuychiev
Tutorial
Bex Tuychiev
Tutorial
Bex Tuychiev
Tutorial
Khalid Abdelaty