Course
We all know that, as spreadsheets grow in complexity and size, they can slow down performance and hog storage space. The most annoying thing that can happen is when your entire Excel file crashes.
Here are my proven steps to reduce your Excel file size. But first, I'll talk briefly about why the Excel files can get too big; this will be helpful in knowing how to debug.
Why Excel Files Become Too Large
Even simple spreadsheets can get larger than you expect. Here are some reasons:
Data volume and complex formulas
Large datasets are often the main culprit behind file bloat. But it’s not just the rows and columns. Functions like VLOOKUP()
, and INDIRECT()
, when used excessively, can significantly impact performance.
Embedded objects and images
Adding high-resolution images, charts, or even embedded Word/PowerPoint files can inflate your workbook.
Formatting and unused elements
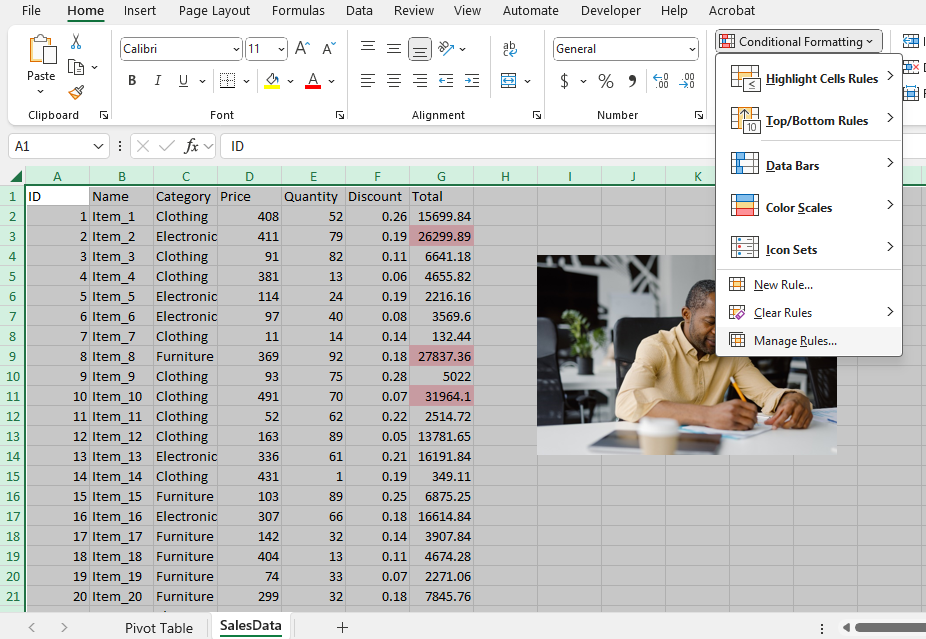
Excessive conditional formatting, unused named ranges, hidden sheets, or extended “used ranges” (where Excel thinks cells are in use even if they're empty) also contribute to unnecessarily large files.
How to Compress Excel Files
Now that you understand what makes Excel files bloated, let's look at six simple ways to fix them. You can use one or more of these methods based on your spreadsheet's content.
To practice, we will use this Excel_Compression_Tutorial_Dataset, which is a sample file I put together. It includes common causes of file bloat, such as high-resolution images, complex formulas, too much formatting, and unused data. We will demonstrate each method with this dataset so you can easily follow along and apply the fixes to your files.
Method 1: Compress images in Excel
- Click on any image in your worksheet.
- Go to the Picture Format tab and select Compress Pictures.
- Uncheck Apply only to this picture to compress all images.
- Choose an appropriate resolution (e.g., Email (96 ppi) or Web (150 ppi)).
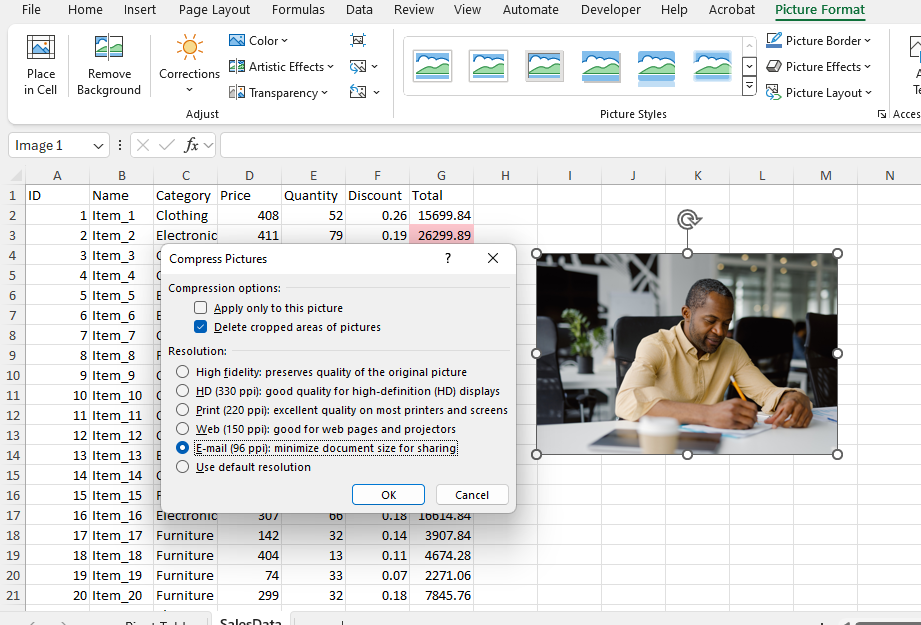
Tip: Use JPEGs instead of PNGs when inserting images; they’re usually smaller.
Method 2: Remove unused data and blank cells
Excel sometimes retains formatting in unused cells, which adds to file size.
- Delete empty rows and columns beyond your active data range.
- Use Ctrl + Shift + Right Arrow/Down Arrow to select and clear them.
- Remove any hidden sheets or old worksheets no longer in use.
Method 3: Clean up formatting and styles
Cleaning up formatting can shrink files by several megabytes.
- Go to Home > Conditional Formatting > Manage Rules to review/delete unnecessary rules.
- Go to File > Info > Check for Issues > Inspect Document to clean up unused styles.
Method 4: Manage and reduce PivotTable caches
This method is especially helpful for files with multiple PivotTables.
- Select your PivotTable, then go to PivotTable Analyze > Options.
- Under the Data tab, uncheck Save source data with file.
- Refresh PivotTables manually when needed.
Method 5: Break external links and remove stale references
- Go to Data > Edit Links
- Break links to unused or unavailable files.
- Use Formulas > Name Manager to remove outdated named ranges.
Method 6: Save and reopen the file
- Use File > Save As and save the file under a new name.
- This helps Excel rebuild the file structure, removing hidden metadata or cached info.
Advance Your Career with Excel
Gain the skills to maximize Excel—no experience required.
Additional Things You Can Do
If your Excel file still feels too heavy after doing all the above, it’s time to explore more advanced options. These methods require a bit more technical knowledge but can significantly reduce file size and improve performance.
Manual ZIP archive manipulation for XLSX files
Excel files with a .xlsx
extension are essentially ZIP-compressed folders containing multiple components like styles, sheets, media, and XML files. By manually accessing these contents, you can remove unnecessary elements that may be bloating the file.
Step 1: Show file extensions (if not already visible)
By default, Windows hides file extensions. You’ll need to make them visible:
-
Open File Explorer.
-
Go to the View tab at the top.
-
Click on Show, then check File name extensions.
-
You should now see
.xlsx
at the end of Excel files.
Step 2: Rename the file
-
Right-click on the Excel file you want to compress.
-
Click Rename.
-
Change the extension from
.xlsx
to.zip
Example:Sales_Report.xlsx
→Sales_Report.zip
-
Press Enter and confirm the warning prompt if it appears.
Step 3: Open the ZIP file
-
Right-click the newly renamed
.zip
file. -
Select Open with and choose a tool like WinRAR or 7-Zip.
-
Navigate to the xl folder inside the archive.
In this folder, you can:
-
Delete unnecessary embedded images.
-
Clean up excess styles from
styles.xml
. -
Remove extra sheets from the
worksheets/
folder if they are no longer needed.
Note: Always make a backup copy of your Excel file before making changes inside the ZIP structure. Editing the wrong file can break your workbook.
Step 4: Repackage the file
-
After making your changes, re-zip the contents (select everything inside, not the folder itself).
-
Rename the new ZIP file back to
.xlsx
Example:Sales_Report.zip
→Sales_Report.xlsx
-
Open the file in Excel to ensure everything works correctly.
Important: If done incorrectly, this may corrupt the file. Always test and keep a backup.
Data segmentation and Power Query connections
Large workbooks often combine multiple data sources or serve multiple departments. Instead of maintaining one huge file, you can split the workbook into smaller, purpose-specific files and reconnect them using Power Query.
- Create separate Excel files based on logical divisions (e.g., Sales Data, Marketing Reports, Inventory Logs).
- In your main workbook, go to the Data tab → Get Data → From Workbook to connect to the others using Power Query.
- Use Refresh All to keep the main workbook updated.
External image management strategies
Images, especially high-resolution ones, can drastically increase workbook size. We worked with images earlier, but here's another method. Instead of embedding these images:
- Upload them to a cloud platform (OneDrive, Google Drive, SharePoint).
- In Excel, go to Insert → Picture → From Online Pictures and link to the image's URL or cloud location.
Images can be updated externally without touching the workbook. Plus, this reduces the chance of file corruption from embedded objects.
Conclusion
A bloated Excel file can slow you down, but it doesn’t have to. Applying these file compression strategies, from compressing images to clearing Pivot caches, can significantly reduce your Excel file size.
If you're new to Excel or want to sharpen your skills further, check out our Data Manipulation in Excel, Advanced Excel Functions, and our Data Preparation in Excel courses. I also mentioned Power Query. If you are interested in trying something new, enroll in our Introduction to Power Query in Excel course also.
Data analyst and analytics mentor specializing in Excel, SQL, and Python. Focusing on actionable insights, I empower businesses of all sizes to drive meaningful change while inspiring new data learners on their journeys.
FAQs
What causes an Excel file to become too large?
Large datasets, high-resolution images, complex formulas, excessive formatting, and embedded objects can all contribute to a bloated Excel file.
How can I reduce the size of an Excel file without losing data?
You can remove unused cells, clean formatting, compress images, and use features like “Save As” or external image links to shrink file size without losing data.
Can too many PivotTables slow down my Excel file?
Yes, especially if they store their own cache. You can reduce file size by disabling cache or deleting unnecessary PivotTables.
Will compressing an Excel file affect its performance?
Yes, compressing improves performance by reducing load times and memory usage, especially in large workbooks with many formulas and visuals.
What’s the best way to handle large datasets in Excel?
Segment large datasets across files, use Power Query for loading only necessary data, and consider linking to external sources to manage size efficiently.