Track
Containerization and Virtualization with Docker and Kubernetes
13 hr
For some reason, setting up a new project with Docker always takes longer than it should.
You Google a template, paste it in, change a couple of lines, and hope for the best. The build fails, so then you tweak and repeat the cycle until it works. Every new project starts the same way - with a blank file and a vague memory of what worked last time. This is a clear setup problem, and Docker isn’t to blame.
The good news is that docker init fixes this. It's a CLI command that detects your project type and generates a Dockerfile, .dockerignore, and Compose file.
In this article, I'll walk you through how docker init works, how to use it step by step with a real Python project, and when it's the right tool for the job.
Are you completely new to Docker and containerization? Learn why it’s an essential part in the data professional’s toolkit by opting for our Introduction to Docker course.
docker init is a CLI tool that sets up Docker configuration for your project. It generates the files you need to containerize your app. So with it, there’s no need for templates or copy-pasting.
It produces three files:
The smart part is automatic project detection. docker init looks at your project structure and figures out what stack you're using - Python, Node.js, Go, and others. It then generates files according to that stack instead of coming up with a generic template.
It's not a deployment tool, and it won't manage your containers in production. It just gets your configuration started so you can focus on the actual work.
docker init follows a four-step flow every time you run it.
First, you run docker init inside your project folder. Docker scans the directory, detects your project type, and chooses the right configuration template. Then it walks you through a short series of interactive prompts - things like which port your app runs on and what command starts it. Once you answer those, it generates your files.
The whole thing takes under a minute.
The prompts are easy to answer and rarely need additional explanation. You can accept the defaults by pressing Enter, or type in your own values if the defaults don't work.
Here's what you’ll see when you first run the command:
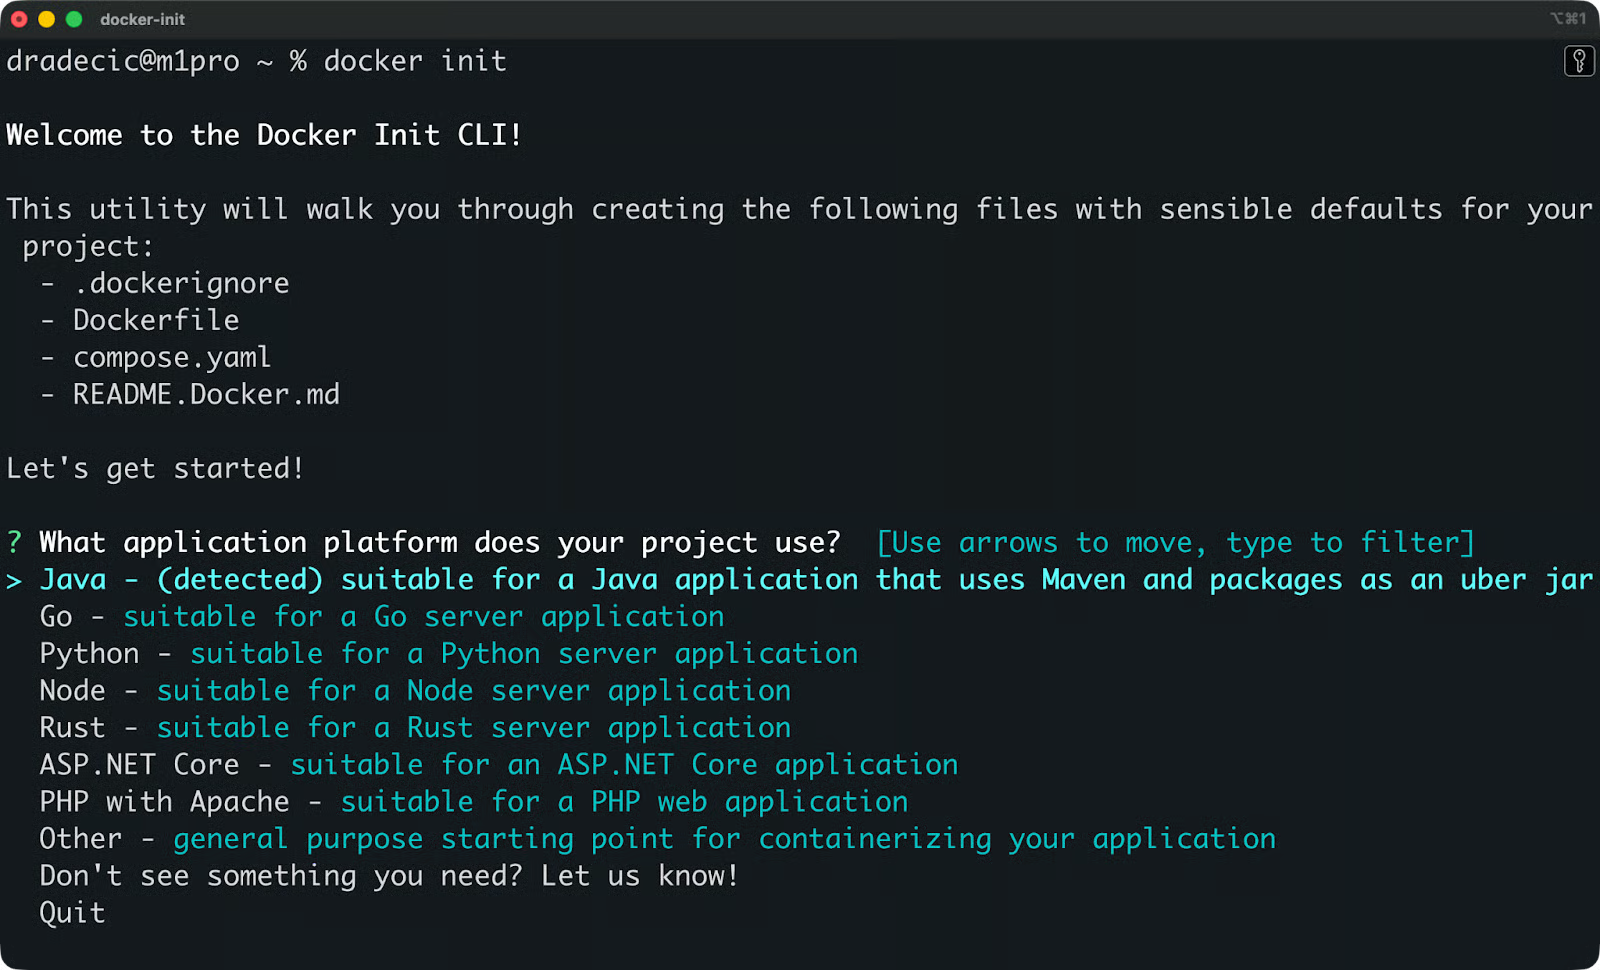
Docker init setup screen
Let me show you this process in more detail next.
Here's an overview on how to go from a project folder to a running container.
Open your terminal and navigate to the root of your project - the folder that contains your application code.
cd /path/to/your/projectdocker init generates files relative to wherever you run it, so make sure you're in the right directory before proceeding.
Run the following command:
docker initDocker will scan your project folder, detect your stack, and launch the interactive setup prompt.
docker init will ask you a couple of questions:
You can accept the suggested defaults by pressing Enter, or type in your own values. If docker init detects your stack, the defaults are usually good enough to start with.
Once you answer the prompts, docker init writes three files to your project folder:
.
├── Dockerfile
├── .dockerignore
└── compose.yaml
Open each file and read through it. The generated files include comments that explain what each line does, so it's worth taking a few minutes to understand what was created before you build anything.
Build and start your container with Docker Compose:
docker compose up --buildThe --build flag tells Docker to build the image from your Dockerfile before starting the container. Once it's running, your app should be accessible on the port you specified in step 3.
docker init supports the most common application stacks out of the box. Here’s just a few:
It detects the stack automatically.. When you run docker init, it scans your project folder for language-specific files - things like requirements.txt for Python or package.json for Node.js - and picks the right template based on what it finds.
Each template is tailored to the stack. A Python project gets a different base image, install commands, and start command than a Go project. You're not getting a one-size-fits-all Dockerfile with a language variable swapped out. The structure itself changes depending on what you're building.
If docker init can't detect your stack, it'll ask you to pick one manually from the list.
docker init generates three files, and each one has a different role in your setup.
The Dockerfile defines how Docker builds your container image. It tells Docker which base image to start from, how to install your dependencies, and what command to run when the container starts.
Here's an example of what a generated Python Dockerfile looks like:
FROM python:3.14-slim
WORKDIR /app
COPY requirements.txt .
RUN pip install -r requirements.txt
COPY . .
CMD ["python", "app.py"]
You'll want to review this file before building. The generated output is a good starting point, but you may need to tweak it - for example, to add environment variables or adjust the base image version.
The .dockerignore file tells Docker which files to exclude from the build context. This is the set of files Docker sends to the build engine when creating your image.
Without it, Docker would copy everything in your project folder into the image, including things like .git, node_modules, or local config files you don't need in production. That increases your image size and can expose files you didn't mean to include.
A typical .dockerignore looks like this:
.git
.env
__pycache__
*.pyc
node_modulesThe compose.yaml file is for running multi-container setups. It defines your services, ports, volumes, and how containers connect to each other.
For a simple single-container app, you might not need it. But if your project involves a database, a cache, or any other service running alongside your app, the Compose file is where you configure all of that in one place.
Let's run docker init on a real project. I'll use a minimal FastAPI app with a single route as the example.
Here's the project structure before running docker init:
my-fastapi-app/
├── app.py
└── requirements.txt
app.py has a single Hello World route:
from fastapi import FastAPI

app = FastAPI()

@app.get("/")
def read_root():
    return {"message": "Hello, World!"}
And requirements.txt has these two dependencies:
fastapi
uvicornTo start, navigate to the project folder and run:
docker init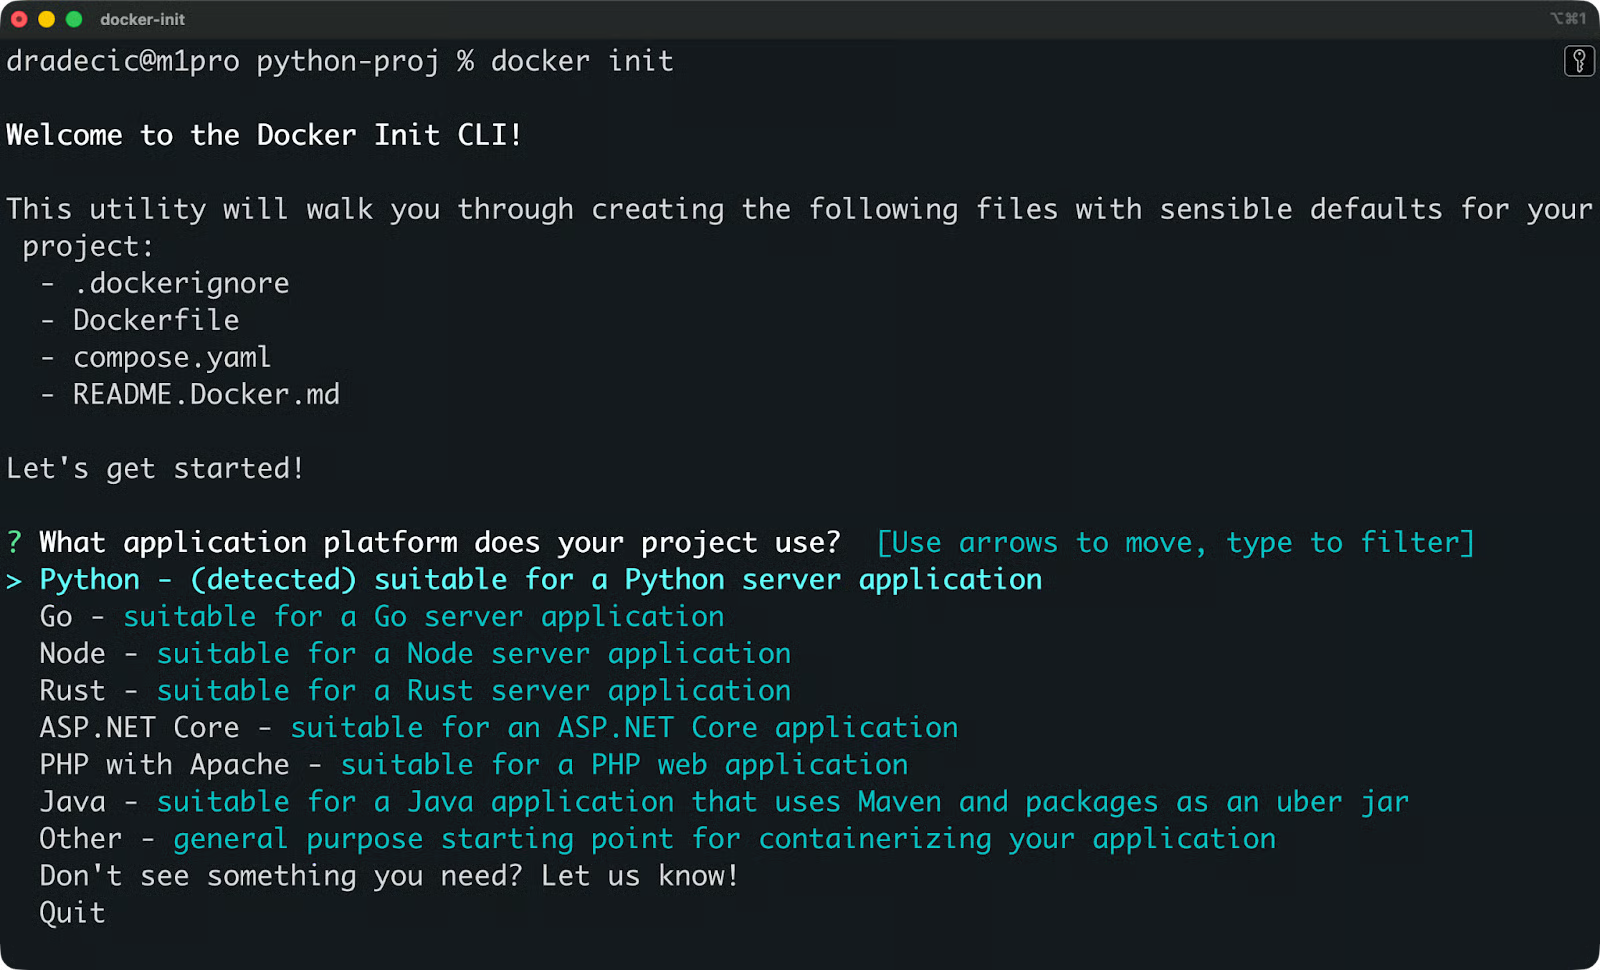
Docker init project detected
docker init detects Python from requirements.txt and asks you a couple of questions. Here's what the prompts look like and what to answer:
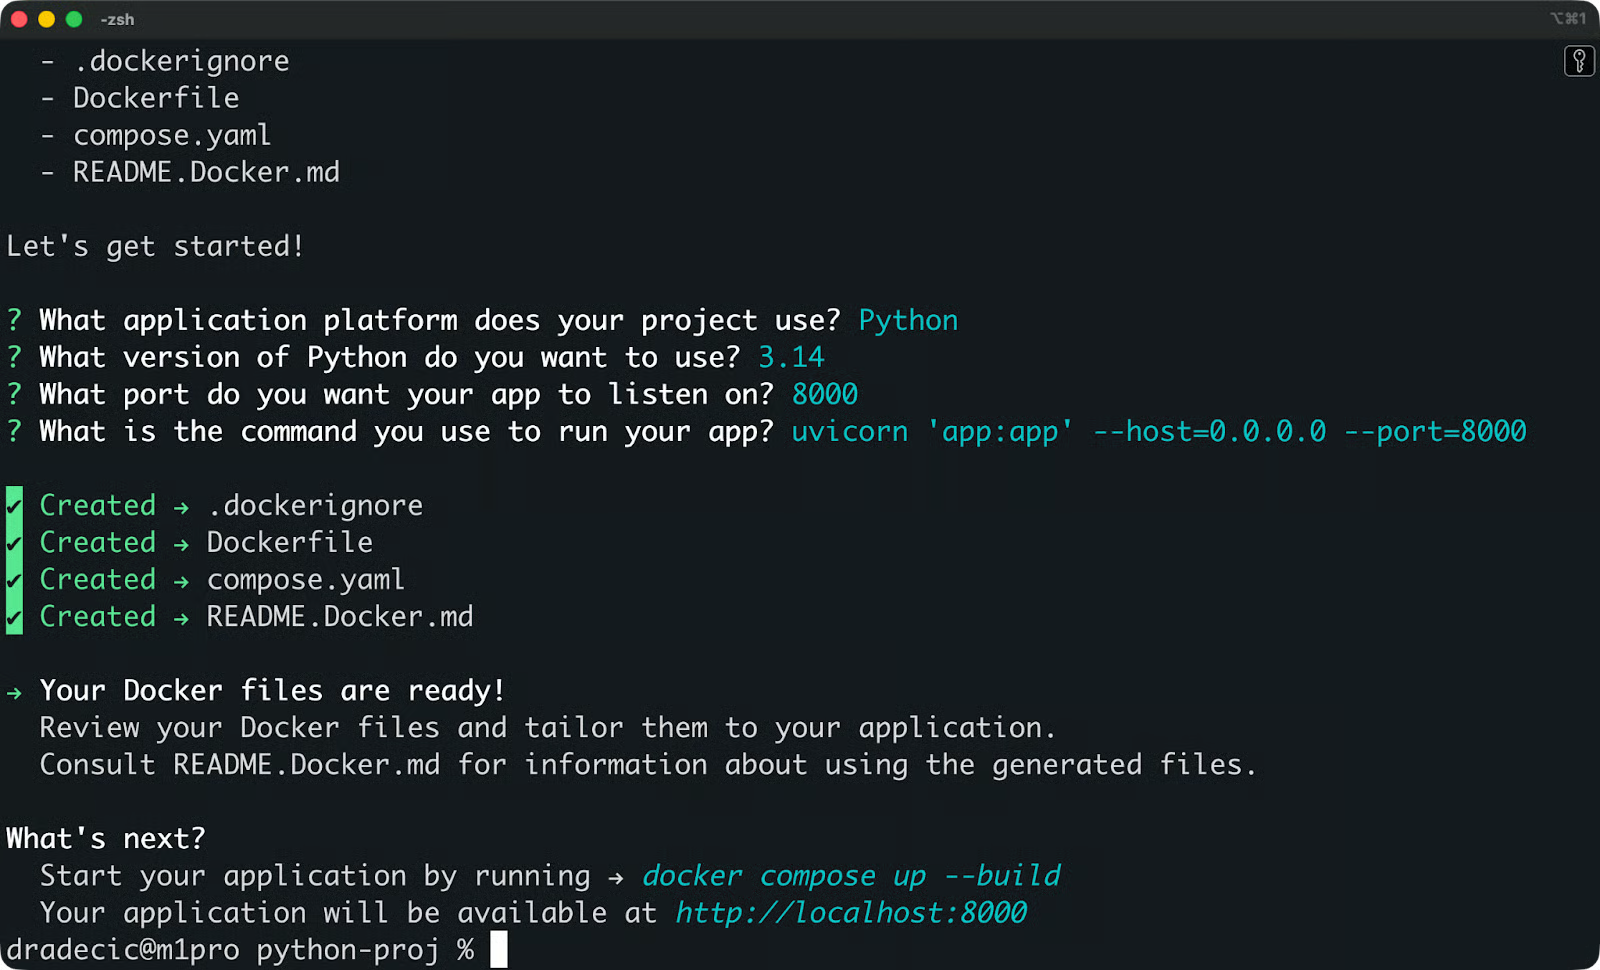
Docker init prompts for a Python project
After answering the prompts, your project folder looks like this:
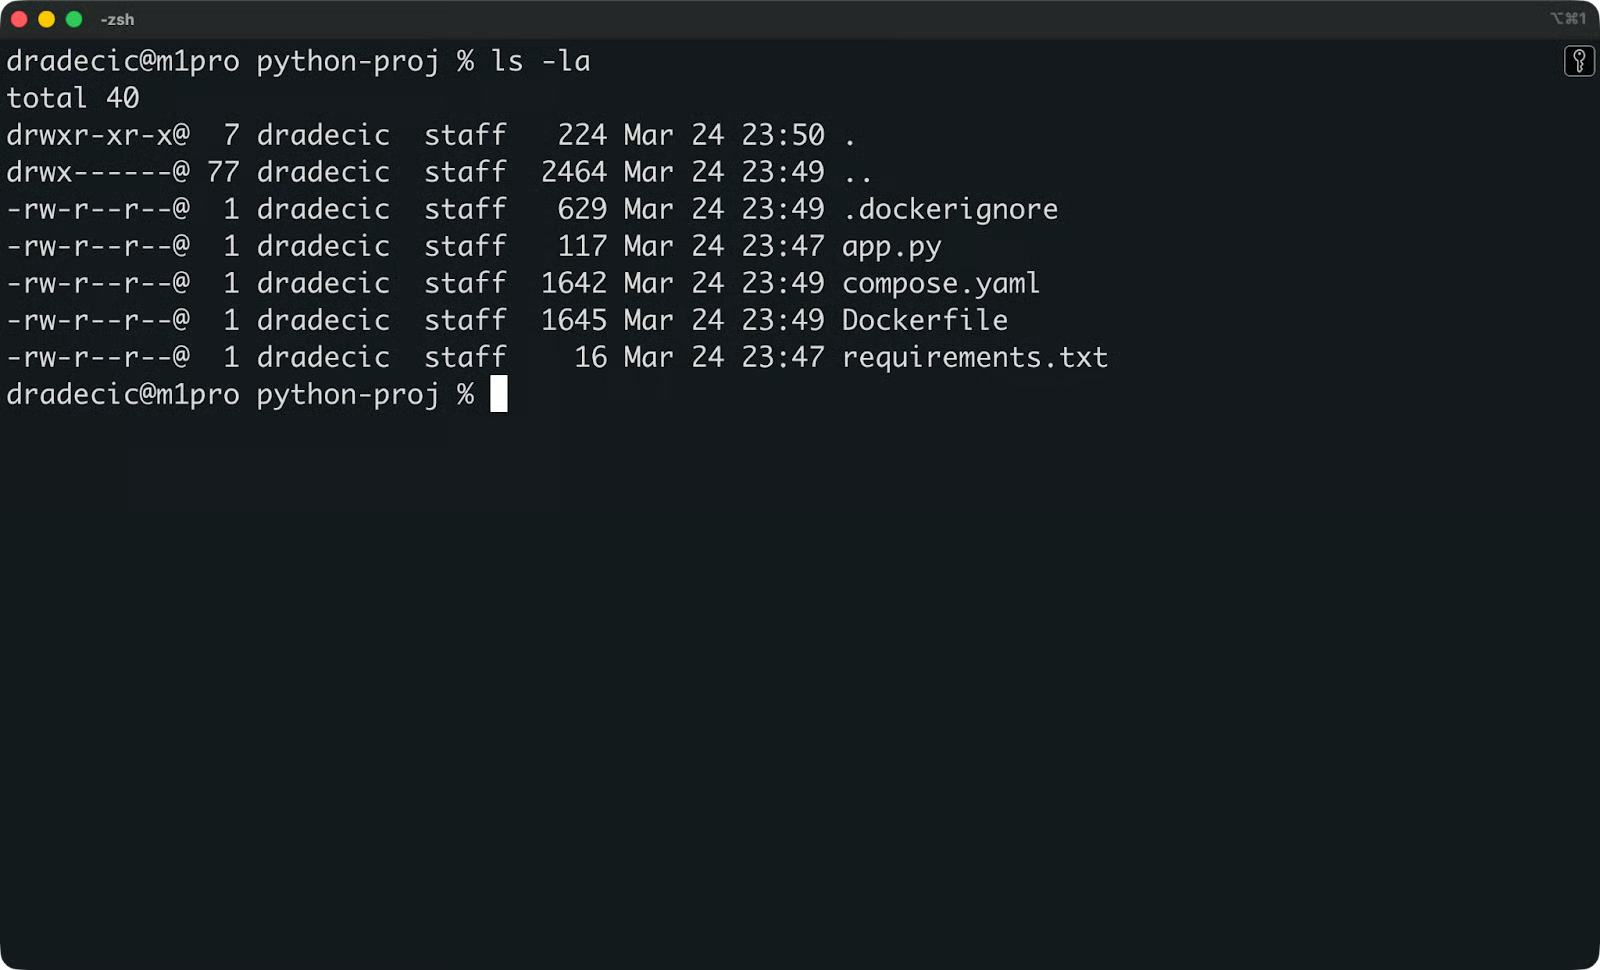
New project folder structure
There are three new files. Let's look at each one.
# syntax=docker/dockerfile:1

ARG PYTHON_VERSION=3.14
FROM python:${PYTHON_VERSION}-slim as base

ENV PYTHONDONTWRITEBYTECODE=1
ENV PYTHONUNBUFFERED=1

WORKDIR /app

ARG UID=10001
RUN adduser \
    --disabled-password \
    --gecos "" \
    --home "/nonexistent" \
    --shell "/sbin/nologin" \
    --no-create-home \
    --uid "${UID}" \
    appuser

RUN --mount=type=cache,target=/root/.cache/pip \
    --mount=type=bind,source=requirements.txt,target=requirements.txt \
    python -m pip install -r requirements.txt

USER appuser

COPY . .

EXPOSE 8000

CMD uvicorn 'app:app' --host=0.0.0.0 --port=8000
A few things stand out here. PYTHONDONTWRITEBYTECODE=1 stops Python from writing .pyc files to disk, and PYTHONUNBUFFERED=1 makes sure logs show up in real time instead of getting held in a buffer - both are good defaults for containerized apps.
The adduser block creates a non-privileged user called appuser to run the application. By default, Docker containers run as root, which is a security risk. Running as a non-root user limits what an attacker can do if they manage to break out of your app.
The --mount=type=cache flag on the pip install step tells Docker to cache downloaded packages between builds. This means the following builds won't re-download dependencies from scratch, which speeds things up.
**/.DS_Store
**/__pycache__
**/.venv
**/.env
**/.git
**/.gitignore
**/node_modules
**/Dockerfile*
**/compose.y*ml
README.md
The .dockerignore file excludes files that don't belong in your image. Local environment files like .env, version control folders like .git, and Python cache files like __pycache__ all get skipped. The Dockerfile and compose.yaml themselves are also excluded - Docker doesn't need them inside the image it's building.
services:
  server:
    build:
      context: .
    ports:
      - 8000:8000
The Compose file defines your app as a service called server, builds it from the Dockerfile in the current directory, and maps port 8000 on your host to port 8000 inside the container.
All three generated files include some comments which I’ve omitted to keep things clean.
Run docker compose up --build and your FastAPI app will be live at http://localhost:8000.
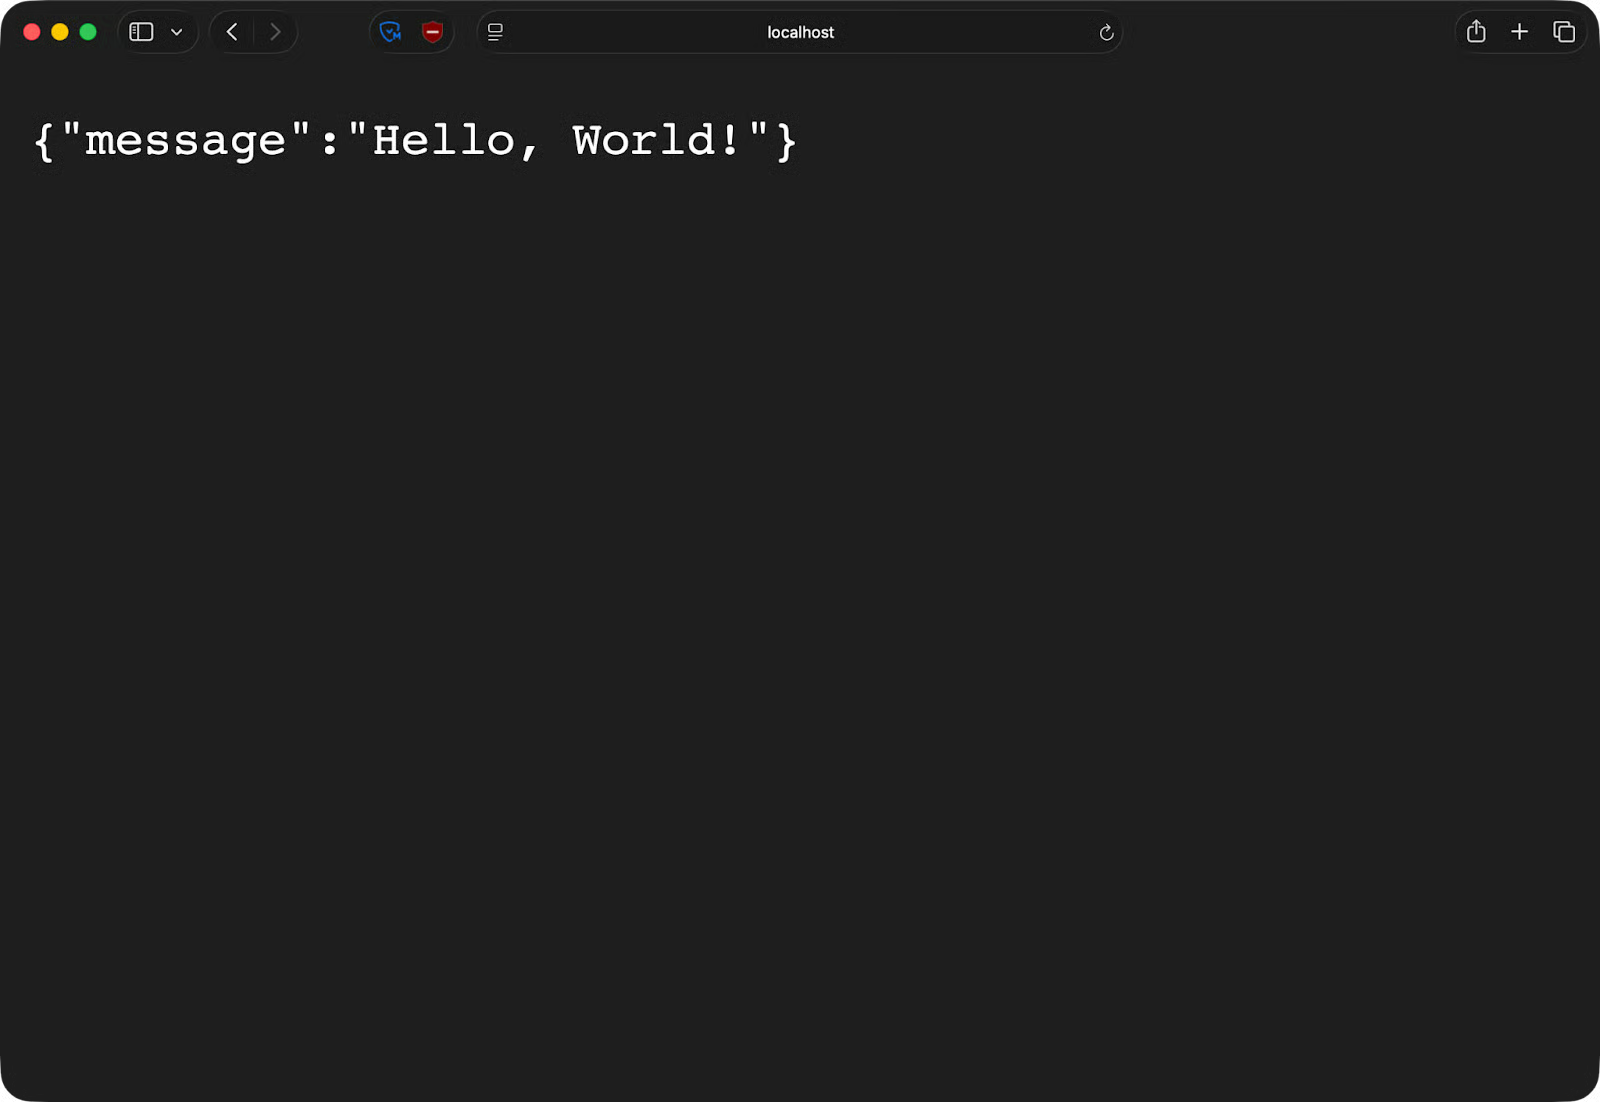
FastAPI app running in a container
Both approaches get you a working Dockerfile, so it’s the matter of how much control you need and how fast you want to get there.
docker init is the faster option. You answer a few prompts and get a working, reasonably secure configuration in under a minute. The generated files follow Docker's own best practices - non-root users, build caching, proper .dockerignore patterns - so you're not starting from scratch.
It's a good fit when you're starting a new project, onboarding a teammate, or just want a solid base to build on without spending time on boilerplate.
But there’s a question of flexibility. The templates cover common stacks well, but they're still templates. If your project has an unusual structure or specific build requirements, you'll hit the limits of what docker init can generate.
Writing your Dockerfile by hand gives you full control over every layer, every instruction, and every build decision. You can implement multi-stage builds to minimize image size, use custom base images, or fine-tune caching behavior in ways that docker init can't anticipate.
But, you need to know what you're doing. A poorly written Dockerfile can produce oversized images, introduce security issues, or fail in ways that are hard to debug, especially if you’re not experienced in the first place.
Here's a simple way to think about it:
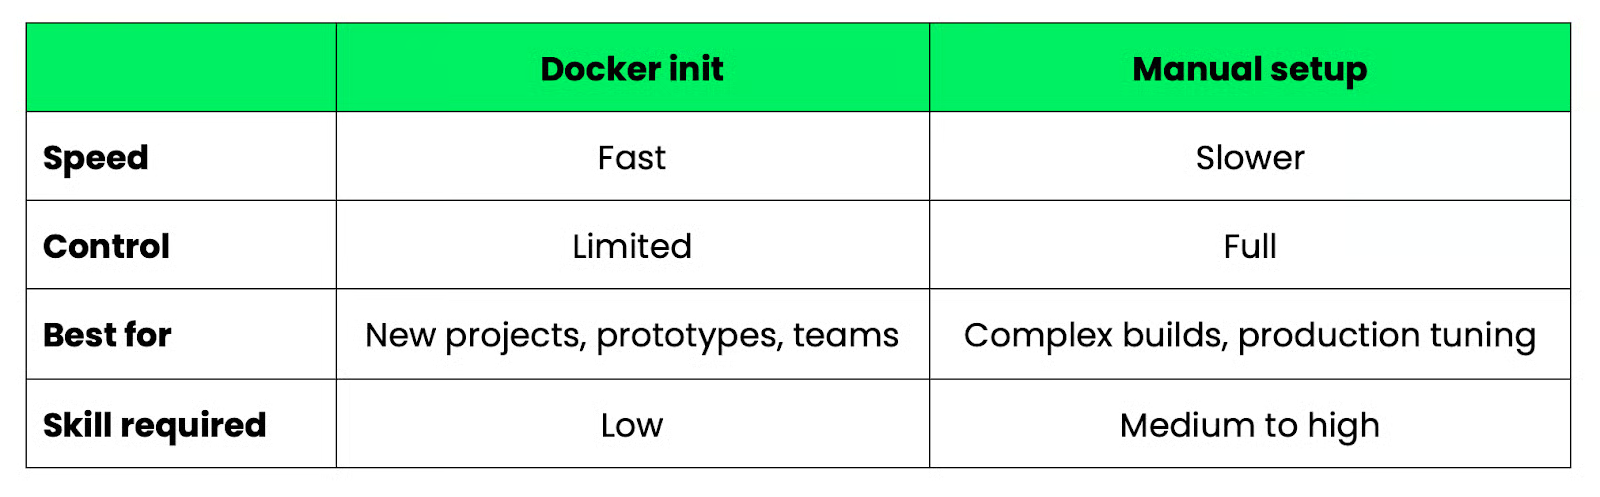
Docker init versus manual setup comparison
A good approach is to start with docker init and then manually edit the generated files as your requirements grow.
docker init isn't the right tool for every situation. Here's when it makes sense and when it doesn't.
Go with docker init when:
You're starting a new project: It gets your Docker configuration off the ground in under a minute, so you can focus on writing code instead of setting up the containerization
You're learning Docker: The generated files are well-commented and follow best practices. They're a better starting point than a random Stack Overflow snippet
You're prototyping: When you need a containerized environment fast and don't care about fine-tuning the build, docker init gives you something that works
You're standardizing across a team: Instead of every developer rolling their own Dockerfile, docker init gives everyone a consistent starting point with the same structure and defaults
That said, you should skip docker init when:
You need multi-stage builds: If you're optimizing image size by splitting your build into separate stages - compiling in one, running in another - you'll need to write that manually. The generated Dockerfile is single-stage
You have complex production requirements: Custom base images, advanced caching strategies, non-standard project layouts - these aren't things docker init can anticipate. You'll spend more time working around the generated files than just writing your own
To conclude, docker init is a starting point. Use it to get moving, then edit the generated files as your needs grow.
You can run into some limitations as your project grows. Here are a few.
The generated files are template-based. They're designed to cover the most common cases for each supported stack, which means they work well for common projects and less well for anything outside that range. If your project has an unusual structure, the generated files maybe won't account for that.
Another common limitation is that manual tuning is almost always required. The defaults are good, but they're still defaults. You'll likely need to adjust the base image version, tweak environment variables, or modify the start command before the configuration fits your project. Think of the generated files as a first draft, nothing more.
docker init also doesn't support advanced build patterns. Multi-stage builds, custom build arguments, conditional logic, and other techniques that experienced Docker users rely on for production images are outside the scope of what the tool generates. But if you need any of that, you're writing the Dockerfile yourself anyway.
None of this makes docker init a bad tool. It just means you need to go in with the right expectations - it removes the blank-page problem, but it doesn't replace the need to understand what's in your Dockerfile.
The files docker init generates are a starting point. Here are the steps you need to take to turn them into something production-ready.
Review the generated files: Read through the Dockerfile, .dockerignore, and compose.yaml line by line. The files are well-commented, so this won't take long. You want to understand what's there before you start building on top of it
Optimize your image size: The default base image is python:3.x-slim, which is already a lightweight choice. But you can go further by making sure your .dockerignore is excluding everything it should, and check that you're not copying files into the image that don't need to be there
Move secrets and environment-specific values into environment variables: Don't hardcode API keys, database URLs, or environment flags in your Dockerfile. Use environment variables, and manage them through a .env file locally or your deployment platform's secret management in production
Test locally before pushing anywhere: Run docker compose up --build and verify your app behaves the same inside the container as it does outside. Check your logs, go to your endpoints, and confirm the port mapping works
Refine your build steps as the project grows: The generated Dockerfile installs dependencies in a single layer. As your project matures, think about layer ordering. In other words, put steps that change less often earlier in the file so Docker can cache them. If your build times start creeping up, that's usually the first place to look
Like always in tech, a couple of things can go wrong. Here's what to look for and how to fix it.
If docker init picks the wrong stack, it'll generate files that don't match your project. This usually happens when your project folder has mixed-language files or is missing the file docker init looks for - like requirements.txt for Python or package.json for Node.js.
When the prompt asks for your application platform, just select the correct one manually instead of accepting the detected default.
If your container starts but you can't reach your app, or Docker throws an error about a port already being in use, another process on your machine is likely occupying the same port.
Find and stop the conflicting process, or change the host-side port in your compose.yaml:
ports:
  - 8001:8000  # maps host port 8001 to container port 8000
The left side is the port on your machine. The right side needs to match what your app listens on inside the container.
If your container builds but crashes on start, missing dependencies are a common reason why. Check that your requirements.txt (or equivalent) is complete and up to date. If you've added a package locally without updating that file, the container won't have it.
Run docker compose logs to see the error output:
docker compose logsThe error message will usually tell you exactly which package is missing.
If the container won't start at all, the problem is almost always in the CMD line of your Dockerfile. Check that the start command matches how you actually run your app.
For the FastAPI example, it should look like this:
CMD uvicorn 'app:app' --host=0.0.0.0 --port=8000If your entry point file has a different name or the module path is wrong, the container will exit . Fix the CMD, rebuild with docker compose up --build, and check the logs again.
docker init won't replace a deep understanding of Docker, but it will get you out of the blank-page problem.
In a single command, you get a working Dockerfile, .dockerignore, and compose.yml file - all following Docker's own best practices. That's a good foundation for any new project, and a much better starting point than a copy-pasted template from Stack Overflow or ChatGPT.
Just don't stop there. The generated files are meant to be edited. Review them, tweak the build steps, lock down your base image version, and add your environment variables. The more your project grows, the more you'll move away from the defaults.
If you know the basics of Docker, the logical next step is to learn about multi-stage builds, networking tools, and Docker compose - all of which is covered in our Intermediate Docker course.
Learn Docker with DataCamp
Track
Course
Course
blog
Joel Wembo
14 min
blog
Joel Wembo
9 min
Tutorial
Dario Radečić
Tutorial
Moez Ali
Tutorial
Arunn Thevapalan
Tutorial
Rajesh Kumar