
Git Alias: How to Create Time-Saving Shortcuts in Git

Learn how to set up Git aliases to save time, reduce typing, and speed up your development process. Perfect for beginners who want to boost productivity without extra tools.
Oct 17, 2025  · 14 min read

Git is a powerful solution for versioning, sharing code, and collaborating on complex tasks. It's also easily accessible from the command line, providing fast access to this valuable tool. But typing out long commands dozens of times a day can quickly become tedious. So engineers have come up with a way to define shortcuts, called Git aliases.

Git aliases are custom shortcuts that let you create your own commands for any Git operation, or set of operations. These can make life a little easier with less typing and a workflow tailored to your personal or your company’s style.

In this tutorial, we'll cover what Git aliases are, how to use them, and tips for sharing them responsibly. If you’re new to Git, check out our Introduction to Git course and GitHub Foundations track for a solid foundation before diving in.

Fundamentals of Git Aliases

Before we start creating custom shortcuts, let’s discuss what Git aliases are, how they work, and why they’re so useful for developers.

What are Git aliases?

A Git alias is a custom command that you define in your Git configuration. It's essentially a shorthand for your most common Git commands.

If you're already familiar with the command line, you may be thinking that Git aliases sound a lot like shell aliases. But there are some important differences. Shell aliases are shortcuts defined in your shell configuration, and they can be used for any command-line tool, not just Git.

Git aliases, however, are defined within Git’s own configuration and are only available when you use the git command. Git aliases can also be portable, since they travel with your Git config. This means they can be shared with your team and will work consistently across different environments. They’re also easier than shell aliases to document and maintain as part of your version control setup. Developers use Git aliases to save time and energy, reduce typos, and automate their workflows.

If you're interested in incorporating shell into your workflow, check out our shell courses to learn how.

Alias scope and persistence

There are two main categories of aliases: global aliases and local aliases. The primary difference lies in where you define them and where they're available for use.

A global alias is available to use in every repository on your system. When you set a global alias, it’s stored in your global Git configuration file. This is the best place to define shortcuts you want to use everywhere.

A quick word of warning about using global aliases: they are specific to your machine. This is important to remember if you are switching between machines or helping colleagues with their own. Your global aliases will not work on their machine.

A local alias, on the other hand, is specific to a single repository. They are stored in that particular repository’s configuration file. Local aliases are useful if you need project-specific shortcuts or want to experiment without affecting your global setup.

Local aliases take precedence

It's important to note that if you define the same alias both globally and locally, the local alias takes precedence. This means the local alias will be the one your computer uses, ignoring the global one while you are in the local repository. Once you leave that repository, the global alias will reassert its dominance. This is a useful feature because it allows you to override global defaults for specific projects.

For more on configuring Git at different levels, check out Intermediate Git.

How Git alias is searched for  in the local Git configuration file

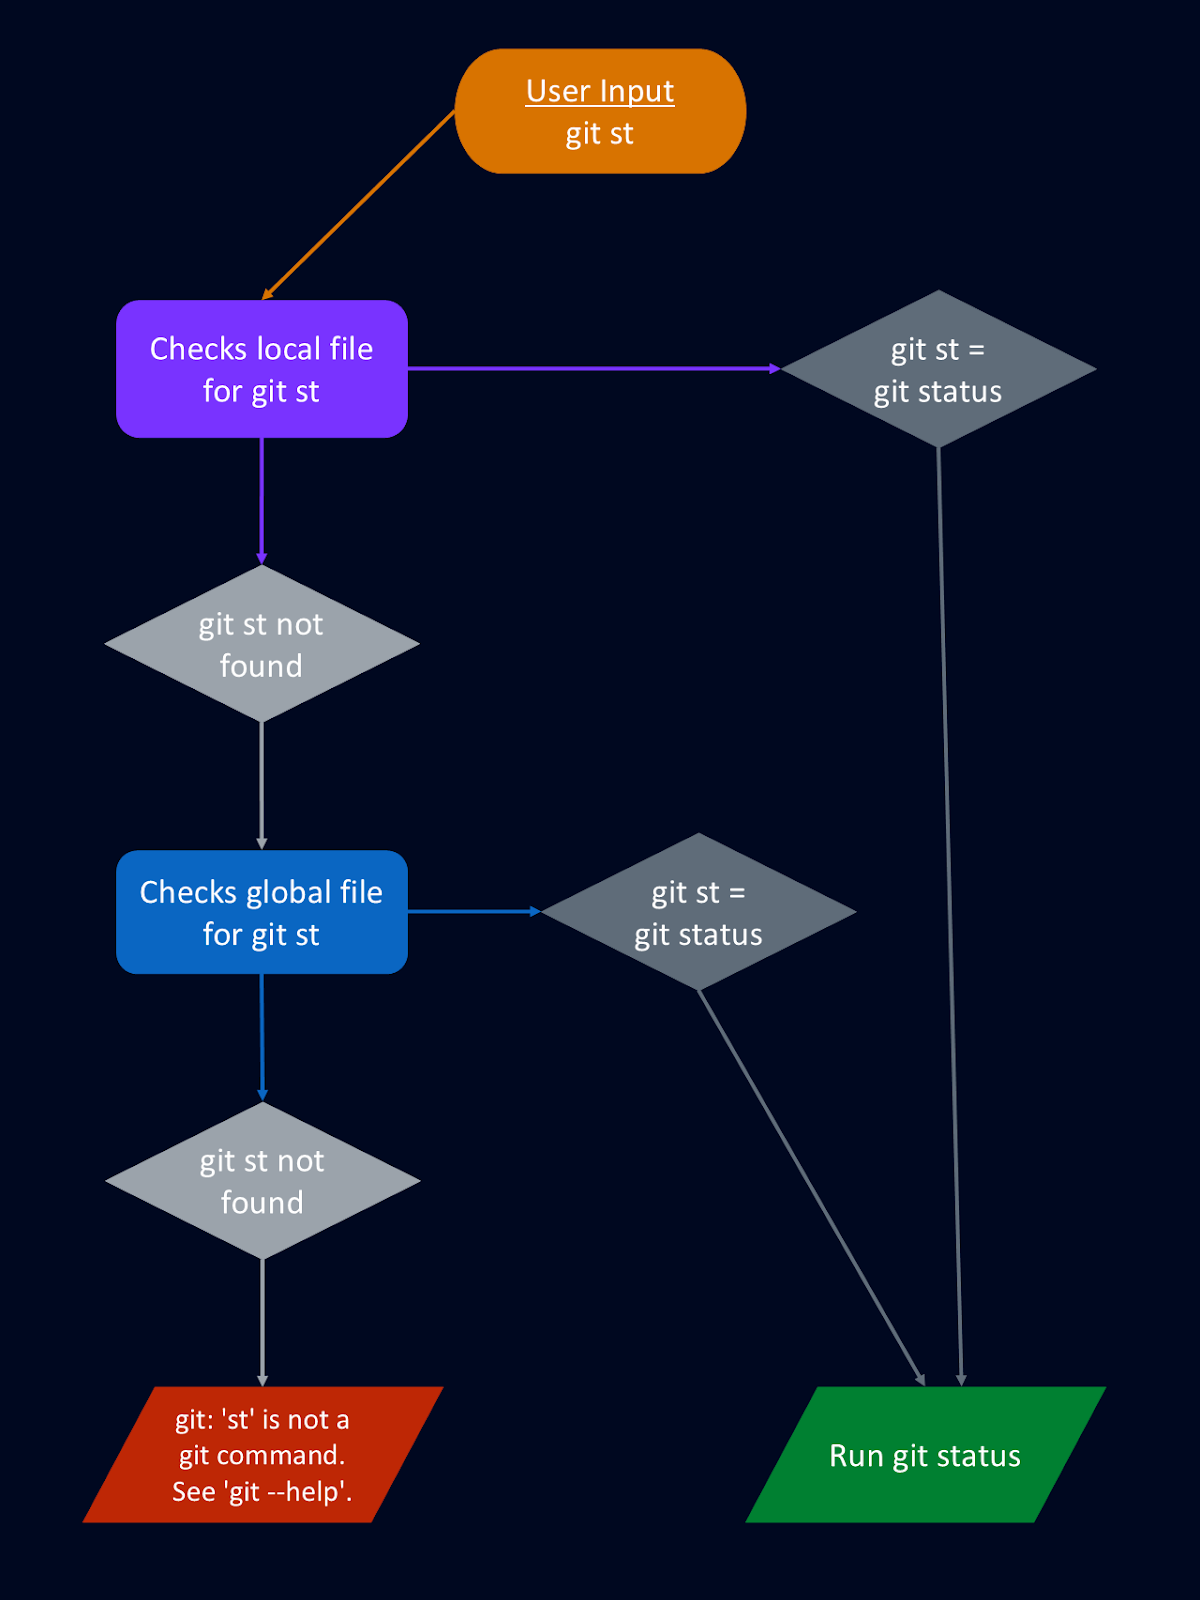
The flow chart above shows that Git first looks for your alias in the local configuration file. If it’s not found there, Git checks the global configuration file to determine which command(s) to run.

Creating and Configuring Git Aliases

Setting up Git aliases is straightforward, but the method you choose can depend on your workflow, operating system, and personal preference.

Creation methods

There are two main ways to create a Git alias; you can create a new Git alias using the command line or you can edit your Git configuration file directly.

Using the command line

The easiest way to add an alias is with the git config command. The general recipe is:

git config alias.<shortcut> <full-command>

For example, let's create a shortcut for git commit -m, which is used to save staged changes to the repository with a message.

git config --global alias.cm "commit -m"

This command adds a new alias called cm that runs git commit -m. The --global flag specifies that the alias should be available in all your repositories. If you omit --global, the alias will default to a local alias applied to your current repository.

Once you've created your desired aliases, you may want to double-check what you've created. You can use the command line to see all of your currently defined aliases using:

git config --get-regexp ^alias\\\\.

This will list every alias and its corresponding command. You can also check a specific alias. For example, the following command will return the value of the alias lg from your configuration file.

git config alias.lg

This is a quick way to confirm that your aliases are set up correctly.

Editing the configuration file directly

When you use the above commands, your Git configuration file (we'll call it the Git config file going forward), either global or local, is updated with your chosen aliases. You can sidestep this process by modifying your config file directly.

You'll need to open your Git config file in a text editor and add the aliases under the [alias] section. In Windows, you’ll usually find this file in C:\\Users\\<YourUsername>\\.gitconfig for global aliases or .git\\config in a repository for local aliases. On macOS or Linux, global aliases are usually in ~/.gitconfig and local ones in .git/config.

Your Git config file should look something like this (if it’s a global file, it may include a few more parts):

[core]
    repositoryformatversion = 0
    filemode = true
    bare = false
    logallrefupdates = true

[remote "origin"]
    url = <https://github.com/username/repo.git>
    fetch = +refs/heads/*:refs/remotes/origin/*

[branch "main"]
    remote = origin
    merge = refs/heads/main

[alias]
    cm = commit -m

If we scroll down to the [alias] section, we can add our custom shortcuts:

[alias]
    cm = commit -m
    st = status
    lg = log --oneline --graph --decorate --all

This approach can be especially useful if you want to add several aliases at the same time. It also makes it easy to copy and paste a set of aliases from a colleague or an online resource.

For a handy reference of common Git commands, check out our Complete Git Cheat Sheet.

OS and shell-specific configuration

Git aliases are defined inside your Git configuration, so they work across operating systems and shells. However, how you use them can depend on your environment.

On Windows, Git aliases work reliably in Git Bash and WSL (Windows Subsystem for Linux). In Command Prompt and PowerShell, simple aliases such as st for status work fine, but advanced ones that rely on shell features like pipes or multiple commands may not behave as expected. For complex aliasing, Git Bash or WSL is the better choice.

On macOS and Linux, Git aliases generally work the same way in Bash, Zsh, and other Unix-like shells. Both simple and complex aliases can be used without issue.

Fish shell is a special case because it uses a different syntax from Bash and Zsh. Some advanced Git aliases that assume POSIX shell syntax may not run correctly in Fish. In those situations, you may need to rewrite the alias as a shell function or stick with simpler Git aliases.

For more on shell basics, see our Bash & Zsh Shell Terminal Basics Cheat Sheet.

Learn Git Fundamentals Today

For beginners: Master version control using Git.
Start Learning For Free

Managing Git Aliases

Once you’ve set up your aliases, you’ll need to keep them organized, update them as necessary, and resolve any conflicts that may arise.

Listing, updating, and deleting aliases

We already discussed how you can see a list of your aliases, either in the configuration file or from the command line. But what if you want to change one or delete it? Fortunately, that’s very straightforward, too. To change an alias, you can either run the git config command again with a new value, or edit the relevant line directly in your configuration file.

Removing an alias is just as easy. In the command line, you can use the --unset flag to delete an alias:

git config --global --unset alias.lg

Or you can simply delete the line from your config file. Once removed, the alias is no longer available.

Handling alias conflicts and issues

Occasionally, you might run into conflicts, such as defining the same alias both globally and locally. Remember that local aliases override global ones within the same repository. So if you find that your usual alias isn’t working correctly, you may want to check and see what repository you are in and whether there are any local aliases defined. It's also a good practice to try to avoid names that overlap with built-in Git commands, like commit or push.

If you move between machines or upgrade Git, it’s a good idea to double-check that your aliases still work. And, when collaborating, consider documenting your aliases or sharing a common configuration file so everyone has access to the same shortcuts.

Common Alias Categories and Use Cases

Let’s look at a few different categories of Git aliases and how they can boost your daily activity.

Command shortening

One of the most obvious uses for aliases is abbreviating long or frequently used commands. Instead of typing git checkout main, you might use git co main, or replace git status with just git st. Over time, these small tweaks can save you an awful lot of typing, making your workflow feel faster.

Enhanced output formatting

Git’s raw output can sometimes be difficult to read, especially with commands like git log or git diff. Aliases let you change the output formatting to make it clearer. We can define a custom log view with colors, dates, and branches, or make diffs more readable with word highlighting. This can make it much easier to spot changes and track history.

For example, we can create a custom alias for git log to improve the readability of the output:

git config --global alias.lg "log --oneline --graph --decorate --date=short --pretty=format:'%h - (%cd) %an %d %s'"

Now, instead of typing git log and getting this generic output:

commit c2f3d4a6b8e9d55f45e2f98c879f6f43be11a765 (HEAD -> main)
Author: Jane Deer <jdeer@example.com>
Date:   Sun Aug 10 14:12:03 2025 -0400

    Fix typo in README

commit a7b1e22c0f6a2d876fe4c9d8e00c64e28793d9e0
Author: John Doe <jdoe@example.com>
Date:   Tue Aug 5 09:33:45 2025 -0400

    Add login validation

We can get a much simpler and easier-to-read output by using our alias git lg:

* c2f3d4a - (2025-08-10) Jane Deer (HEAD -> main) Fix typo in README
* a7b1e22 - (2025-08-05) John Doe Add login validation

You can see how our aliased output would be significantly easier to read, especially if there were twenty or more entries instead of just these two.

Workflow automation

Aliases can also act as mini-automation tools for your Git workflow. For example, you might combine multiple commands into one alias that stages, commits, and pushes changes all in one single step. This type of automation can be useful, particularly for teams that use DevOps practices and value consistency.

You can learn more about how Git ties into broader automation workflows in CI/CD for Machine Learning.

Some aliases are so popular that they’ve become staples in the Git community. These include shortcuts along with more advanced aliases that make life easier. Check out the table below showing 20 of the most common Git aliases that I see.

Full Command

Alias

Function

status

st

Show the working directory status

checkout

co

Switch branches or restore files

branch

br

List, create, or delete branches

commit

ci

Record staged changes

commit -m

cm

Commit with a message

add -A

aa

Stage all changes (new, modified, deleted)

reset HEAD --

unstage

Unstage files without discarding changes

log -1 HEAD

last

Show the latest commit

log --oneline --graph --decorate --date=short --pretty=format:"%h - (%cd) %an %d %s"

lg

Pretty log view with graph and metadata

log --pretty=format:"%h %ad %s%d [%an]" --graph --date=short

hist

Another readable log format with history graph

diff

df

Show unstaged changes

diff --cached

dc

Show staged changes

pull

pl

Fetch from and integrate with remote

push

ps

Upload changes to remote

rebase

rb

Reapply commits on top of another base tip

rebase --abort

rba

Cancel a rebase in progress

rebase --continue

rbc

Resume rebase after fixing conflicts

commit --amend

fix

Edit the last commit

reset --soft HEAD~1

undo

Undo last commit but keep changes staged

fetch --all --prune

fa

Update all remotes and prune deleted branches

Advanced Alias Techniques

Beyond shortening long commands, there are some advanced alias techniques that provide the flexibility to integrate with your shell, handle parameters, or even tailor aliases to specific repositories.

Shell command integration

You can integrate shell commands directly into your Git aliases. By prefixing an alias with !, Git will pass the rest to your shell. This opens up the possibility of combining Git actions with external tools, such as running a linter before committing or chaining multiple commands together. If you’re new to shell environments, a resource like the Bash & zsh Shell Terminal Basics Cheat Sheet can help you understand how this works in practice.

Parameter handling

Sometimes you’ll want aliases that aren’t hardcoded, but instead adapt to whatever arguments you pass. By writing aliases as anonymous Bash functions, you can accept parameters and use them dynamically. This flexibility lets you turn repetitive tasks into simple, reusable commands tailored to your needs.

For example, let’s create a parameterized Git alias that will search our commits for specific text. On Windows, you can do this in Git Bash. On macOS and Linux, the same alias works too, since Git runs it in a Bash-compatible shell.

git config --global alias.find '!f() { git log --grep="$1"; }; f'

Now running git find bugfix will search commit messages for “bugfix” and show the matching commits.

Conditional configuration

Git’s includeIf directive allows you to load different alias sets depending on the repository or environment. For example, you might want one set of aliases for work projects and another for personal projects. Conditional configs keep your setup organized while making sure the right tools are available in the right context.

In your global git config file, you could include:

[includeIf "gitdir:C:/Users/YourName/work/"]
    path = C:/Users/YourName/.gitconfig-work
[includeIf "gitdir:C:/Users/YourName/personal/"]
    path = C:/Users/YourName/.gitconfig-personal

Then, inside C:/Users/YourName/.gitconfig-work, define aliases like:

[alias]
    st = status
    lg = log --oneline --graph

And in C:/Users/YourName/.gitconfig-personal:

[alias]
    st = status -s
    co = checkout

Now, when you are in a repository under C:/Users/YourName/work/, typing git lg will use the work-specific alias, while in C:/Users/YourName/personal/, git co will use the personal alias. It’s important to remember what directory you are in if you use this system, however. You don’t want to get your aliases mixed up!

A note for Mac/Linux users: just replace Windows paths with Unix-style paths, for example: ~/work/ or ~/personal/. The behavior is otherwise identical.

Maintenance and Collaboration Strategies

As your collection of Git aliases grows, maintaining clarity and consistency becomes essential, especially if you’re collaborating. Let’s talk about some best practices for documenting, sharing, and securing your aliases so they remain an asset instead of becoming a source of confusion.

Documentation

Proper documentation of Git aliases is just as important as documentation of every other part of the development process. This documentation is invaluable for new team members and for your future self. Here are some strategies:

  • Maintain a section in your project’s README for project-specific Git aliases. For each alias, briefly describe its purpose and usage.
  • When editing .gitconfig directly, add comments above complex or non-obvious aliases. For example:
# Quickly stage, commit, and push changes
acp = !git add -A && git commit -m \\"$1\\" && git push
  • If you work on a team, you may consider standardizing the aliases used across your team. And, if your team uses a wiki or internal documentation platform, include a page on Git aliases and update it as your project evolves.

Clear documentation and communication ensure that everyone understands what each alias does, reducing the risk of mistakes and making it easier to adopt new shortcuts.

Security and validation

Another point to consider is security. While aliases are powerful, they can also introduce risks if not managed carefully. For example, aliases that perform destructive actions, such as deleting branches or force-pushing, should be carefully thought out and tested on non-critical data. The last thing you want is to think you are doing something innocuous but accidentally end up deleting key branches from your repository!

One life-saving measure you can incorporate when using potentially dangerous Git aliases is the --dry-run flag. This allows you to preview the action you are proposing when you use the alias, without actually doing it! For example, say you want to remove file.txt using an alias. You may do yourself a favor by running it as a dry run first to make sure the correct action is being executed.

git rm --dry-run file.txt

Another potential security concern are aliases that run shell commands or external scripts. Aliases that start with ! execute whatever follows in your shell, which means a poorly reviewed or untrusted alias could delete files, steal data, or perform other harmful actions. Similarly, aliases that call external scripts can be risky if the script comes from an unverified source or has been modified. It’s important to review every alias before using it and avoid blindly copying aliases from the internet. This is also why I prefer not to mix Git commands with shell commands in the same alias.

Conclusion

Git aliases are a powerful yet often underutilized feature that can dramatically improve both personal and team productivity. By allowing you to condense complex or repetitive commands into memorable shortcuts, aliases help reduce cognitive load, minimize typing errors, and streamline your daily workflow.

If you have more questions or want to dive deeper, check out the Complete Git Cheat Sheet and other linked resources in this article. If you’re curious about other ways to simplify your command-line experience, you might also enjoy How to Use a SQL Alias to Simplify Your Queries.


Amberle McKee's photo
Author
Amberle McKee
LinkedIn

I am a PhD with 13 years of experience working with data in a biological research environment. I create software in several programming languages including Python, MATLAB, and R. I am passionate about sharing my love of learning with the world.

FAQs

What is a Git alias?

A Git alias is a custom shortcut for one or more Git commands. They allow you to quickly execute commands or sequences without a lot of extra typing.

Can I use Git aliases across multiple repositories?

Yes. By setting a Git alias to be global, you will be able to use it across multiple repositories. However, any local aliases will override the global ones.

How do I delete a Git alias if I no longer need it?

To delete a Git alias, you can either open the Git configuration file and manually delete it or you can use the --unset flag in the command line.

How can I customize Git aliases for my specific workflow?

The best way to customize Git aliases for your specific workflow is to consider which commands and sequences you use most often and create custom aliases to simplify or automate them. Git aliases can be extremely personal and simplify tasks you personally find irksome.

Are Git aliases the same as shell aliases?

No. Git aliases are defined in Git and only use Git commands. Shell aliases are defined within your shell and can use commands from many tools, including Git.

Topics

Learn with DataCamp

Track

Git Fundamentals

0 min
Learn version control with Git from basics to advanced workflows. Track changes, manage repositories, and collaborate efficiently.
See DetailsRight Arrow
Start Course
See MoreRight Arrow
Related

Tutorial

Git Init: How to Initialize and Set Up a Git Repository

Learn how to set up a Git repository with git init, connect to a remote, configure settings, and troubleshoot common issues—all in one beginner-friendly guide.
Khalid Abdelaty's photo

Khalid Abdelaty

Tutorial

Git Branch: A Guide to Creating, Managing, and Merging Branches

Master the power of Git branches for smoother development and better collaboration.
Oluseye Jeremiah's photo

Oluseye Jeremiah

Tutorial

Git Tag Tutorial: How to Create, Manage and Use Tags

Learn how to use Git tags effectively to mark important milestones, organize your workflow, and improve project collaboration.
Patrick Brus's photo

Patrick Brus

Tutorial

How to Clone a Specific Branch In Git

Learn how to clone only a single branch from a Git repository to save disk space and reduce cloning time.
Bex Tuychiev's photo

Bex Tuychiev

Tutorial

Git Setup: The Definitive Guide

In this tutorial, you'll learn how to set up Git on your computer in different operating systems.

Olivia Smith

Tutorial

Git Status: How To Track Changes in Your Project with Confidence

Learn how to use the git status command to monitor your repository’s state. This guide is perfect for beginners and early‑career practitioners who want an optimized Git workflow.
Khalid Abdelaty's photo

Khalid Abdelaty

See MoreSee More