Course
Building AI Agents with Google ADK
1 hr
6.5K
Google Antigravity is an agent-driven IDE that pairs powerful models like Gemini 3 with an agent-first workflow. Instead of manually configuring tools, terminals, and browser sessions, you collaborate with an AI agent that can plan work as tasks, run commands, edit code, and even interact with your browser to test and document your app.
In this tutorial, I’ll walk you through how to build a working Personal Finance Risk Dashboard using Google Antigravity. You’ll see how to:
By the end, you’ll have a multi-page dashboard that visualizes risk levels for Savings, Bonds, Index Funds, and Crypto, complete with interactive controls and a modern fintech UI, built through a single prompt. I also recommend checking out our guide to the Gemini 3 API and Gemini 3 Flash tutorial.
Disclaimer: This tutorial is for educational purposes only and does not constitute financial advice; always conduct your own research or consult a qualified financial professional before making investment decisions.
Google Antigravity is an agent-first development platform that turns your IDE into a mission control for AI agents. At its core, it gives agents synchronized control over your editor, terminal, and browser, so they can plan work, change code, run commands, and verify behavior end-to-end from a single place.
Instead of manually wiring together scripts and tools, you describe the outcome you want and let Antigravity’s agents handle the heavy lifting. They can:
Antigravity is built around Google’s Gemini 3 models, but also supports other providers like Claude Sonnet 4.5 and GPT-OSS. It comes with two main surfaces, i.e., an Editor view that feels like an IDE (if you ever used Cursor or VS Code), and an Agent Manager view that acts as mission control for longer-running, multi-workspace tasks. Together, they make it easier to work at a task-oriented level while the agents handle the implementation details.
In this section, we’ll build a personal finance risk dashboard with Google Antigravity. The agent will turn a single natural-language prompt into a Next.js project that models different investment products and their risk profiles.
By the end, you’ll have:
Let's start by downloading Google Antigravity from the official website and selecting the installer according to your machine specifications.

Click Download for MacOS (or your OS), and it will take you to a platform selection screen to choose the appropriate binary for your machine and complete the installation.

For this tutorial, I ran it on a Mac with Apple Silicon, but the interface won’t be any different for any machine.
Once downloaded, set up Google Antigravity just as you would any other application and launch it.
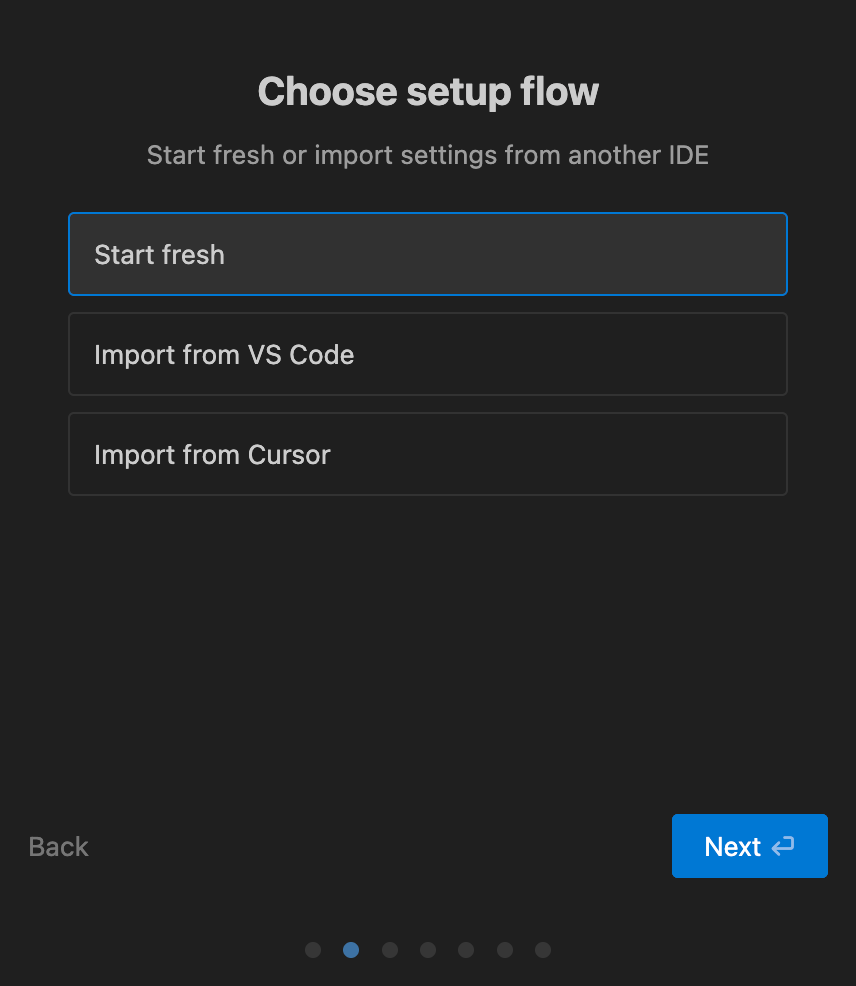
On first launch, Antigravity walks you through an onboarding wizard.
If you are a power user of Cursor or VS Code and would like to use its settings for setting up Antigravity, then choose the options accordingly. However, I like to start fresh, so select Start fresh and click Next.
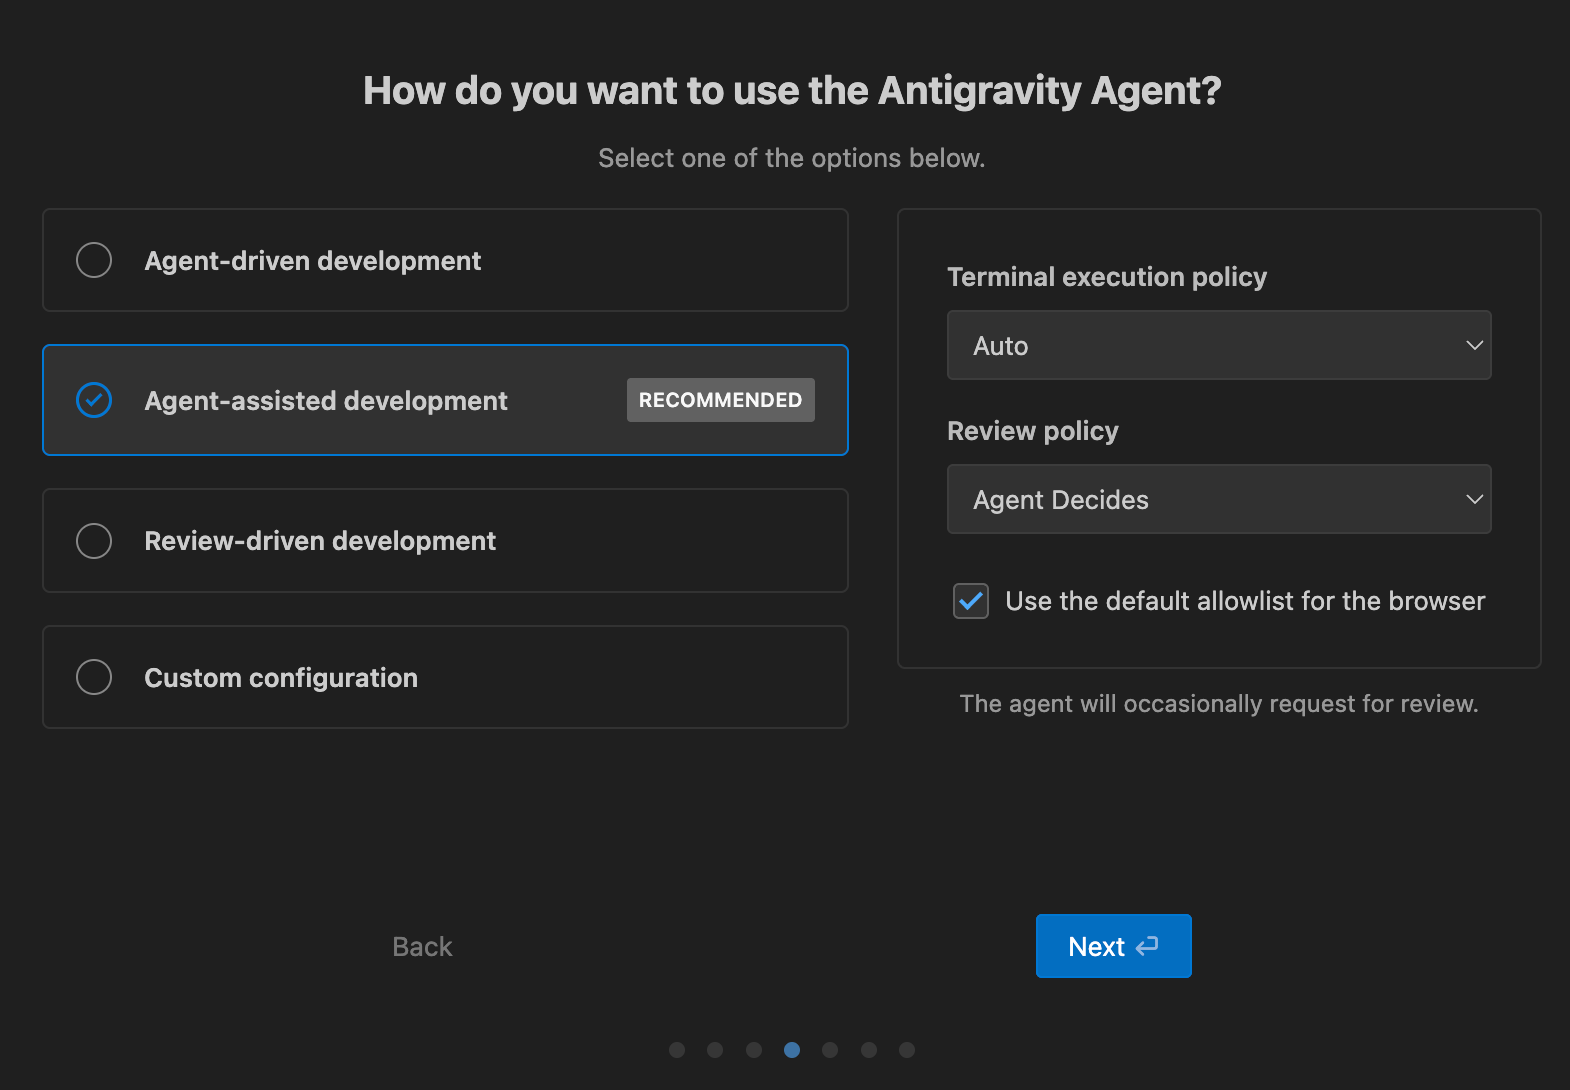
Next, you’ll see a screen about Agent usage. For this tutorial, choose:
Click Next to finish setup.
Once setup is complete, the next step is to create a workspace for our experiment.
Once setup completes, you’ll land on the Antigravity home screen. To proceed further, click Open Folder and create/select a new directory for this project. eg: ~/Antigravity/personal-finance-dashboard. This folder will become your Next.js app.
On the right side, you should see the Agent panel where you can select a model and send prompts.
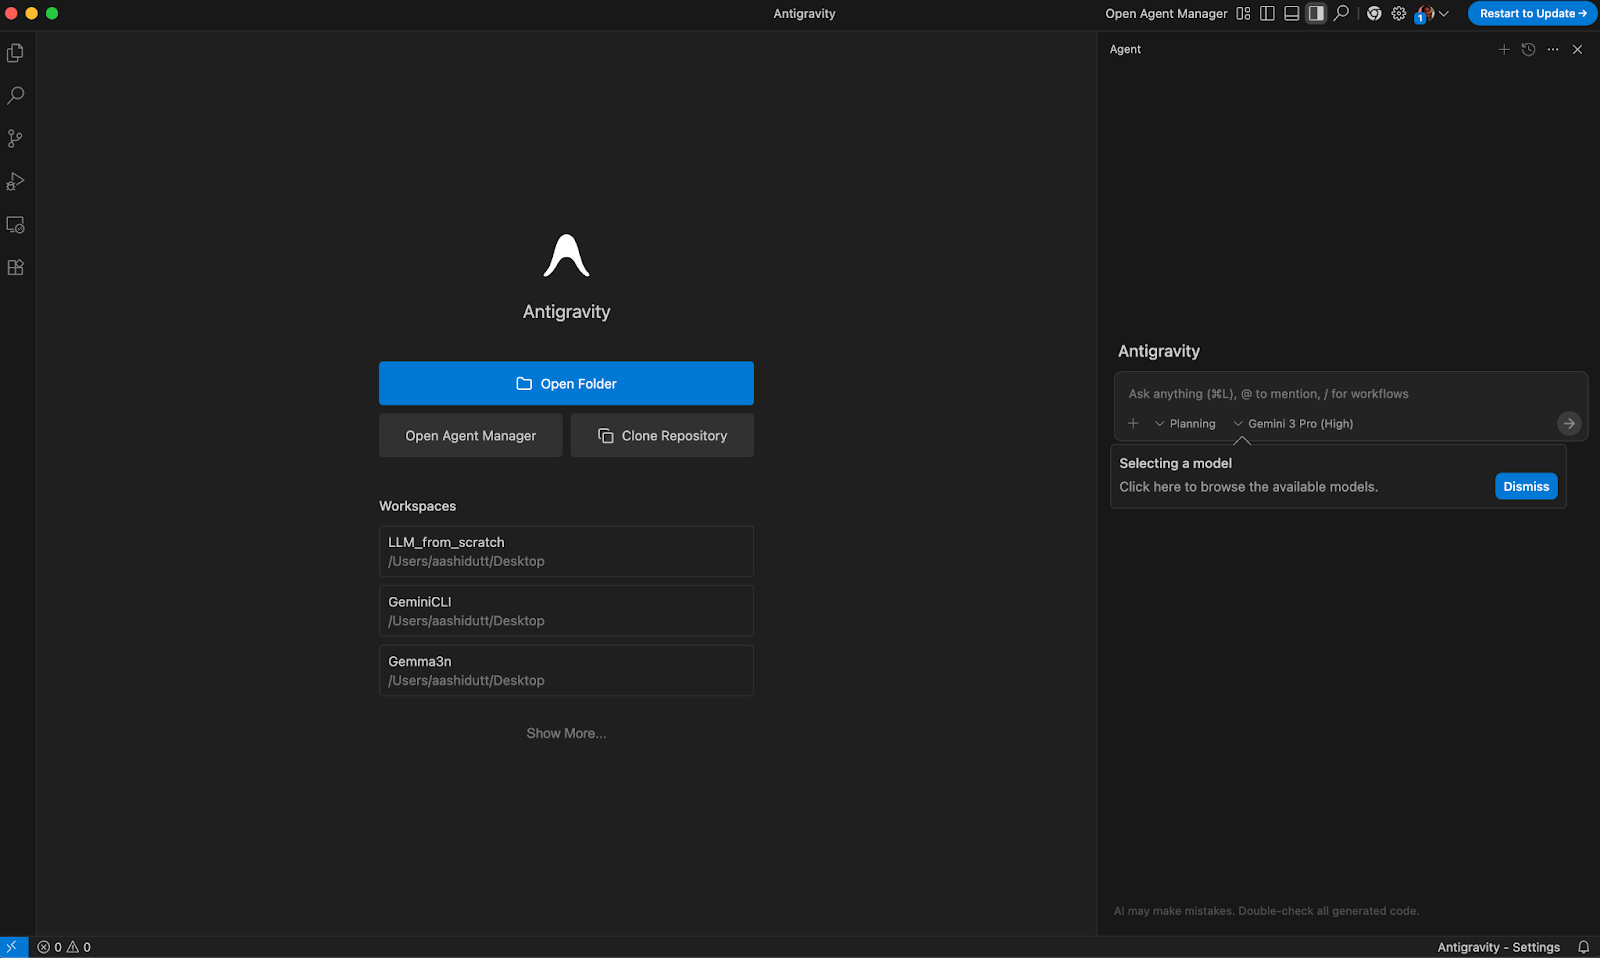
With your workspace open, pick a model (for example, Gemini 3 Pro or Claude Sonnet 4.5, or GPT OSS 120B) in the Agent panel. Then, paste the following prompt:
Build me a Next.js app called “Personal Finance Risk Dashboard” that shows different risk profiles for Savings, Bonds, Index Funds, and Crypto, each on its own page.
For every product, display risk level, volatility, and projected returns (with a slider for time horizon),
and use Tailwind plus shadcn/ui to make the UI look like a polished, responsive fintech dashboardNote: At the time of writing this tutorial, I tried with the Gemini 3 Pro(low) model, but it ran into some errors. However, feel free to try out the model as per your use case.
You’ll see the agent respond with something like:

Immediately after, Antigravity will propose a terminal command to scaffold the project. Just click Accept to let the agent run the command and run a couple of background steps to make a complete checklist for the app.
Below is a screenshot of the background steps running in the side terminal, starting with dependency installation.

You can leave it running while you watch the logs.
Once scaffolding is done, the agent generates a Task checklist artifact for the whole project.

Each section contains checkboxes such as:
Once this list is ready, the agent then begins to cover each task one by one. At this point, you can now open the Explorer sidebar to see what the agent created:
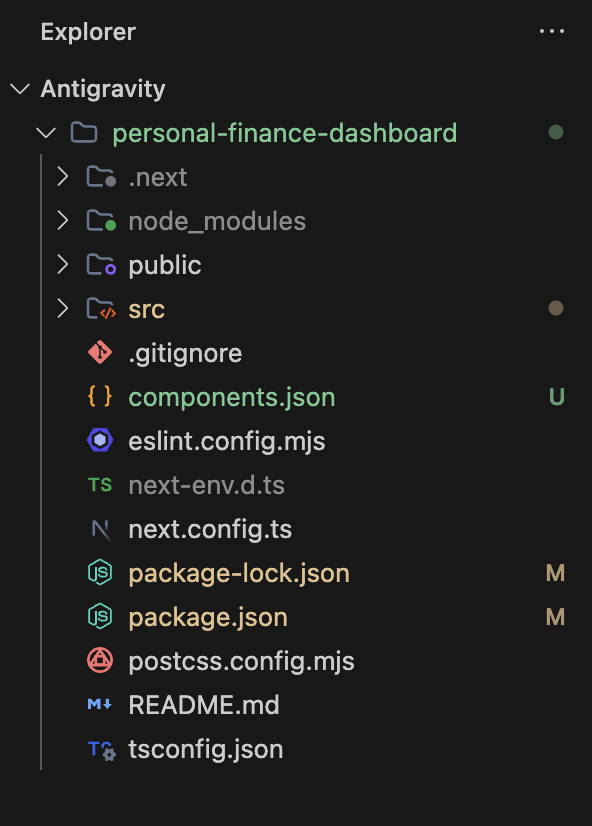
Now you have a standard Next.js, Tailwind, and a shadcn/ui file ready to be customized for this application.
Alongside the checklist, Antigravity generates a more detailed Implementation Plan artifact:

The User Review Required section typically includes:
/savings, /bonds, /index-funds, /crypto, and the specific risk, volatility, and return information each one will display.lib/financial-data.ts that hold product data, risk profiles, projected returns calculations, and helper functions for formatting money and percentages.We can adjust risk numbers if we want more realistic data or add extra requirements. Finally, add comments in the Task/Implementation Plan artifacts if you want the agent to adjust the course.
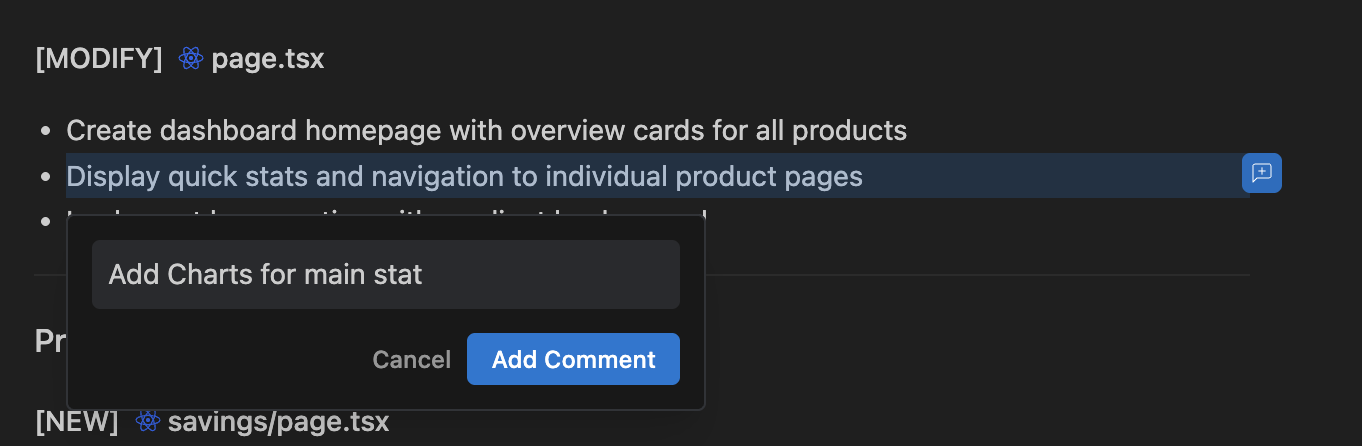
Once the plan looks good, click Proceed in the Implementation Plan tab. When you do this, the agent will start modifying and creating source files under the src/ directory. It will build individual pages for Savings, Bonds, Index Funds, and Crypto.
Along the way, it will create reusable components for cards, sliders, and charts, apply Tailwind and shadcn/ui styling across the app.
Finally, you’ll see new Background Steps and Progress Updates for each code change.
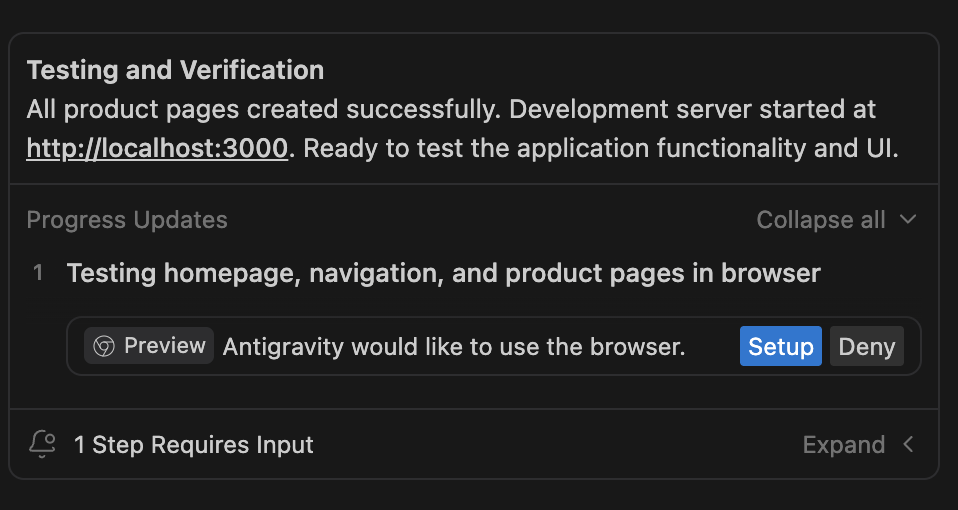
Once implementation is complete, Antigravity moves into Testing and Verification. You’ll see a new progress item where Antigravity will ask to use the browser via the Setup or Deny button. Simply click Setup to proceed.
Before the agent can interact with the browser, you need the official extension.

Visit the Chrome Web Store listing and click on Add to Chrome.

After installation, when the agent is controlling the browser, you’ll notice a glow around the screen as shown below:
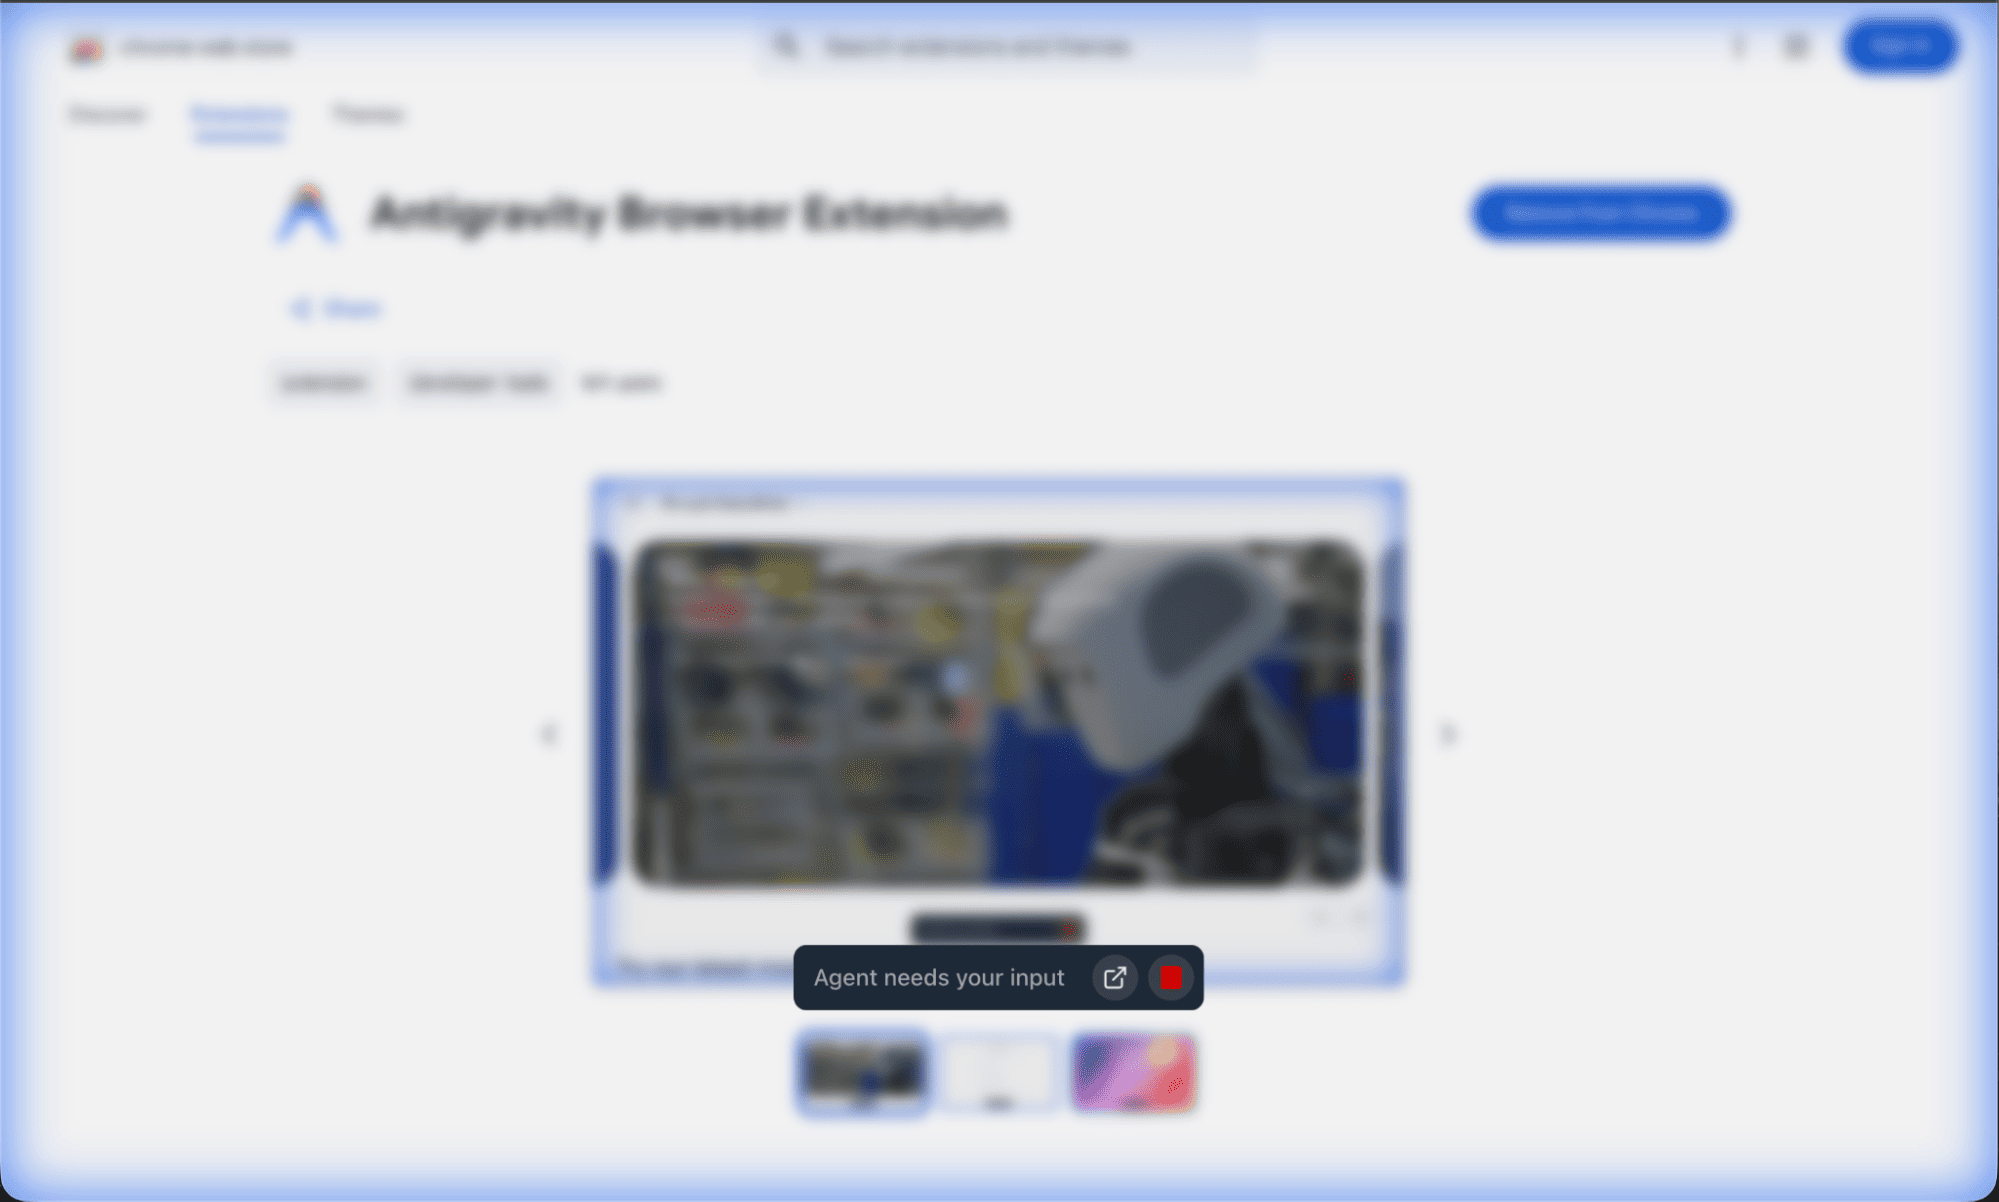
This glow indicates that the Antigravity Agent is actively using the browser, i.e, clicking, scrolling, and testing the app as part of the verification step.
When testing completes, you’ll see a final Progress Updates summary as follows:
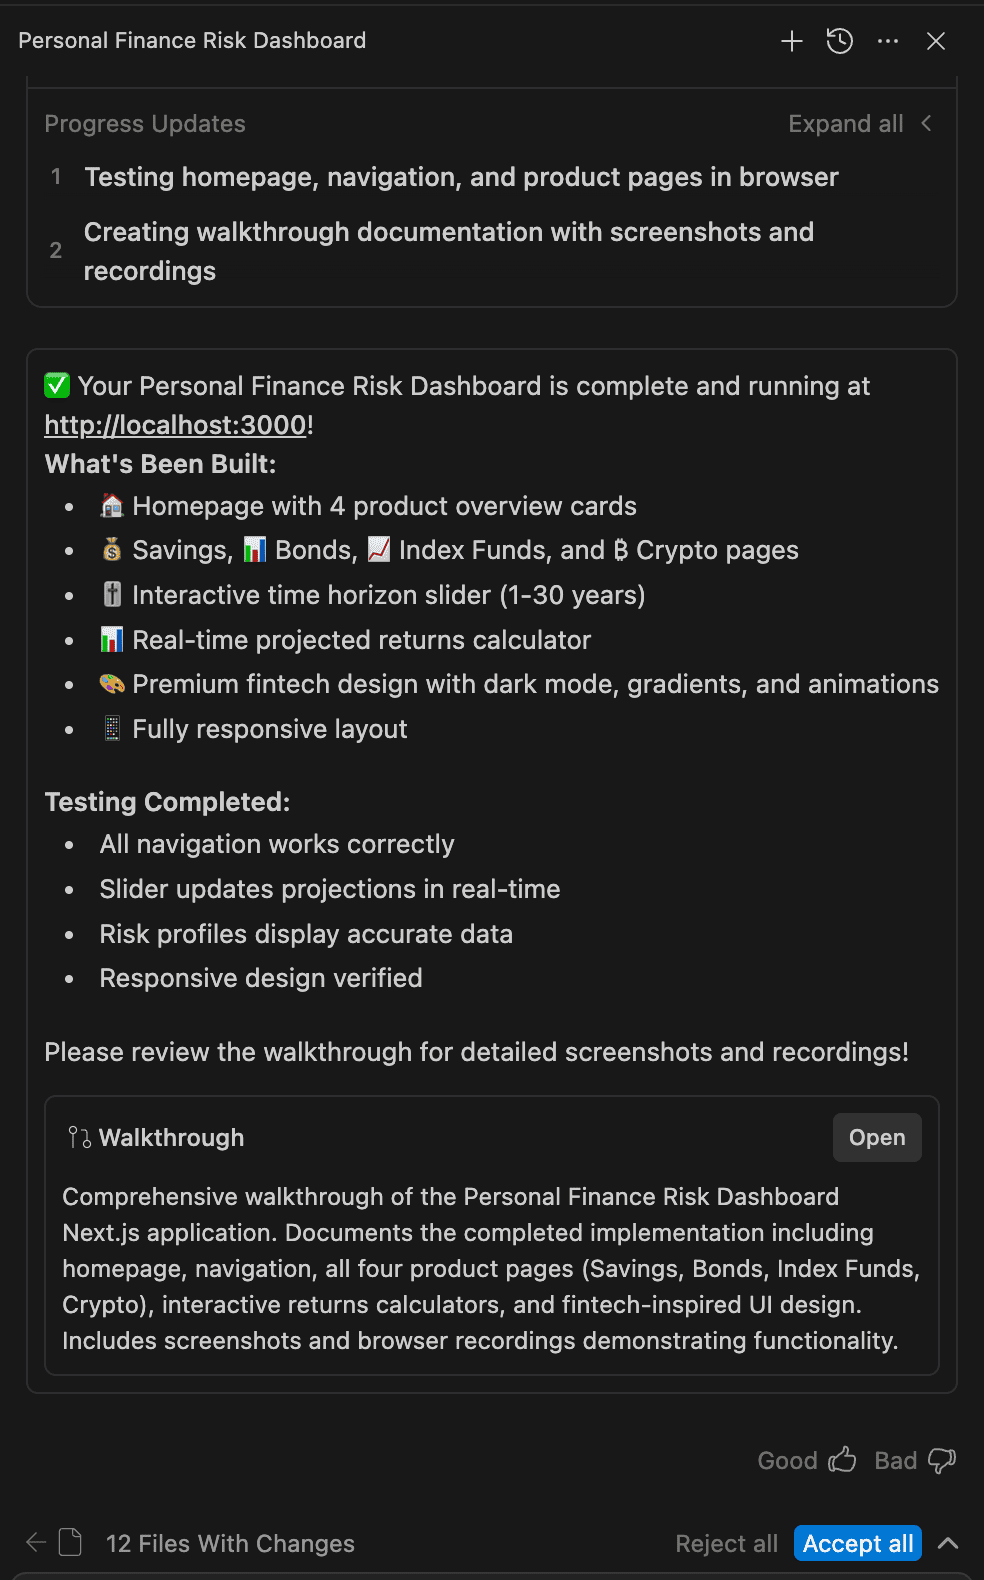
The Walkthrough artifact typically includes:
If everything looks good, click Accept all to apply the changes.
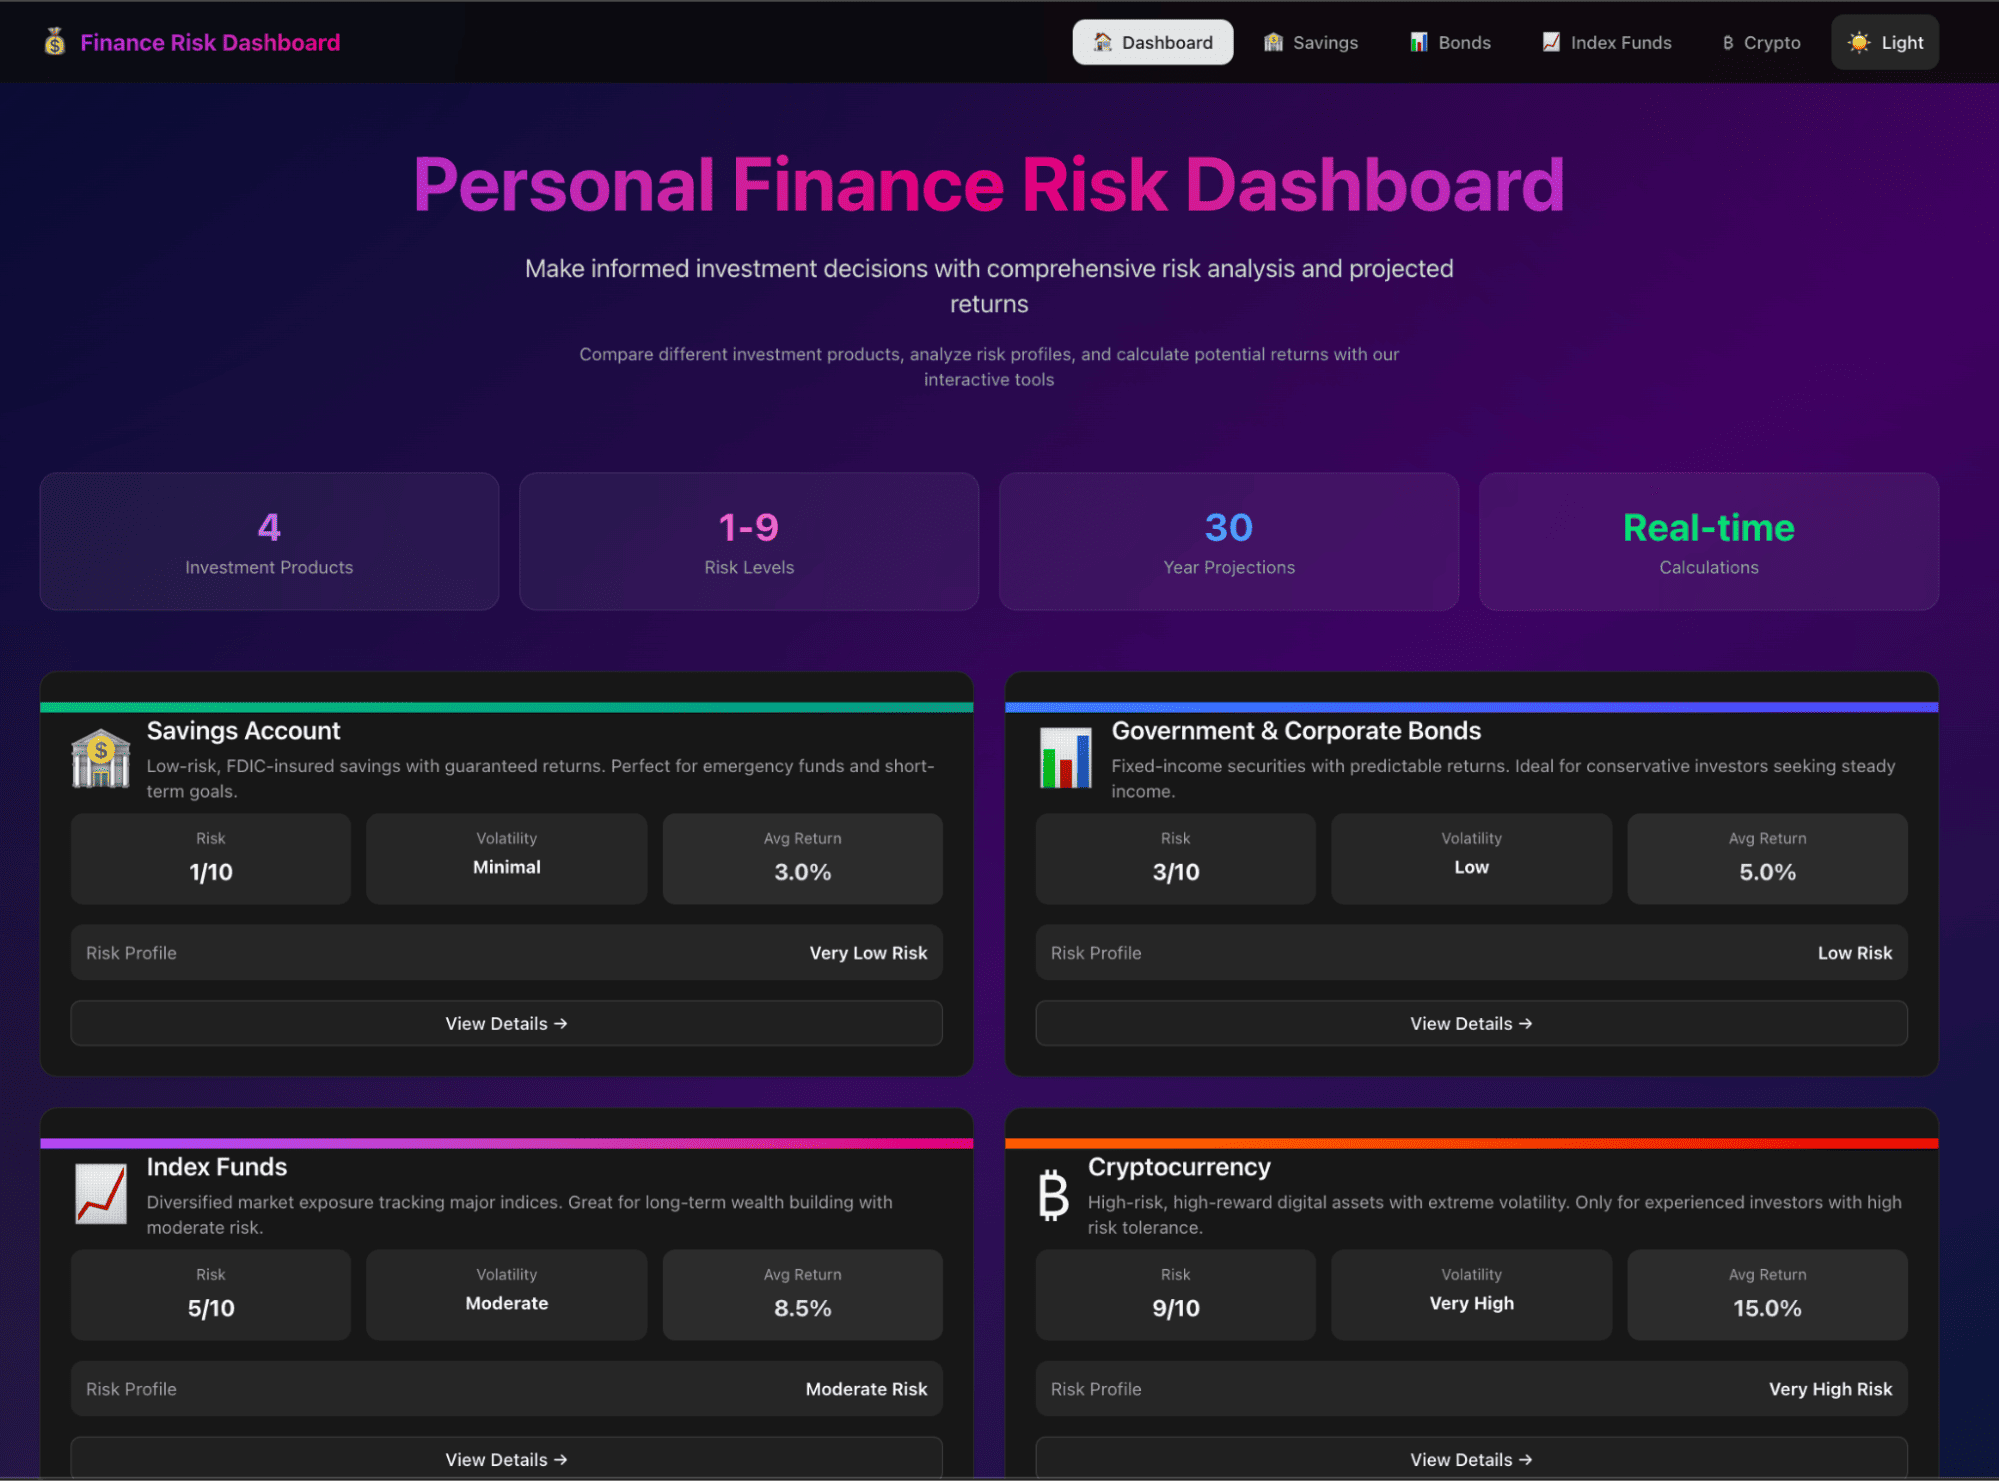
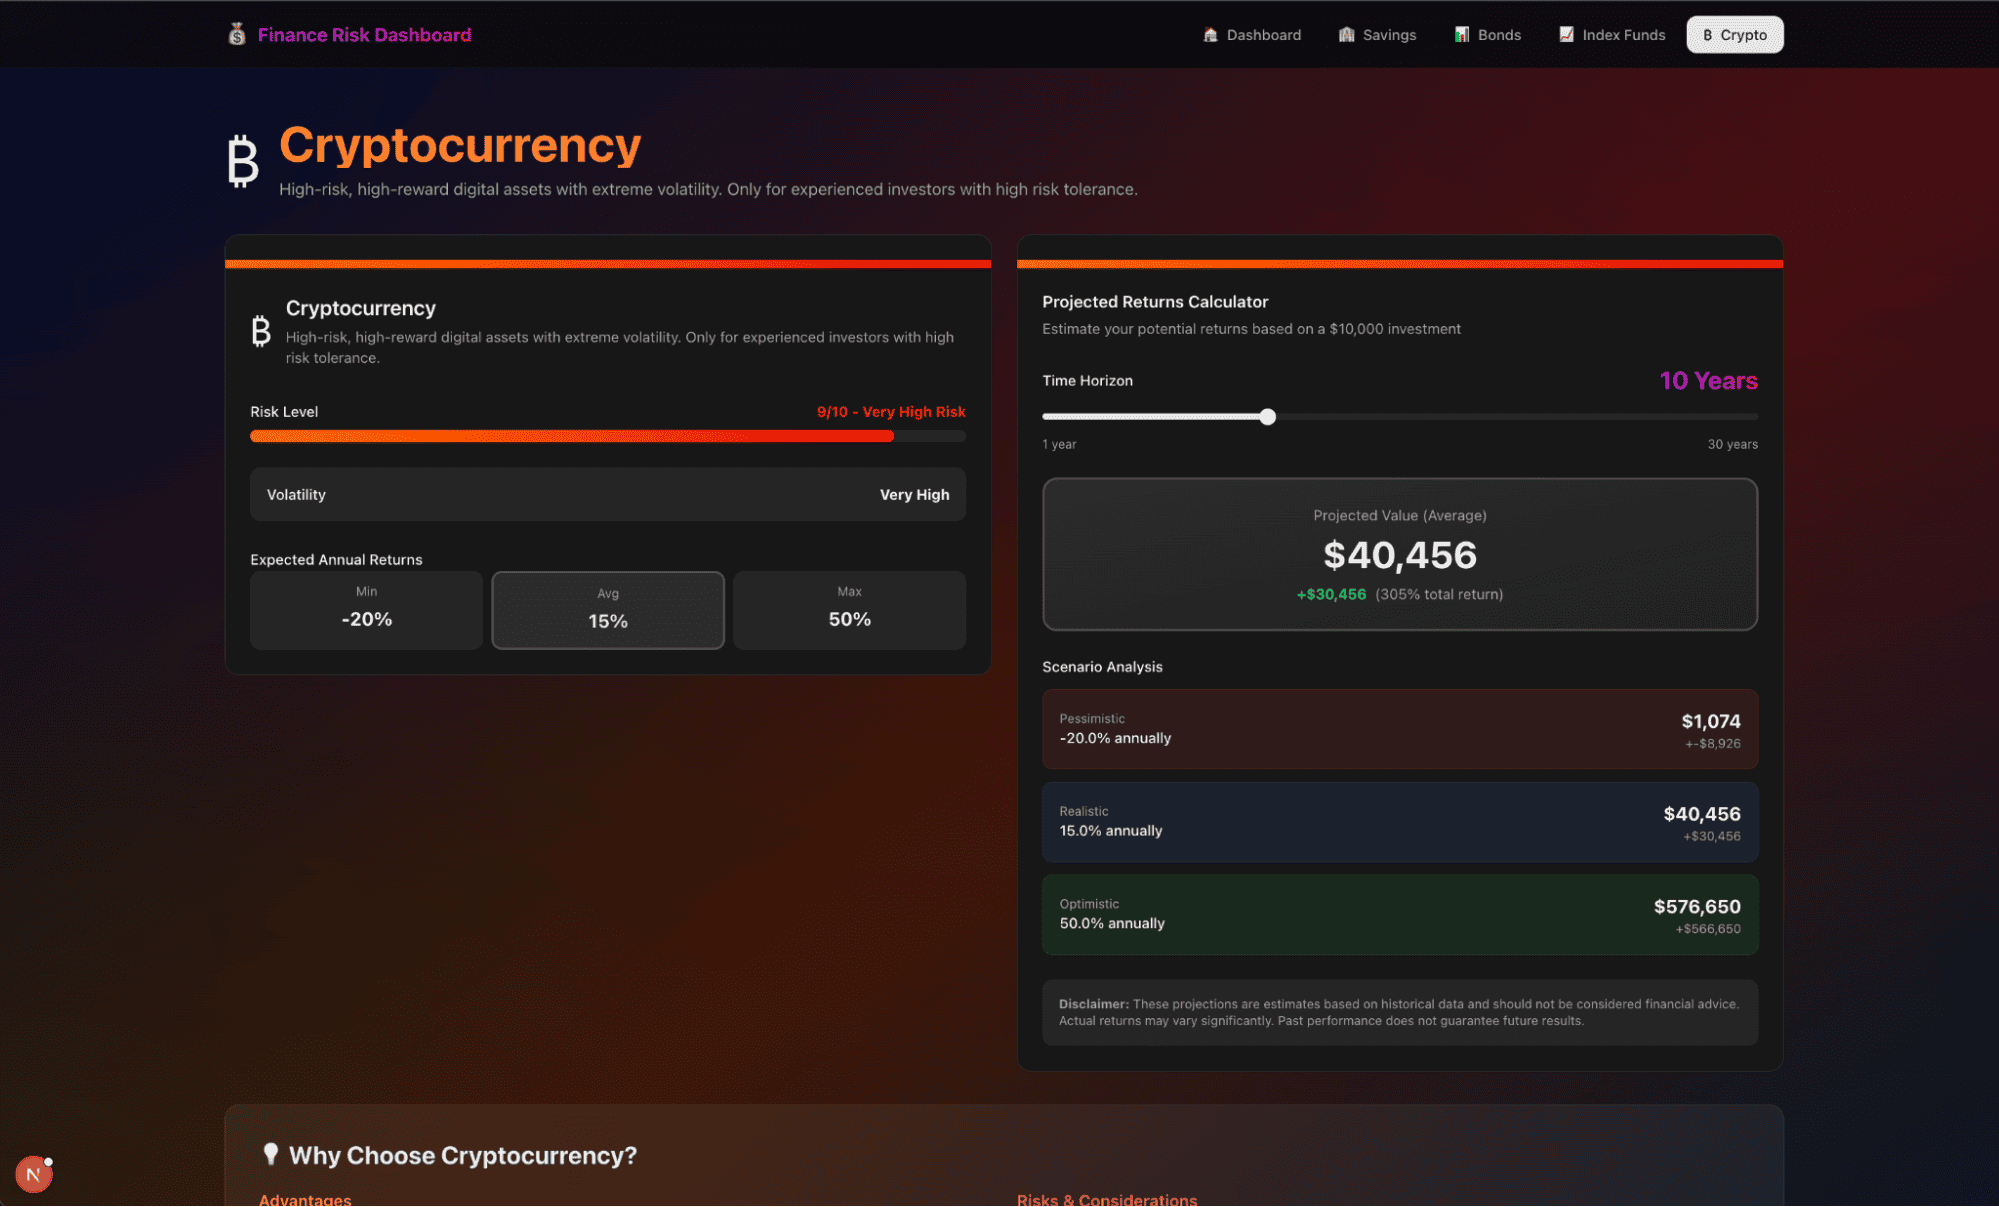
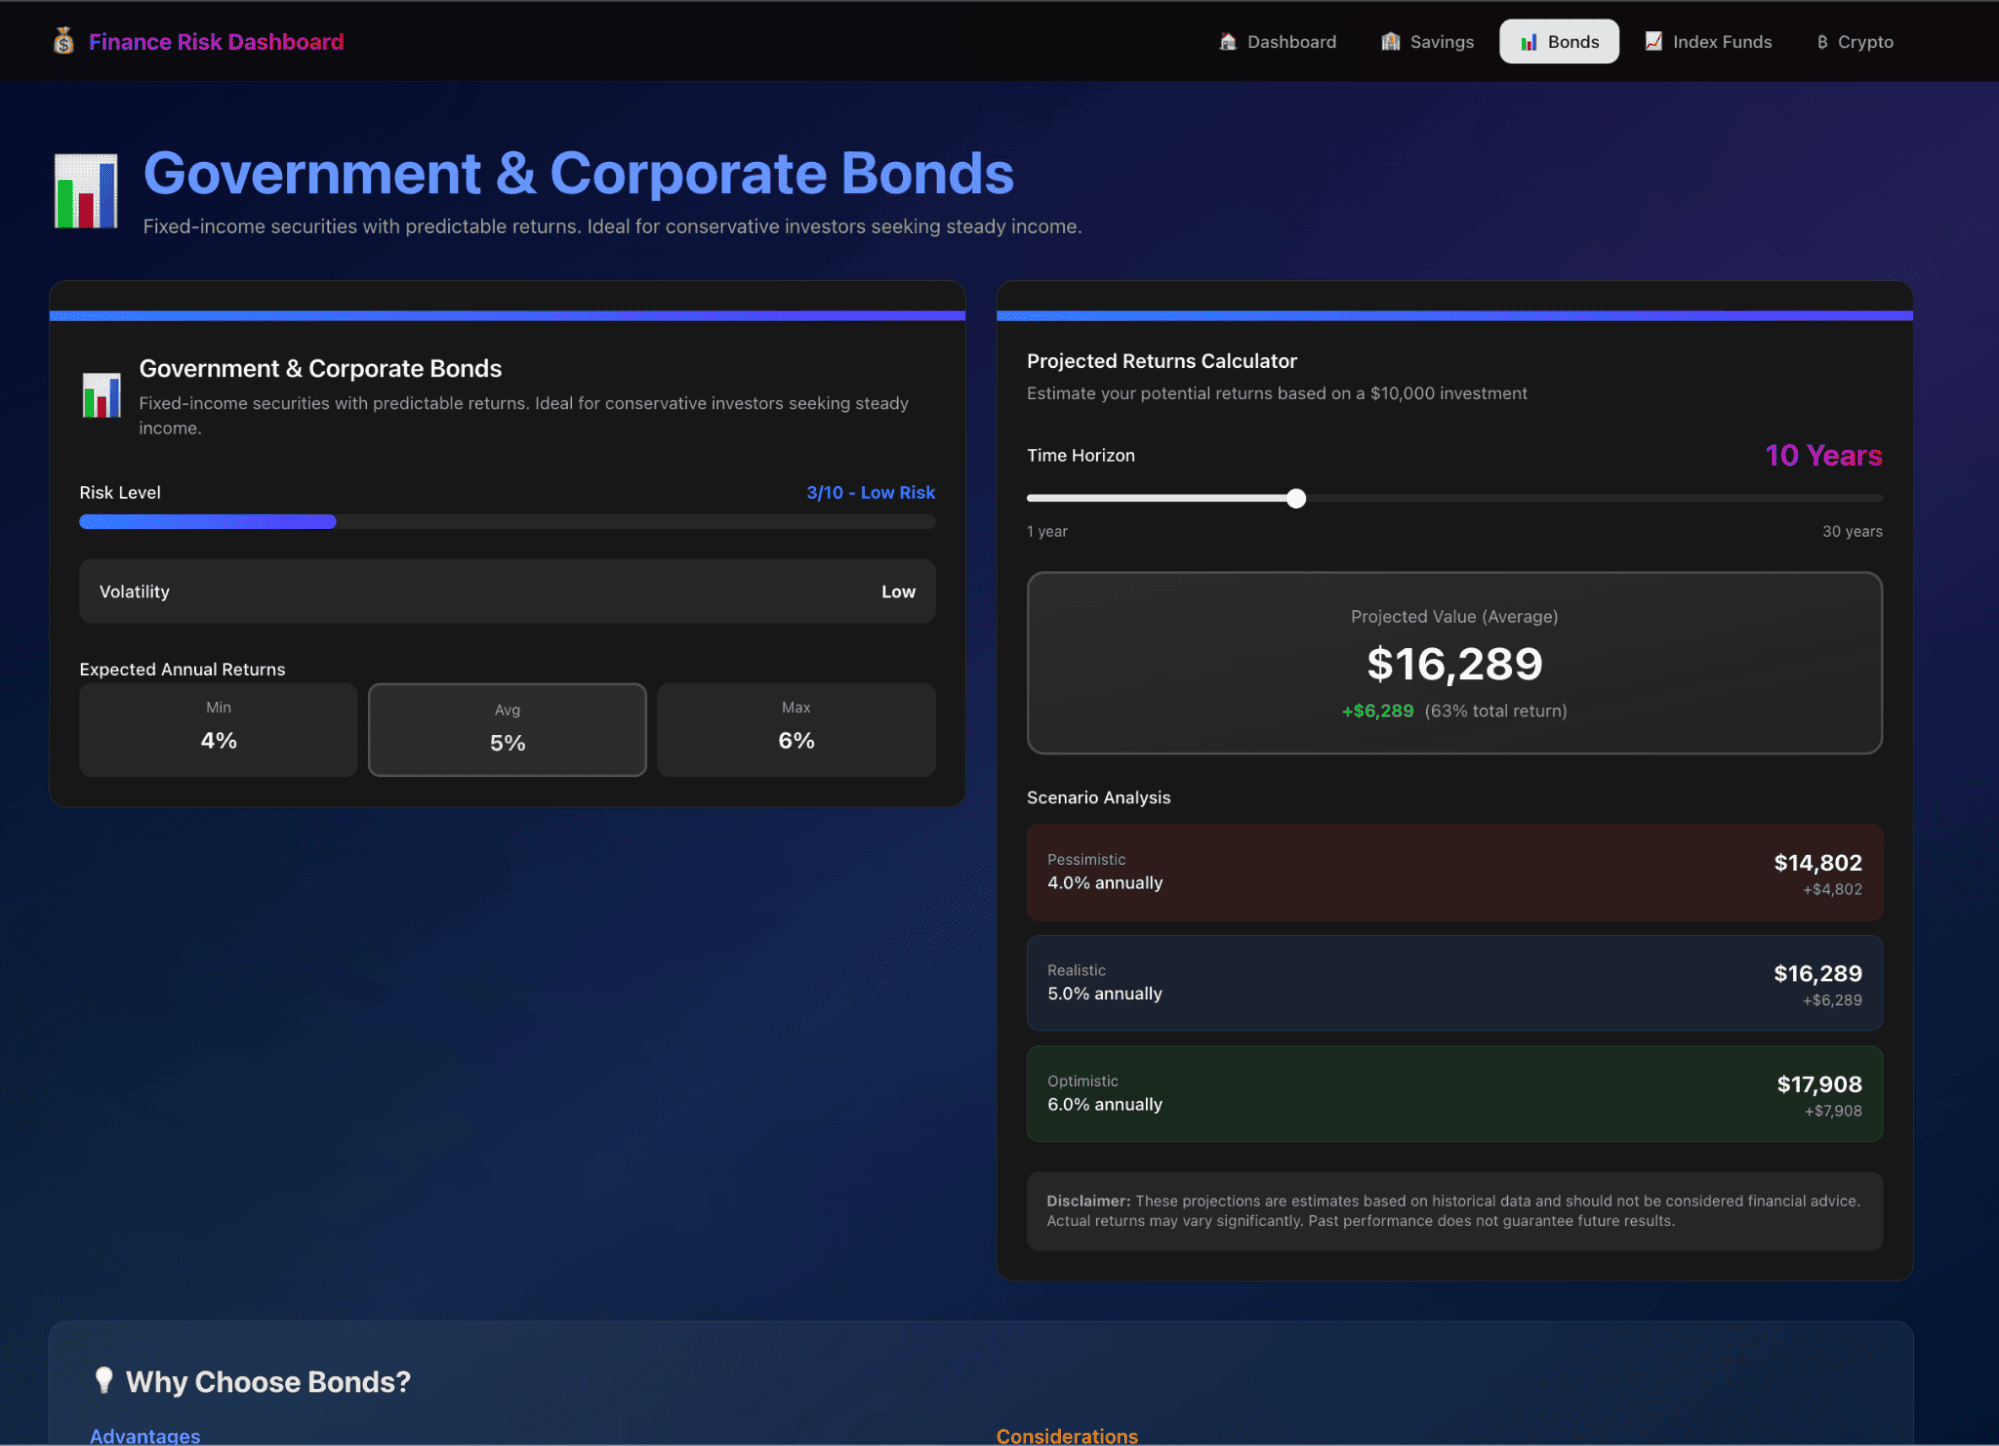
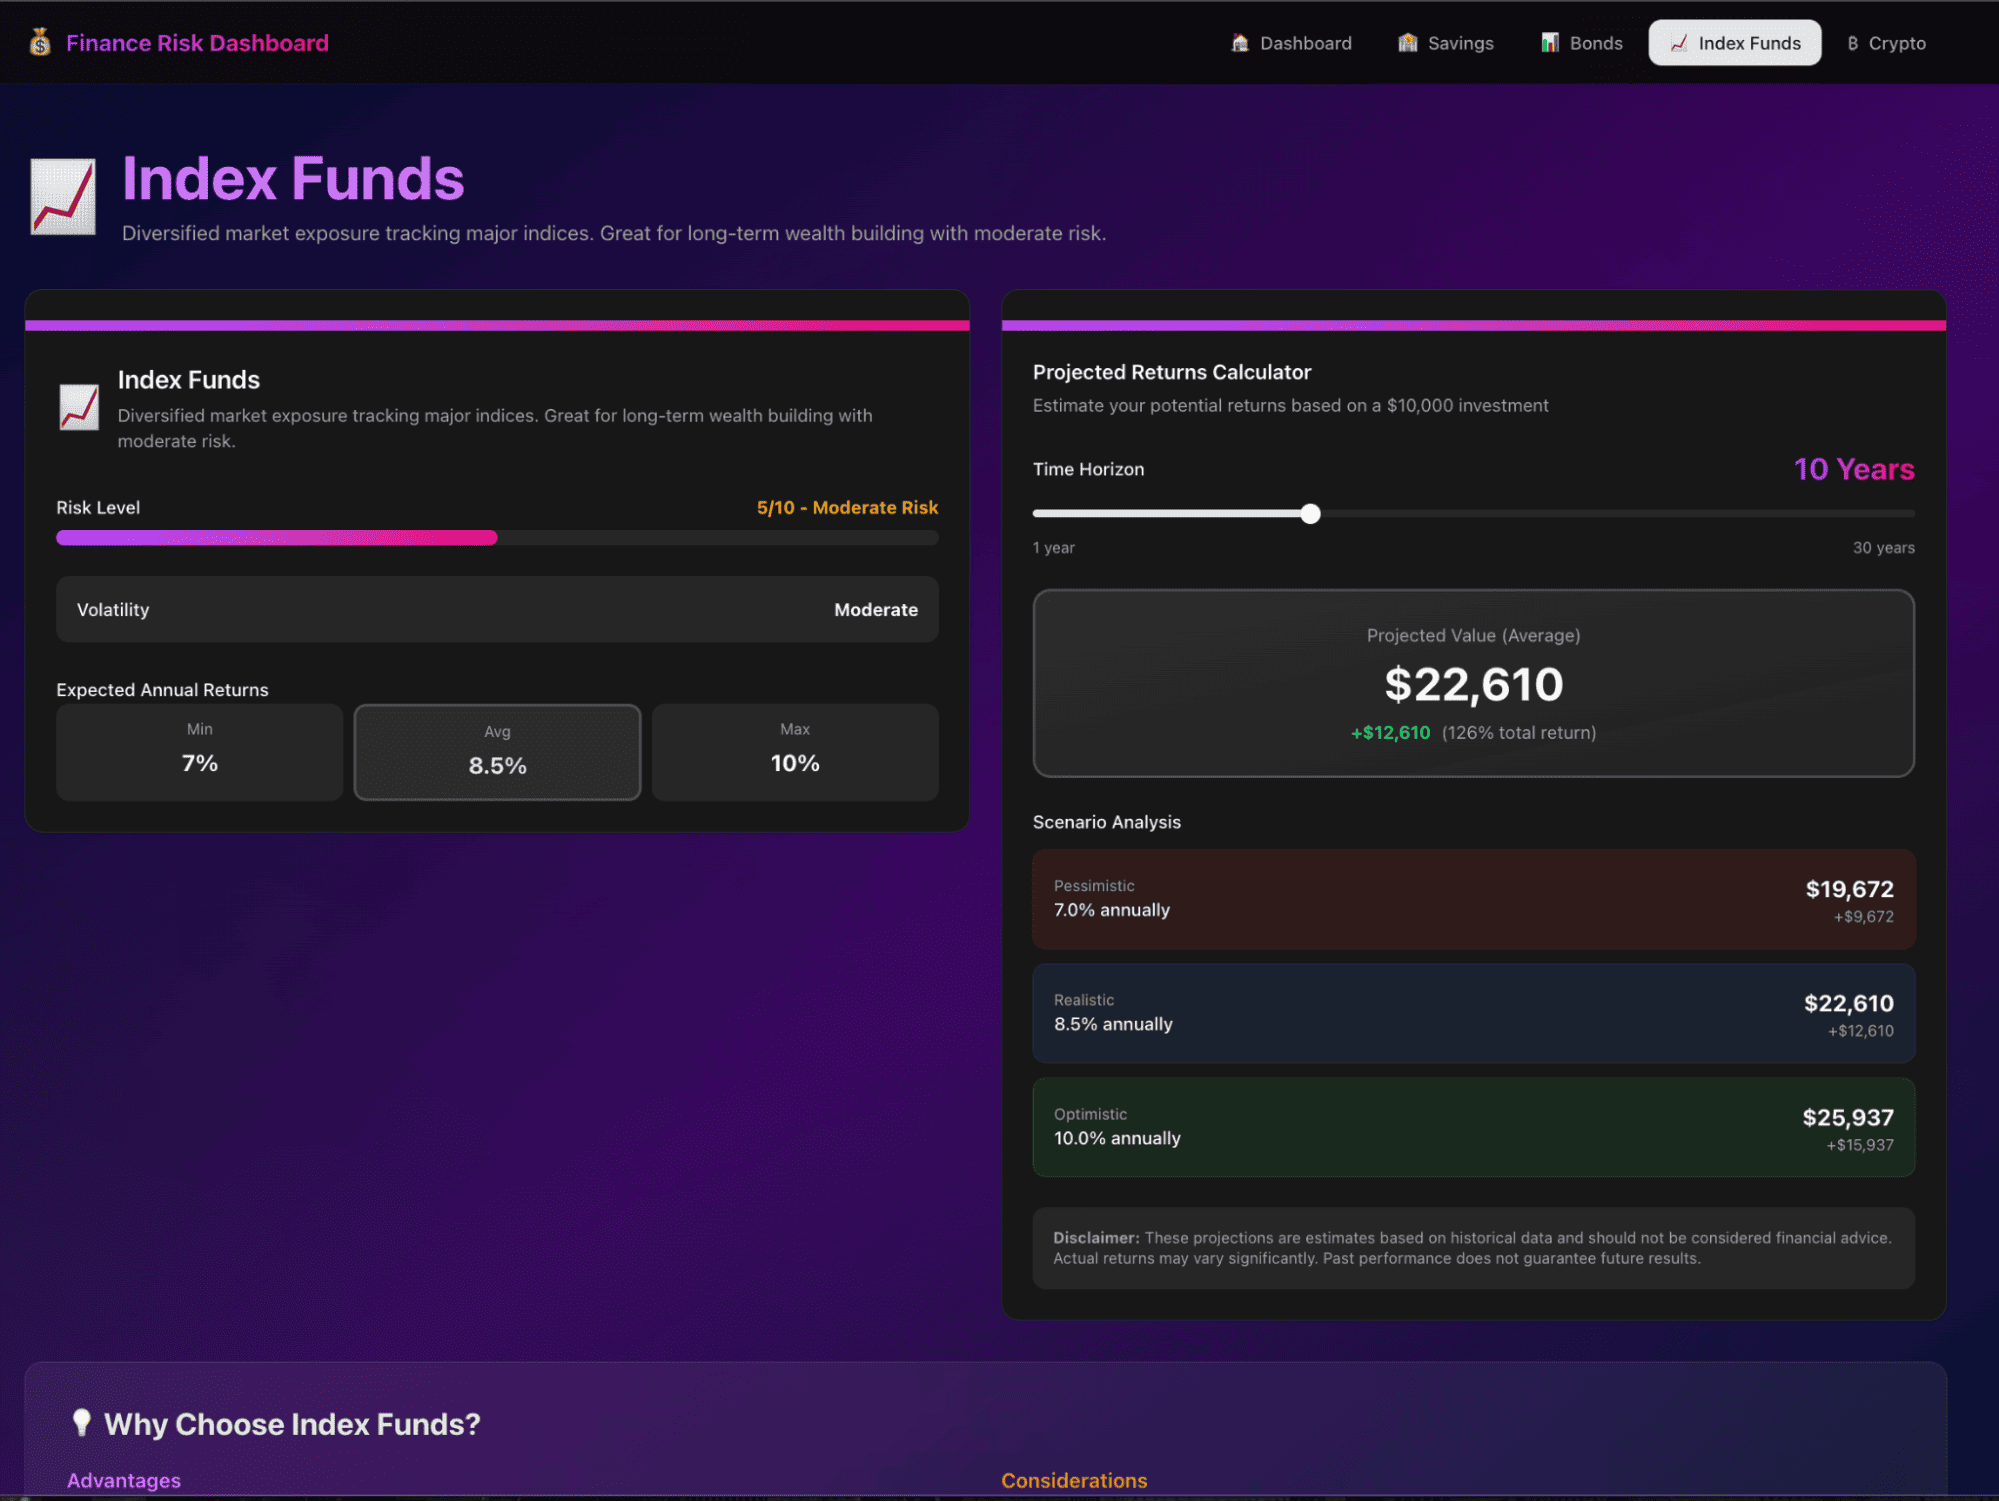
Here is our final app:

Now let’s iterate on the UI. Suppose you want a dark/light mode toggle in the dashboard header and add a few charts for each page. In the Task or Implementation Plan, or directly in the Agent panel, you can ask:

Antigravity will:
Now click on Submit, and both our earlier comment and this comment will be implemented.
In practice, you may notice that reviews often lead to a lot of errors, maybe due to the model, but Antigravity still keeps working on it with Computer Use.

Even when the agent encounters errors, it can:
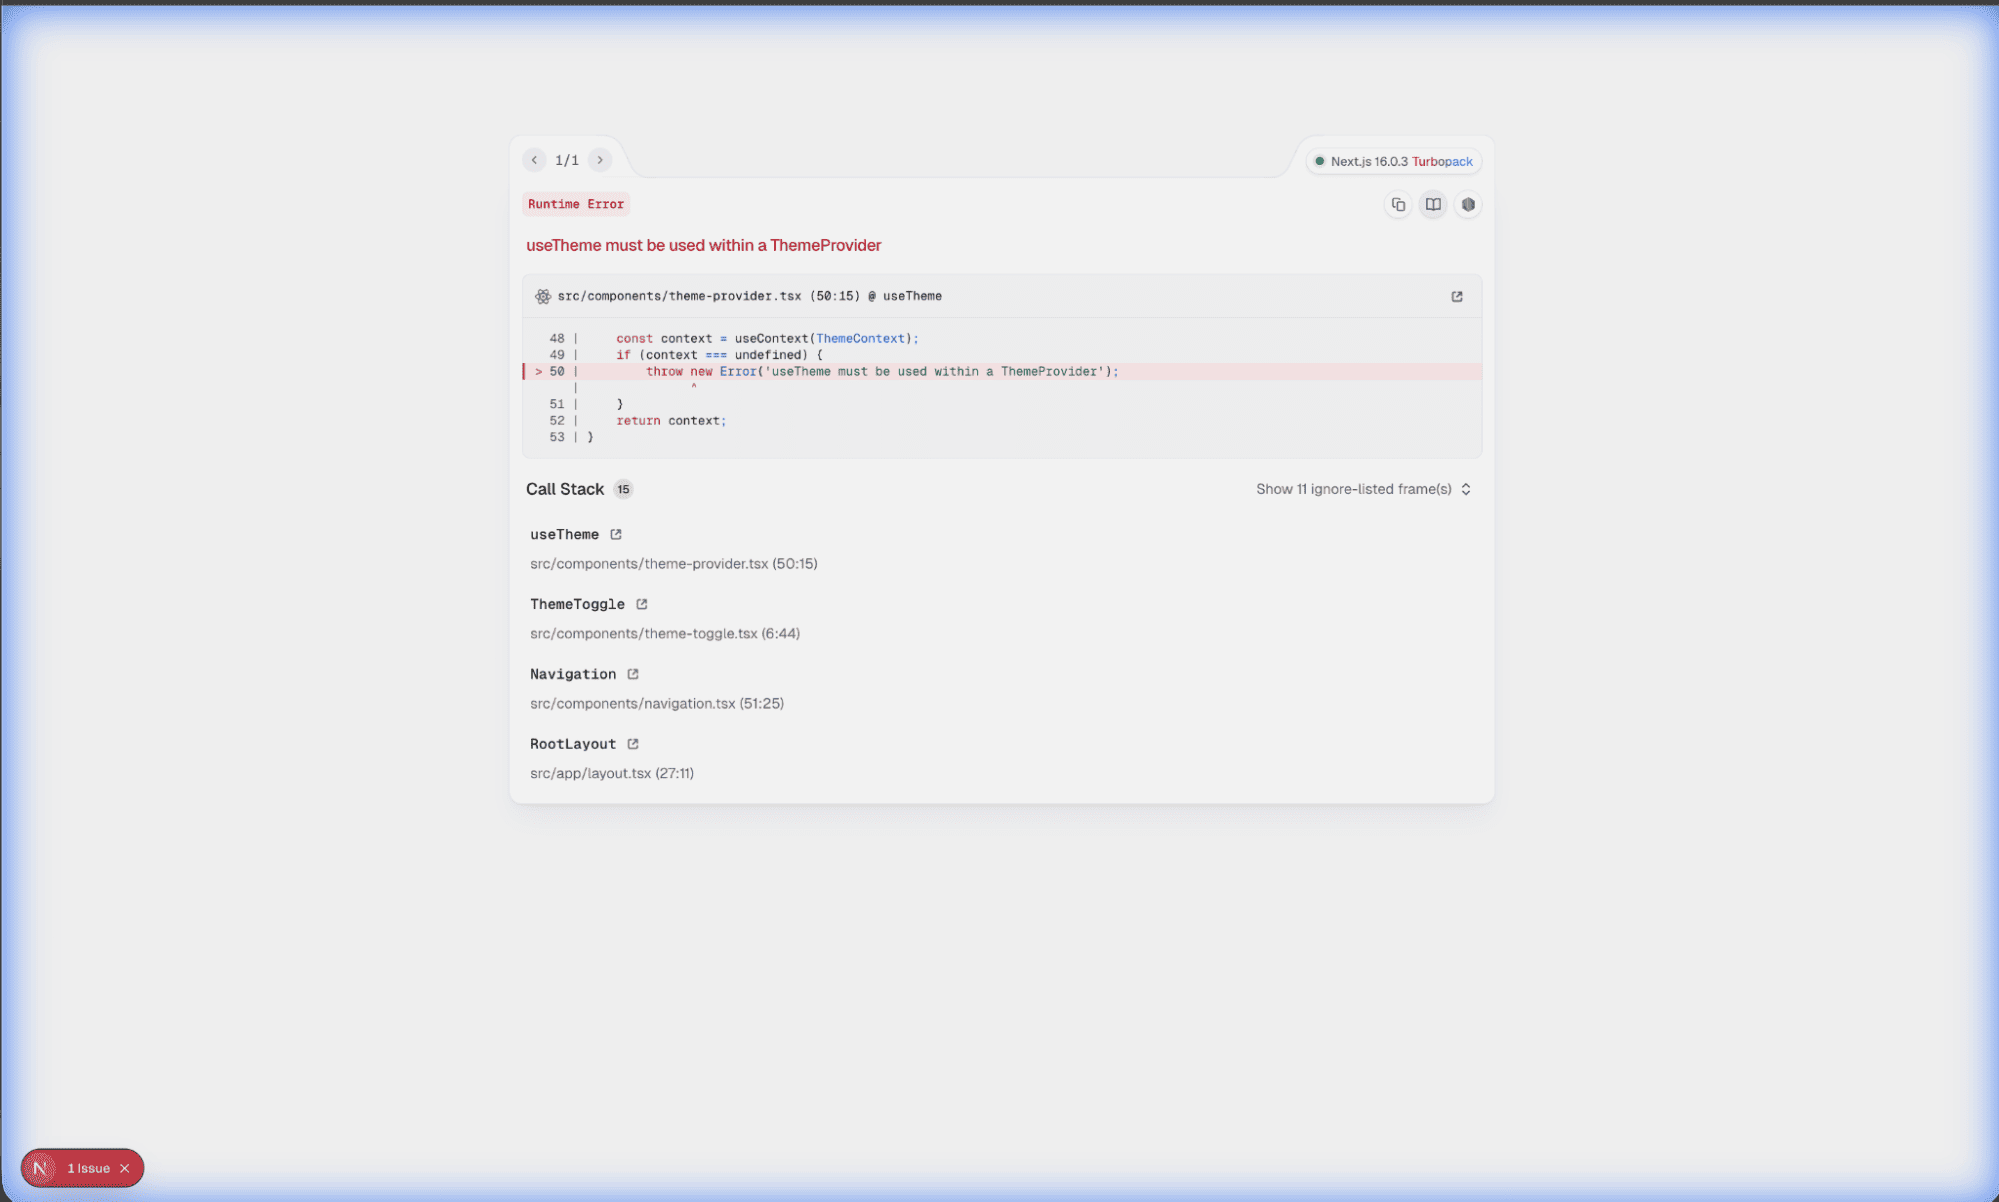
You can follow along by opening the Walkthrough or checking the new Progress Updates for debugging steps.

At this point, you’ve:
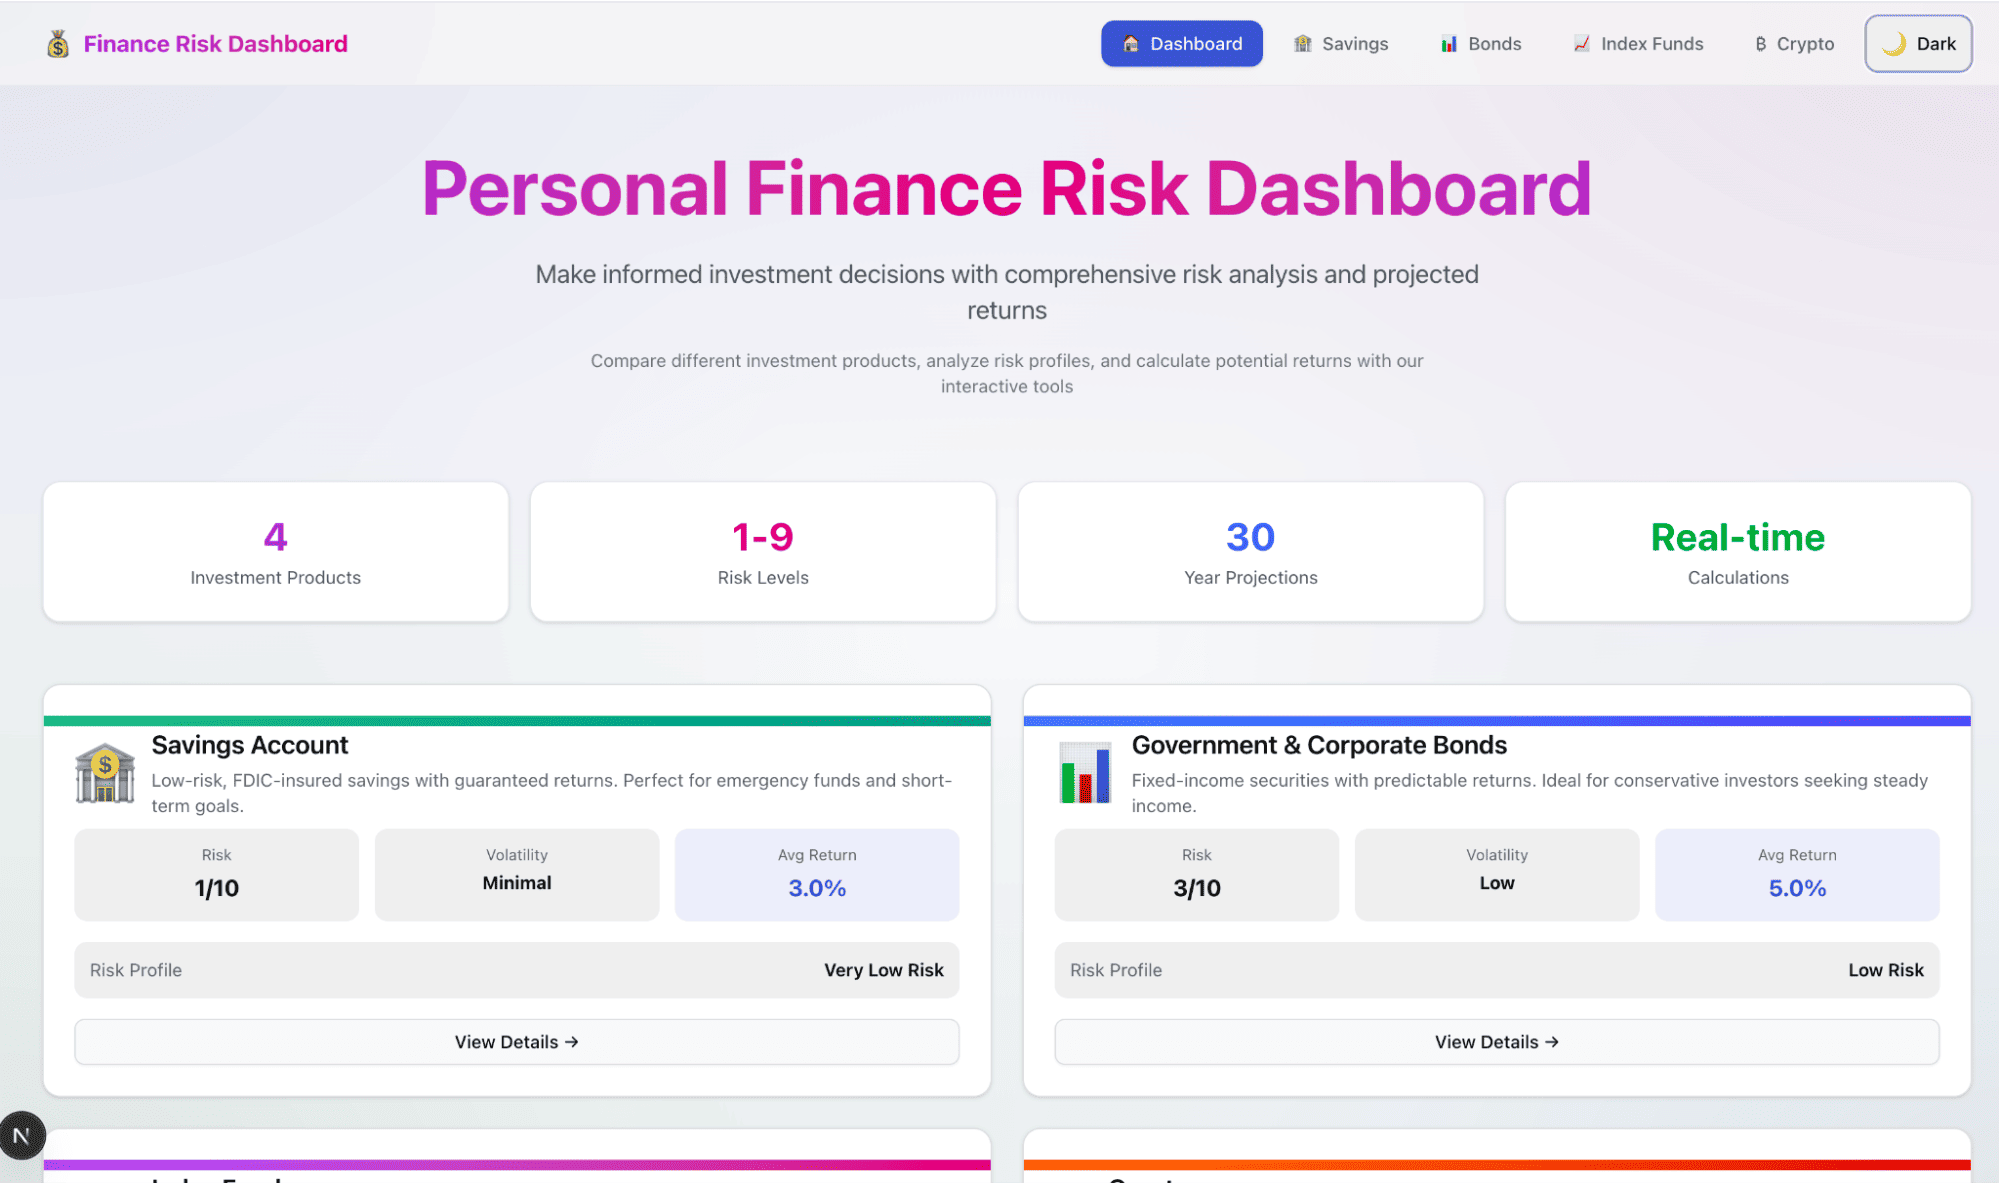
Now our final app is ready for review.
After iterating on the toggle and layout, you’ll end up with a final application where the charts are removed, and the light/dark mode toggle works across the entire dashboard.
Dark mode:
Light mode:
You can see our dashboard in action in the video below:
Top DataCamp Courses
Course
Course
Course
blog
Matt Crabtree
13 min
Tutorial
Abid Ali Awan
Tutorial
Bex Tuychiev
Tutorial
Abid Ali Awan
Tutorial
Aashi Dutt
code-along
Francisco Quintana