Track
Excel Fundamentals
16 hr
If you've ever stared at a formula like =SUM($A$2:$A$500) and wondered what it's actually calculating, you're not alone. The formula works, but it doesn't tell you anything about what those cells represent.
You're ready to learn about named ranges. Instead of cryptic cell references, you can write =SUM(Q1_Sales). Now the intent is crystal clear: you're summing first quarter sales.
In this guide, I'll walk you through three methods to name a range in Excel, the rules you need to follow, and practical techniques I've learned for managing names as your workbooks grow.
A named range is a descriptive label you assign to a cell or group of cells. Instead of referring to cells by their coordinates like B2:B50, you give that range a meaningful name like Q1_Sales, as I did above, or something else, like Monthly_Revenue.

Here's what this looks like in practice:
|
Context |
Formula |
|
Without named ranges |
|
|
With named ranges |
|
See the difference? The second formula tells you exactly what it's doing: you're summing sales for a selected item from a products list.
I find named ranges helpful for three main reasons.
First, they make formulas readable. Anyone reviewing your spreadsheet can understand what a calculation does without tracing cell references across multiple sheets.
Second, they simplify maintenance. If your data moves or expands, you update the name's definition once in Name Manager, and every formula using that name automatically points to the correct location.
Third, they enable quick navigation. You can click the Name Box dropdown and jump directly to any named range in your workbook (super handy when you're working with large spreadsheets).
The Name Box sits at the far-left edge of your Excel window, directly below the ribbon and to the left of the formula bar. By default, it shows the active cell's address (like "A1").
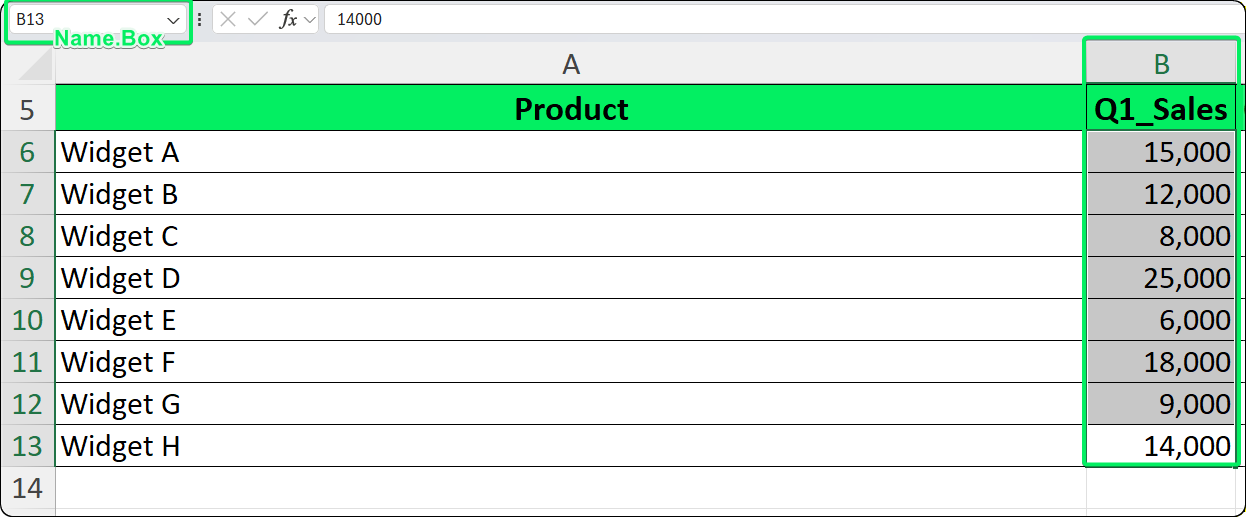
The Name Box displays the active cell address. Image by Author.
Here's how to use it:
Select the range you want to name
Click into the Name Box (the current address becomes highlighted)
Type your name (for example, Revenue_2026)
Press Enter to confirm
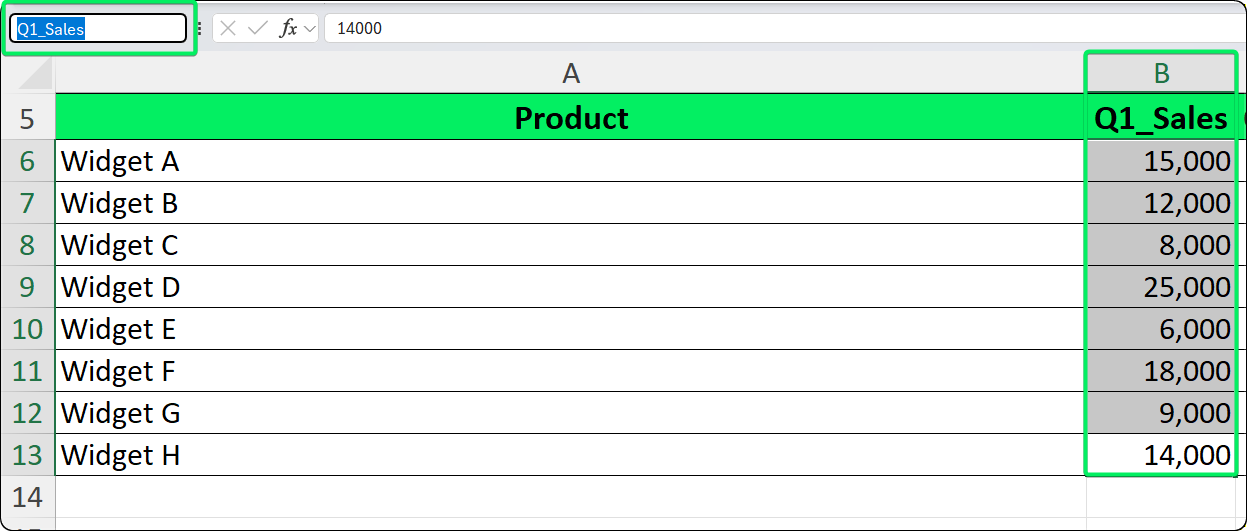
Type a valid name and press Enter to confirm. Image by Author.
One thing I've learned the hard way: the Enter key is mandatory. If you click elsewhere without pressing Enter, Excel discards the name silently. I've made this mistake more times than I'd like to admit.
Names created through the Name Box always get workbook-level scope, meaning they're accessible from any sheet. You cannot restrict them to a single worksheet using this method. You'll need the Define Name feature for that.
Here's a quirk: if you type an existing name and press Enter, Excel navigates to that range instead of creating a new one. This is actually useful for quick navigation (as I mentioned earlier), but it can be confusing if you expect to redefine the name.
The Define Name dialog gives you more control than the Name Box. I use it when I need to set a specific scope, add a description, or define a named constant rather than a cell range.
You'll find it at Formulas → Defined Names group → Define Name.
Let me walk you through the process:
Optionally, select the cells you want to name first
Go to Formulas → Define Name
In the New Name dialog, fill in Name (e.g., Tax_Rate), choose Scope (Workbook or a specific worksheet), confirm the Refers to field (auto-filled if you pre-selected), and add a Comment to describe what this name represents (optional but I recommend it)
Click OK
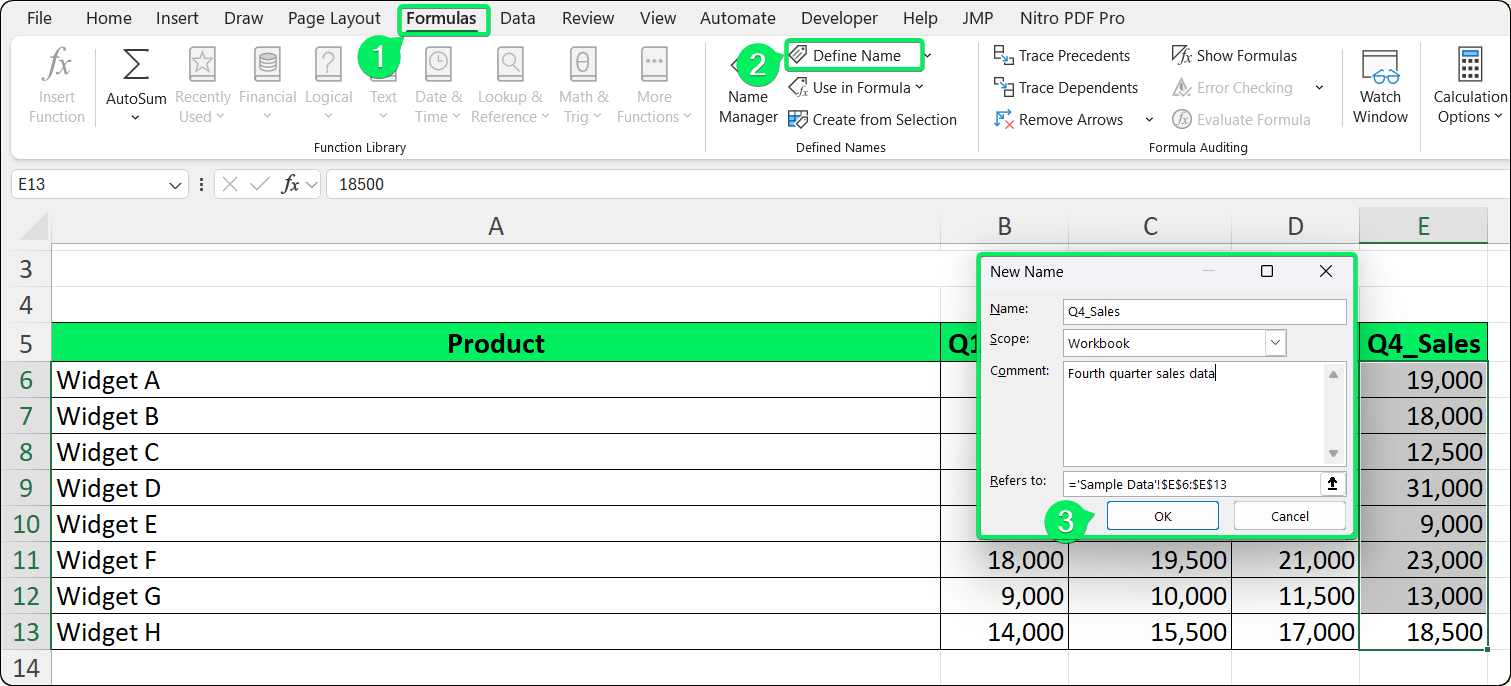
Define Name provides full control over scope and comments. Image by Author.
Here's something really useful: you can define names that refer to values rather than cells. For example:
Name: Commission_Rate
Refers to: =0.15
Now you can use =Sales*Commission_Rate anywhere in your workbook. If the commission rate changes, you update it once in Name Manager rather than hunting through every formula. This has saved me countless hours.
Excel has strict rules to prevent confusion between names and cell references. I've had my share of rejected names, so let me help you avoid the same frustration.
Your name must start with a letter (A-Z), an underscore (_), or a backslash (\). You cannot begin with a number.
After the first character, you can use letters, numbers, underscores, periods, and backslashes. That's it. Nothing else is allowed.
Spaces are prohibited. Use underscores or periods instead: Sales_Tax or Sales.Tax work, but Sales Tax doesn't. Hyphens, ampersands, and most special characters (&, #, !, @, -) are also invalid because they have special meaning in Excel's formula syntax.
Here's where things get tricky: names cannot match valid cell addresses. This catches a lot of people because modern Excel supports columns through XFD (16,384 columns) and over one million rows.
|
Invalid name |
Why it fails |
Valid alternative |
|
A1 |
Matches cell address |
|
|
ABC123 |
Column ABC, row 123 exists |
|
|
TAX2025 |
Column TAX exists |
|
|
R100 |
Conflicts with R1C1 notation |
|
The single letters R and C are reserved for R1C1 reference notation, so you can't use them as names either.
Names are case-insensitive. This means Revenue, REVENUE, and revenue all refer to the same name. Excel preserves the case you enter, but it won't let you create duplicates that differ only by capitalization.
The maximum length is 255 characters, though I recommend keeping names under 30-40 characters. Anything longer becomes unwieldy in formulas.
When your data already has clear column or row headers, the Create from Selection feature is a huge time-saver. It generates multiple names at once.
Here's how to use it:
Select the entire data range including headers (e.g., A1:D20 where row 1 contains column headers)
Go to Formulas → Create from Selection (or press Ctrl+Shift+F3)
In the dialog, check where your headers are located (Top row for column headers, Left column for row labels, or both if headers exist in both locations)
Click OK

Select where your headers are located to auto-generate names. Image by Author.
Excel creates a named range for each header, pointing to the corresponding data cells. The headers themselves are excluded from the ranges, which is exactly what you want.
Excel automatically converts headers into valid names:
Spaces become underscores: "Sales Total" → Sales_Total
Invalid characters are removed: "Sales & Marketing" → Sales_Marketing
Numeric prefixes get an underscore: "2026 Budget" → _2026_Budget
I've learned to watch out for a few things. Empty headers create names with unexpected identifiers. Duplicate headers cause conflicts. Very long headers produce unwieldy names. My advice: clean and standardize your headers before using this feature to avoid surprises.
Once you've created named ranges, you can use them anywhere you'd normally type a cell reference.
Let's say data refers to A1:A10. You can write:
=SUM(data)
=AVERAGE(data)
=MAX(data)
=COUNTIF(data, ">100")
Named ranges work in lookup functions, conditional formulas, and virtually any context that accepts cell references. I use them everywhere.
Here's a handy feature: when you're typing a formula, Excel suggests names that match what you're typing. Type =SUM(Rev and a dropdown appears showing names like Revenue or Revenue_2026. Use the arrow keys to select, then press Tab to insert the name.
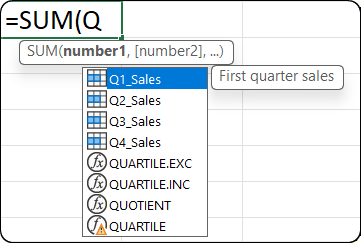
AutoComplete suggests matching names as you type. Image by Author.
If AutoComplete doesn't show names, check that Formula AutoComplete is enabled in File → Options → Formulas.
While editing a formula, press F3 to open a list of all defined names. Select one to insert it at the cursor position. This is super useful when you can't remember the exact name.
Here's something I've learned: if you type a name in lowercase within a formula and it stays lowercase after pressing Enter, Excel doesn't recognize it. The name either doesn't exist, contains a typo, or has a scope that doesn't include your current sheet.
Name Manager is your central hub for viewing, editing, and cleaning up named ranges. I spend a lot of time here when I'm working with complex workbooks.
You'll find it at Formulas → Name Manager or press Ctrl+F3.
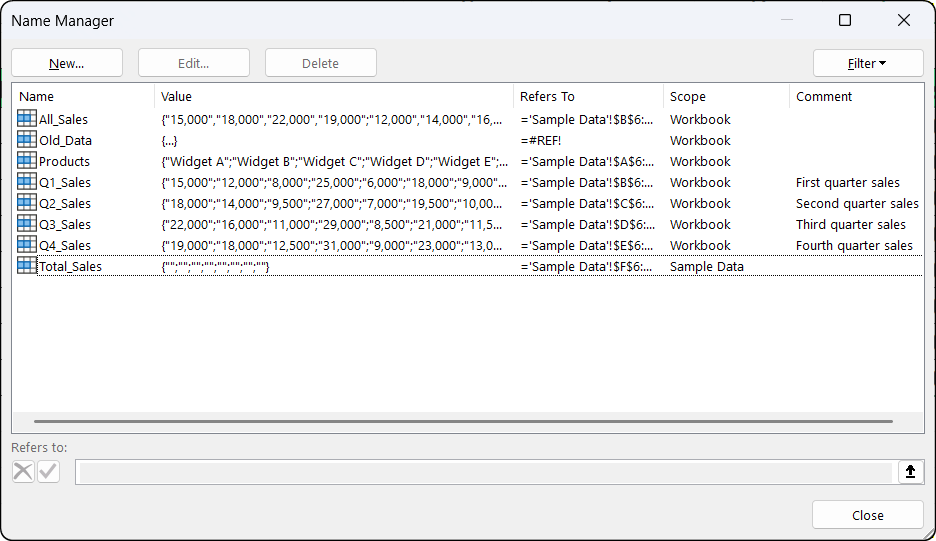
The interface shows all your named ranges in one place. Image by Author.
Here is what Name Manager displays:
|
Column |
Shows |
|
Name |
The name itself |
|
Value |
Current calculated value |
|
Refers To |
The cell reference or formula |
|
Scope |
Workbook or specific sheet |
|
Comment |
Your description (if provided) |
Here's how to edit:
One important thing: you cannot change scope here. To change scope, you need to delete the name and recreate it with Define Name (I'll explain more about scope in the next section).
Also, when you rename a name, Excel does not automatically update formulas that reference the old name. You'll need to use Find & Replace (Ctrl+H) to update them manually.
Select one or more names (Ctrl+Click for multiple selections), click Delete, and confirm. Any formula referencing deleted names immediately shows a #NAME? error.
Here's a warning I wish someone had given me earlier: deletion cannot be undone with Ctrl+Z. Save your workbook before bulk deletions.
Name Manager doesn't show which formulas use each name. Instead, use Find (Ctrl+F), set "Look in" to Formulas and "Within" to Workbook, then search for the name. Click Find All to see every cell that references it. This technique is also helpful before deleting names (as I mentioned in the FAQ).
The Filter button in Name Manager is really helpful for auditing large workbooks:
Names with Errors: Shows names where "Refers To" contains #REF!
Names Scoped to Worksheet/Workbook: Filters by scope
Defined Names vs Table Names: Separates your names from Excel Table names
Earlier, I mentioned that you can set scope when creating names with Define Name. Scope determines where a name is accessible without qualification. Let me break down the two types.
The name works on all sheets. You can reference it simply as =SUM(Revenue) from anywhere. Names created via the Name Box always have workbook scope.
I use workbook scope for shared data: tax rates, company constants, master data ranges, or anything multiple sheets need to reference.
The name is valid only on a specific sheet. To use it from another sheet, you need to qualify it with the sheet name: =SUM(Sheet1!Revenue).
Create worksheet-scoped names when you need the same name on different sheets pointing to different data. For example, each monthly sheet could have its own Sales name.
Here's where things get tricky. If a local name and a global name share the same identifier, the local name takes precedence on its own sheet. Let's say you have Sheet2 with a local Total and a global Total:
On Sheet2: =Total returns the local value
On other sheets: =Total returns the global value
This causes silent errors when someone on Sheet2 expects to reference the global name. I recommend avoiding local names that duplicate global names unless you have a very specific reason.
You cannot change scope in Name Manager. You'll need to delete the name and recreate it with Define Name, selecting the correct scope in the dialog.
I've run into these issues more times than I'd like to admit. Let me help you troubleshoot them.
This means Excel doesn't recognize the name. Common causes:
How to fix it: Open Name Manager, verify the name exists with the expected scope, and use AutoComplete when inserting names into formulas.
This happens when the cells, rows, columns, or sheet that the name referenced were deleted. In Name Manager, find names with #REF! in the "Refers To" column. Either edit them to point to valid cells or delete them if they're obsolete.
For workbooks with many broken names, use the Filter button (as I will mention in the FAQ) to isolate them quickly.
When you copy sheets between workbooks, Excel may show a Name Conflict dialog if names collide. Your options:
When unsure, I always choose No to prevent silent overwrites.
A few things could be happening here. The name might have worksheet scope and you're on a different sheet. Or AutoComplete is disabled. Or you just created the name and need to start the formula fresh for Excel to recognize it.
As I mentioned earlier, check that Formula AutoComplete is enabled in File → Options → Formulas.
Using entire columns (like A:A) in names or OFFSET-based dynamic names can slow down recalculation. I prefer bounded ranges (A1:A1000) and INDEX-based formulas for dynamic ranges. Better yet, use Excel Tables (I'll discuss this more in Best Practices). They auto-expand with your data and provide structured references like SalesTable[Revenue].
Here are some practices I've learned over the years that make working with named ranges much easier.
Good: Monthly_Revenue, Customer_List, Q1_2026_Sales
Avoid: Data1, Range2, X, Temp
A name should tell you what the data represents without needing to check its definition. Your future self will thank you.
Pick a style and stick with it:
Underscores: sales_data, tax_rate
PascalCase: SalesData, TaxRate
Prefixes: rng_PriceList, const_TaxRate, tbl_Employees
Consistency makes names predictable and easier to type from memory.
Worksheet scope adds complexity. I only use it when I genuinely need the same name on multiple sheets pointing to different data.
When creating names via Define Name, fill in the Comment field. Your future self (or colleagues) will appreciate knowing why Adjustment_Factor exists and what it's meant to adjust. Trust me on this one.
I open Name Manager every few months to delete unused names and fix any showing #REF!. Accumulating broken or obsolete names clutters AutoComplete and makes auditing harder.
After creating a name, use it in a simple formula right away to confirm it works as expected. Catching problems early is much easier than debugging broken formulas later.
As I mentioned in the Performance section, Excel Tables (Ctrl+T) are often better than named ranges for data organized in rows and columns that grow over time. Tables auto-expand with new data, provide structured references like Table1[Revenue], and include built-in filtering. I reserve named ranges for constants, non-tabular references, data validation sources, and cross-sheet references where Tables don't fit.
The key decisions at creation time (choosing the right method, setting appropriate scope, and following a consistent naming convention) determine whether named ranges become an asset or a source of confusion. I recommend periodic cleanup through Name Manager to keep your workbooks organized as they evolve.
Now that you're ready to explore further, I recommend taking our Introduction to Excel course to build foundational skills, and our Data Analysis in Excel course to see how these techniques fit into larger analytical workflows.
Learn Excel with DataCamp
Track
Course
Course
Tutorial
Laiba Siddiqui
Tutorial
Laiba Siddiqui
Tutorial
Javier Canales Luna
Tutorial
Allan Ouko
Tutorial
Allan Ouko
Tutorial
Josef Waples