Course
The explosion of data volumes and the growing demand for real-time insights have transformed how companies operate. In response, data teams increasingly rely on integrated data platforms to streamline data management and stay competitive.
Recognizing this need, Microsoft introduced Fabric in 2023—a powerful, all-in-one solution to manage data across its entire lifecycle.
In this hands-on tutorial, we'll cover:
- Setting up Microsoft Fabric
- Exploring the interface
- Ingesting data
- Building data pipelines
- Analyzing data
- Collaboration and sharing
Before we get started with the practical step-by-step guide to Microsoft Fabric, let’s lay some foundations.
What is Microsoft Fabric?
Microsoft Fabric is a comprehensive data management and analytics platform that unifies the entire data lifecycle within the Microsoft ecosystem. It was designed to meet the demands of enterprises by simplifying processes like:
- Data ingestion
- Data transformation
- Data storage
- Analytics
Effectively, Fabric consolidates various services, including data engineering, real-time analytics, and data science, into a single integrated platform.
With tools like OneLake centralizing data and embedding AI capabilities, Fabric enables teams to transform raw data into actionable insights, eliminating the complexity of managing multiple vendor services.
Become a Data Engineer
Setting Up Microsoft Fabric
Before you can get started with Microsoft Fabric, there are two prerequisites you must have in place:
- Azure subscription. You can sign up for a free trial on the Azure website if you don't have one.
- Microsoft Entra ID access. Fabric uses Microsoft Entra ID (formerly known as Azure Active Directory) for authentication, so ensure you have access to the necessary admin privileges. More on this later.
Creating a Microsoft Fabric account
Once you’ve logged into your Azure Portal, navigate to the search bar at the top of the page and search for “Microsoft Fabric.” Note that you may also see the Microsoft Fabric icon in the Azure Services section at the top of your screen, and you can click there directly.
Select the service from the dropdown menu, and then click Create to begin provisioning the Fabric workspace.
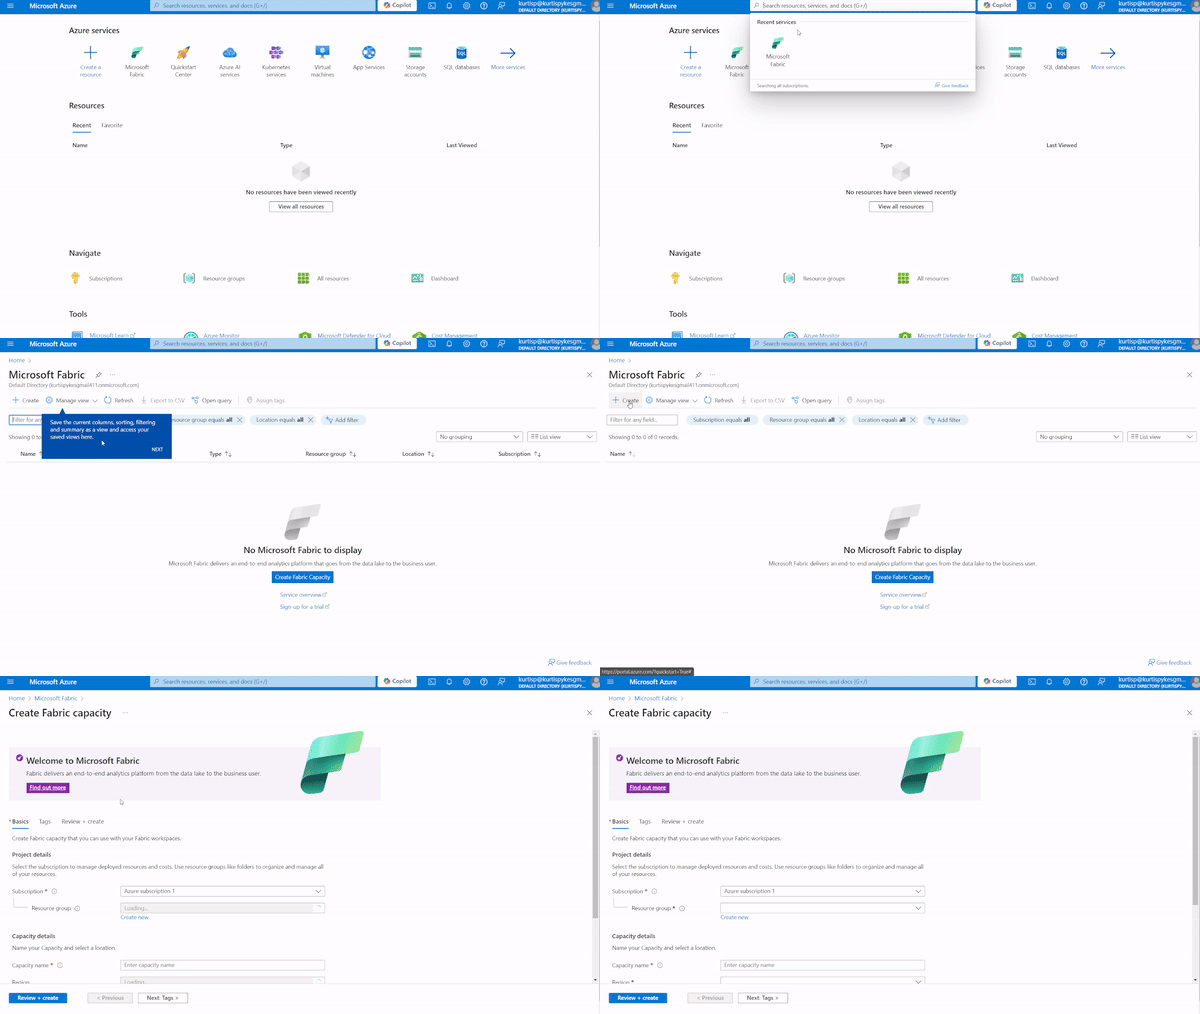
Figure 1: A GIF demonstrating how to begin provisioning a Microsoft Fabric workspace
If you run into the error “You cannot create a Microsoft capacity using a personal account. Use your organizational account instead,” it is because you are using what is considered to be a Microsoft Personal Account.
To eliminate this error, create a new user in your Microsoft Entra ID tenant and give it an admin role for Microsoft Fabric and Power Platform. Once complete, use that newly created user to log in to Azure and repeat the same steps.
Step 1. Create a Fabric Capacity.
The next step from here is to choose your Subscription and Resource group.
If you’re using the free trial, “Azure subscription 1” should be your only subscription—it is the same as the free trial.
The Resource group is a collection of resources that share the same lifecycle, permissions, and policies. We don’t have one yet, so we will have to create one—I called mine “Demo.”

Figure 2: Project details section
Step 2. Name your Fabric workspace
The “datacamp1” is the name I’ve given to the Capacity. You can give yours any name you want, but it must only contain lowercase letters and numbers. For the Region, select the one closest to your location to optimize performance.
If you get the error “The default location can't be detected because the tenant or user wasn't recognized by Microsoft Fabric. Sign up for Microsoft Fabric and try again” in your Region section, it is because you haven’t signed up for Microsoft Fabric. A prompt will pop up for you to sign up.
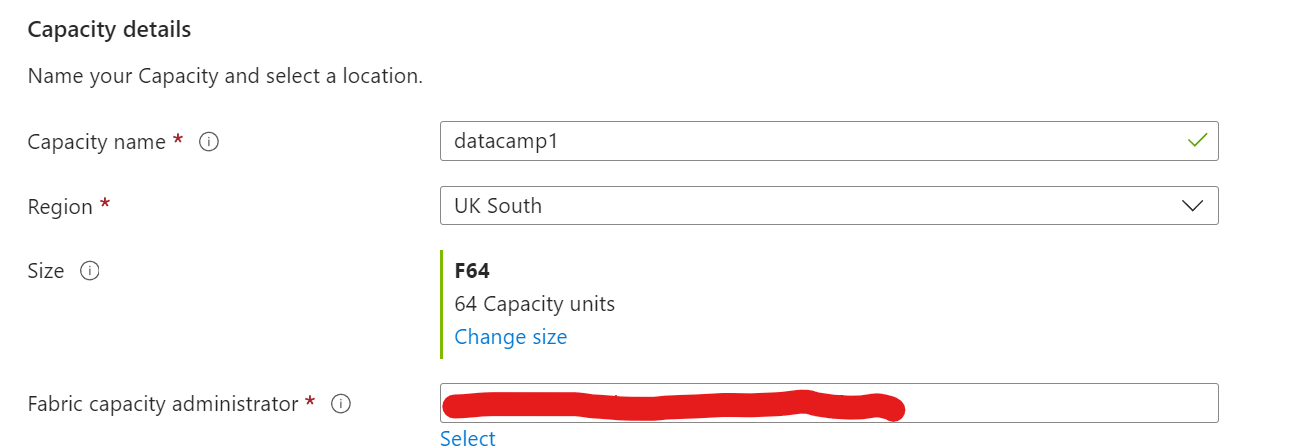
Figure 3: Capacity details section
When you’ve filled in these details, select Review + create.
Once your account is created, you can access your Fabric workspace through the Azure Portal.
Initial configuration
The next step is to configure the Microsoft Fabric platform to your needs.
To assign permissions, navigate to the Access Control (IAM) settings within your Fabric workspace.
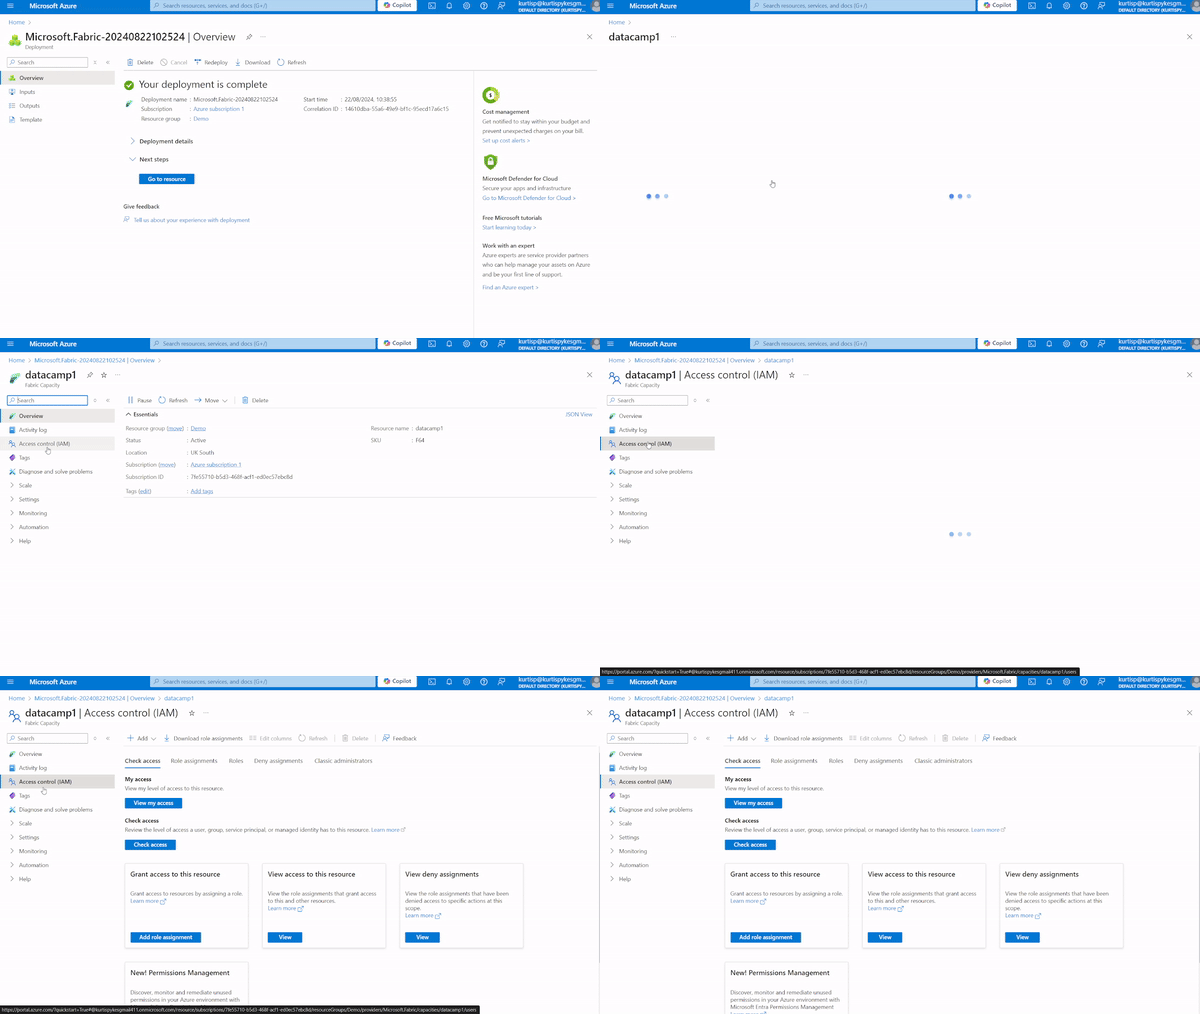
Figure 4: Navigating to IAM settings within the Fabric
From here, select Add > Add role assignment.
In the Job Function roles subheader, search “Admin.” This should return App Compliance Automation. From here, select Next.

Figure 5: Selecting the role definitions
Under the Members header, click the + Select members link. This will bring up a side tab with all the account members. Select the appropriate member and click Next.

Figure 6: Selecting the member
Note: You can also manage user permissions via Microsoft Entra ID, allowing you to enforce security policies and ensure access is only granted to authorized users.
Step 2: Starting the free trial
After logging in, you will be greeted with the Microsoft Fabric dashboard.
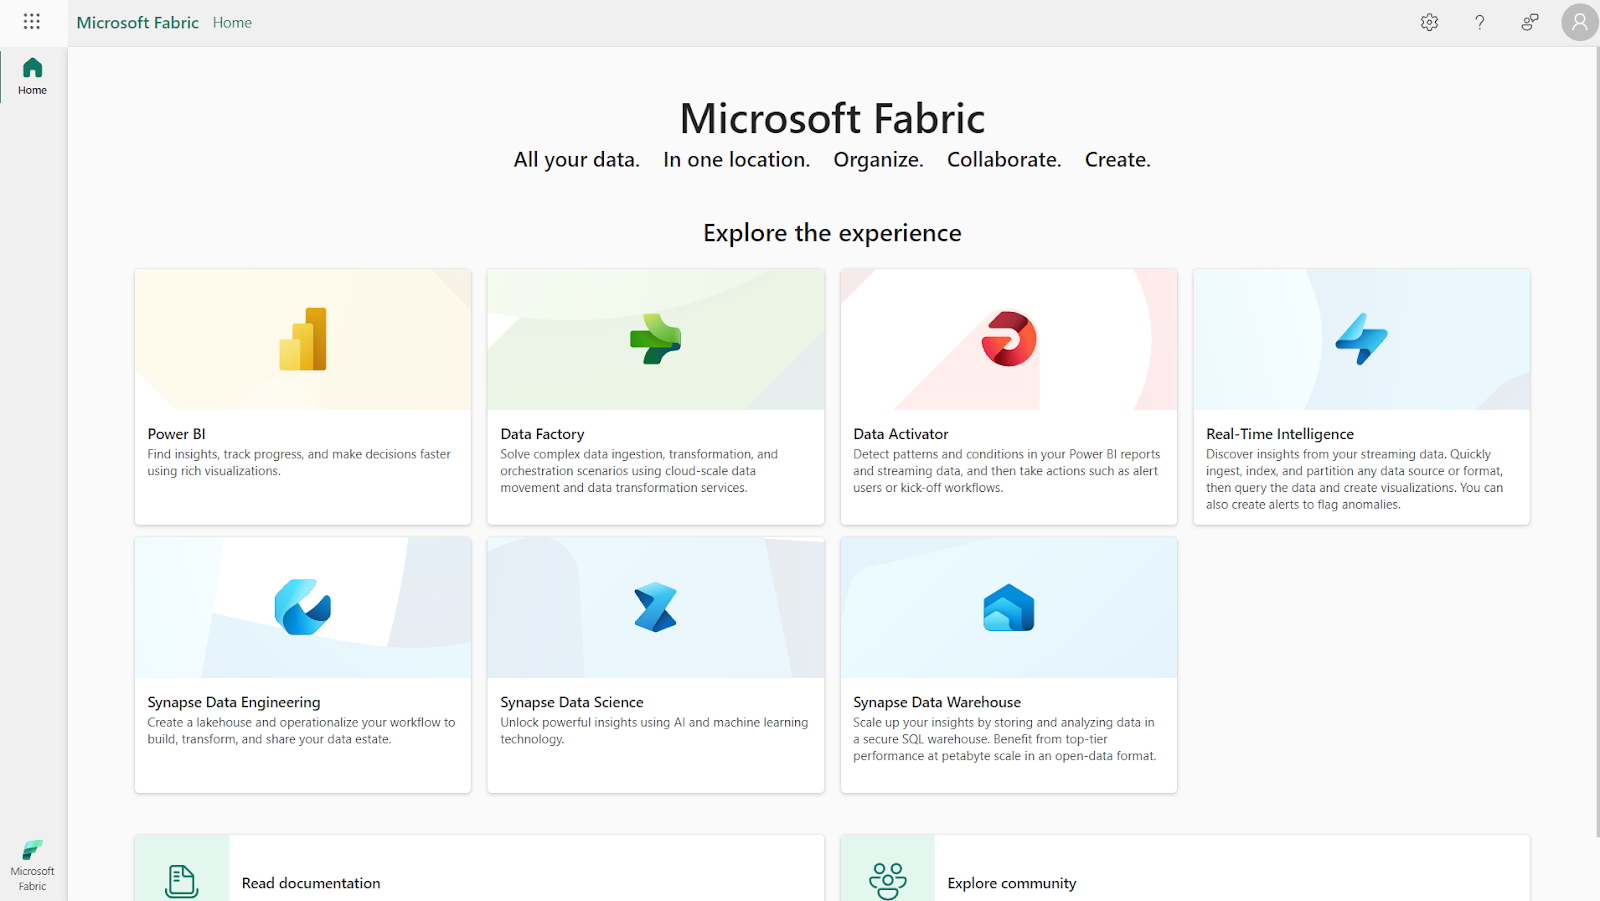
Figure 7: Microsoft Fabric interface
Here’s what you must do to start your Fabric capacity trial.
- Select the Account manager (top right-hand corner) from the homepage.
- In the account manager, select Free trial.
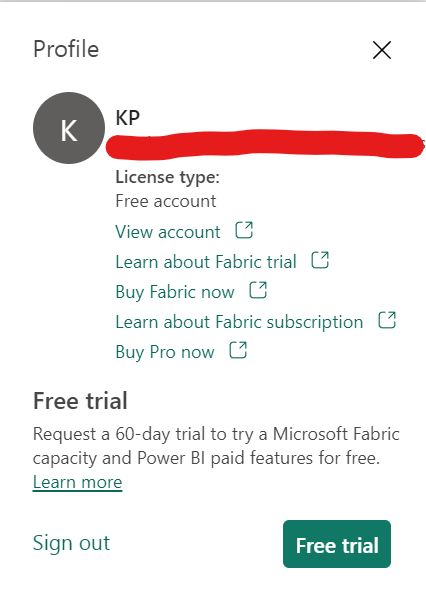
Figure 8: Account manager screen
- This will bring up another screen with the details of what’s available. Select Start trial and click Fabric Home Page at the next prompt to confirm your upgrade.

Figure 9: Upgrade message
Voila!
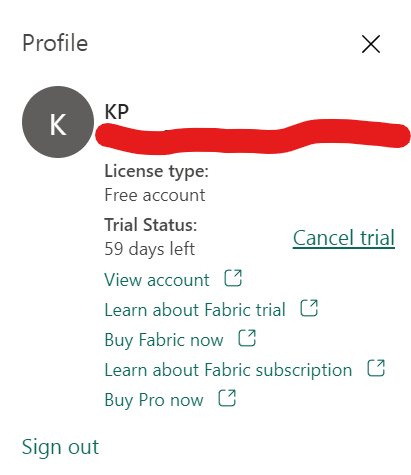
Figure 10: Confirmation of free trial
You now have a Fabric free trial for 60 days (at the time of writing).
Exploring the Microsoft Fabric Interface
Microsoft Fabric provides a user-friendly interface. The layout, as seen in the image below, seeks to ensure easy access to all the tools and services necessary for managing the entire data lifecycle.
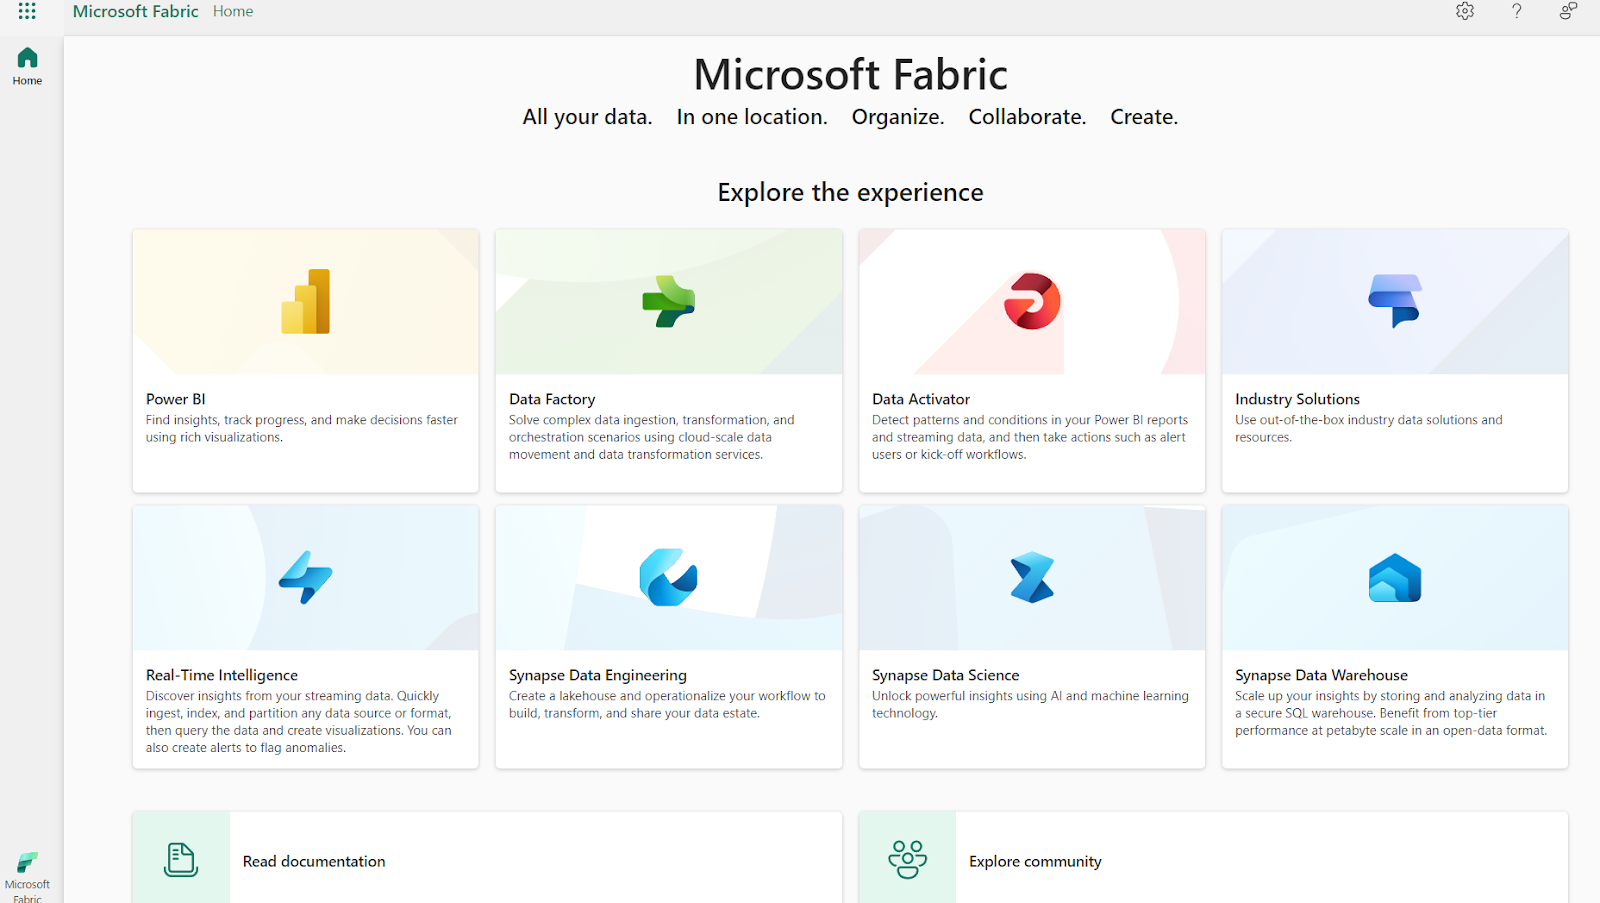
Figure 11: Microsoft Fabric interface
In this section, I'll break down the main components of the interface and explore how workspaces play a central role in organizing your projects.
Dashboard overview
On the home page of any experience you select (e.g., Power BI, Data Factory, etc.) in Microsoft Fabric, you'll find all the items you've created, have permission to use, or pulled from the workspaces you can access.
Since everyone’s home page is based on their specific permissions, what you see might look different from what others see. At first, you might not see a lot there, but your content will grow as you start creating and sharing more Microsoft Fabric items.
Generally speaking, here’s what you’ll find in a dashboard:
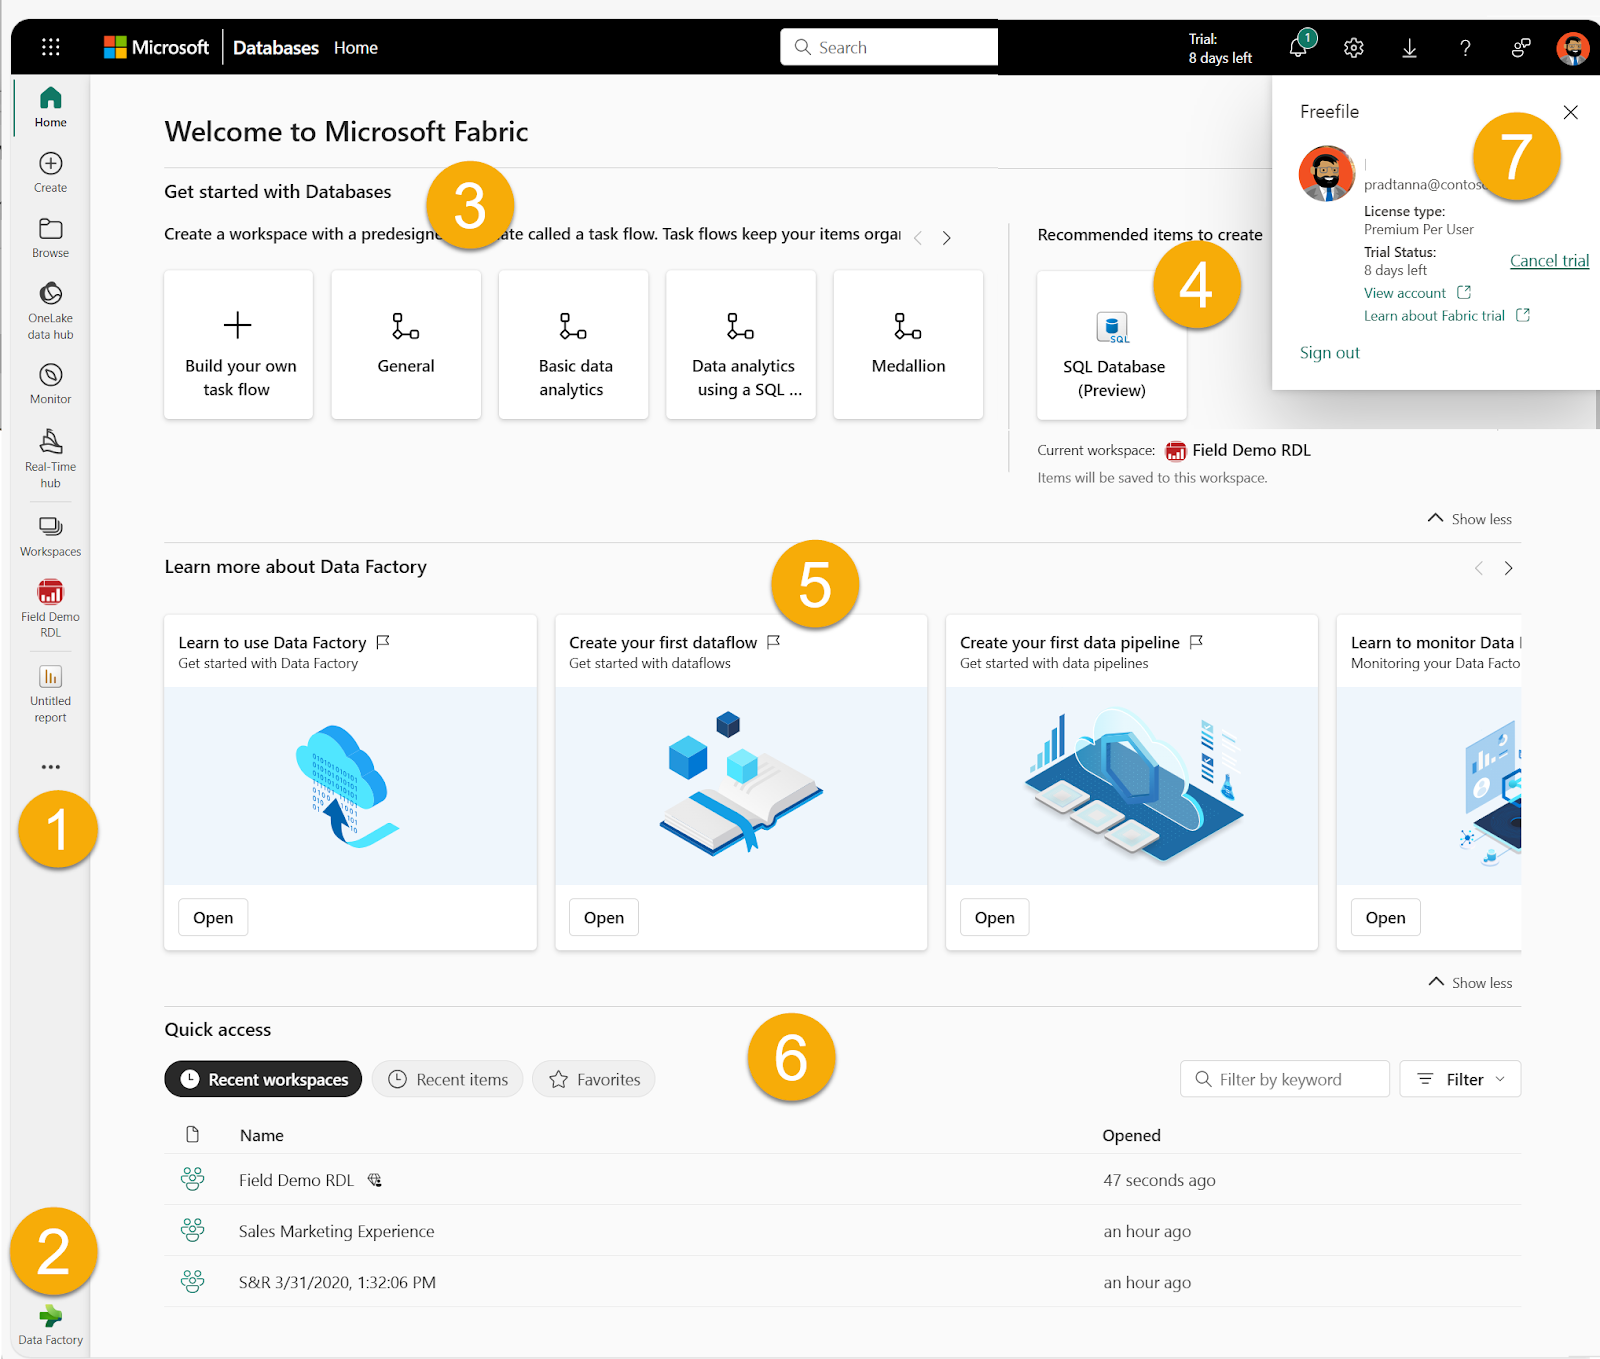
Figure 12: An example Microsoft Fabric dashboard for Data Factory. Image source: Microsoft
- The left-hand navigation panel connects you to different views of your items and creator tools tailored to your specific workload. You can customize it by removing icons that don't fit your workflow.
- This selector lets you switch between different workloads (e.g., Power BI, Data Factory, Real-time intelligence, etc.).
- You’ll also find options here for creating new items.
- The top menu bar helps you navigate Fabric, search for items, access help, and send feedback. It also includes the Account Manager, where you can manage your account information and Fabric trial.
- Learning resources are available to help you get started with the selected workload.
- Your items are organized by recent workspaces, recent items, and favorites, and these stay consistent across all workloads—except for Power BI.
Understanding workspaces
Workspaces are where you and your colleagues can collaborate to create and organize items like lakehouses, warehouses, reports, and task flows.
Here are the steps to create a workspace:
Step 1. Select Workspaces > New workspace. This will open the Create a workspace pane.
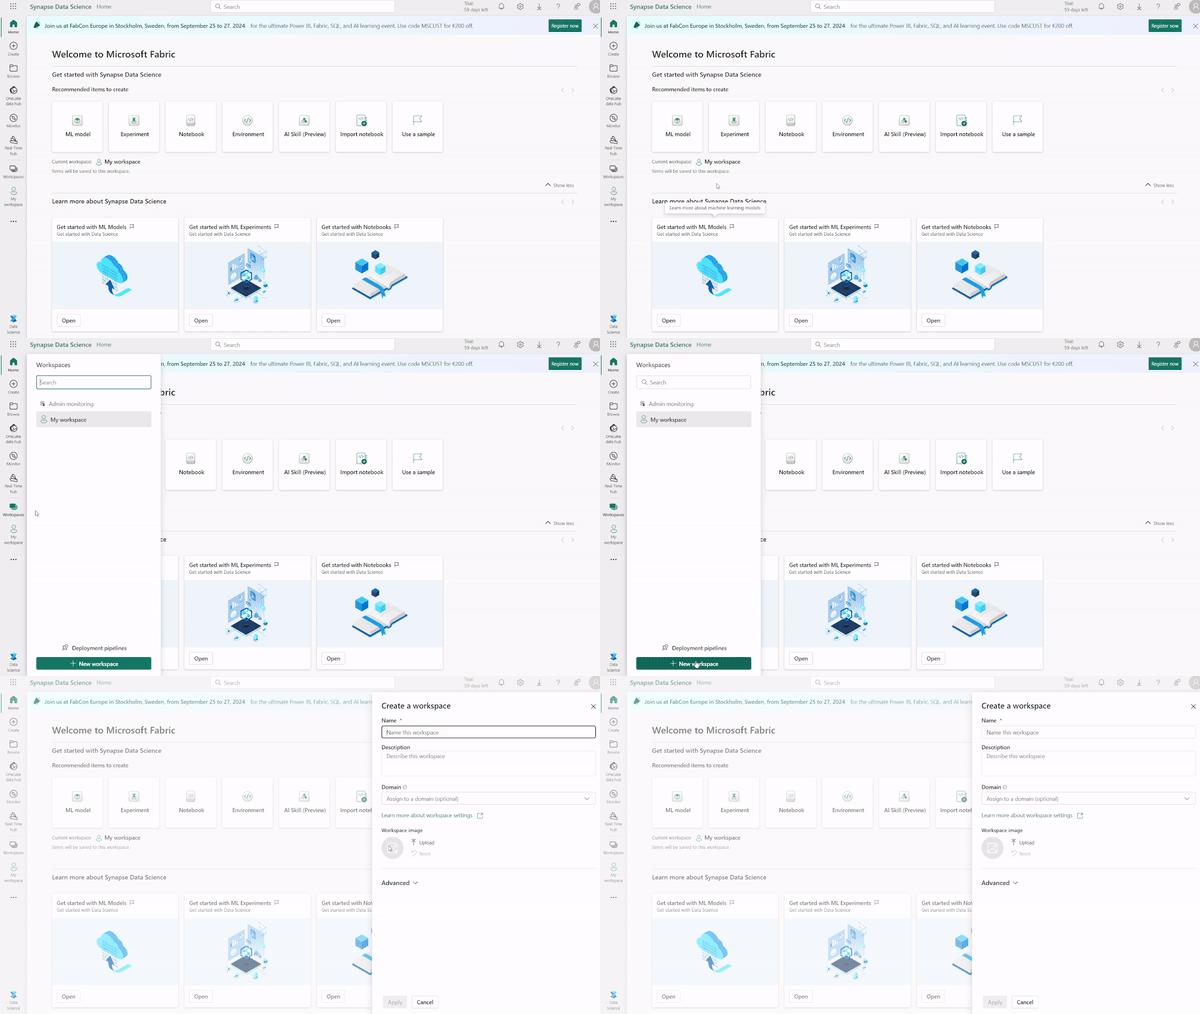
Figure 13: Creating a new workspace in the Synapse Data Science experience
Step 2. Give the workspace a name, as this is mandatory. You can also provide a description and assign the workspace to a domain, but those options are optional—I called my workspace “DataCamp.”
Ingesting Data into Microsoft Fabric
Microsoft Fabric makes connecting data from various sources (e.g., cloud, on-premises, or external APIs) easy. In this section, we will run through a quick step-by-step guide to help you connect Microsoft Fabric to Azure SQL Server as a cloud data source.
Note: You will need an existing Azure SQL Database for this step—follow this tutorial to help you create a single database.
Connecting to on-premise data sources is beyond the scope of this article, but you can learn more about it in Microsoft’s add or remove a gateway data source tutorial.
Step 1. Select the Settings icon in the header of your Microsoft Fabric service, and then navigate to Manage connections and gateways.
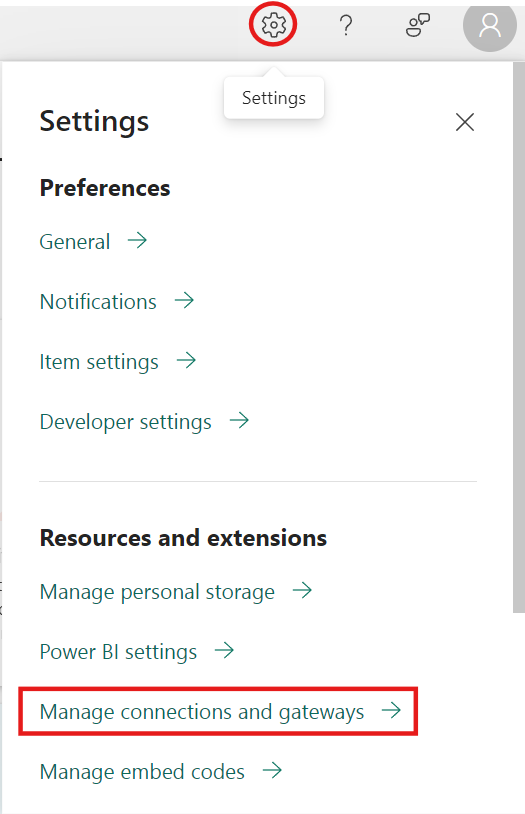
Figure 14: Path to manage connections and gateways
Step 2. From here, select the Connections tab, then select + New in the top left-hand corner of the screen to add a new data source.
Step 3. This will bring up the New connection panel on the right of your screen. Select Cloud, provide a Connection name and select the Connection type from the drop-down list. For our example, we will be using an SQL Server. Here’s how things should look when you’re done.
Step 4. Fill in the details about your data source. Since we’re connecting to SQL Server, just enter the Server name and Database.
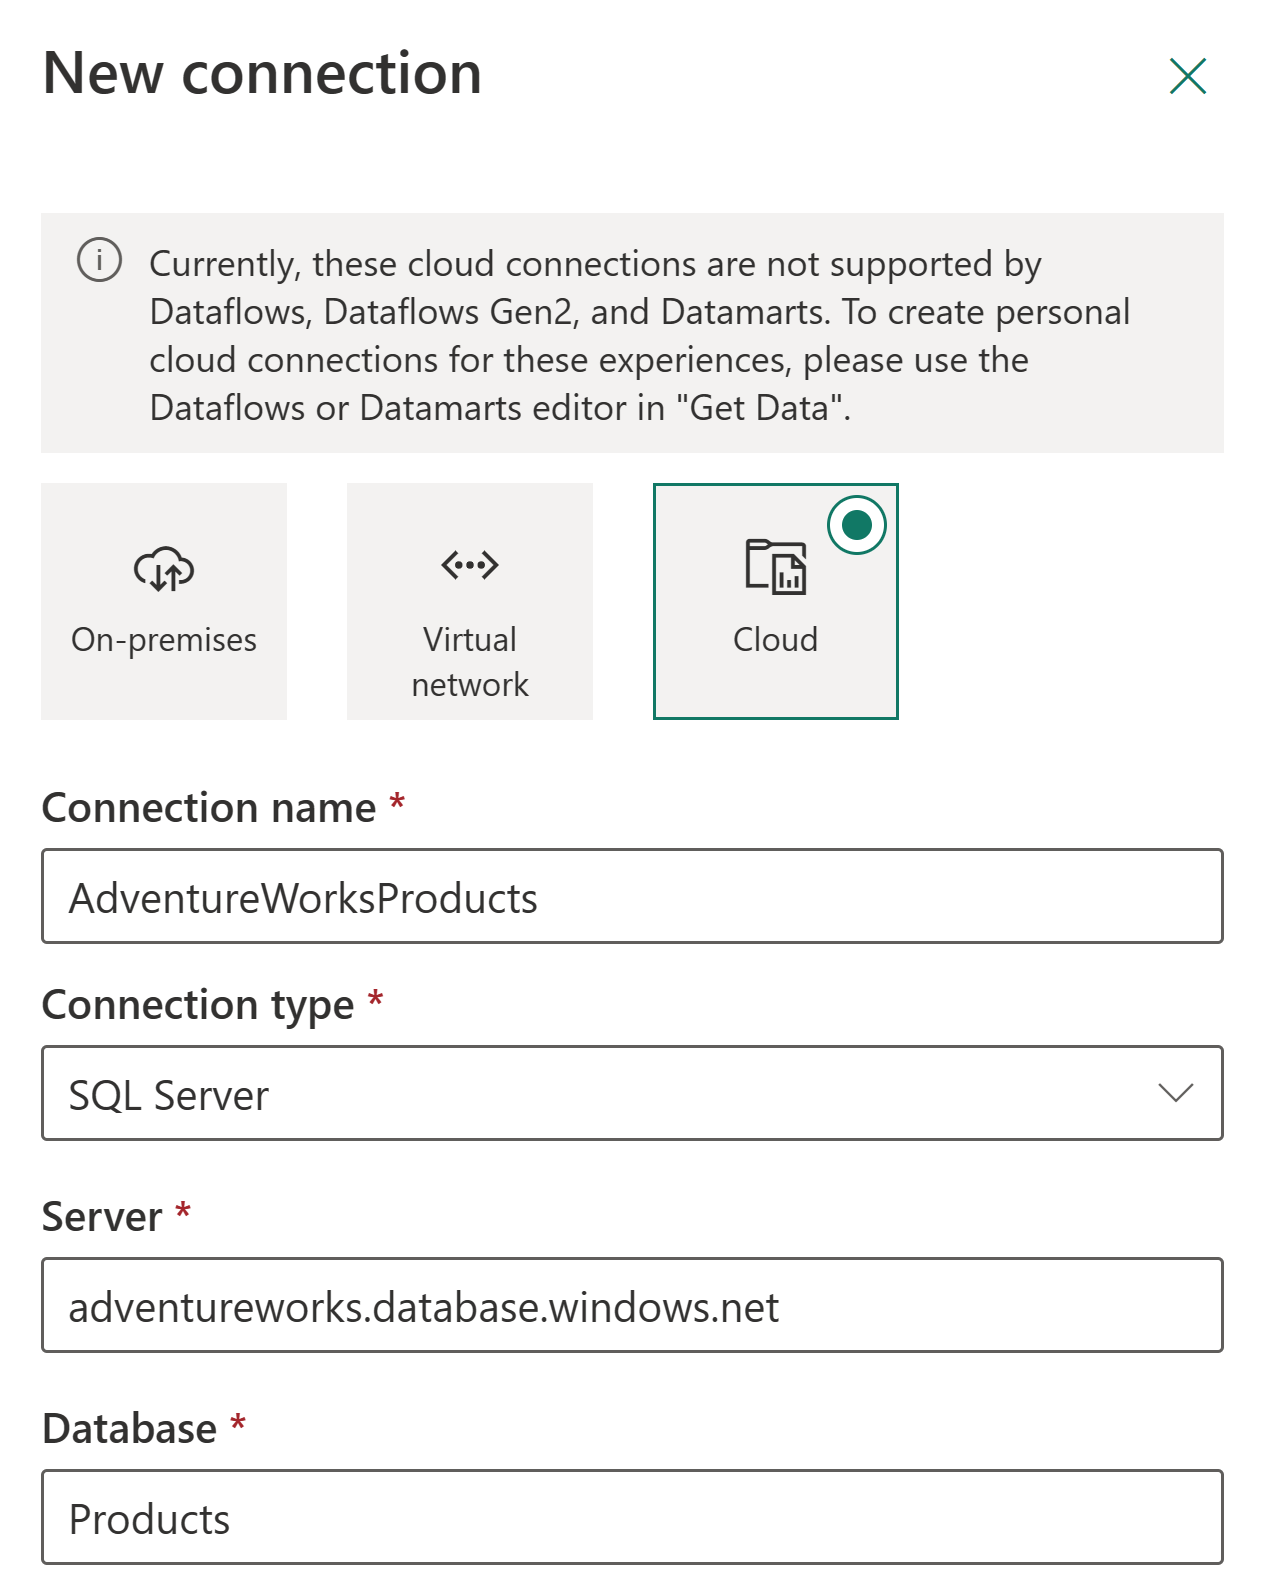
Figure 15: The details of the SQL Server connection. Image source: Microsoft
Step 5. Select how you'd like to authenticate when connecting to the data source. For instance, you can use OAuth2 and simply sign in with your account.
Step 6. In the "General" section under "Privacy level," you can set a privacy level for your data source if needed. If you’re happy with things, select “Create,” and voila! If the connection is successful, you’ll see “Created new connection” under Settings.

Figure 15: Confirmation of a new connection being added
Data transformation and cleaning
There are several ways to transform data in Microsoft Fabric, but let’s dive into Dataflow Gen2 for now.
Dataflow Gen2 gives you a low-code interface and access to over 300 data and AI-based transformations. This makes it super easy to clean, prepare, and transform your data, giving you plenty of flexibility.
Here’s how to create a Dataflow:
Step 1: Select your Fabric workspace, click New, and choose Dataflow Gen2. This will open up the Dataflow editor window.
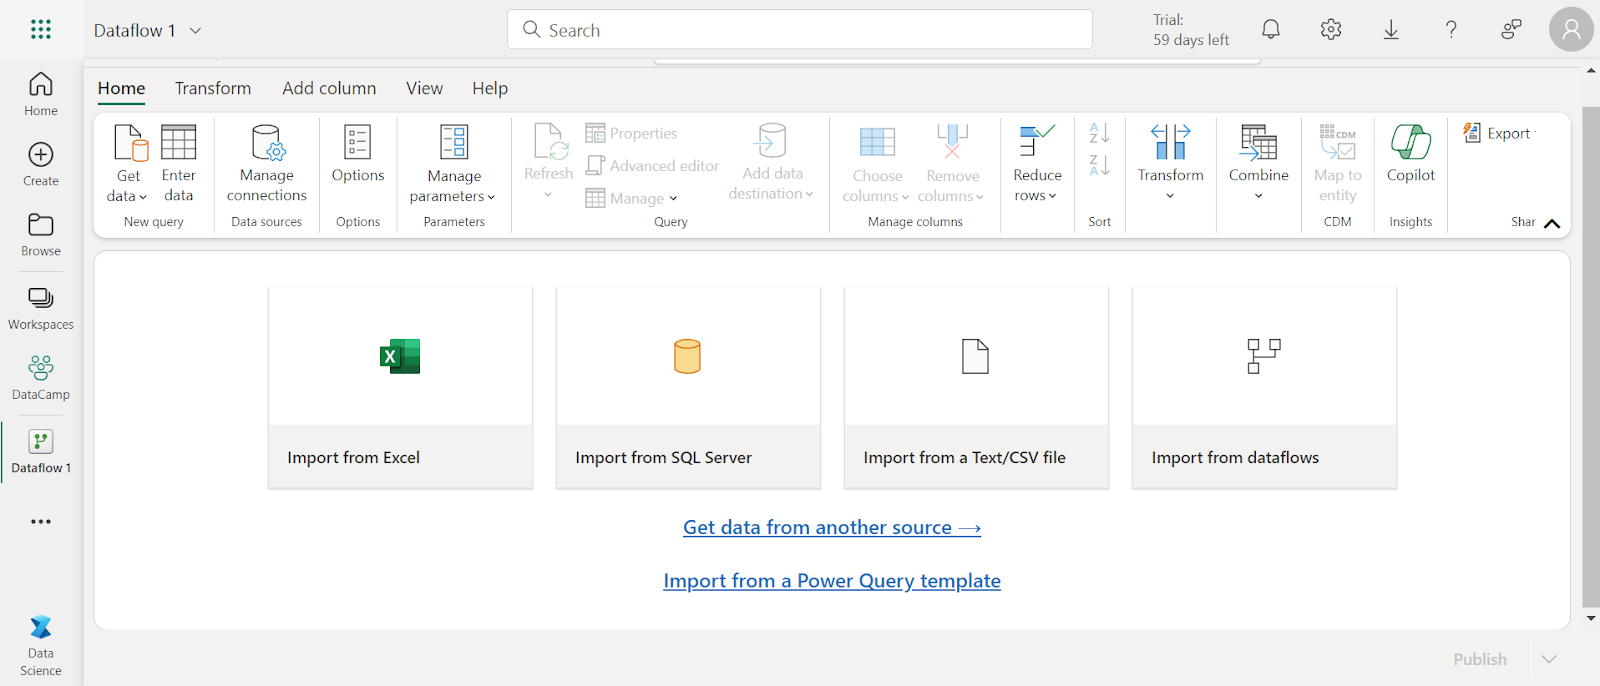
Figure 16: The Dataflow editor
Step 2. Choose the Import from SQL server card to import data, and on the Connect to data source dialog that appears, enter the details to connect your Azure SQL database.
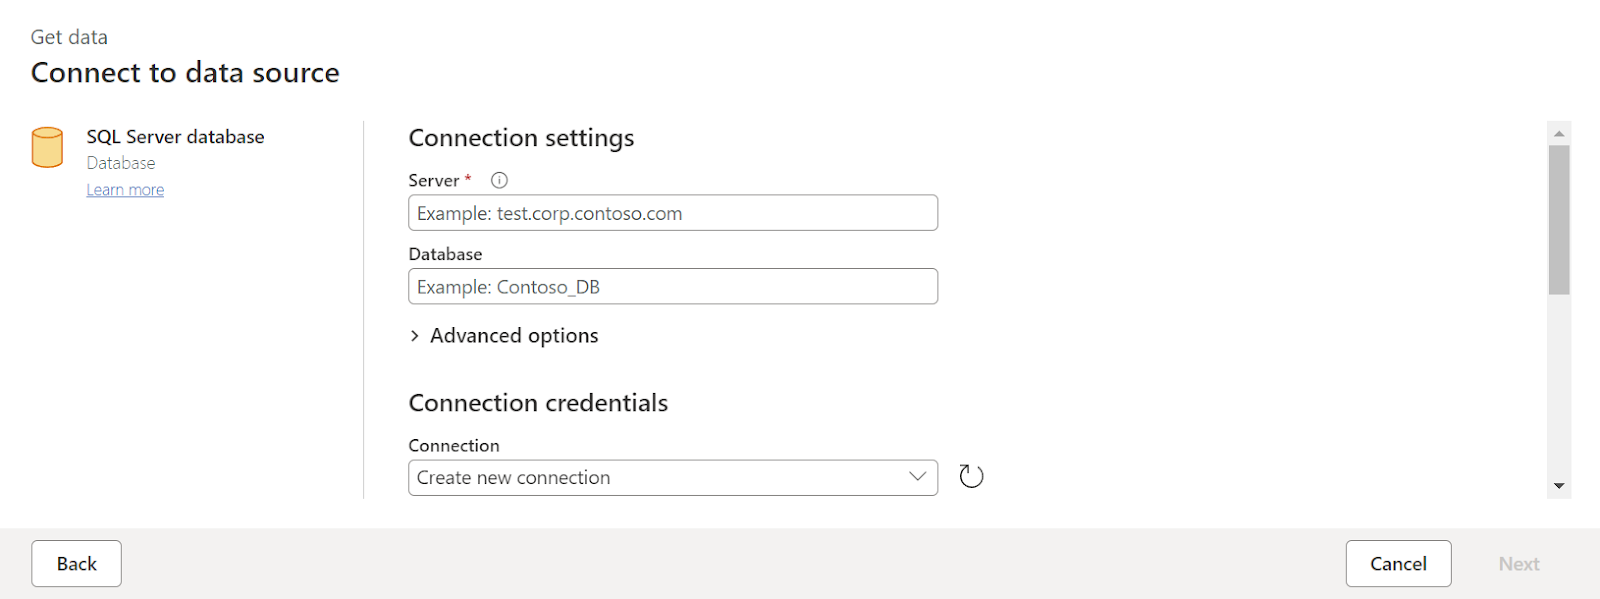
Figure 17: Connecting to a data source
Step 3. Choose the data you want to transform and hit Create. For this demo, we will use the SalesLT.Customer from the AdventureWorksLT sample data in the Azure SQL Database. Also, be sure to click Select related tables to add two related tables automatically.
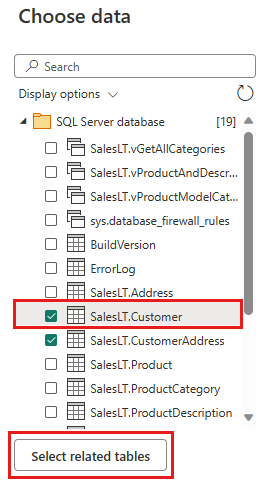
Figure 18: Choose data from the SQL Server database. Image source: Microsoft
Step 4. Now, you’re ready to start transforming your data. The next step is to ensure the Diagram view button in the View menu is selected.

Figure 19: The location of the “Diagram view”
Step 5. Next, right-click on your SalesLT Customer query (or click the three vertical dots on the right) and select Merge queries.
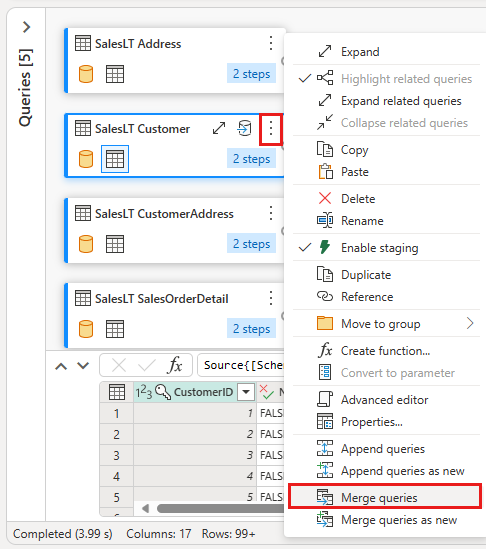
Figure 20: Merging queries. Image source: Microsoft
In the merge setup, select the SalesLTOrderHeader table to merge with, choose the CustomerID column from both tables as the join column, and set the join type to Left outer. Click OK to complete the merge.
And voila!
You’ve just completed a merge data transformation.
Building Data Pipelines in Microsoft Fabric
Data orchestration can be conducted with the Data Pipelines tool. Data Pipelines gives you powerful, built-in tools to create flexible workflows to fit the needs of your specific use case.
In a pipeline, you can group together activities that work together to complete a task, like calling a Dataflow to clean and prep your data. While both pipelines and dataflows have similar features, the best choice depends on what you need—if you require a more complex and robust solution, pipelines are the way to go; if your needs are simpler, dataflows may be all you need.
In this section, we’ll copy the data generated from the dataflow above into text format and store it in an Azure Blob Storage account.
Step 1. From your workspace, select New, and then Data pipeline. This will prompt you to give your new pipeline a name.
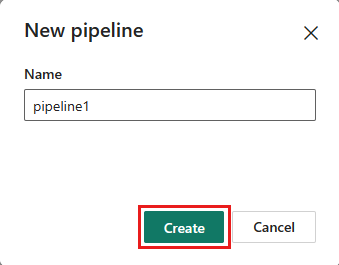
Figure 21: Naming the new data pipeline
Step 2. Now, we need to configure a dataflow. To add a new dataflow activity to your pipeline, head to the Activities tab and select Dataflow.

Figure 22: Adding a Dataflow activity to the data pipeline
Step 3. On the pipeline canvas, click on the dataflow you just added, then switch to the Settings tab. From there, pick the dataflow you created above from the drop-down list (note this assumes you’ve saved the dataflow).
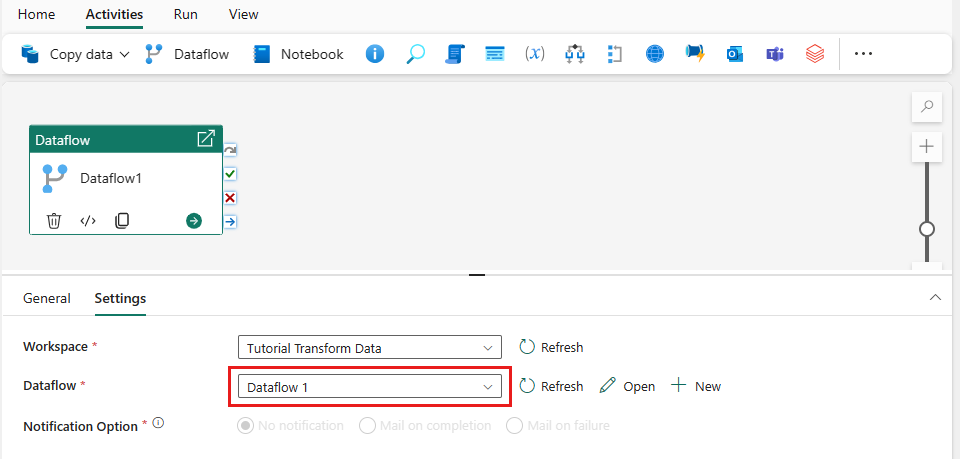
Figure 23: Adding the existing Dataflow
Step 4. After that, hit Save, and when you're ready, click Run to populate the merged query table you set up in the previous step.
The next step is to copy the dataflow into a text format that is stored in Azure Blob Storage. Here’s how we do it:
Step 5. Select Copy data on the canvas to open the Copy Assistant tool and get started, or use Copy Assistant from the Copy data dropdown under the Activities tab on the ribbon.
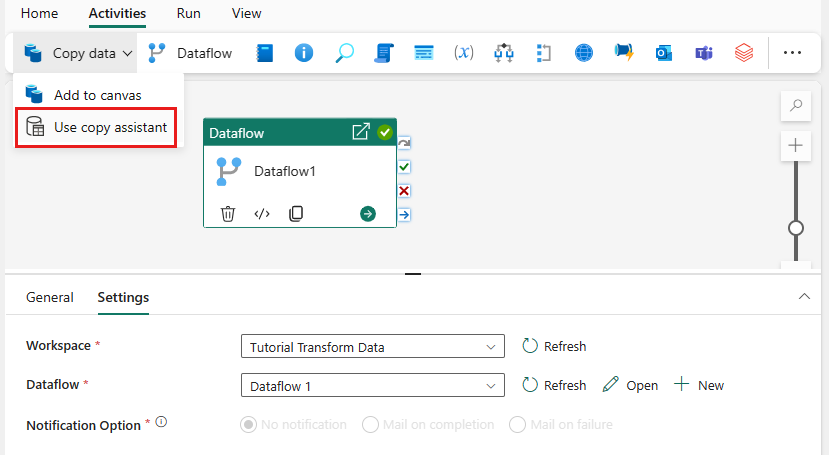
Figure 24: Using the copy assistant
Step 6. Next, select your data source by choosing a type. Note we’ve been using the Azure SQL Database. Thus, you must scroll down to the Azure tab and pick Azure SQL Database before clicking Next.
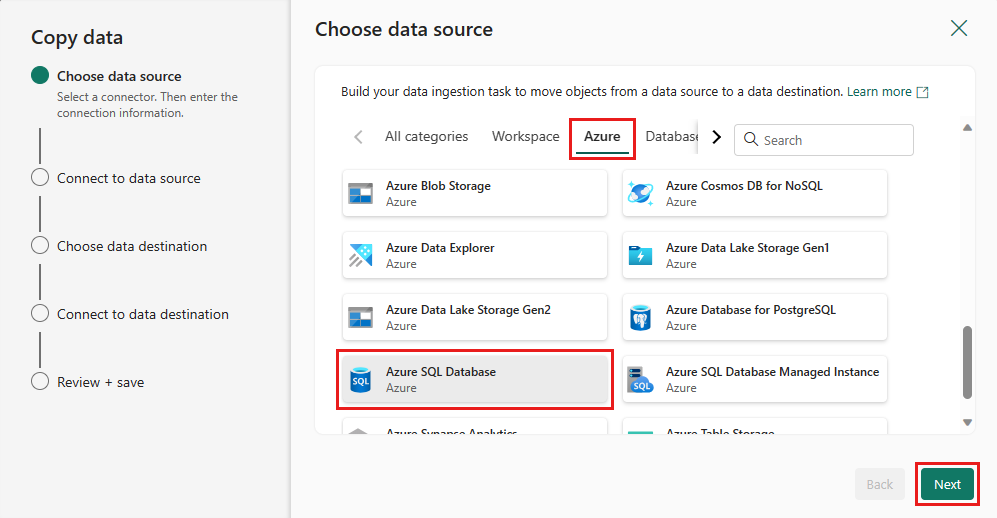
Figure 25: Selecting a data source
Step 7. To connect to your data source, choose Create new connection. Use “AdventureWorksLT” as the database where the merge query was generated, then click Next. Select the table you created above with dataflow, then click Next.
Step 8. Pick “Azure Blob Storage” for your destination, then click Next. Create a connection for your destination and fill in the required details. Choose a Folder path and provide a File name.
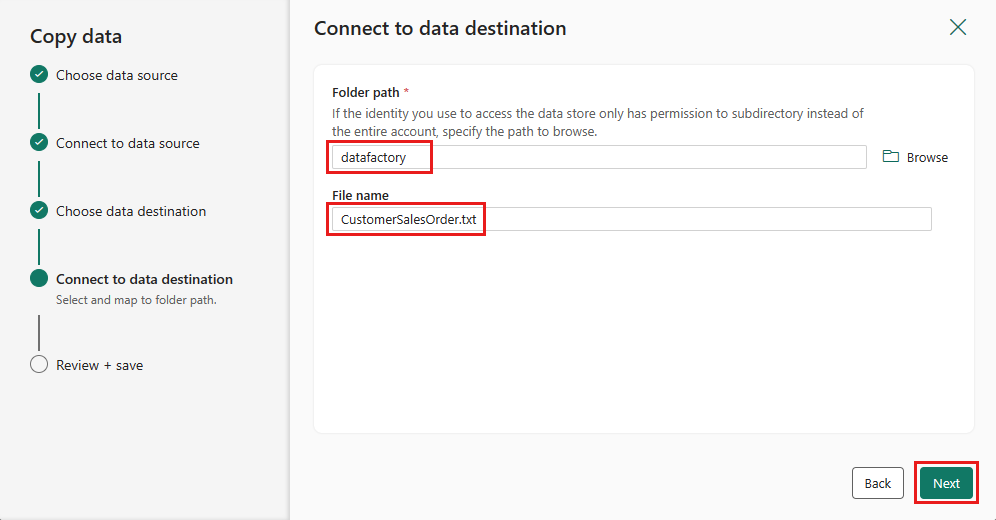
Figure 27: Connecting to a data destination
Step 9. Click Next again to confirm the default file format, column delimiter, row delimiter, and compression type. You can also include a header if desired. Finalize your settings, review them, and select Save + Run to complete the process.
Voila!
You’ve created a new pipeline to move data generated from the dataflow to an Azure Blob Storage account.
Collaboration and Sharing in Microsoft Fabric
Microsoft Fabric simplifies collaboration through workspaces, which serve as central hubs for teams.
Users can assign roles within the workspace for access and collaboration. Additionally, item-level sharing allows for more granular control, enabling you to manage permissions for specific items, even beyond assigned roles within the workspace.
This comes in handy when:
- You want to work with a colleague outside the workspace (a.k.a., someone who doesn’t have a role).
- You need to give team members who already have roles in the workspace extra permissions on specific items.
Let’s look at how we share an item.
Step 1. Click the Share button in the item list or while viewing an open item.

Figure 28: The share button
A Create and send link dialog will appear when you’ve done that.
Step 2. Choose the People in your organization can view option. This opens a Select permissions dialog, where you decide who gets access to the shared link.
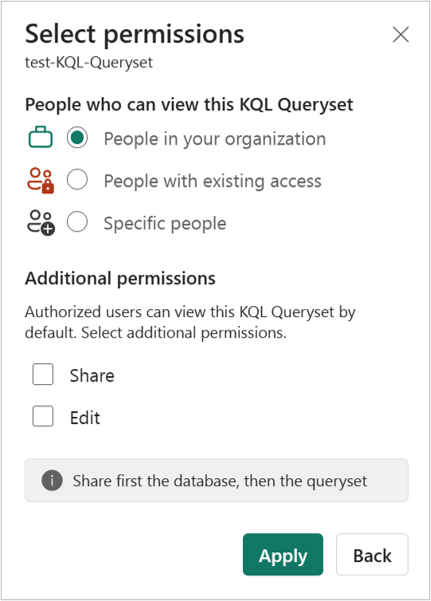
Figure 29: Select the permissions dialog box
This will give you a few options to choose from:
- People in your organization: This link allows people within your organization to access the item, meaning it won’t work for external or guest users. The best time to use this option is when you’re sharing with colleagues internally, you don’t mind the link being passed around within the company, or you want to ensure the link doesn’t work for external or guest users.
- People with existing access: This provides a direct link to the item without changing permissions. It’s handy if you simply want to send the item to someone with access.
- Specific people: This lets you share with specific individuals or groups. Note you’ll need to enter their names or email addresses. You can also share this link with guest users registered in your organization’s Microsoft Entra ID, though it won’t work for external users who aren’t listed as guests.
Step 3. Once you’ve decided who can view the workspace, you must choose the permissions you want to grant via the link. When you’re finished, select Apply.
This will open the Create and send link dialog box, which provides you the option to:
- Copy the sharing link
- Generate an email with the link
- Share the link via Teams
- Select specific people to share the link with
Step 4. Pick whichever option works best for you, and you’re all set.
Conclusion
In this tutorial, we've covered the essentials of getting started with Microsoft Fabric, including:
- Setting up your workspace
- Connecting data sources
- Transforming data with Dataflow
- Building pipelines
We also explored collaboration features that make sharing items within your organization easy, enhancing team productivity. With this foundation, you’re ready to leverage the full capabilities of Microsoft Fabric.
Ready to keep learning? Consider expanding your knowledge of related tools. The Introduction to Power BI course provides a strong foundation for visualizations and reporting. Additionally, the Understanding Microsoft Azure and Understanding Microsoft Azure Architecture and Services courses can help you dive deeper into Microsoft’s cloud ecosystem.
Enhance Your BI Skills as a Team
Empower your team of any size to master BI tools with DataCamp for Business. Enjoy in-depth courses, practical projects, and centralized performance tracking.

FAQs
What is the difference between Microsoft Fabric and Snowflake?
Microsoft Fabric integrates seamlessly within Azure's ecosystem, offering comprehensive data management and analytics capabilities with strong adaptability. In contrast, Snowflake is renowned for its exceptional scalability and ease of use, focusing on efficient data warehousing and processing across various cloud environments.
What’s the difference between Databricks and Fabric?
Databricks is a cloud platform designed for data processing, offering a collaborative workspace for data scientists, engineers, and analysts. In contrast, Fabric serves as a comprehensive analytics platform, unifying all the necessary tools and resources that organizations require for data and analytics.
What’s the difference between Azure and Fabric?
Azure is a broad cloud computing platform offering services for building, deploying, and managing applications. In contrast, Microsoft Fabric is a unified analytics platform focused on integrating data engineering, warehousing, and business intelligence.
What is the difference between Microsoft Fabric and Microsoft Power BI?
Microsoft Fabric is a comprehensive data platform designed to manage the entire data lifecycle, including ingestion, storage, transformation, and analysis. Power BI, on the other hand, is a tool within the Microsoft ecosystem that focuses specifically on data visualization and reporting. While Power BI is integrated into Fabric, Fabric offers a broader range of features for data management and analytics.
Can I use Microsoft Fabric with data sources outside of the Microsoft ecosystem?
Yes, Microsoft Fabric supports various data sources, including non-Microsoft cloud providers, on-premises databases, and external APIs. You can connect Fabric to sources like AWS or Google Cloud Storage using data connectors, making it a versatile tool for multi-cloud and hybrid data environments.
Is Microsoft Fabric suitable for real-time analytics?
Yes, Microsoft Fabric is built to support real-time analytics through services like Azure Synapse and Power BI. It allows you to process streaming data, create dashboards, and monitor key metrics in real time, making it a suitable choice for scenarios requiring timely data insights.
What are the main differences between using Dataflows and Pipelines in Microsoft Fabric?
Dataflows in Fabric are ideal for low-code data transformation tasks and simpler workflows, such as cleaning and preparing data for analysis. Pipelines, however, are more robust and flexible, allowing you to create complex data workflows with various activities. Pipelines are best used for orchestrating multiple steps in data processing or moving data between environments, while Dataflows are generally more suited to straightforward data preparation tasks.


