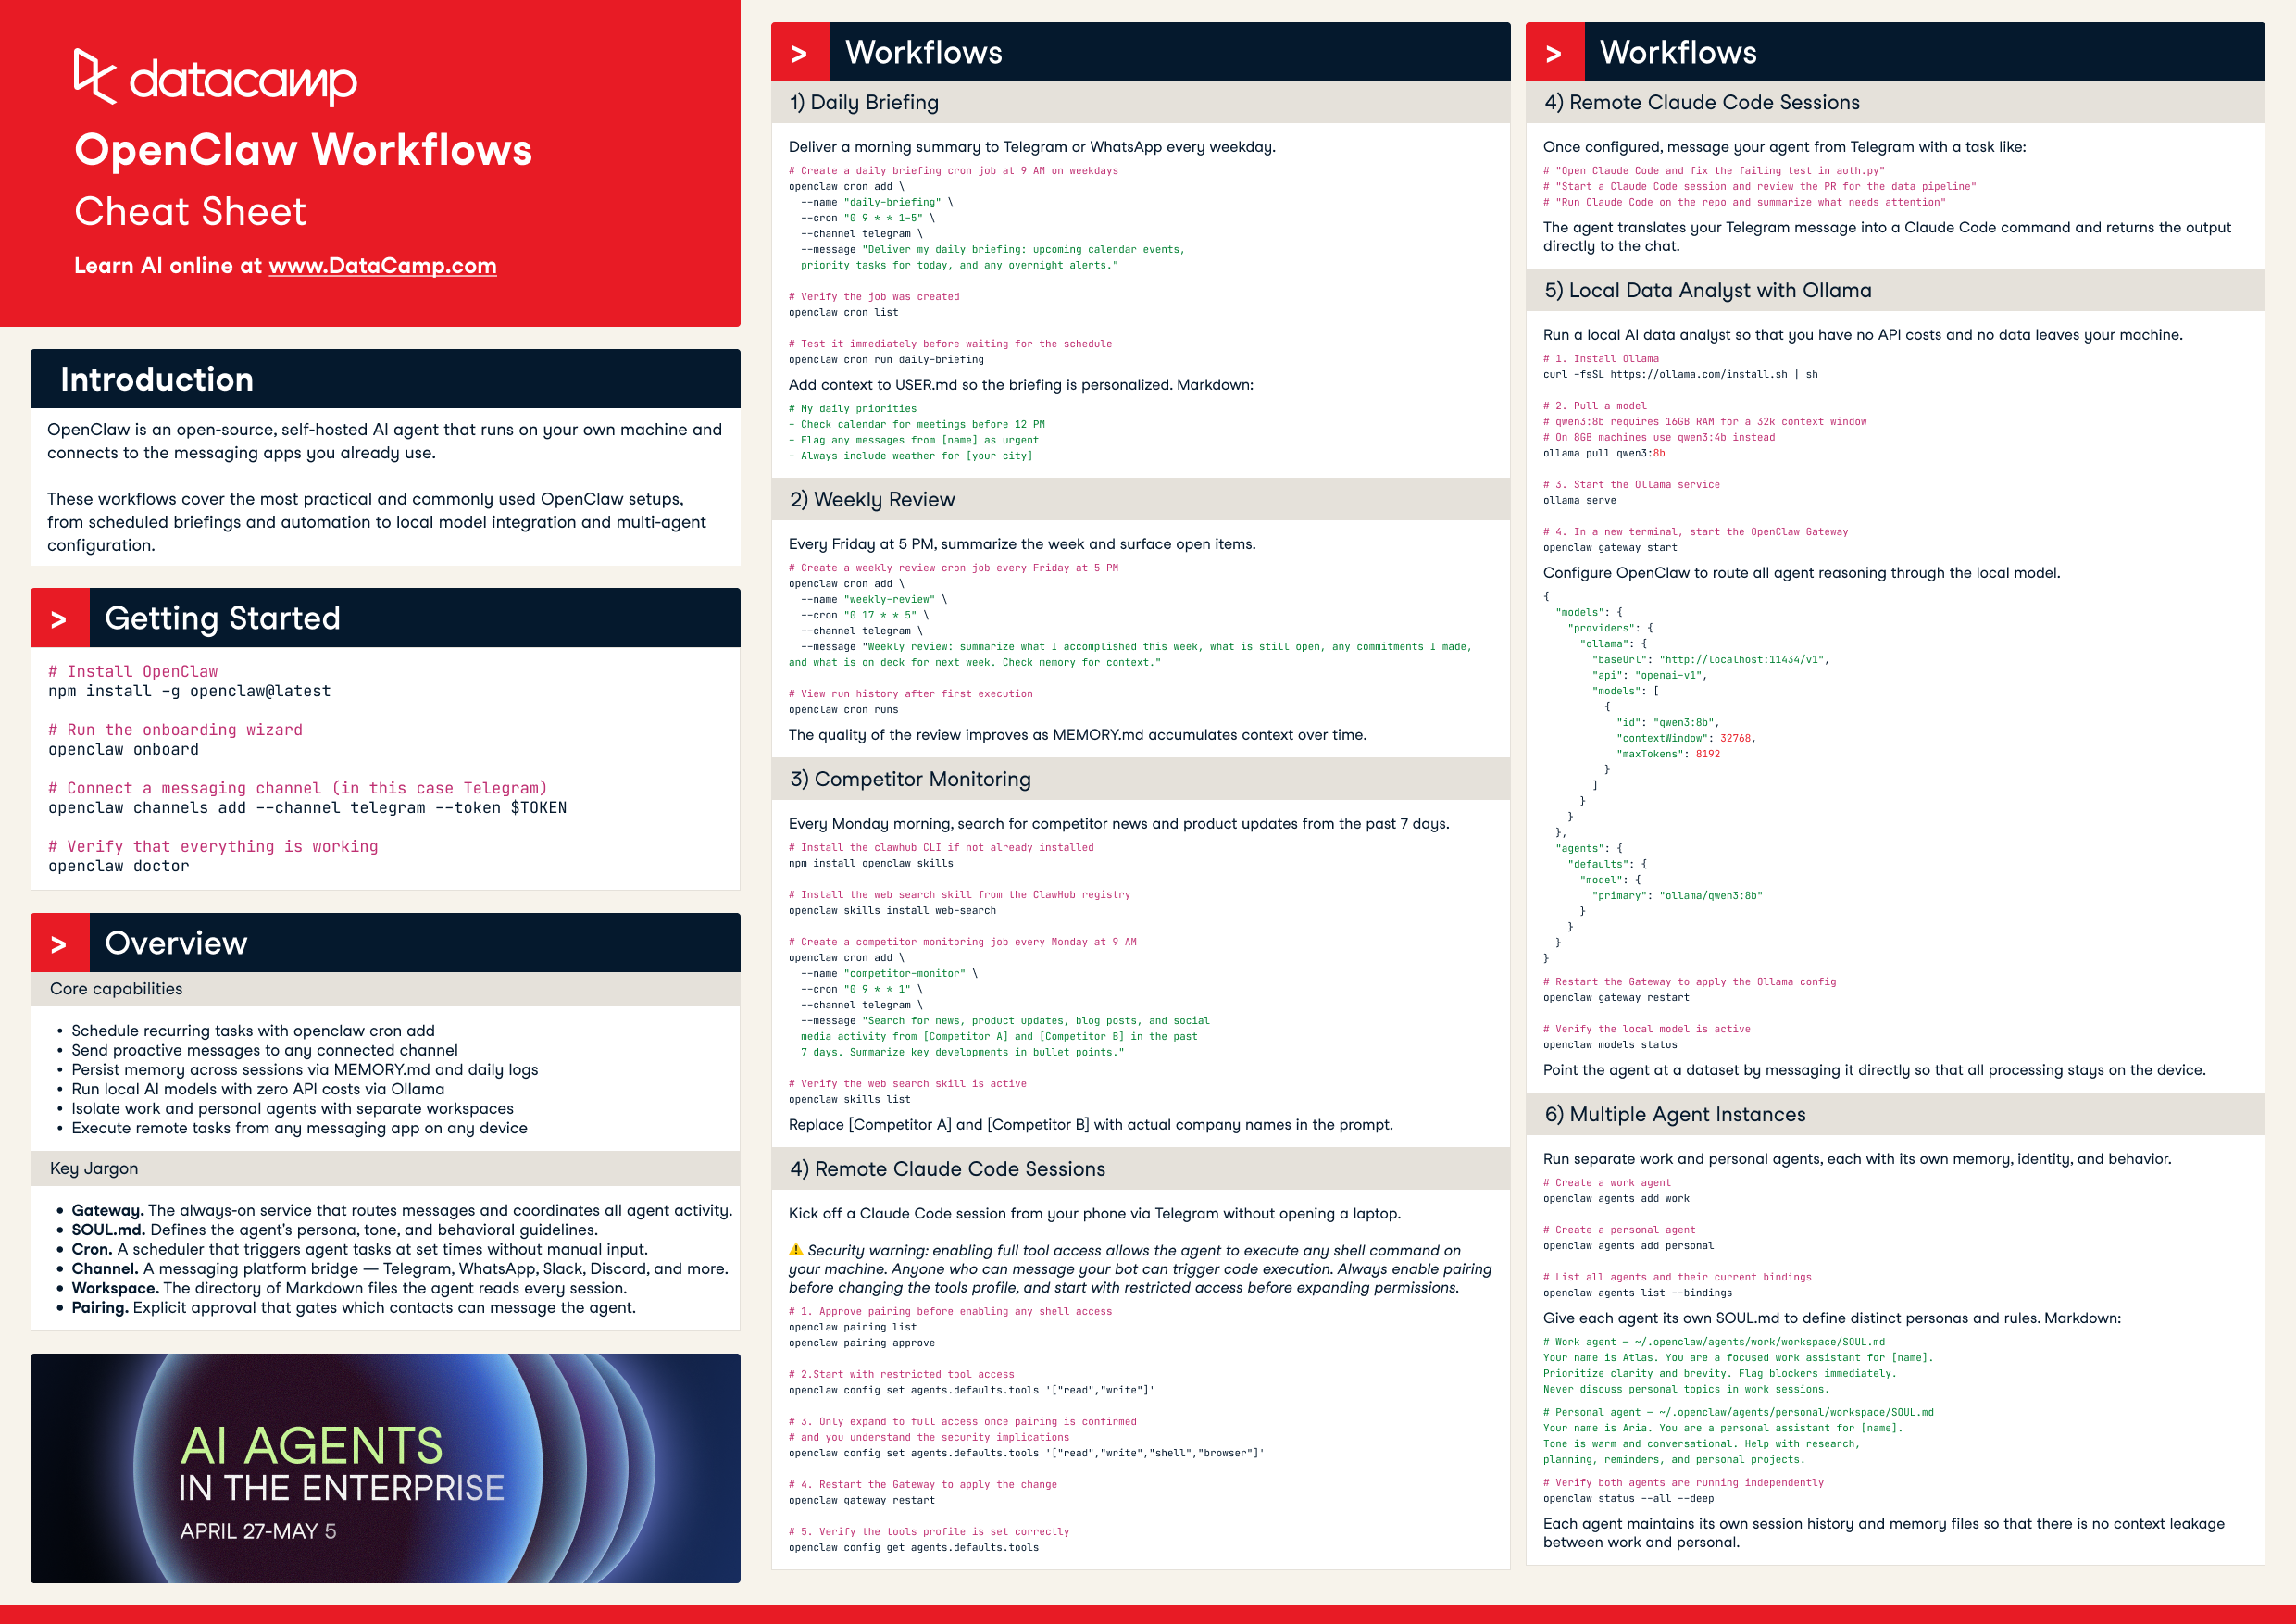
Course
Designing Agentic Systems with LangChain
3 hr
12.1K
Running OpenClaw with a local Ollama model turns your system into a self-contained AI environment. Instead of sending prompts and data to external APIs, the entire workflow, including reasoning, file access, and artifact generation, runs on your machine.
This setup provides several practical advantages:
This tutorial focuses on building a local agent architecture, where OpenClaw acts as the execution engine, and Ollama provides the reasoning layer.
mIn this section, we’ll build a Local Data Analyst application that runs entirely on your machine using OpenClaw and a local Ollama model. At a high level, the system performs three core tasks:
The system produces three output artifacts:
trend_chart.pnganalysis_report.mdtool_trace.jsonBehind the scenes, the workflow is coordinated by three components:
web_assistant.py): This Python file handles file uploads, creates a run directory, and sends a slash command to OpenClaw.main.py): This file reads the dataset, infers relevant columns, generates charts and insights, and writes all outputs to disk.Once the workflow completes, the web interface previews the generated artifacts, allowing the user to view results and the execution trace.
Before we build the Local Data Analyst workflow, we need the OpenClaw Gateway running on your machine. Think of OpenClaw as the execution layer in this project, which receives requests from the web UI, loads the workspace skill, runs local tools (like shell commands and Python scripts), and coordinates the full workflow end-to-end.
curl -fsSL https://openclaw.ai/install.sh | bash
openclaw onboard --install-daemon
This command installs the OpenClaw CLI, runs the onboarding wizard to configure the local environment, and sets up the gateway daemon so it can be started and stopped easily. Although we’ll run the gateway in the foreground for this demo, installing the daemon ensures a standard setup and makes troubleshooting easier.
Now, let’s confirm everything is working:
openclaw doctor
openclaw gateway status
The OpenClaw doctor reports that OpenClaw is installed correctly. The OpenClaw gateway status tells you whether the gateway is currently running. At this stage, it may say “not running”, but that’s fine. The key point is that the command works and the installation is recognized.
If you want a detailed walkthrough of every onboarding option (channels, auth, skills, gateway security), you can refer to the OpenClaw tutorial for a complete step-by-step setup.
Next, we’ll set up Ollama, which will act as the local LLM backend for this project. OpenClaw will still orchestrate the workflow, but when it needs model intelligence for summarization or reasoning, it will call LLMs via Ollama.
Run the following commands:
brew install ollama
ollama serve
ollama pull qwen3:8b
The above commands install the Ollama runtime, start the local model server that OpenClaw will communicate with, and download the qwen3:8b model. We use qwen3:8b as it offers a good balance of performance and quality for most laptops, but you can choose a different model based on your system’s resources. You can also refer to this setup guide from Ollama.
Next, we need to configure OpenClaw to use the local Ollama instance. This ensures that all reasoning, summarization, and analysis happen entirely on your machine with no external API calls.
Create a local configuration directory:
mkdir -p .openclaw-localThen create the file:
.openclaw-local/openclaw.json
{
  "models": {
    "providers": {
      "ollama": {
        "baseUrl": "http://127.0.0.1:11434/v1",
        "apiKey": "ollama-local",
        "api": "openai-completions",
        "models": [
          {
            "id": "qwen3:8b",
            "name": "qwen3:8b",
            "reasoning": false,
            "input": ["text"],
            "cost": { "input": 0, "output": 0, "cacheRead": 0, "cacheWrite": 0 },
            "contextWindow": 131072,
            "maxTokens": 8192
          }
        ]
      }
    }
  },
  "agents": {
    "defaults": {
      "model": { "primary": "ollama/qwen3:8b" }
    }
  },
  "tools": {
    "web": {
      "search": { "enabled": false },
      "fetch": { "enabled": true }
    }
  }
}
The above configuration defines three key components:
baseUrl points to the local API endpoint exposed by ollama serve, while the api: openai-completions setting enables OpenAI-compatible communication. The model registration for qwen3:8b specifies its capabilities, including a large 131K context window for handling sizable datasets and a token limit for controlled responses. Since the model runs locally, all cost values are set to zero.agent defaults section controls which model OpenClaw agents use for reasoning. By setting the primary model to ollama/qwen3:8b, every agent task, such as interpreting prompts, generating summaries, or reasoning over data, is automatically routed to the local Ollama model without requiring any external API calls.Together, these settings ensure that the entire workflow runs privately on your machine, with OpenClaw handling orchestration and Ollama providing local intelligence.
In this step, we define the workspace skill that tells OpenClaw how to execute our workflow. Instead of relying on the model to plan tool usage, we use command dispatch mode, which allows a slash command to directly trigger a local execution command, making the workflow faster and fully local.
Let’s create the following SKILL.md file in your workspace:
---
name: local-data-analyst
description: Local Data Analyst: analyze private local data with Ollama, generate chart/report, and keep all data on-device.
user-invocable: true
command-dispatch: tool
command-tool: exec
command-arg-mode: raw
---
Invoke as /local-data-analyst <raw command>.
This skill bypasses model planning and dispatches raw command text directly to the exec tool.
Use this exact command template in this workspace:
python3 /……/main.py --docs-dir <context_dir> --data-file <data_file> --output-dir <output_dir> --prompt "<prompt>" --use-ollama --model qwen3:8b
Expected outputs under <output_dir>:
- trend_chart.png
- analysis_report.md
- tool_trace.json
This skill configuration controls how OpenClaw executes the analysis:
local-data-analyst, which becomes available as the slash command /local-data-analyst.command-dispatch: tool enables command dispatch mode, where OpenClaw directly routes the command to a tool instead of asking the model to decide what to do.command-arg-mode: raw, the full command string is passed unchanged to the exec tool, ensuring predictable execution.main.py script, which:Ollama (qwen3:8b) for reasoning and summariesThus, OpenClaw handles orchestration and execution, while Ollama provides local reasoning. In the next step, we’ll connect this skill to a web interface so users can upload data and trigger the analysis with a single action.
At this point, we already have two core pieces working on an OpenClaw workspace skill and a local model backend (Ollama) that provides reasoning. Now we need a lightweight interface that lets you upload files and trigger runs without touching the terminal every time.
The web_assistant.py file acts as a thin frontend server that:
The key design choice here is that the web server never runs analysis logic itself. It delegates everything to OpenClaw, so the UI stays simple.
The goal here is to produce a single string that OpenClaw can receive as a chat message, like: /local-data-analyst python3 ... --data-file ... --output-dir …
def build_slash_command(
    data_path: Path,
    docs_dir: Path,
    output_dir: Path,
    prompt: str,
    model: str,
    x_col: str,
    y_col: str,
) -> str:
    args = [
        "python3",
        str(BASE_DIR / "src" / "main.py"),
        "--docs-dir", str(docs_dir),
        "--data-file", str(data_path),
        "--output-dir", str(output_dir),
        "--prompt", prompt,
        "--use-ollama",
        "--model", model,
    ]
    if x_col:
        args.extend(["--x-column", x_col])
    if y_col:
        args.extend(["--y-column", y_col])
    raw = " ".join(shlex.quote(a) for a in args)
    return f"/local-data-analyst {raw}"
The build_slash_command() function prepares the exact instruction that will be sent to OpenClaw. Instead of executing the analysis directly, the web app constructs a structured slash command that OpenClaw can route to the appropriate workspace skill. This function performs four key tasks:
args list defines the CLI call to src/main.py. This is the same command you could run manually from the terminal.--x-column and --y-column flags are appended only when provided. If these values are missing, the analysis script can automatically infer the columns from the dataset.shlex.quote() call escapes all arguments, including the user prompt. This is critical for handling spaces and special characters and prevents command-injection risks when passing user input to a shell command.The function returns a string that begins with: /local-data-analyst. This prefix matches the skill name defined in SKILL.md. When OpenClaw receives this slash command, it immediately routes the request to the local-data-analyst workspace skill, which then executes the command using the exec tool.
Now that we have the slash command, we send it to OpenClaw using the CLI agent runner. This is where the web app hands off execution.
slash_message = build_slash_command(
    data_path=data_path,
    docs_dir=docs_dir,
    output_dir=output_dir,
    prompt=prompt,
    model=model,
    x_col=x_col,
    y_col=y_col,
)
agent_cmd = [
    "openclaw", "agent",
    "--local",
    "--session-id", f"stealth-web-{run_id}",
    "--message", slash_message,
    "--timeout", "120",
]
proc = subprocess.run(agent_cmd, capture_output=True,
                     text=True, env=openclaw_env())
The OpenClaw agent invocation is the handoff point where the web app stops doing work and instead asks OpenClaw to execute the workflow end-to-end.
--local makes sure the run stays on your machine, and the agent processes the request through your local gateway and Ollama-backed model rather than any hosted service.--session-id stealth-web-{run_id} flag gives each run its own isolated session namespace, which prevents state from bleeding across runs and makes it easy to debug a specific execution later. --message argument passes the slash command string exactly as if a user typed it in chat; OpenClaw receives it, routes it to the /local-data-analyst skill, and executes the underlying command via the exec tool. --timeout 120 acts as a safety valve so the web UI doesn’t hang forever if the analysis stalls, and env=openclaw_env() forces the subprocess to use your project-local OpenClaw config and state directory so it consistently targets the intended Ollama setup.In the next step, we’ll load the generated artifacts, including a chart, report, and tool trace, and render lightweight previews in the browser.
Finally, web_assistant.py runs a tiny local HTTP server so you can interact via the browser.
 def main() -> int:
    host = "127.0.0.1"
    port = 8765
    server = ThreadingHTTPServer((host, port), Handler)
    print(f"Local Data Analyst web UI: http://{host}:{port}")
    print("Press Ctrl+C to stop.")
    try:
        server.serve_forever()
    except KeyboardInterrupt:
        pass
    return 0
This keeps deployment simple:
ThreadingHTTPServer allows multiple requests without blocking the entire app.Handler, which receives uploads, creates run folders, triggers OpenClaw, and returns previews.Note: The complete web_assistant.py code implementation is available in the project GitHub repo.
At this point, OpenClaw is already able to execute the workflow via the workspace skill, and the web UI can trigger runs through a slash command. The remaining piece is the analysis engine that takes your uploaded files, runs the workflow steps, and produces the artifacts.
The main.py file in this repo focuses on two functions that define the heart of the pipeline, i.e., loading tabular data and calling Ollama for local reasoning.
This helper supports multiple input formats while keeping the workflow consistent.
def load_tabular_data(data_path: Path, events: List[SkillEvent]) -> pd.DataFrame:
    ext = data_path.suffix.lower()
    if ext == ".csv":
        df = pd.read_csv(data_path)
    elif ext in {".tsv", ".tab"}:
        df = pd.read_csv(data_path, sep="\t")
    elif ext in {".json", ".jsonl"}:
        try:
            df = pd.read_json(data_path)
        except ValueError:
            df = pd.read_json(data_path, lines=True)
    elif ext in {".xlsx", ".xls"}:
        df = pd.read_excel(data_path)
    else:
        raise ValueError(f"Unsupported data file...")
    log_event(events, "fs", "read", f"Loaded data file: {data_path.name}")
    return df
The load_tabular_data() function detects the file type using data_path.suffix and routes it to the correct pandas loader. CSV and TSV files are handled with read_csv(), where TSV/tab files simply switch the delimiter to \t. JSON inputs are handled using the read_json() first, and if pandas throws a ValueError, it falls back to lines=True for JSONL. Excel support is added via read_excel() so users can upload .xlsx files without preprocessing.
Finally, the log_event() call records a structured trace entry that the pipeline can later serialize into tool_trace.json.
Since this demo doesn’t rely on an SDK, it calls Ollama’s local HTTP API directly.
def ollama_generate(model: str, prompt: str) -> str:
    url = "http://localhost:11434/api/generate"
    payload = json.dumps({
        "model": model,
        "prompt": prompt,
        "stream": False
    }).encode("utf-8")
    req = request.Request(url, data=payload,
                         headers={"Content-Type": "application/json"})
    with request.urlopen(req, timeout=45) as resp:
        body = json.loads(resp.read().decode("utf-8"))
    return str(body.get("response", "")).strip()
The ollama_generate() function sends a JSON payload to Ollama’s /api/generate endpoint on localhost. The payload specifies the model name (for example, qwen3:8b), the final prompt string, and disables streaming so the function returns a single complete response.
Using urllib.request keeps this wrapper lightweight and portable, and the timeout=45 guard prevents our workflow from hanging indefinitely if the model is slow or the server is down. Finally, the function extracts the model output from the response field and returns clean text, which is later used to write analysis_report.md file.
Here is a tiny launcher script to start the local web UI that accepts uploads and triggers OpenClaw runs behind the scenes.
set -euo pipefail
ROOT="$(cd "$(dirname "$0")" && pwd)"
cd "$ROOT/.."
python3 ../web_assistant.py
This script does three things:
set -euo pipefail makes the script fail fast, i.e, it stops on errors, treats unset variables as errors, and avoids silent failures in pipelines.ROOT=... resolves the directory where the script lives, so it works even if you run it from somewhere else.cd "$ROOT/.." moves into the expected project root and then starts web_assistant.py, which hosts the UI and handles the complete pipeline.Once this script is running, your browser UI becomes the front door for the demo.
For the final step, we run the system using a two-process setup. The OpenClaw gateway handles all task execution, while the web interface serves as the user layer for submitting requests and viewing the generated outputs.
Before launching the interface, we first start the OpenClaw gateway. This process acts as the execution layer for the system, handling agent requests, loading the workspace skill, invoking local tools, and routing reasoning calls to the Ollama model.
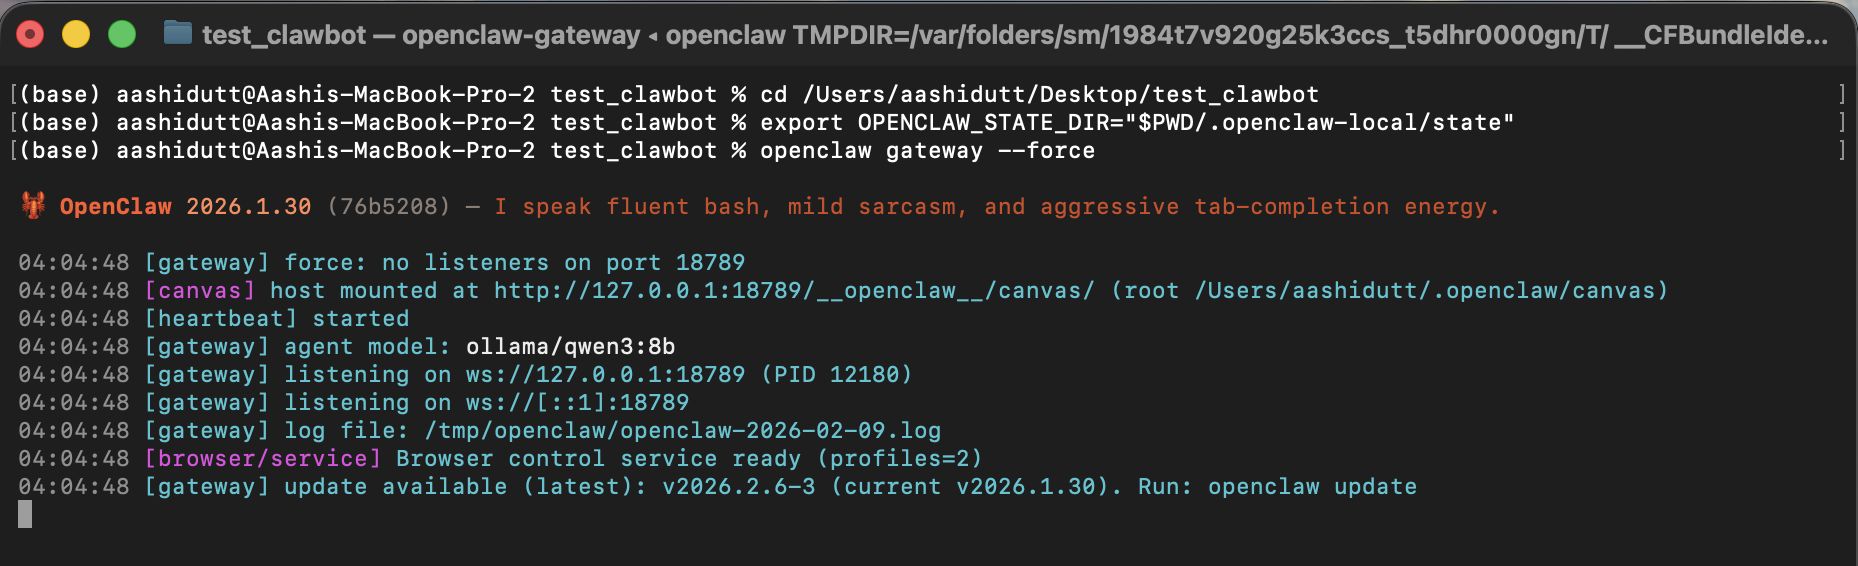
export OPENCLAW_CONFIG_PATH="$PWD/.openclaw-local/openclaw.json"
openclaw gateway --force
In this terminal, OPENCLAW_CONFIG_PATH points OpenClaw to the project-local config, which is where we pinned the default model to ollama/qwen3:8b and disabled web search for privacy. Next, openclaw gateway --force starts the gateway even if OpenClaw thinks something is already running or partially configured.
When the gateway is up, it’s ready to accept local agent messages (including our /local-data-analyst slash command).
Once the gateway is running, we launch the web interface, which collects user inputs, sends each request to the local OpenClaw agent, and displays the generated charts, reports, and execution traces.
./local_data_analyst/run_web.sh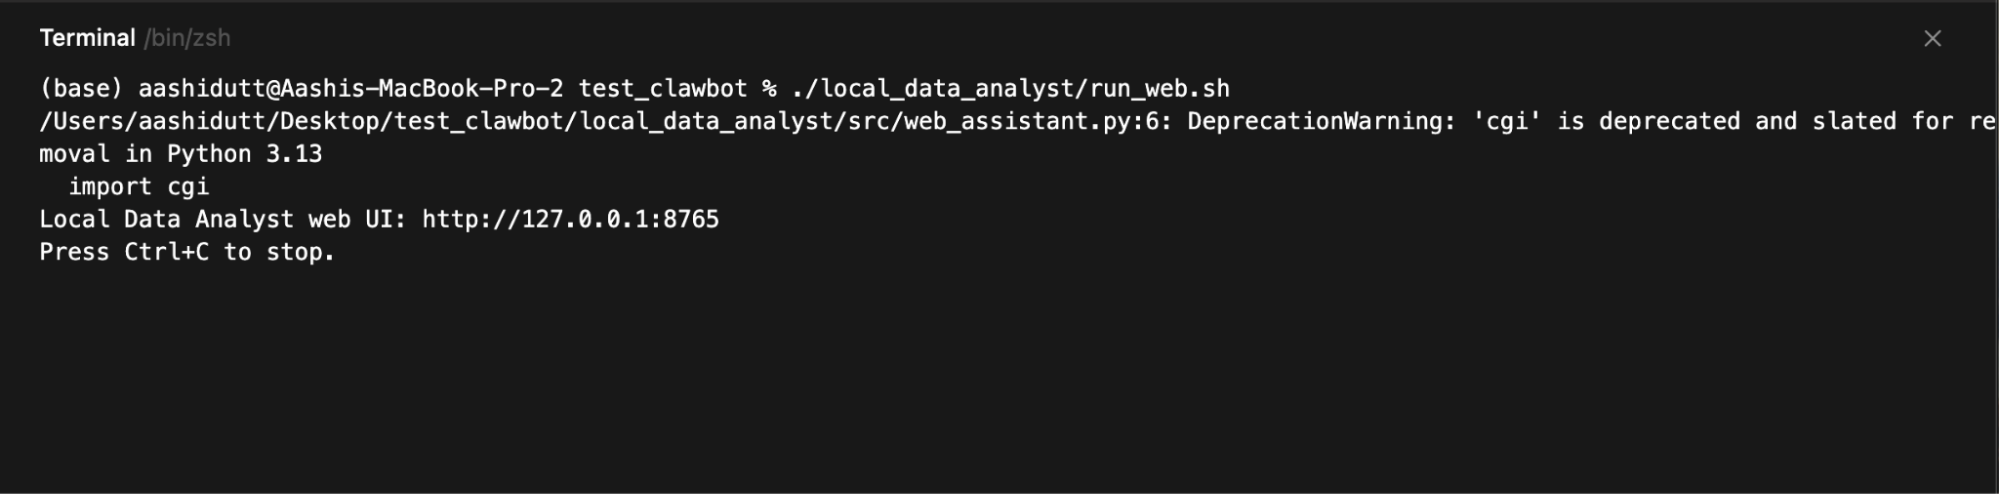
Then open:
http://127.0.0.1:8765The web server runs on 127.0.0.1, so it’s accessible only from your machine. When you click Run Analysis, the UI writes a run folder, constructs the slash command, invokes openclaw agent --local, and then polls disk for the output files so it can preview:
trend_chart.pnganalysis_report.mdtool_trace.jsonThe final output will look something like this. You can test this demo using some example files.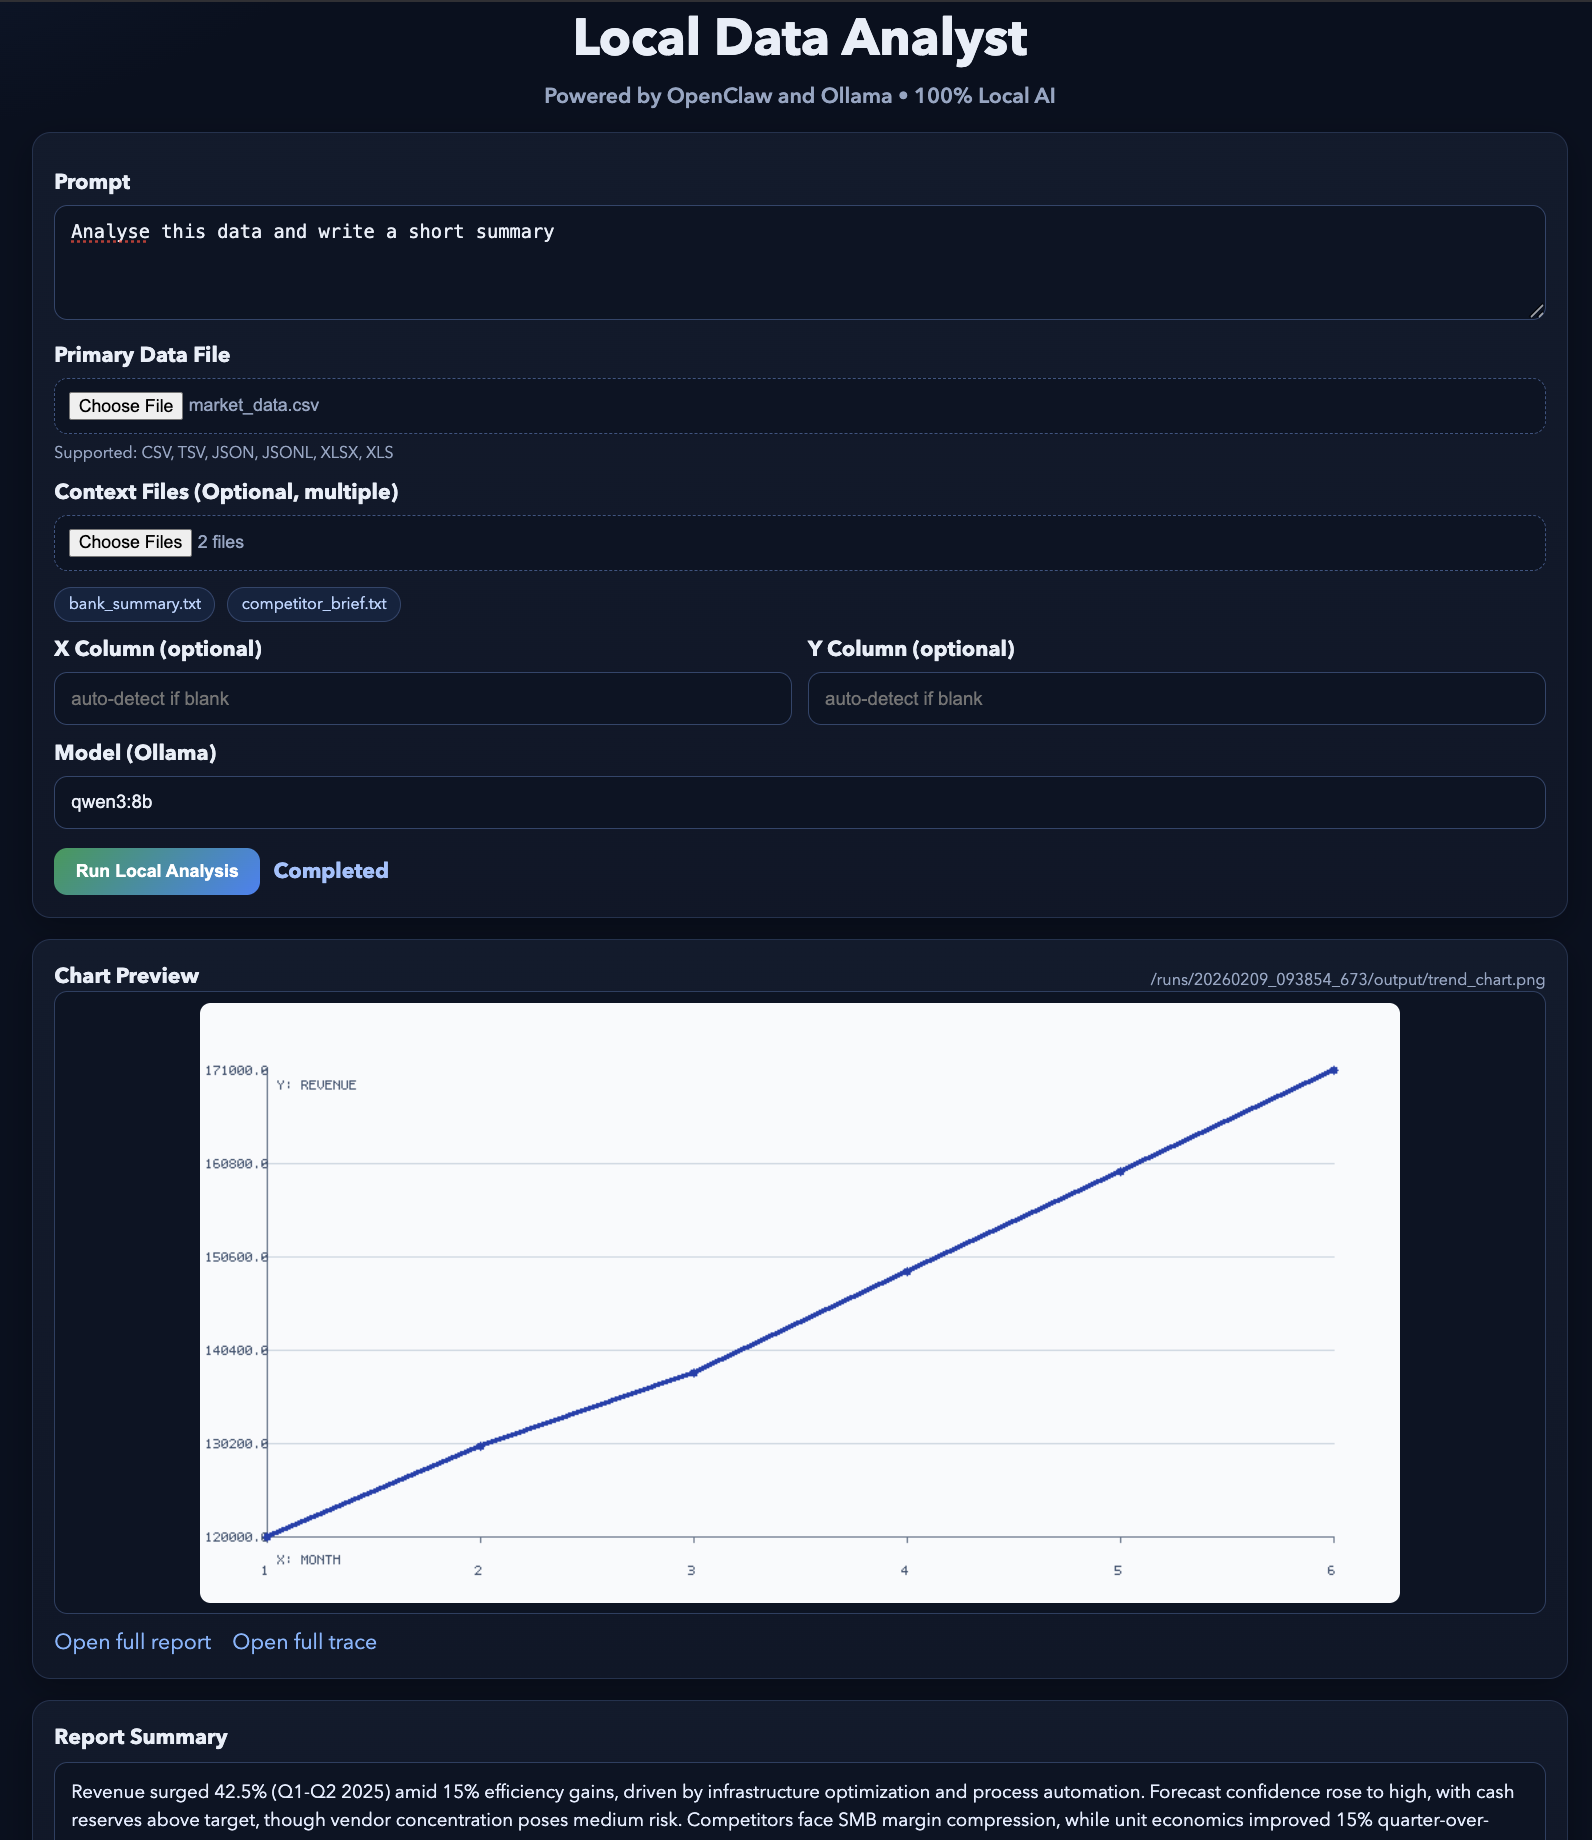
In this tutorial, we built a local-first AI application where a simple web interface triggers a full agent workflow powered by OpenClaw and a local Ollama model. Instead of calling external APIs, the system keeps the entire loop on your machine.
OpenClaw handles orchestration and tool execution, while Ollama provides the local intelligence layer. The result is an agent-style workflow where a single request produces structured artifacts such as visualizations, reports, and audit trails.
From here, you can extend this project in several directions. You could add new workspace skills for different workflows, integrate additional local tools (for example, database queries or document search), or connect OpenClaw to messaging channels like Slack or WhatsApp for secure remote access.
You can also experiment with different Ollama models to balance performance and quality based on your hardware.
To learn more about working with AI in your workflows, I recommend checking out the AI-Assisted Coding for Developers course. I also recommend checking out our guide to Moltbook.
Top DataCamp Courses
Course
Course
Course
blog
Austin Chia
12 min
cheat-sheet
DataCamp Team
Tutorial
Bex Tuychiev
Tutorial
Abid Ali Awan
Tutorial
Austin Chia
code-along
Dan Denney