Course
Introduction to Docker
4 hr
48.3K
Imagine spinning up a multi-node Docker Swarm cluster in seconds without installing a single byte on your laptop. For years, I watched developers struggle with Docker installations, wrestling with system dependencies, troubleshooting permission errors, and worrying whether their aging hardware could handle the resource demands.
Then I discovered Play with Docker, and it completely transformed how I teach and learn containerization.
Play with Docker is a free, browser-based sandbox that gives you instant access to Alpine Linux virtual machines where you can build and run Docker containers. Whether you're a junior data practitioner just starting your containerization journey or a seasoned professional wanting to quickly test a new Docker feature, PWD provides an accessible, risk-free environment.
In this comprehensive tutorial, I'll walk you through everything from your first container to multi-container orchestration with Docker Compose. By the end, you'll have a containerized web server running without ever leaving your browser.
If you are new to Docker and its concepts, I recommend taking our Introduction to Docker course or studying Containerization and Virtualization Concepts.
Play with Docker (PWD) is a free, temporary Docker playground that runs directly in your web browser. Created by Docker Captains Marcos Liljedhal and Jonathan Leibiusky, PWD emerged from a hackathon project and quickly became an essential tool for the Docker community.
At its core, PWD uses Docker-in-Docker (dind) technology, where Docker containers run inside other Docker containers. This nested architecture might sound complex, but it's what allows you to experiment with full Docker functionality, including advanced features like multi-node Swarm clusters, without affecting your local machine.
The platform handles all the complexity behind the scenes, presenting you with a clean terminal interface. It provides Alpine Linux instances, lightweight Linux distributions perfect for container workloads. Alpine is deliberately minimal, with a base image size of only about 5 MB compared to Ubuntu's 100+ MB.
This efficiency means faster downloads and quicker startup times. Each instance comes with a complete terminal experience, giving you the same command-line power you'd have on a local installation, including a shell, Docker CLI, and Docker Compose.
PWD eliminates installation barriers for beginners while providing advanced users a space to test orchestration features like Docker Swarm. You can create multi-node clusters, experiment with networking configurations, and test container scheduling, all without the overhead of managing virtual machines or cloud instances.
With a clear understanding of what PWD offers, you're probably wondering when to use it versus installing Docker Desktop locally. Understanding when to use Play with Docker versus Docker Desktop will save you time and frustration.
Play with Docker offers instant browser access with no installation, zero local resource consumption, and full Docker Swarm support, all completely free. However, sessions last only two hours before everything is deleted, performance is limited, and there's no persistent storage after session expiration.
Note: The PWD documentation shows a session duration of four hours, but when I tested it, it was actually only two hours. It seems like the documentation is not up to date.
Docker Desktop runs locally on your machine, providing persistent storage, better performance, and seamless integration with development tools like Visual Studio Code. You can work on long-term projects without session timeouts.
|
Feature |
Play with Docker |
Docker Desktop |
|
Setup |
Zero installation, browser-based |
Requires installation |
|
Session duration |
2-hour limit |
No time limits |
|
Performance |
Shared resources, limited |
Full system resources |
|
Storage |
Temporary, deleted after the session |
Persistent on local disk |
|
Cost |
Free |
Free for personal use; paid for enterprise |
|
System impact |
None (cloud-based) |
Uses local CPU and memory |
|
Swarm support |
Native support |
Requires additional setup |
|
IDE integration |
None |
Excellent (VS Code, etc.) |
Play with Docker shines in the following scenarios:
Docker Desktop becomes essential for
Now that you know when PWD is the right tool for your needs, let's get you set up and running your first session.
Before starting, you'll need a Docker Hub account. Visit the Docker Hub to create one. If you don't have it already, just provide an email and password.
Play with Docker Login
Navigate to the Play with Docker website and log in using your Docker Hub credentials. After authenticating, click the green "Start" button to generate your session. Within seconds, PWD provisions a fresh Alpine Linux environment in your browser with a countdown timer showing your remaining two-hour session time.
The PWD interface is simple but powerful. Click "Add New Instance" to create new Alpine Linux containers. You can run up to 5 instances simultaneously for testing multi-node clusters. The main terminal window provides a full bash shell with Docker pre-installed.
Keep an eye on the countdown timer. When it hits zero, everything is deleted with no way to extend the session.
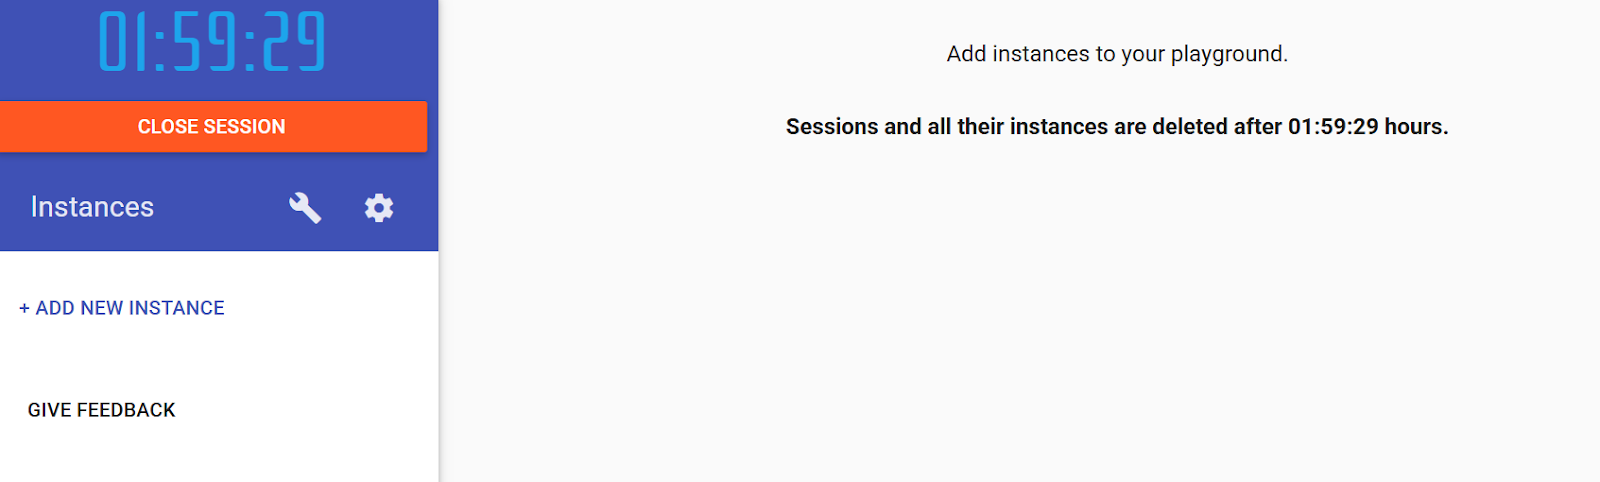
Dashboard in Play with Docker
Hint: Standard Ctrl+V paste operations often don't work in PWD. Use Ctrl+Insert to copy and Shift+Insert to paste. Test your paste shortcut immediately to avoid frustration.
With your PWD environment ready and the interface familiar, it's time to run your first container and learn the essential Docker commands.
Let's deploy an Nginx web server to understand images and containers. Execute this command:
docker run -d -p 80:80 nginxHere's what happens: docker run creates and starts a new container. The -d flag runs it in detached mode (background). The -p 80:80 maps port 80 on the host to port 80 in the container. nginx is the Docker image name.
Think of a Docker image as a recipe. The Nginx recipe in this case. The running container is the cake you bake from that recipe. You can create multiple cakes (containers) from one recipe (image).
To manage your container:
docker ps              # Show running containers
docker stop <id>       # Stop a container
docker rm <id>         # Remove a stopped container
You only need the first few characters of the container ID. Docker figures out which one you mean.
Port forwarding in PWD works differently from local port forwarding. When you expose a port, PWD automatically creates a dynamic URL for access.
After running the Nginx container, look at the top of your PWD screen under IP. Click "Open Port” and add “80”. It will open a new browser tab with a unique URL like http://ip<numbers>-<session-id>.direct.labs.play-with-docker.com.
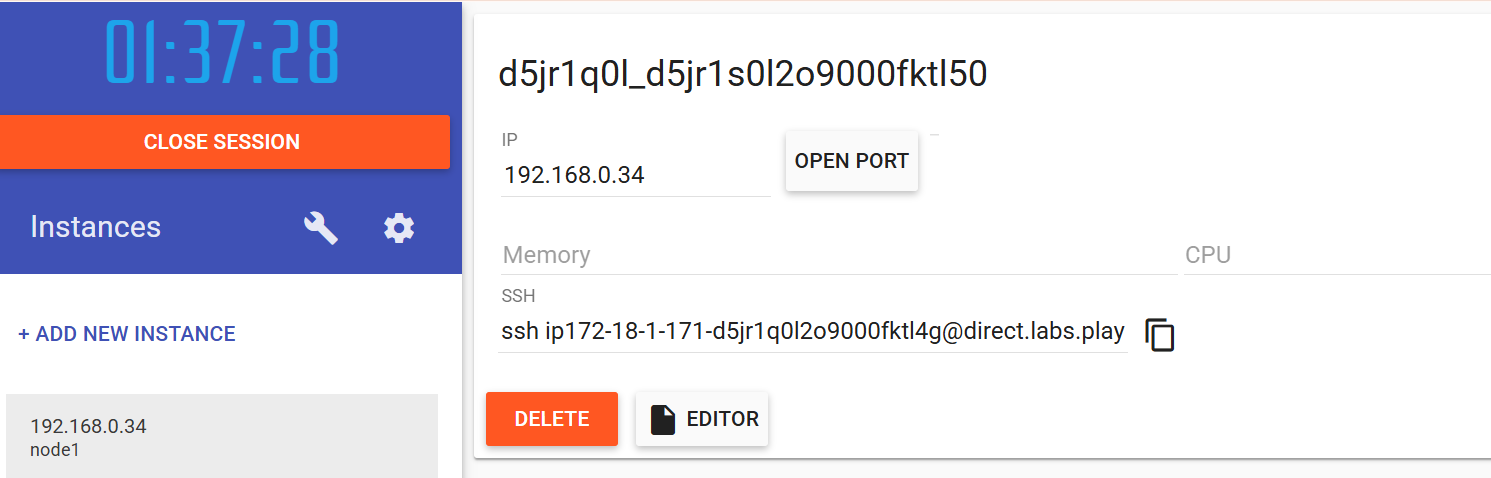
Port Forwarding in Play with Docker
You're not accessing localhost here. PWD creates special URLs that route internet traffic to your specific container. This means you can share these URLs with colleagues to show them your work in real-time.
If things don't work as expected, you'll need tools to investigate what's happening inside your containers.
When troubleshooting, these commands help you peek inside containers:
docker logs <container-id>         # View container output
docker ps                          # Show running container status
docker inspect <container-id>      # Get detailed JSON configuration
Run docker logs after clicking the port 80 link, and you'll see your browser's request in the Nginx access logs. This real-time feedback helps you understand request flow through your application.

Docker Logs in Play with Docker
With these core operations mastered, you're ready to move beyond running pre-built images and start creating your own custom containers.
Now that we've covered basic container operations, let's dive into creating your own custom images. This is where Docker's true power emerges. The ability to package your applications with all their dependencies into portable, reproducible images.
Dockerfiles automate image building through text-based instructions. Instead of manually configuring a container each time, you write a Dockerfile once, and Docker handles the rest.
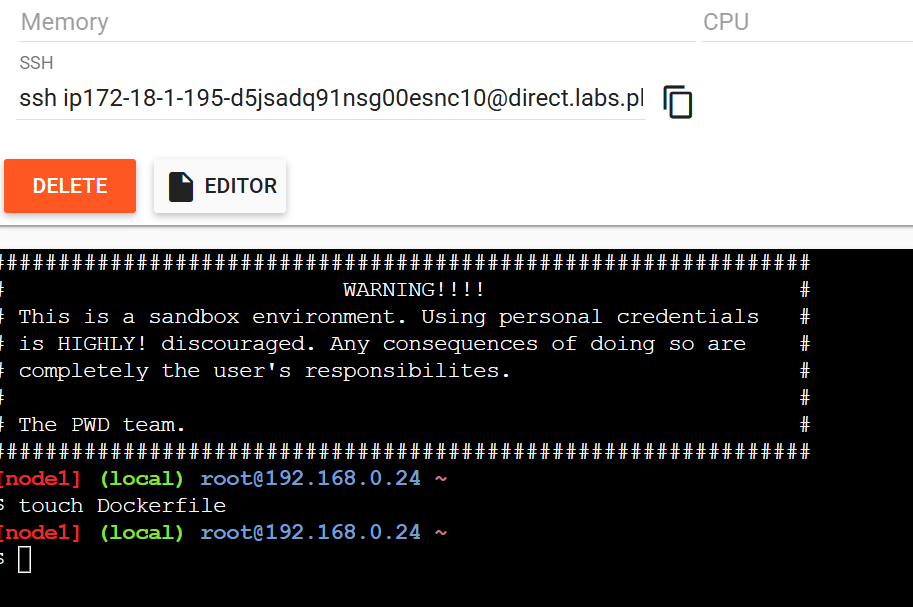
Create a Dockerfile in Play with Docker
First, create the Dockerfile in the terminal:
touch DockerfileThen click the "Editor" button in PWD and add a simple image:
FROM alpine
CMD ["echo", "Hello DataCamp"]
Finally, build and run the Dockerfile. The -t flag names (or "tags") your image, making it easy to reference. The . tells Docker to use the current directory as the build context, the location where Docker finds the Dockerfile and any files it needs. You'll see Docker execute each instruction and output the layer IDs.
docker build -t my-first-image .
docker run my-first-image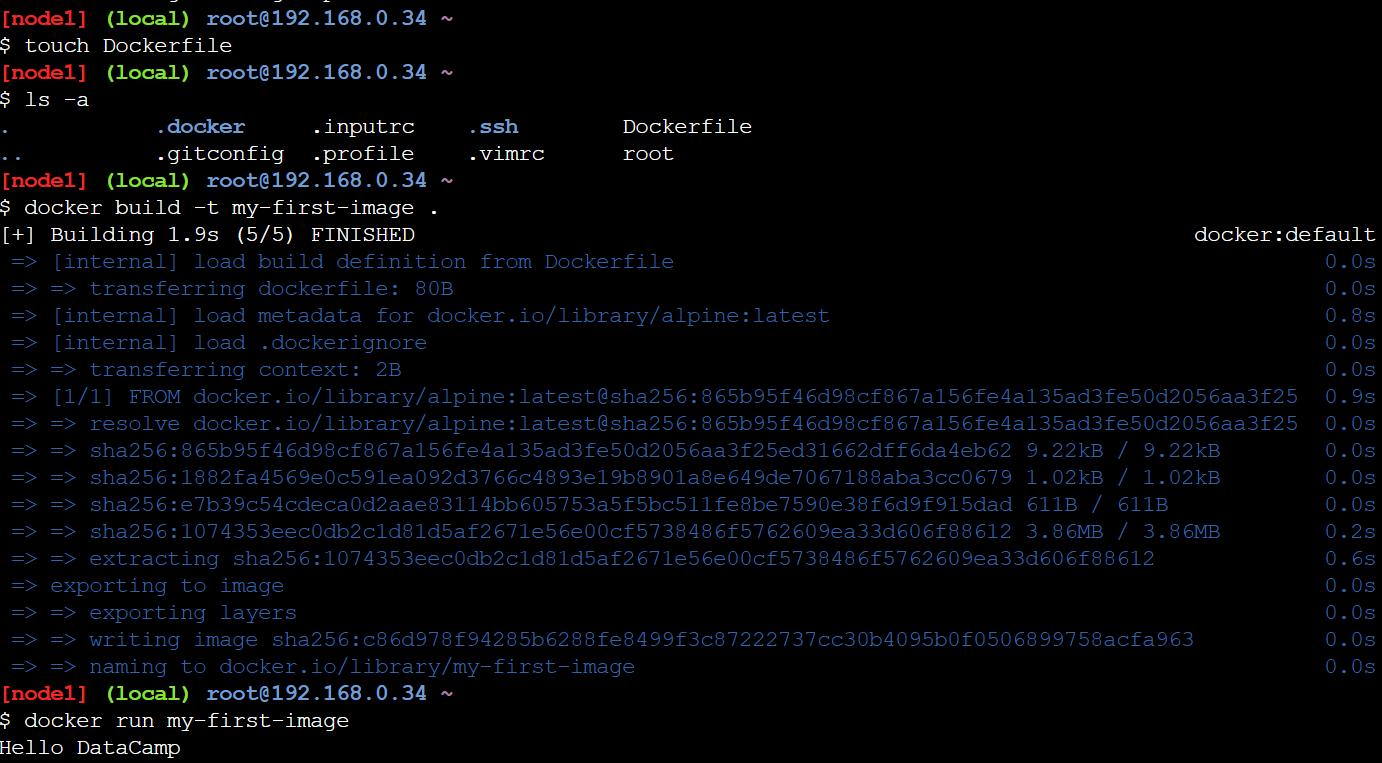
Build a Docker image in Play with Docker
You'll see "Hello DataCamp" printed. Congratulations!. You've built your first custom image! This simple example demonstrates the core workflow: write instructions, build an image, run a container.
But there's a critical challenge we need to address: what happens to your data when containers stop or are deleted?
Understanding data persistence is fundamental to working effectively with containers. By default, containers are ephemeral by design: when you delete a container, every file modification, every database record, every log entry vanishes instantly.
This might seem problematic, but it's actually one of Docker's key features. Ephemeral containers are easy to replace, scale, and debug because they're disposable.
But what about the data you need to keep? That's where Docker volumes come in. A volume is a storage area managed by Docker that exists outside the container filesystem. Think of it as a USB drive you can plug into different containers. The data stays on the drive even when you unplug it from one container and plug it into another.
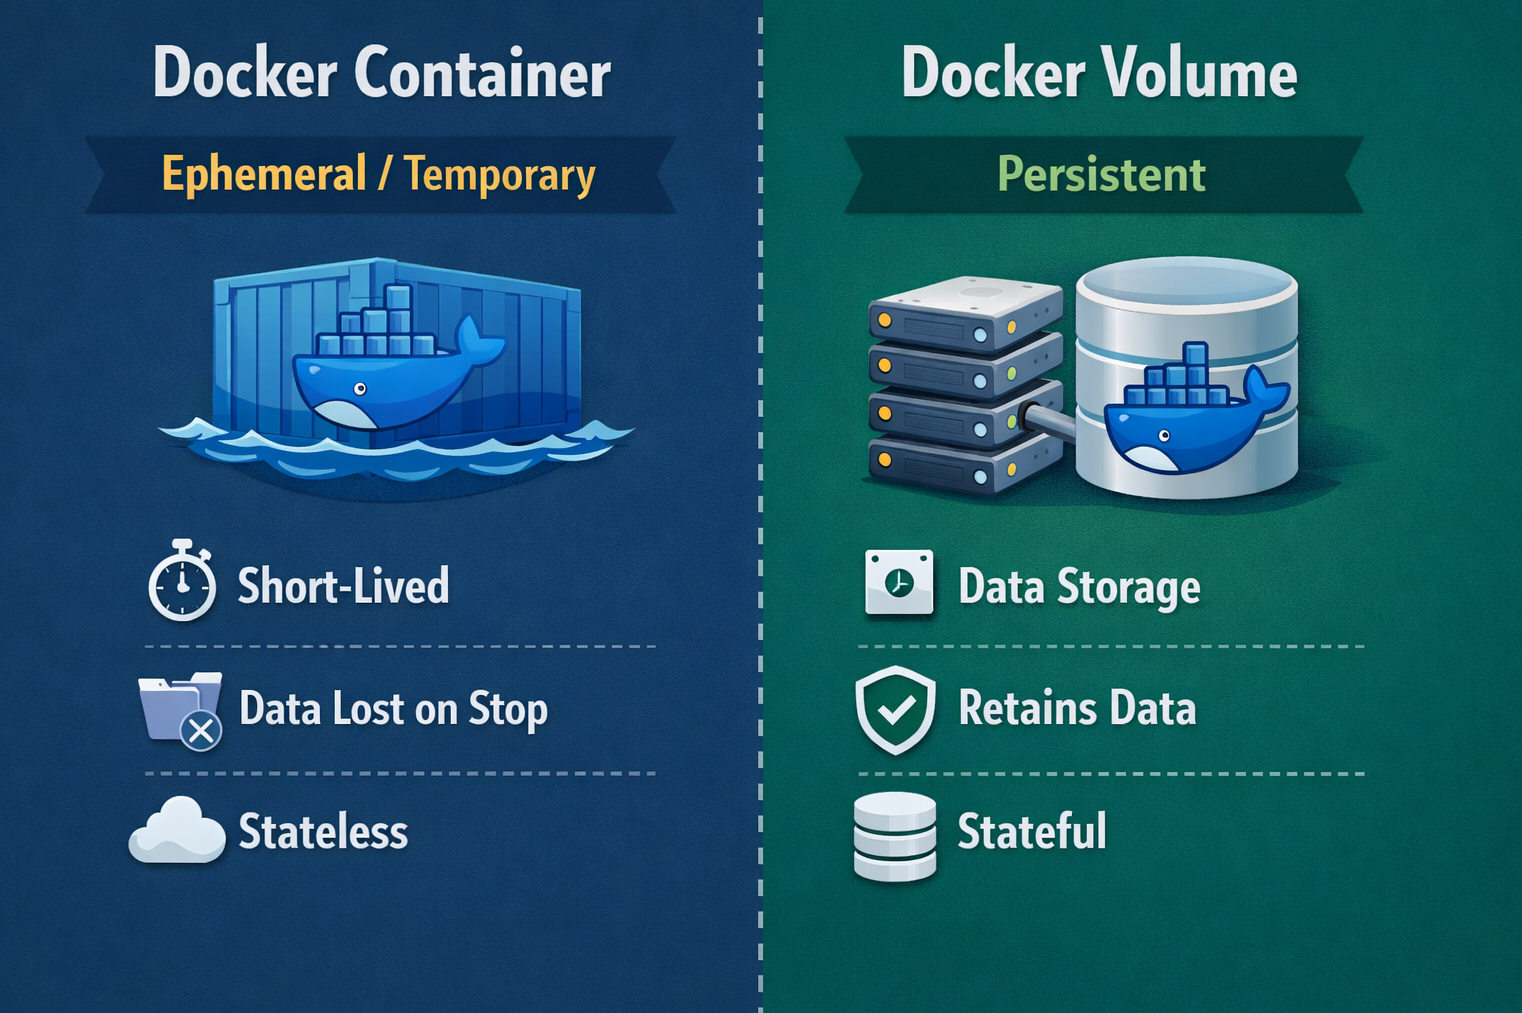
Docker Container vs. Docker Volume
Let me show you how this works in practice. Create and use a volume:
docker volume create mydata
docker run -it -v mydata:/data alpine sh
The -v mydata:/data flag mounts the mydata volume at the /data path inside the container. Everything written to /data is actually stored in the volume. Create a test file:
echo "This data persists!" > /data/important.txt
echo "Container ID: $(hostname)" >> /data/important.txt
exit
The container has stopped and is gone. Now start a completely new container with the same volume:
docker run -it -v mydata:/data alpine sh
cat /data/important.txt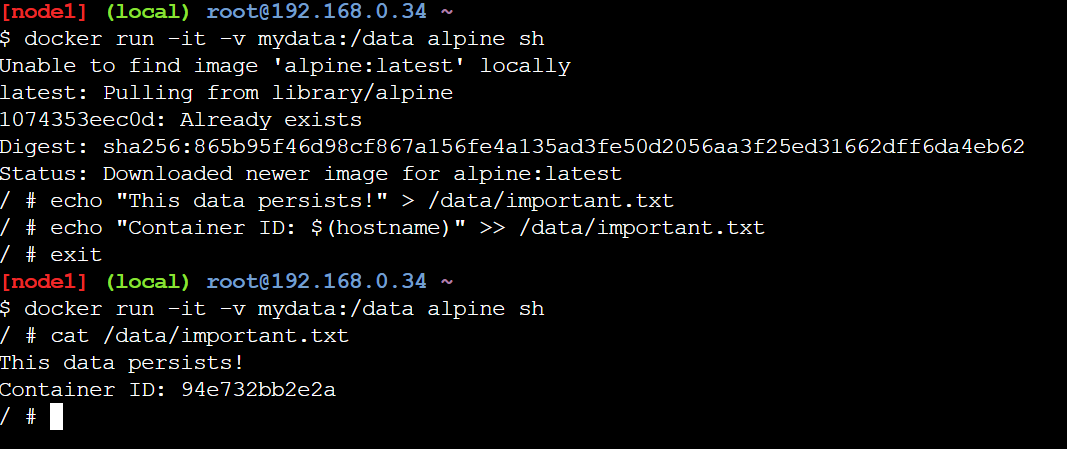
Data Persistence using Docker Volumes
The file is still there, complete with the old container's ID! The data survived because it was stored in the volume, not the container's temporary filesystem. You can attach this same volume to as many containers as you need, and they'll all see the same data.
However, and this is crucial for PWD users, even volumes are deleted when your two-hour session expires. Volumes persist within a session but not across sessions.
Understanding data persistence is crucial, but most real applications involve multiple interconnected services. That's where Docker Compose becomes essential.
With individual containers mastered, it's time to tackle real-world applications, which rarely consist of a single service. Modern applications typically include multiple components: a web frontend, an API backend, a database, a cache, and perhaps a message queue. Managing all these pieces with separate docker run commands becomes a coordination nightmare.
Picture this scenario: You're deploying an application that needs a web server, a PostgreSQL database, and a Redis cache.
Without Compose, you'd need three separate docker run commands, each with numerous flags for networking, port mapping, volume mounting, and environment variables. You'd have to remember the exact order to start them (database first, then cache, then web server), and if something goes wrong, debugging becomes a hunt through multiple terminal windows.
Docker Compose solves this orchestration challenge elegantly. Instead of juggling multiple commands, you define your entire multi-container application in a single YAML file called docker-compose.yml. This file becomes the single source of truth for your application's architecture, describing all services, their configurations, how they connect to each other, and what volumes they use.
With Compose, deploying your entire stack becomes one command: docker-compose up. Tearing it down is equally simple: docker-compose down. This declarative approach makes infrastructure reproducible. Anyone can clone your repository and run your entire application stack with one command, regardless of their operating system or local configuration.
Let’s create a basic Docker Compose file.
First, create the file in the terminal with touch docker-compose.yml, then click "Editor" in PWD and add the following to the file:
services:
  web:
    image: nginx
    ports:
      - "80:80"
  redis:
    image: redis
The services section defines each container. Service names (like web and redis) become hostnames on the Docker network. The image key specifies which Docker Hub image to use. Deploy it:
docker-compose up -dWith both containers now running, you might wonder: how do they find and communicate with each other?
Compose automatically creates a network connecting all services, enabling service discovery. The containers communicate using service names as hostnames.
Test this by entering the web container and pinging Redis:
docker-compose exec web sh
apt-get update && apt-get install -y iputils-ping
ping redis
Successful pings prove the containers can communicate! The web container reaches redis without knowing its IP address. Docker's internal DNS automatically resolves service names to correct container addresses.
As you work more with PWD, you'll encounter common challenges. Here's how to handle them effectively.
The two-hour limit is PWD's biggest constraint. When the timer hits zero, everything vanishes, including instances and data. Work efficiently by preparing code locally before pasting it into PWD, maintaining backups. Push custom images to Docker Hub before your session ends:
docker tag my-first-image yourusername/my-first-image
docker push yourusername/my-first-image
Focus on one concept per session rather than building complex systems. The two-hour limit is generous for learning, so break work into discrete chunks.
Unlike local Docker, where you access containers via localhost, PWD uses dynamic URLs. Don't try localhost:80. Instead, click the port badge at the top of the PWD interface. If badges don't appear immediately, wait a few seconds or refresh your browser.
Additionally, keep these best practices in mind:
You've covered substantial ground in this tutorial. You learned what Play with Docker is, when to use it versus Docker Desktop, ran your first container, understood port forwarding, and used debugging commands. We built custom images with Dockerfiles, explored data persistence with volumes, and orchestrated multi-container applications with Docker Compose.
Play with Docker provides a risk-free environment to learn Docker fundamentals without local installation commitment. The skills you practiced: writing Dockerfiles, managing containers, and configuring networks, translate directly to real-world Docker usage.
Now that you understand these fundamentals, install Docker Desktop locally. While PWD is excellent for learning and quick tests, serious development requires the persistence, performance, and tooling integration that only local installation provides. Everything you learned in PWD applies directly to Docker Desktop: the commands are identical, and the concepts are the same.
Continue building on this foundation. Experiment with different base images, explore Docker's networking capabilities, and practice writing production-ready Dockerfiles. Keep learning, experimenting, and building.
Our Containerization and Virtualization with Docker and Kubernetes provides an excellent foundation for working with containers. To keep learning, I also recommend checking out the following resources:
Docker Courses
Course
Course
Course
blog
Laiba Siddiqui
15 min
Tutorial
Moez Ali
Tutorial
Srujana Maddula
Tutorial
Derrick Mwiti
Tutorial
Dario Radečić
Tutorial
Rajesh Kumar