Track
Containerization and Virtualization with Docker and Kubernetes
13 hr
Docker has become a go-to tool for developers and data professionals who need to build, share, and run applications consistently across environments. Whether you're spinning up containers for local development or deploying microservices in production, mastering Docker commands is essential.
In this guide, I’ll walk you through 18 essential Docker commands—covering images, containers, networking, volumes, and Compose—that will boost your workflow and make working with Docker smoother and more efficient.
Docker is a platform for developing, shipping, and running applications. It lets you separate your app from the underlying infrastructure, enabling faster software delivery and managing your setup the same way you manage your applications.
Docker runs apps in isolated environments using lightweight packages called containers, which include everything an app needs to run, like dependencies and installations, helping you save system resources. We can easily share containers with teammates, run several simultaneously, and manage them all using Docker’s tools and platform.
We can use Docker for lots of things, including:
When using Docker, we work with different Docker objects like images, containers, networks, plugins, and volumes. These form the building blocks of the Docker setup. Under the hood, Docker uses features of the Linux kernel to make all this work. We interact with it using simple commands in the terminal, and every Docker command starts with docker.
> If you're just getting started, the Introduction to Docker course offers a practical foundation for learning containerization basics.
Now that we covered what Docker is and how it works, let’s look at some of the most common commands. These will help you build, run, and manage containers in your day-to-day workflow.
In Docker commands, anything that starts with -- is called a flag.
For example, --version is a flag that shows the version of the Docker CLI you're using. You can also use docker version (without the flag) to get detailed version info for all Docker components.
The output is split into two parts:
You can also format this output using the --format flag with a custom template.
The docker info command gives you a full overview of your Docker setup. It’s the same as running docker system info, just with a shorter name. You’ll see details like your kernel version, number of containers and images, and other system-wide details.
Depending on your storage driver, you may also see info like pool names and data files. Like the docker version, you can format the output using --format or -f.
The pull command downloads a Docker image from a registry, usually Docker Hub, a public library of pre-built images you can use without setting anything up yourself. You can run it as either docker pull <image> or docker pull, and both will do the same thing.
docker image pull [OPTIONS] NAME[:TAG|@DIGEST]If you don’t specify a tag, Docker will use :latest by default. For example: docker image pull debian pulls the debian:latest image.
You can also add options after the command to customize how the image is pulled, like limiting bandwidth or skipping image verification. The image below shows all available options and their functions.
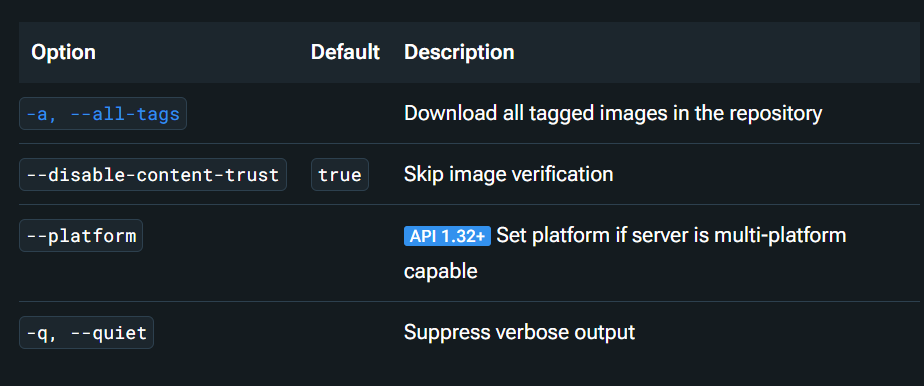
Options for the docker pull command. Source: Docker docs
The docker run <image> command creates and starts a new container from a specified image, meaning it runs the image in a fresh container. It's shorthand for docker container run, and both work the same way.
docker container run [OPTIONS] IMAGE [COMMAND] [ARG...]If you’ve already run a container and want to start it again with all its previous changes, use: docker start <container>.
The run command comes with lots of options to customize how your container runs. We’ll go through a few common ones with examples:
|
Flag |
Command example |
Description |
|
|
|
The specified custom identifier for the container named test using |
|
|
|
Runs the command executed inside the directory specified, in this example, |
|
|
|
By default, all containers have the PID namespace enabled, providing separation of processes. The example runs an alpine container with |
|
|
|
This creates a container and prints a test to the console The |
The docker start <container> command starts one or more stopped containers. For example, in docker start my_container, my_container is the name of the container we want to start. We can also use its alias: docker container start.
docker container start [OPTIONS] CONTAINER [CONTAINER...]Similarly, docker stop stops one or more running containers. For example, in docker stop my_container, my_container is the name of a running container.
It also has an alias: docker container stop.
docker container stop [OPTIONS] CONTAINER [CONTAINER...]Like start, the stop command has options to customize how containers are stopped. We’ll highlight some useful ones next:
Options for docker stop. Source: Docker docs
Images are the foundation of every container. In this section, we’ll look at how to create, manage, and inspect Docker images using its common commands.
The docker build command is one of Docker's most commonly used features. While it is part of a broader ecosystem that supports advanced use cases, we’ll focus on how to use it to build an image from a simple Dockerfile.
A Dockerfile is a plain text file (no file extension) that contains step-by-step instructions Docker uses to build an image. Here’s how create one:
Dockerfile with the following contents:# syntax=docker/dockerfile:1
FROM node:lts-alpine
WORKDIR /app
COPY . .
RUN yarn install --production
CMD ["node", "src/index.js"]
EXPOSE 3000This Dockerfile starts with a lightweight base image that includes Node.js and Yarn. It copies your app’s source code into the image, installs the dependencies, and defines how to start the app.
docker build -t getting-started.The -t flag lets you tag the image. In this case, we’ve named it getting-started. The . at the end tells Docker to look for the Dockerfile in the current directory.
The docker images command lists all your top-level images, their repository, tags, and size. You can also use its aliases:
docker image listdocker image lsIts syntax is: docker image ls [OPTIONS] [REPOSITORY[:TAG]]
This command supports several options. For example, to show all images, including intermediate ones, you can add the -a or --all flag like this: docker images -a.
The docker rmi <image> command removes one or more images from your system. If an image has multiple tags, running this command with a specific tag will only remove that tag. But if the tag is the only one linked to the image, both the tag and the image will be removed.
You can also use one of these aliases:
docker image removedocker image rmIts syntax is: docker image rm [OPTIONS] IMAGE [IMAGE...]
If you need to remove an image still being used by a running container, you’ll need to force it by adding the -f or --force option.
We often have to manage containers — start, stop, inspect, or remove them as our app evolves. So, I’ll walk you through the most useful Docker commands for handling containers in your day-to-day workflow.
The docker exec command lets you run a command inside a running container without restarting it. It’s especially useful for debugging or checking something manually inside the container. You can also use its alias: docker container exec.
The command only works if the container’s main process (PID 1) is running. It doesn’t automatically re-run if the container restarts.
Its syntax is: docker exec [OPTIONS] CONTAINER COMMAND [ARG...]
There are several optional flags you can use with this. For example, --privileged gives the command extended permissions inside the container. For the full list of options, check out the official docs.
Here is an example to execute a command on the container:
docker exec -d mycontainer touch /tmp/execWorksThe touch command creates a new file /tmp/execWorks inside the running container mycontainer, in the background.
The docker logs command lets you view the logs from a specific container and show everything printed to standard output and error at the time of execution. You can also use its alias: docker container logs
Its syntax is: docker container logs [OPTIONS] CONTAINER
There are a number of useful options you can add. For example:
--details shows extra attributes like environment variables and labels.--until lets you fetch logs up to a specific point in time.docker logs -f --until=2s test follows the log output for the test container and stops after showing the last two seconds of logs.Here are all the options that we can use with docker logs:
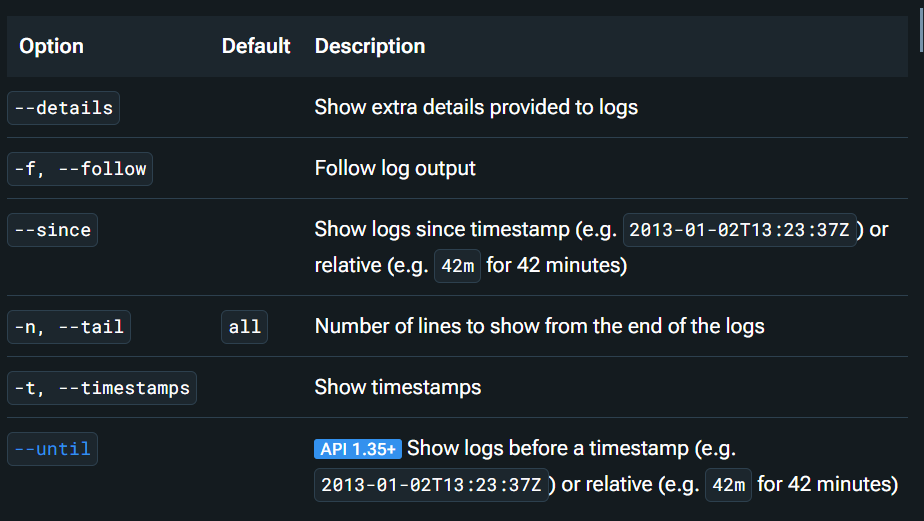
Options for docker log <container>. Source: Docker docs
The docker rm <container> command removes one or more containers from your system. You can also use its aliases:
docker container removedocker container rmIts syntax is: docker container rm [OPTIONS] CONTAINER [CONTAINER...]
This command has a few optional flags you can use. Here are some of them:
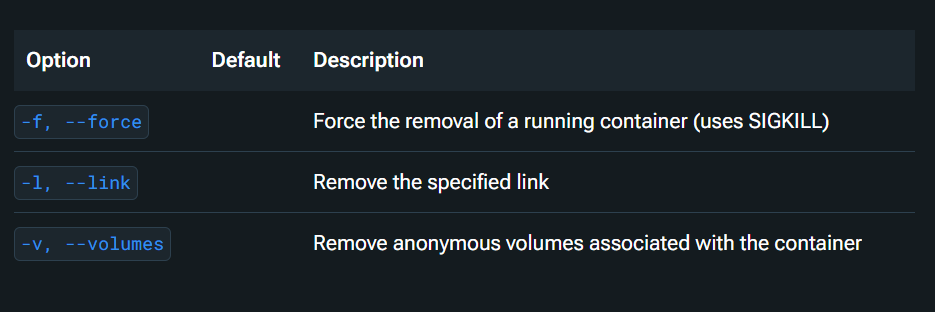
Options for docker rm <container>. Source: Docker docs
For example, you can use docker rm /redis to remove the container identified by the /redis link. However, note that this command removes running containers only.
If you want to remove stopped containers, you need to use docker container prune. To keep your environment clean, learn how to safely remove unused Docker resources with this Docker prune tutorial.
The docker restart <container> command stops and then restarts one or more containers. You can also use its alias: docker container restart.
Its syntax is: docker restart [OPTIONS] CONTAINER [CONTAINER...]
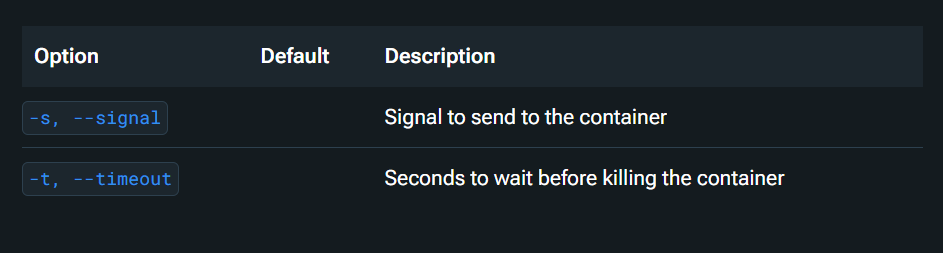
The restart command has several useful options for customizing container restarts. Below are both options, along with examples.
|
Option |
Description |
Example |
|
-s, --signal |
Signal to send to the container. |
|
|
-t, --timeout |
Seconds to wait before killing the container. |
|
> For hands-on practice, explore these Docker project ideas that range from beginner to advanced level.
Container networking enables communication between containers and external workloads. By default, containers have networking enabled and can make outgoing connections, but they don’t automatically know what kind of network they’re on or what other workloads they’re connected to.
Unless you use the none network driver (which disables networking), containers can interact with networking elements like IP addresses, gateways, and DNS.
Let’s explore some common docker networking commands that you can use.
The docker network ls command lists all networks known to the Docker Engine, including those across multiple hosts in a cluster. Its alias is: docker network list.
docker network ls [OPTIONS]You can use multiple options with this, as shown in the image below:
By default, this command shows each network’s:
You can use flags to customize the output. For example, the --no-trunc flag shows the full network IDs instead of shortened ones. Here is how you use this command:
docker network ls --no-truncThe docker network create command creates a new Docker network. By default, it uses the bridge driver unless you specify another one using the --driver (or -d) flag.
Docker supports built-in network drivers like:
bridge for single-host networks.overlay for multi-host networks in Swarm mode.You can also use third-party or custom drivers if needed.
docker network create [OPTIONS] NETWORKThe command offers many options for various purposes. Check out their official documentation to view the complete list of options.
Here is an example of creating a bridge network:
docker network create -d bridge my-bridge-networkBridge networks are limited to a single Docker Engine so that they won’t connect containers across different hosts.
Once Swarm mode is enabled, you can create a network that spans multiple Docker hosts:
docker network create --scope=swarm --attachable -d overlay my-multihost-network> Curious how Docker compares to Kubernetes? This breakdown of Kubernetes vs Docker covers key differences and use cases.
Docker volumes are used to store data that needs to persist, even when a container stops or is removed. You can create them explicitly or let Docker create them automatically when starting a container.
Volumes are stored on the host system but are isolated from the host’s core files. They’re mounted into containers in a way that’s similar to bind mounts but with better portability and security.
Let’s explore some relevant docker volume commands:
The docker volume ls command lists all volumes that Docker knows about. You can also use its alias: docker volume list.
docker volume ls [OPTIONS]This command supports a few optional flags to help you filter or format the output — here’s what they are:
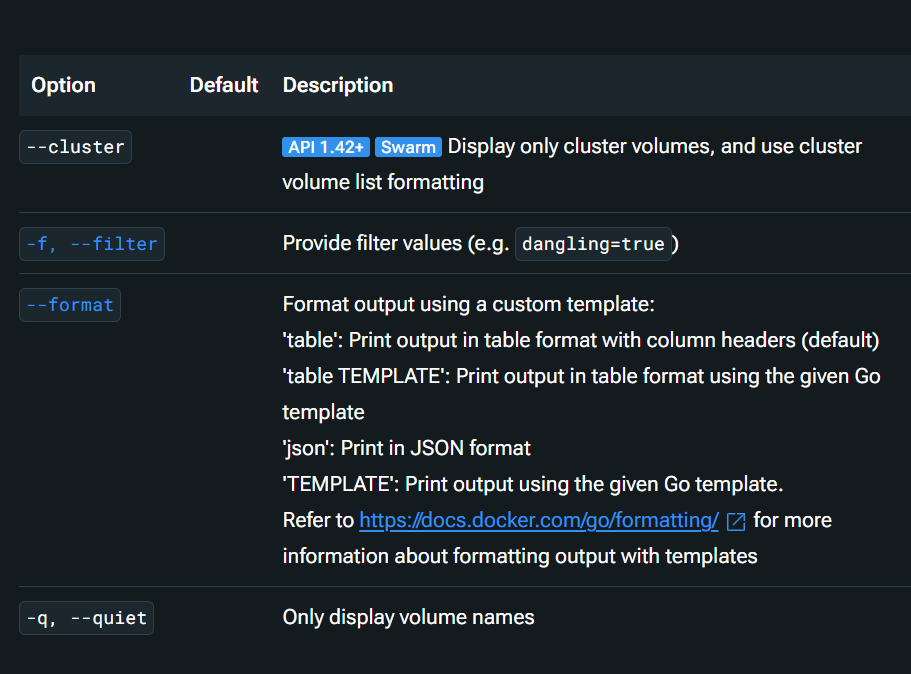
Options for the docker volume ls command. Source: Docker docs
The docker volume create command creates a new volume for storing persistent data. If you don’t provide a name, Docker will generate one for you automatically.
Creating volumes is a common step when you want data to persist beyond the life of a single container.
docker volume create [OPTIONS] [VOLUME_NAME]Let’s see an example of creating a volume and then configuring a container to use it:
docker volume create hello
docker run -d -v hello:/world busybox ls /world
In this example, a volume called hello is created. Then, it's mounted into a container at the /world path. This allows the container to write or read data from that volume.
Multiple containers can use the same volume, which is useful if one container needs to write data while another reads it.
Note: Volume names must be unique across drivers. You can’t use the same volume name in two different storage drivers.
Docker Compose makes it easy to manage multi-container applications using a simple YAML file. It supports different environments like development, testing, staging, production, and CI. With one command, you can control services, set up networks, and manage volumes — all in one place.
Let’s explore some common compose commands:
The docker compose up command builds, (re)creates, starts, and attaches to containers for a service. If the containers aren’t running yet, it also starts any linked services automatically.
docker compose up [OPTIONS] [SERVICE...]By default, this command combines the output of all containers. If you want to focus on specific services, you can:
--attach flag to attach to certain services--no-attach flag to exclude othersFor example, docker compose up --no-attach <service-name> starts all services except the one you’ve excluded from the logs.
When the command finishes, the containers stop, too. To keep them running in the background, use the --detach flag:
docker compose up --detachBefore running this command, make sure you’ve navigated (cd) to the directory where your docker-compose.yml file is located.
The docker compose down command stops containers and removes containers, images, networks, and volumes created by docker compose up.
docker compose down [OPTIONS] [SERVICES]You can use various options with it, including the following:

Options for the docker compose down command. Source: Docker docs.
By default, the command removes the following:
The following are not removed by default:
Anonymous volumes aren’t mounted automatically when you run docker compose up again because they don’t have names. If you need persistent data storage, using named volumes or bind mounts is better.
Docker is a powerful way to build, ship, and run applications in containers. But to use it well and ensure your setup is efficient and easy to scale, you must follow some best practices.
By default, container files are stored in a writable layer that is lost when the container is removed! This layer is unique to each container and not easily accessible. Docker uses different types of mounts to persist data, one of which is volumes, managed by the Docker daemon and stored on the host.
Volumes let us:
They’re ideal for long-term data or when multiple containers need to share access. Just keep in mind that if you need to access files directly from the host, bind mounts might be a better fit, as volumes are managed entirely by Docker.
Managing multiple containers manually can become overwhelming. Docker Compose simplifies things by letting you define everything in a single YAML file so you can focus on building.
Here’s why it’s a best practice worth following:
--scale flag, which is great for testing how your app handles different loads.Docker can feel like a lot at first, but once you get the hang of the core commands, it opens up many possibilities. From running your first container to managing networks, volumes, and services, you’re now better equipped to confidently build and run containerized apps.
And if you're keen to keep learning, here are some great resources to explore next:
Learn more about Docker with these courses!
Track
Course
Course
blog
Joel Wembo
9 min
blog
Joel Wembo
14 min
Tutorial
Moez Ali
Tutorial
Arunn Thevapalan
Tutorial
Dario Radečić
Tutorial
Rajesh Kumar