Solo sellers and small brands rarely have the budget for a full product photoshoot. In this guide, we’ll build and run a Gradio app that transforms a single input image into e-commerce-ready, multi-angle product renders (wide, macro, ±45°, top-down) using Qwen-Image-Edit-2509 with LoRA-based virtual camera controls for reproducible AI product photography.
Under the hood, we use:
- Base model:
Qwen/Qwen-Image-Edit-2509(Apache-2.0) - Angle control LoRA:
dx8152/Qwen-Edit-2509-Multiple-angles - Optional speed LoRA:
lightx2v/Qwen-Image-Lightning
In this tutorial, you’ll learn how to:
- Load the Qwen edit pipeline and stack multiple LoRAs.
- Drive camera moves with robust angle macros.
- Build a clean Gradio UI for creators and ecommerce teams.
- Export all results as a ZIP for easy handoff.
If you’re keen to learn more about how image data is processed in deep learning, check out the Image Processing in Python skill track.
Why Use Qwen Image Edit with Multiple Angles LoRA?
Qwen-Image-Edit-2509 is the latest iteration of Qwen’s image-editing model with enhanced consistency and multi-image editing. The Multiple-Angles LoRA injects reliable “virtual camera” controls so you can say:
- 将镜头转为广角镜头 (turn to wide-angle)
- 将镜头转为特写镜头 (turn to close-up)
- 将镜头向左旋转45度 (rotate 45° left)
- 将镜头转为俯视 (top-down view)
These commands consistently reframe the same product without hallucinating to a new product.
Qwen Image Edit Step-By-Step Tutorial: Building a Product Shot Booster
In this guide, we’ll build an app that transforms a single product image into a studio-ready angle set (including angles like wide, close-up, 45° left/right, and top-down), with optional lifestyle presets and fast preview mode. It uses Qwen/Qwen-Image-Edit-2509 model and a Multiple-Angles LoRA wrapped in a Gradio UI.
We’ll go from environment setup to model loading, generation helpers, and a web UI.
Step 1: Prerequisites
First, install all runtime dependencies. We use PyTorch with CUDA wheels, Hugging Face tooling, Diffusers library, Gradio for the UI, and Pillow/OpenCV for image handling.
pip install -q torch torchvision torchaudio --index-url https://download.pytorch.org/whl/cu121
pip install -q transformers>=4.44.0 accelerate>=0.33.0 safetensors>=0.4.3
pip install -q pillow>=10.2.0 huggingface_hub>=0.24.0 opencv-python-headless>=4.9.0.80
pip install -q numpy>=1.26.0 gradio>=4.0.0
pip install -q git+https://github.com/huggingface/diffusers
Here is what each prerequisite does:
- CUDA Wheels: The PyTorch line points to NVIDIA CUDA 12.1 wheels for GPU acceleration.
- Transformers and Diffusers: Transformers manages configs and tokenizers while Diffusers provides the
QwenImageEditPlusPipeline. - Safetensors: They provide a secure tensor format (faster and safer than Pickle).
- OpenCV-headless and Pillow: It provides robust image I/O and resizing for pre/post-processing.
- Gradio: It is a rapid web UI that works locally and in Colab.
With the environment ready, we can authenticate to Hugging Face (optional) and load models.
Step 2: Hugging Face authentication
Some models or adapters may require authentication from HuggingFace. This step logs you in once for the session.
from huggingface_hub import login
import os
HF_TOKEN = "Your_HF_Token" # @param {type:"string"}
if HF_TOKEN:
login(token=HF_TOKEN)
print("Logged in to Hugging Face")
else:
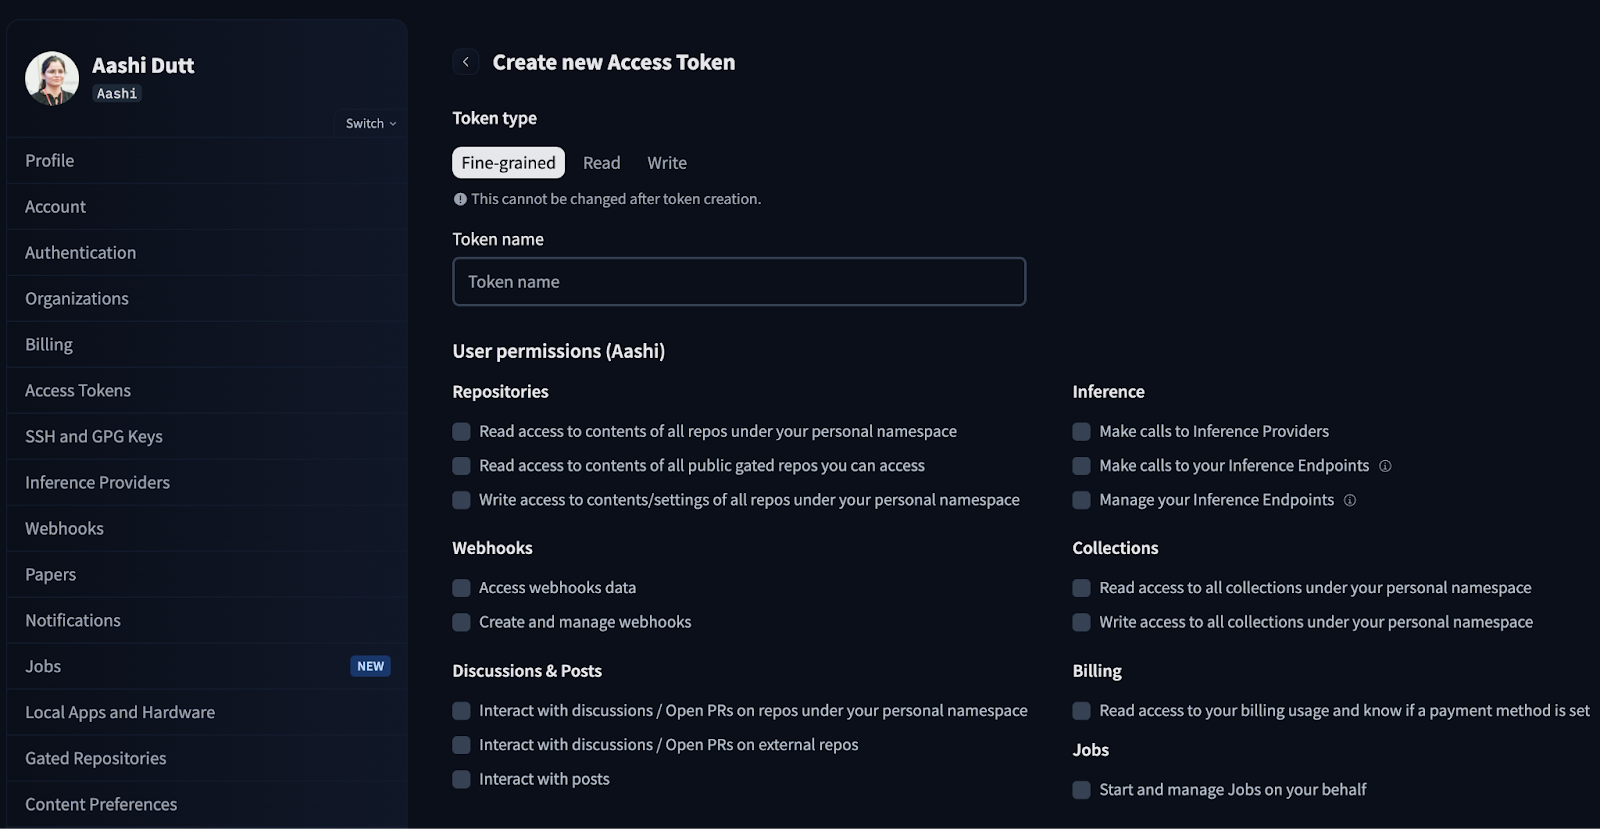
print("WARNING: No token provided. Continuing without authentication")Start by logging in to your HuggingFace account and looking for Access Tokens within your account settings. Click on Create new token and generate a new token with Read token type. Select the required permissions and generate a new token.
In production/Colab, do not hardcode tokens, instead use environment variables or Colab “Secrets.”
Step 3: Load model and set up pipeline
In this section, we set up the Qwen-Image-Edit pipeline, load the angles LoRA, and add a Fast toggle with GPU-aware settings. Note that this code runs efficiently on a high-RAM A100 GPU.
Step 3.1: Imports and GPU config
Now, we’ll import core libraries and detect the GPU to set precision, attention slicing, and VAE slicing automatically for stability.
import io
import zipfile
from typing import List, Tuple, Optional
import gc
import torch
from PIL import Image
from diffusers import QwenImageEditPlusPipeline
import gradio as gr
def get_gpu_config():
    if not torch.cuda.is_available():
        return {
            'device': 'cpu',
            'dtype': torch.float32,
            'gpu_name': 'CPU',
            'vram_gb': 0,
            'max_batch': 1,
            'enable_attention_slicing': True,
            'enable_vae_slicing': True,
        }
    gpu_name = torch.cuda.get_device_name(0)
    vram_gb = torch.cuda.get_device_properties(0).total_memory / 1e9
    if 'T4' in gpu_name or vram_gb < 20:
        return {
            'device': 'cuda',
            'dtype': torch.bfloat16,
            'gpu_name': gpu_name,
            'vram_gb': vram_gb,
            'max_batch': 1,
            'enable_attention_slicing': True,
            'enable_vae_slicing': True,
        }
    else:
        return {
            'device': 'cuda',
            'dtype': torch.bfloat16,
            'gpu_name': gpu_name,
            'vram_gb': vram_gb,
            'max_batch': 2,
            'enable_attention_slicing': False,
            'enable_vae_slicing': False,
        }
gpu_config = get_gpu_config()
HF_BASE_MODEL = "Qwen/Qwen-Image-Edit-2509"
LORA_ANGLES = "dx8152/Qwen-Edit-2509-Multiple-angles"
LORA_LIGHTNING = "lightx2v/Qwen-Image-Lightning"
ANGLE_MACROS = {
    "Wide-angle": "将镜头转为广角镜头",
    "Close-up": "将镜头转为特写镜头",
    "Forward": "将镜头向前移动",
    "Left": "将镜头向左移动",
    "Right": "将镜头向右移动",
    "Down": "将镜头向下移动",
    "Rotate 45° Left": "将镜头向左旋转45度",
    "Rotate 45° Right": "将镜头向右旋转45度",
    "Top-down": "将镜头转为俯视",
}
BACKGROUND_PRESETS = {
    "(None)": None,
    "Pure Studio (white seamless)": "in a professional studio with seamless white background, soft shadows, product centered",
    "Soft Gray Studio": "in a professional studio with seamless soft gray background, gentle vignette, softbox lighting",
    "Lifestyle (cozy desk)": "on a cozy wooden desk near a window, soft natural light, minimal props",
    "Lifestyle (marble)": "on a clean white marble surface, bright daylight, subtle reflections",
    "Lifestyle (outdoor)": "outdoors on a neutral table, soft shade, bokeh background",
}
ASPECT_RATIOS = {
    "1:1 (Square)": (1024, 1024),
    "4:3 (Standard)": (1024, 768),
    "3:4 (Portrait)": (768, 1024),
    "16:9 (Widescreen)": (1024, 576),
    "9:16 (Mobile)": (576, 1024),
    "3:2 (Photo)": (1024, 683),
    "2:3 (Portrait Photo)": (683, 1024),
}
Here are the key components of the above code blocks:
- GPU auto-config (
get_gpu_configfunction): We detect the available accelerator and return a small config dictionary that is used to choose device (cpu/cuda), dtype (like bfloat16 on GPU), and memory behaviors: - On CPU, we default to float32 and enable attention/VAE slicing for safety.
- On T4 / <20 GB VRAM, we keep bfloat16 but enable slicing to prevent OOMs.
- On 20 GB+ GPUs (like A100), we disable slicing and allow a larger batch for speed.
- Model IDs and adapters: We load
Qwen-Image-Edit-2509as the core editor,along with Multiple-angles LoRA for camera control, and optionally blend the Lightning LoRA when you toggle to Fast Mode. HF_BASE_MODEL = "Qwen/Qwen-Image-Edit-2509"is the main image-editing backbone.LORA_ANGLES = "dx8152/Qwen-Edit-2509-Multiple-angles"adds “virtual camera” controls.LORA_LIGHTNING = "lightx2v/Qwen-Image-Lightning"is an optional speed adapter for fast previews.
Note: for HQ Mode, only the angles adapter stays active.
- Angle macros:
ANGLE_MACROS maps labels like “Wide-angle” or “Top-down” to equivalent Chinese commands that the angles LoRA understands reliably. These commands consistently moves the virtual camera (move/rotate/zoom) without changing identity. - Background presets:
BACKGROUND_PRESETS are short English fragments like “marble surface”, “soft gray studio”, that we merge into the final prompt. They are orthogonal to the angle macros and is responsible for controling scene. - Aspect ratios (
ASPECT_RATIOS): These allow us to generate canvas (1:1, 4:3, 16:9, etc.) and resize or center-crop the input prior to inference so outputs don’t need a post generation cropping.
We now have GPU andadapters set up. Let’s instantiate the Diffusers pipeline and attach the LoRAs next.
Step 3.2: Pipeline
Next, we load the base Qwen Edit pipeline, enable memory optimizations according to the GPU, and stack the Multiple-Angles LoRA. We also implement a mode switch to optionally add the Lightning LoRA for fast previews.
pipe = QwenImageEditPlusPipeline.from_pretrained(
    HF_BASE_MODEL,
    torch_dtype=gpu_config['dtype'],
)
pipe = pipe.to(gpu_config['device'])
if gpu_config['enable_attention_slicing']:
    pipe.enable_attention_slicing()
if gpu_config['enable_vae_slicing']:
    pipe.enable_vae_slicing()
pipe.load_lora_weights(LORA_ANGLES, adapter_name="angles")
current_mode = {"fast": False}
def set_pipeline_mode(use_lightning: bool):
    global current_mode
    if use_lightning and not current_mode["fast"]:
        pipe.load_lora_weights(LORA_LIGHTNING, adapter_name="lightning")
        pipe.set_adapters(["angles", "lightning"], adapter_weights=[1.0, 1.0])
        current_mode["fast"] = True
    elif not use_lightning and current_mode["fast"]:
        pipe.set_adapters(["angles"], adapter_weights=[1.0])
        current_mode["fast"] = False
    elif not use_lightning and not current_mode["fast"]:
        pipe.set_adapters(["angles"], adapter_weights=[1.0])
set_pipeline_mode(False)
The above code is the pipeline setup layer for the Product Shot Booster app, which performs the following functions:
- Pipeline initialization: It instantiates the
QwenImageEditPlusPipelinefrom the base model (Qwen/Qwen-Image-Edit-2509), moves it to the detected device (CPU/GPU), and sets the tensor precision (torch_dtype) based on your hardware. - Memory safety: On smaller GPUs, it enables attention and VAE slicing to reduce peak VRAM and avoid out-of-memory errors while trading a small amount of speed for stability.
- LoRA composition: It loads the Multiple-angles LoRA to provide repeatable “virtual camera” controls (move/rotate/zoom) and optionally blends the Lightning LoRA for faster previews.
- Mode switching logic: The
set_pipeline_mode()helper function and acurrent_modeflag manage HQ vs Fast states, preventing redundant Lightning reloads and letting you flip adapters.
Now the pipeline is ready. Let’s move on to wiring generation functions and the Gradio UI.
Step 4: Generation functions
Generation functions power generation by building prompts, resizing to the target aspect ratio, running the pipeline across selected angles, and packaging results for download in a zip file.
Step 4.1: Prompt Composer and Image Resize Helpers
Before we invoke the model, we normalize inputs with two stateless helpers:
compose_prompt()function: This function assembles a single instruction string from camera angle, background preset, custom scene, and style notes. Concise clauses helps to keep Qwen’s instruction parsing stable and avoids over-weighting any one part.resize_image()function: It fits the source image to the target aspect ratio using a scale-to-cover strategy, Lanczos resampling helps with high-quality down/up-scaling, and a center crop so key subject matter stays in frame.
def compose_prompt(angle_phrase: str,
                   bg_preset_text: Optional[str],
                   custom_scene: str,
                   extra_style: str) -> str:
    parts = [angle_phrase]
    if bg_preset_text:
        parts.append(f"{bg_preset_text}")
    if custom_scene.strip():
        parts.append(custom_scene.strip())
    if extra_style.strip():
        parts.append(extra_style.strip())
    return " | ".join(parts)
def resize_image(img: Image.Image, target_size: Tuple[int, int]) -> Image.Image:
    target_w, target_h = target_size
    orig_w, orig_h = img.size
    scale = max(target_w / orig_w, target_h / orig_h)
    new_w = int(orig_w * scale)
    new_h = int(orig_h * scale)
    img = img.resize((new_w, new_h), Image.Resampling.LANCZOS)
    left = (new_w - target_w) // 2
    top = (new_h - target_h) // 2
    img = img.crop((left, top, left + target_w, top + target_h))
    return img
The above two functions perform the following tasks:
- Composable prompt: We join parts with " | " to keep clauses visually distinct, while Qwen-Edit handles punctuation and yields consistent parsing without biasing toward the last clause. We also use
.strip()with user text to avoid empty fragments. - Scale-to-cover math: This guarantees that the resized image fully covers the target canvas in both dimensions.
- Lanczos resampling: It is a high-quality filter that preserves fine details when downsampling and reduces aliasing when upscaling.
- Center crop: After resizing, we crop the exact target canvas from the center to preserve typical composition and avoid unexpected off-center trims.
With helpers ready, we can now run a multi-angle generation loop and package results.
Step 4.2: Generate images
Next, we validate inputs, conform the image to the chosen aspect, loop over selected angles, and run the pipeline in inference_mode. Finally, we return a zip file with all generated images.
def generate_images(
    source_img: Image.Image,
    angle_keys: List[str],
    bg_key: str,
    custom_scene: str,
    extra_style: str,
    aspect_ratio: str,
    use_lightning: bool,
    seed: int,
    steps: int,
    guidance_scale: float,
    true_cfg_scale: float,
    images_per_prompt: int,
    progress=gr.Progress()
) -> List[Image.Image]:
    if source_img is None:
        return [], "WARNING: Please upload an image first!"
    if not angle_keys:
        return [], "WARNING: Please select at least one angle!"
    target_size = ASPECT_RATIOS[aspect_ratio]
    source_img = resize_image(source_img, target_size)
    set_pipeline_mode(use_lightning)
    results = []
    generator = torch.manual_seed(seed)
    bg_preset_text = BACKGROUND_PRESETS.get(bg_key)
    total_angles = len(angle_keys)
    for idx, angle_name in enumerate(angle_keys):
        progress((idx + 1) / total_angles, f"Generating {angle_name}...")
        angle_phrase = ANGLE_MACROS[angle_name]
        full_prompt = compose_prompt(angle_phrase, bg_preset_text, custom_scene, extra_style)
        inputs = {
            "image": [source_img],
            "prompt": full_prompt,
            "generator": generator,
            "true_cfg_scale": true_cfg_scale,
            "negative_prompt": " ",
            "num_inference_steps": steps,
            "guidance_scale": guidance_scale,
            "num_images_per_prompt": images_per_prompt,
            "height": target_size[1],
            "width": target_size[0],
        }
        with torch.inference_mode():
            out = pipe(**inputs)
        for img_idx, im in enumerate(out.images):
            results.append(im)
        if 'T4' in gpu_config['gpu_name']:
            torch.cuda.empty_cache()
    return results
def create_zip(images: List[Image.Image]) -> Optional[str]:
    if not images:
        return None
    zip_path = "/content/product_shot_booster.zip"
    with zipfile.ZipFile(zip_path, mode="w", compression=zipfile.ZIP_DEFLATED) as zf:
        zf.writestr("manifest.txt", "Product Shot Booster Export\nGenerated angles exported as PNG files.\n")
        for idx, img in enumerate(images):
            buf = io.BytesIO()
            img.save(buf, format="PNG")
            zf.writestr(f"angle_{idx+1:03d}.png", buf.getvalue())
    return zip_path
The generate_images() function implements multi-angle generation and export by:
- Validate, normalize, and configure: It checks for an uploaded image and selected angles, then fits the image to the chosen aspect (resize and center crop), and toggles HQ vs Fast mode via
set_pipeline_mode(use_lightning). - Efficient inference: For each angle, it builds a single instruction string including angle macro, background preset, scene and style. It then prepares the Diffusers inputs and executes under
torch.inference_mode()to save memory. On low-VRAM GPUs (like a T4), calls liketorch.cuda.empty_cache()per angle help to reduce fragmentation. - Aggregate results with UI feedback: It finally updates Gradio progress as each angle completes and collects all outputs into one list for downstream zipping.
The create_zip(images) function provides a portable export which writes a zip file with a brief manifest.txtalong with encoding images via in-memory (BytesIO) for lossless files and returns None if no images are present.
With generation and packaging finalized, the UI can trigger a multi-angle pass and offer a one-click download of the complete angle pack.
Step 5: Gradio UI
This UI allows users to upload a product image, pick angles and aspect ratios, choose a background preset, set style notes, and generate multiple-angle images on the go.
with gr.Blocks(title="Product Shot Booster", theme=gr.themes.Soft()) as demo:
    gr.Markdown("<h1 style='text-align: center;font-weight: bold;'>Product Shot Booster</h1>")
    with gr.Row():
        with gr.Column(scale=1):
            input_image = gr.Image(
                label="Product Image",
                type="pil",
                height=300
            )
            angle_choices = gr.CheckboxGroup(
                choices=list(ANGLE_MACROS.keys()),
                value=["Wide-angle", "Close-up", "Rotate 45° Left", "Rotate 45° Right", "Top-down"],
                label="Camera Angles"
            )
            aspect_ratio = gr.Dropdown(
                choices=list(ASPECT_RATIOS.keys()),
                value="1:1 (Square)",
                label="Aspect Ratio"
            )
            bg_preset = gr.Dropdown(
                choices=list(BACKGROUND_PRESETS.keys()),
                value="(None)",
                label="Background"
            )
            custom_scene = gr.Textbox(
                label="Custom Scene",
                placeholder="e.g., 'on a matte black table with soft reflections'",
                lines=2
            )
            extra_style = gr.Textbox(
                label="Style Notes",
                value="studio-grade lighting, high clarity, ecommerce-ready composition",
                lines=2
            )
        with gr.Column(scale=2):
            output_gallery = gr.Gallery(
                  label="Generated Images",
                  show_label=True,
                  columns=3,
                  height="auto",
                  object_fit="contain"
              )

            info_output = gr.Markdown("")
            zip_output = gr.File(label="Download ZIP")
    with gr.Accordion("Advanced Settings", open=False):
        with gr.Row():
            use_lightning = gr.Checkbox(
                label="Fast Mode (Lightning LoRA)",
                value=('T4' in gpu_config['gpu_name']),
                info="Enable for faster generation (recommended for T4)"
            )
            seed = gr.Number(
                label="Seed",
                value=123,
                precision=0
            )
            steps = gr.Slider(
                label="Inference Steps",
                minimum=10,
                maximum=60,
                value=28,
                step=1
            )
        with gr.Row():
            guidance_scale = gr.Slider(
                label="Guidance Scale",
                minimum=0.0,
                maximum=8.0,
                value=1.0,
                step=0.1
            )
            true_cfg_scale = gr.Slider(
                label="True CFG Scale",
                minimum=0.0,
                maximum=10.0,
                value=4.0,
                step=0.1
            )
            images_per_prompt = gr.Slider(
                label="Images per Angle",
                minimum=1,
                maximum=4,
                value=1,
                step=1
            )
    generate_btn = gr.Button("Generate", variant="primary", size="lg")
    def generate_and_zip(*args):
      images = generate_images(*args)
      zip_file = create_zip(images) if images else None
      return images, zip_file
    generate_btn.click(
        fn=generate_and_zip,
        inputs=[
            input_image,
            angle_choices,
            bg_preset,
            custom_scene,
            extra_style,
            aspect_ratio,
            use_lightning,
            seed,
            steps,
            guidance_scale,
            true_cfg_scale,
            images_per_prompt
        ],
        outputs=[output_gallery, zip_output]
    )
demo.launch(share=True, debug=True, show_error=True)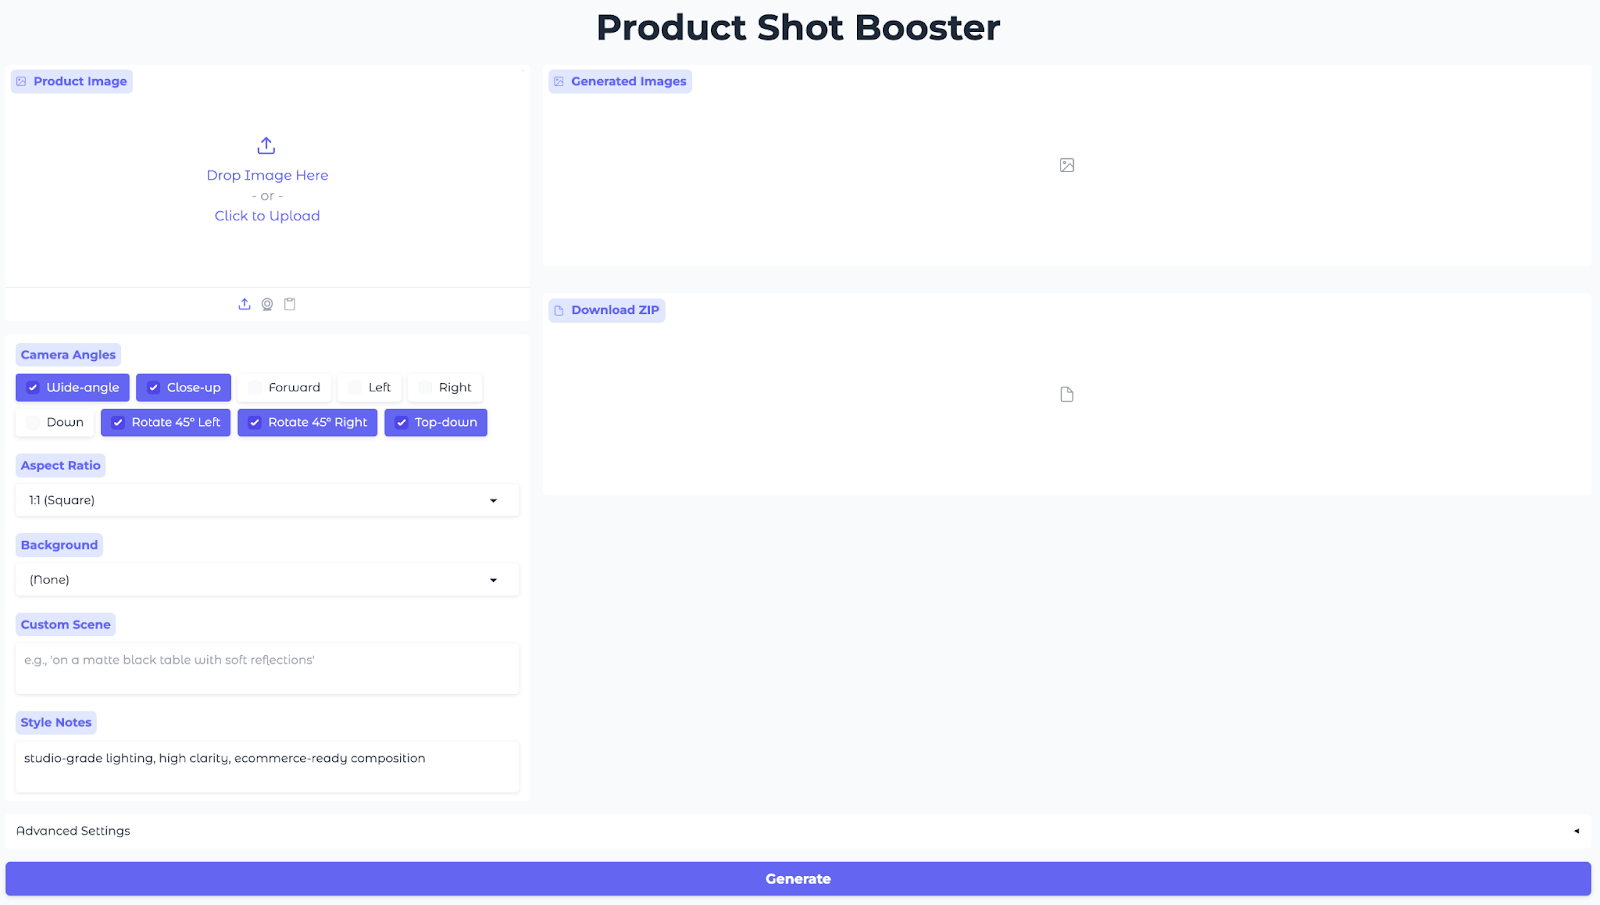
The above code builds an interactive Gradio app that wires a single generate action to the inference and exposes a shareable web UI, by using:
- Inputs (left column): The left pane collects everything the model needs using a
gr.Imageto upload product photo,gr.CheckboxGroupfor camera angles, twogr.Dropdownsfor aspect ratio and background presets and twogr.Textboxfields for custom scene and style notes to fine-tune the look. - Outputs (right column): A
gr.Gallerymethod shows all generated angles in a grid so you can compare compositions at a glance, and agr.Filecomponent offers ZIP of PNGs for quick download. - Advanced settings : A
gr.Checkboxtoggles Fast Mode (Lightning LoRA) for quick previews on T4-class GPUs, while Seed and Steps adjust reproducibility and the quality/time trade-off.GuidanceandTrue-CFGsteer edit strength versus identity stability, andImages per Anglelets you produce multiple variants per camera macro in one go. - Interface wiring (action): A single Generate button connects all inputs to
generate_images()function(which runs Qwen Edit with the selected adapters) and then tocreate_zip()function(which packages outputs), returning both the gallery and the ZIP back to the interface. - App launch: Finally,
demo.launch()method spins up the web app and provides a public share URL—perfect for Colab sessions, quick demos, or sending stakeholders a link to try the tool themselves.
Finally, hit Generate and watch a full-angle pack render.
Here are the results from my experiments with this model. First, you can see how the products are displayed based on the different parameters set.