Track
AI Fundamentals
10 hr
In this blog post, I'll walk you through how to build a browser extension powered by Qwen-Agent that summarizes the content of any webpage in real time. We'll cover how to:
By the end, you’ll have an offline-capable summarizer agent, powered by Qwen3, that reads and summarizes webpages in your browser with a single click.
We keep our readers updated on the latest in AI by sending out The Median, our free Friday newsletter that breaks down the week’s key stories. Subscribe and stay sharp in just a few minutes a week:
Qwen-Agent is a lightweight Python framework built by Alibaba for developing powerful LLM applications using the Qwen3 family of models. It focuses on supporting:
At its core, Qwen-Agent simplifies the development of modular AI agents with robust reasoning and code execution capabilities. It includes atomic components like LLM wrappers and tools, as well as high-level Agent classes for orchestrating workflows.
Qwen-Agent works with both cloud-based APIs (like Alibaba DashScope) and local OpenAI-compatible runtimes like vLLM and Ollama. It makes it easy to build powerful LLM apps with:
In this section, we’ll build a real-time summarizer extension powered by Qwen-Agent. This includes:
Let’s walk through each part of this project.
In this step, we will cover all the code files that we need to set up for our backend to work synchronously with our extension.
Start by installing ollama on your system. Next, list all Python dependencies required for the backend in requirements.txt. This helps ensure a consistent environment setup across machines and containers.
fastapi
uvicorn
python-dateutil
python-dotenv
qwen-agent[code_interpreter]
matplotlib
Here’s a breakdown of what each library is used for:
qwen-agent[code_interpreter]: This is a core agent framework with tool-use support, enabling code execution and structured reasoning.fastapi and uvicorn: These libraries together power the async API backend and serve your summarizer logic.python-dotenv and python-dateutil: These Utility libraries handle environment variables and date/time processing (useful for future scaling).matplotlib: It is used for plotting or showing visual outputs (optional) If you want to run this project locally, run the following command to install all dependencies:
pip install -r requirements.txtNow, let’s set up a Dockerfile that creates a minimal Python environment with our app and exposes port 7864, allowing the Chrome extension to send requests to the FastAPI backend.
FROM python:3.10

WORKDIR /app
COPY . .

RUN pip install --no-cache-dir -r requirements.txt

EXPOSE 7864

CMD ["uvicorn", "app:app", "--host", "0.0.0.0", "--port", "7864"]
This setup is optional if you choose to run the project locally using Uvicorn instead of Docker.
Next, you’ll need to pull and serve the Qwen3 model locally using Ollama. This step enables offline inference by hosting the LLM service on your machine.
ollama pull qwen3:1.7b
ollama serve The app.py file defines a FastAPI server that streams real-time summaries of webpage content using a locally running Qwen3:1.7B model via Qwen-Agent.
Start with importing FastAPI, streaming utilities, and Qwen-Agent components like Assistant, which wraps the model and its tool abilities.
import re
from fastapi import FastAPI, Request
from fastapi.responses import StreamingResponse
from pydantic import BaseModel
from typing import List, Dict, Any
from qwen_agent.agents import Assistant
import loggingNext, we define a simple RequestData schema to receive content, and create a bot instance of Assistant.
app = FastAPI()
class RequestData(BaseModel):
    content: str
bot = Assistant(
    llm={
        "model": "qwen3:1.7b",
        "model_server": "http://localhost:11434/v1",
        "api_key": "EMPTY"
    },
    function_list=["code_interpreter"],
    system_message="You are a summarization assistant. Directly output the cleaned summary of the given text without any reasoning, self-talk, thoughts, or internal planning steps. Do not include phrases like 'I think', 'maybe', 'let's', 'the user wants', or anything not part of the final summary. Your output must look like it was written by an editor, not a model."
)
In the above code, the bot is an instance of the Assistant class from Qwen-Agent, configured to interact with the locally served Qwen3:1.7B model via Ollama. It uses the built-in code_interpreter tool to reason through content and execute Python code if needed. A custom system_message guides its behavior to generate concise webpage summaries.
Note: You can use smaller models like qwen3:0.6b or qwen3:1.7b to significantly reduce response time and memory usage. This is especially useful for faster summarization tasks without much reasoning overhead.
Finally, an endpoint reads the incoming content and yields live summary text as it's generated by the model. It uses streaming output so the user doesn’t have to wait for the full response to be generated.
@app.post("/summarize_stream_status")
async def summarize_stream_status(data: RequestData):
    user_input = data.content
    def stream():
        try:
            yield "🔍 Reading content on website...\n"
            print(" Received text:", user_input[:200])
            messages = [
            {"role": "system", "content": "You are a summarization assistant. Directly output the cleaned summary of the given text without any reasoning, self-talk, thoughts, or internal planning steps. Do not include phrases like 'I think', 'maybe', 'let's', 'the user wants', or anything not part of the final summary. Your output must look like it was written by an editor, not a model."},
            {"role": "user", "content": "<nothink>\nSummarize the following text clearly and concisely. Do not include any internal thoughts, planning, or reasoning. Just return the final summary:\n\n" + user_input + "\n</nothink>"}
            ]
            yield "🧠 Generating summary...\n"
            result = bot.run(messages)
            result_list = list(result)
            print(" Raw result:", result_list)
            # Extract summary
            last_content = None
            for item in reversed(result_list):
                if isinstance(item, list):
                    for subitem in reversed(item):
                        if isinstance(subitem, dict) and "content" in subitem:
                            last_content = subitem["content"]
                            break
                if last_content:
                    break
            if not last_content:
                yield " No valid summary found.\n"
                return
            summary = re.sub(r"</?think>", "", last_content)
            summary = re.sub(
                r"(?s)^.*?(Summary:|Here's a summary|The key points are|Your tutorial|This tutorial|To summarize|Final summary:)",
                "",
                summary,
                flags=re.IGNORECASE
            )
            summary = re.sub(r"\n{3,}", "\n\n", summary)
            summary = summary.strip()
            yield "\n📄 Summary:\n" + summary + "\n"
        except Exception as e:
            print(" Error:", e)
            yield f"\n Error: {str(e)}\n"
    return StreamingResponse(stream(), media_type="text/plain")
Here’s how our summarizer works:
POST data instruction using the RequestData schema, expecting a field named content that holds the raw webpage text.stream() generator function is defined to yield messages progressively. This allows real-time feedback to be sent back to the frontend before the final summary is complete.</nothink> tag wrapper in the user message to suppress internal reasoning, and a detailed system prompt reinforces this behavior.bot.run(messages) where messages is a list containing a single user input message. result_list. The code then loops through the list in reverse to extract the most recent content string returned by the LLM.<think> and </think> are removed from the output using a regex to clean the final summary.This section walks through all the files required to set up the extension, including the frontend UI, logic to extract page content, background communication scripts, and configuration metadata.
Before we look at the individual scripts, here’s a simple breakdown of what each file does:
manifest.json: This is a configuration file that defines extension metadata, permissions, and scripts.popup.html: This script defines the visible UI for the Chrome extension popup with a button and output panel.popup.js: This handles frontend logic and captures the current tab’s text and streams the summary response to the UI.content.js: It extracts visible webpage content when requested, acting as the content script.background.js: This script coordinates backend communication and relays streamed summaries to the popup.icon.png: This is an extension icon displayed in Chrome's toolbar and extension manager.Together, these files make the extension interactive, reactive, and able to talk to a local model server.
The manifest.json script contains metadata for Chrome. It defines the extension’s behavior, permissions, background service worker, and popup UI.
{
    "manifest_version": 3,
    "name": "Web Summarizer",
    "version": "1.0",
    "description": "Summarize the content of the current page using a local LLM agent.",
    "permissions": [
      "scripting",
      "activeTab",
      "storage"
    ],
    "host_permissions": [
      "<all_urls>"
    ],
    "action": {
      "default_popup": "popup.html",
      "default_icon": "icon.png"
    },
    "background": {
      "service_worker": "background.js"
    },
    "content_scripts": [
      {
        "matches": ["<all_urls>"],
        "js": ["content.js"],
        "run_at": "document_idle"
      }
    ]
}
This file defines the configuration and capabilities of your Chrome extension. It grants essential permissions such as scripting (to inject JavaScript), activeTab (to access the current tab), and storage (for saving user preferences).
The host_permissions field with "<all_urls>" allows the extension to run on any webpage. It also sets up the extension's UI through popup.html and icon.png, and registers background behavior using a service worker (background.js). Finally, it defines a content script (content.js) to run on all loaded pages, enabling interaction with webpage content when needed.
The popup.html defines the visible interface of the extension. It connects to the active tab that captures the visible text and sends it to your backend server.
<!DOCTYPE html>
<html>
<head>
  <meta charset="UTF-8">
  <meta http-equiv="X-UA-Compatible" content="IE=edge">
  <meta name="viewport" content="width=device-width, initial-scale=1.0">
  <title>Web Summarizer Assistant</title>
  <style>
    body {
      width: 500px;
      height: 600px;
      background-color: aliceblue;


    }
    .container {
      display: flex;
      flex-direction: column;
      align-items: center;
      gap: 15px;
    }
    button {
      border: none;
      border-radius: 5px;
      background-
      color: white;


      cursor: pointer;
    }
    button:hover {
      background-
    }
    pre {
      background-
      border: 1px solid #ccc;
      border-radius: 5px;

      width: 90%;
      height: 350px;
      overflow: auto;
    }
    input[type="text"] {

      width: 90%;
      border-radius: 5px;
      border: 1px solid #ccc;
    }
  </style>
</head>
<body>
  <div class="container">
    <h2>Summarize Current Page</h2>
    <button id="summarizeBtn">Summarize</button>
    <pre id="output">Summary will appear here...</pre>
  </div>
  <script src="popup.js"></script>
</body>
</html>
Let’s understand the above code step by step:
<head> tag that includes meta tags for character encoding, viewport settings, and a <title> tag.<body> tag, a container holds all UI elements, including:<h2> heading prompting the user to summarize the current page.Summarize button (“#summarizeBtn”) that the user clicks to trigger content extraction and summarization.<pre> element (“#output”) that serves as a scrollable panel for displaying the summary as it streams in.pre block is used to make output scrollable and visually distinct.popup.js script listens for button clicks, extracts the page content, sends it to the FastAPI backend, and updates the output panel with streaming summary text.The popup.js acts as a frontend logic controller that responds to button clicks, extracts text from the current tab, sends it to the backend, and streams the summary back into the output area in real time.
document.addEventListener('DOMContentLoaded', function () {
    let serverAddress = '127.0.0.1';
    document.getElementById('summarizeBtn').addEventListener('click', async () => {
      const [tab] = await chrome.tabs.query({ active: true, currentWindow: true });
      chrome.scripting.executeScript(
        {
          target: { tabId: tab.id },
          func: () => {
            try {
              return document.body?.innerText || 'EMPTY';
            } catch (e) {
              return 'SCRIPT_ERROR';
            }
          }
        },
        async (results) => {
          const pageText = results?.[0]?.result || '';
          console.log(' Extracted text:', pageText.slice(0, 500));
          if (pageText === 'SCRIPT_ERROR') {
            document.getElementById('output').innerText = 'Could not access page content (script error).';
            return;
          }
          if (!pageText || pageText.trim() === 'EMPTY') {
            document.getElementById('output').innerText = ' No page text found.';
            return;
          }
          try {
            console.log( Sending streaming POST to http://${serverAddress}:7864/summarize_stream_status);
            const res = await fetch(http://${serverAddress}:7864/summarize_stream_status, {
            method: 'POST',
            headers: { 'Content-Type': 'application/json' },
            body: JSON.stringify({ content: pageText }),
            });
            const reader = res.body.getReader();
            const decoder = new TextDecoder();
            let resultText = '';
            while (true) {
            const { done, value } = await reader.read();
            if (done) break;
            const chunk = decoder.decode(value, { stream: true });
            resultText += chunk;
            document.getElementById('output').innerText = resultText;
            }
          } catch (err) {
            console.error(' Fetch error:', err);
            document.getElementById('output').innerText = ' Failed to get summary.\n' + err.message;
          }
        }
      );
    });
  });
This JavaScript file powers the frontend UI logic of the Chrome extension, letting users extract and summarize webpage content with a click.
Here’s how it works:
DOMContentLoaded), an event listener is attached to the "Summarize" button.chrome.tabs.query.chrome.scripting.executeScript, which tries to extract the innerText of the page body.http://127.0.0.1:7864/summarize_stream_status.res.body.getReader(), which allows partial chunks of the summary to appear in real time in the output panel.TextDecoder decodes each streamed chunk of text, appending it live to the display.Before we can send webpage content to our backend, we need a way to extract it from the current tab. The content.js script listens for messages from the background or popup scripts and returns the visible text content from the webpage.
chrome.runtime.onMessage.addListener((request, sender, sendResponse) => {
    if (request.type === "GET_PAGE_TEXT") {
      const bodyText = document.body.innerText.trim();
      sendResponse({ text: bodyText || null });
    }
});
This script listens for messages of type "GET_PAGE_TEXT" and responds by extracting and returning the visible body text (document.body.innerText). This allows the background worker to easily request webpage content without injecting code each time, keeping communication clean and asynchronous.
The background script (background.js) bridges the popup UI and content scripts. It ensures that message passing and summarization coordination happen correctly behind the scenes.
chrome.runtime.onMessage.addListener(async (request, sender, sendResponse) => {
    if (request.type === "SUMMARIZE_PAGE") {
      const tabId = sender.tab.id;
        chrome.scripting.executeScript(
        {
          target: { tabId },
          func: () => {
            try {
              return document.body?.innerText || 'EMPTY';
            } catch (e) {
              return 'SCRIPT_ERROR';
            }
          }
        },
        async (results) => {
          const pageText = results?.[0]?.result || '';
          if (!pageText || pageText === 'SCRIPT_ERROR') {
            chrome.runtime.sendMessage({
              type: 'SUMMARY_RESULT',
              summary: ' Failed to read page text.',
            });
            return;
          }
          chrome.storage.local.get(['database_host'], async function (result) {
            const host = result.database_host || '127.0.0.1';
            try {
              const response = await fetch(http://${host}:7864/summarize_stream_status, {
                method: 'POST',
                headers: { 'Content-Type': 'application/json' },
                body: JSON.stringify({ content: pageText }),
              });
              const reader = response.body.getReader();
              const decoder = new TextDecoder();
              let fullSummary = '';
              while (true) {
                const { done, value } = await reader.read();
                if (done) break;
                const chunk = decoder.decode(value, { stream: true });
                fullSummary += chunk;
                chrome.runtime.sendMessage({
                  type: 'SUMMARY_PROGRESS',
                  chunk
                });
              }
              chrome.runtime.sendMessage({
                type: 'SUMMARY_DONE',
                summary: fullSummary
              });
            } catch (err) {
              chrome.runtime.sendMessage({
                type: 'SUMMARY_RESULT',
                summary: ' Error during summarization: ' + err.message
              });
            }
          });
        }
      );
      return true;
    }
  });
The above code ensures a smooth flow of content extraction, summarization, and real-time updates. Here’s a step-by-step breakdown of how it works:
sender.tab.id and runs an injected script via chrome.scripting.executeScript to extract the visible text from the webpage.database_host (usually 127.0.0.1) from Chrome's local storage and uses it to send a POST request to the FastAPI backend with the extracted content.ReadableStreamDefaultReader.chrome.runtime.sendMessage with type 'SUMMARY_PROGRESS'.This background script is key to enabling real-time, streaming summaries in the Chrome extension without blocking the UI or reloading the page.
Choose or draw an icon image for the extension and save it as icon.png within the extension folder. This is what we’ll use:

Image generated with FireFly
Your overall folder structure should look like this:
QWEN-WEB-SUMMARIZER/
├── backend/
│   ├── app.py
│   ├── Dockerfile
│   └── requirements.txt
├── extension/
│   ├── background.js
│   ├── content.js
│   ├── icon.png
│   ├── manifest.json
│   ├── popup.html
│ └── popup.jsTo run everything locally, run the following command in the terminal:
uvicorn backend.app:app --host 0.0.0.0 --port 7864This is ideal for local development or debugging without Docker. To run in Docker, run the following commands one at a time in your terminal:
docker build -t qwen-agent-backend .
docker run -p 7864:7864 qwen-agent-backend
The Chrome extension communicates with port 7864. Now, follow the following steps to get your extension running on Chrome:
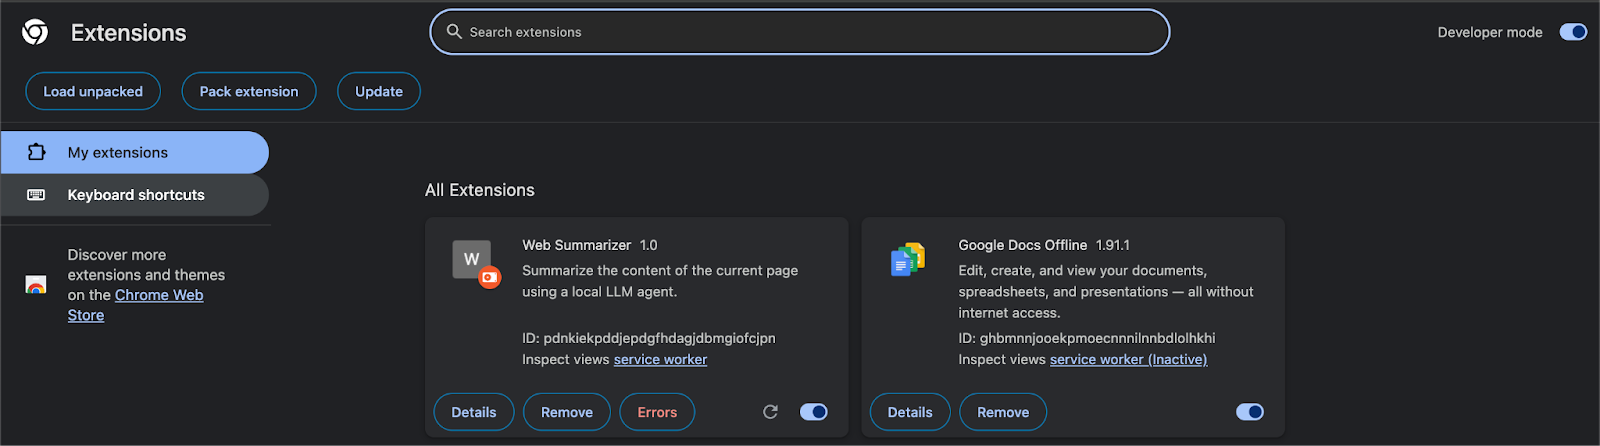
Let’s see the results:
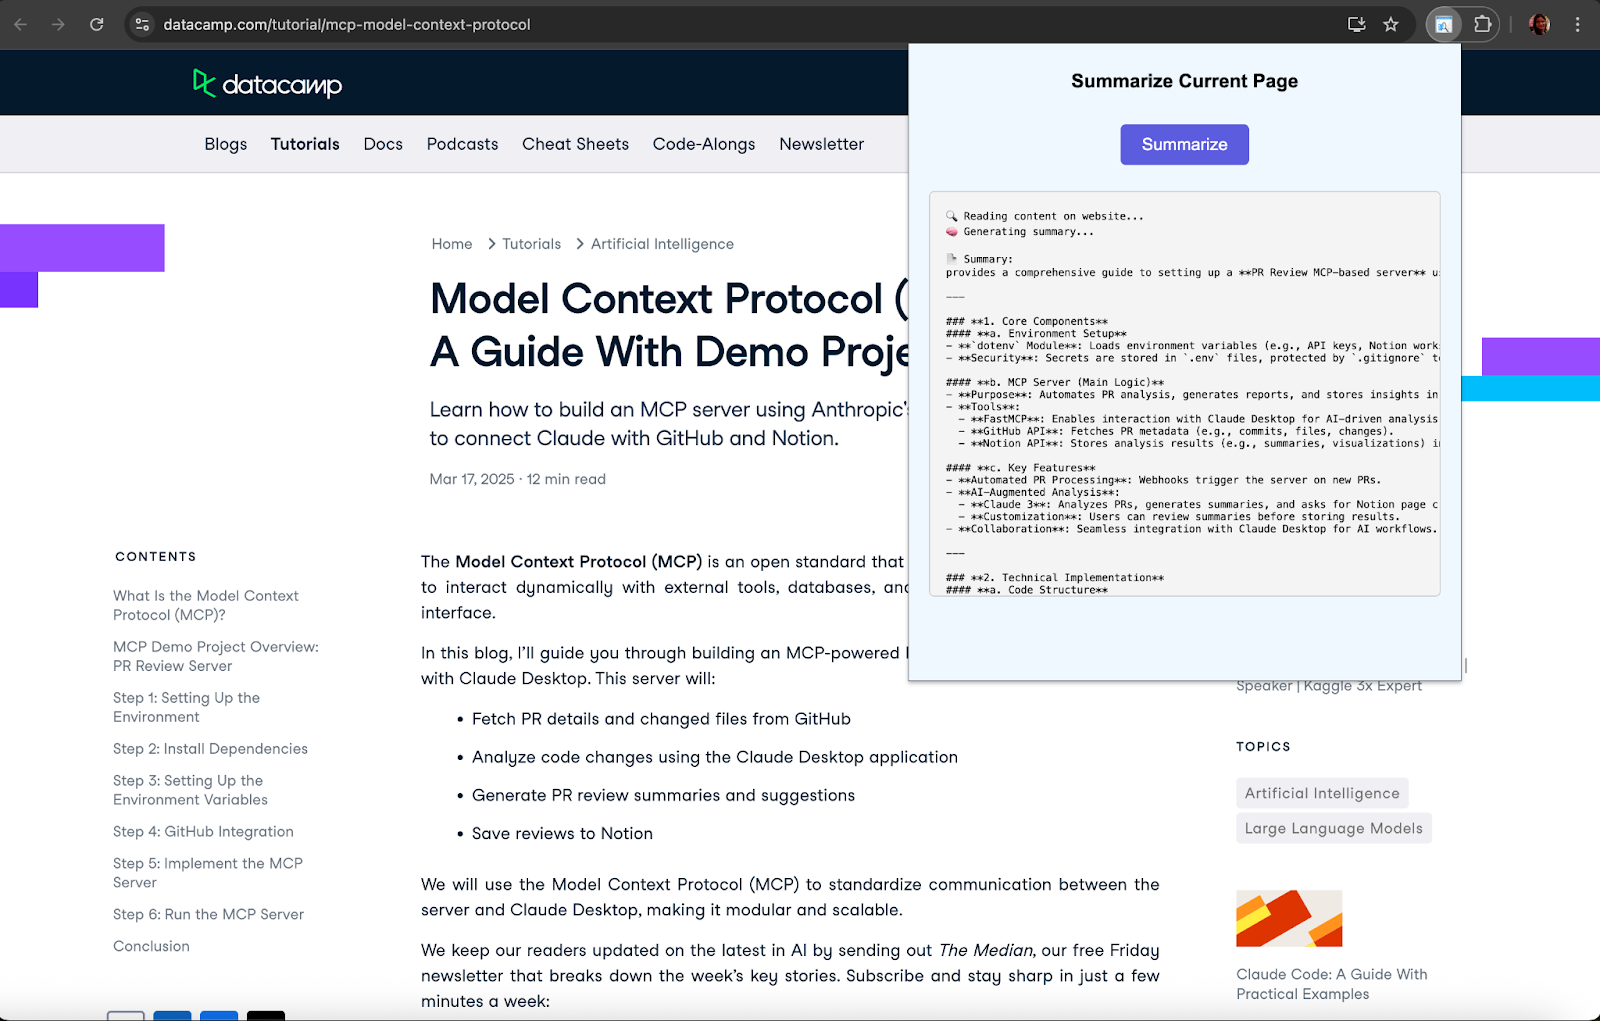
In this project, we built a real-time webpage summarization assistant using the Qwen-Agent framework and Qwen3:1.7B model running locally via Ollama. We developed a FastAPI backend to handle LLM inference and integrated it with a Chrome extension that captures visible page content and displays a live-streamed summary.
This demo showcases how Qwen-Agent can enable fully offline, tool-augmented reasoning workflows in the browser. It lays the foundation for building more advanced local agents such as browser automation tools, research copilots, or document-based chatbots.
To learn more about AI agents, check out these blogs:
Learn AI with these courses!
Track
Course
Course
Tutorial
Dr Ana Rojo-Echeburúa
Tutorial
Aashi Dutt
Tutorial
Aashi Dutt
Tutorial
Dr Ana Rojo-Echeburúa
Tutorial
Aashi Dutt
Tutorial
Abid Ali Awan