
Track
Image Processing in Python
12 hr
Photoshop users spend hours manually masking objects and painting in backgrounds. Qwen-Image-Layered, a new model from the Qwen team at Alibaba, does this automatically: feed it a single image, and it returns multiple RGBA layers with transparent backgrounds.
This tutorial covers what Qwen-Image-Layered is, how it differs from segmentation tools like SAM, and how to run it in Python. You'll decompose an image into layers, then edit and recombine those layers into a new composite. By the end, you'll have a working workflow for programmatic image editing that skips manual masking entirely.
If you're new to handling image data and transparency in code, check out our Image Processing in Python course to build a strong foundation before diving in. I also recommend reading our guide on Google's latest image generation model, Nano Banana 2.
Qwen-Image-Layered is built on Qwen2.5-VL, a vision-language model from Alibaba. The VL backbone means the model understands what's in an image semantically: it can distinguish a product from its shadow and from the surface it sits on, not just detect edges. Like Vision Transformers, it processes images through attention mechanisms rather than traditional convolutional approaches.
When you run inference, you specify how many layers you want. Ask for 4, and the model distributes the image content across 4 RGBA outputs. Ask for 8, and you get finer separation. The model decides what goes where based on the scene structure.
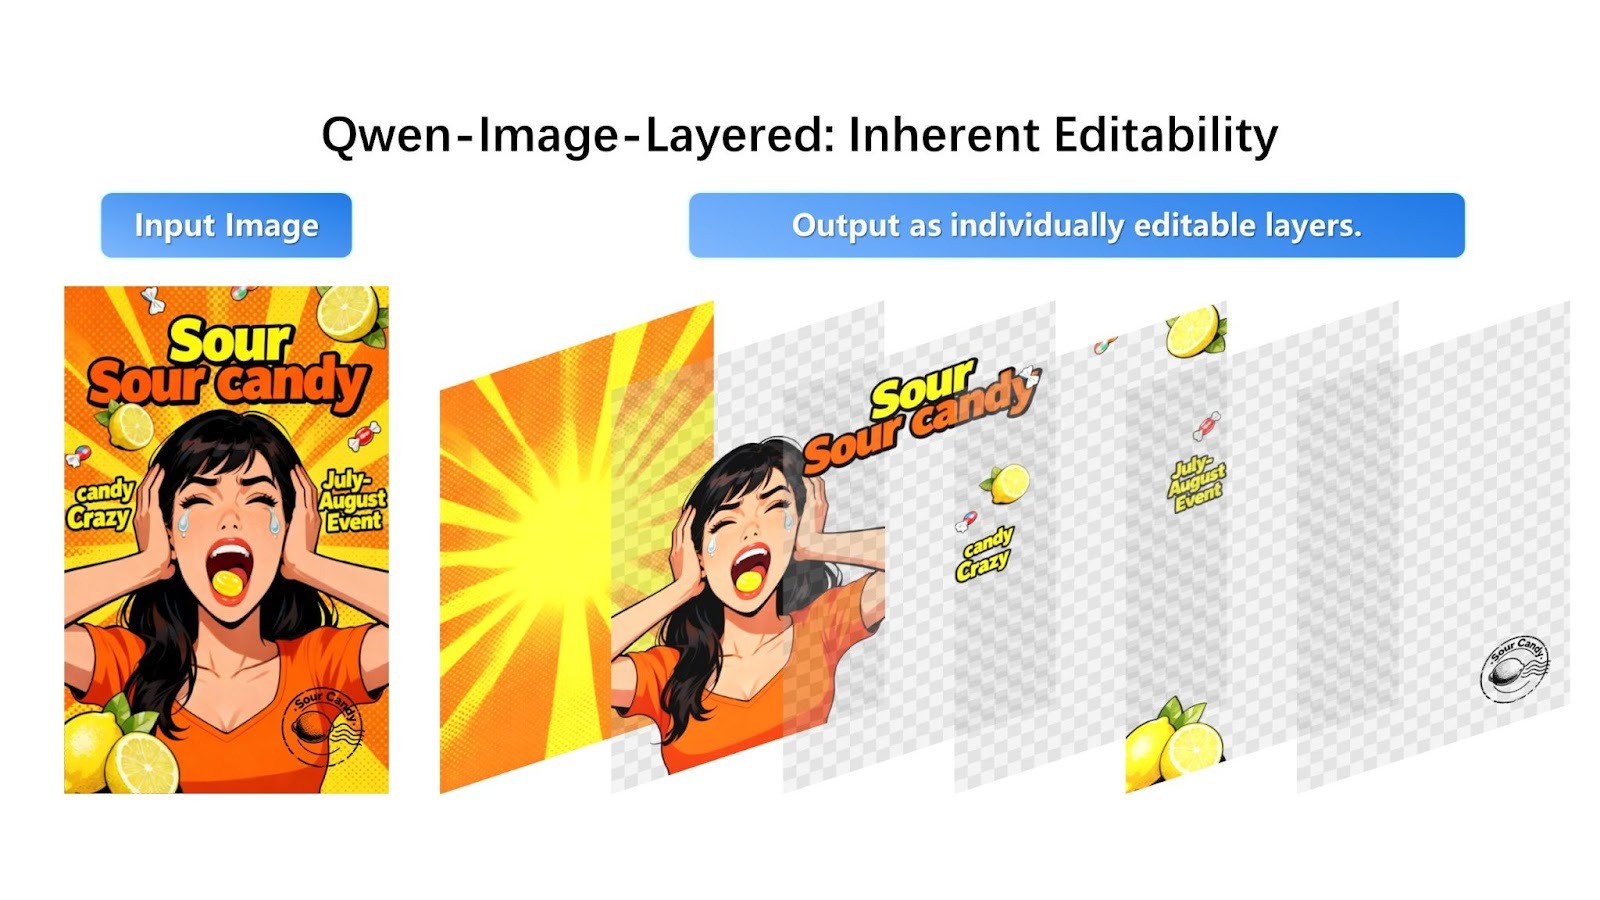
Here's what the decomposition looks like in Qwen's announcement:
The model takes a composite image and separates it into individually editable RGBA layers with transparency.
The candy promotional image breaks down into four distinct layers: the starburst background, the person in orange, the "Sour Candy" text and branding, and the individual candy pieces. Each layer comes out with a transparent background (shown with the checkerboard pattern), ready for editing or rearrangement.
The model distributes visual elements across layers based on depth and semantic understanding. Background graphics go to layer 0, the main subject (person) goes to layer 1, text overlays go to layer 2, and small foreground objects (candy pieces) go to layer 3. Each element is cleanly separated with proper transparency.
If you've worked with image segmentation before, you might wonder how Qwen-Image-Layered compares to existing tools, particularly the Segment Anything Model (SAM).
SAM and similar segmentation models output masks: binary maps of which pixels belong to which object. Useful, but a mask just tells you where something is. Extracting the object still leaves a hole in the original image.
Qwen-Image-Layered, on the other hand, outputs complete layers. The foreground object comes out with transparency, and the background layer behind it is already filled in. When you delete or move a layer later, there's nothing to patch.
|
Feature |
Qwen-Image-Layered |
Segment Anything Model 2 (SAM 2) |
|
Primary goal |
Layer decomposition (create editable assets) |
Segmentation (identify and isolate pixels) |
|
Key output |
Stack of RGBA images (transparent layers) |
Binary Masks (black & white outlines) |
|
Background handling |
Inpaints occlusions: Generates pixels to fill the "hole" behind an object. |
None: Leaves the background empty/black where the object was removed. |
|
Input modality |
Image + text prompt (optional) |
Image/video + points, boxes, or masks |
|
Architecture type |
Generative (diffusion-based, Qwen2.5-VL) |
Discriminative (transformer-based) |
|
Video support |
Limited (frame-by-frame application) |
Native (state-of-the-art object tracking in video) |
|
User control |
Variable layers (e.g., "split this into 4 layers vs 8 layers") |
Promptable (click points or draw boxes to select specific objects) |
|
Best use case |
Graphic design, asset creation, "Photoshop-free" editing. |
Video editing, object tracking, scientific analysis, robotics. |
SAM uses a discriminative approach, analyzing existing pixels to define object boundaries precisely. Qwen-Image-Layered, by contrast, employs a generative diffusion-based architecture that reconstructs occluded or hidden regions through learned image generation.
While SAM outputs masks that define what to remove, Qwen-Image-Layered generates plausible background content to complete the layered decomposition. Notably, SAM can achieve similar background filling when combined with dedicated inpainting models, but Qwen-Image-Layered integrates this capability end-to-end within its decomposition process.
The input control mechanism is different, too: SAM relies on precise interactive prompts, requiring you to click points or draw bounding boxes to select a specific target. Qwen-Image-Layered operates more holistically, allowing you to simply specify a desired number of layers (e.g., "split this into 4 layers") to organize the entire image structure automatically.
We have to note that SAM 2 is explicitly designed for video, capable of tracking objects through sequences using a memory-augmented streaming architecture (maintains ~6 recent frames) with high temporal consistency. Qwen-Image-Layered is specialized for static image decomposition and does not currently offer native object tracking for video editing.
Now for the hands-on part. Before writing any code, there's a practical consideration: where to run the model.
Qwen-Image-Layered requires over 57GB of model weights and a high-end GPU with plenty of VRAM.
I tested running it locally on Google Colab with a T4 GPU, and the session ran out of RAM before the model even finished downloading. Disk usage climbed to 90GB of the 112GB available in the GPU runtime. The model is simply too large for free-tier cloud environments.
Large generative models like Stable Diffusion face similar hosting challenges, which is why hosted APIs have become common.
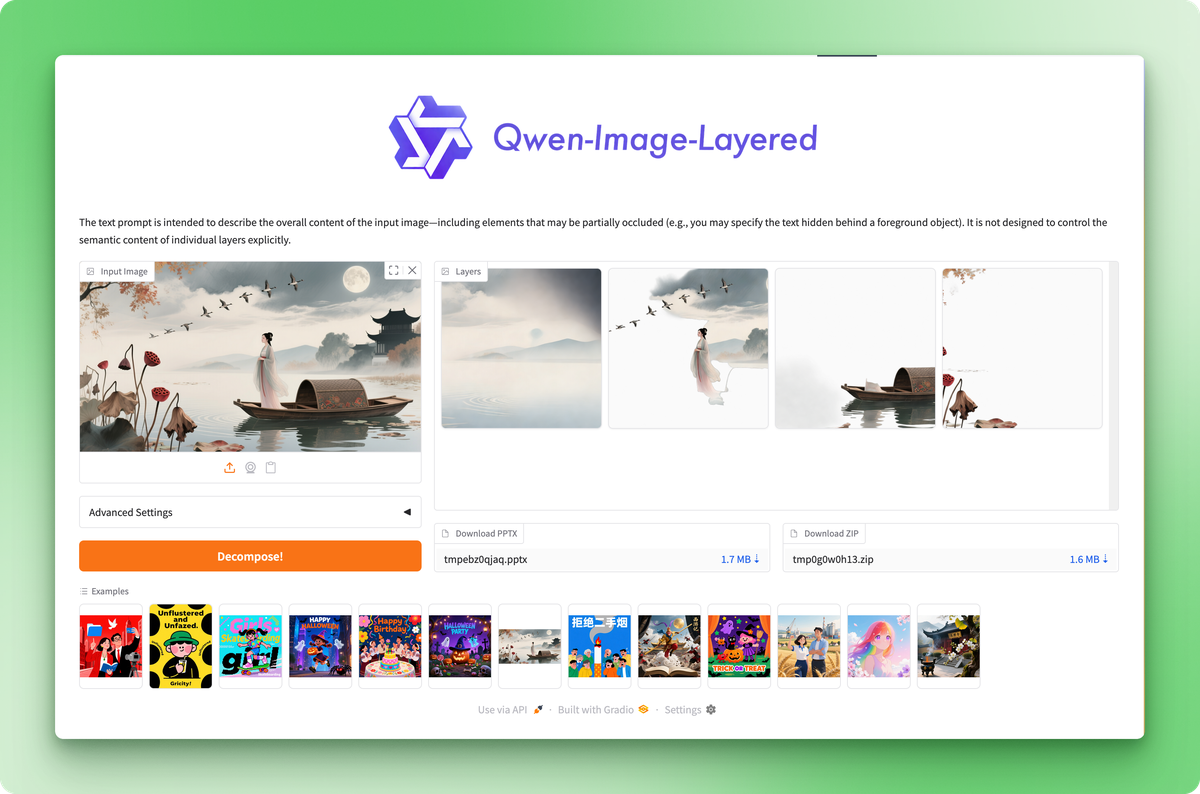
For this tutorial, we'll use Replicate's hosted API. Each decomposition costs about $0.03, which buys you a stable, reproducible run without worrying about memory limits or dependency conflicts. If you just want to try the model without writing code, the Hugging Face Space offers a free web interface where you can upload images and download layers manually.
The Hugging Face Space lets you test the model without code, but the API gives you programmatic control.
Create a new project directory and install the required packages:
pip install replicate python-dotenvGet your API token from the Replicate account settings and save it in a .env file:
REPLICATE_API_TOKEN=your_token_hereOfficial model announcements usually showcase cherry-picked examples where the model performs at its best. Let's test with a real-world image instead to see realistic performance.
This is the image we'll decompose into layers:

Photo by Karola G on Pexels
The photograph shows three skincare products on a mint surface against a lavender backdrop: a white gift box with black ribbon, a pink serum bottle, and a small cream jar. Clean composition, distinct objects, subtle shadows. A good test case for layer separation.
import replicate
from dotenv import load_dotenv

load_dotenv()

with open("data/healthcare_products.jpg", "rb") as f:
	output = replicate.run(
         "qwen/qwen-image-layered",
     	    input={
         	"image": f,
         	"num_layers": 4,
         	"go_fast": True,
         	"output_format": "png",
         	"seed": 42,
     	    }
	)
The num_layers parameter controls how finely the model splits the image. Values can range from 2 to 8. With 4 layers, you get a reasonable balance between granularity and manageability. Setting seed to a fixed value makes the output reproducible.
The API also accepts URLs directly, so you can skip the file handling if your image is hosted somewhere:
output = replicate.run(
	"qwen/qwen-image-layered",
	input={
     	  "image": "https://example.com/photo.jpg",
     	  "num_layers": 4,
     	  "go_fast": True,
     	  "output_format": "png",
	}
)The API returns a list of FileOutput objects. Each one has a .read() method that gives you the image bytes:
for i, layer in enumerate(output):
	with open(f"layer_{i}.png", "wb") as f:
     	  f.write(layer.read())
Layers are ordered from bottom to top: index 0 is the background, and higher indices stack above it. Each PNG is an RGBA image with transparency, where other layers would show through.
Here's the result:
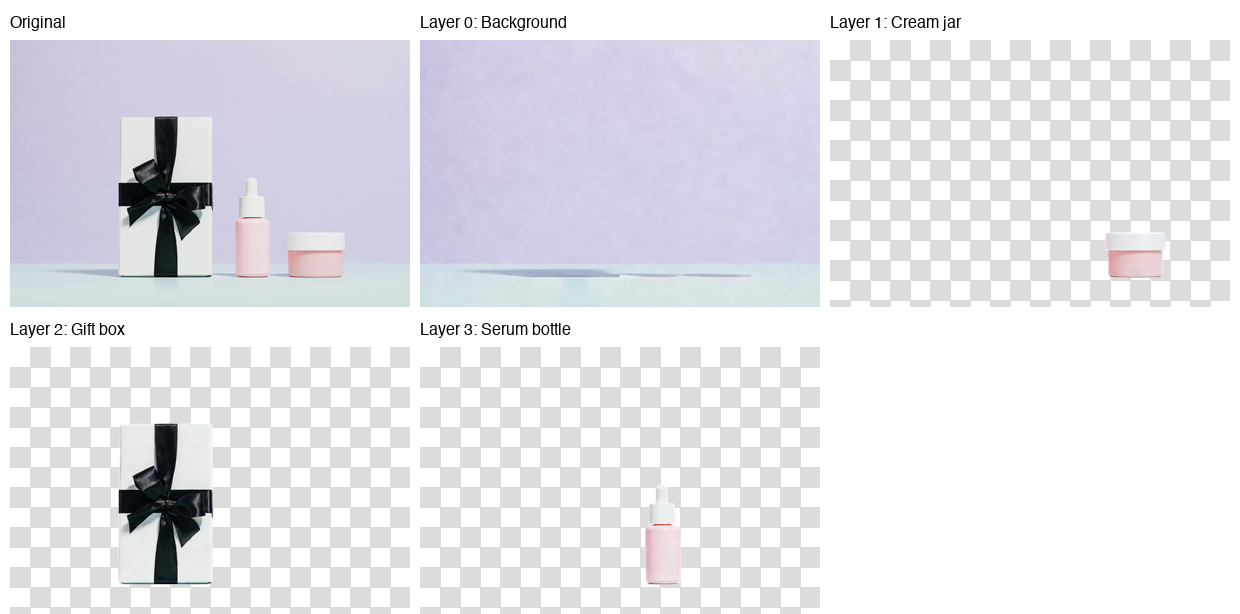
The model placed the background (lavender wall and mint surface) on layer 0, the cream jar on layer 1, the gift box on layer 2, and the serum bottle on layer 3. Each product came out with clean edges and accurate transparency.
Look at the background layer, though, and you'll spot faint shadow remnants where the products used to be. This showed up consistently in my tests: the model handles object isolation well, but struggles with background reconstruction when shadows are involved.
The more prominent the shadows in your source image, the more visible these artifacts become. It's the first model of its kind, so expect the Qwen team to refine this in future updates.
Decomposition is only half the workflow. The layers become useful when you edit and reassemble them into something new.
Product photographers often need the same shot with different backgrounds for A/B testing, seasonal campaigns, or platform-specific requirements. With separated layers, this takes a few lines of code.
from PIL import Image

# Load the decomposed layers
layers = [Image.open(f"layer_{i}.png") for i in range(4)]

# Create a new background (solid coral)
new_bg = Image.new("RGBA", layers[0].size, (255, 180, 162, 255))

# Replace the original background layer
layers[0] = new_bg

# Composite from bottom to top
result = layers[0]
for layer in layers[1:]:
	result = Image.alpha_composite(result, layer)

result.save("coral_background.png")
The alpha_composite() function handles RGBA blending automatically. It respects the transparency in each layer, so foreground objects sit naturally on top of whatever background you provide.
PIL makes image manipulation straightforward, and if you need to apply more complex transformations, PyTorch's image processing capabilities integrate well with PIL workflows.
Here's the result:
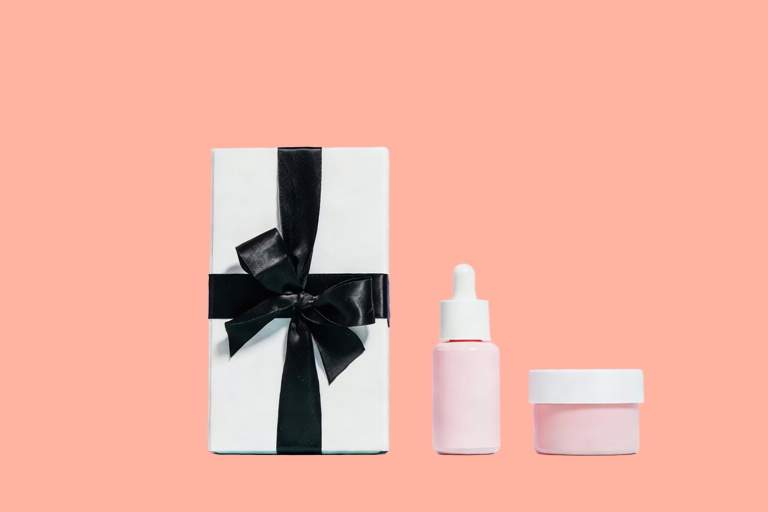
Same products, different environment, no manual masking. You could swap in a gradient, a texture, or another photograph entirely. The process stays the same: replace layer 0, composite the rest.
The same pattern applies to other edits. Remove an object by skipping its layer:
# Composite without the cream jar (layer 1)
layers_without_jar = [layers[0], layers[2], layers[3]]

result = layers_without_jar[0]
for layer in layers_without_jar[1:]:
	result = Image.alpha_composite(result, layer)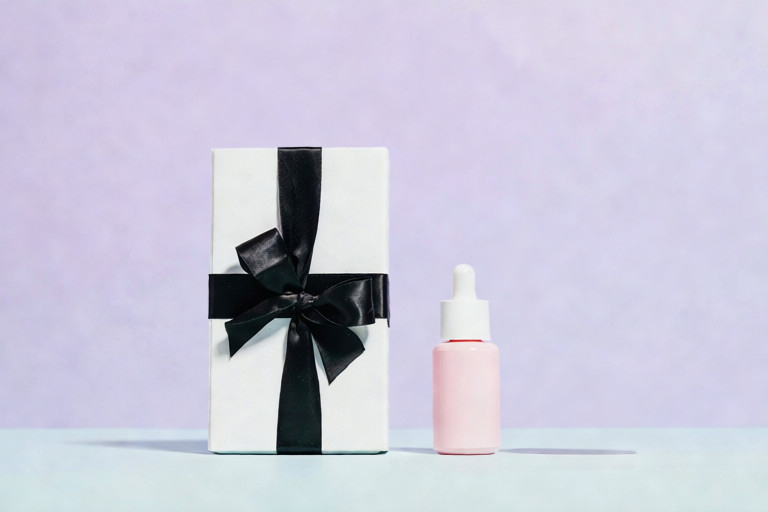
To reposition an object by pasting it at different coordinates, use the paste() method with your chosen x/y offset:
# Move the serum bottle 50 pixels left
 canvas = Image.new("RGBA", layers[0].size, (0, 0, 0, 0))
 canvas.paste(layers[3], (-50, 0), layers[3])
 layers[3] = canvas

 # Then composite as usual
The workflow is always the same:
Each operation happens on an isolated layer, so edits stay contained.
Running these operations in a notebook works for one-off edits, but the feedback loop is slow. You write code, execute a cell, check the output, adjust, repeat. For iterative work where you want to toggle layers on and off, compare compositions, and download results without rerunning cells, a lightweight GUI makes more sense.
We'll build a Streamlit app in about 160 lines that lets you upload an image, decompose it, toggle layers, and see a live preview. Create a file called streamlit_app.py in your project directory.
Start with the imports and basic configuration:
import os
import io
import time
from typing import List
import streamlit as st
from PIL import Image, ImageDraw
from dotenv import load_dotenv
import replicate

load_dotenv()

# Constants
MAX_LAYERS, MIN_LAYERS, DEFAULT_LAYERS = 8, 2, 4
THUMBNAIL_SIZE = (150, 150)

# Initialize session state
if "layers" not in st.session_state:
	st.session_state.layers = []
	st.session_state.layer_visibility = []
	st.session_state.original_image = None

st.set_page_config(page_title="Qwen-Image-Layered", page_icon="🎨", layout="wide")
st.title("🎨 Qwen-Image-Layered")
st.markdown("Decompose images into editable RGBA layers")
Session state persists across Streamlit reruns. Without it, your layers would disappear every time someone clicks a button.
Before calling Replicate, make sure the token exists:
token = os.environ.get("REPLICATE_API_TOKEN")
if not token:
	st.error("REPLICATE_API_TOKEN not found. Set it in your .env file.")
	st.code("export REPLICATE_API_TOKEN=your_token_here", language="bash")
	st.stop()
st.stop() halts execution if the token is missing. No point rendering the rest of the UI.
The decomposition API costs $0.03 per call and takes 30-60 seconds. Caching prevents redundant calls:
@st.cache_data(show_spinner=False)
def decompose_image(_image_bytes: bytes, num_layers: int, seed: int) -> List[bytes]:
    """Call Replicate API with retry logic for 502 errors."""
    for attempt in range(3):
        try:
            output = replicate.run(
                "qwen/qwen-image-layered",
                input={
                    "image": io.BytesIO(_image_bytes),
                    "num_layers": num_layers,
                    "go_fast": True,
                    "output_format": "png",
                    "seed": seed,
                },
            )
            return [layer.read() for layer in output]
        except Exception as e:
            if attempt < 2 and ("502" in str(e) or "Replicate" in str(type(e).__name__)):
                time.sleep(5)
                continue
            raise
The underscore prefix on _image_bytes tells Streamlit not to hash that parameter (bytes are expensive to hash). The retry loop handles Replicate's occasional 502 errors by waiting 5 seconds and trying up to 3 times.
Next, we define small utilities for visualization and compositing:
def create_checkerboard(size: tuple) -> Image.Image:
    """Create a checkerboard pattern to show transparency."""
    img = Image.new("RGBA", size, (220, 220, 220, 255))
    draw = ImageDraw.Draw(img)

    square = 10
    for y in range(0, size[1], square):
        for x in range(0, size[0], square):
            if (x // square + y // square) % 2:
                draw.rectangle(
                    [x, y, x + square, y + square],
                    fill=(255, 255, 255, 255),
                )

    return img


def composite_layers(
    layers: List[Image.Image],
    visibility: List[bool],
) -> Image.Image:
    """Composite visible layers from bottom to top."""
    if not layers or not any(visibility):
        return Image.new(
            "RGBA",
            layers[0].size if layers else (400, 400),
            (0, 0, 0, 0),
        )

    result = None
    for layer, visible in zip(layers, visibility):
        if visible:
            result = layer.copy() if result is None else Image.alpha_composite(result, layer)

    return result or Image.new("RGBA", layers[0].size, (0, 0, 0, 0))
The checkerboard makes transparency visible (standard image editor convention). The composite function mirrors what we did in the notebook, now driven by the checkbox state.
The sidebar handles image upload and decomposition settings:
with st.sidebar:
    st.header("🖼️ Image Upload")
    uploaded_file = st.file_uploader(
        "Choose an image",
        type=["png", "jpg", "jpeg"],
        help="Upload an image to decompose",
    )

    if uploaded_file is not None:
        st.session_state.original_image = uploaded_file
        st.image(uploaded_file, caption="Uploaded", use_container_width=True)

    st.divider()

    st.header("⚙️ Settings")
    num_layers = st.slider(
        "Number of layers",
        MIN_LAYERS,
        MAX_LAYERS,
        DEFAULT_LAYERS,
    )
    seed = st.number_input(
        "Random seed",
        0,
        999999,
        42,
        help="For reproducibility",
    )

    # Decompose button
    if st.button(
        "🔄 Decompose Image",
        disabled=uploaded_file is None,
        use_container_width=True,
        type="primary",
    ):
        if st.session_state.original_image is not None:
            image_bytes = st.session_state.original_image.getvalue()

            with st.spinner(f"Decomposing into {num_layers} layers... (30-60s)"):
                try:
                    layer_bytes = decompose_image(image_bytes, num_layers, seed)
                    st.session_state.layers = [
                        Image.open(io.BytesIO(lb)).convert("RGBA") for lb in layer_bytes
                    ]
                    st.session_state.layer_visibility = [True] * len(
                        st.session_state.layers
                    )
                    st.success(
                        f"Decomposed into {len(st.session_state.layers)} layers!"
                    )
                except Exception as e:
                    if "502" in str(e):
                        st.error(
                            "Replicate API error (502). Try again or use fewer layers."
                        )
                    else:
                        st.error(f"Error: {e}")

    # Reset button
    if st.session_state.layers and st.button("🗑️ Reset", use_container_width=True):
        st.session_state.layers = []
        st.session_state.layer_visibility = []
        st.session_state.original_image = None
        st.rerun()
The decompose button is disabled until an image is uploaded. On success, layers are stored in session state, and all visibility toggles default to True.
Two columns display the layer controls and live preview:
col1, col2 = st.columns([1, 1])  # two equal-width columns [web:61]

with col1:
    st.subheader("📑 Layers")

    if not st.session_state.layers:
        st.info("Upload an image and decompose to see layers here.")
    else:
        st.caption("Toggle layers on/off. Layer 0 is the background.")

        cols = st.columns(min(len(st.session_state.layers), 4))
        for i, layer in enumerate(st.session_state.layers):
            with cols[i % 4]:
                thumb = layer.copy()
                thumb.thumbnail(THUMBNAIL_SIZE)

                checkerboard = create_checkerboard(thumb.size)
                display = Image.alpha_composite(checkerboard, thumb)

                st.image(display, caption=f"Layer {i}", use_container_width=True)

                st.session_state.layer_visibility[i] = st.checkbox(
                    f"Show Layer {i}",
                    value=st.session_state.layer_visibility[i],
                    key=f"layer_{i}",
                )

with col2:
    st.subheader("👁️ Preview")

    if not st.session_state.layers:
        st.info("Composite preview will appear here.")
    else:
        composite = composite_layers(
            st.session_state.layers,
            st.session_state.layer_visibility,
        )
        visible = sum(st.session_state.layer_visibility)

        st.caption(f"Showing {visible} of {len(st.session_state.layers)} layers")
        st.image(composite, caption="Composite result", use_container_width=True)

        if visible > 0:
            buf = io.BytesIO()
            composite.save(buf, format="PNG")

            st.download_button(
                "⬇️ Download Result",
                data=buf.getvalue(),
                file_name="composite.png",
                mime="image/png",
                use_container_width=True,
            )
When you uncheck a layer, Streamlit reruns the script. The checkbox updates layer_visibility, the composite function recalculates the preview, and the UI refreshes automatically.
Save the file and run:
streamlit run streamlit_app.py
The app has a decomposed image. Toggle layers off to remove objects from the preview.
Upload an image, click decompose, then toggle layers on and off. The preview updates instantly. Download the result when you find a composition you like. The entire workflow happens in the browser without rerunning notebook cells.
Qwen-Image-Layered takes a different approach to image editing: instead of masking pixels, it separates content into complete RGBA layers with inpainted backgrounds. You get object isolation without the cleanup work. The model struggles with shadow artifacts in complex scenes, but object extraction itself works well.
The Python workflow is straightforward. Call Replicate's API, get back a list of layers, and composite them with PIL. Background swaps and object removal become a few lines of code. The Streamlit app wraps that logic in a GUI for faster iteration.
This is the first model of its kind. The Qwen team ships updates quickly, so expect refinements to background reconstruction and better handling of shadow-heavy images. The research paper covers the architecture if you want to understand how variable layer decomposition works under the hood.
Ready to explore more open-source AI models? Master the ecosystem behind Qwen by taking the Hugging Face Fundamentals skill track on DataCamp.
Artificial Intelligence Courses
Track
Track
Course
Tutorial
Aashi Dutt
Tutorial
Aashi Dutt
Tutorial
François Aubry
Tutorial
Aashi Dutt
Tutorial
Bhavishya Pandit
Tutorial
Aashi Dutt