Track
Associate AI Engineer for Developers
26 hr
SAM 3 is Meta’s new “segment anything” model that can find every instance of a concept via short text prompts or exemplars and return pixel-accurate masks across images and video. This makes it perfect for practical privacy tasks like blurring faces, license plates, or screens without hand-drawing selections or writing classical detectors.
In this tutorial, we’ll build a SAM3 Privacy Filter in Colab using a Gradio UI. Just upload an image or video, type a prompt (like faces, license plates), and SAM3 will return instance masks so we can blur only those pixels. We’ll walk through setup, mask generation, applying a Gaussian blur, and wiring the Gradio app to export the final files.
Segment Anything Model 3 (SAM 3) is Meta’s unified model for open-vocabulary detection, segmentation, and tracking across images and video. Instead of configuring separate detectors for each class, you can prompt with short phrases or exemplars, and SAM 3 returns per-instance masks.
Under the hood, SAM 3 fuses a text encoder and image encoder with a DETR-style detector and a SAM-2–derived tracker with a memory bank. At each frame, it detects masks for your concept from the prompt, propagates masks forward via the tracker, and merges newly detected and tracked masks into the final output for that frame.
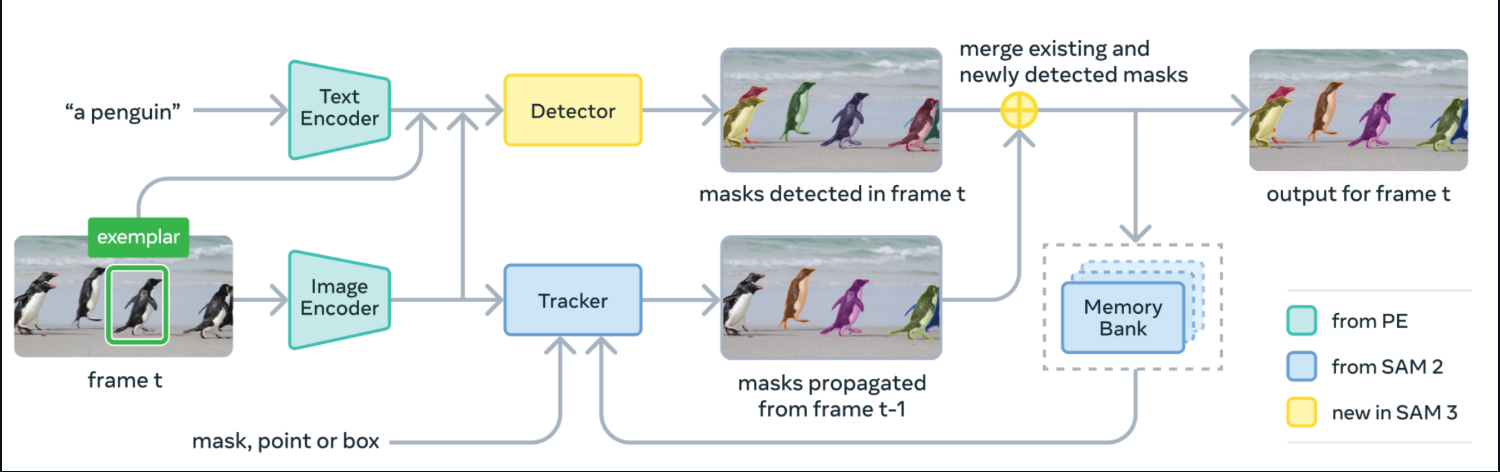
Source: SAM3 GitHub
SAM 3 is released with model weights, fine-tuning code, and evaluation data, including the SA-Co benchmark for promptable concept segmentation.
In Meta’s reports, it shows ~2x gains over strong baselines on open-vocabulary segmentation in images and video, while maintaining SAM-2’s interactive strengths.
In this tutorial, we’ll take those SAM 3 masks and turn them into a Gaussian-blurred composite for both images and videos, wrapped within a Gradio UI.
In this section, we’ll build a privacy filter with SAM3 for images and videos embedded in a simple Gradio UI.
Here’s how it works:

We’ll walk through the complete implementation in small steps.
Before running this demo, let’s make sure we have all the prerequisites in place. To run the SAM3 Privacy Filter in Colab, you need the latest Transformers library along with a few runtime libraries for UI, tensor ops, images, and video I/O. The snippet below installs everything in one go.
import subprocess
import sys
import os
def install(package):
    subprocess.check_call([sys.executable, "-m", "pip", "install", "-q", package])
print(" Installing latest Transformers")
install("git+https://github.com/huggingface/transformers.git")
pkgs = [
    "accelerate",
    "gradio",
    "numpy",
    "pillow",
    "torch",
    "torchvision",
    "imageio[ffmpeg]"
]
for p in pkgs:
    install(p)
Here is what each prerequisite does:
git+https://github.com/huggingface/transformers.git: This pulls the latest Transformers library from source, so the Sam3Processor and Sam3Model classes are available.torch and torchvision: These are the tensor compute and image utilities which run the SAM3 forward passaccelerate: This is the inference helper used by Transformers.gradio: A lightweight web UI for uploading media and previewing blurred results.numpy, pillow: These include image arrays and PIL image ops for mask/blur composition.imageio[ffmpeg]: It reads/writes videos and encodes MP4 (FFmpeg) for the video tab.Once the environment is set up and facebook/sam3 is loaded, the demo lets you segment with short text prompts and blur the resulting masks in images or video through a simple Gradio app.
Note: If you plan to use a GPU in Colab, set the runtime to GPU (T4/A100) before installation. I used an A100 GPU on Colab for a faster experience.
With the environment set up, import the libraries that power the UI, model inference, image/video handling, and timing. These are the only modules you need for the SAM3 privacy filter.
import gradio as gr
import torch
import numpy as np
import imageio
from PIL import Image, ImageFilter
from transformers import Sam3Processor, Sam3Model
import time
Now, Gradio provides the web interface, the transformers library runs SAM3, and PyTorch executes inference on GPU or CPU. While PIL loads and edits images (including Gaussian blur), NumPy manages the mask arrays, and imageio reads and writes video files.
Next, we’ll load the model and build a small engine that turns text prompts into masks you can blur.
Now that the environment is ready, let’s wrap SAM3 into a small engine that loads the model once, runs text-prompted instance segmentation on demand, and returns binary masks that are used for blurring.
class Sam3PrivacyEngine:
    def __init__(self):
        self.device = "cuda" if torch.cuda.is_available() else "cpu"
        self.model = None
        self.processor = None
        print(f"Initializing SAM3 on {self.device}")
        try:
            self.model = Sam3Model.from_pretrained("facebook/sam3").to(self.device)
            self.processor = Sam3Processor.from_pretrained("facebook/sam3")
            print("SAM3 Loaded Successfully!")
        except Exception as e:
            print(f"Error loading SAM3: {e}")
    def predict_masks(self, image_pil, text_prompt, threshold=0.4):
        if self.model is None: return []
        inputs = self.processor(
            images=image_pil,
            text=text_prompt,
            return_tensors="pt"
        ).to(self.device)
        with torch.no_grad():
            outputs = self.model(**inputs)
        results = self.processor.post_process_instance_segmentation(
            outputs,
            threshold=threshold,
            mask_threshold=0.5,
            target_sizes=inputs["original_sizes"].tolist()
        )[0]
        masks = []
        if "masks" in results:
            for i, mask_tensor in enumerate(results["masks"]):
                mask_np = (mask_tensor.cpu().numpy() * 255).astype(np.uint8)
                mask_pil = Image.fromarray(mask_np)
                masks.append(mask_pil)
        return masks
engine = Sam3PrivacyEngine()
Let’s understand how this engine fits into the pipeline:
Sam3PrivacyEngine.init(): This initializer selects the best device (CUDA if available, otherwise CPU), loads the facebook/sam3 weights and the paired Sam3Processor, and moves the model to the chosen device so inference can run efficiently.Sam3PrivacyEngine.predict_masks(): This method builds model inputs from a PIL image and a text prompt, runs forward inference under torch.no_grad() to avoid gradient overhead, and post-processes outputs with post_process_instance_segmentation using the given detection and mask thresholds as well as original target sizes for correct scaling. It returns per-instance segmentation masks converted from tensors to NumPy arrays and then to PIL “L” masks(8-bit grayscale images (mode "L") where each pixel is a value from 0–255) for compositing.engine = Sam3PrivacyEngine(): This line constructs a single, reusable engine instance so the SAM3 model loads once and can be called repeatedly for images or video frames without reinitialization.With this self-contained engine initialized, you can turn any image and text prompt into instance masks. Next, we’ll apply blur selectively using these masks and embed everything into the Gradio UI.
In this section, we take SAM3’s masks and apply privacy. It blurs only the masked regions while preserving everything else. We start with a reusable Gaussian blur function, then connect it into two pipelines, one for images and one for videos.
This helper takes an image and one or more PIL "L" masks, blends them into a single composite mask, and pastes a blurred copy of the image only where the mask is white (255).
def apply_blur_pure(image_pil, masks, blur_strength):
    if not masks:
        return image_pil
    radius = blur_strength
    blurred_image = image_pil.filter(ImageFilter.GaussianBlur(radius=radius))
    composite_mask = Image.new("L", image_pil.size, 0)
    for mask in masks:
        composite_mask.paste(255, (0, 0), mask=mask)
    final_image = image_pil.copy()
    final_image.paste(blurred_image, (0, 0), mask=composite_mask)
    return final_image
Here is how this function works:
GaussianBlur() function first creates a fully blurred version of the image. While composite_mask is an “L” (grayscale) mask initialized to black (0 = keep the original). composite_mask, so only the white regions end up blurred.final_image.paste() method replaces only masked pixels, leaving the rest untouched for maximum visual fidelity.With a single call, you can blur any set of regions like faces, screens, plates, while keeping the backgrounds as it is.
This substep covers end-to-end image flow, right from normalizing input to getting masks from SAM3, then blurring masked pixels, and finally returning the result.
def process_image(input_img, text_prompt, blur_strength, confidence):
    if input_img is None: return None, None
    if isinstance(input_img, np.ndarray):
        image_pil = Image.fromarray(input_img).convert("RGB")
    else:
        image_pil = input_img.convert("RGB")
    masks = engine.predict_masks(image_pil, text_prompt, confidence)
    result_pil = apply_blur_pure(image_pil, masks, blur_strength)
    output_path = "privacy_image.png"
    result_pil.save(output_path)
    return np.array(result_pil), output_path
We handle images with the following step-by-step pipeline:
engine.predict_masks() to obtain SAM3 instance masks for the provided text_prompt.apply_blur_pure() function with the selected blur_strength so that only the masked regions are blurred.png and return both a NumPy array and a downloadable file.With the image flow complete, we can now proceed to the video pipeline.
The video flow mirrors the image path, but streams frame-by-frame with imageio. For each frame, we segment, blur masked regions, and write to an H.264-encoded MP4 file.
def process_video(video_path, text_prompt, blur_strength, confidence, max_frames):
    if not video_path: return None, None
    try:
        reader = imageio.get_reader(video_path)
        meta = reader.get_meta_data()
        fps = meta.get('fps', 24)
        output_path = "privacy_video.mp4"
        writer = imageio.get_writer(
            output_path,
            fps=fps,
            codec='libx264',
            pixelformat='yuv420p',
            macro_block_size=1
        )
        print("Starting video processing...")
        for i, frame in enumerate(reader):
            if i >= max_frames:
                break
            frame_pil = Image.fromarray(frame).convert("RGB")
            masks = engine.predict_masks(frame_pil, text_prompt, confidence)
            processed_pil = apply_blur_pure(frame_pil, masks, blur_strength)
            writer.append_data(np.array(processed_pil))
            if i % 10 == 0:
                print(f"Processed frame {i}...")
        writer.close()
        reader.close()
        print("Video processing complete.")
        return output_path, output_path
    except Exception as e:
        print(f"Error: {e}")
        return None, None
Here is how we handle videos with the following pipeline:
imageio.get_reader(), then iterate frames, and read FPS from metadata (defaulting to 24 if missing).engine.predict_masks() method, and blur the masked regions using apply_blur_pure() function.pixelformat='yuv420p' for broad compatibility and macro_block_size=1 to avoid alignment artifacts.With this video flow in place, you can blur sensitive regions in meeting recordings, dashcam clips, or screen captures using a simple text prompt.
Now that masking and blurring are ready, we’ll wrap everything in a lightweight Gradio UI so anyone can upload an image or video, type a text prompt, and download the output.
with gr.Blocks(title="SAM3 Privacy Filter", theme=gr.themes.Soft()) as demo:
    gr.Markdown("# SAM3 Privacy Filter")
    gr.Markdown("Auto-detect and blur faces/objects.")
    with gr.Tabs():
        with gr.Tab("Image"):
            with gr.Row():
                with gr.Column():
                    im_input = gr.Image(label="Input Image", type="numpy")
                    im_prompt = gr.Textbox(label="Text Prompt", value="faces")
                    im_blur = gr.Slider(5, 100, value=30, label="Blur Strength")
                    im_conf = gr.Slider(0.1, 1.0, value=0.4, label="Confidence")
                    im_btn = gr.Button("Blur Image", variant="primary")
                with gr.Column():
                    im_output = gr.Image(label="Preview")
                    im_dl = gr.File(label="Download Image")
            im_btn.click(process_image, [im_input, im_prompt, im_blur, im_conf], [im_output, im_dl])
        with gr.Tab("Video"):
            with gr.Row():
                with gr.Column():
                    vid_input = gr.Video(label="Input Video")
                    vid_prompt = gr.Textbox(label="Text Prompt", value="faces")
                    vid_blur = gr.Slider(5, 100, value=30, label="Blur Strength")
                    vid_conf = gr.Slider(0.1, 1.0, value=0.4, label="Confidence")
                    vid_limit = gr.Slider(10, 300, value=60, step=10, label="Max Frames")
                    vid_btn = gr.Button("Blur Video", variant="primary")
                with gr.Column():
                    vid_output = gr.Video(label="Preview")
                    vid_dl = gr.File(label="Download Video")
            vid_btn.click(process_video, [vid_input, vid_prompt, vid_blur, vid_conf, vid_limit], [vid_output, vid_dl])
demo.launch(share=True, debug=True)
The Gradio app embeds the SAM3 masking and blurring pipeline to a simple web UI by using:
gr.Blocks): This block creates a single-page Gradio app with a title, and two tabs, one for images and one for videos, so the users can switch modes without leaving the page.process_image, which calls SAM3 for masks and applies Gaussian blur only on masked pixels.process_video, iterating frames to predict masks, blur masked regions, and encode an H.264 video.demo.launch() method starts the app, generates a sharable link, and surfaces detailed stack traces when debugging is enabled.Now, our SAM3 Privacy Filter is ready to upload media(image/video), set prompt and thresholds, and export the blurred outputs.
Note: All images and videos in this demo are sourced from Pexels.com and are free to use.
Top DataCamp Courses
Track
Course
Course
blog
Dr Ana Rojo-Echeburúa
10 min
blog
Stanislav Karzhev
10 min
Tutorial
Aashi Dutt
Tutorial
Zoumana Keita
Tutorial
Aashi Dutt
Tutorial
François Aubry