course
डेवलपर्स के लिए AI-असिस्टेड कोडिंग
1 घंटा 30 मिनट
10K
ज़्यादातर LLM ऐप एक साधारण पैटर्न का पालन करते हैं: एक प्रॉम्प्ट भेजें, एक उत्तर पाएं, और उस उत्तर को अपने एप्लिकेशन में उपयोग करें।
यह साधारण कार्यों के लिए अच्छा काम करता है, लेकिन चीजें तब जटिल हो जाती हैं जब मॉडल को कोड लिखना, उसे चलाना, परिणाम जाँचना, फ़ाइलों के साथ काम करना, त्रुटियाँ ठीक करना, और तब तक आगे बढ़ते रहना हो जब तक कार्य सचमुच पूरा न हो जाए।
यहीं पर OpenAI का Agents API वाकई उपयोगी हो जाता है।
Instead of building every step yourself, you can give the agent the task, the files it needs, and an environment to work in, and let it handle the rest.
In this tutorial, I will keep the example simple. We will create a small fictional cafe sales dataset and give it to the agent. The agent will write and run the analysis, verify the results, and create three output files for us.
Once you see the whole thing working behind the scenes, you’ll start to realize how much of the usual coding workflow is being automated for you.
If you’re new to AI agents, I recommend checking out our AI Agents Fundamentals Skill track.
The OpenAI Agents API lets you give an agent a task, the files it needs, and the environment it should work in, and then let it handle the rest.
Instead of manually creating a sandbox, starting a session, uploading files, running code, checking errors, and managing every step yourself, you can send one API request with the task, configuration, environment, and input files.
After that, most of the work is handled by the Agents API.
Under the hood, OpenAI manages the Codex harness, including orchestration, context, tool use, execution, and long-running sessions. You can think of it almost like having OpenAI Codex running in the cloud for your application.
You do not need to worry as much about setting up compute, managing the working environment, keeping track of the session, or building the full agent loop yourself.
This is especially useful for more complex and long-running tasks where the agent needs to actually do the work, not just return an answer.
For this tutorial, we will use an OpenAI-hosted sandbox:
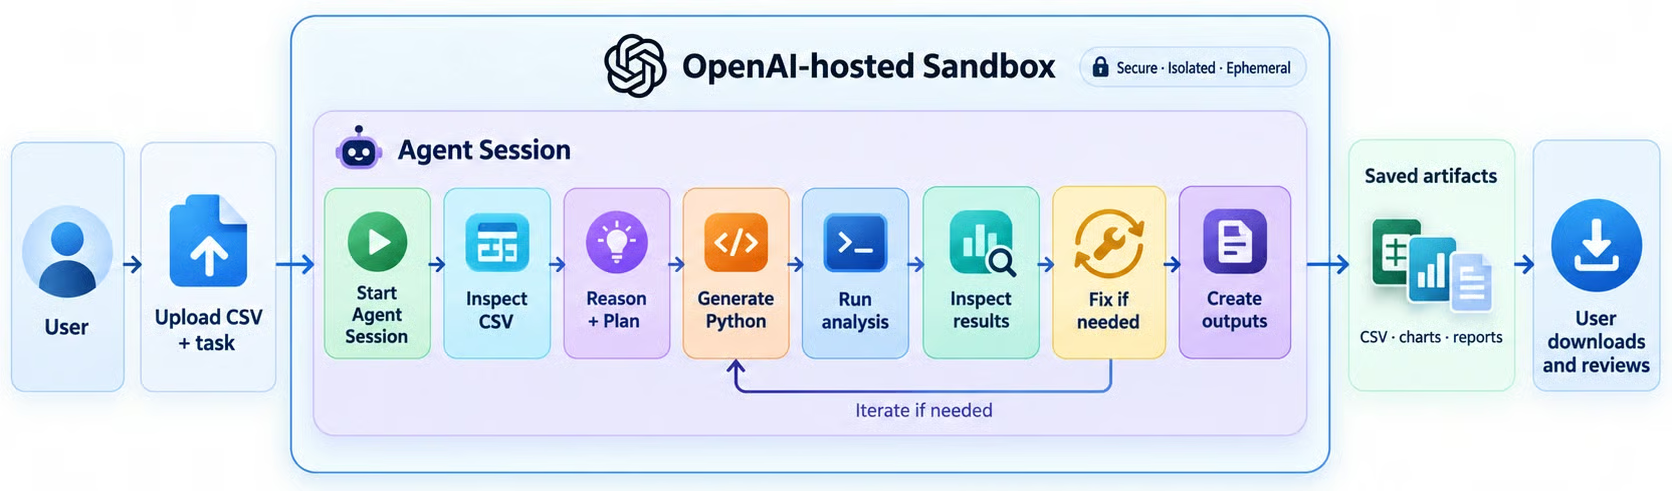
We send one request with the CSV file, the task, and the agent configuration.
The Agents API then creates and manages the session and sandbox for us.
Inside the sandbox, the agent can look at the file, figure out how to approach the analysis, generate Python code, run it, check the results, and fix things if something goes wrong.
Once everything is done, the outputs are saved as session artifacts.
These can be charts, cleaned datasets, reports, or any other files the agent creates. We can then retrieve those files and let the user download and review them.
So the main idea is simple: we send the task once, and the agent handles the actual work from there.
The main difference between these three is how much of the workflow you want to manage yourself.
|
Responses API |
Agents SDK |
Agents API |
|
|
What it is |
API for model responses and tool use |
Framework for building agent applications |
Managed API for running longer agent tasks |
|
Workflow |
Your application controls the workflow |
You build the agent loop and orchestration |
OpenAI manages more of the execution |
|
Key features |
Prompts, tools, structured outputs |
Agents, runners, tools, handoffs, guardrails |
Sessions, sandboxes, files, code execution |
|
Best for |
Short, focused tasks |
Custom and multi-agent applications |
Longer, multi-step tasks involving files and code |
|
Example |
Summarize or extract data |
Build a customer-support agent system |
Analyze expenses, detect unusual spending, and build monthly reports |
Use the Responses API when you need the model to complete a focused task, such as summarization, extraction, classification, question answering, structured outputs, or a few tool calls.
Use the Agents SDK when you are building an agent application yourself and want more control over agents, tools, handoffs, guardrails, and multi-agent workflows.
Use the Agents API when the task is more complex and needs its own working environment. This is useful when the agent needs to work with files, run code, inspect results, fix errors, and keep going across multiple steps.
For this tutorial, we use the Agents API because the agent needs to work with a file, reason about the analysis, run code, inspect the results, and save the final artifacts for the user.
Let’s get started
For this tutorial, we will use a Jupyter Notebook to test the Agents API step by step and understand how each part works.
We will start by installing the OpenAI package and importing the libraries we need for the rest of the tutorial.
First, install or upgrade the OpenAI Python package:
%pip install -q --upgrade openaiThen import the libraries we will use:
import base64
import csv
import io
import os
import random
from datetime import date, timedelta
from pathlib import Path

from IPython.display import Markdown, display
from openai import OpenAI
Now create the OpenAI client:
client = OpenAI()Make sure your OPENAI_API_KEY is already set in your environment. The OpenAI client will pick it up automatically.
We will create a small fake sales dataset so we have something simple to give the agent.
random.seed(42)

products = {
    "Latte": 4.50,
    "Tea": 3.00,
    "Cookie": 2.50,
    "Sandwich": 7.00
}

locations = ["Downtown", "Airport", "Campus"]
first_day = date(2026, 1, 1)
orders = []

for order_id in range(1, 51):
    product = random.choice(list(products))

    orders.append(
        {
            "order_id": order_id,
            "date": first_day + timedelta(days=random.randint(0, 89)),
            "location": random.choice(locations),
            "product": product,
            "units": random.randint(1, 5),
            "unit_price": products[product],
            "discount_rate": random.choice([0, 0, 0, 0.10]),
        }
    )
This creates 50 fake cafe orders across different products, locations, dates, and discounts. We use a fixed random seed so the same dataset is generated every time we run the notebook.
Next, we will turn the generated data into a CSV file that can be passed to the agent.
csv_buffer = io.StringIO()

writer = csv.DictWriter(
    csv_buffer,
    fieldnames=orders[0].keys()
)

writer.writeheader()
writer.writerows(orders)

csv_text = csv_buffer.getvalue()

csv_base64 = base64.b64encode(
    csv_text.encode()
).decode()

print("Preview:")
print("\n".join(csv_text.splitlines()[:6]))
Output:
Preview:
order_id,date,location,product,units,unit_price,discount_rate
1,2026-01-04,Campus,Latte,3,4.5,0
2,2026-01-18,Campus,Tea,1,3.0,0
3,2026-01-05,Downtown,Sandwich,1,7.0,0
4,2026-03-06,Campus,Tea,1,3.0,0
5,2026-01-29,Airport,Sandwich,5,7.0,0
We also Base64-encode the CSV because we will send the file directly with the agent request.
Now we will describe what we want the agent to do with the CSV file.
task = """
Analyze /workspace/cafe_sales.csv. Write /workspace/analyze_sales.py and run it.

Your job:
1. Check that the required columns exist and numeric values are valid.
2. Calculate gross_sales = units * unit_price.
3. Calculate net_sales = gross_sales * (1 - discount_rate).
4. Summarize net sales by location, product, and month.
5. Find the best-selling location and product by net sales.
6. Write these files:
   - /workspace/outputs/summary.json
   - /workspace/outputs/location_sales.csv
   - /workspace/outputs/morning_brief.md
7. Make the Morning Brief friendly and include three evidence-based insights.
8. Read the files back and verify that location totals equal total net sales.
9. Finish by reporting the verified total and the three output filenames.

Use only Python's standard library. Do not invent or silently change data.
""".strip()
The important part is that we describe the goal and expected outputs, rather than writing the analysis code ourselves.
The agent can decide how to do the work, run the code, and verify the results before it finishes.
Now we will send everything to the Agents API in one request and let the agent do the actual work in the cloud.
session_id = None
turn_id = None
response_parts = []

live_output = display(
    Markdown(""),
    display_id=True
)

with client.beta.agents.sessions.create(
    agent={
        "model": "gpt-6-astra",
        "instructions": (
            "You are a careful data analyst. "
            "Write simple code, run it, and verify the results."
        ),
    },
    environment={
        "type": "openai_hosted",
        "network": {"access": "disabled"},
        "files": [
            {
                "type": "inline",
                "path": "/workspace/cafe_sales.csv",
                "data": csv_base64,
            }
        ],
    },
    input=task,
    stream=True,
) as events:

    for event in events:

        if hasattr(event, "session_id"):
            session_id = event.session_id

        if event.type == "agent.session.turn.output_text.delta":
            response_parts.append(event.delta)

            live_output.update(
                Markdown("".join(response_parts))
            )

        elif event.type == "agent.session.turn.completed":
            turn_id = event.turn.id

        elif event.type.endswith(("failed", "cancelled")):
            raise RuntimeError(
                event.model_dump_json(indent=2)
            )

assert session_id and turn_id

live_output.update(
    Markdown("".join(response_parts))
)

print("✅ Analysis complete")
print(f"Session: {session_id}")
print(f"Turn: {turn_id}")
This is where most of the work happens.
We make one request containing the agent configuration, hosted environment, CSV file, and task.
OpenAI creates the managed session and runs the agent inside the hosted sandbox. The agent can then inspect the file, write analyze_sales.py, execute it, check the results, fix anything that goes wrong, and create the final output files.
The session creation endpoint supports both the environment and initial input in the same request.
There are three main parts to the request:
agent tells OpenAI which model to use and how the agent should behave.environment gives the agent its hosted workspace and places our CSV file inside it.input gives the agent the task we defined in the previous section.We also set stream=True.
This does not change how the task is completed. It simply lets us receive events while the agent is working instead of waiting for the entire turn to finish before seeing anything.
In this example, we listen for agent.session.turn.output_text.delta events and keep updating the notebook with the latest text.
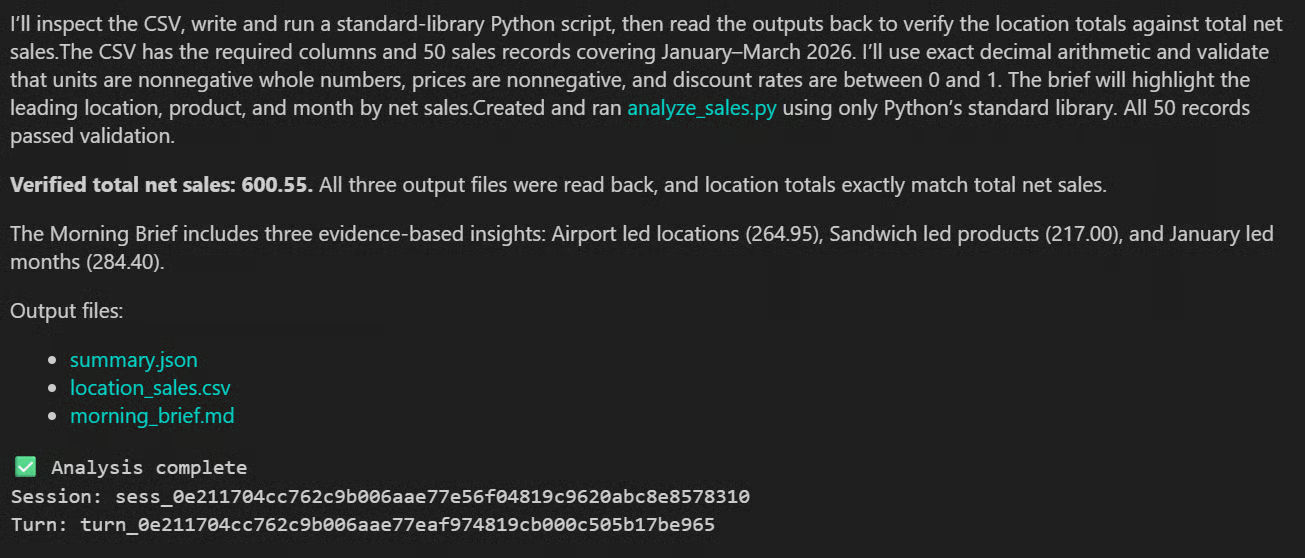
So the text we see appearing above is the agent reporting its progress and final response.
The actual task continues running in the hosted environment until we receive the agent.session.turn.completed event.
In my run, the agent created and ran analyze_sales.py, checked the generated files, and verified total net sales of 600.55.
The important part is that the model did not just tell us what Python code to run. The agent actually wrote the code, executed it, inspected the result, and verified the output itself.
Now that the agent has finished, we can download the files it created during that turn.
download_dir = Path("cloud_bean_results")
download_dir.mkdir(exist_ok=True)

downloaded = []

for artifact in client.beta.agents.sessions.artifacts.list(
    session_id
):
    if artifact.turn_id == turn_id:

        destination = (
            download_dir / Path(artifact.path).name
        )

        with (
            client.beta.agents.sessions.artifacts
            .with_streaming_response
            .content(
                artifact.id,
                session_id=session_id
            )
        ) as response:
            response.stream_to_file(destination)

        downloaded.append(destination)

assert downloaded

print("Downloaded:")

for path in downloaded:
    print(f"- {path}")
Output:
Downloaded:
- cloud_bean_results/summary.json
- cloud_bean_results/morning_brief.md
- cloud_bean_results/location_sales.csv
Here, we list the artifacts from the session, keep the ones created by the completed turn, and download them into our local cloud_bean_results folder.
Once we are done with the files, we should delete the session so we are not keeping the managed environment around longer than needed.
result = client.beta.agents.sessions.delete(
    session_id
)

print(f"Session deleted: {result.deleted}")
Output:
Session deleted: TrueThis removes the managed session from the API.
OpenAI notes that physical cleanup of the underlying resources may continue asynchronously after the delete request returns.
This step is especially important when using an OpenAI-hosted sandbox.
The sandbox is the compute environment where the agent runs code and works with files, and hosted sandboxes use container compute that is billed separately from model usage.
So if you keep sessions and environments running longer than needed, you can keep adding compute costs.
What stood out to me about the Agents API is how much it can do from one simple API call.
We gave it the file, the task, the model configuration, and the hosted environment.
From there, it handled the rest: it created the workspace, inspected the data, wrote the Python code, ran it, checked the outputs, fixed anything if needed, and produced the final artifacts.
It really feels like having Codex running in the cloud for your application.
I did not have to worry about setting up compute, managing the execution loop, handling intermediate files, or keeping track of every step. I mostly just had to define the task well and then look at the result.
The run itself took around two minutes, but during that time, the agent was doing quite a lot behind the scenes.
That is what makes this different from a normal API request.
You are not just waiting for a model to generate text. You are waiting for an agent to actually complete a piece of work.
In my testing, three runs of this example cost around $1.52 in total, including the model and hosted environment usage.
For such a small task, that is not cheap, so for production, I would definitely test smaller or cheaper models first.
But for more complex work involving coding, debugging, files, reasoning, and multiple dependent steps, the extra cost can make much more sense.
Top DataCamp Courses
course
Track
course