
Course
Introduction to AWS Boto in Python
4 hr
18.4K
Before diving into the aws s3 cp command, you need to have AWS CLI installed and properly configured on your system. Don't worry if you've never worked with AWS before - the setup process is easy and should take less than 10 minutes.
I'll break this down into three simple phases: installing the AWS CLI tool, configuring your credentials, and creating your first S3 bucket for storage.
The installation process differs slightly based on what operating system you're using.
For Windows systems:
For Linux systems:
Run the following three commands through the Terminal:
curl "https://awscli.amazonaws.com/awscli-exe-linux-x86_64.zip" -o "awscliv2.zip"
unzip awscliv2.zip
sudo ./aws/install
For macOS systems:
Assuming you have Homebrew installed, run this one line from the Terminal:
brew install awscliIf you don't have Homebrew, use these two commands instead:
curl "https://awscli.amazonaws.com/AWSCLIV2.pkg" -o "AWSCLIV2.pkg"
sudo installer -pkg AWSCLIV2.pkg -target /
To confirm a successful installation, run aws --version in your terminal. You should see something like this:
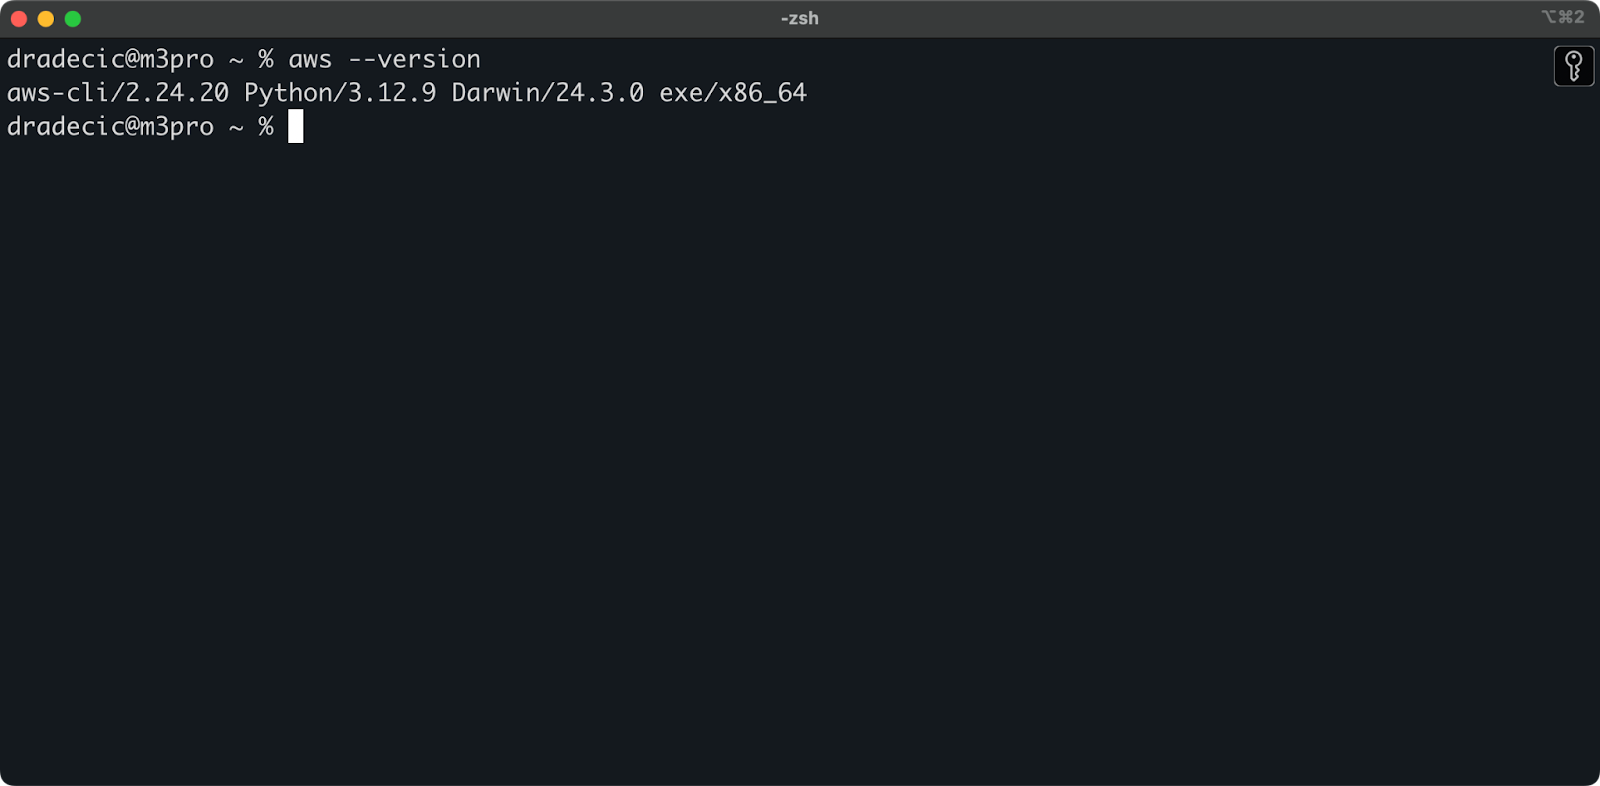
Image 1 - AWS CLI version
With the CLI installed, it's time to set up your AWS credentials for authentication.
First, access your AWS account and navigate to the IAM service dashboard. Create a new user with programmatic access and attach the appropriate S3 permissions policy:
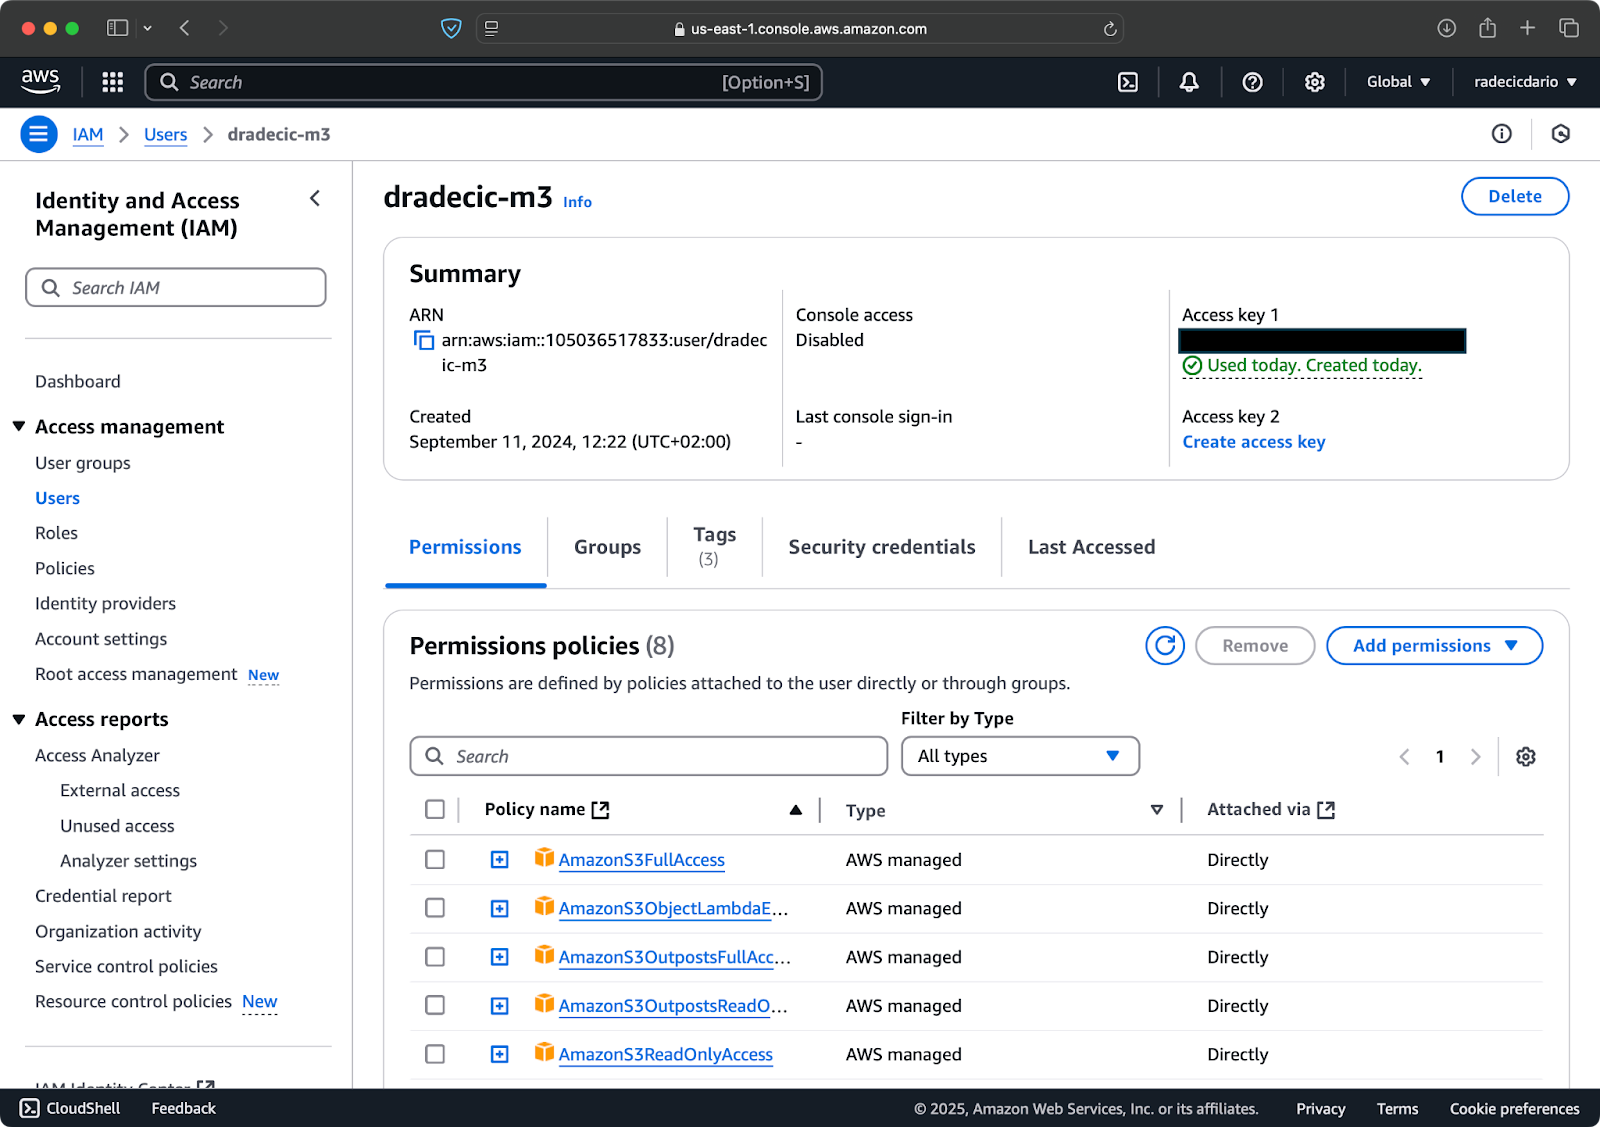
Image 2 - AWS IAM user
Next, visit the "Security credentials" tab and generate a new access key pair. Make sure to save both the Access key ID and Secret access key somewhere secure – Amazon won't show you the secret key again after this screen:

Image 3 - AWS IAM user credentials
Now open your terminal and execute the aws configure command. You'll be prompted for four pieces of information: your Access key ID, Secret access key, default region (I'm using eu-central-1), and preferred output format (typically json):
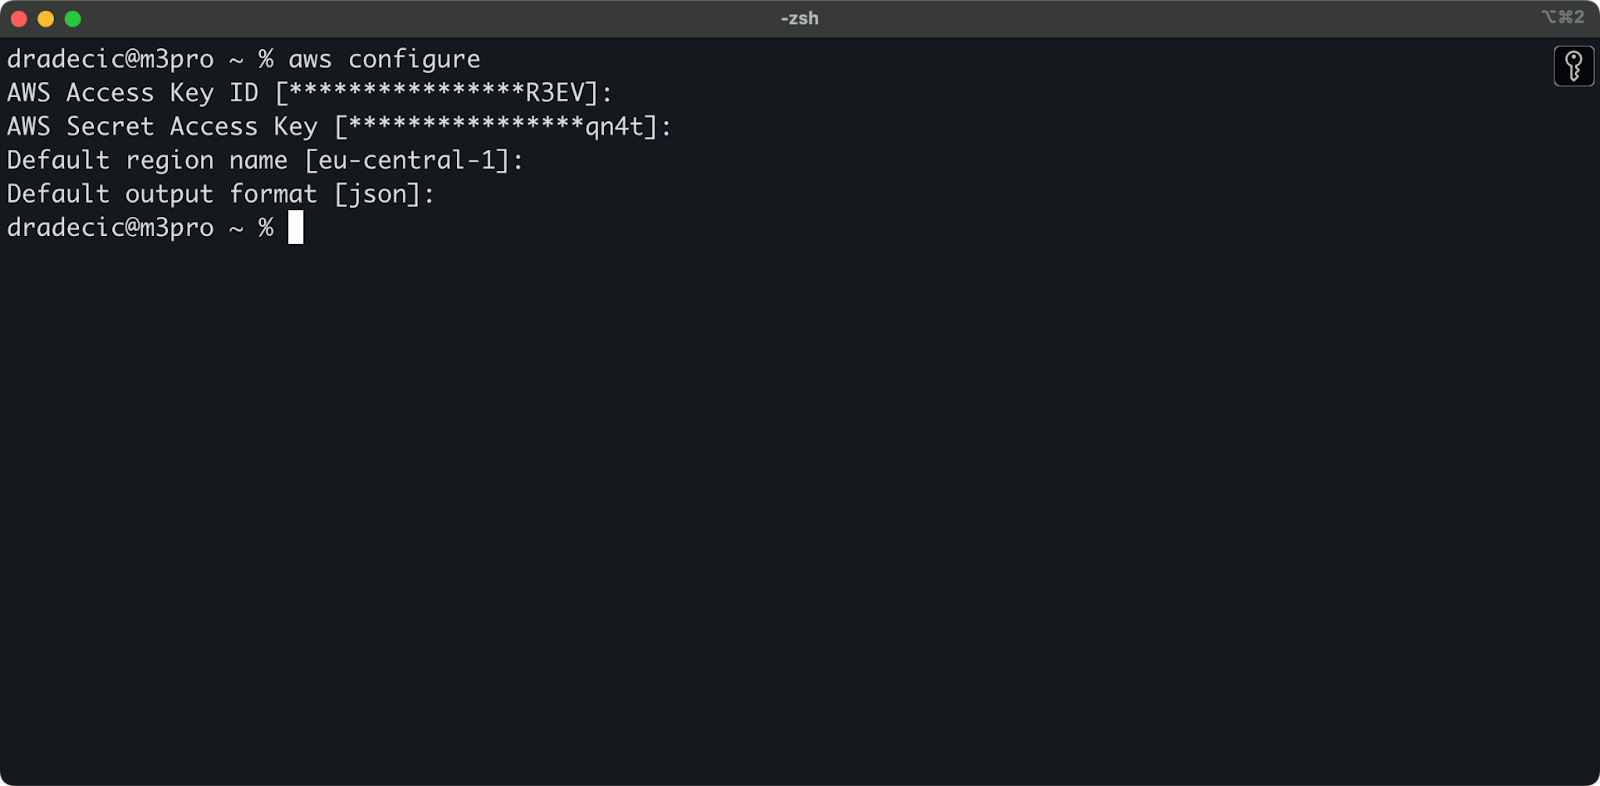
Image 4 - AWS CLI configuration
To make sure everything's connected properly, verify your identity with the following command:
aws sts get-caller-identityIf configured correctly, you'll see your account details:
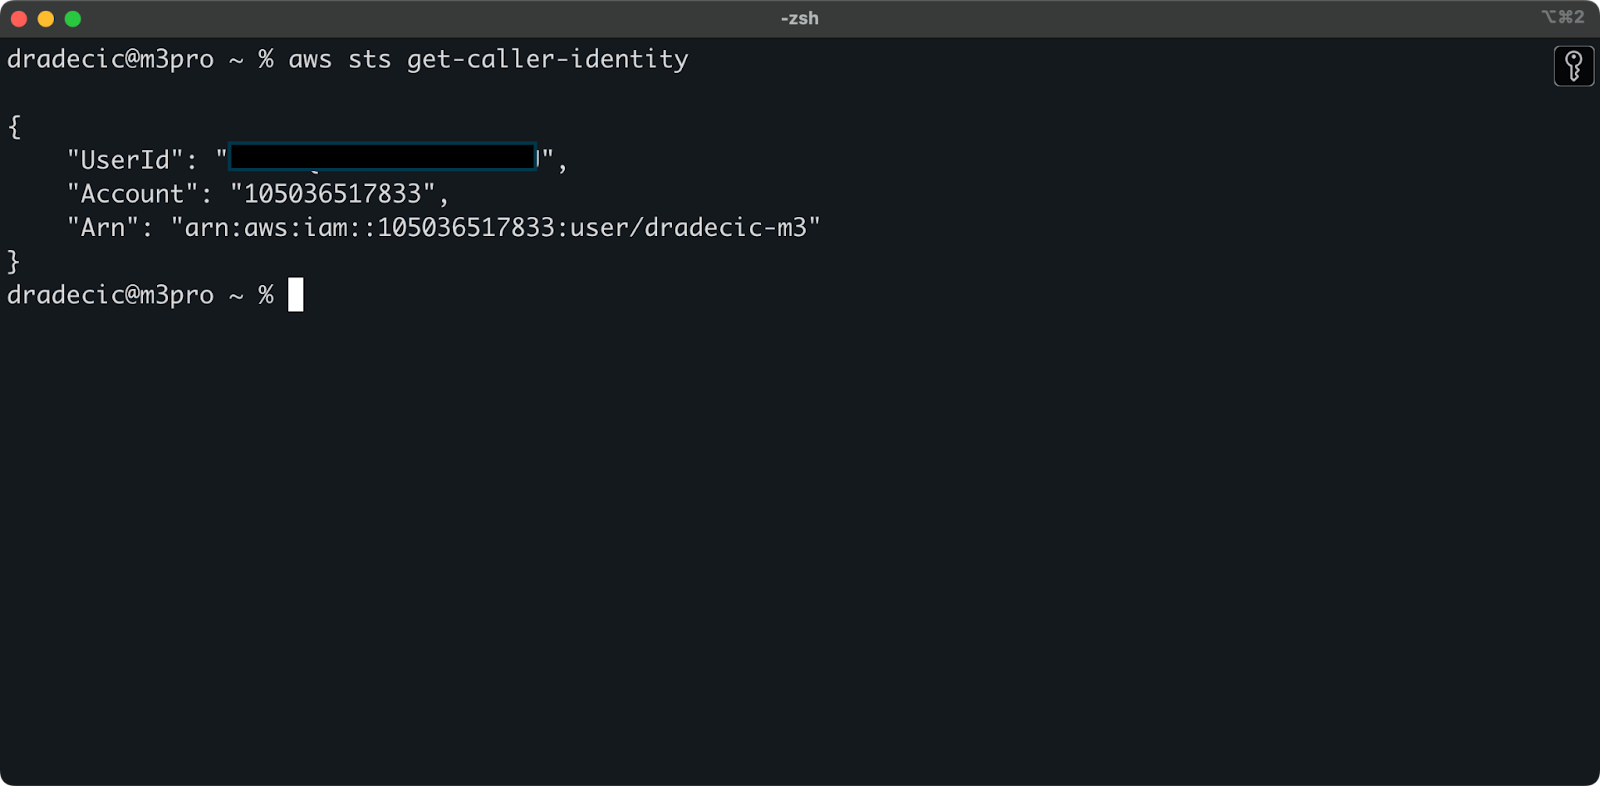
Image 5 - AWS CLI test connection command
Finally, you need to create an S3 bucket to store the files you'll be copying.
Head to the S3 service section in your AWS Console and click "Create bucket". Remember that bucket names must be globally unique across all of AWS. Choose a distinctive name, leave the default settings for now, and click "Create":
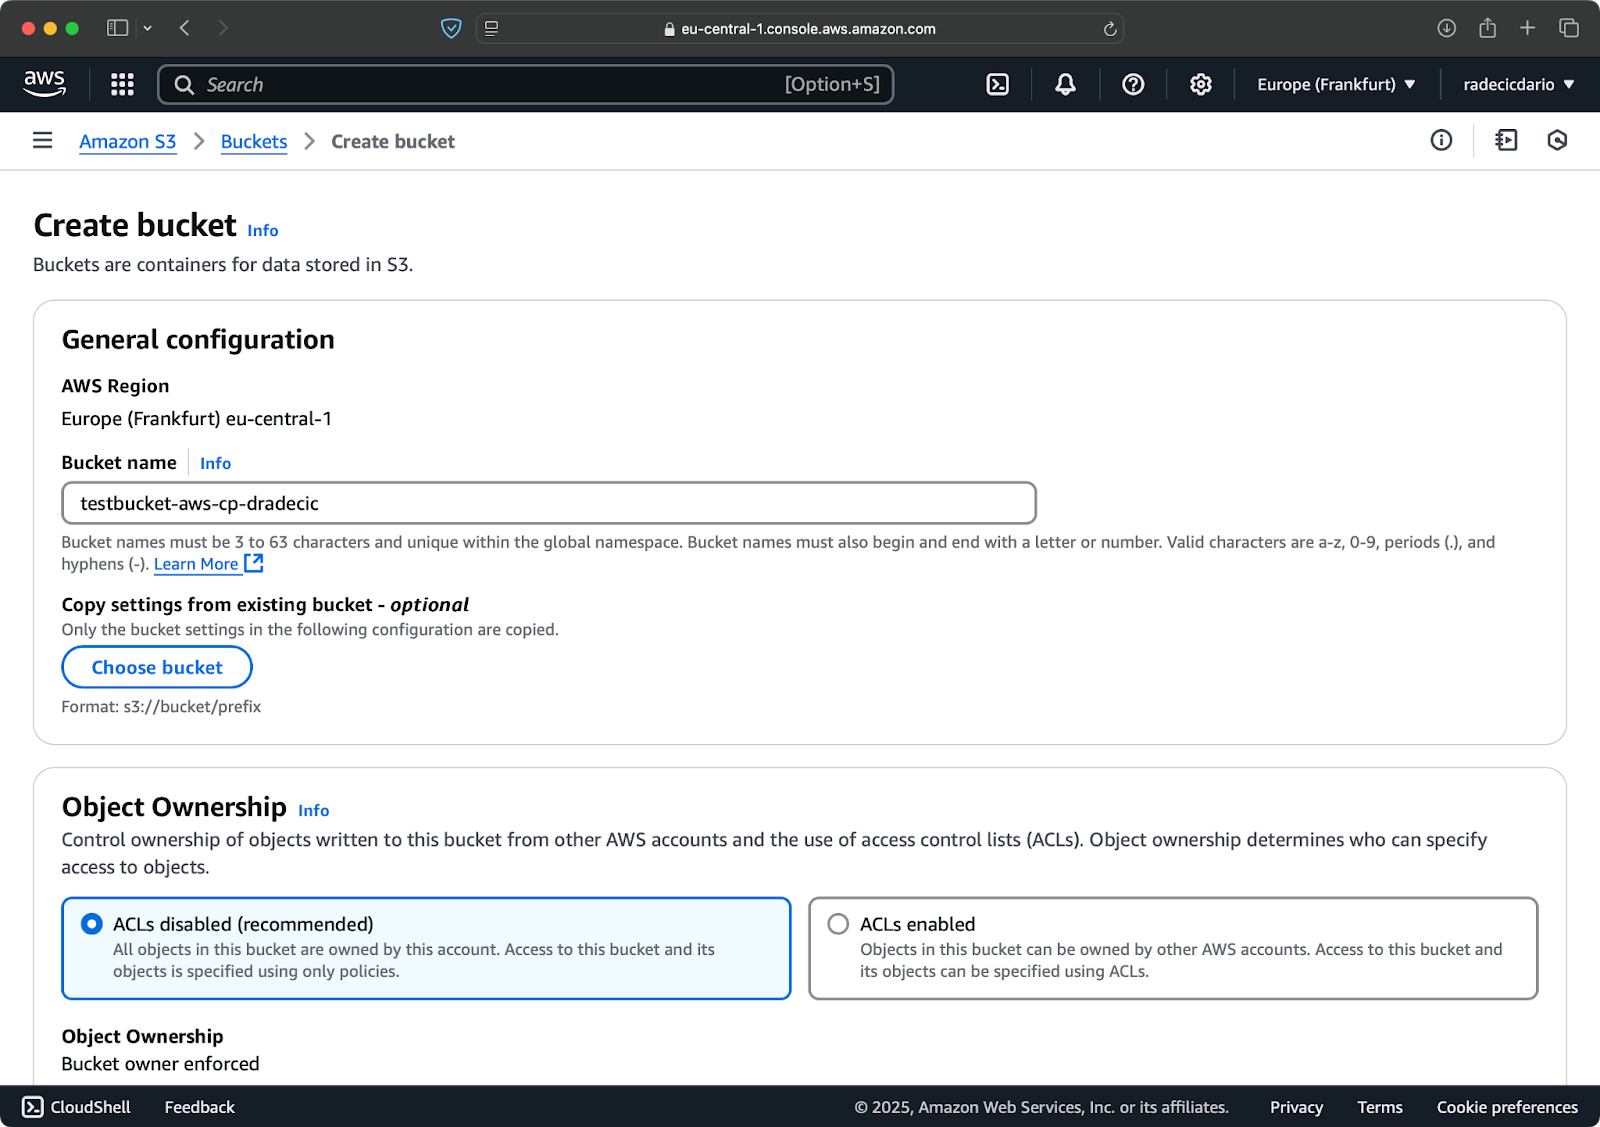
Image 6 - AWS bucket creation
Once created, your new bucket will appear in the console. You can also confirm its existence through the command line:
aws s3 ls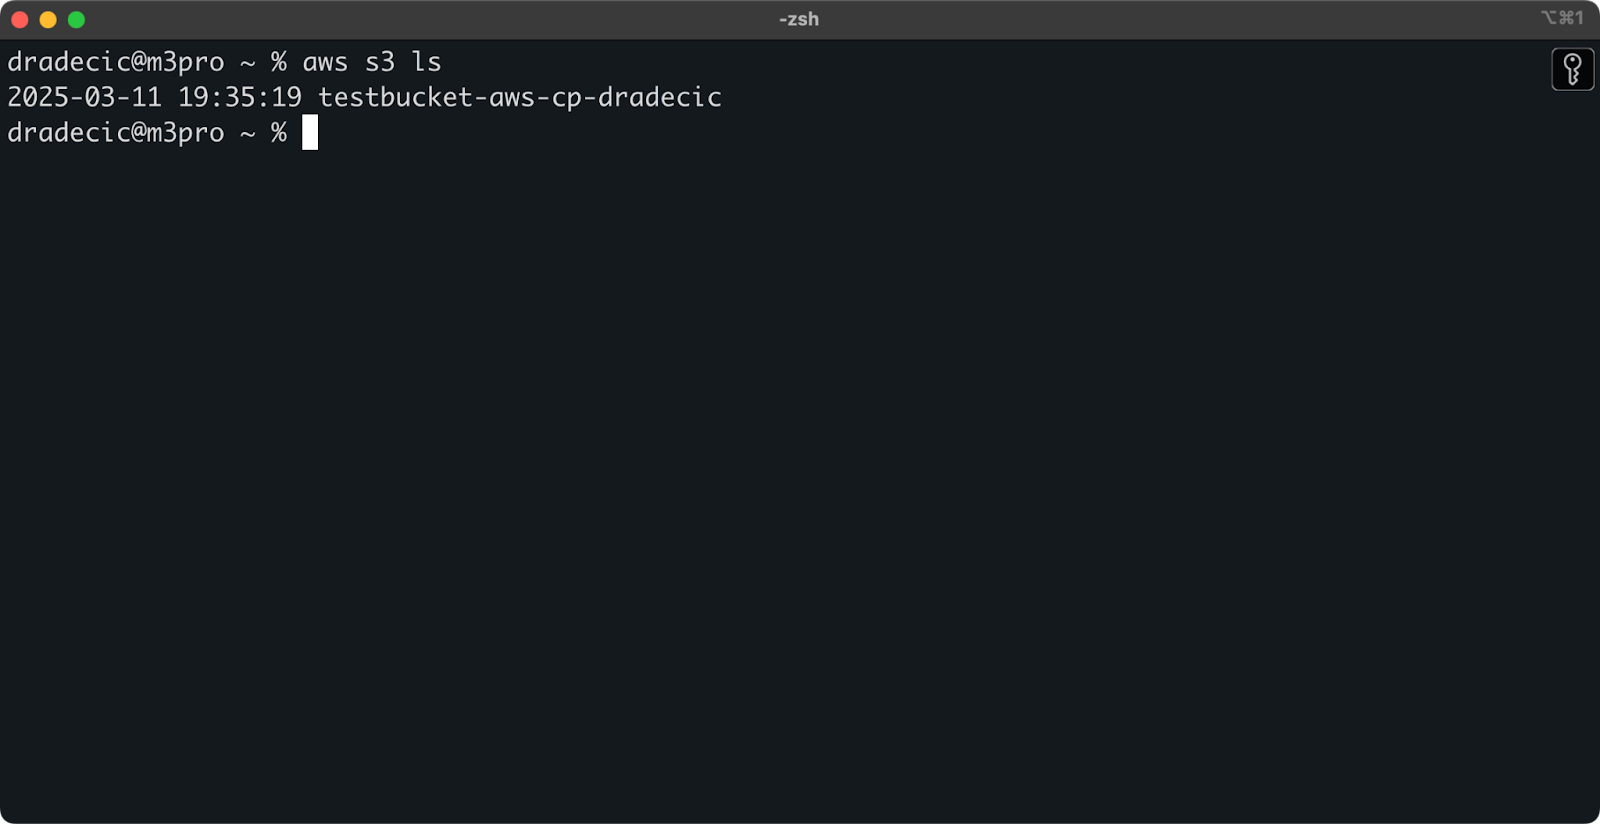
Image 7 - All available S3 buckets
All S3 buckets are configured as private by default, so keep this in mind. If you intend to use this bucket for publicly accessible files, you'll need to modify the bucket policies accordingly.
You're now fully equipped to start using the aws s3 cp command to transfer files. Let's start with the basics next.
Now that you have everything configured, let's dive into the basic usage of the aws s3 cp command. As usual with AWS, the beauty lies in simplicity, even though the command can handle different file transfer scenarios.
At its most basic form, the aws s3 cp command follows this syntax:
aws s3 cp <source> <destination> [options]Where <source> and <destination> can be local file paths or S3 URIs (which start with s3://). Let's explore the three most common use cases.
To copy a file from your local system to an S3 bucket, the source will be a local path and the destination will be an S3 URI:
aws s3 cp /Users/dradecic/Desktop/test_file.txt s3://testbucket-aws-cp-dradecic/test_file.txtThis command uploads the file test_file.txt from the provided directory to the specified S3 bucket. If the operation is successful, you'll see console output like this:
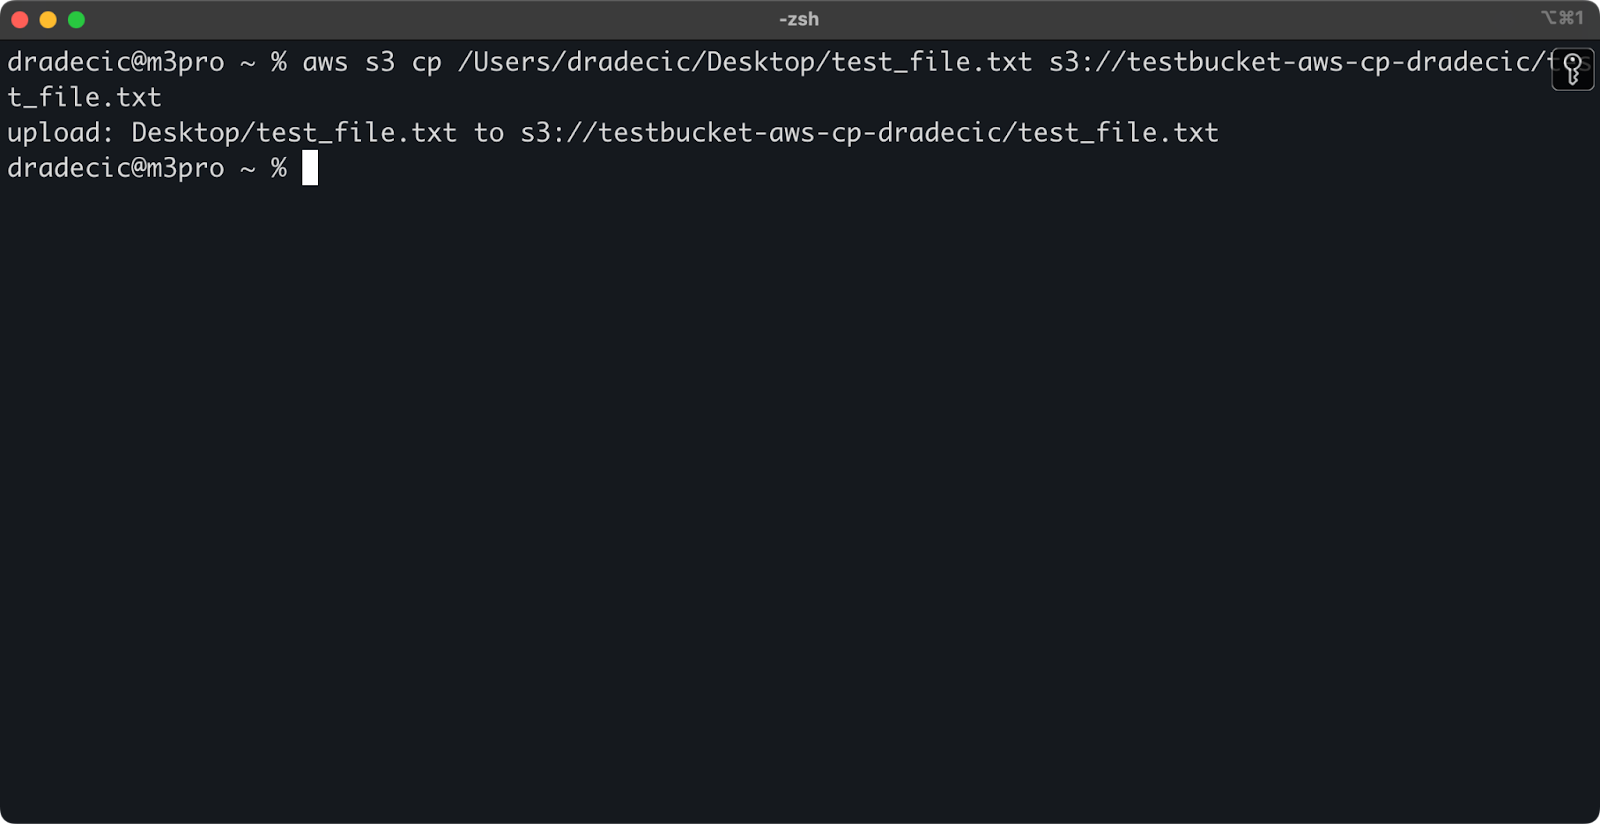
Image 8 - Console output after copying the local file
And, on the AWS management console, you'll see your file uploaded:
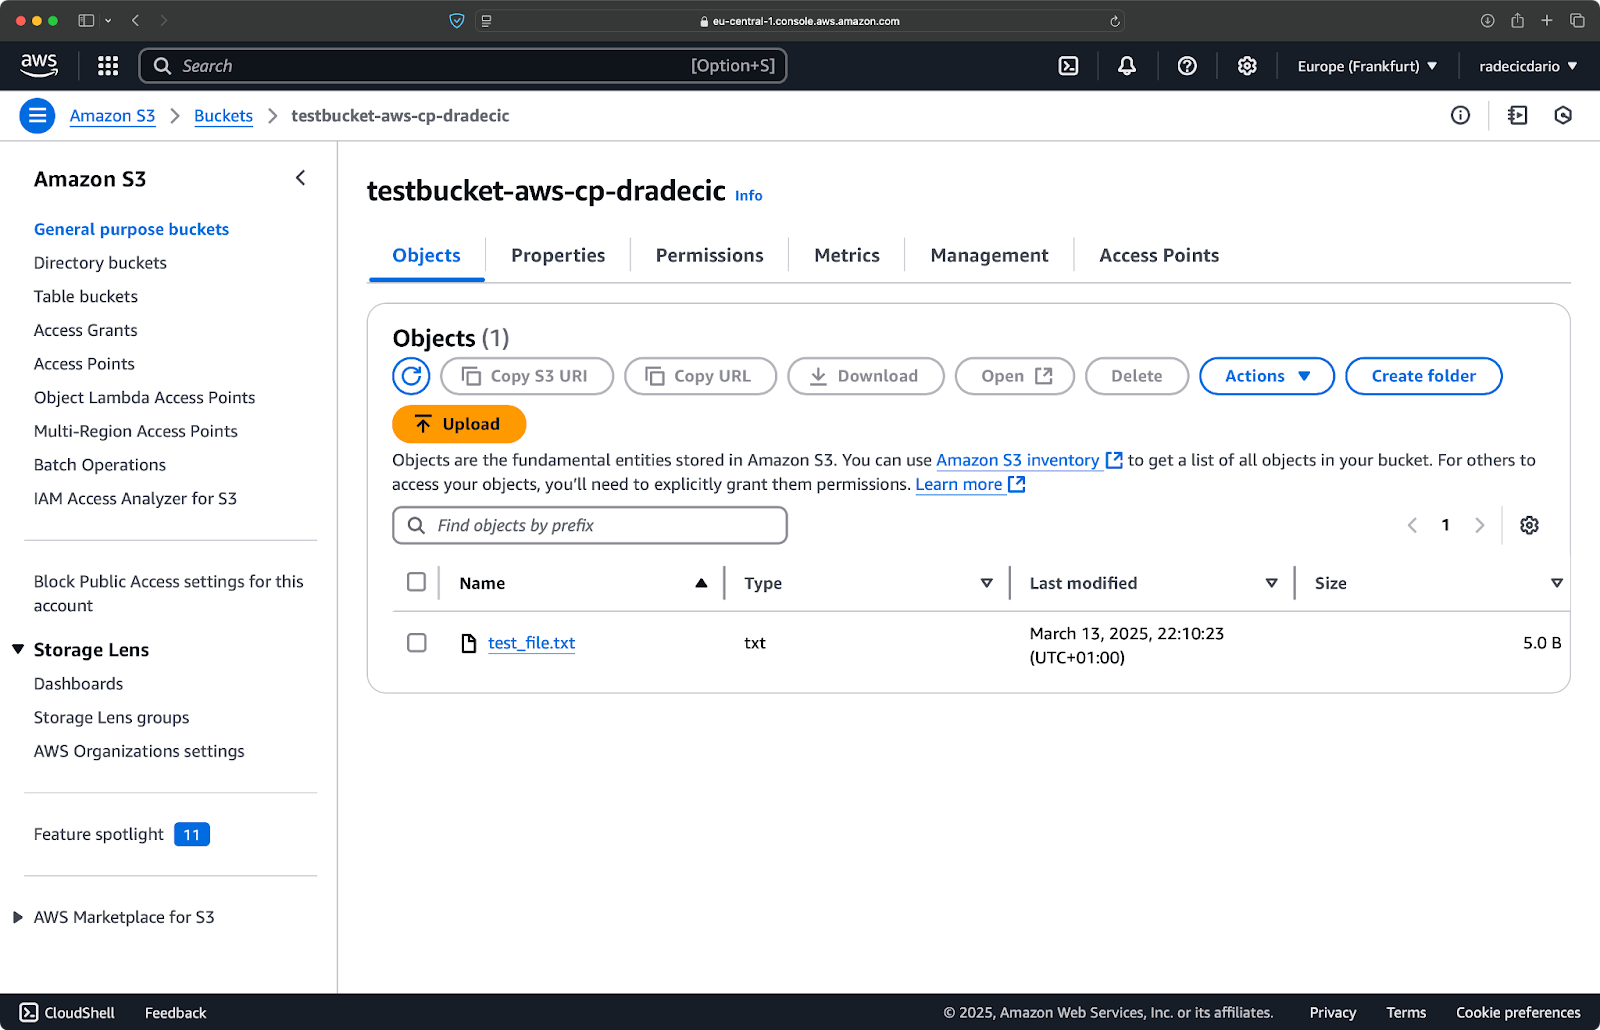
Image 9 - S3 bucket contents
Similarly, if you want to copy a local folder to your S3 bucket and put it, let's say, in another nested folder, run a command similar to this one:
aws s3 cp /Users/dradecic/Desktop/test_folder s3://testbucket-aws-cp-dradecic/my-desired-folder/test_folder/ --recursive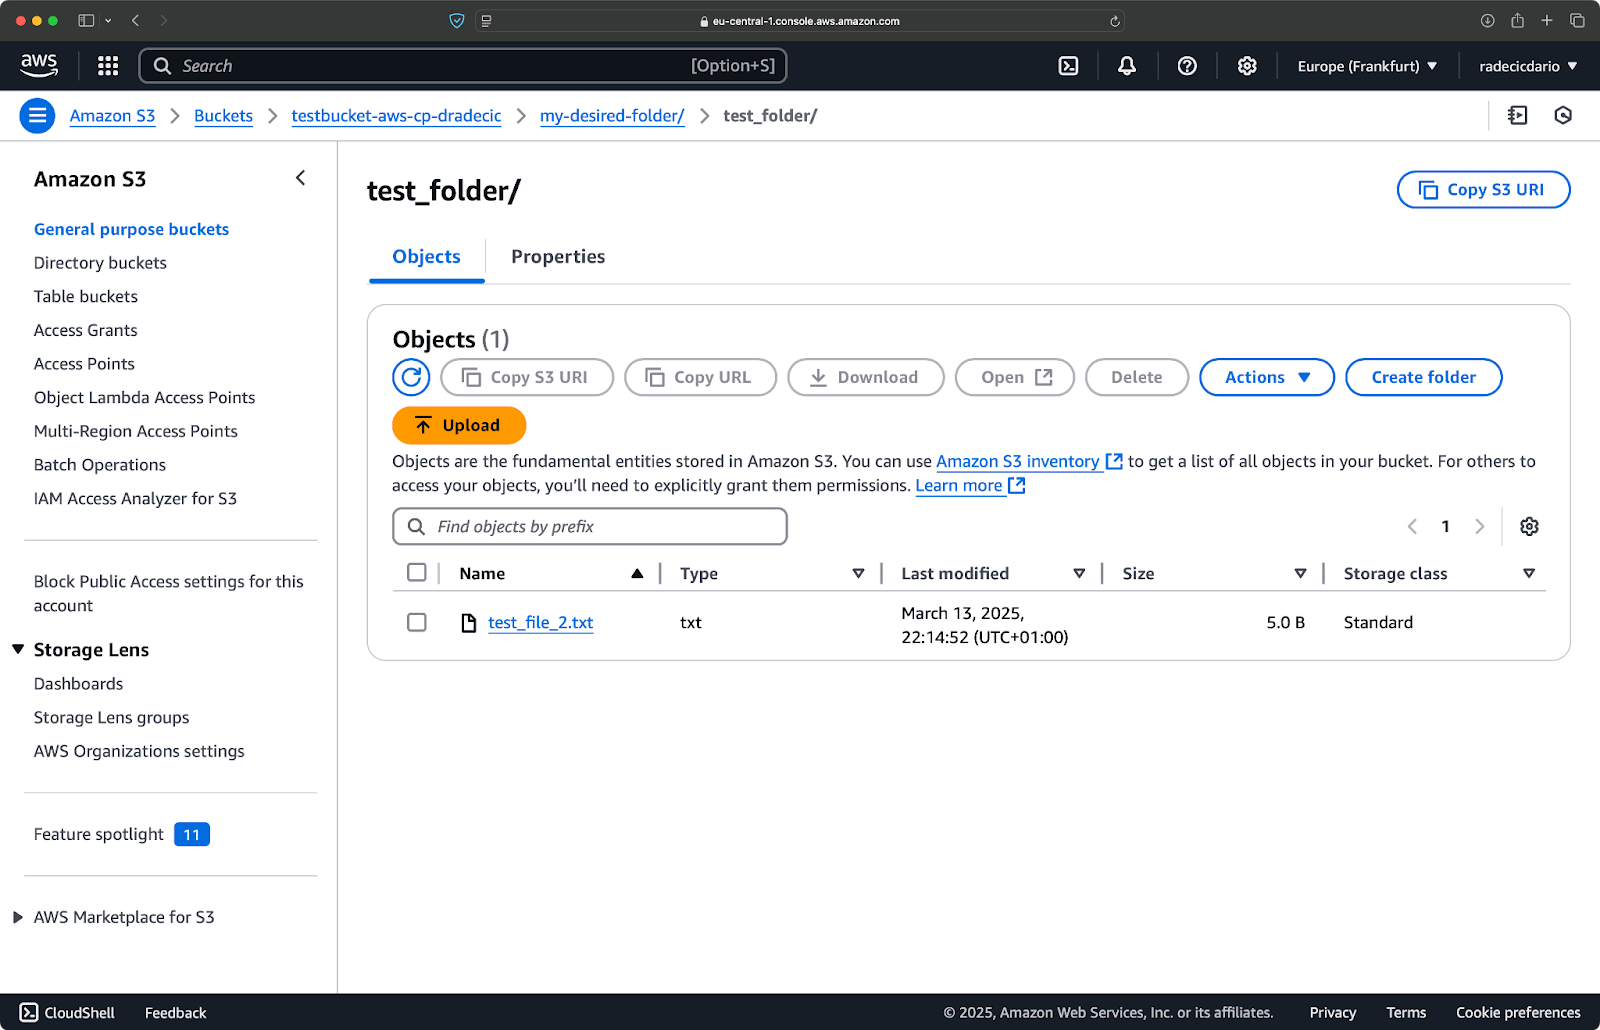
Image 10 - S3 bucket contents after uploading a folder
The --recursive flag will make sure all files and subfolders inside the folder are copied.
Just keep in mind - S3 doesn't actually have folders – the path structure is just part of the object's key, but it works conceptually like folders.
To copy a file from S3 to your local system, simply reverse the order – the source becomes the S3 URI, and the destination is your local path:
aws s3 cp s3://testbucket-aws-cp-dradecic/test_file.txt /Users/dradecic/Documents/s3-data/downloaded_test_file.txtThis command downloads test_file.txt from your S3 bucket and saves it as downloaded_test_file.txt in the provided directory. You'll see it immediately on your local system:
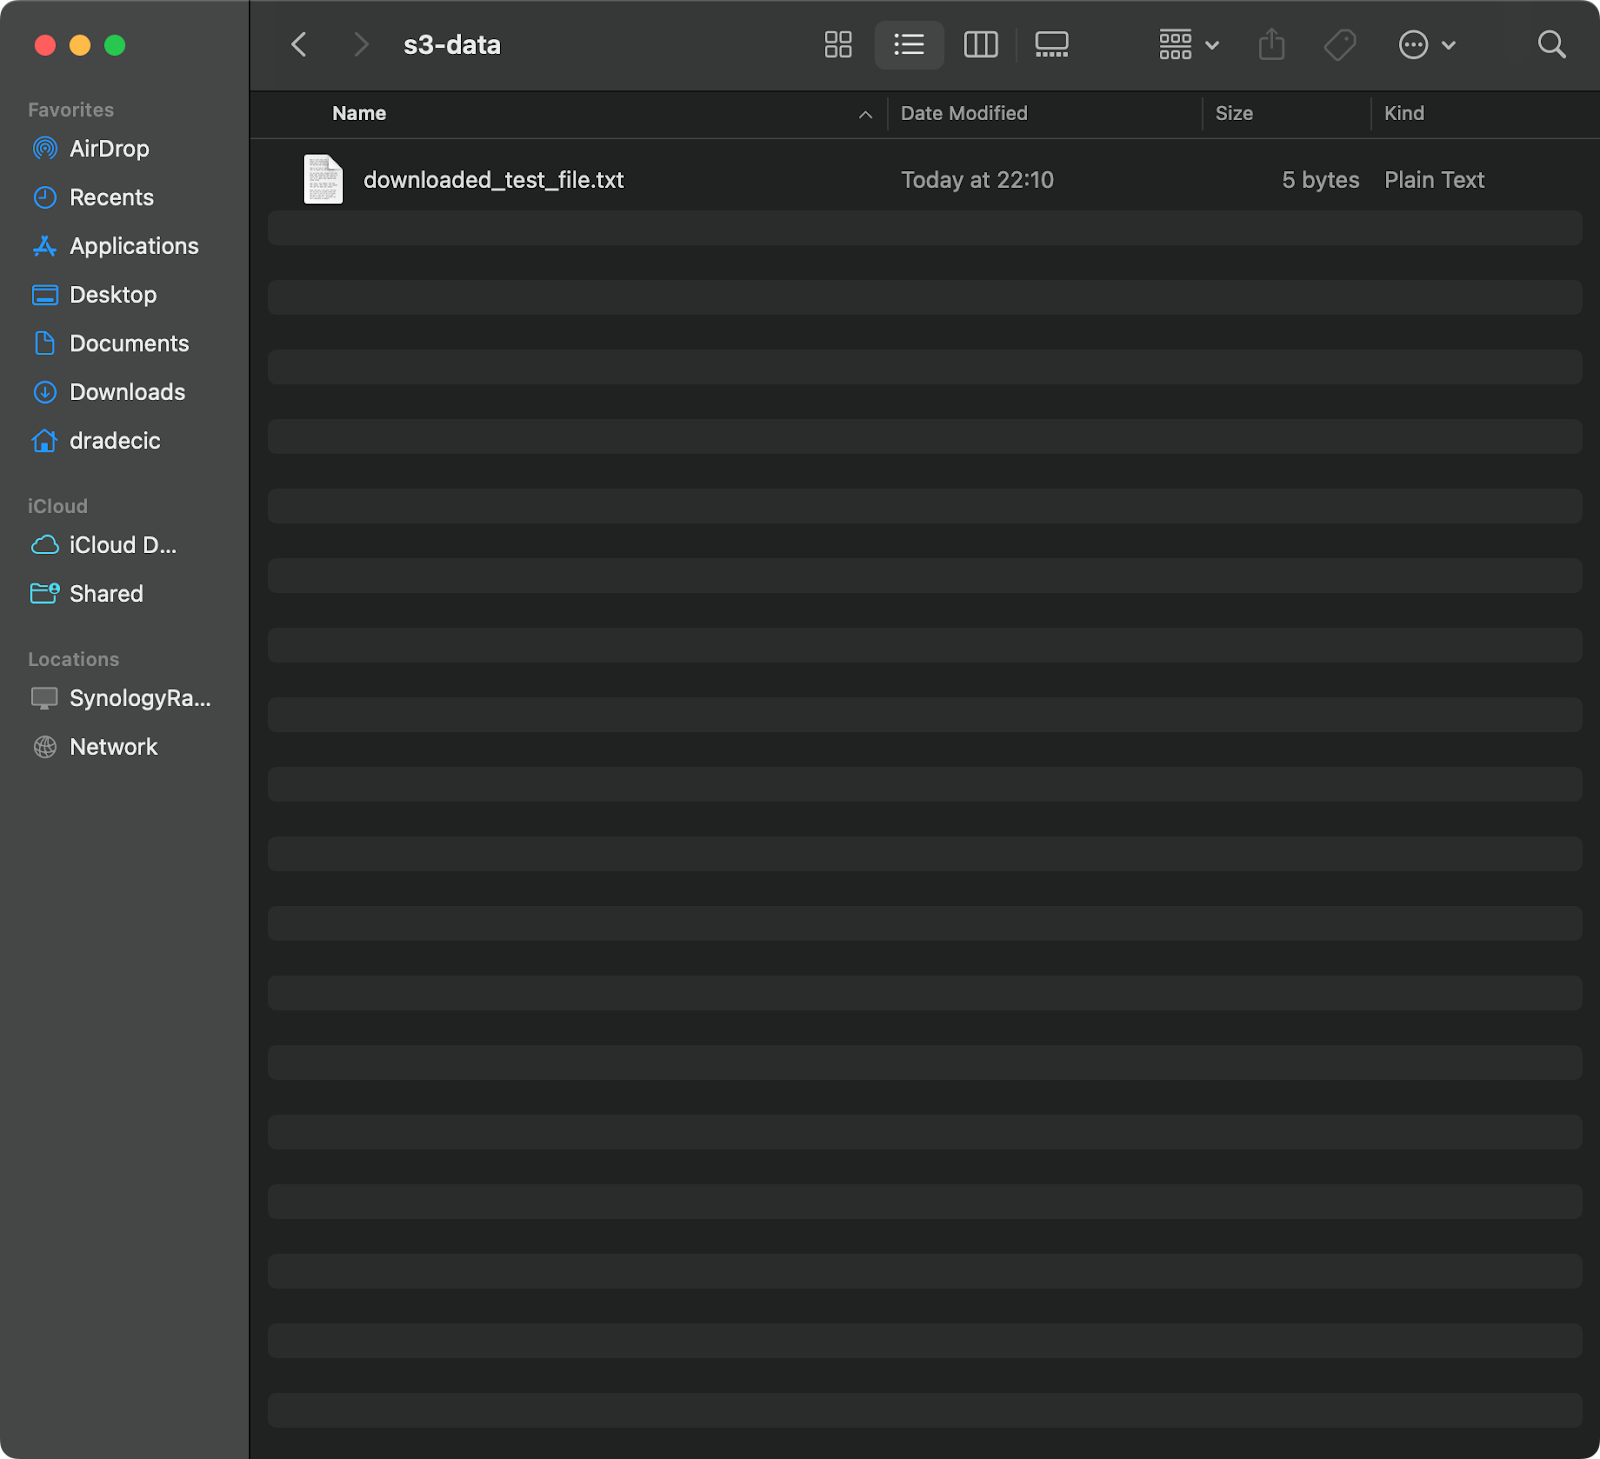
Image 11 - Downloading a single file from S3
If you omit the destination file name, the command will use the original filename:
aws s3 cp s3://testbucket-aws-cp-dradecic/test_file.txt .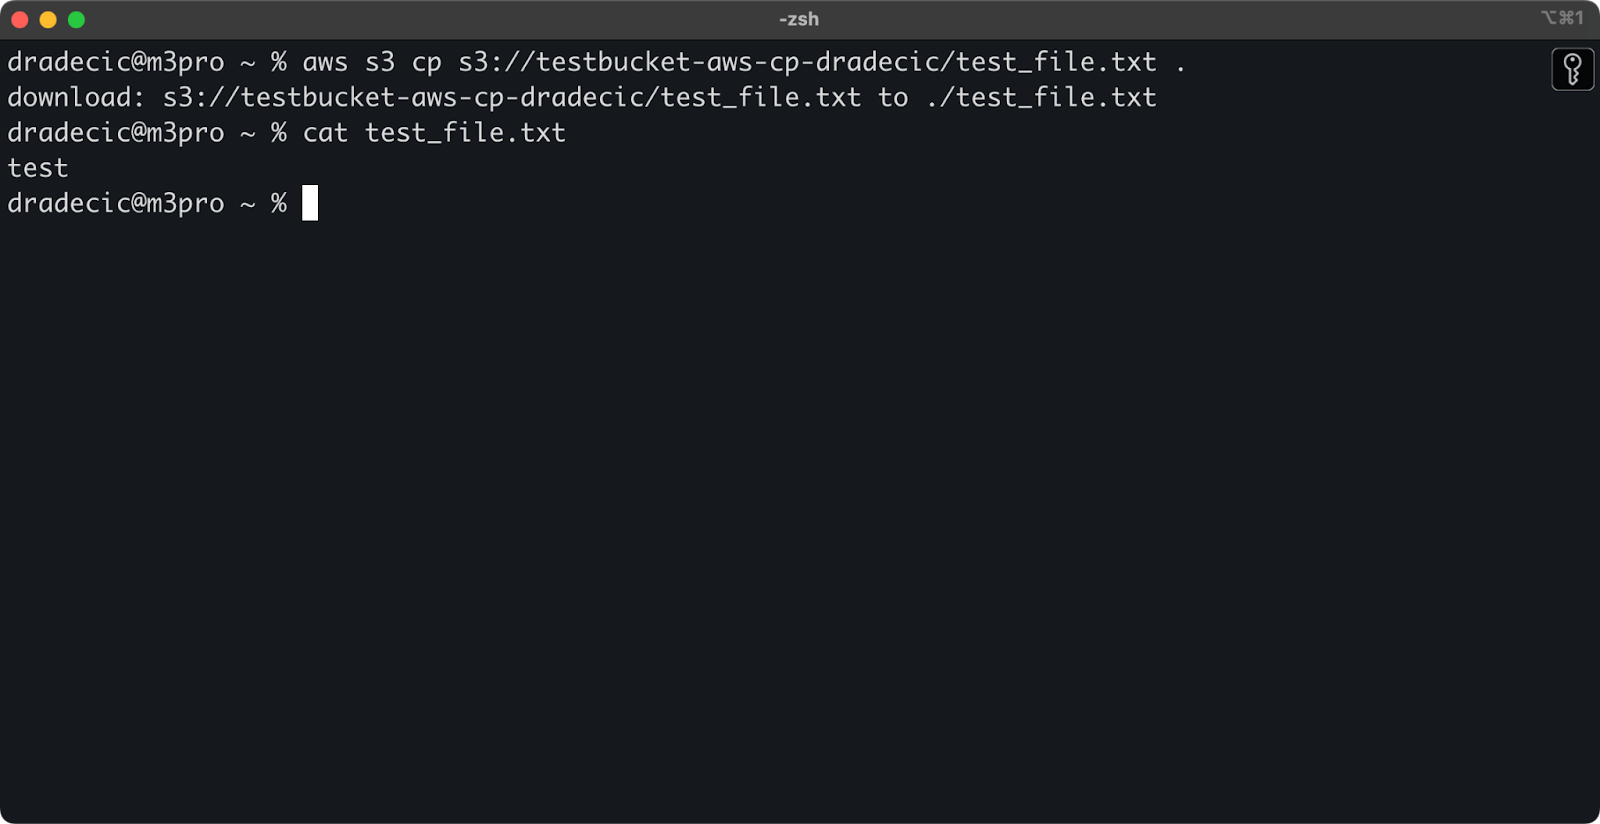
Image 12 - Contents of the downloaded file
The period (.) represents your current directory, so this will download test_file.txt to your current location.
And finally, to download an entire directory, you can use a command similar to this one:
aws s3 cp s3://testbucket-aws-cp-dradecic/my-desired-folder/test_folder /Users/dradecic/Documents/test_folder --recursive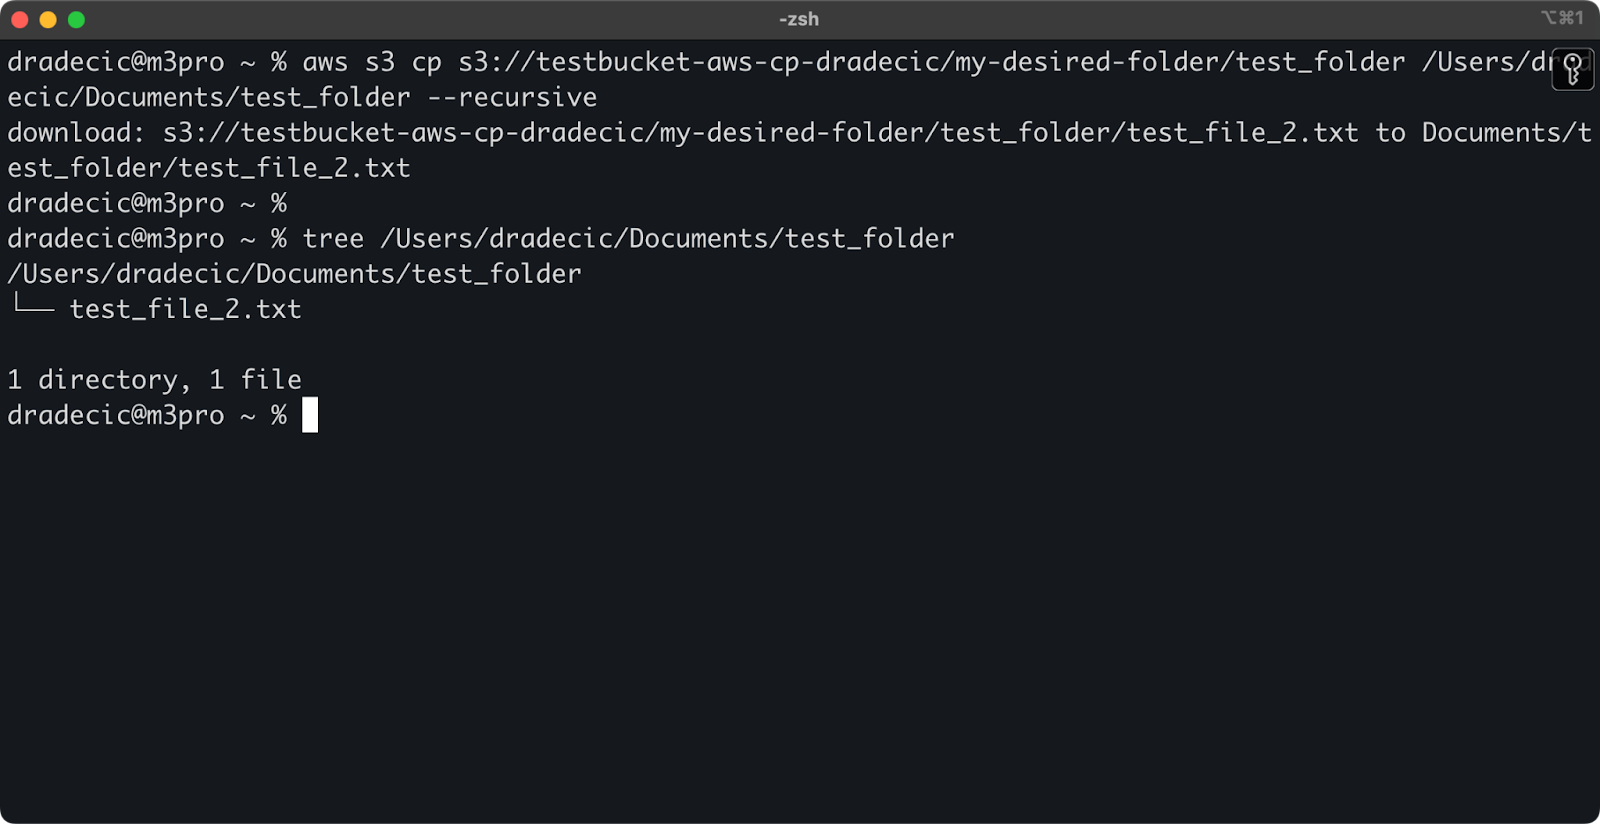
Image 13 - Contents of the downloaded folder
Keep in mind that the --recursive flag is essential when working with multiple files – without it, the command will fail if the source is a directory.
With these basic commands, you can already accomplish most of the file transfer tasks you'll need. But in the next section, you'll learn more advanced options that give you better control over the copying process.
AWS offers a couple of advanced options that allow you to maximize file copying operations. In this section, I'll show you some of the most useful flags and parameters that will help you with your everyday tasks.
Sometimes you only want to copy certain files that match specific patterns. The --exclude and --include flags let you filter files based on patterns, and they give you precise control over what gets copied.
Just to set the stage, this is the directory structure I'm working with:
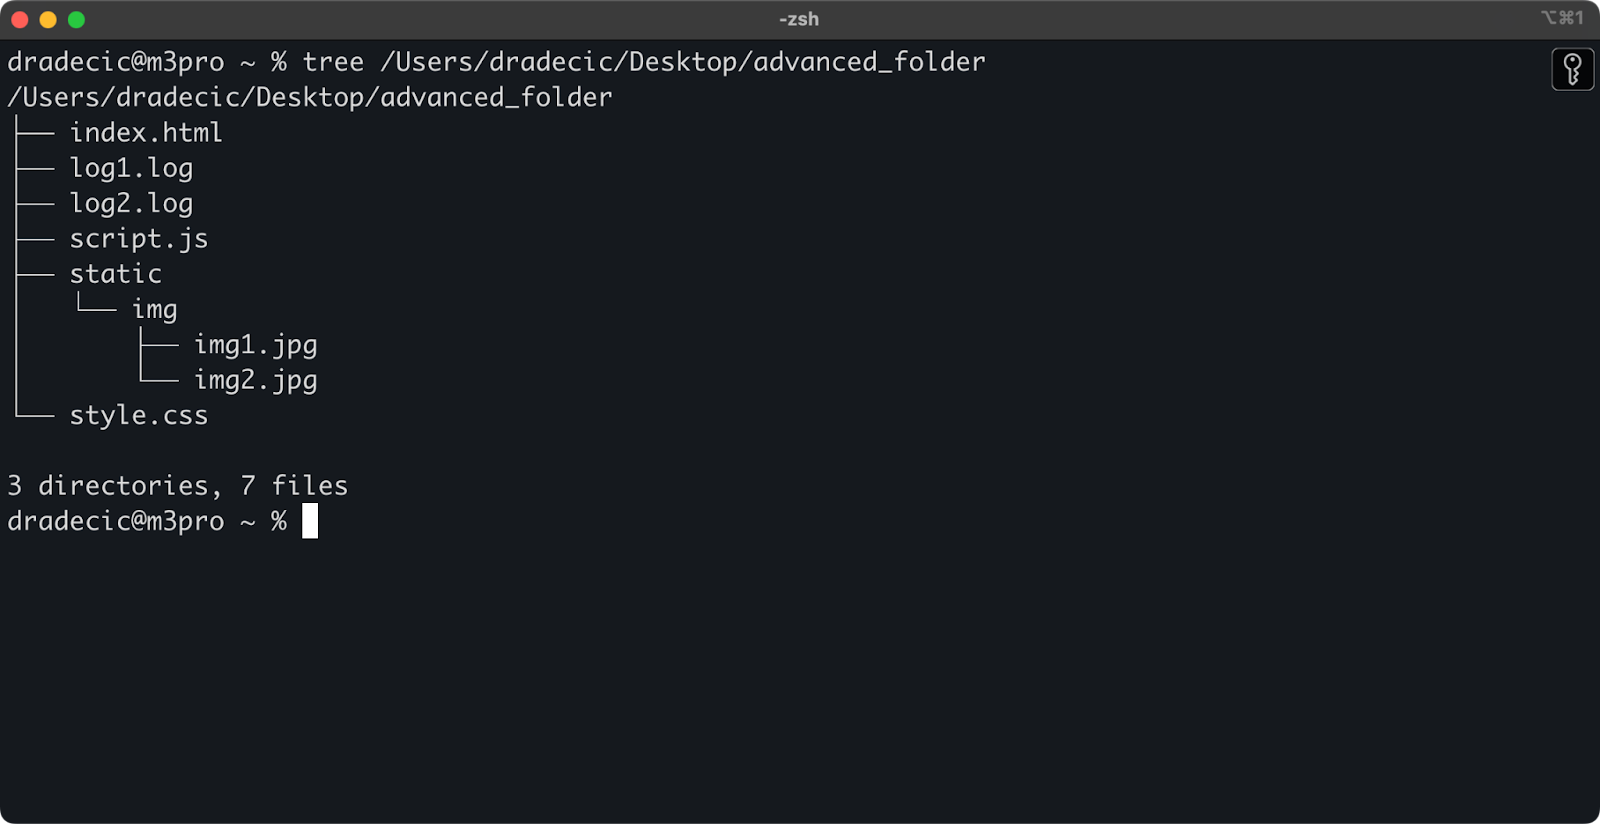
Image 14 - Directory structure
Now, let's say you want to copy all files from the directory except the .log files:
aws s3 cp /Users/dradecic/Desktop/advanced_folder s3://testbucket-aws-cp-dradecic/advanced_folder/ --recursive --exclude "*.log"This command will copy all files from the advanced_folder directory to S3, excluding any file with the .log extension:
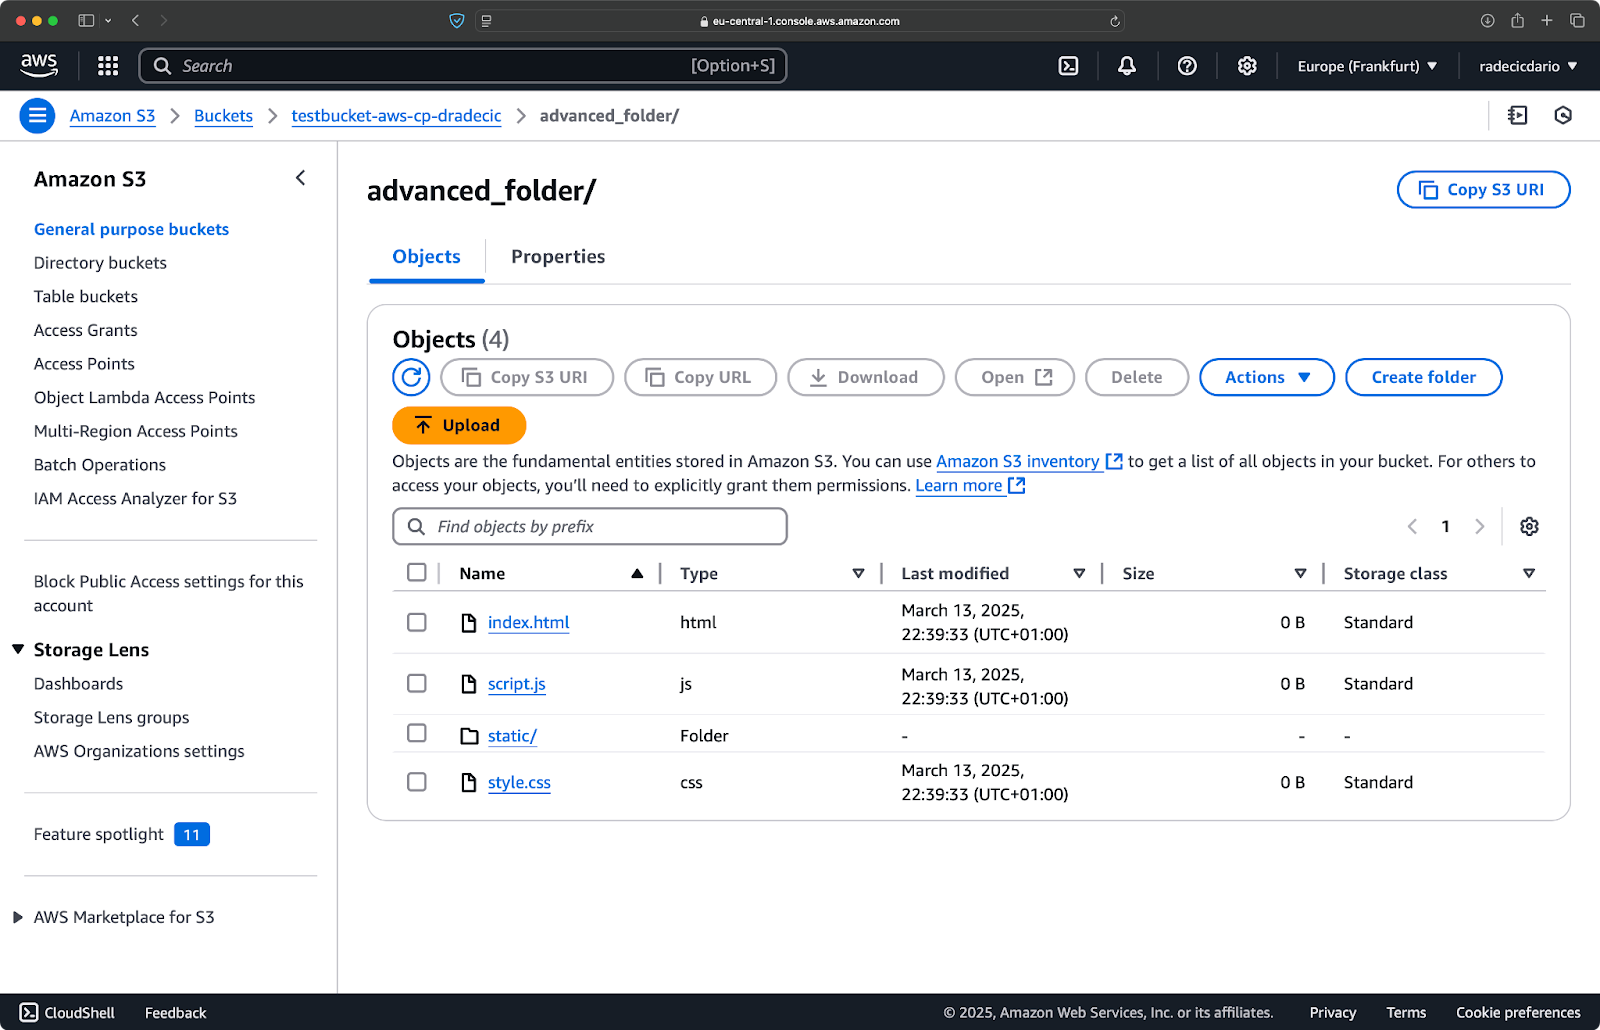
Image 15 - Folder copy results
You can also combine multiple patterns. Let's say you want to copy only the HTML and CSS files from the project folder:
aws s3 cp /Users/dradecic/Desktop/advanced_folder s3://testbucket-aws-cp-dradecic/advanced_folder/ --recursive --exclude "*" --include "*.html" --include "*.css"This command first excludes everything (--exclude "*"), then includes only files with .html and .css extensions. The result looks like this:
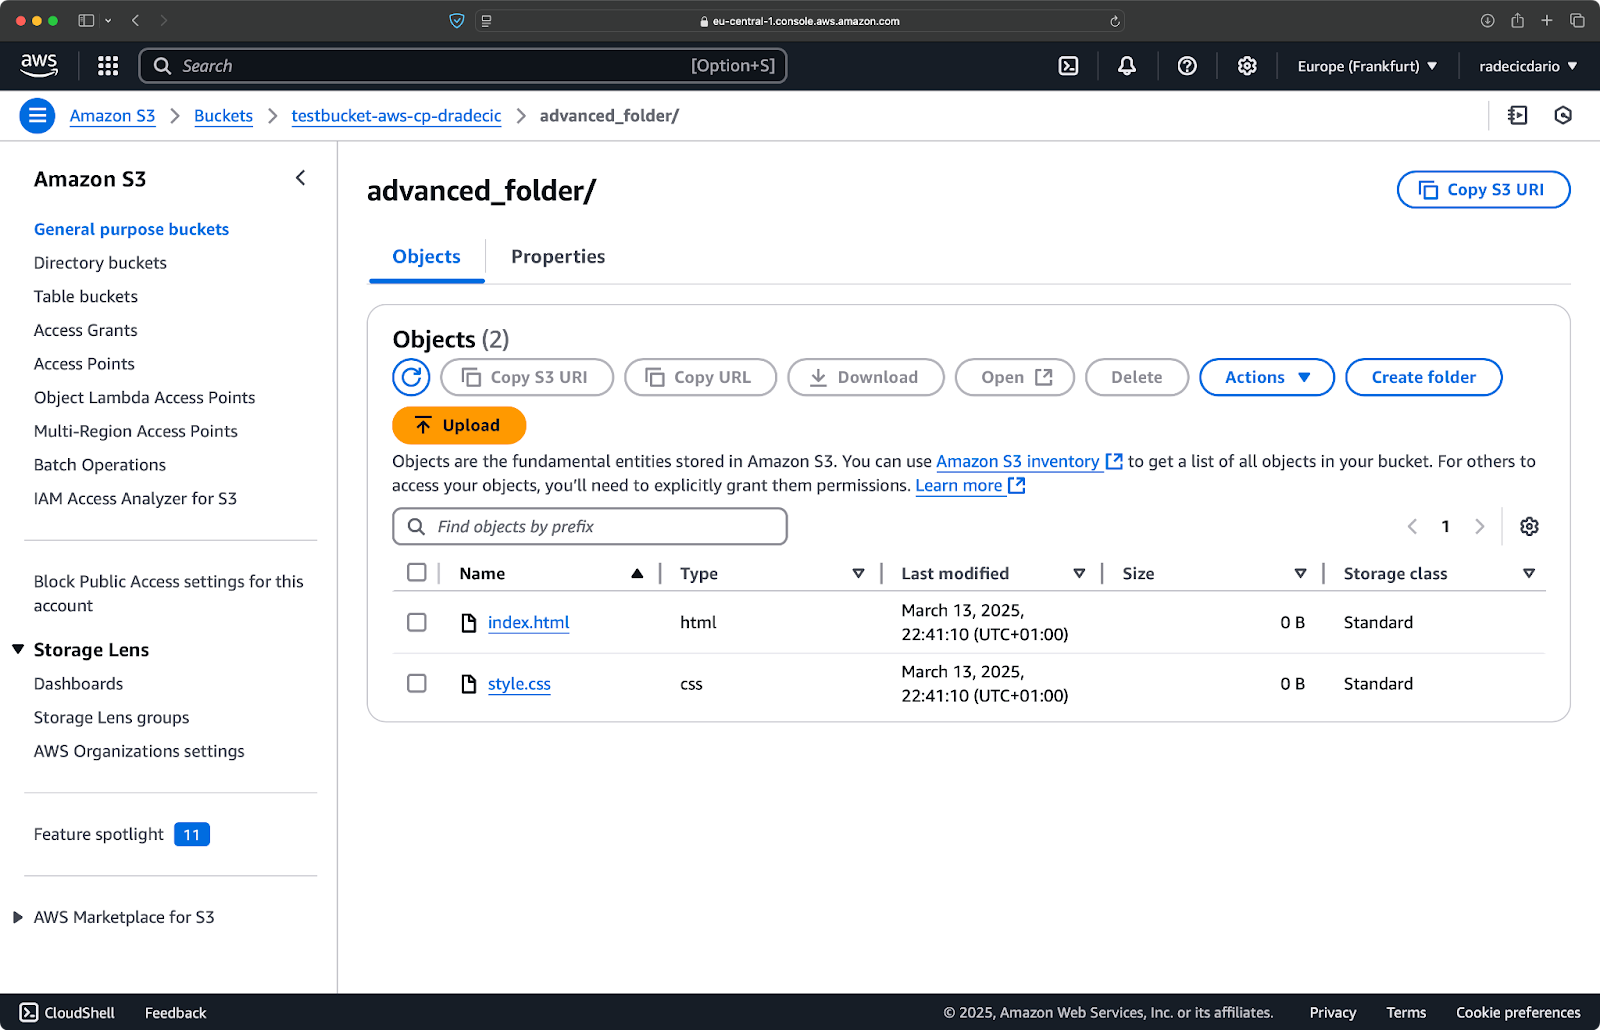
Image 16 - Folder copy results (2)
Keep in mind that the order of the flags matters - AWS CLI processes these flags sequentially, so if you put --include before --exclude, you'll get different results:
aws s3 cp /Users/dradecic/Desktop/advanced_folder s3://testbucket-aws-cp-dradecic/advanced_folder/ --recursive --include "*.html" --include "*.css" --exclude "*"This time, nothing was copied to the bucket:
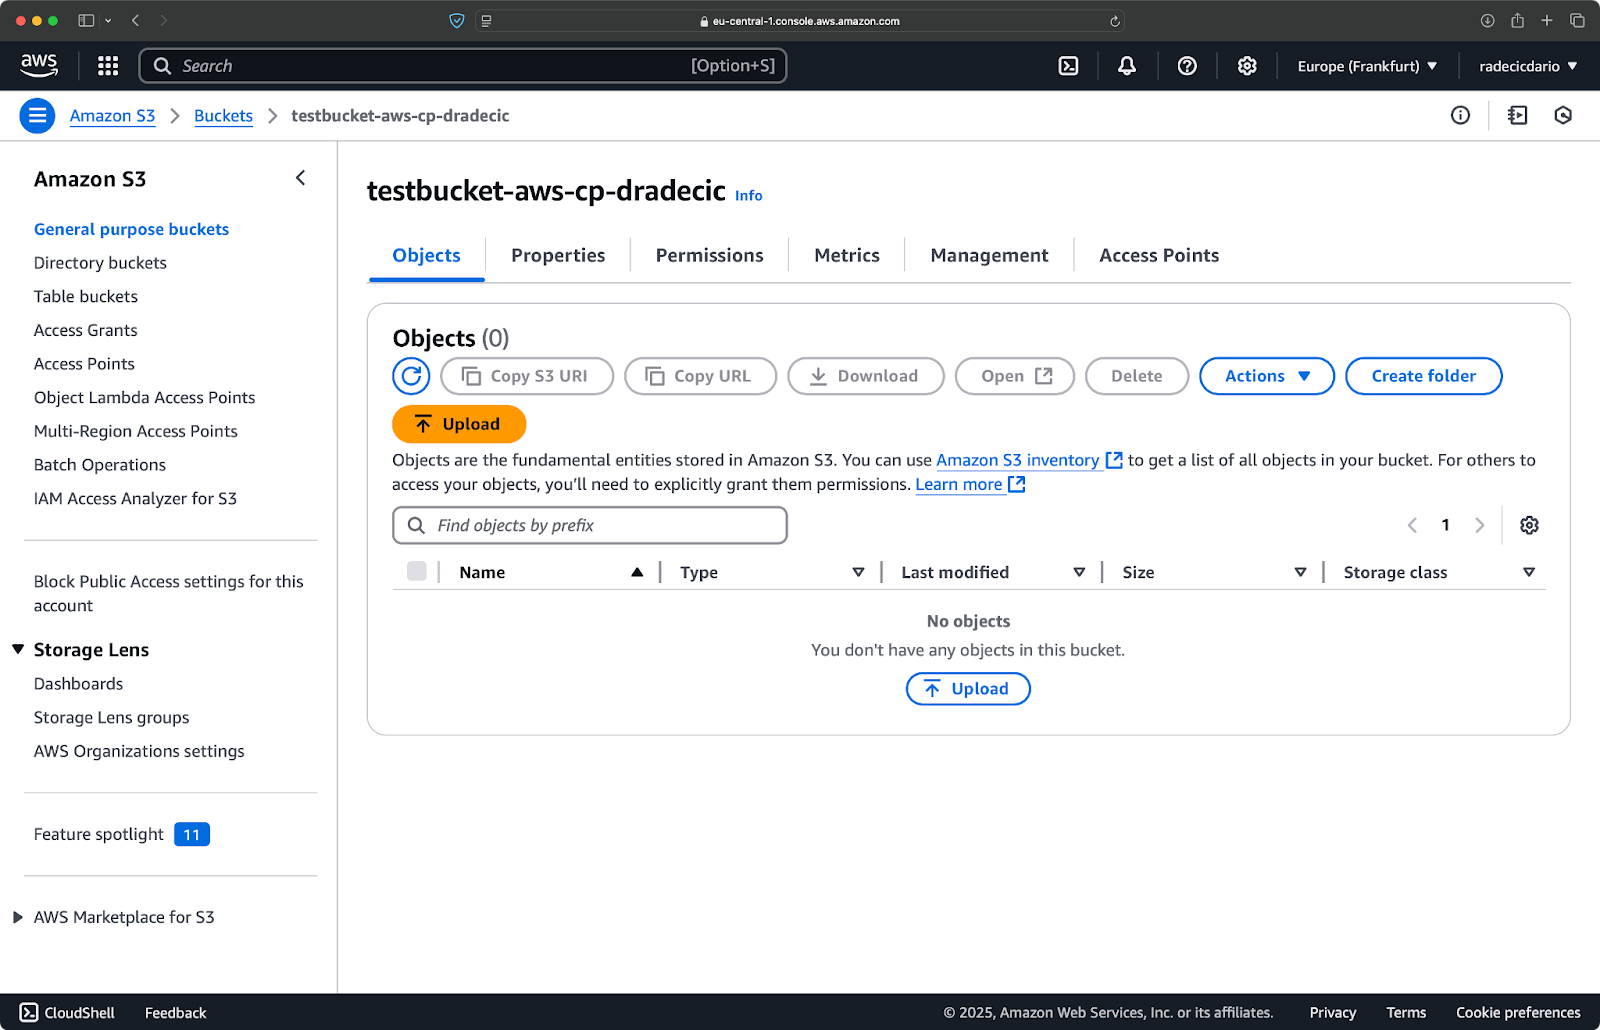
Image 17 - Folder copy results (3)
Amazon S3 offers different storage classes, each with different costs and retrieval characteristics. By default, aws s3 cp uploads files to the Standard storage class, but you can specify a different class using the --storage-class flag:
aws s3 cp /Users/dradecic/Desktop/large-archive.zip s3://testbucket-aws-cp-dradecic/archives/ --storage-class GLACIERThis command uploads large-archive.zip to the Glacier storage class, which is significantly cheaper but has higher retrieval costs and longer retrieval times:
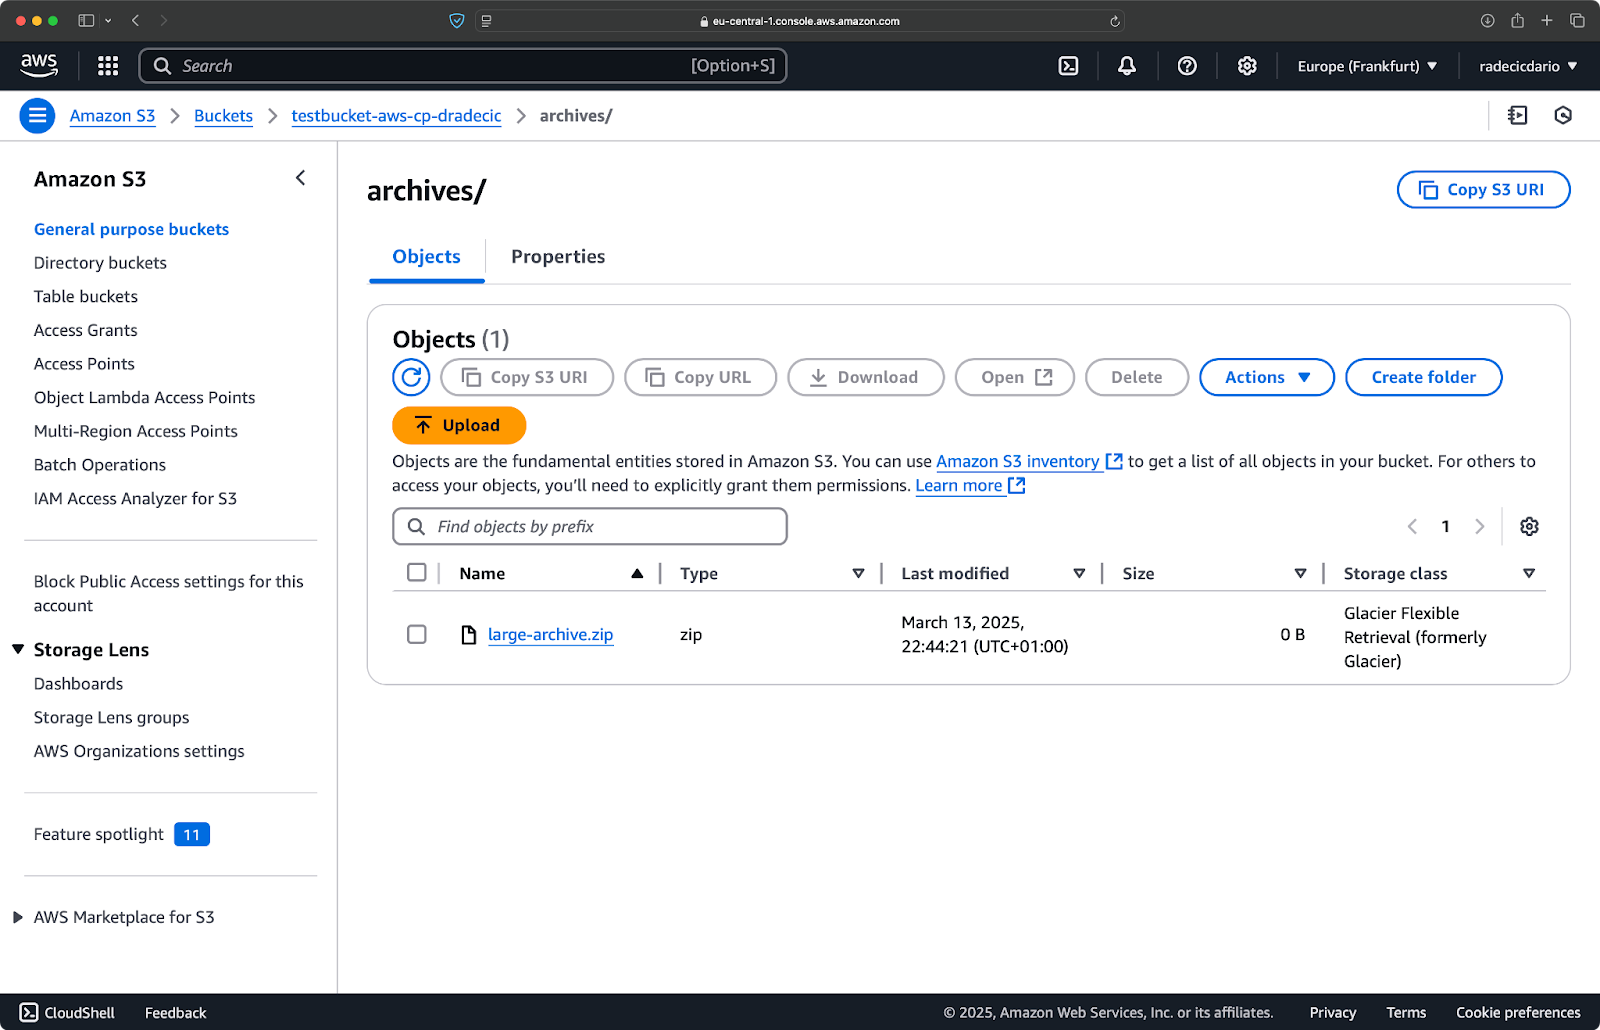
Image 18 - Copying files to S3 with different storage classes
The available storage classes include:
STANDARD (default): General-purpose storage with high durability and availability.REDUCED_REDUNDANCY (not recommended anymore): Lower durability, cost-saving option, now deprecated.STANDARD_IA (Infrequent Access): Lower-cost storage for data accessed less frequently.ONEZONE_IA (Single Zone Infrequent Access): Lower-cost, infrequent access storage in a single AWS Availability Zone.INTELLIGENT_TIERING: Automatically moves data between storage tiers based on access patterns.GLACIER: Low-cost archival storage for long-term retention, retrieval within minutes to hours.DEEP_ARCHIVE: Cheapest archival storage, retrieval within hours, ideal for long-term backup.If you're backing up files you don't need immediate access to, using GLACIER or DEEP_ARCHIVE can save you significant storage costs.
When you're updating files in S3 that already exist, you might only want to copy files that have changed. The --exact-timestamps flag helps with this by comparing timestamps between source and destination.
Here's an example:
aws s3 cp /Users/dradecic/Desktop/advanced_folder s3://testbucket-aws-cp-dradecic/advanced_folder/ --recursive --exact-timestampsWith this flag, the command will only copy files if their timestamps differ from the files already in S3. This can reduce transfer time and bandwidth usage when you're regularly updating a large set of files.
So, why is this useful? Just imagine deployment scenarios where you want to update your application files without unnecessarily transferring unchanged assets.
While --exact-timestamps is useful to perform some sort of synchronization, if you need a more sophisticated solution, consider using aws s3 sync instead of aws s3 cp. The sync command was specifically designed to keep directories in sync and has additional capabilities for this purpose. I wrote all about the sync command in the AWS S3 Sync tutorial.
With these advanced options, you now have much finer control over your S3 file operations. You can target specific files, optimize storage costs, and efficiently update your files. In the next section, you'll learn to automate these operations using scripts and scheduled tasks.
So far, you've learned how to manually copy files to and from S3 using the command line. One of the biggest advantages of using aws s3 cp is that you can easily automate these transfers, which will save you tons of time.
Let's explore how you can integrate the aws s3 cp command into scripts and scheduled jobs for hands-off file transfers.
Here's a simple bash script example that backs up a directory to S3, adds a timestamp to the backup, and implements error handling and logging into a file:
#!/bin/bash

# Set variables
SOURCE_DIR="/Users/dradecic/Desktop/advanced_folder"
BUCKET="s3://testbucket-aws-cp-dradecic/backups"
DATE=$(date +%Y-%m-%d-%H-%M)
BACKUP_NAME="backup-$DATE"
LOG_FILE="/Users/dradecic/logs/s3-backup-$DATE.log"

# Ensure the logs directory exists
mkdir -p "$(dirname "$LOG_FILE")"

# Create the backup and log the output
echo "Starting backup of $SOURCE_DIR to $BUCKET/$BACKUP_NAME" | tee -a $LOG_FILE
aws s3 cp $SOURCE_DIR $BUCKET/$BACKUP_NAME --recursive 2>&1 | tee -a $LOG_FILE

# Check if the backup was successful
if [ $? -eq 0 ]; then
    echo "Backup completed successfully on $DATE" | tee -a $LOG_FILE
else
    echo "Backup failed on $DATE" | tee -a $LOG_FILE
fi
Save this as backup.sh, make it executable with chmod +x backup.sh, and you've got a reusable backup script!
You can then run it with the following command:
./backup.sh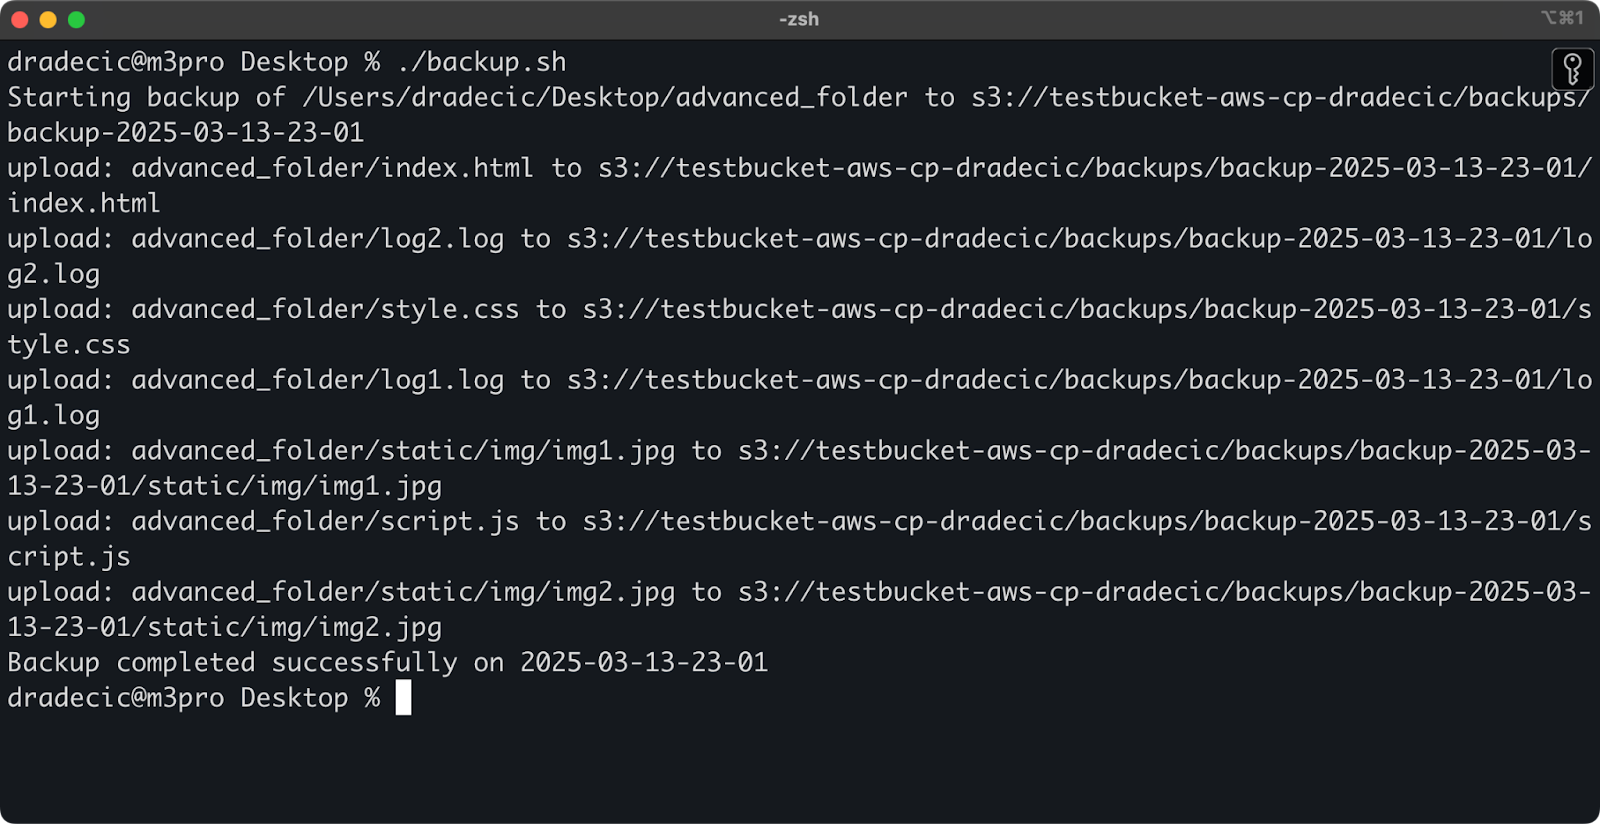
Image 19 - Script running in terminal
Immediately after, the backups folder on the bucket will get populated:
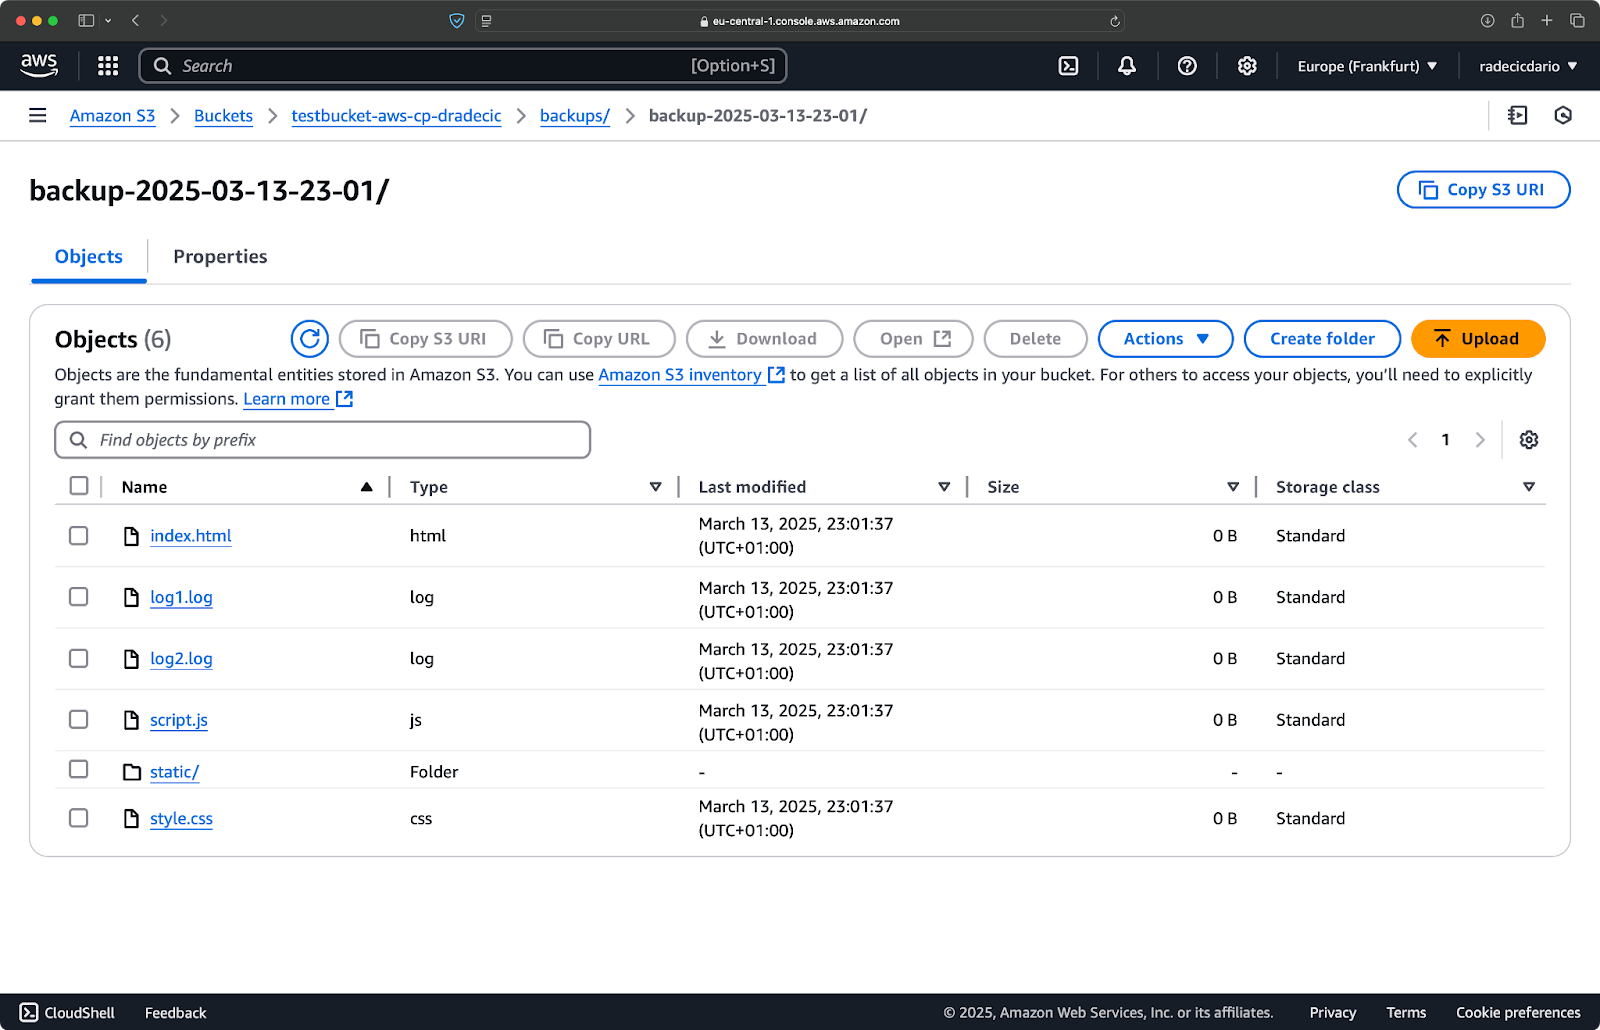
Image 20 - Backup stored on S3 bucket
Let's take this to the next level by running the script on a schedule.
Now that you have a script, the next step is to schedule it to run automatically at specific times.
If you're on Linux or macOS, you can use cron to schedule your backups. Here's how to set up a cron job to run your backup script every day at midnight:
1. Open your crontab for editing:
crontab -e2. Add the following line to run your script daily at midnight:
0 0 * * * /path/to/your/backup.sh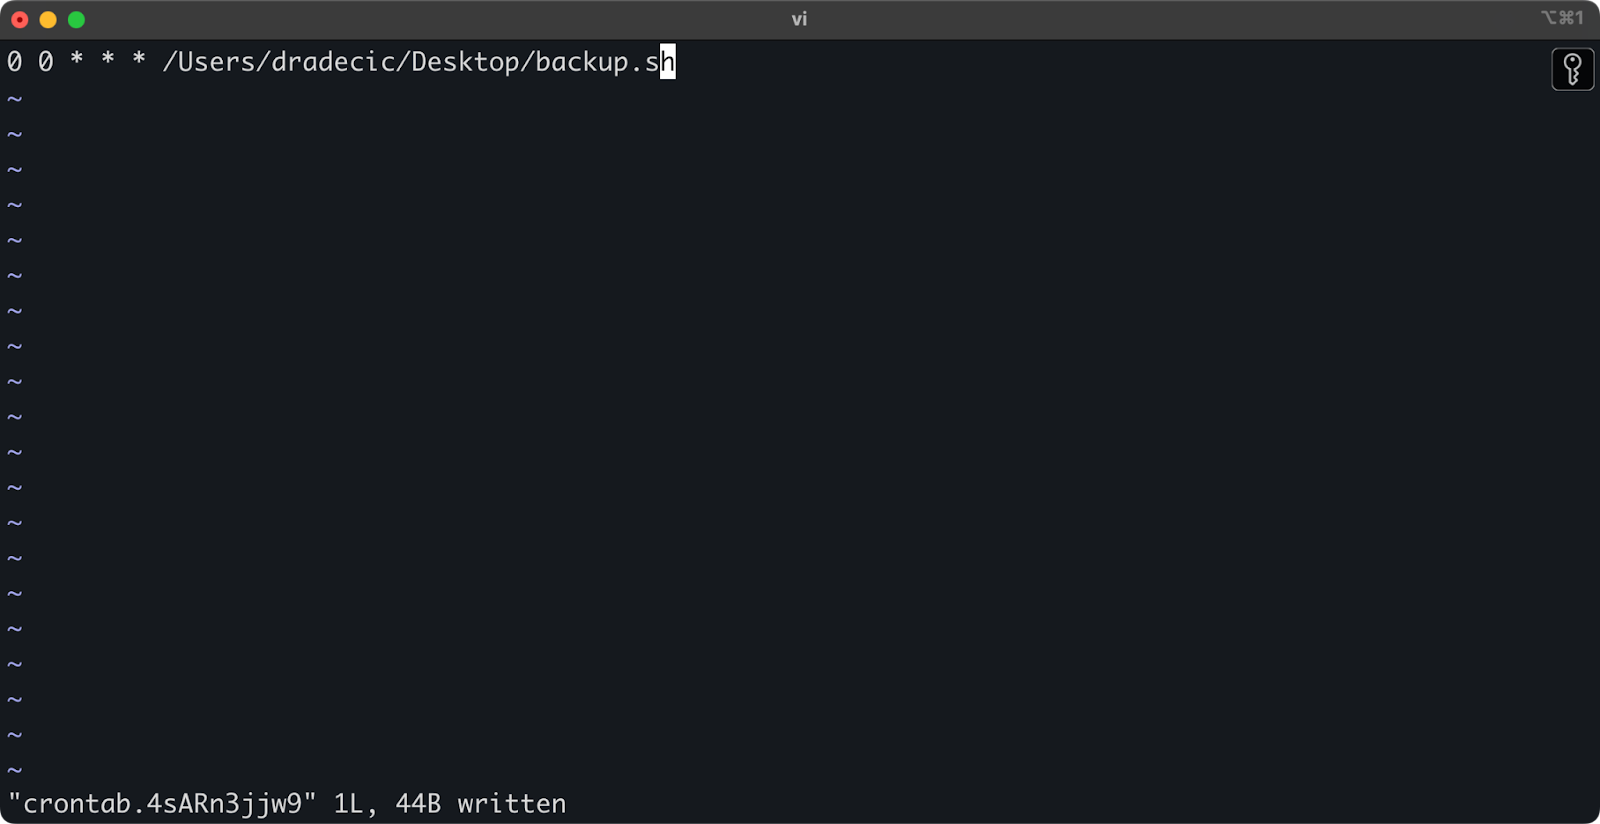
Image 21 - Cron job for running script daily
The format for cron jobs is minute hour day-of-month month day-of-week command. Here are a few more examples:
0 * * * * /path/to/your/backup.sh0 9 * * 1 /path/to/your/backup.sh0 0 1 * * /path/to/your/backup.shAnd that's it! The backup.sh script will now run on the scheduled interval.
Automating your S3 file transfers is a way to go. It's especially useful for scenarios like:
Automation techniques like these will help you set up a reliable system that handles file transfers without manual intervention. You just have to write it once, and then you can forget about it.
In the next section, I'll cover some best practices to make your aws s3 cp operations more secure and efficient.
While the aws s3 cp command is easy to use, things can go wrong.
If you follow the best practices, you'll avoid common pitfalls, optimize performance, and keep your data secure. Let's explore these practices to make your file transfer operations more efficient.
When working with S3, organizing your files logically will save you time and headaches down the road.
First, establish a consistent bucket and prefix naming convention. For example, you can separate your data by environment, application, or date:
s3://company-backups/production/database/2023-03-13/
s3://company-backups/staging/uploads/2023-03/
This kind of organization makes it easier to:
Another tip: When transferring large sets of files, consider grouping small files together first (using zip or tar) before uploading. This reduces the number of API calls to S3, which can lower costs and speed up transfers.
# Instead of copying thousands of small log files
# tar them first, then upload
tar -czf example-logs-2025-03.tar.gz /var/log/application/
aws s3 cp example-logs-2025-03.tar.gz s3://testbucket-aws-cp-dradecic/logs/2025/03/When you're copying large files or many files at once, there are a few techniques to make the process more reliable and efficient.
You can use the --quiet flag to reduce output when running in scripts:
aws s3 cp large-directory/ s3://testbucket-aws-cp-dradecic/backups/ --recursive --quietThis suppresses the progress information for each file, which makes logs more manageable. It also improves performance slightly.
For very large files, consider using multipart uploads with the --multipart-threshold flag:
aws s3 cp huge-file.iso s3://testbucket-aws-cp-dradecic/backups/ --multipart-threshold 100MBThe above setting tells AWS CLI to split files larger than 100MB into multiple parts for upload. Doing so has a couple of benefits:
When transferring data between regions, consider using S3 Transfer Acceleration for faster uploads:
aws s3 cp large-file.zip s3://testbucket-aws-cp-dradecic/backups/ --endpoint-url https://s3-accelerate.amazonaws.comThe above routes your transfer through Amazon's edge network, which can significantly speed up cross-region transfers.
Security should always be a top priority when working with your data in the cloud.
First, make sure your IAM permissions follow the principle of least privilege. Only grant the specific permissions needed for each task.
Here's an example policy you can assign to the user:
{
    "Version": "2012-10-17",
    "Statement": [
        {
            "Effect": "Allow",
            "Action": [
                "s3:PutObject",
                "s3:GetObject"
            ],
            "Resource": "arn:aws:s3:::testbucket-aws-cp-dradecic/backups/*"
        }
    ]
}
This policy allows copying files to and from only the "backups" prefix in "my-bucket".
An additional way to increase security is by enabling encryption for sensitive data. You can specify server-side encryption when uploading:
aws s3 cp confidential.docx s3://testbucket-aws-cp-dradecic/ --sse AES256Or, for more security, use AWS Key Management Service (KMS):
aws s3 cp secret-data.json s3://testbucket-aws-cp-dradecic/ --sse aws:kms --sse-kms-key-id myKMSKeyIdHowever, for highly sensitive operations, consider using VPC endpoints for S3. This keeps your traffic within the AWS network and avoids the public internet entirely.
In the next section, you'll learn how to troubleshoot common issues you might encounter when working with this command.
One thing is certain - you'll occasionally run into issues when working with aws s3 cp. But, by understanding common errors and their solutions, you'll save some time and frustration when things don't go as planned.
In this section, I'll show you the most frequent problems and how to fix them.
This is probably the most common error you'll encounter:
upload failed: ./myfile.txt to s3://testbucket-aws-cp-dradecic/myfile.txt An error occurred (AccessDenied) when calling the PutObject operation: Access DeniedThis usually means one of three things:
To troubleshoot:
s3:PutObject (for uploads) or s3:GetObject (for downloads) permissions.aws configure to update your credentials if they've expired.This error occurs when the local file or directory you're trying to copy doesn't exist:
upload failed: ./missing-file.txt to s3://testbucket-aws-cp-dradecic/missing-file.txt An error occurred (404) when calling the PutObject operation: Not FoundThe solution is simple - check your file paths carefully. Paths are case-sensitive, so keep that in mind. Also, make sure you're in the correct directory when using relative paths.
If you see this error:
upload failed: ./myfile.txt to s3://testbucket-aws-cp-dradecic/myfile.txt An error occurred (NoSuchBucket) when calling the PutObject operation: The specified bucket does not existCheck for:
You can list all your buckets with aws s3 ls to confirm the correct name.
Network issues can cause connection timeouts:
upload failed: ./largefile.zip to s3://testbucket-aws-cp-dradecic/largefile.zip An error occurred (RequestTimeout) when calling the PutObject operation: Request timeoutTo resolve this:
Errors are much more likely to occur when transferring large files. When that's the case, try to handle failures gracefully.
For example, you can use the --only-show-errors flag to make error diagnosis easier in scripts:
aws s3 cp large-directory/ s3://testbucket-aws-cp-dradecic/ --recursive --only-show-errorsThis suppresses successful transfer messages, showing only errors, which makes troubleshooting large transfers much easier.
For handling interrupted transfers, the --recursive command will automatically skip files that already exist in the destination with the same size. However, to be more thorough, you can use the AWS CLI's built-in retries for network issues by setting these environment variables:
export AWS_RETRY_MODE=standard
export AWS_MAX_ATTEMPTS=5
aws s3 cp large-file.zip s3://testbucket-aws-cp-dradecic/
This tells the AWS CLI to automatically retry failed operations up to 5 times.
But for very large datasets, consider using aws s3 sync instead of cp, as it's designed to handle interruptions better:
aws s3 sync large-directory/ s3://testbucket-aws-cp-dradecic/large-directory/The sync command will only transfer files that are different from what's already in the destination, making it perfect for resuming interrupted large transfers.
If you understand these common errors and implement proper error handling in your scripts, you'll make your S3 copy operations much more robust and reliable.
To conclude, aws s3 cp command is a one-stop shop for copying local files to S3 and vice-versa.
You learned all about it in this article. You started from fundamentals and environment configuration, and ended up writing scheduled and automated scripts for copying files. You also learned how to tackle some common errors and challenges when moving files, especially large ones.
So, if you're a developer, data professional, or system administrator, I think you'll find this command useful. The best way to get comfortable with it is by using it regularly. Make sure you understand the fundamentals, and then spend some time automating tedious bits of your job.
To learn more about AWS, follow these courses by DataCamp:
You can even use DataCamp to prepare for AWS certification exams - AWS Cloud Practitioner (CLF-C02).
Learn more about AWS with these courses!
Course
Course
Course
blog
Vikash Singh
8 min
Tutorial
Dario Radečić
Tutorial
Zoumana Keita
Tutorial
Kenny Ang
Tutorial
Zoumana Keita
Tutorial
Don Kaluarachchi