Track
Llama Fundamentals
4 hr
Chainlit helps you create frontends for AI chatbots, tools, and LLM workflows. It abstracts away front-end complexity and lets you focus on Python logic while providing support for adding buttons, sliders, file upload support, or even plugging into tools using the model context protocol (MCP).
Chainlit is ideal for:
Every Chainlit app is built on a few essential features:
@cl.on_chat_start runs when a chat begins.@cl.on_message runs when the user sends a message.@cl.on_chat_end runs when the chat ends.cl.Action and handle them with @cl.action_callback. These are great for building clean, interactive UIs without requiring user text input.stream=True, making your app feel more dynamic and responsive.config.toml: This file allows you to enable features like chat persistence, file upload, theme customization, and usability tweaks—all without modifying your Python code.I will explain each concept with a hands-on code example so you can see exactly how it works and how to integrate it into your Chainlit apps. Let’s start with the first step.
Make sure you have Python 3.8+ installed, then install Chainlit using pip. We’ll also use Langchain for the Ollama demo, so make sure to install it. Run the following command in the terminal:
pip install chainlit langchain langchain-communityIn this section, we will cover Chainlit's core building blocks, which will form the core of any project.
Whenever a user connects to your Chainlit app, a chat session is created. You can tap into different stages of that session using the decorators provided by Chainlit. These include:
This hook runs when a new chat session begins. You can use it to greet the user, display a welcome message, or initialize the session state.
import chainlit as cl
@cl.on_chat_start
def on_chat_start():
    print("A new chat session has started!")
This message hook runs when the user sends a new message. We use it to process user input, call an LLM, or return a response.
import chainlit as cl
@cl.on_message
async def on_message(msg: cl.Message):
    print("The user sent:", msg.content)
    await cl.Message(content=f"You said: {msg.content}").send()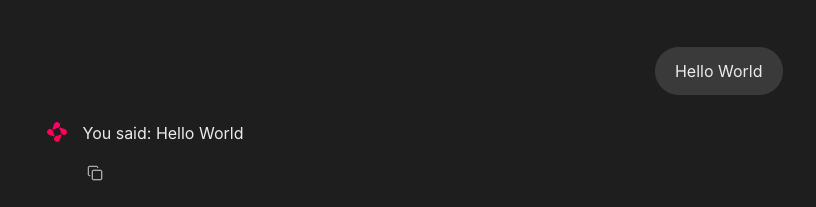
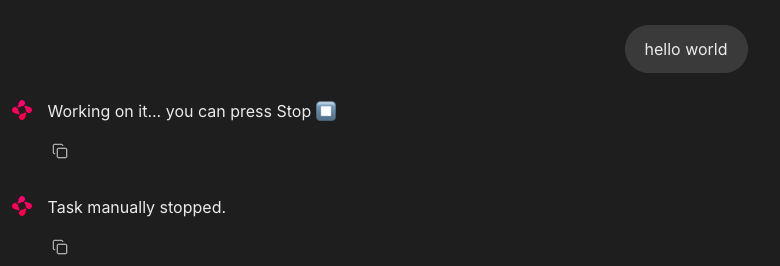
The on_stop hook runs when the user clicks the stop button (⏹) during a running task. It stands for canceling long-running operations or cleaning up interrupted sessions.
import chainlit as cl
import asyncio
@cl.on_chat_start
async def start():
    await cl.Message("Type anything and I'll pretend to work on it.").send()
@cl.on_message
async def on_message(msg: cl.Message):
    await cl.Message("Working on it... you can press Stop").send()
    try:
        # Simulate a long task
        await asyncio.sleep(10)
        await cl.Message("Task complete!").send()
    except asyncio.CancelledError:
        print("Task was interrupted!")
        # This is optional, just logs in the server
        raise
@cl.on_stop
async def on_stop():
    print("The user clicked Stop!")
When the user sends a message, Chainlit simulates a task with asyncio.sleep(10). If the user clicks the stop button (⏹), the task is canceled, and @cl.on_stop is triggered to log the interruption.
This hook is triggered when the session ends—either the user refreshes, closes the tab, or starts a new session. This is usually used to log disconnections or save the state.
import chainlit as cl
@cl.on_chat_start
async def on_chat_start():
    await cl.Message("Welcome! Feel free to leave anytime").send()
@cl.on_chat_end
async def on_chat_end():
    print("The user disconnected!")
Once the localhost is open, you can work with it. When you close the localhost tab or window, the terminal will display the following:

Chainlit lets you add interactive buttons directly into your chatbot interface. Each button is defined as an action and connected to a Python callback function. You send buttons as part of a Message using the actions argument:
import chainlit as cl
@cl.on_chat_start
async def start():
    actions = [
        cl.Action(
            name="hello",
            label="👋 Say Hello",
            icon="smile",
            payload={"value": "hi"}
        )
    ]
    await cl.Message("Click a button!", actions=actions).send()
This is how you can handle a button click:
@cl.action_callback("hello")
async def on_hello(action: cl.Action):
    await cl.Message("Hello there! 👋").send()
The @cl.action_callback("hello") decorator tells Chainlit to listen for clicks on a button with the name "hello". When clicked, it sends a friendly message to the user in the chat interface.
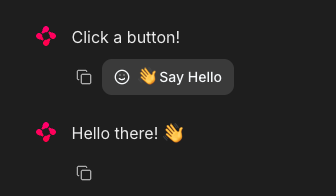
Tip: You can customize the payload with any data you want to send back to the server.
Chainlit supports real-time streaming of LLM responses. This means you can send content to the user incrementally as it's generated.
@cl.on_message
async def on_message(message: cl.Message):
    await cl.Message(content="Thinking...").send()
    async for chunk in llm.astream(message.content):
        await cl.Message(content=chunk, author="LLM", stream=True).send()
Let’s break this down:
stream=True parameter ensures that each chunk appears incrementally instead of waiting for the full response.Note: This works best with models that support streaming.
To unlock powerful features such as chat persistence, file uploads, theming, and more, you can customize your Chainlit app using the config.toml file. This file resides in the root of your project directory (under the .chainlit folder) and enables you to adjust runtime behavior without modifying code.
This parameter allows Chainlit to persist chat history and session state. It activates the @cl.on_chat_resume hook, making it ideal for apps where users might disconnect and come back later.
[persistence]
enabled = trueThis setting lets users upload files in the chat interface. You can restrict allowed file types and file sizes to ensure security and performance.
[features.spontaneous_file_upload]
enabled = true
accept = ["*/*"]
max_files = 5
max_size_mb = 500
Here are a few file types that are accepted by Chainlit.
# 1. For specific file types:
    # accept = ["image/jpeg", "image/png", "application/pdf"]
# 2. For all files of a certain type:
    #    accept = ["image/*", "audio/*", "video/*"]
# 3. For specific file extensions:
    #    accept = { "application/octet-stream" = [".xyz", ".pdb"] }
This lets you tailor uploads for safety, performance, or domain-specific use cases.
This customization changes the assistant name under the UI parameter and enables the Chain of Thought (CoT) in rendering mode, which is useful for step-by-step reasoning or debugging.
[UI]
name = "Assistant"
cot = "full"These enhance the user experience by auto-scrolling new messages into view and allowing message edits.
[features]
user_message_autoscroll = true
edit_message = true
The above usability tweaks allow the user to enable autoscroll and message editing features within the UI.
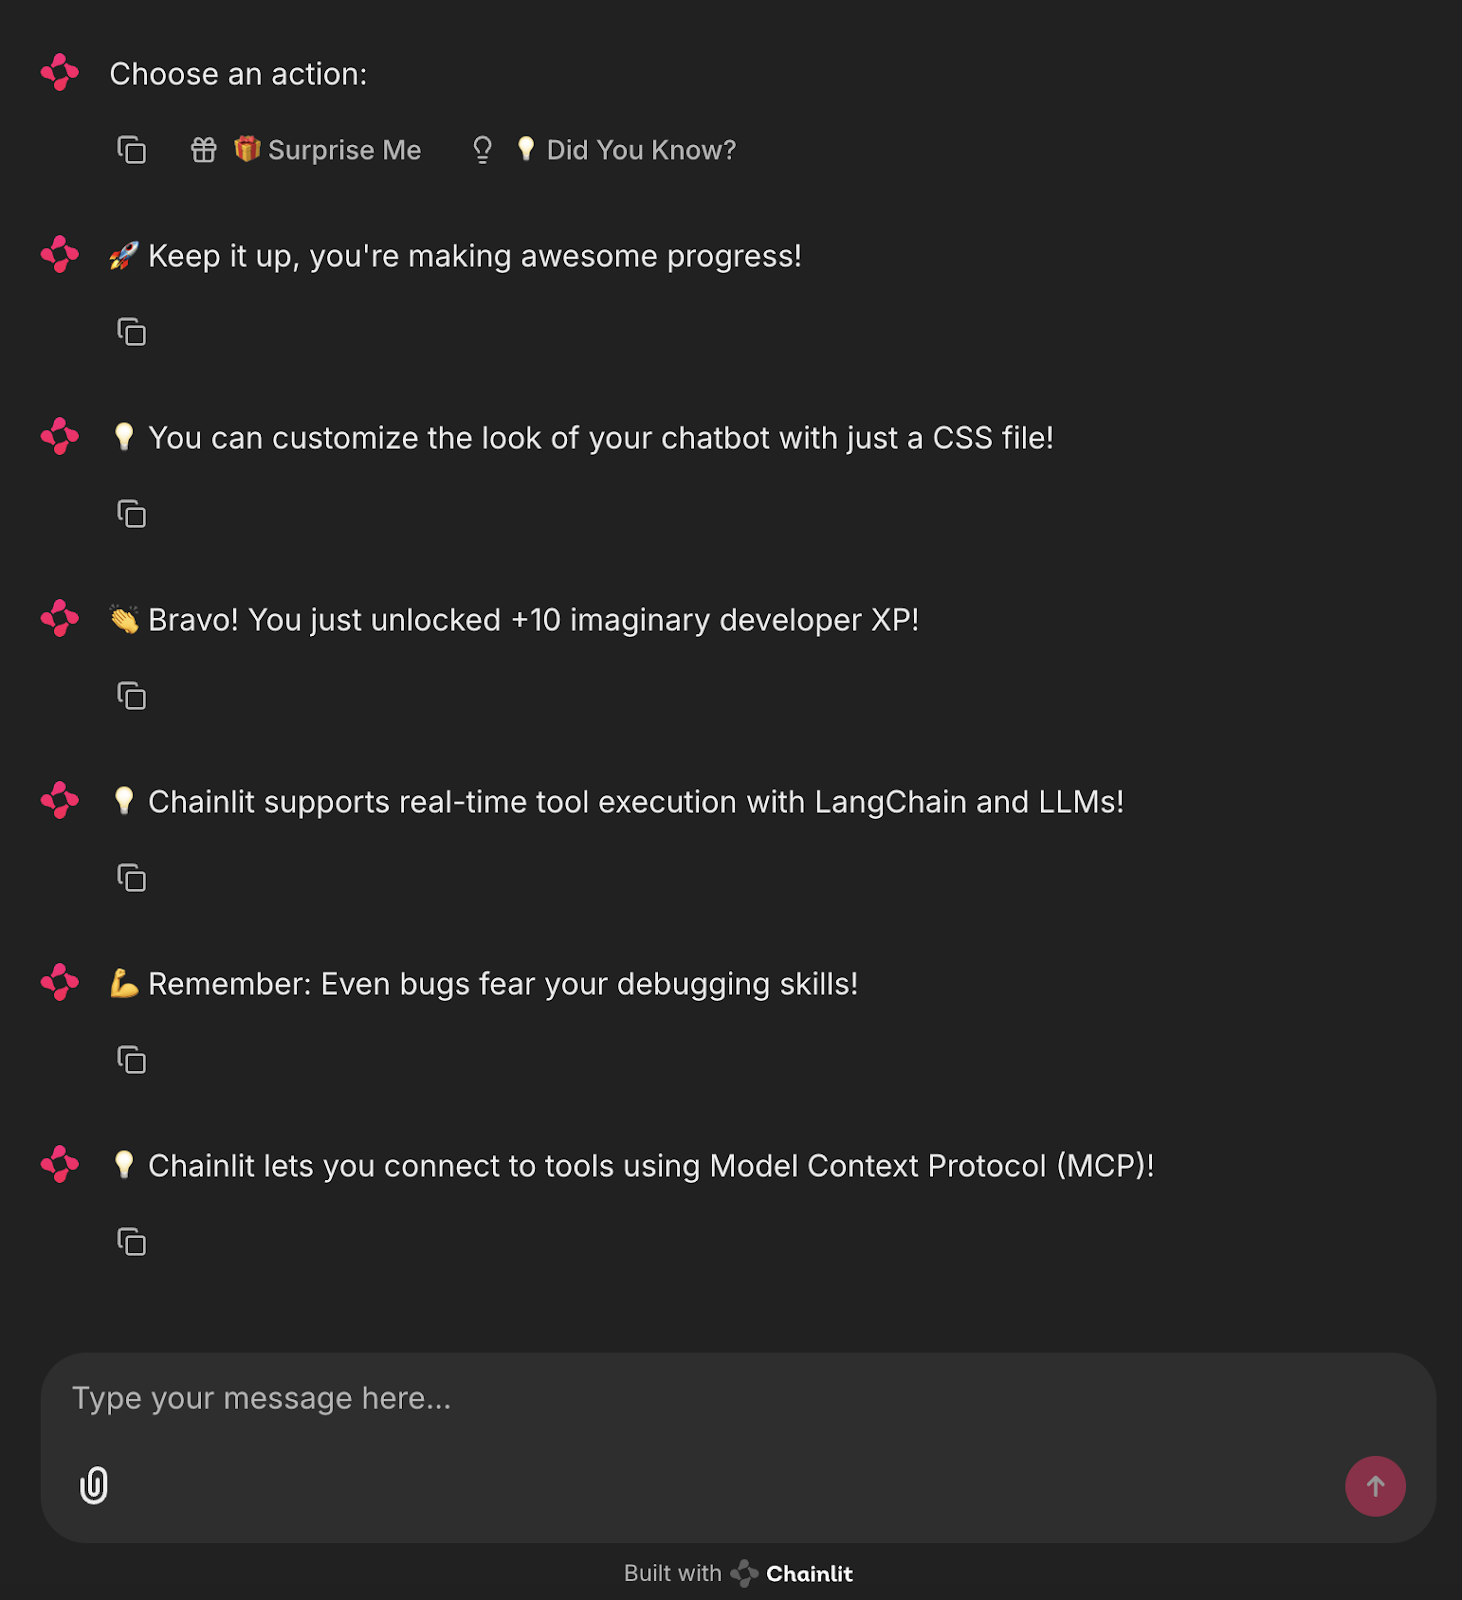
Now that we know the basic components of Chainlit, let’s build a simple UI-based app that uses buttons to show pre-defined fun facts or developer motivation messages.
import chainlit as cl
import random
FUN_FACTS = [
    "💡 Did you know? Chainlit supports file uploads and custom themes!",
    "💡 You can add buttons, sliders, and images directly in your chatbot UI!",
    "💡 Chainlit supports real-time tool execution with LangChain and LLMs!",
    "💡 You can customize the look of your chatbot with just a CSS file!",
    "💡 Chainlit lets you connect to tools using Model Context Protocol (MCP)!"
]
SUPRISES = [
    "🎉 Surprise! You're doing great!",
    "🚀 Keep it up, you're making awesome progress!",
    "🌟 Fun fact: Someone out there just smiled because of you. Why not make it two?",
    "👏 Bravo! You just unlocked +10 imaginary developer XP!",
    "💪 Remember: Even bugs fear your debugging skills!"
]
@cl.on_chat_start
async def start():
    actions = [
        cl.Action(
            name="surprise_button",
            label="🎁 Surprise Me",
            icon="gift",
            payload={"value": "surprise"}
        ),
        cl.Action(
            name="fact_button",
            label="💡 Did You Know?",
            icon="lightbulb",
            payload={"value": "fact"}
        )
    ]
    await cl.Message(content="Choose an action:", actions=actions).send()
@cl.action_callback("surprise_button")
async def on_surprise(action: cl.Action):
    suprise = random.choice(SUPRISES)
    await cl.Message(content=suprise).send()
@cl.action_callback("fact_button")
async def on_fact(action: cl.Action):
    fact = random.choice(FUN_FACTS)
    await cl.Message(content=fact).send()
The above code defines two lists: “FUN_FACTS” for interesting Chainlit tips and “SUPRISES” for motivational messages.
cl.Action. ', which sends a random surprise message.This creates a simple, interactive chatbot using buttons that requires no LLMs and is perfect for learning how Chainlit actions and callbacks work.
To run this application, simply run the following command in the terminal:
chainlit run main.pyYou’ll see interactive buttons in the UI that trigger facts or fun messages!
Now, let’s automate this process and generate the surprise and fact messages using a local LLM via Ollama.
import chainlit as cl
from langchain_community.llms import Ollama
import random
llm = Ollama(model="mistral", temperature=0.7) # Use any lightweight local model
# Reusable action buttons
def get_action_buttons():
return [
cl.Action(
name="surprise_button",
label="🎁 Surprise Me",
icon="gift",
payload={"value": "surprise"}
),
cl.Action(
name="fact_button",
label="💡 Did You Know?",
icon="lightbulb",
payload={"value": "fact"}
)
]
@cl.on_chat_start
async def start():
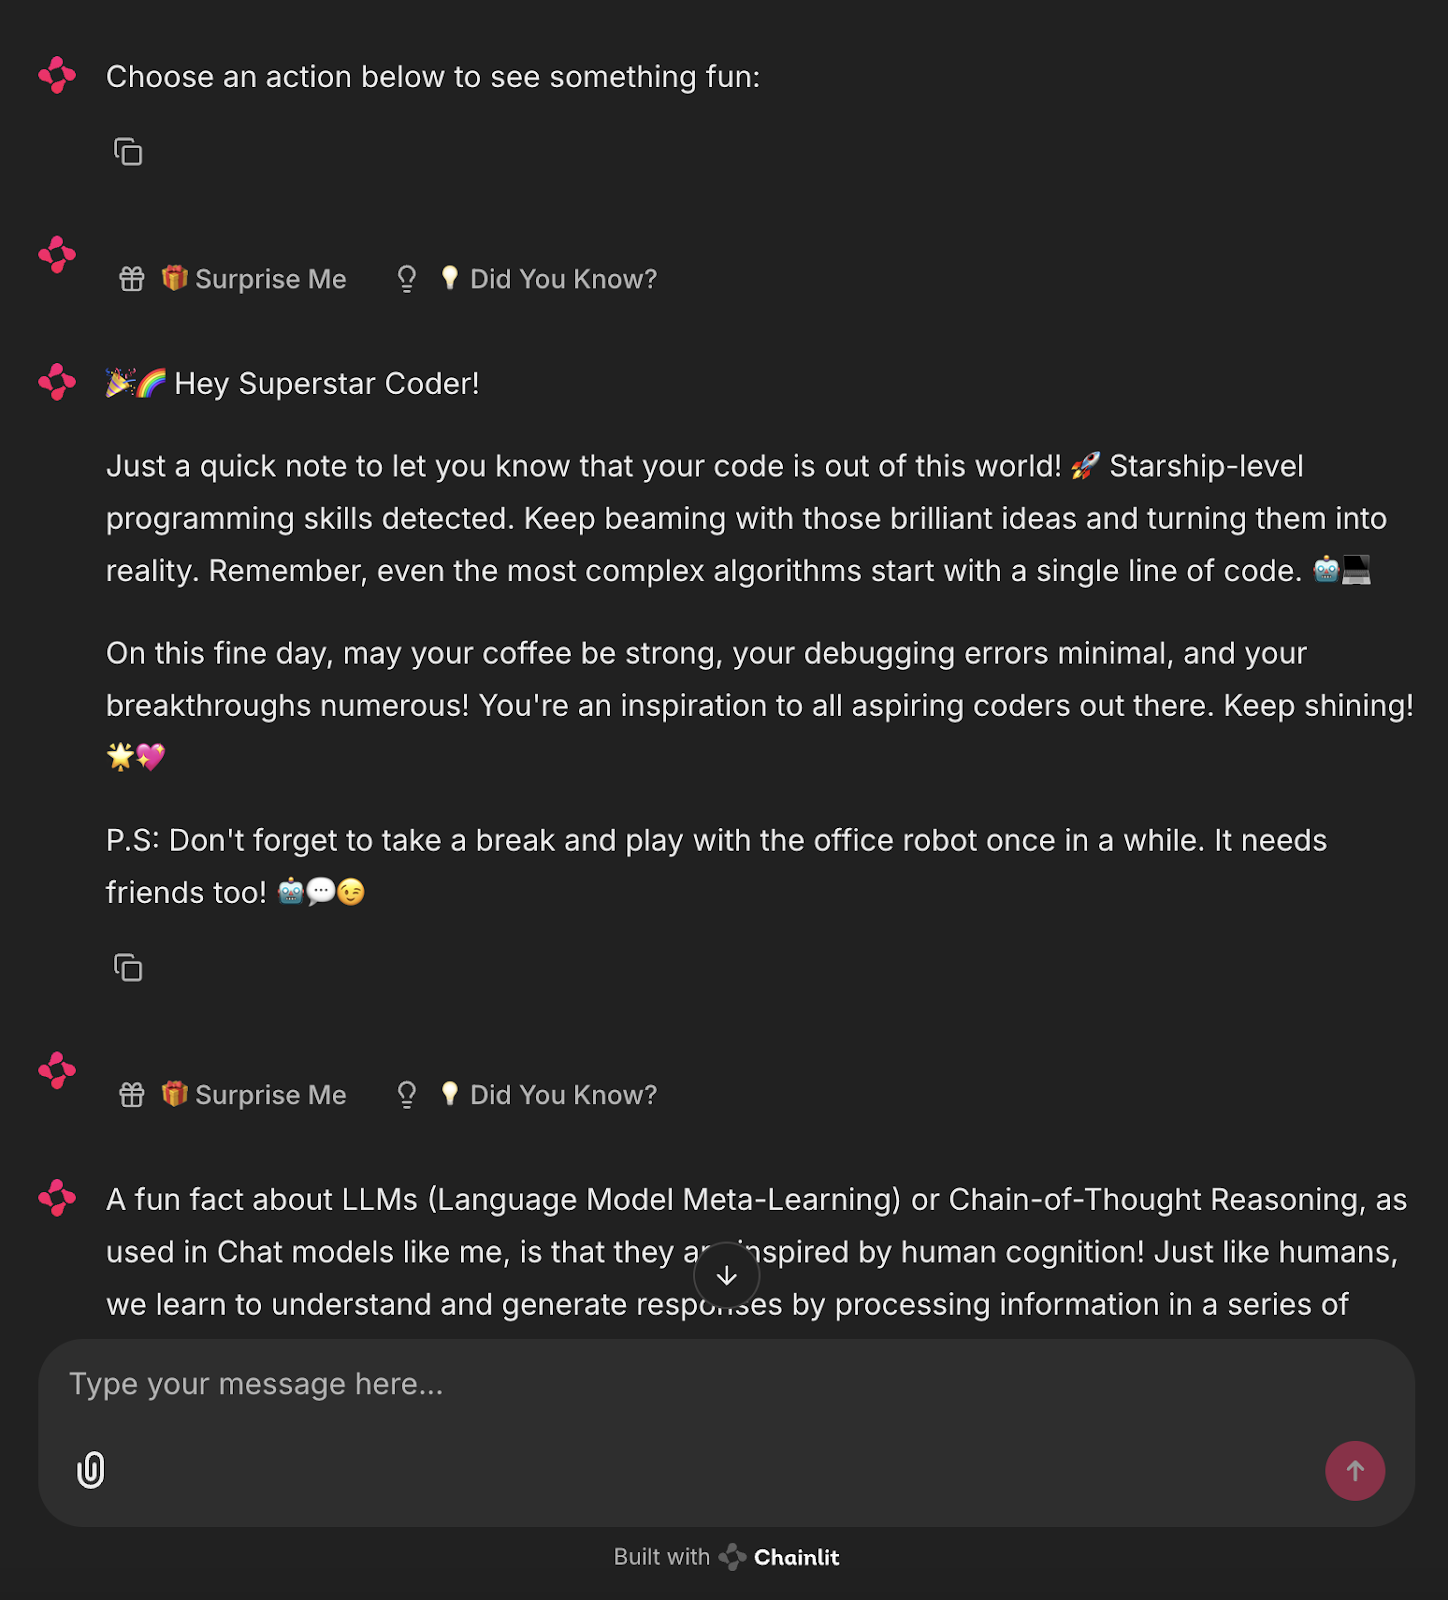
await cl.Message(content="Choose an action below to see something fun:").send()
await cl.Message(content="", actions=get_action_buttons()).send()
@cl.action_callback("surprise_button")
async def on_surprise(action: cl.Action):
prompt = "Give a short, uplifting surprise message to a developer. Make it fun."
try:
surprise = llm.invoke(prompt).strip()
except Exception:
surprise = "🎉 Surprise! You're doing great!"
await cl.Message(content=surprise).send()
await cl.Message(content="", actions=get_action_buttons()).send()
@cl.action_callback("fact_button")
async def on_fact(action: cl.Action):
prompt = "Give a fun and helpful fact about LLMs or Chainlit."
try:
fact = llm.invoke(prompt).strip()
except Exception:
fact = "💡 Did you know? You can add sliders and buttons to Chainlit with just a few lines of code!"
await cl.Message(content=fact).send()
await cl.Message(content="", actions=get_action_buttons()).send() This Chainlit app integrates a local LLM (via Ollama with the Mistral model) to dynamically generate responses based on user interactions.
cl.Action buttons—"Surprise Me" and "Did You Know?" using a reusable get_action_buttons() function.@cl.on_chat_start) sends a message with these interactive buttons.@cl.action_callback handler sends a prompt to the LLM asking for a short, uplifting developer message. The response is cleaned with the .strip() function and sent back to the chat.This demonstrates how to combine Chainlit UI with LLM-based content generation, offering a modular and extensible foundation for local AI-powered chat apps.
Run the following command in the terminal:
ollama run mistral
chainlit run main.py
Now you’ve got a live, local AI assistant generating automated messages.
Chainlit has strong potential for prototyping chat-based tools, building assistants, and integrating real-time LLM outputs—all without touching JavaScript. For advanced use cases, check out the Chainlit Cookbook.
To expand your learning with new AI tools, check out the following blogs:
Learn AI with these courses!
Track
Course
Course
Tutorial
Moez Ali
Tutorial
Richie Cotton
Tutorial
Bex Tuychiev
Tutorial
Bex Tuychiev
Tutorial
Ryan Ong
code-along
Emmanuel Pire