
Course
Data Preparation in Excel
3 hr
85.3K
Excel offers two different ways to add checkboxes, and picking the right one matters. The native checkbox feature in Microsoft 365 is faster to set up and works well with formulas. The legacy Developer tab method works in all Excel versions but requires more configuration. This guide covers both approaches so you can choose based on your situation.
I'll show you how to add checkboxes, link them to cells for formulas, count checked items, apply conditional formatting, and troubleshoot common problems.(If you're looking for static checkmarks rather than interactive checkboxes, see our guide on check marks in Excel.)
Excel has different checkbox types, and which one you use depends on your version.

Microsoft introduced native checkboxes for Microsoft 365 in 2024, rolling them out to Windows, Mac, and Excel for the web. If you have Microsoft 365, this is the method I recommend. It's simpler than the old way.
Native checkboxes live inside cells, not floating above them. When you check a box, the cell contains TRUE. Uncheck it, and it contains FALSE. The checkbox moves with your data when you sort, filter, or insert rows because the checkbox is the cell.
This table shows where native checkboxes are available:
|
Platform |
Native Checkbox Support |
|
Microsoft 365 (Windows) |
Yes |
|
Microsoft 365 (Mac) |
Yes |
|
Excel for the Web |
Yes (native checkboxes visible; legacy controls not supported) |
|
Excel 2024 (perpetual license) |
No |
|
Excel 2021, 2019, 2016 |
No |
If you have a perpetual license (Excel 2024, 2021, or 2019), you won't see native checkboxes. These versions only support Form Controls. Microsoft 365 subscriptions get ongoing feature updates, which is why they have the newer checkbox type.
If you don't have Microsoft 365, you'll use Form Control checkboxes. You'll find them in the Developer tab. This method has been around for over 20 years and works in every Excel version.
Form Controls are objects that float above the cell grid. They don't automatically store values, so you need to manually link each checkbox to a cell. Here's the catch: if you sort or filter your data, the checkboxes can become misaligned because they don't move with the rows.
Despite these limitations, you'll need Form Controls if you share files with people using older Excel versions. Native checkboxes will show up as plain text ("TRUE" or "FALSE") on their screen, which isn't ideal.
You might see ActiveX Controls mentioned in older tutorials. You'll rarely need them in modern workbooks. Microsoft disabled them by default in 2025 because of security issues. They only work on Windows and need special security settings. Stick with native checkboxes or Form Controls.
I'll show you both methods. If you have Microsoft 365, start here. If not, skip to the Developer tab method.
The native method is quick: two clicks and you're done.
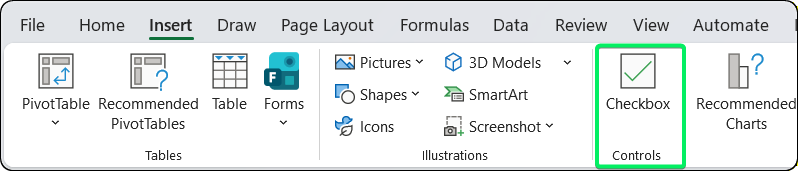
Native checkbox button in the Insert tab. Image by Author.
A checkbox appears in the cell. Click it to toggle between checked and unchecked.
Select a range before clicking the Checkbox button. Checkboxes appear in all selected cells simultaneously. This works for non-adjacent selections too. Hold Ctrl while clicking cells, then insert.
After inserting one checkbox, grab the fill handle (the small square at the cell's bottom-right corner) and drag. Checkboxes copy just like regular cell data. You can also use Ctrl+C and Ctrl+V.
|
Shortcut |
Action |
|
Spacebar |
Toggle checkbox state |
|
Delete |
Clear cell or remove checkbox formatting |
If you look at the Formula Bar, you'll see TRUE when a checkbox is checked and FALSE when it's unchecked.
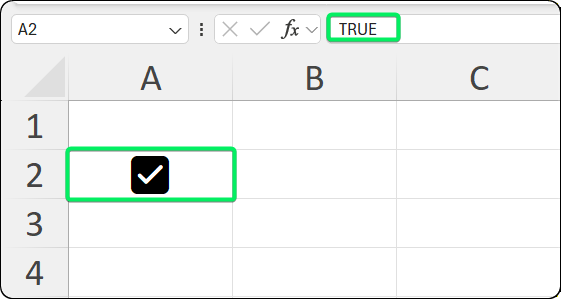
Formula bar displays the underlying boolean value. Image by Author.
If you're using Excel 2024 (perpetual), 2021, 2019, or 2016, you'll need to enable the Developer tab and use Form Controls.
The Developer tab is hidden by default. Here's how to enable it.
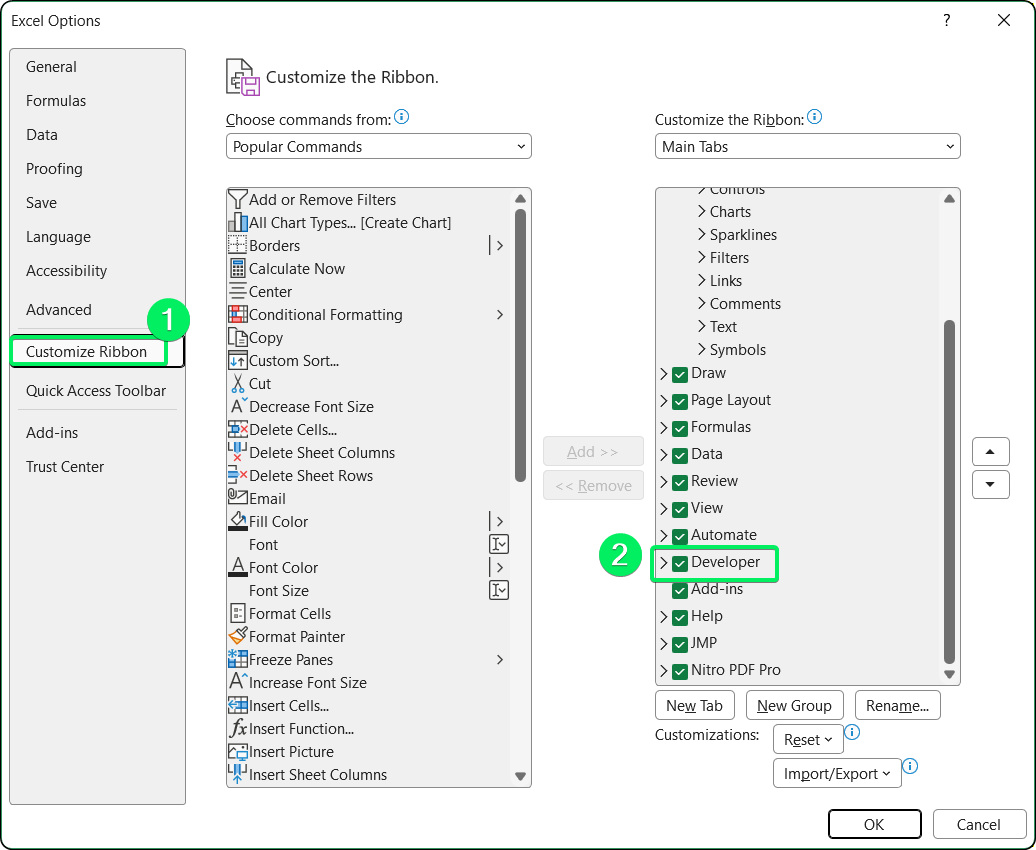
Enabling the Developer tab in Excel Options. Image by Author.
Once you enable it, the Developer tab stays in your ribbon.
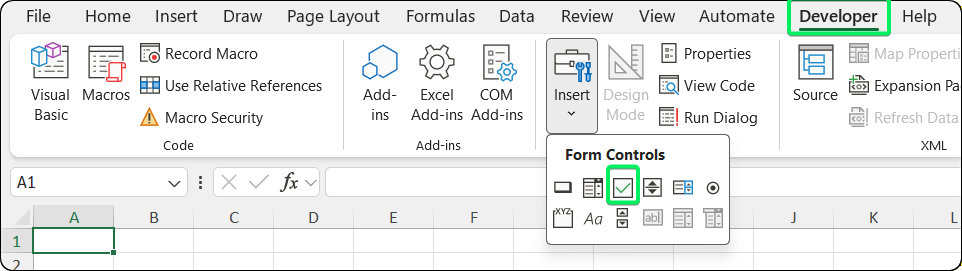
Form Controls section in the Developer menu. Image by Author.
A checkbox appears with the default text "Check Box 1." You can edit this text by clicking on it, or delete it if you only want the box.
Unlike native checkboxes, Form Controls don't automatically store values. You need to link them to cells first. I'll show you how in the next section.
Linking checkboxes to cells is what makes them useful for formulas. The process depends on which checkbox type you're using.
Native checkboxes don't need linking because the checkbox is the cell value. As I mentioned earlier, checking the box sets the cell to TRUE, and unchecking sets it to FALSE. You can reference the cell directly in your formulas.
For example, if your checkbox is in cell A2, you can immediately use =A2 in another cell. No setup needed.
Every Form Control checkbox needs explicit configuration to output values.
Right-click the checkbox (not left-click, or you'll just toggle it)
Select Format Control
Switch to the Control tab
In the Cell link field, enter a cell reference (like $B$2) or click the cell selector and click an empty cell
Click OK
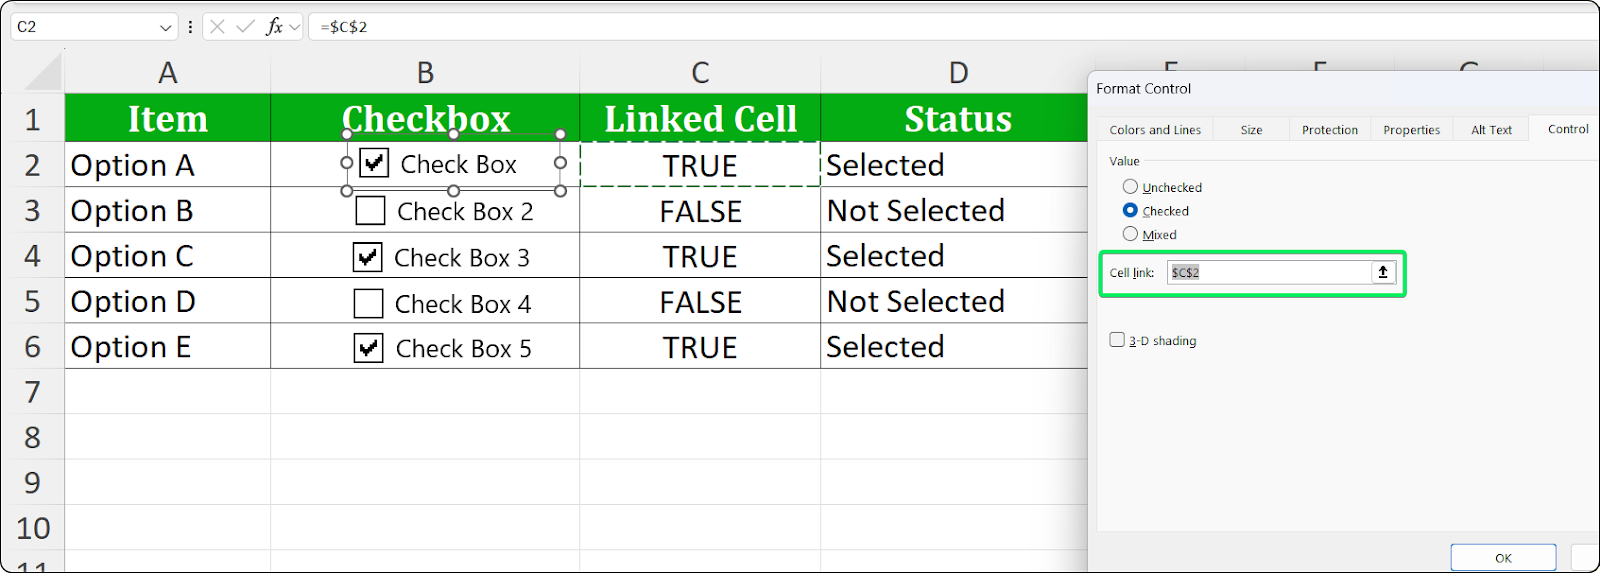
Linking a Form Control checkbox to a cell. Image by Author.
The linked cell now displays TRUE when checked and FALSE when unchecked.
Important: Each checkbox needs its own cell link. If you copy a Form Control checkbox, the copy will still point to the original linked cell. You'll need to manually update the cell link for each copy.
Formulas can't "see" Form Control checkboxes directly. They can only see cell values. The linked cell acts as a bridge. The checkbox updates the cell, and your formulas read the cell.
Here's a tip: place linked cells in a column next to your checkboxes, then hide that column. This way, your formulas can access the data, but users won't see the TRUE/FALSE values cluttering the interface.
Both checkbox types output boolean values (TRUE or FALSE) that work with Excel's formulas.
The most common use case is checking whether a box is checked and returning different results based on that.
Standard syntax:
=IF(A2=TRUE, "Complete", "Pending")Shortened syntax:
=IF(A2, "Complete", "Pending")Both approaches work because Excel evaluates TRUE as meeting the condition. I prefer the explicit =TRUE version because it's clearer when someone else reads your spreadsheet.
Practical examples:
|
Formula |
Description |
|
|
Show "Done" only when checked |
|
|
Calculate 10% bonus when checked |
|
|
Apply 20% discount when checked |
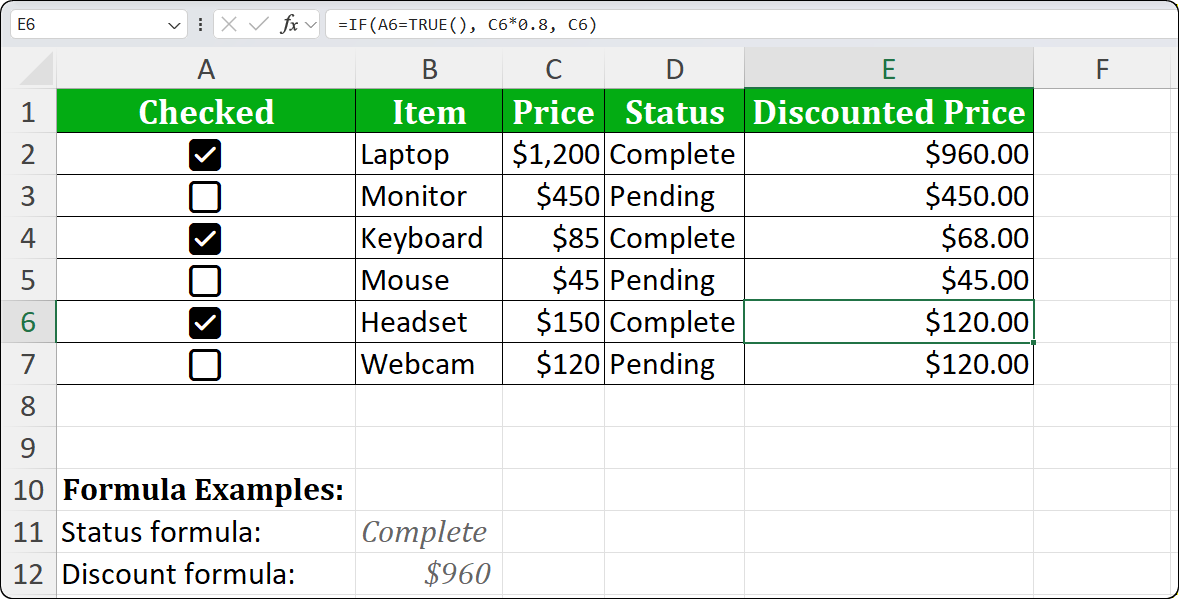
IF() changes output based on checkbox. Image by Author.
Checkboxes work well for decision-driven calculations. For example, a budget tracker might apply different tax rates based on what you select. A project planner might calculate resources only for selected tasks. Users click boxes instead of typing conditions, making everything simpler.
The COUNTIF() function makes counting checked and unchecked boxes easy.
=COUNTIF(A2:A20, TRUE)For native checkboxes, reference the checkbox column directly. For Form Controls, reference the linked cells instead.
Use TRUE (the boolean value), not "TRUE" (text in quotes). If you use quotes, Excel will count cells containing the literal text "TRUE" instead of actual checkbox values.
=COUNTIF(A2:A20, FALSE)This counts all unchecked boxes in the range.
=COUNTIF(A2:A20, TRUE) / COUNTA(A2:A20)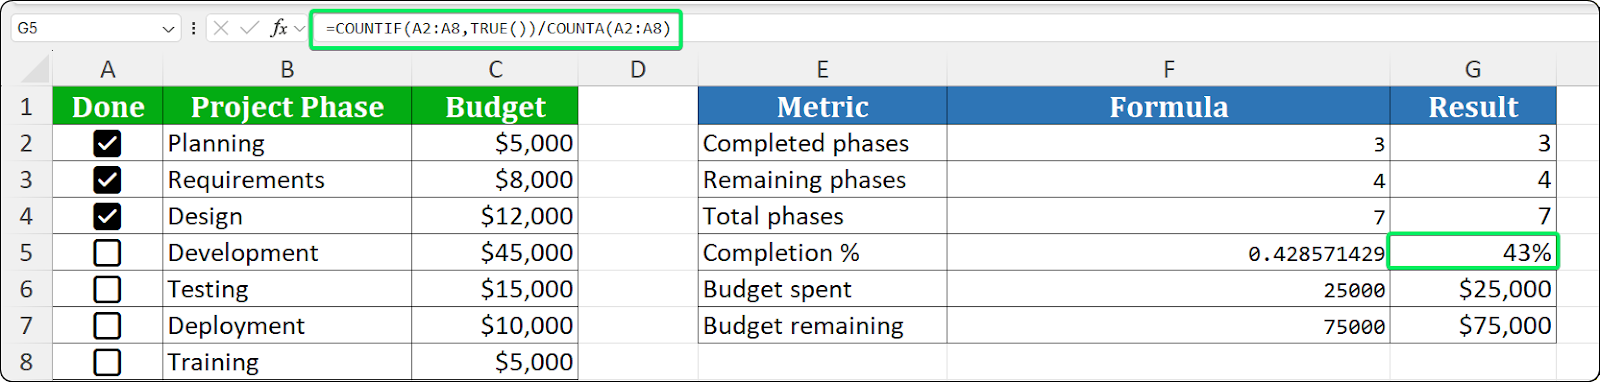
Progress formula counts checked versus total items. Image by Author.
Format the result cell as a percentage. The COUNTA() function counts non-empty cells, so empty rows won't mess up your percentage.
=COUNTA(A2:A20) - COUNTIF(A2:A20, TRUE)This calculates total items minus completed items.
=SUMIF(A2:A20, TRUE, B2:B20)This sums amounts in column B only where the corresponding checkbox in column A is checked.
Conditional formatting creates visual feedback that updates automatically when checkboxes change.
Select the range you want to format (like A2:D20 for your entire data area)
Navigate to Home > Conditional Formatting > New Rule
Select "Use a formula to determine which cells to format"
Enter the formula: =$A2=TRUE
Click Format > choose a fill color (light green works well for completed items)
Click OK twice
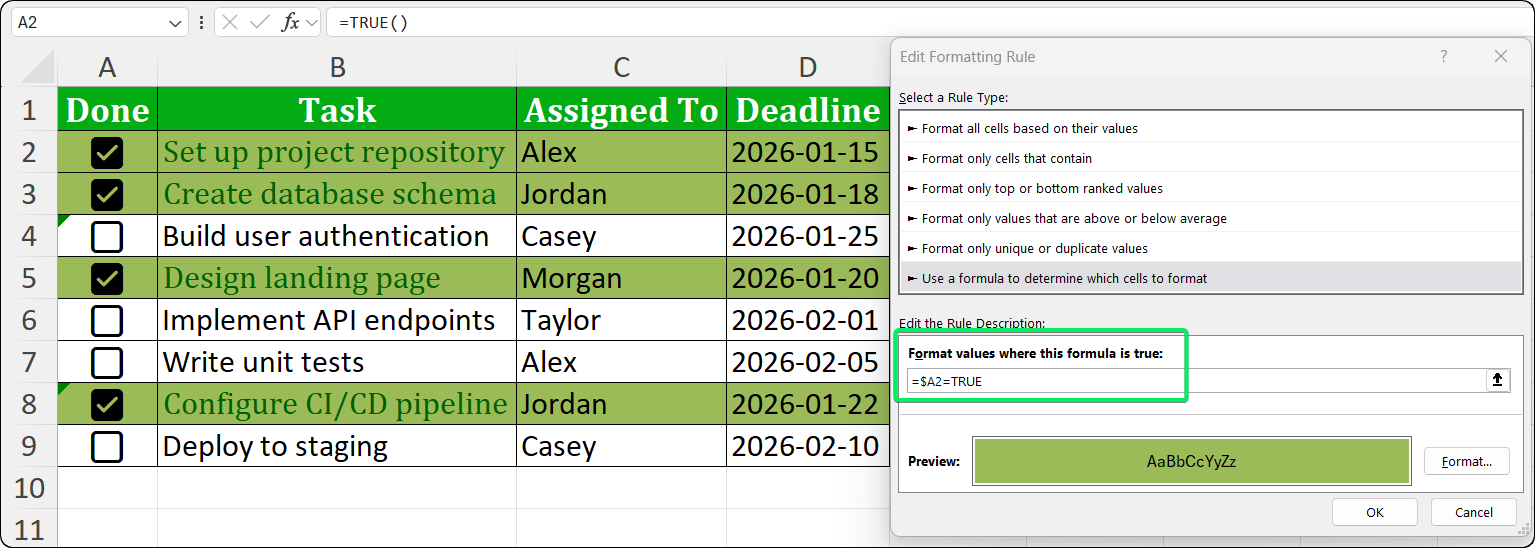
Setting up a formula-based conditional formatting rule. Image by Author.
The =$A2 reference uses an absolute column and relative row, so it always checks column A while adjusting for each row.
Select the task description column (like B2:B20)
Go to Home > Conditional Formatting > New Rule
Select "Use a formula to determine which cells to format"
Enter: =$A2=TRUE
Click Format > Font tab
Check Strikethrough
Optionally change font color to gray
Click OK twice
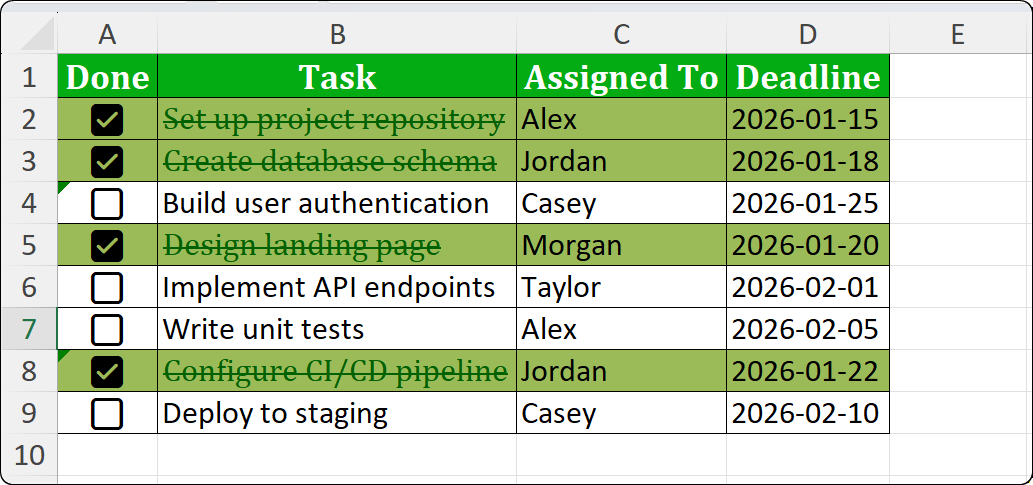
Strikethrough and gray text indicate completed items. Image by Author.
You can combine multiple effects in a single rule. Just select all the format options (strikethrough, fill color, lighter text) before clicking OK.
The process for removing checkboxes differs between checkbox types.
The checkbox graphic disappears, but the TRUE or FALSE value stays in the cell. This is the most reliable way to remove just the checkbox.
Select the cells and press Delete. This clears both the content and formatting. You can also use Home > Clear > Clear All to remove everything.
Form Control checkboxes are objects, so you need to delete them differently.
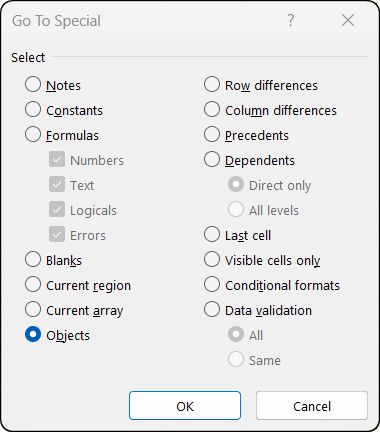
Selecting all objects for bulk deletion. Image by Author.
This selects all objects on the sheet (shapes, charts, images, and checkboxes). If you only want to delete checkboxes, use Home > Find & Select > Selection Pane to view and select specific objects by name.
When you delete Form Control checkboxes, the linked cells keep their last values. You might want to clear these manually.
These are the issues I see most often when helping people with checkboxes.
Symptom: You don't see a Checkbox button in the Insert tab.
Cause: You're not using Microsoft 365. Native checkboxes only work with the subscription version.
Solution: Check your version under File > Account. If it says "Microsoft Excel 2024" (or 2021, 2019, 2016), you have a perpetual license. You'll need to use the Developer tab method instead.
If you have Microsoft 365 but don't see the button, try updating: File > Account > Update Options > Update Now.
Symptom: Recipients see "TRUE" and "FALSE" text instead of checkboxes.
Cause: The file was created with native checkboxes but opened in a non-365 Excel version.
Solution: If you share files with users on older Excel versions, use Form Controls. They work everywhere, while native checkboxes only display properly in Microsoft 365.
Symptom: The instructions you're following don't match what you see in Excel.
Cause: Different Excel versions have different checkbox methods. Many online tutorials don't specify which one they're using.
Solution: First, figure out which checkbox type you have:
|
Indicator |
Native Checkbox |
Form Control |
|
Click behavior |
Selects the cell |
Toggles or selects the control |
|
Formula Bar |
Shows TRUE/FALSE |
Shows nothing (checkbox related) |
|
Sizing handles |
None visible |
Appear when Ctrl+clicked |
|
Right-click menu |
Standard cell menu |
Includes "Assign Macro" |
Once you know which type you have, follow the instructions for that specific method.
Here's what I've learned from using checkboxes in dozens of projects.
Use native checkboxes when you can. They're faster to set up, work better with sorting and filtering, and integrate directly with formulas. The only reason to avoid them is if you need backward compatibility with non-365 users.
Plan where you put linked cells. For Form Controls, I place linked cells in a column next to the checkboxes, then hide that column. This keeps the interface clean while your formulas can still access the data.
Test formulas before copying. Build and verify one formula first, then copy it down. Catching reference errors early saves time.
Don't overuse checkboxes in large sheets. Form Controls increase file size and slow things down. If you need hundreds of checkboxes, native checkboxes handle this better because they're just cell formatting, not separate objects.
Document your approach. If someone else will maintain your spreadsheet, add a note explaining which checkbox type you used and where the linked cells are located.
If you have Microsoft 365, use native checkboxes. Two clicks from the Insert tab and you're done. They store their own values, move with your data, and work with COUNTIF() and conditional formatting.
If you're on a perpetual license or sharing files with people using different Excel versions, use Form Controls. They take more setup, but they work everywhere.
For more Excel techniques, download our Excel Formulas Cheat Sheet and Data Manipulation in Excel Cheat Sheet.
Learn Excel with DataCamp
Course
Course
Course
Tutorial
Javier Canales Luna
Tutorial
Laiba Siddiqui
Tutorial
Laiba Siddiqui
Tutorial
Laiba Siddiqui
Tutorial
Khalid Abdelaty
Tutorial
Laiba Siddiqui