Course
Efficient AI Model Training with PyTorch
4 hr
1.5K
You may already be familiar with image and video segmentation, but audio segmentation is a much less explored idea. It refers to the ability to separate and isolate sounds within an audio stream, such as extracting a speaking voice from background music or isolating a single person’s voice in a group meeting. Until recently, these tasks required specialized, task-specific tools and a fair amount of manual effort.
In this tutorial, we will explore SAM Audio, the audio extension of the Segment Anything Model. We will set up a local environment, install the required dependencies, load the model, and run inference on an RTX 3090 GPU.
Along the way, we will visualize how SAM Audio can precisely segment specific parts of an audio signal in a way that feels far more intuitive and clinically precise than traditional audio processing approaches.
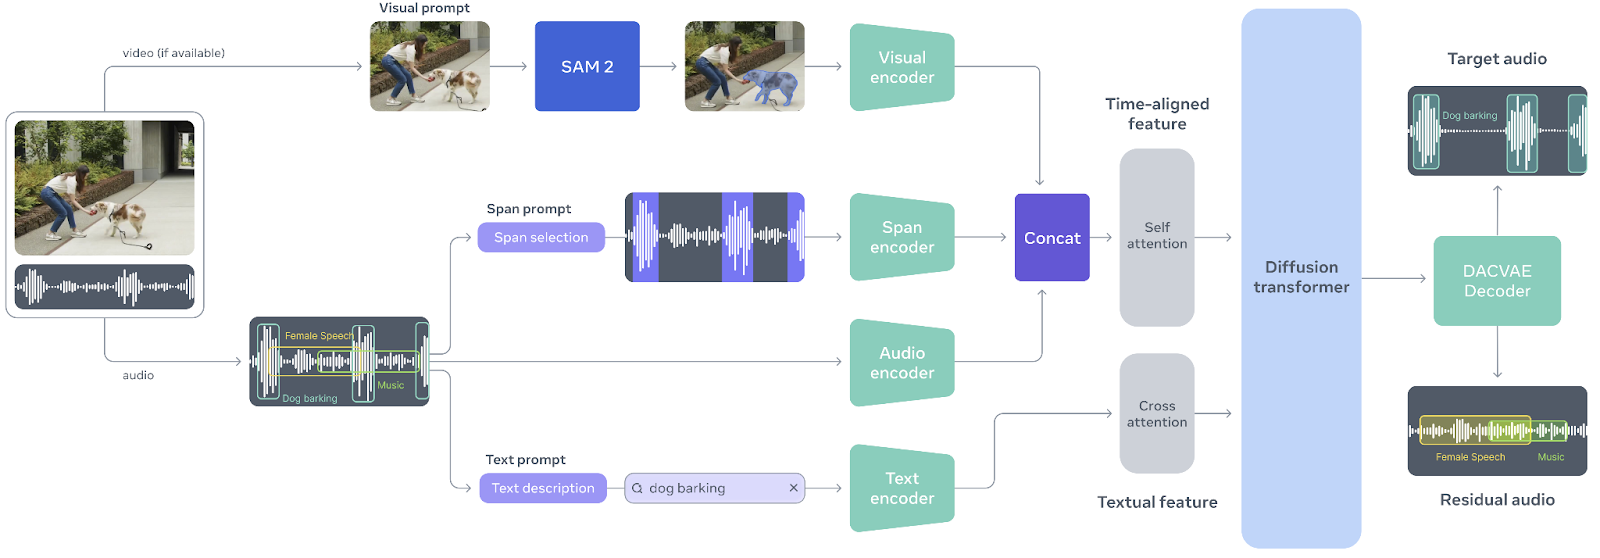
SAM Audio is a first-of-its-kind unified multimodal model designed to make audio separation as intuitive as interacting with sound itself. Inspired by the success of the Segment Anything Model in vision, SAM Audio allows users to isolate any sound from complex audio mixtures using natural prompts, whether through text, visual cues in video, or by marking time spans. This unified approach replaces fragmented, single-purpose audio tools with a single system that works reliably across speech, music, and general sounds, even in real-world, in-the-wild scenarios.
Source: facebookresearch/sam-audio
At the core of SAM Audio is Perception Encoder Audiovisual (PE-AV), a powerful engine that aligns what is seen with what is heard by jointly encoding audio and visual signals over time.
Built on Meta’s open-source Perception Encoder, PE-AV provides the rich, temporally precise representations that enable state-of-the-art performance in multimodal audio separation.
Together, SAM Audio and PE-AV open up new possibilities for creative media, accessibility, and audio understanding, making professional-grade audio segmentation faster, more accessible, and easier to control than ever before.
I’ll now walk you through how to get up and running using SAM Audio locally.
SAM Audio is a gated model, which means you must request access before you can download and use it locally. Start by visiting the Hugging Face model page at facebook/sam-audio-large and complete the access request form. Approval typically takes around 10 minutes, but in some cases, access may be denied depending on your location or other policies enforced by Meta.
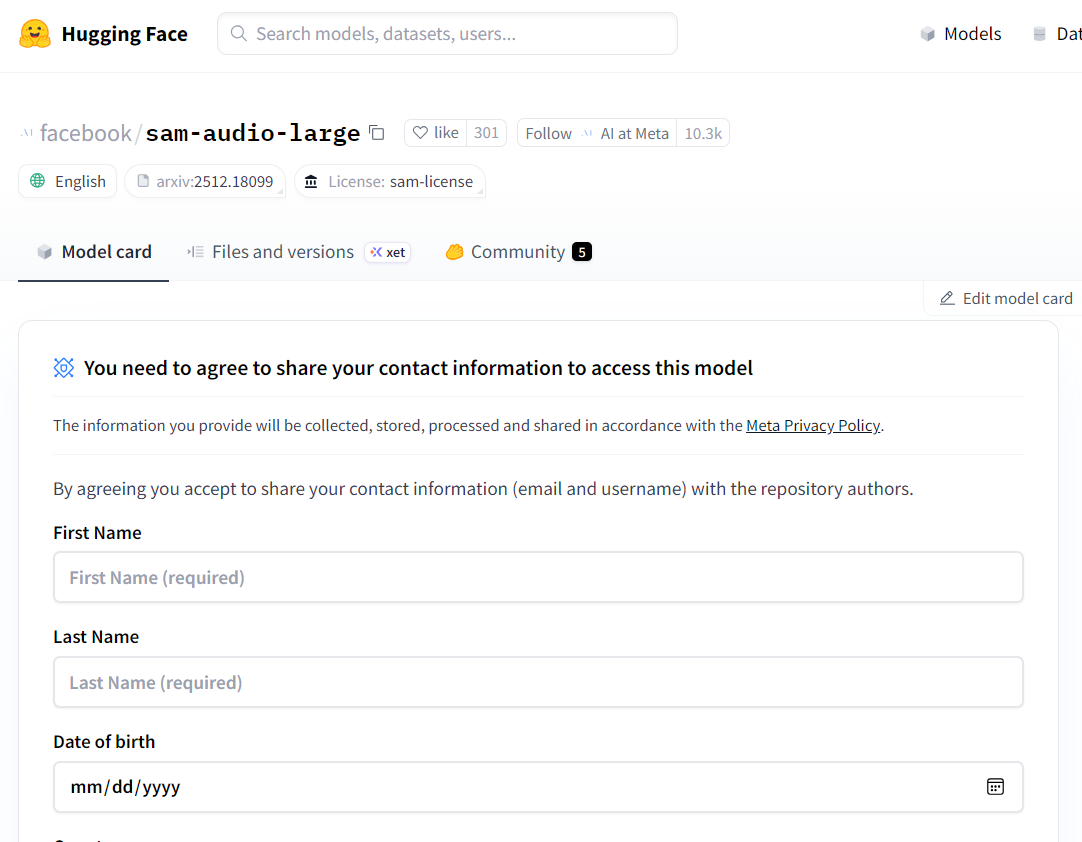
Source: facebook/sam-audio-large · Hugging Face
Once access is granted, launch a local Jupyter Notebook and install the SAM Audio library directly from the official repository:
!pip install -q git+https://github.com/facebookresearch/sam-audio.gitA common issue when working with SAM Audio is the Jupyter kernel crashing or restarting unexpectedly. This is usually caused by an incompatible version of torchcodec. To fix this, uninstall the existing version and install the recommended one explicitly:
!pip uninstall -y torchcodec
!pip install --no-cache-dir "torchcodec==0.7.0" -f https://download.pytorch.org/whl/torchcodec/
For faster model and dependency downloads, we will use hf_transfer:
!pip install hf_transferFinally, log in to the Hugging Face Hub using an access token. Make sure you have generated an API token from your Hugging Face account and stored it as an environment variable (HF_TOKEN):
import os
from huggingface_hub import login

login(token=os.environ["HF_TOKEN"])In this step, we will download and load the SAM Audio base model. While SAM Audio also provides a large variant, the base model offers nearly the same separation quality while being significantly lighter on GPU memory.
This makes it a much better fit for local experimentation, especially on consumer GPUs like the RTX 3090.
To avoid out-of-memory (OOM) errors, it is important to load the model in FP16 (half precision) rather than FP32.
The RTX 3090 has excellent FP16 support, and switching to half precision nearly halves VRAM usage without noticeably affecting inference quality.
import torch
import torchaudio
from pathlib import Path
from sam_audio import SAMAudio, SAMAudioProcessor
MODEL_ID = "facebook/sam-audio-base" # base model
device = torch.device("cuda" if torch.cuda.is_available() else "cpu")
model = SAMAudio.from_pretrained(MODEL_ID).eval()
# Use fp16 on GPU to cut VRAM roughly in half (3090 supports fp16 well)
model = model.to(device=device, dtype=torch.float16).eval()
processor = SAMAudioProcessor.from_pretrained(MODEL_ID)
print("Device:", device)
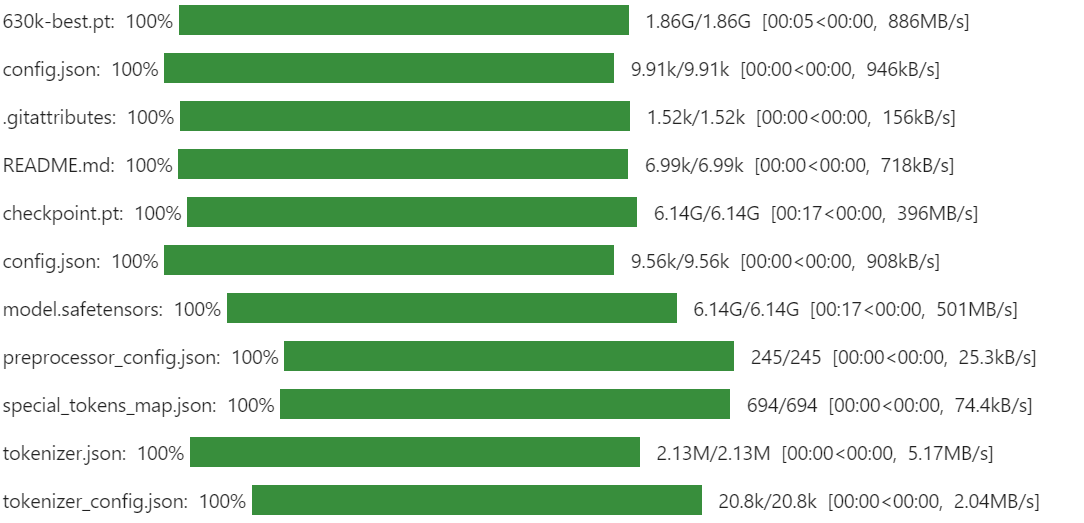
print("Sampling rate:", processor.audio_sampling_rate)The first time you run this, the download may take a while. SAM Audio pulls multiple components and checkpoints that together form the full audio segmentation pipeline, including the perception encoder and generative separation modules. This is expected behavior and only happens once, as the files are cached locally for future runs.
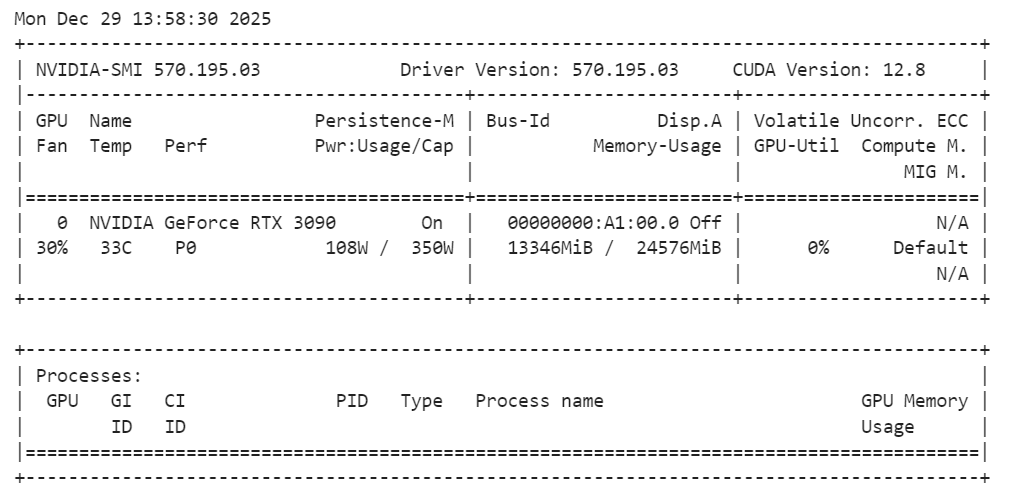
After the model is loaded, it is a good practice to check GPU memory usage to ensure everything is running within limits:
!nvidia-smiYou should observe that the SAM Audio base model uses roughly 14 GB of VRAM, which fits comfortably on an RTX 3090. This leaves enough headroom for inference and experimentation without triggering memory issues, making the setup stable and reliable for local audio segmentation tasks.
To test SAM Audio, we need a realistic audio sample that contains multiple overlapping sound sources. For this tutorial, we will use an example from AudioCaps, a widely used benchmark dataset for audio understanding and captioning.
AudioCaps contains short, diverse audio clips collected from real-world environments, making it ideal for evaluating audio separation models.
We load the dataset directly from Hugging Face using the datasets library. The sample audio is stored in Parquet format and includes both waveform data and metadata such as the sampling rate.
from datasets import load_dataset
from IPython.display import Audio

# Get an example audio from AudioCaps
dset = load_dataset(
    "parquet",
    data_files="hf://datasets/OpenSound/AudioCaps/data/test-00000-of-00041.parquet",
)

samples = dset["train"][8]["audio"].get_all_samples()
Audio(samples.data, rate=samples.sample_rate)
This code downloads a single shard of the AudioCaps test set and extracts one audio clip for demonstration. The Audio widget allows you to listen to the raw mixture directly inside the notebook, which is useful for understanding how complex the original audio is before segmentation. Here's how it sounds:
Listening is the quickest way to understand an audio mixture, but visualizing the waveform helps you see where things happen.
A waveform plot makes it easier to spot moments with strong energy (like a horn, clap, or shout), quieter regions (pauses or background noise), and sudden spikes that often correspond to short sound events.
This becomes especially useful once we start separating sounds, because you can compare the original mixture against the segmented output and quickly validate whether SAM Audio actually extracted the right region.
Below is a simple helper function that plots the waveform for up to a fixed duration (so the plot stays readable). It supports both mono and stereo audio, and automatically moves tensors to CPU so it works smoothly in a notebook.
import matplotlib.pyplot as plt
import torch
def plot_waveform(wav, sr, title="Waveform", max_seconds=15):
"""
wav: Tensor [C, T] or [T]
sr: sample rate (int)
"""
if isinstance(wav, torch.Tensor):
w = wav.detach().cpu()
else:
w = torch.tensor(wav)
if w.ndim == 1:
w = w.unsqueeze(0)
# limit duration for readability
max_samples = int(sr * max_seconds)
w = w[:, :max_samples]
t = torch.arange(w.shape[1]) / sr
plt.figure(figsize=(14, 3))
for c in range(w.shape[0]):
plt.plot(t, w[c].numpy(), label=f"ch{c}")
plt.title(title)
plt.xlabel("Time (s)")
plt.ylabel("Amplitude")
if w.shape[0] > 1:
plt.legend()
plt.tight_layout()
plt.show()
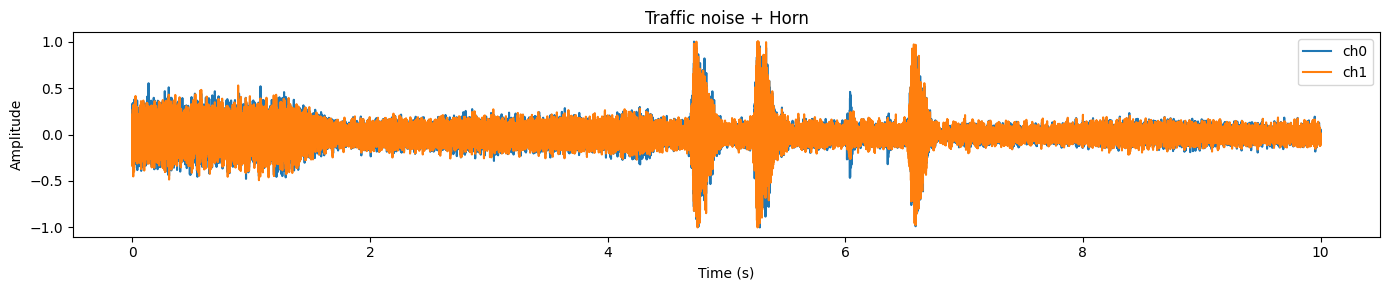
plot_waveform(samples.data, samples.sample_rate, title="Traffic noise + Horn")In this example, you will typically notice a busy, dense waveform representing continuous background noise (traffic), and sharper peaks that often match short, louder events (like a horn).
Before we can run SAM Audio, we need to make sure the input waveform matches what the model expects. In practice, raw audio from datasets can vary in shape, dtype, number of channels, and sample rate. If we skip this step, you will often hit errors (wrong dimensions), get poor results (wrong sample rate), or waste GPU memory (wrong dtype).
Here’s what we will standardize:
C, T] format (channels first).float32 first for safe processing, then match the model dtype (FP16 on CUDA).wav = torch.tensor(samples.data)
# Ensure [C, T]
if wav.ndim == 1:
wav = wav.unsqueeze(0) # [1, T]
elif wav.ndim == 2 and wav.shape[0] > wav.shape[1]:
wav = wav.transpose(0, 1) # [T, C] -> [C, T]
wav = wav.float()
orig_sr = int(samples.sample_rate)
target_sr = int(processor.audio_sampling_rate)
if orig_sr != target_sr:
wav = torchaudio.functional.resample(wav, orig_sr, target_sr)
# Mono
wav = wav.mean(0, keepdim=True) # [1, T]
# Move to device + match model dtype (FP16 on CUDA)
wav = wav.to(device=device, dtype=next(model.parameters()).dtype)
duration_s = wav.shape[-1] / target_sr
print(f"Resampled duration: {duration_s:.2f}s @ {target_sr} Hz")If everything is set up correctly, you should see an output like:
Resampled duration: 10.00s @ 48000 HzIt confirms (1) the audio length is what we expect, and (2) the waveform is now using the model’s preferred sampling rate.
Now comes the fun part: we will actually separate a target sound from the original audio mixture. SAM Audio lets you do this using natural prompts, and in this example, we will extract “a horn honking” from a clip that contains traffic noise and horn events.
We will use two types of guidance at the same time:
description): tells the model what we want (“A horn honking”).anchors): tells the model where in time the target occurs (in seconds).This makes separation much more reliable, especially when the audio mixture is busy or when the target sound is brief.
In the anchors format:
6.3, 7.0] is the time window (start, end) in secondsdescription = "A horn honking"
anchors = [[["+", 6.3, 7.0]]] # batch -> one sample -> one anchor
# (Optional) sanity-check anchors
assert 0 <= anchors[0][0][1] < anchors[0][0][2] <= duration_s + 1e-6, "Anchor out of range!"
inputs = processor(
audios=[wav],
descriptions=[description],
anchors=anchors,
).to(device)
with torch.inference_mode():
result = model.separate(inputs)
target_np = result.target[0].detach().float().cpu().numpy()
resid_np = result.residual[0].detach().float().cpu().numpy()
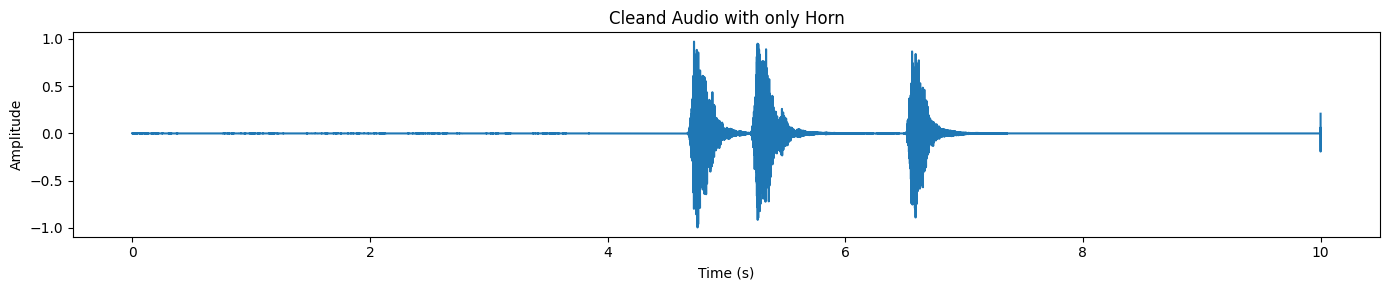
Audio(target_np, rate=processor.audio_sampling_rate)When this works correctly, the output is genuinely impressive: the target audio should sound like a clean horn track with most of the background removed. This is the key idea behind SAM Audio: you don’t need perfect stems or manual editing, you guide the model with intuitive prompts, and it isolates the sound for you. Below is how it sounds:
Listening is the best proof, but the waveform makes it easy to see what happened.
plot_waveform(target_np, processor.audio_sampling_rate, title="Cleand Audio with only Horn")In the separated output, you will typically notice distinct spikes where the horn occurs, while the rest of the waveform stays comparatively quiet.
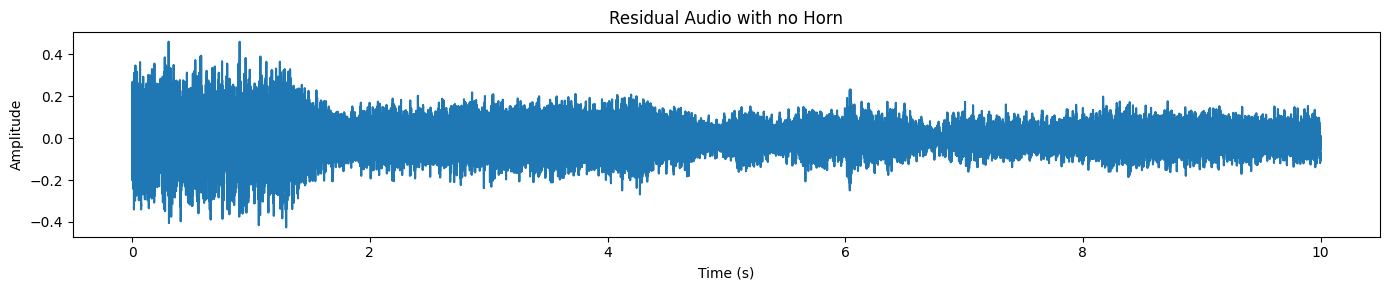
SAM Audio also returns a residual track, which is essentially “the rest of the audio” after removing the target.
plot_waveform(resid_np, processor.audio_sampling_rate, title="Residual Audio with no Horn")We only see traffic/background noise here, and no horn sound.
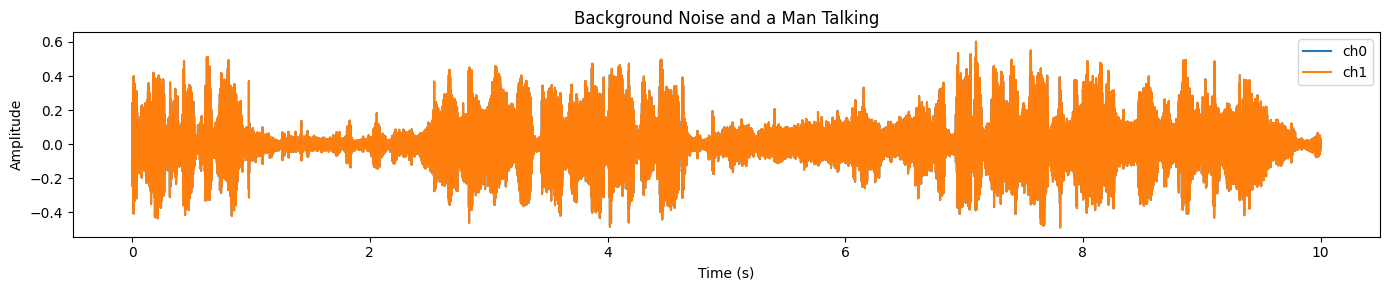
Let’s try a harder, more realistic example. This time, we will pick a clip where a non-English speaker is talking on the phone while there is heavy background noise (street noise, ambience, overlapping sounds).
This is exactly the kind of situation where audio separation becomes genuinely useful: the speech is present, but it is difficult to understand because the mixture is messy.
First, load a new sample and listen to the raw audio mixture:
samples_2 = dset["train"][45]["audio"].get_all_samples()
Audio(samples_2.data, rate=samples_2.sample_rate)
Now visualize the waveform.
plot_waveform(samples_2.data, samples_2.sample_rate, title="Background Noise and a Man Talking")You will see a dense, high-energy signal across most of the clip, which usually indicates strong background noise and overlapping audio:
We will run the same preprocessing steps as before: ensure [C, T] shape, resample to the processor’s target sampling rate, convert to mono, and move to GPU in FP16.
# Convert numpy → torch
wav = torch.tensor(samples_2.data)

# Ensure [C, T]
if wav.ndim == 1:
    wav = wav.unsqueeze(0)
elif wav.ndim == 2 and wav.shape[0] > wav.shape[1]:
    wav = wav.transpose(0, 1)

wav = wav.float()

orig_sr = int(samples.sample_rate)
target_sr = int(processor.audio_sampling_rate)

# Resample if needed
if orig_sr != target_sr:
    wav = torchaudio.functional.resample(wav, orig_sr, target_sr)

# Mono
wav = wav.mean(0, keepdim=True)

# Move to GPU + FP16
wav = wav.to(device=device, dtype=next(model.parameters()).dtype)

duration_s = wav.shape[-1] / target_sr
print(f"Duration: {duration_s:.2f}s @ {target_sr} Hz")
You should see something like:
Duration: 10.00s @ 48000 HzIn the previous example, we helped the model with a time span anchor and text prompt. Here, we will do text-only prompting, which is a great way to test how well the model can generalize without extra guidance.
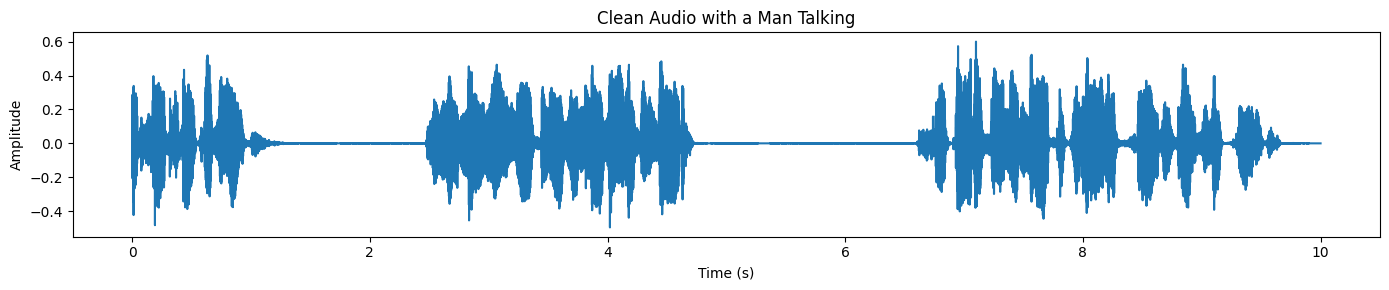
description = "A man speaking"

inputs = processor(
    audios=[wav],
    descriptions=[description],
).to(device)

with torch.inference_mode():
    result = model.separate(inputs)
target_np = result.target[0].detach().float().cpu().numpy()

plot_waveform(target_np, processor.audio_sampling_rate, title="Clean Audio with a Man Talking")
Finally, plot the waveform of the separated speech. Compared to the original mixture, the waveform should look cleaner and less “busy,” especially in regions where background noise dominated earlier:
If you run into any issues while executing the code above, please refer to the DataLab notebook linked below for a complete, working reference and additional guidance: Using SAM-Audio Locally — DataLab.
SAM Audio is designed for real-world audio understanding and editing. Instead of relying on task-specific tools, it uses natural prompts to separate and isolate sounds across speech, music, and everyday environments.
These features make it useful across creative, professional, and research workflows where clean and controllable audio is important.
To be honest, there is not much information out there on how to actually run SAM Audio locally. I tried running it on Kaggle with T4 GPUs, and it failed. I also tried using UV and setting up a virtual Python environment, but that failed as well.
The main issue I kept running into was dependency conflicts. Installing SAM Audio directly from the GitHub repository often overrides existing audio and PyTorch libraries, which causes the Jupyter kernel to crash.
This is why I strongly recommend starting from a clean setup using Conda or a fresh Python virtual environment, installing PyTorch and CUDA first, and then adding the required libraries. In this tutorial, the setup became stable once I fixed the crash by reinstalling the correct torchcodec version.
In this tutorial, we successfully ran the SAM Audio base model on an RTX 3090 using around 14 GB of VRAM, which is very reasonable for local inference. The inference speed is fast, and the quality of audio separation is genuinely impressive. You can also extend this setup to video-based prompting, where SAM Audio works together with SAM 3 to isolate audio based on visual cues.
To learn more about SAM 3, I recommend checking out our SAM 3 Tutorial next.
Top DataCamp Courses
Course
Course
Course
Tutorial
Abid Ali Awan
Tutorial
Aashi Dutt
Tutorial
Aashi Dutt
Tutorial
François Aubry
Tutorial
Aashi Dutt
Tutorial
Abid Ali Awan