Track
Every developer and operations engineer in the IT field is familiar with Docker for building and deploying applications, whether locally or in the cloud. However, as a developer or machine learning operations engineer, you may be looking to optimize resources, enhance security, and improve system integration. Podman offers a compelling alternative. It is a free, open-source tool that serves as an alternative to Docker and Docker Desktop.
In this tutorial, we will explore what Podman is, the differences between Podman and Docker, and how to install and use Podman. Additionally, we will cover how to train, evaluate, and deploy machine learning models locally using Dockerfile and Podman commands.

Image by Author
What is Podman?
Podman is an open-source container management tool designed to provide developers and machine learning engineers with a seamless and secure experience. Unlike Docker, Podman operates daemonless, which enhances security and flexibility by allowing users to run containers as rootless processes. This key feature enables Podman to run containers without requiring root privileges, thereby minimizing potential vulnerabilities.
Podman is fully compatible with OCI (Open Container Initiative) standards, ensuring that containers and images created with Podman can be easily integrated with other OCI-compliant tools and platforms such as runc, Buildah, and Skopeo. Additionally, Podman supports the creation and management of pods, which are groups of containers sharing the same network namespace, similar to Kubernetes pods.
One of the best aspects of using Podman is that it offers an experience similar to Docker. The command-line interface is comparable to Docker's, and you can pull images from Docker Hub as well. This similarity allows for an easy transition for those familiar with Docker while providing advanced features that meet the evolving needs of containerized application development and deployment.
Podman is just one tool in the arsenal of MLOps. Learn about all types of tools used in the MLOps ecosystem by reading the blog 25 Top MLOps Tools You Need to Know in 2025.
Docker vs Podman Comparison
Docker and Podman are prominent container management tools, each offering distinct features and capabilities. This comparison will examine their differences and assist you in deciding which one best fits your needs.
|
Docker |
Podman |
|
|
Architecture |
Docker uses a client-server architecture with a daemon process called dockerd. |
Podman is daemonless, using a fork-exec model, which enhances security and simplicity. |
|
Security |
Docker runs containers as root by default, which can pose security risks. |
Podman supports rootless containers by default, reducing security risks. |
|
Image Management |
Docker can build and manage container images using its own tools. |
Podman relies on Buildah for building images and can run images from Docker registries. |
|
Compatibility |
Docker is widely used and integrated with many CI/CD tools. |
Podman offers a Docker-compatible CLI, making it easier for users to switch without changing workflows. |
|
Container Orchestration |
Docker supports Docker Swarm and Kubernetes for orchestration. |
Podman does not support Docker Swarm but can work with Kubernetes using pods. |
|
Platform Support |
Docker runs natively on Linux, macOS, and Windows (with WSL). |
Podman also supports Linux, macOS, and Windows (with WSL). |
|
Performance |
Docker is known for its efficient resource management and fast deployment. |
Podman is generally comparable in performance and offers faster startup times. |
|
Use Cases |
Docker is ideal for projects requiring well-established tools and integrations. |
Podman is suitable for environments prioritizing security and lightweight operations. Ideal for large-scale deployments. |
The choice between Docker and Podman largely depends on specific project requirements, particularly concerning security, compatibility, and orchestration needs.
Docker remains a strong choice for established CI/CD pipelines and comprehensive container management, while Podman offers a secure, lightweight alternative for environments prioritizing security and rootless operations. It also offers faster startup times, which is ideal for large-scale deployments.
Discover Docker for Data Science by reading our introductory article, which includes sample code and examples.
Installing Podman
First, you’ll want to download and install the Podman Desktop package by going to the official website.
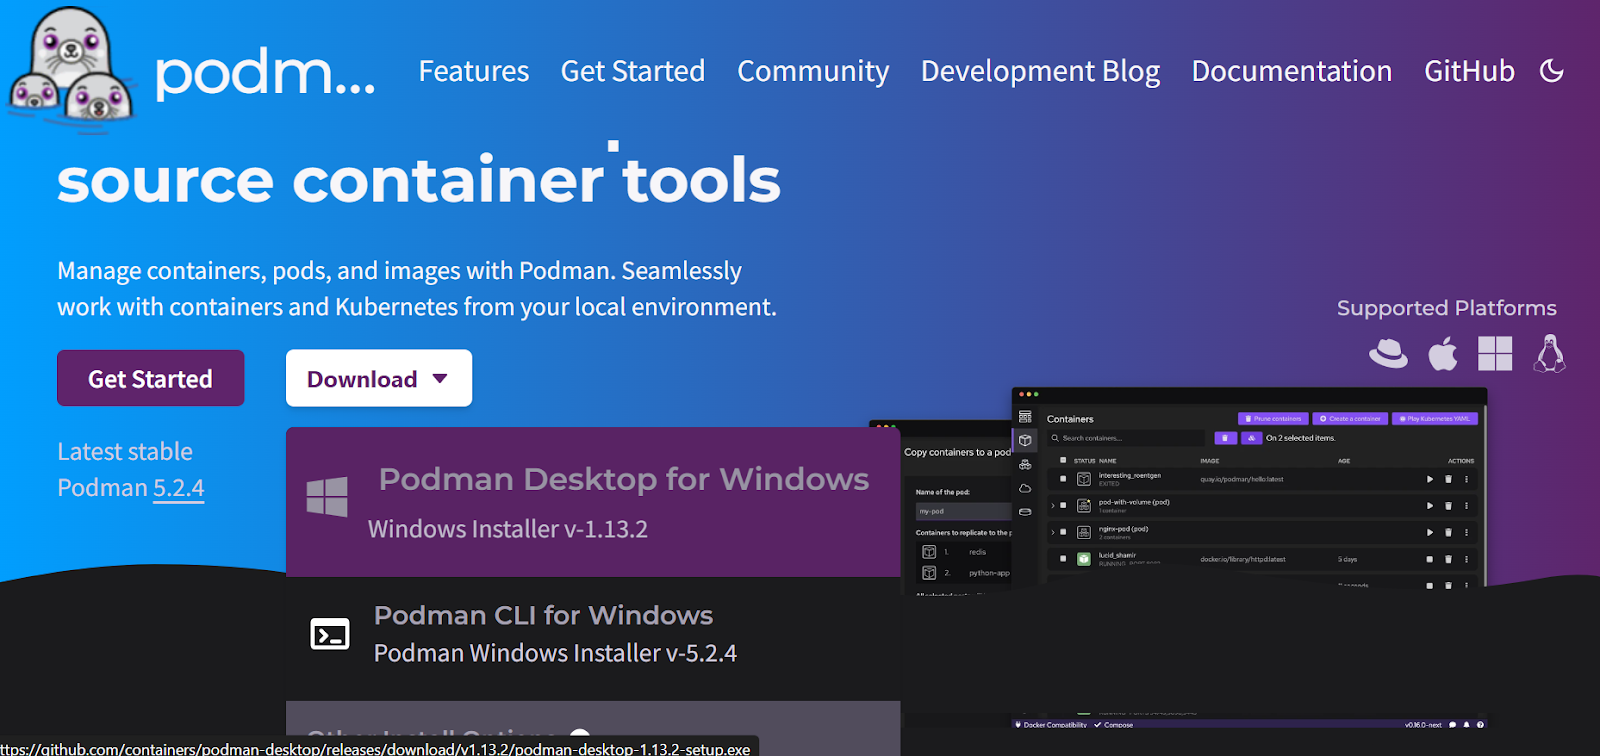
Source: Podman
The installation is simple and fast. Within a few minutes, you will be on the getting started screen, where you will be asked to install optional extensions.
If you don't have WSL in Windows, It will automatically install WSL.
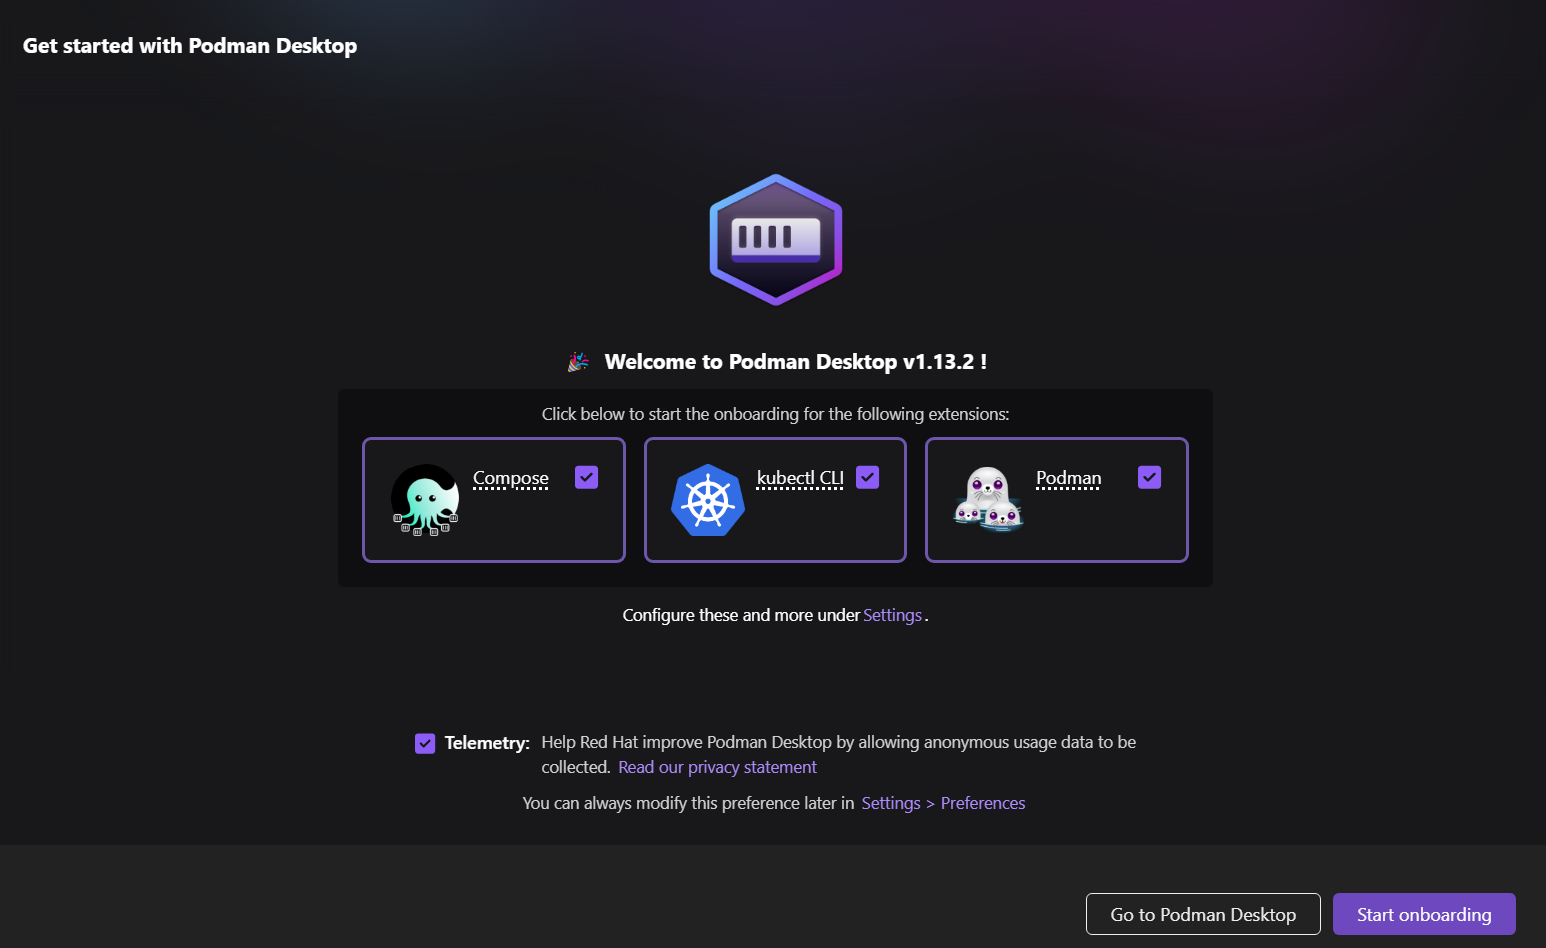
Next, set up the Podman machine.
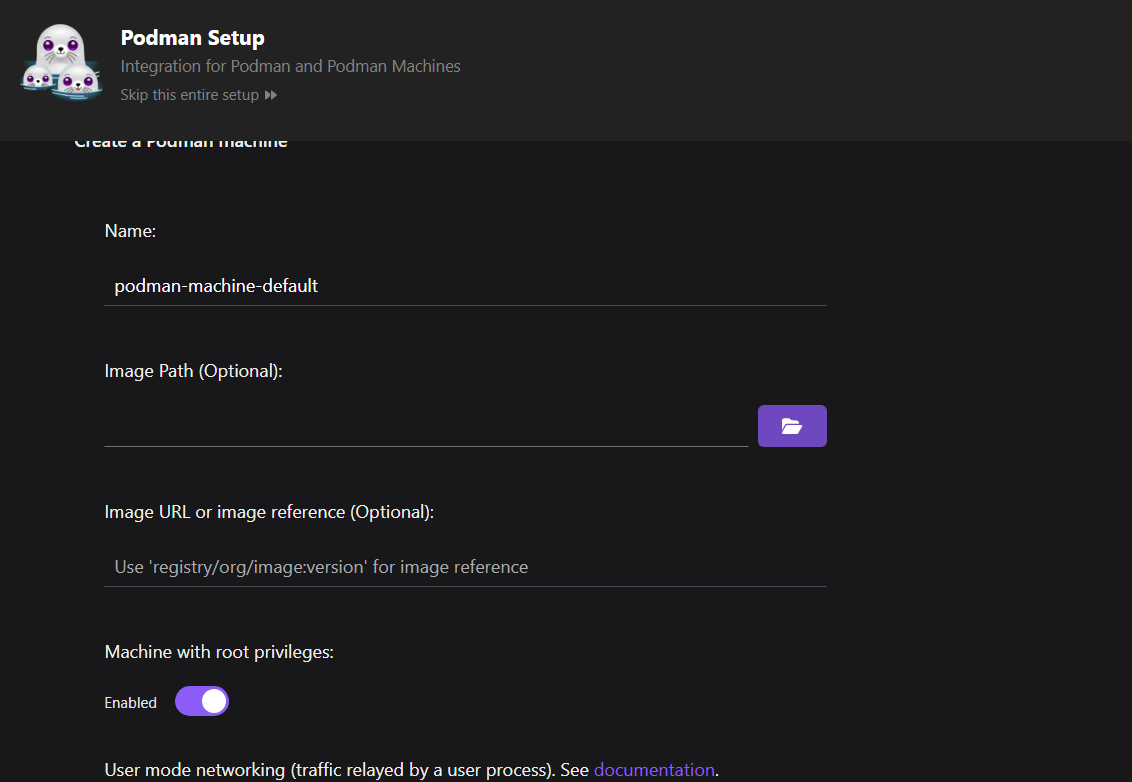
Compared to Docker, you don't need to set up a machine. However, in Podman, you can manage multiple machines handling different containers simultaneously, which allows for better resource management.
Our machine is up and running, ready to create images and run the containers.

To verify that Podman is functioning correctly, we will pull a sample image from quay.io and execute the container.
$ podman run quay.io/podman/helloThe Podman machine has successfully pulled the image and run the container, displaying the logs.
Trying to pull quay.io/podman/hello:latest...
Getting image source signatures
Copying blob sha256:81df7ff16254ed9756e27c8de9ceb02a9568228fccadbf080f41cc5eb5118a44
Copying config sha256:5dd467fce50b56951185da365b5feee75409968cbab5767b9b59e325fb2ecbc0
Writing manifest to image destination
!... Hello Podman World ...!

         .--"--.
       / -     - \
      / (O)   (O) \
   ~~~| -=(,Y,)=- |
    .---. /`  \   |~~
 ~/  o  o \~~~~.----. ~~
  | =(X)= |~  / (O (O) \
   ~~~~~~~  ~| =(Y_)=-  |
  ~~~~    ~~~|   U      |~~

Project:   https://github.com/containers/podman
Website:   https://podman.io
Desktop:   https://podman-desktop.io
Documents: https://docs.podman.io
YouTube:   https://youtube.com/@Podman
X/Twitter: @Podman_io
Mastodon:  @Podman_io@fosstodon.org
Building an MLOps Project With Podman
In this MLOps project, we will automate the model training and evaluation and serve the model using Dockerfile and Podman. This will be similar to Docker, but instead, we will use the Podman CLI to build images and then run the container.
If you’re new to the concepts, you can learn the fundamentals of MLOPs by completing the MLOps Concepts course.
1. Setting up the machine learning project
To set up the machine learning project, we need to create a training and serving script, as well as a requirements.txt file for installing Python packages.
The training Python script will load the credit score classification dataset, process it, encode it, and train the model. We will also perform model evaluation. In the end, we will save the preprocessing and training pipeline along with the model using the pickle format.
src/train.py:
# src/train.py

import os
import pickle

import matplotlib.pyplot as plt
import numpy as np
import pandas as pd
from sklearn.compose import ColumnTransformer
from sklearn.ensemble import RandomForestClassifier
from sklearn.impute import SimpleImputer
from sklearn.metrics import (
    accuracy_score,
    classification_report,
    confusion_matrix,
    roc_auc_score,
)
from sklearn.model_selection import train_test_split
from sklearn.pipeline import Pipeline
from sklearn.preprocessing import OneHotEncoder


def load_data():
    data_path = "data/train.csv"
    df = pd.read_csv(data_path,low_memory=False)
    print("Data loaded successfully!")
    return df


def preprocess_data(df):
    # Drop unnecessary columns
    df = df.drop(columns=["ID", "Customer_ID", "SSN", "Name", "Month"])

    # Drop rows with missing values
    df = df.dropna()

    # Convert data types
    # Convert the 'Age' column to numeric, setting errors='coerce' to handle non-numeric values
    df["Age"] = pd.to_numeric(df["Age"], errors="coerce")

    # Filter the DataFrame to include only rows where 'Age' is between 1 and 60
    df = df[(df["Age"] >= 1) & (df["Age"] <= 60)]

    df["Annual_Income"] = pd.to_numeric(df["Annual_Income"], errors="coerce")
    df["Monthly_Inhand_Salary"] = pd.to_numeric(
        df["Monthly_Inhand_Salary"], errors="coerce"
    )

    # Separate features and target
    X = df.drop("Credit_Score", axis=1)
    y = df["Credit_Score"]

    print("Data preprocessed successfully!")
    return X, y


def encode_data(X):
    # Identify categorical and numerical features
    categorical_features = [
        "Occupation",
        "Credit_Mix",
        "Payment_of_Min_Amount",
        "Payment_Behaviour",
        "Type_of_Loan",
    ]
    numerical_features = X.select_dtypes(include=["int64", "float64"]).columns.tolist()

    # Define preprocessing steps
    numerical_transformer = SimpleImputer(strategy="median")

    categorical_transformer = Pipeline(
        steps=[
            ("imputer", SimpleImputer(strategy="most_frequent")),
            ("onehot", OneHotEncoder(handle_unknown="ignore")),
        ]
    )

    preprocessor = ColumnTransformer(
        transformers=[
            ("num", numerical_transformer, numerical_features),
            ("cat", categorical_transformer, categorical_features),
        ]
    )

    return preprocessor


def split_data(X, y):
    X_train, X_test, y_train, y_test = train_test_split(
        X, y, test_size=0.2, random_state=42
    )
    return X_train, X_test, y_train, y_test


def train_model(X_train, y_train, preprocessor):
    # Create a pipeline with preprocessing and model
    clf = Pipeline(
        steps=[
            ("preprocessor", preprocessor),
            ("classifier", RandomForestClassifier(n_estimators=100)),
        ]
    )

    # Train the model
    clf.fit(X_train, y_train)

    # Return the trained model
    return clf


def evaluate_model(clf, X_test, y_test):
    # Predict and evaluate
    y_pred = clf.predict(X_test)
    acc = accuracy_score(y_test, y_pred)
    report = classification_report(y_test, y_pred, labels=["Poor", "Standard", "Good"])
    cm = confusion_matrix(y_test, y_pred, labels=["Poor", "Standard", "Good"])

    # Calculate AUC score
    y_test_encoded = y_test.replace({"Poor": 0, "Standard": 1, "Good": 2})
    y_pred_proba = clf.predict_proba(X_test)
    auc_score = roc_auc_score(y_test_encoded, y_pred_proba, multi_class="ovr")

    # Print metrics
    print("Model Evaluation Metrics:")
    print(f"Accuracy: {acc}")
    print(f"AUC Score: {auc_score}")
    print("Classification Report:")
    print(report)

    # Plot confusion matrix
    plt.figure(figsize=(8, 6))
    plt.imshow(cm, interpolation="nearest", cmap=plt.cm.Blues)
    plt.title("Confusion Matrix")
    plt.colorbar()
    tick_marks = np.arange(3)
    plt.xticks(tick_marks, ["Poor", "Standard", "Good"], rotation=45)
    plt.yticks(tick_marks, ["Poor", "Standard", "Good"])
    plt.ylabel("True label")
    plt.xlabel("Predicted label")
    plt.tight_layout()
    cm_path = os.path.join("model", "confusion_matrix.png")
    plt.savefig(cm_path)
    print(f"Confusion matrix saved to {cm_path}")


def save_model(clf):
    model_dir = "model"
    os.makedirs(model_dir, exist_ok=True)
    model_path = os.path.join(model_dir, "model.pkl")

    # Save the trained model
    with open(model_path, "wb") as f:
        pickle.dump(clf, f)
    print(f"Model saved to {model_path}")


def main():
    # Execute steps
    df = load_data()
    X, y = preprocess_data(df)
    preprocessor = encode_data(X)
    X_train, X_test, y_train, y_test = split_data(X, y)
    clf = train_model(X_train, y_train, preprocessor)
    evaluate_model(clf, X_test, y_test)
    save_model(clf)


if __name__ == "__main__":
    main()
The model serving script will load the saved model pipeline using the model file, create a POST request function that takes a list of dictionaries from the user, converts it into a DataFrame, provides it to the model to generate predictions, and then returns the predicted label. We are using FastAPI as our API framework, which allows us to serve the model with just a few lines of code.
src/app.py:
# src/app.py

import pickle
from fastapi import FastAPI
from pydantic import BaseModel
import pandas as pd
import os

# Load the trained model
model_path = os.path.join("model", "model.pkl")
with open(model_path, "rb") as f:
    model = pickle.load(f)

app = FastAPI()


class InputData(BaseModel):
    data: list  # List of dictionaries representing feature values


@app.post("/predict")
def predict(input_data: InputData):
    # Convert input data to DataFrame
    X_new = pd.DataFrame(input_data.data)
    # Ensure the columns match the training data
    prediction = model.predict(X_new)
    # Return predictions
    return {"prediction": prediction.tolist()}
We need to create a requirements.txt file that includes all the necessary Python packages to run the scripts mentioned above. This file will be used to set up a running environment in the Docker container, ensuring that we can execute the Python scripts smoothly.
requirements.txt:
fastapi
uvicorn[standard]
numpy
pandas
scikit-learn
pydantic
matplotlib
2. Creating a Dockerfile
Create a “Dockerfile” and add the following code.
Here are the steps this Dockerfile performs:
- Uses Python 3.9 slim image as a base
- Sets up /app as a working directory
- Installs Python dependencies from requirements.txt
- Copies source code and data files into the container
- Creates model directory and runs training script
- Exposes port 8000 for the API
- Launches FastAPI app using the uvicorn server on port 8000
# Dockerfile

FROM python:3.9-slim

WORKDIR /app

# Install dependencies
COPY requirements.txt .
RUN pip install --no-cache-dir -r requirements.txt

# Copy the application code
COPY ./src/ ./src/
COPY ./data/ ./data/

# Ensure the model directory exists and is copied
RUN mkdir -p model

# Run the training script during the build
RUN python src/train.py

# Expose the port for the API
EXPOSE 8000


# Run the FastAPI app
CMD ["uvicorn", "src.app:app", "--host", "0.0.0.0", "--port", "8000"]
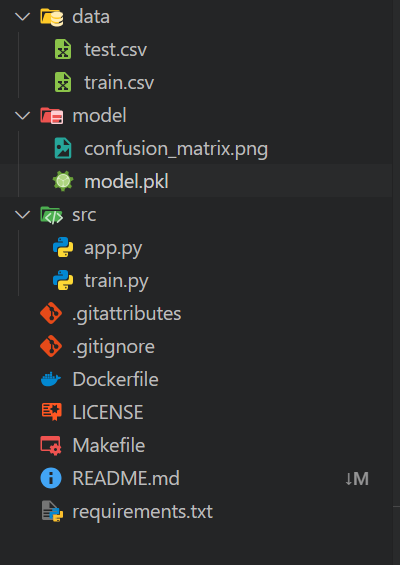
Your local workspace should be organized as follows:
- A
datafolder containing all CSV files - A
modelsfolder - A
srcfolder that holds Python scripts - In the main directory, include a
requirements.txtfile and aDockerfile
The remaining files are additional components for automation and Git operations.
3. Building the Docker image with Podman
Building the Docker image is simple: Just provide the build command with your Docker image name and the current directory where the Dockerfile is located.
$ podman build -t mlops_app .The build tool will execute all the commands in the Dockerfile sequentially, from setting up the environment to serving the machine learning application.
We can also see that the logs contain the model evaluation results. The model has an accuracy of 75% and a ROC AUC score of 0.89, which is considered average.
STEP 1/11: FROM python:3.9-slim
STEP 2/11: WORKDIR /app
--> Using cache 72ac9e49ae29da1ff19e118653efca17e7a489ae9e7ead917c83d942a3ea4e13
--> 72ac9e49ae29
STEP 3/11: COPY requirements.txt .
--> Using cache 3a05ca95caaf98c448c53a796714328bf9f7cff7896cce348f84a26b8d0dae61
--> 3a05ca95caaf
STEP 4/11: RUN pip install --no-cache-dir -r requirements.txt
--> Using cache 28109d1183449396a5df0006ab603dd5cf2aa2c06a810bdc6bcf0f843f855ee0
--> 28109d118344
STEP 5/11: COPY ./src/ ./src/
--> f814f699c58a
STEP 6/11: COPY ./data/ ./data/
--> 922550900cd0
STEP 7/11: RUN mkdir -p model
--> 36fc01f2d169
STEP 8/11: RUN python src/train.py
Data loaded successfully!
Data preprocessed successfully!
Data encoded successfully!
Data split successfully!
Model trained successfully!
Model Evaluation Metrics:
Accuracy: 0.7546181417149159
ROC AUC Score: 0.8897184704689612
Classification Report:
              precision    recall  f1-score   support

        Good       0.71      0.67      0.69      1769
        Poor       0.75      0.76      0.75      3403
    Standard       0.77      0.78      0.78      5709

    accuracy                           0.75     10881
   macro avg       0.74      0.74      0.74     10881
weighted avg       0.75      0.75      0.75     10881

Model saved to model/model.pkl
--> 5d4777c08580
STEP 9/11: EXPOSE 8000
--> 7bb09a613e7f
STEP 10/11: WORKDIR /app/src
--> 06b6394c2e2d
STEP 11/11: CMD ["uvicorn", "app:app", "--host", "0.0.0.0", "--port", "8000"]
COMMIT mlops-app
--> 9a7a42b03664
Successfully tagged localhost/mlops-app:latest
9a7a42b03664f1e4631330cd682cb2de26e513c5d776fa2ce2042b3bb9455e14
If you open the Podman Desktop application and click on the “Images” tab, you will see that your mlops_app image has been successfully created.

Check out the Docker for Data Science cheat sheet to learn all the relevant Docker commands. Just replace the first command, docker, with podman.
4. Running the Docker Container with Podman
We will use the run command to start a container named "mlops_container" from the mlops-app image. This will be done in detached mode (-d), mapping port 8000 of the container to port 8000 on the host machine. This setup will allow access to the FastAPI application from outside the container.
$ podman run -d --name mlops_container -p 8000:8000 mlops-app To view all the logs for the "mlops_container," use the logs command.
$ podman logs -f mlops_container Output:
INFO:     Started server process [1]
INFO:     Waiting for application startup.
INFO:     Application startup complete.
INFO:     Uvicorn running on http://0.0.0.0:8000 (Press CTRL+C to quit)
INFO:     10.88.0.1:36886 - "POST /predict HTTP/1.1" 200 OK
You can also open the Podman Desktop application and click on the “Containers” tab to view the running containers.

To view the logs in the Podman Desktop application, click on “mlops_container” and then select the “Terminal” tab.

5. Testing the ML inference server
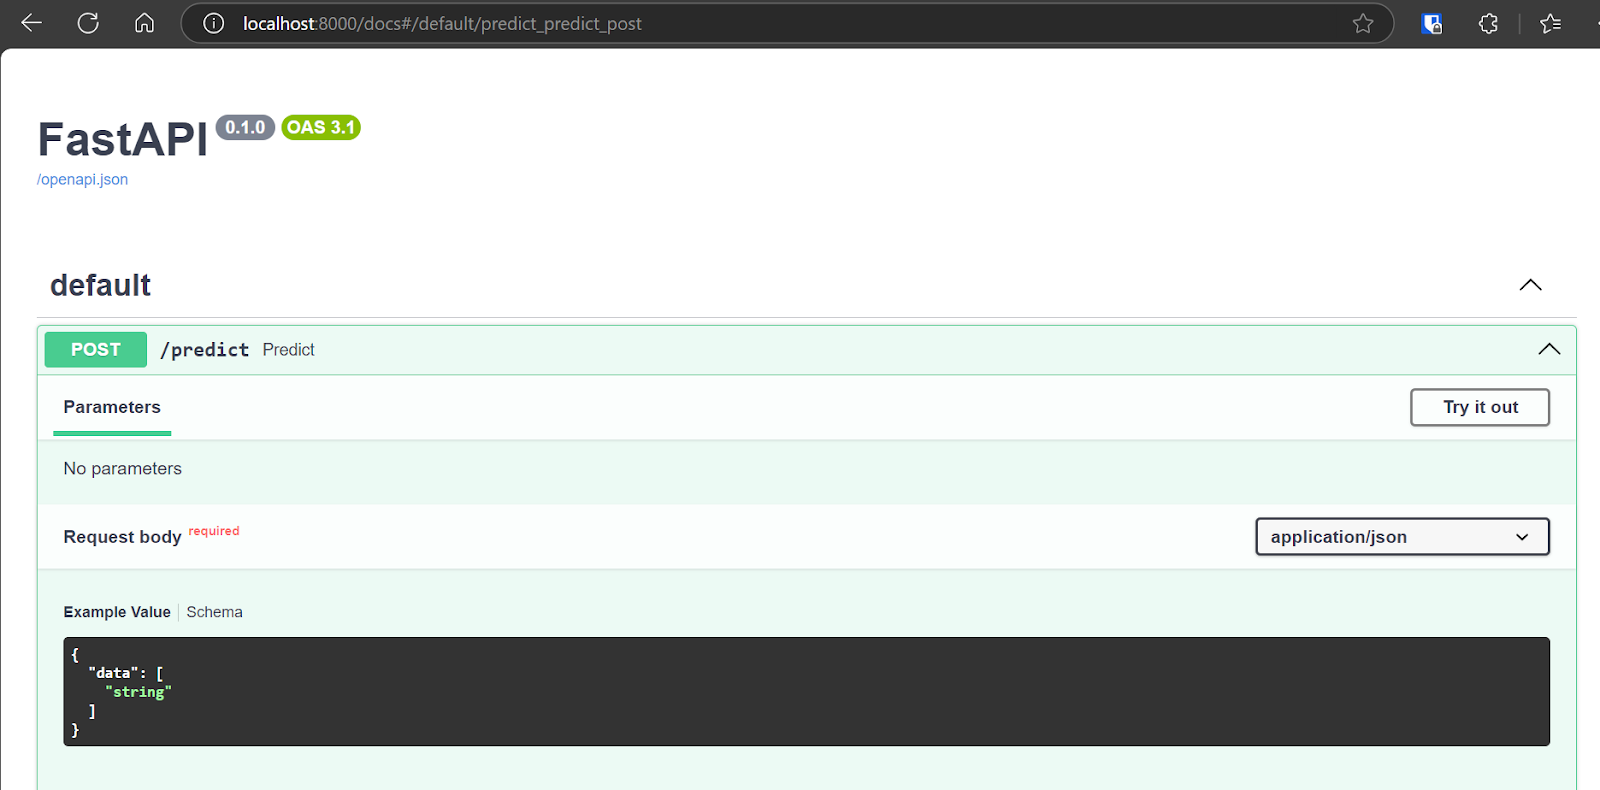
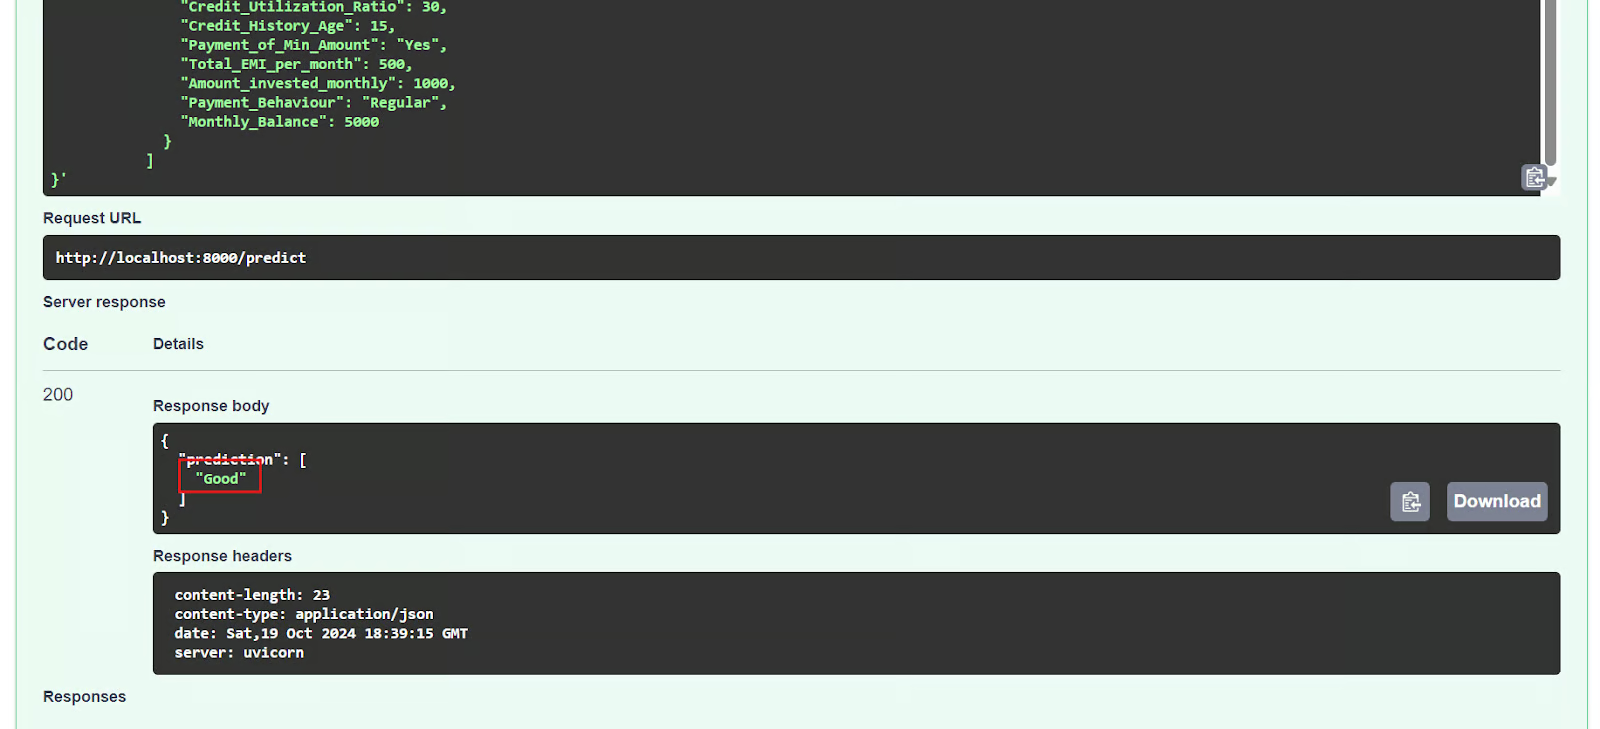
We will now test the deployed application by accessing the interactive Swagger UI at: http://localhost:8000/docs. The Swagger UI offers a user-friendly interface that allows you to explore all available API endpoints.
We can also test the API by using the CURL command in the terminal.
$ curl -X POST "http://localhost:8000/predict" \
     -H "Content-Type: application/json" \
     -d '{
           "data": [
             {
               "Age": 35,
               "Occupation": "Engineer",
               "Annual_Income": 85000,
               "Monthly_Inhand_Salary": 7000,
               "Num_Bank_Accounts": 2,
               "Num_Credit_Card": 3,
               "Interest_Rate": 5,
               "Num_of_Loan": 1,
               "Type_of_Loan": "Personal Loan",
               "Delay_from_due_date": 2,
               "Num_of_Delayed_Payment": 1,
               "Changed_Credit_Limit": 15000,
               "Num_Credit_Inquiries": 2,
               "Credit_Mix": "Good",
               "Outstanding_Debt": 10000,
               "Credit_Utilization_Ratio": 30,
               "Credit_History_Age": 15,
               "Payment_of_Min_Amount": "Yes",
               "Total_EMI_per_month": 500,
               "Amount_invested_monthly": 1000,
               "Payment_Behaviour": "Regular",
               "Monthly_Balance": 5000
             }
           ]
         }'
The FastAPI server is functioning correctly, successfully processing the user input and returning an accurate prediction.
{"prediction":["Good"]}6. Stopping and removing the container
After experimenting with the API, we will stop the container using the stop command.
$ podman stop mlops_container Also, we can remove the container using the rm command, freeing up system resources. The container must be stopped first before it can be removed.
$ podman rm mlops_container 7. Removing the Image
To remove the locally stored container image named "mlops-app" we will use the rmi command.
$ podman rmi mlops-app If you are facing issues running the above code or creating your own Docker file, please check the GitHub repository kingabzpro/mlops-with-podman. It includes a usage guide and all the necessary files for you to execute the code on your system.
The next step in your learning journey is to try building 10 Docker project ideas, ranging from beginner to advanced, but with Podman. This will help you gain a better understanding of the Podman ecosystem.
Conclusion
Podman offers a compelling alternative to Docker for certain use cases, yet many developers continue to favor Docker Desktop and CLI. This preference is largely due to Docker's extensive integrations and user-friendly tools.
However, for a straightforward MLOps project, engineers might opt for Podman, which provides a lightweight and easy set up compared to Docker Desktop.
In this tutorial, we explore Podman, a popular container management tool, by comparing it with Docker and demonstrating how to install Podman Desktop. We also guide you through an MLOps project using Podman, covering the creation of a Dockerfile, building an image, and running a container. Getting started with Podman is straightforward, and if you're already familiar with Docker, you'll appreciate the seamless transition.
Take the MLOps Deployment and LifeCycling course to explore the modern MLOps framework, exploring the lifecycle and deployment of machine learning models.

As a certified data scientist, I am passionate about leveraging cutting-edge technology to create innovative machine learning applications. With a strong background in speech recognition, data analysis and reporting, MLOps, conversational AI, and NLP, I have honed my skills in developing intelligent systems that can make a real impact. In addition to my technical expertise, I am also a skilled communicator with a talent for distilling complex concepts into clear and concise language. As a result, I have become a sought-after blogger on data science, sharing my insights and experiences with a growing community of fellow data professionals. Currently, I am focusing on content creation and editing, working with large language models to develop powerful and engaging content that can help businesses and individuals alike make the most of their data.

