Course
Introduction to Python
4 hr
6.9M
If you would like an overview of web scraping in Python, take DataCamp's Web Scraping with Python course.
In this tutorial, you will learn how to use Scrapy which is a Python framework using which you can handle large amounts of data! You will learn Scrapy by building a web scraper for AliExpress.com which is an e-commerce website. Let's get scrapping!
A basic HTML and CSS knowledge will help you understand this tutorial with greater ease and speed. Read this article for a fresher on HTML and CSS.
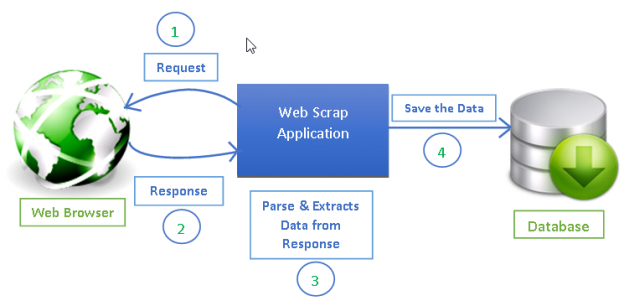
Web scraping has become an effective way of extracting information from the web for decision making and analysis. It has become an essential part of the data science toolkit. Data scientists should know how to gather data from web pages and store that data in different formats for further analysis.
Any web page you see on the internet can be crawled for information and anything visible on a web page can be extracted [2]. Every web page has its own structure and web elements that because of which you need to write your web crawlers/spiders according to the web page being extracted.
Scrapy provides a powerful framework for extracting the data, processing it and then save it.
Scrapy uses spiders, which are self-contained crawlers that are given a set of instructions [1]. In Scrapy it is easier to build and scale large crawling projects by allowing developers to reuse their code.
In this section, you will have an overview of one of the most popularly used web scraping tool called BeautifulSoup and its comparison to Scrapy.
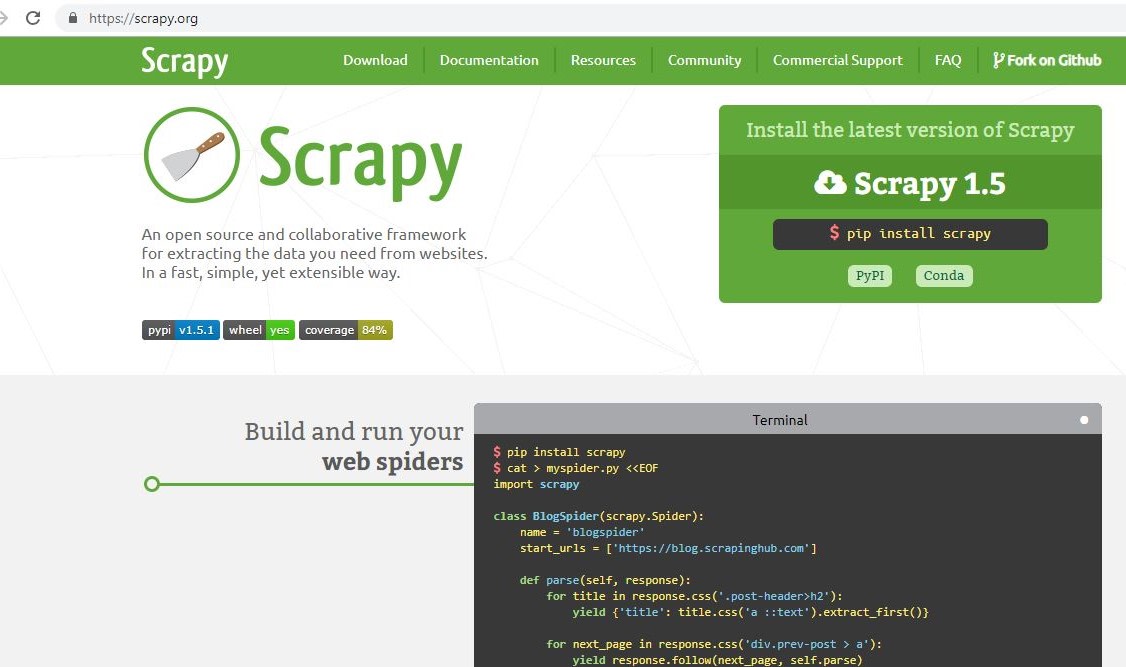
Scrapy is a Python framework for web scraping that provides a complete package for developers without worrying about maintaining code.
Beautiful Soup is also widely used for web scraping. It is a Python package for parsing HTML and XML documents and extract data from them. It is available for Python 2.6+ and Python 3.
Here are some differences between them in a nutshell:
| Scrapy | BeautifulSoup |
|---|---|
| Functionality | --- |
| Scrapy is the complete package for downloading web pages, processing them and save it in files and databases | BeautifulSoup is basically an HTML and XML parser and requires additional libraries such as requests, urlib2 to open URLs and store the result [6] |
| Learning Curve | --- |
| Scrapy is a powerhouse for web scraping and offers a lot of ways to scrape a web page. It requires more time to learn and understand how Scrapy works but once learned, eases the process of making web crawlers and running them from just one line of command. Becoming an expert in Scrapy might take some practice and time to learn all functionalities. | BeautifulSoup is relatively easy to understand for newbies in programming and can get smaller tasks done in no time |
| Speed and Load | --- |
Scrapy can get big jobs done very easily. It can crawl a group of URLs in no more than a minute depending on the size of the group and does it very smoothly as it uses Twister which works asynchronously (non-blocking) for concurrency. |
BeautifulSoup is used for simple scraping jobs with efficiency. It is slower than Scrapy if you do not use multiprocessing. |
| Extending functionality | --- |
| Scrapy provides Item pipelines that allow you to write functions in your spider that can process your data such as validating data, removing data and saving data to a database. It provides spider Contracts to test your spiders and allows you to create generic and deep crawlers as well. It allows you to manage a lot of variables such as retries, redirection and so on. | If the project does not require much logic, BeautifulSoup is good for the job, but if you require much customization such as proxys, managing cookies, and data pipelines, Scrapy is the best option. |
Information: Synchronous means that you have to wait for a job to finish to start a new job while Asynchronous means you can move to another job before the previous job has finished
Here is an interesting DataCamp BeautifulSoup tutorial to learn.
With Python 3.0 (and onwards) installed, if you are using anaconda, you can use conda to install scrapy. Write the following command in anaconda prompt:
conda install -c conda-forge scrapy
To install anaconda, look at these DataCamp tutorials for Mac and Windows.
Alternatively, you can use Python Package Installer pip. This works for Linux, Mac, and Windows:
pip install scrapy
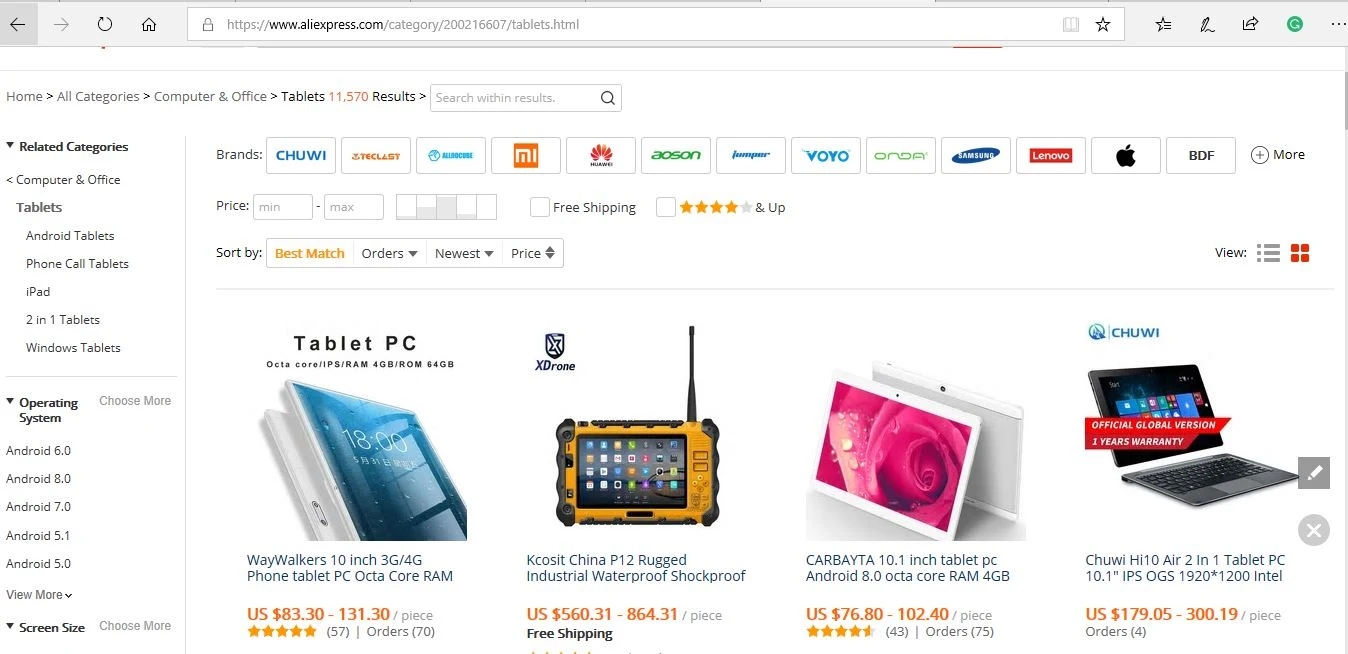
Scrapy also provides a web-crawling shell called as Scrapy Shell, that developers can use to test their assumptions on a site’s behavior. Let us take a web page for tablets at AliExpress e-commerce website. You can use the Scrapy shell to see what components the web page returns and how you can use them to your requirements.
Open your command line and write the following command:
scrapy shell
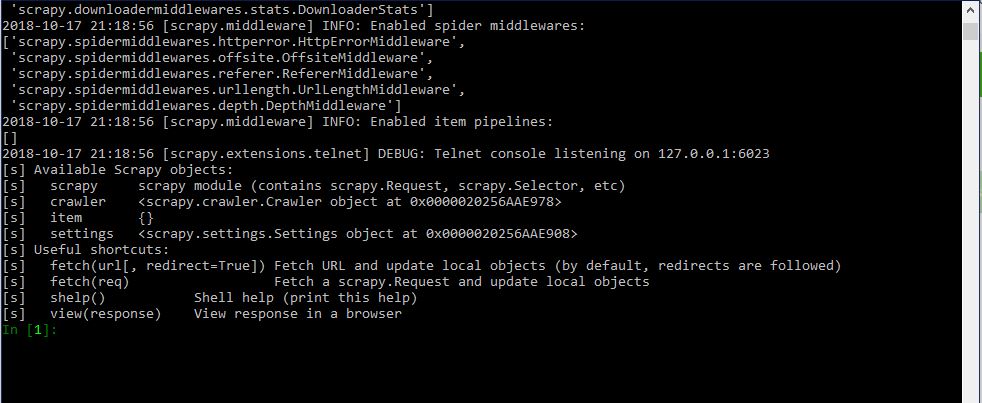
If you are using anaconda, you can write the above command at the anaconda prompt as well. Your output on the command line or anaconda prompt will be something like this:
You have to run a crawler on the web page using the fetch command in the Scrapy shell. A crawler or spider goes through a webpage downloading its text and metadata.
fetch(https://pt.aliexpress.com/category/201005406/special-store.html)
Note: Always enclose URL in quotes, both single and double quotes work

The crawler returns a response which can be viewed by using the view(response) command on shell:
view(response)
And the web page will be opened in the default browser.
You can view the raw HTML script by using the following command in Scrapy shell:
print(response.text)

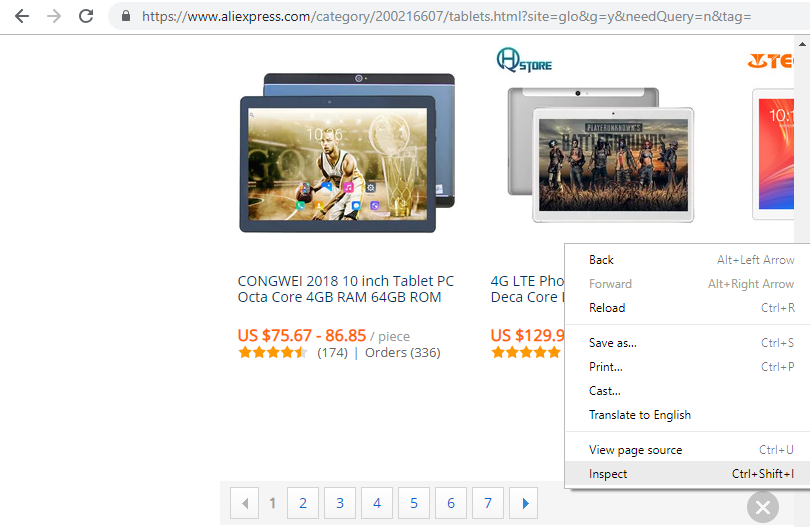
You will see the script that's generating the webpage. It is the same content that when you left right-click any blank area on a webpage and click view source or view page source. Since, you need only relevant information from the entire script, using browser developer tools you will inspect the required element. Let us take the following elements:
Right-click on the element you want and click inspect like below:
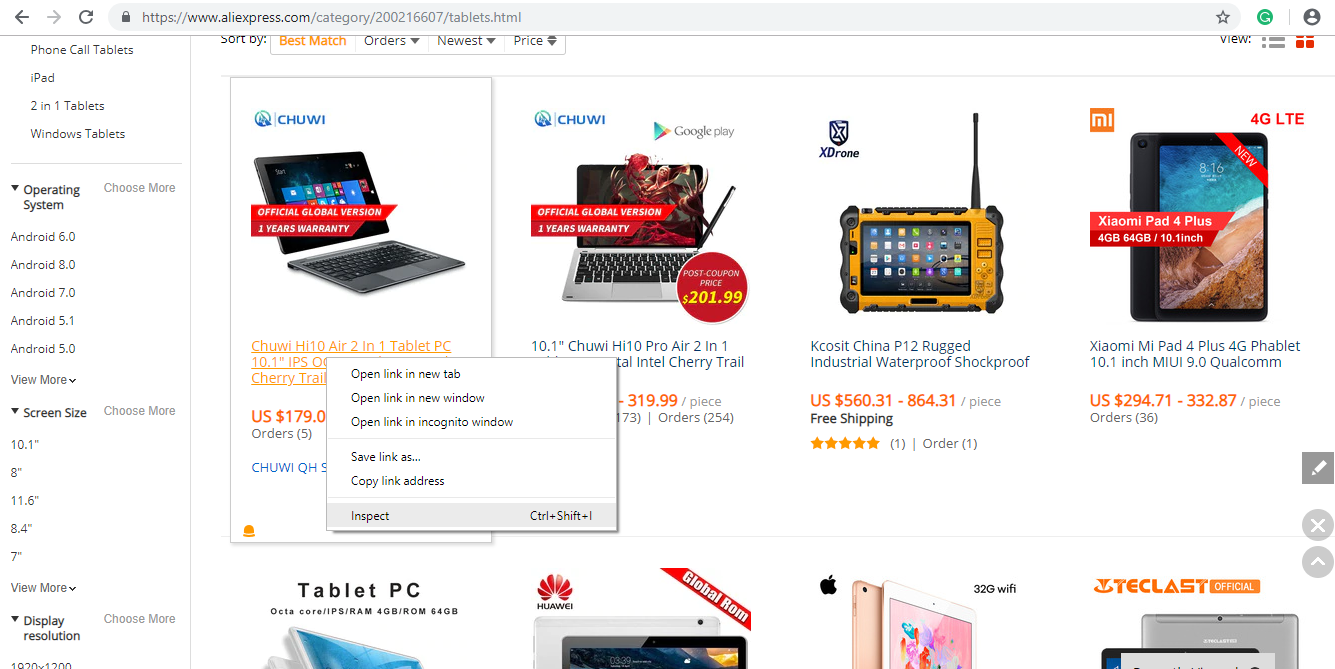
Developer tools of the browser will help you a lot with web scraping. You can see that it is an <a> tag with a class product and the text contains the name of the product:

You can extract this using the element attributes or the css selector like classes. Write the following in the Scrapy shell to extract the product name:
response.css(".product::text").extract_first()
The output will be:

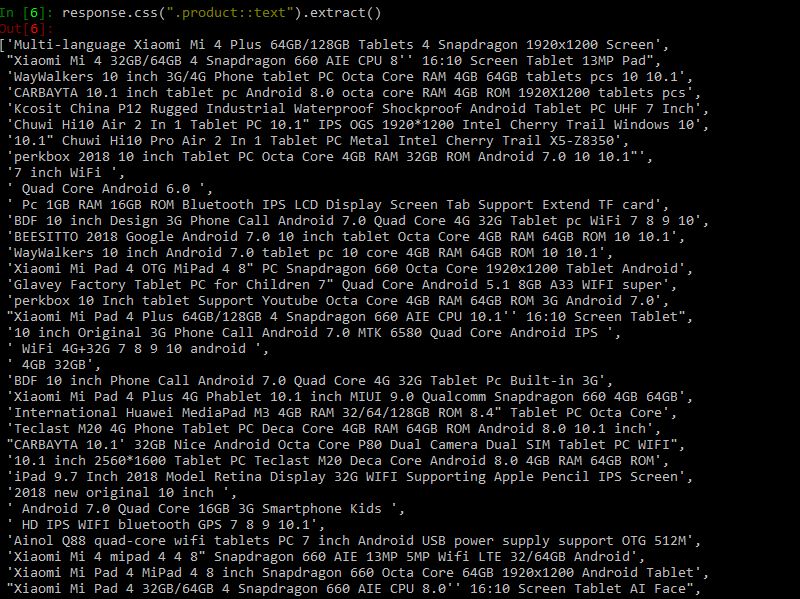
extract_first() extract the first element that satisfies the css selector. If you want to extract all the product names use extract():
response.css(".product::text").extract()
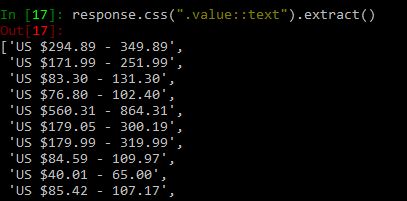
Following code will extract price range of the products:
response.css(".value::text").extract()
Similarly, you can try with a number of orders and the name of the store.
XPath is a query language for selecting nodes in an XML document [7]. You can navigate through an XML document using XPath. Behind the scenes, Scrapy uses Xpath to navigate to HTML document items. The CSS selectors you used above are also converted to XPath, but in many cases, CSS is very easy to use. But you should know how the XPath in Scrapy works.
Go to your Scrapy Shell and write fetch(https://pt.aliexpress.com/category/201005406/special-store.html/) the same way as before. Try out the following code snippets [3]:
response.xpath('/html').extract()
This will show you all the code under the <html> tag. / means direct child of the node. If you want to get the <div> tags under the html tag you will write [3]:
response.xpath('/html//div').extract()
For XPath, you must learn to understand the use of / and // to know how to navigate through child and descendent nodes. Here is a helpful tutorial for XPath Nodes and some examples to try out.
If you want to get all <div> tags, you can do it by drilling down without using the /html [3]:
response.xpath("//div").extract()
You can further filter your nodes that you start from and reach your desired nodes by using attributes and their values. Below is the syntax to use classes and their values.
response.xpath("//div[@class='quote']/span[@class='text']").extract()
response.xpath("//div[@class='quote']/span[@class='text']/text()").extract()
Use text() to extract all text inside nodes
Consider the following HTML code:

You want to get the text inside the <a> tag, which is child node of <div> haing classes site-notice-container container you can do it as follows:
response.xpath('//div[@class="site-notice-container container"]/a[@class="notice-close"]/text()').extract()

Web scraping can be used to make an aggregator that you can use to compare data. For example, you want to buy a tablet, and you want to compare products and prices together you can crawl your desired pages and store in an excel file. Here you will be scraping aliexpress.com for tablets information.
Now, you will create a custom spider for the same page. First, you need to create a Scrapy project in which your code and results will be stored. Write the following command in the command line or anaconda prompt.
scrapy startproject aliexpress
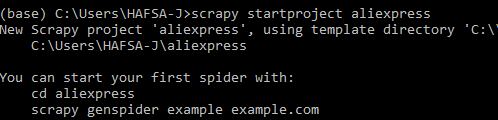
This will create a hidden folder in your default python or anaconda installation. aliexpress will be the name of the folder. You can give any name. You can view the folder contents directly through explorer. Following is the structure of the folder:
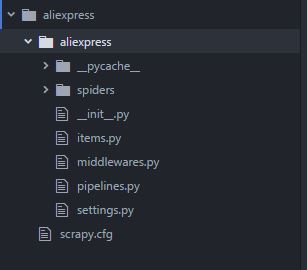
| file/folder | Purpose |
|---|---|
| scrapy.cfg | deploy configuration file |
| aliexpress/ | Project's Python module, you'll import your code from here |
__init.py__ |
Initialization file |
| items.py | project items file |
| pipelines.py | project pipelines file |
| settings.py | project settings file |
| spiders/ | a directory where you'll later put your spiders |
__init.py__ |
Initialization file |
Once you have created the project you will change to the newly created directory and write the following command:
[scrapy genspider aliexpress_tablets](https://pt.aliexpress.com/category/201005406/special-store.html)

This creates a template file named aliexpress_tablets.py in the spiders directory as discussed above. The code in that file is as below:
import scrapy

class AliexpressTabletsSpider(scrapy.Spider):
    name = 'aliexpress_tablets'
    allowed_domains = ['aliexpress.com']
    start_urls = ['https://www.aliexpress.com/category/200216607/tablets.html']


    def parse(self, response):
         pass
In the above code you can see name, allowed_domains, sstart_urls and a parse function.
scrapy crawl name_of_spider is used.response (used in Scrapy shell) returned as a result of crawling is passed in this function, and you write the extraction code inside it!Information: You can use BeautifulSoup inside parse() function of the Scrapy spider to parse the html document.
Note: You can extract data through css selectors using response.css() as discussed in scrapy shell section but also using XPath (XML) that allows you to access child elements. You will see the example of response.xpath() in the code edited in pass() function.
You will make changes to the aliexpress_tablet.py file. I have added another URL in start_urls. You can add the extraction logic to the pass() function as below:
# -*- coding: utf-8 -*-
import scrapy


class AliexpressTabletsSpider(scrapy.Spider):
    name = 'aliexpress_tablets'
    allowed_domains = ['aliexpress.com']
    start_urls = ['https://www.aliexpress.com/category/200216607/tablets.html',
                 'https://www.aliexpress.com/category/200216607/tablets/2.html?site=glo&g=y&tag=']


    def parse(self, response):

        print("procesing:"+response.url)
        #Extract data using css selectors
        product_name=response.css('.product::text').extract()
        price_range=response.css('.value::text').extract()
        #Extract data using xpath
        orders=response.xpath("//em[@title='Total Orders']/text()").extract()
        company_name=response.xpath("//a[@class='store $p4pLog']/text()").extract()

        row_data=zip(product_name,price_range,orders,company_name)

        #Making extracted data row wise
        for item in row_data:
            #create a dictionary to store the scraped info
            scraped_info = {
                #key:value
                'page':response.url,
                'product_name' : item[0], #item[0] means product in the list and so on, index tells what value to assign
                'price_range' : item[1],
                'orders' : item[2],
                'company_name' : item[3],
            }

            #yield or give the scraped info to scrapy
            yield scraped_info
Information: zip() takes n number of iterables and returns a list of tuples. ith element of the tuple is created using the ith element from each of the iterables. [8]
The yield keyword is used whenever you are defining a generator function. A generator function is just like a normal function except it uses yield keyword instead of return. The yield keyword is used whenever the caller function needs a value and the function containing yield will retain its local state and continue executing where it left off after yielding value to the caller function. Here yield gives the generated dictionary to Scrapy which will process and save it!
Now you can run the spider:
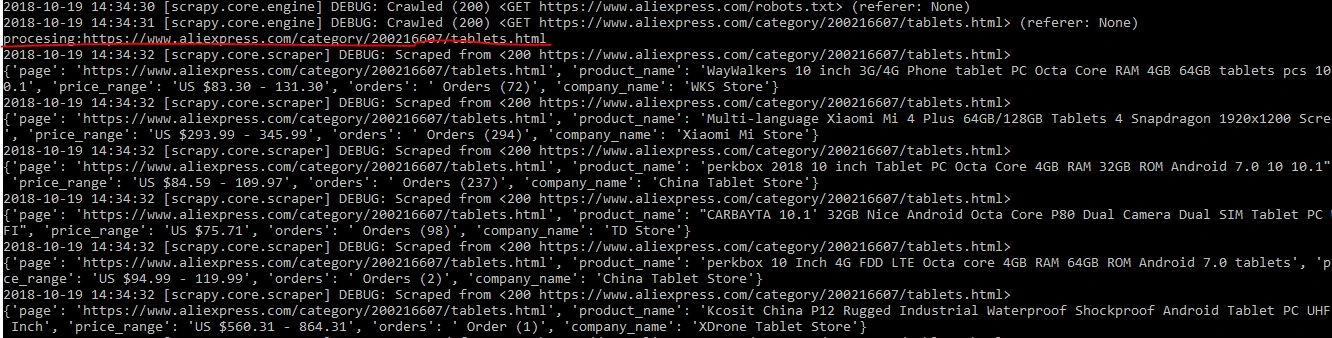
scrapy crawl aliexpress_tablets
You will see a long output at the command line like below:

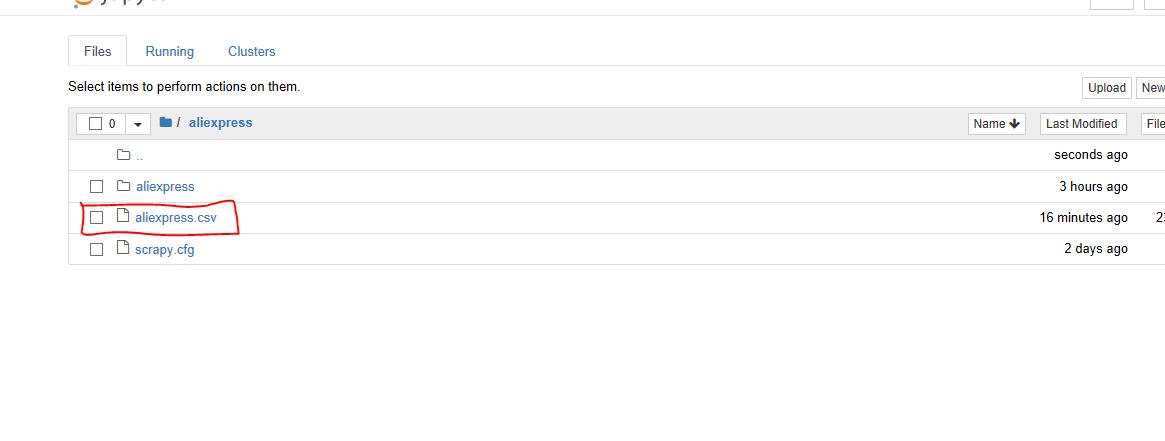
You will need data to be presented as a CSV or JSON so that you can further use the data for analysis. This section of the tutorial will take you through how you can save CSV and JSON file for this data.
To save a CSV file, open settings.py from the project directory and add the following lines:
FEED_FORMAT="csv"
FEED_URI="aliexpress.csv"
After saving the settings.py, rerun the scrapy crawl aliexpress_tablets in your project directory.
The CSV file will look like:
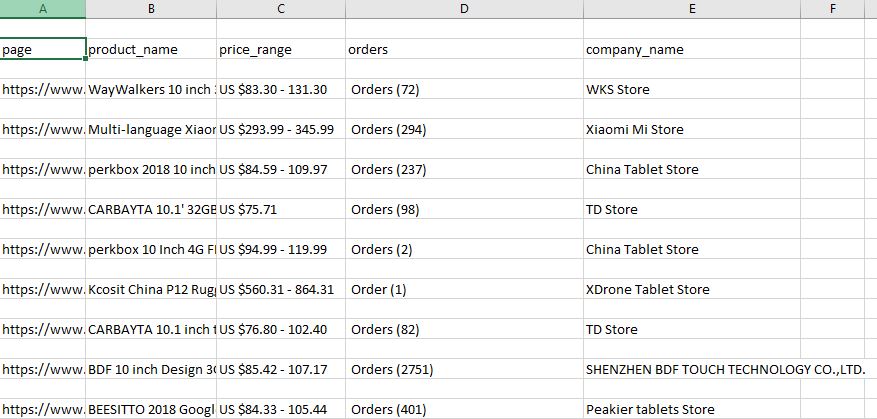
Note: Everytime you run the spider it will append the file.
     + JSON
     + CSV
     + JSON Lines
     + XML
Scrapy's Feed Export can also add a timestamp and the name of spider to your file name, or you can use these to identify a directory in which you want to store.
%(time)s: gets replaced by a timestamp when the feed is being created [5]%(name)s: gets replaced by the spider name [5]For Example:
ftp://user:[email protected]/scraping/feeds/%(name)s/%(time)s.json
The Feed changes you make in settings.py will apply to all spiders in the project. You can also set custom settings for a particular spider that will override the settings in the settings.py file.
# -*- coding: utf-8 -*-
import scrapy


class AliexpressTabletsSpider(scrapy.Spider):
    name = 'aliexpress_tablets'
    allowed_domains = ['aliexpress.com']
    start_urls = ['https://www.aliexpress.com/category/200216607/tablets.html',
                 'https://www.aliexpress.com/category/200216607/tablets/2.html?site=glo&g=y&tag=']

    custom_settings={ 'FEED_URI': "aliexpress_%(time)s.json",
                       'FEED_FORMAT': 'json'}

    def parse(self, response):

        print("procesing:"+response.url)
        #Extract data using css selectors
        product_name=response.css('.product::text').extract()
        price_range=response.css('.value::text').extract()
        #Extract data using xpath
        orders=response.xpath("//em[@title='Total Orders']/text()").extract()
        company_name=response.xpath("//a[@class='store $p4pLog']/text()").extract()

        row_data=zip(product_name,price_range,orders,company_name)

        #Making extracted data row wise
        for item in row_data:
            #create a dictionary to store the scraped info
            scraped_info = {
                #key:value
                'page':response.url,
                'product_name' : item[0], #item[0] means product in the list and so on, index tells what value to assign
                'price_range' : item[1],
                'orders' : item[2],
                'company_name' : item[3],
            }

            #yield or give the scraped info to Scrapy
            yield scraped_info
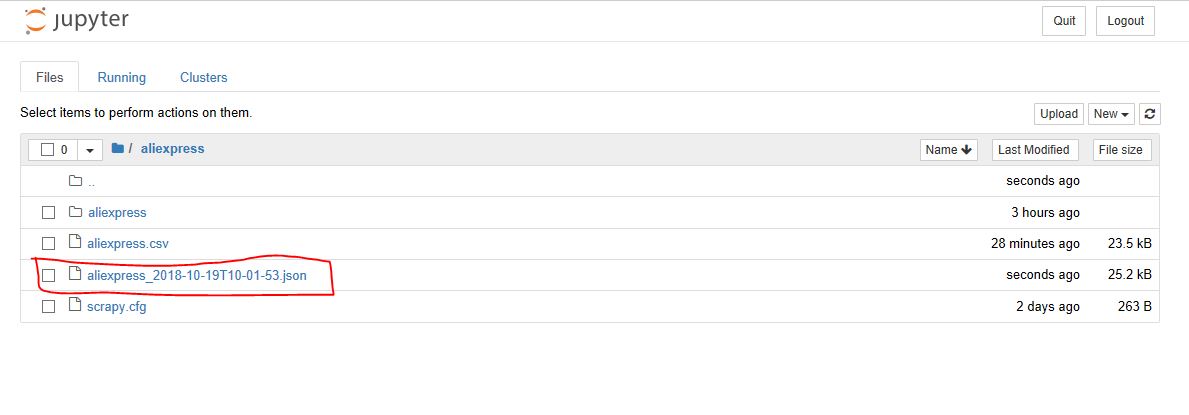
response.url returns the URL of the page from which response is generated. After running the crawler using scrapy crawl aliexpress_tablets you can view the json file:
You must have noticed, that there are two links in the start_urls. The second link is the page 2 of the same tablets search results. It will become impractical to add all links. A crawler should be able to crawl by itself through all the pages, and only the starting point should be mentioned in the start_urls.
If a page has subsequent pages, you will see a navigator for it at the end of the page that will allow moving back and forth the pages. In the case you have been implementing in this tutorial, you will see it like this:
Here is the code that you will see:
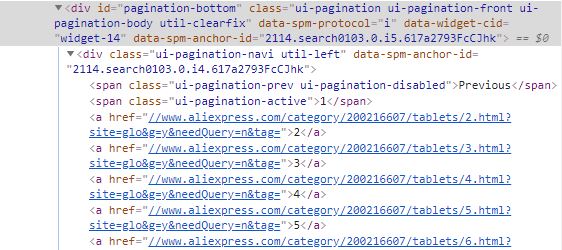
As you can see that under there is a <span> tag with class .ui-pagination-active class that is the current page you are on, and under that are all <a> tags with links to the next page. Everytime you will have to get the <a> tags after this <span> tag. Here comes a little bit of CSS! In this, you have to get sibling node and not a child node, so you have to make a css selector that tells the crawler to find <a> tags that are after <span> tag with .ui-pagination-active class.
Remember! Each web page has its own structure. You will have to study the structure a little bit on how you can get the desired element. Always try out response.css(SELECTOR) on Scrapy Shell before writing them in code.
Modify your aliexpress_tablets.py as below:
import scrapy


class AliexpressTabletsSpider(scrapy.Spider):
    name = 'aliexpress_tablets'
    allowed_domains = ['aliexpress.com']
    start_urls = ['https://www.aliexpress.com/category/200216607/tablets.html']


    custom_settings={ 'FEED_URI': "aliexpress_%(time)s.csv",
                       'FEED_FORMAT': 'csv'}

    def parse(self, response):

        print("procesing:"+response.url)
        #Extract data using css selectors
        product_name=response.css('.product::text').extract()
        price_range=response.css('.value::text').extract()
        #Extract data using xpath
        orders=response.xpath("//em[@title='Total Orders']/text()").extract()
        company_name=response.xpath("//a[@class='store $p4pLog']/text()").extract()

        row_data=zip(product_name,price_range,orders,company_name)

        #Making extracted data row wise
        for item in row_data:
            #create a dictionary to store the scraped info
            scraped_info = {
                #key:value
                'page':response.url,
                'product_name' : item[0], #item[0] means product in the list and so on, index tells what value to assign
                'price_range' : item[1],
                'orders' : item[2],
                'company_name' : item[3],
            }

            #yield or give the scraped info to scrapy
            yield scraped_info


            NEXT_PAGE_SELECTOR = '.ui-pagination-active + a::attr(href)'
            next_page = response.css(NEXT_PAGE_SELECTOR).extract_first()
            if next_page:
                yield scrapy.Request(
                response.urljoin(next_page),
                callback=self.parse)
In the above code:
you first extracted the link of the next page using next_page = response.css(NEXT_PAGE_SELECTOR).extract_first() and then if the variable next_page gets a link and is not empty, it will enter the if body.
response.urljoin(next_page): The parse() method will use this method to build a new url and provide a new request, which will be sent later to the callback. [9]
After receiving the new URL, it will scrape that link executing the for body and again look for the next page. This will continue until it doesn't get a next page link.
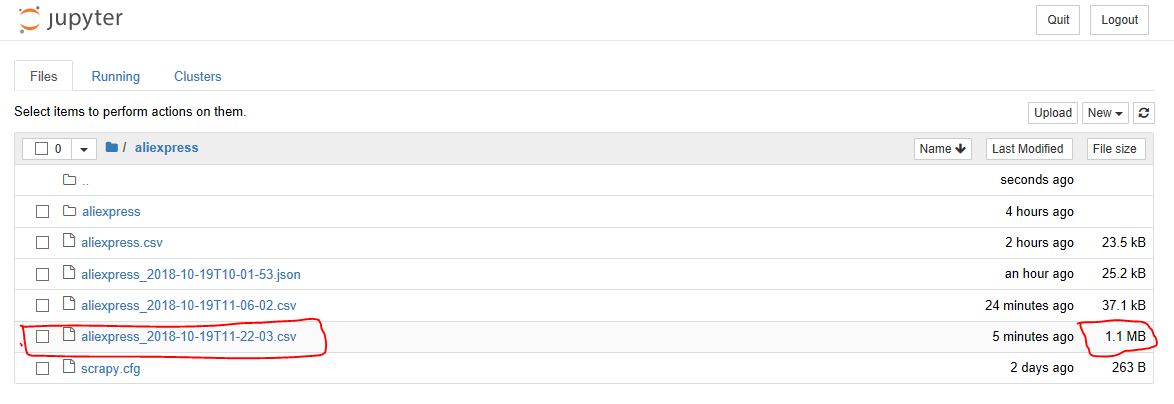
Here you might want to sit back and enjoy your spider scraping all the pages. The above spider will extract from all subsequent pages. That will be a lot of scraping! But your spider will do it! Below you can see the size of the file has reached 1.1MB.
In this tutorial, you have learned about Scrapy, how it compares to BeautifulSoup, Scrapy Shell and how to write your own spiders in Scrapy. Scrapy handles all the heavy load of coding for you, from creating project files and folders till handling duplicate URLs it helps you get heavy-power web scraping in minutes and provides you support for all common data formats that you can further input in other programs. This tutorial will surely help you understand Scrapy and its framework and what you can do with it. To become a master in Scrapy, you will need to go through all the fantastic functionalities it has to provide, but this tutorial has made you capable of scraping groups of web pages in an efficient way.
For further reading, you can refer to Offical Scrapy Docs.
Also, don't forget to check out DataCamp's Web Scraping with Python course.
Python related courses
Course
Course
Course
Tutorial
Sicelo Masango
Tutorial
Hugo Bowne-Anderson
Tutorial
Aditya Sharma
Tutorial
Abhishek Kasireddy
Tutorial
Olivia Smith
Tutorial
Abid Ali Awan