Course
MLOps Deployment and Life Cycling
4 hr
12K
Metaflow is a powerful framework for building and managing data workflows. In this tutorial, you’ll learn how to get started. Namely, we will touch on:
By the end of this article, you will have the necessary skills to streamline and scale your workflows efficiently!
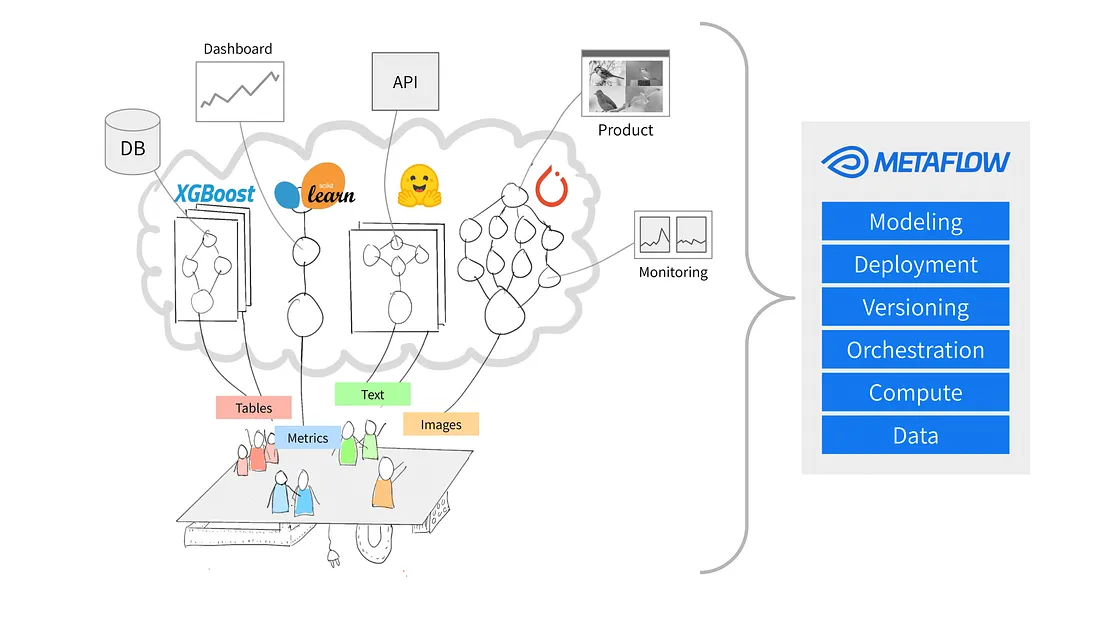
Source: Why Metaflow?
Metaflow is a Python framework designed to help manage data science projects. Netflix initially developed the tool to help data scientists and machine learning engineers be more productive. It achieves this objective by simplifying complex tasks, like workflow orchestration, which ensures that processes run smoothly from start to finish.
Key features of Metaflow include automatic data versioning, which tracks changes to your workflows, and support for scalable workflows, which enables users to handle larger datasets and more complex tasks.
Another perk of Metaflow is that it integrates easily with AWS. This means users can leverage cloud resources for storage and computing power. Additionally, its user-friendly Python API makes it accessible to both beginners and experienced users.
Let’s get started on setting it up.
Metaflow suggests that users install Python 3 rather than Python 2.7 for new projects. The documentation states that “Python 3 has fewer bugs and is better supported than the deprecated Python 2.7.”
The next step is to create a virtual environment to manage your project dependencies. Run the following command to do so:
python -m venv venv
source venv/bin/activate
This will create and activate a virtual environment. Once activated, you’re ready to install Metaflow.
Metaflow is available as a Python package for MacOS and Linux. The latest version can be installed from the Metaflow Github repository or PyPi by running the following command:
pip install metaflowUnfortunately, at the time of writing, Metaflow doesn’t offer native support for Windows users. However, users with Windows 10 can use WSL (Windows Subsystem for Linux) to install Metaflow, which enables them to run a Linux environment inside their Windows operating system. Check out the documentation for a step-by-step guide on installing Metaflow on Windows 10.
Metaflow offers seamless with AWS, which allows users to scale their workflows using cloud infrastructure. To integrate AWS, you’ll need to set up your AWS credentials.
Note: These steps assume you already have an AWS account and AWS CLI installed. For more details, follow the AWS documentation instructions.
pip install awscliaws configureFrom here, you will be prompted to enter your AWS Access Key ID and Secret Access Key—these are simply the credentials the AWS CLI uses to authenticate your requests to AWS. Note that you may also be prompted to enter your region and output format.
Once you have input these details, voila! Metaflow will automatically use your AWS credentials to run workflows.
Now that Metaflow is set up, it's time to build your first workflow. In this section, I’ll walk you through the basics of creating a flow, running it, and understanding how tasks and steps are organized in Metaflow.
By the end of this section, you will have a workflow that processes data and performs simple operations. Let’s go!
Metaflow uses the dataflow paradigm, which represents a program as a directed graph of operations. This approach is ideal for building data processing pipelines, especially in machine learning.
In Metaflow, the graph of operations is called a flow. A flow consists of a series of tasks broken into steps. Note that each step can be considered an operation represented as a node with transitions between steps acting as the edges of the graph.
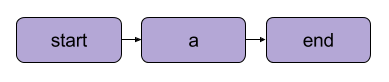
A Metaflow basic linear transition | Source: Metaflow documentation
There are a few structural rules for flows in Metaflow. For example, every flow must include a start step and an end step. When a flow executes, known as a run, it begins with the start step and is considered successful if it reaches the end step without errors.
What happens between the start and end steps is entirely up to you – as you will see in the next segment.
Here’s a simple flow to get started with. Note: The code can be run in DataLab.
from metaflow import FlowSpec, step

class MyFirstFlow(FlowSpec):
    @step
    def start(self):
        print("Starting the flow!")
        self.data = [1, 2, 3, 4, 5]  # Example dataset
        self.next(self.process_data)
    @step
    def process_data(self):
        self.processed_data = [x * 2 for x in self.data]  # Simple data processing
        print("Processed data:", self.processed_data)
        self.next(self.end)
    @step
    def end(self):
        print("Flow is complete!")

if __name__ == '__main__':
    MyFirstFlow()
In this flow:
start() step initializes the workflow and defines a dataset.process_data() step processes the data by doubling each element.end() step completes the flow.Each step uses the @step decorator, and you define the flow sequence using self.next() to connect the steps.
After writing your flow, save it as my_first_flow.py. Run it from the command line by using:
py -m my_first_flow.py runA new feature was added in Metaflow 2.12 that enables users to develop and execute flows in notebooks.
To execute a flow in a defined cell, all you must do is add the NBRunner one-liner on the last line of the same cell. For example:
from metaflow import FlowSpec, step, NBRunner

class MyFirstFlow(FlowSpec):
    @step
    def start(self):
        print("Starting the flow!")
        self.data = [1, 2, 3, 4, 5]  # Example dataset
        self.next(self.process_data)
    @step
    def process_data(self):
        self.processed_data = [x * 2 for x in self.data]  # Simple data processing
        print("Processed data:", self.processed_data)
        self.next(self.end)
    @step
    def end(self):
        print("Flow is complete!")

run = NBRunner(MyFirstFlow).nbrun()
If you get the following error:
“Metaflow could not determine your user name based on environment variables ($USERNAME etc.)”
Add the following to your code before the execution of Metaflow:
import os
if os.environ.get("USERNAME") is None:
    os.environ["USERNAME"] = "googlecolab"
In both instances, Metaflow will execute the flow step-by-step. Namely, it will display each step's output in the terminal as follows:
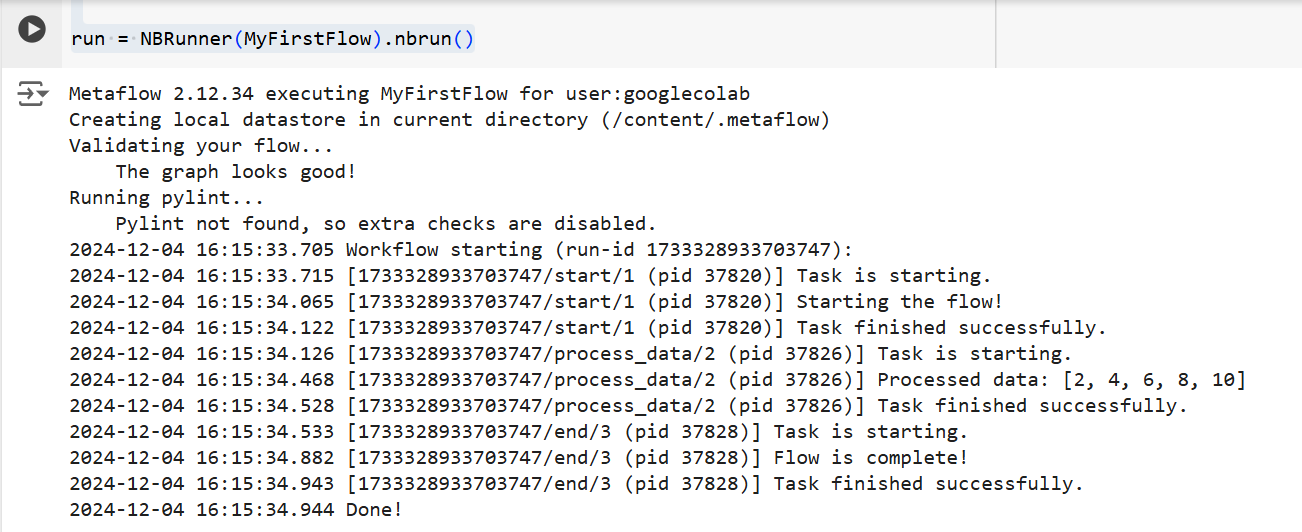
The output from the code above | Source: Image by author
Understanding the core concepts of Metaflow is essential for building efficient and scalable data workflows. In this section, I’ll cover three fundamental concepts:
These elements form the backbone of Metaflow's structure and execution of workflows, allowing you to manage complex processes easily.
We briefly touched on steps earlier in the article, but for the sake of clarity, we’ll revisit them again. The most important thing to understand about Metaflow workflows is that they are built around steps.
Steps represent each individual task within a workflow. In other words, each step will perform a specific operation (e.g., data loading, processing, modeling, etc.).
The example we created above in “Writing your first flow” was a linear transformation. In addition to sequential steps, Metaflow also enables users to branch workflows. Branch workflows allow you to run multiple tasks in parallel by creating separate paths for execution.
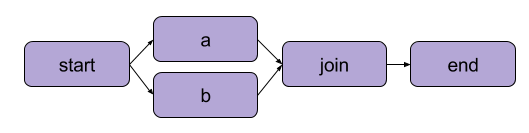
An example of branching | Source: Metaflow documentation
The major benefit of a branch is performance. Branching means Metaflow can execute various steps over multiple CPU cores or instances in the cloud.
Here’s what a branch would look like in code:
from metaflow import FlowSpec, step, NBRunner

class BranchFlow(FlowSpec):
    @step
    def start(self):
        print("Starting the flow!")
        self.data = [1, 2, 3, 4, 5]  # Example dataset
        self.next(self.split)
    @step
    def split(self):
        self.next(self.branch1, self.branch2)

    @step
    def branch1(self):
        # Code for branch 1
        print("This is branch 1")
        self.next(self.join)

    @step
    def branch2(self):
        # Code for branch 2
        print("This is branch 2")
        self.next(self.join)

    @step
    def join(self, inputs):
        # Merging branches back
        print("Branches joined.")
        self.next(self.end)

    @step
    def end(self):
        print("Flow is complete!")

run = NBRunner(BranchFlow).nbrun()|
💡TLDR: Branching allows users to design complex workflows that can simultaneously process multiple tasks. |
Data artifacts are variables that allow you to store and pass data between steps in a workflow. These artifacts persist the output of one step to the next—this is how data is made available for subsequent steps.
Essentially, when you assign data to self within a step in a Metaflow class, you save it as an artifact, which can then be accessed by any other step in the flow (see the comments in the code).
class ArtifactFlow(FlowSpec):
    @step
    def start(self):
        # Step 1: Initializing data
        print("Starting the flow!")
        self.data = [1, 2, 3, 4, 5]  # Example dataset saved as an artifact
        self.next(self.process_data)
    @step
    def process_data(self):
        # Step 2: Processing the data from the 'start' step
        self.processed_data = [x * 2 for x in self.data]  # Processing artifact data
        print("Processed data:", self.processed_data)
        self.next(self.save_results)
    @step
    def save_results(self):
        # Step 3: Saving the processed data artifact
        self.results = sum(self.processed_data)  # Saving final result as an artifact
        print("Sum of processed data:", self.results)
        self.next(self.end)
    @step
    def end(self):
        # Final step
        print("Flow is complete!")
        print(f"Final result: {self.results}")  # Accessing artifact in final step
Why are artifacts a core concept of Metaflow? Because they have a number of uses:
Metaflow automatically handles versioning for your workflows. This means each time a flow is executed, it is tracked as a unique run. In other words, each run has its own version, allowing you to easily review and reproduce past runs.
Metaflow does this by assigning unique identifiers to each run and preserving the data and artifacts from that execution. This persistence ensures that no data is lost between runs. Past workflows can easily be revisited and inspected, and specific steps can be rerun if required. As a result, debugging and iterative development are much more efficient, and maintaining reproducibility is simplified.
In this section, I'll guide you through using Metaflow to train a machine learning model. You’ll learn how to:
By the end, you'll better understand how to use Metaflow to structure and run machine learning workflows efficiently. Let’s go!
To begin, we will create a basic flow that loads a dataset, performs training, and outputs the model’s results.
Note: The code can be run in DataLab.
from metaflow import FlowSpec, step, Parameter, NBRunner

class TrainModelFlow(FlowSpec):
    @step
    def start(self):
        # Load and split the dataset
        print("Loading data...")
        self.data = [1, 2, 3, 4, 5]  # Replace with actual data loading logic
        self.labels = [0, 1, 0, 1, 0]  # Replace with labels
        self.next(self.train_model)

    @step
    def train_model(self):
        # Training a simple model (e.g., linear regression)
        print("Training the model...")
        self.model = sum(self.data) / len(self.data)  # Replace with actual model training
        print(f"Model output: {self.model}")
        self.next(self.end)

    @step
    def end(self):
        # Final step
        print("Training complete. Model ready for deployment!")f
In this code, we define three steps:
start(): Loads and splits the dataset. In a real-world scenario, you would load data from an actual source (e.g., a file or database).train_model(): Simulates the training of a model. Here, a simple average calculation is performed instead of an actual machine learning algorithm, but you can replace this with any training code you need.end(): Marks the end of the flow and signifies that the model is ready for deployment.Once you've defined the flow, you can run it using the following command:
run = NBRunner(TrainModelFlow)
run.nbrun()
Note that this code only works in notebooks (all code must be in one cell).
If you want to run this code as a script, remove the NBRunner commands and attach the following to the end of your script, and save it (e.g., “metaflow_ml_model.py”):
if __name__ == "__main__":
    TrainModelFlow()
Then, to run the script, navigate to the command line and run the following command:
py -m metaflow_ml_model.py Metaflow automatically tracks each run and lets you visualize results through the Metaflow UI.
So, how do we make the most out of Metaflow’s features? Here are a few best practices that can help you achieve this feat while optimizing your workflows simultaneously:
If you're new to Metaflow, begin with simple workflows to familiarize yourself with its API. Starting small will help you understand how the framework works and build confidence in its capabilities before moving on to more complex projects. This approach reduces the learning curve and ensures that your foundation is solid.
Metaflow includes a powerful user interface that can be extremely helpful for debugging and tracking your workflows. Use the UI to monitor runs, check the outputs of individual steps, and identify any issues that might arise. Visualizing your data and logs makes it easier to identify and fix problems during the execution of your flow.
When you first install Metaflow, it operates in local mode. In this mode, artifacts and metadata are saved in a local directory, and computations are run using local processes. This setup works well for personal use, but if your project involves collaboration or large datasets, it's advisable to configure Metaflow to utilize AWS for better scalability. The good thing here is that Metaflow provides excellent integration with AWS.
In this tutorial, we explored how to get started with Metaflow, from installation to building your first data science workflow. We covered the core concepts, such as defining steps, using data artifacts to pass data between steps, and versioning to track and reproduce runs. We also walked through a practical example of training a machine learning model, which demonstrated how to define, run, and monitor your workflow. Lastly, we touched on some best practices to help you get the most out of Metaflow.
To continue your learning of MLOps, check out the following resources:
Learn more about Python and machine learning with these courses!
Course
Course
Course
Tutorial
Karlijn Willems
Tutorial
Moez Ali
Tutorial
Moez Ali
Tutorial
Nadia mhadhbi
Tutorial
Moez Ali
Tutorial
Jake Roach