Course
Working with the OpenAI API
3 hr
141.6K
GLM-4.7 is your new coding partner, designed to perform better in real development workflows. Compared to GLM-4.6, it shows clear gains in multilingual and agentic coding, terminal-based tasks, and tool use, with strong results on SWE-bench, SWE-bench Multilingual, and Terminal Bench 2.0. It also supports thinking before acting, making it more reliable for complex tasks in modern agent frameworks.
In this tutorial, we jump straight into setting up a Runpod environment, installing all required dependencies, and cloning llama.cpp with full CUDA support. We then download the GLM-4.7 2-bit model from Hugging Face, run it using both the CLI and server modes, and finally test the running server using the OpenAI SDK.
You can also check out our guide to running GLM 4.7 Flash locally.
Before running GLM-4.7 locally, make sure your system meets the requirements below.
An NVIDIA GPU is required for usable performance.
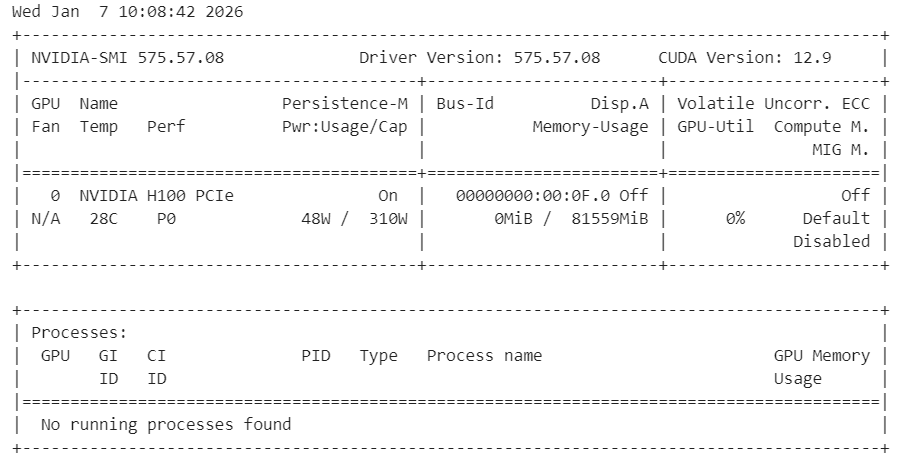
Install the latest NVIDIA drivers and verify the installation with:
nvidia-smiIf this command works and shows your GPU, the driver setup is correct.
CUDA is required for GPU acceleration when running GLM-4.7. If you are building llama.cpp from source, CUDA must be correctly detected at build time.
When using prebuilt CUDA-enabled binaries, a working CUDA runtime must already be installed on the system. Without CUDA support, GLM-4.7 will fall back to CPU execution, which is impractically slow for real use.
GLM-4.7 is extremely large, even when quantized. Whether the model runs at all, and how fast it runs, depends on your combined memory, not just GPU VRAM.
Think in terms of GPU VRAM + system RAM together.
For GLM-4.7, H100 GPU size alone is not enough. Stable and fast inference depends on the total available memory, combining both GPU VRAM and system RAM.
For this tutorial, we will use RunPod because it is quick to set up and offers a wide range of GPUs that are available on demand.
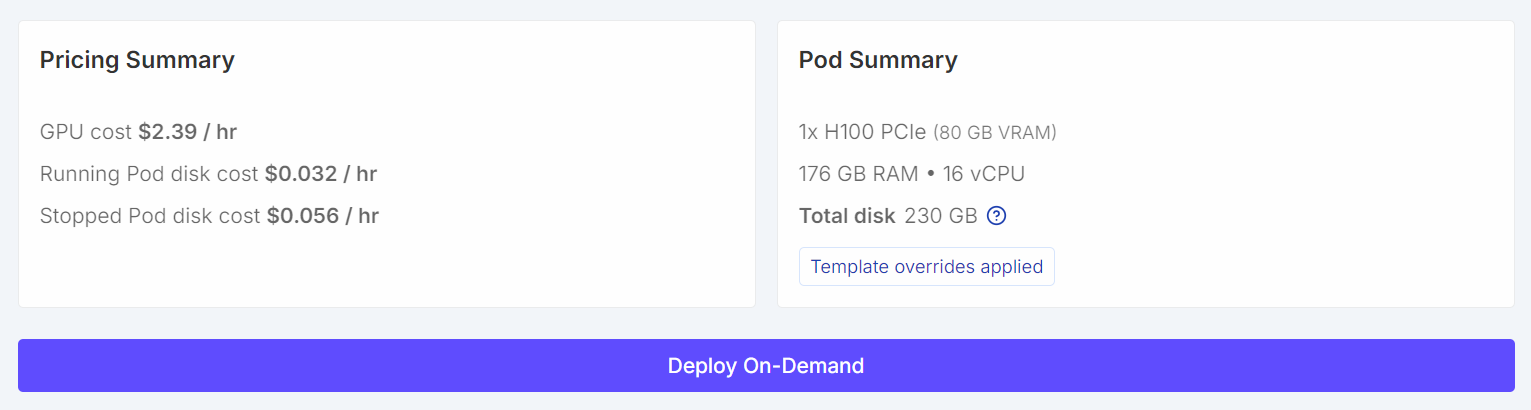
Start by creating a new pod. Select the latest PyTorch image, then click Edit on the template settings. Increase the volume disk size to 200 GB, since the GLM-4.7 model is very large, even in 2-bit quantized form.
Next, expose the required ports. Keep the default 8080 port for JupyterLab, and add an additional port that will later be used by the llama.cpp server.
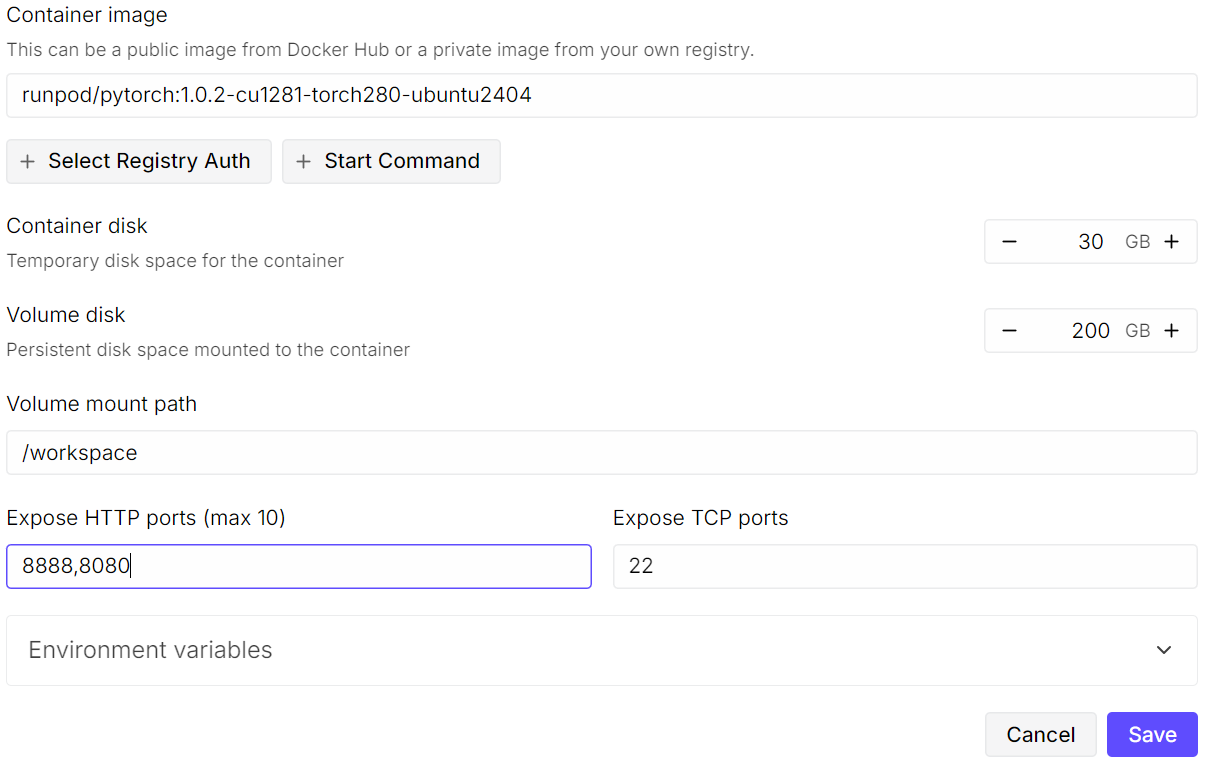 Once configured, your pricing summary and pod summary should clearly show that the default template has been overridden with a larger volume size.
After the pod starts, click the Jupyter Notebook link to launch JupyterLab. Create a new notebook and run the following setup code.
import os

WORKDIR = "/workspace"
LLAMA_DIR = f"{WORKDIR}/llama.cpp"
MODEL_DIR = f"{WORKDIR}/models/unsloth/GLM-4.7-GGUF"

os.makedirs(MODEL_DIR, exist_ok=True)

# Put Hugging Face cache on /workspace (big speed win on RunPod)
os.environ["HF_HOME"] = f"{WORKDIR}/.cache/huggingface"
os.environ["HUGGINGFACE_HUB_CACHE"] = f"{WORKDIR}/.cache/huggingface/hub"
os.environ["HF_HUB_CACHE"] = f"{WORKDIR}/.cache/huggingface/hub"
os.environ["HF_HUB_DISABLE_SYMLINKS_WARNING"] = "1"

# Enable HF Xet high performance (Xet backend)
os.environ["HF_XET_HIGH_PERFORMANCE"] = "1"

print("WORKDIR:", WORKDIR)
print("LLAMA_DIR:", LLAMA_DIR)
print("MODEL_DIR:", MODEL_DIR)
print("HF_HOME:", os.environ["HF_HOME"])
print("HF_HUB_CACHE:", os.environ["HF_HUB_CACHE"])
print("HF_XET_HIGH_PERFORMANCE:", os.environ["HF_XET_HIGH_PERFORMANCE"])
This code will:
/workspace as the main working directory on RunPod.llama.cpp will be cloned and built./workspace for faster downloads and more disk space.You should see output similar to this:
WORKDIR: /workspace
LLAMA_DIR: /workspace/llama.cpp
MODEL_DIR: /workspace/models/unsloth/GLM-4.7-GGUF
HF_HOME: /workspace/.cache/huggingface
HF_HUB_CACHE: /workspace/.cache/huggingface/hub
HF_XET_HIGH_PERFORMANCE: 1
Next, verify that the NVIDIA drivers are installed correctly and that the GPU is visible.
!nvidia-smiYou should see an H100 GPU with 80 GB of available VRAM, confirming that the environment is ready for GPU acceleration.
Finally, install the system dependencies required to build llama.cpp from source.
%%capture
!apt-get update -y
!apt-get install -y build-essential cmake curl libcurl4-openssl-dev git pciutils
Note: We have used %%capture to hide verbose installation logs in Jupyter while still running the commands.
In this step, we clone and build llama.cpp from source with CUDA enabled to ensure optimal GPU performance.
First, clone the official repository into the workspace.
!git clone https://github.com/ggml-org/llama.cpp /workspace/llama.cppNext, configure the build with CUDA support enabled and shared libraries disabled.
%%capture
!cmake /workspace/llama.cpp -B /workspace/llama.cpp/build -DBUILD_SHARED_LIBS=OFF -DGGML_CUDA=ON -DLLAMA_CURL=ON
Then build the required binaries in release mode.
%%capture
!cmake --build /workspace/llama.cpp/build --config Release -j --clean-first --target llama-cli llama-server
After the build completes, copy the binaries to the main directory and verify the output.
%%capture
!cp /workspace/llama.cpp/build/bin/llama-* /workspace/llama.cpp/
!ls -la /workspace/llama.cpp | sed -n '1,60p'
At this point, llama.cpp is ready with full CUDA support and can be used to run GLM-4.7 via the CLI or server.
In this step, we install the Hugging Face libraries with Xet and HF Transfer support to significantly speed up large model downloads. Xet provides much faster performance than Git LFS, which is essential for downloading GLM-4.7 efficiently.
First, install the required Hugging Face dependencies and enable HF Transfer.
!pip -q install -U "huggingface_hub[hf_xet]" hf-xet
!pip -q install -U hf_transfer
Enable HF Transfer by setting the environment variable.
import os
os.environ["HF_HUB_ENABLE_HF_TRANSFER"] = "1"
After installing these packages, restart the Jupyter kernel to ensure the new settings take effect.
Next, download the GLM-4.7 GGUF model from Hugging Face using snapshot_download. We restrict the download to the recommended dynamic 2-bit quantization to reduce storage and memory usage.
from huggingface_hub import snapshot_download

snapshot_download(
    repo_id="unsloth/GLM-4.7-GGUF",
    local_dir=MODEL_DIR,
    allow_patterns=["*UD-Q2_K_XL*"],  # recommended dynamic 2-bit
)
print("Downloaded into:", MODEL_DIR)
With Xet and HF Transfer enabled, download speeds can reach 726 MB per second and later scale up to 1.2 GB per second. Without this setup, download speeds are typically around 50 MB per second, which can take nearly a full day to download a model of this size.

Once the download finishes, the GLM-4.7 model will be available locally in the workspace model directory, ready for inference with llama.cpp.

We will now run GLM-4.7 in interactive mode using the llama.cpp CLI.
Start by opening a terminal inside JupyterLab. Click the Plus (+) button in JupyterLab, scroll down, and select Terminal. This will open a new shell session inside the RunPod environment.
In the terminal, run the following command to launch the interactive CLI.
 /workspace/llama.cpp/llama-cli \
  --model "/workspace/models/unsloth/GLM-4.7-GGUF/UD-Q2_K_XL/GLM-4.7-UD-Q2_K_XL-00001-of-00003.gguf" \
  --jinja \
  --threads -1 \
  --ctx-size 16384 \
  --temp 1.0 \
  --top-p 0.95 \
  --seed 3407 \
  --fit on
This command loads the GLM-4.7 dynamic 2-bit model and starts an interactive chat session. The --fit on flag allows llama.cpp to automatically offload as many layers and KV cache blocks as possible to the GPU, while safely spilling the remaining components to system RAM. This removes the need for manual layer tuning and helps avoid out-of-memory errors.
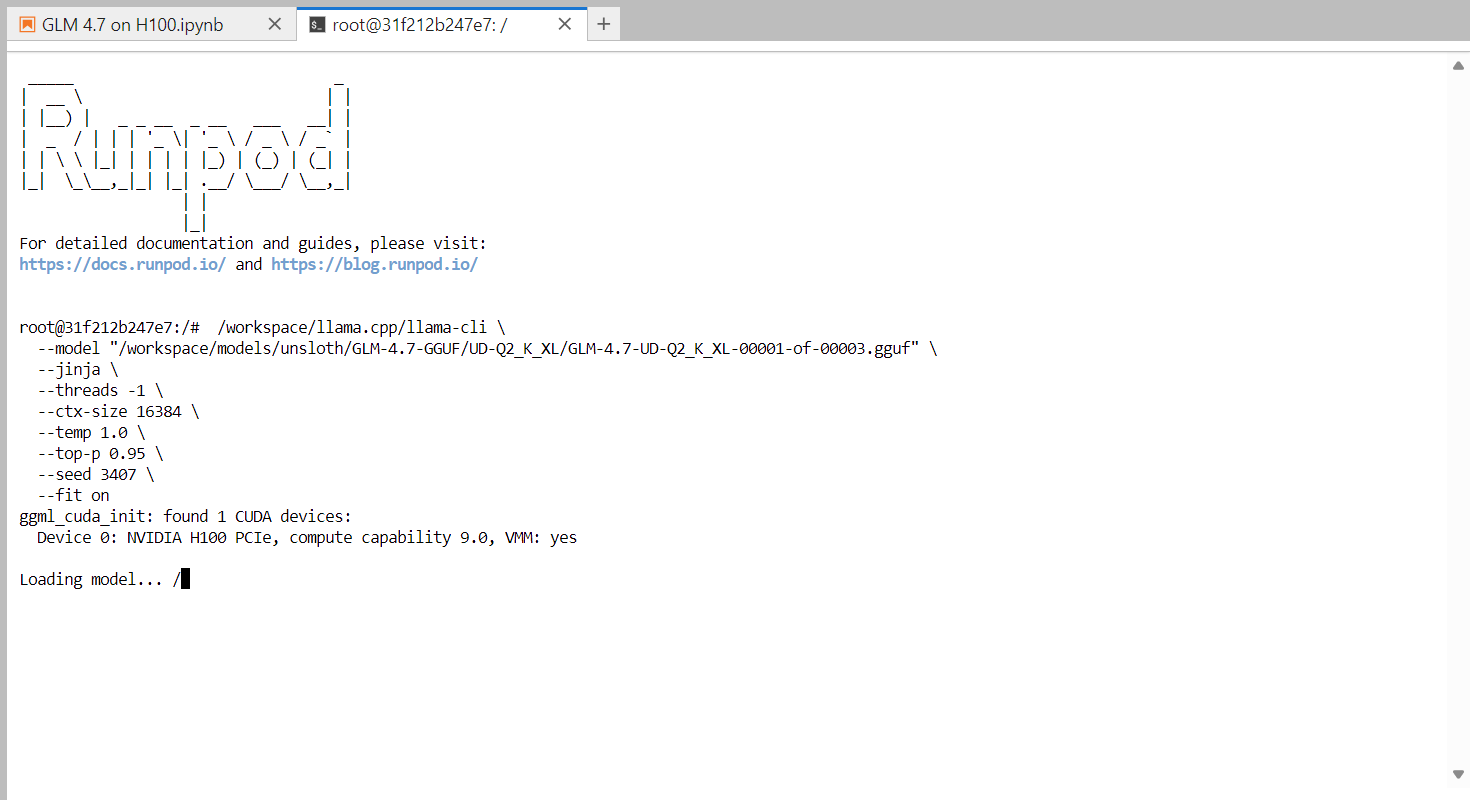
Once the model finishes loading, you will see the llama.cpp banner followed by an interactive prompt. You can now type a message, such as a simple greeting, and the model will begin generating responses.
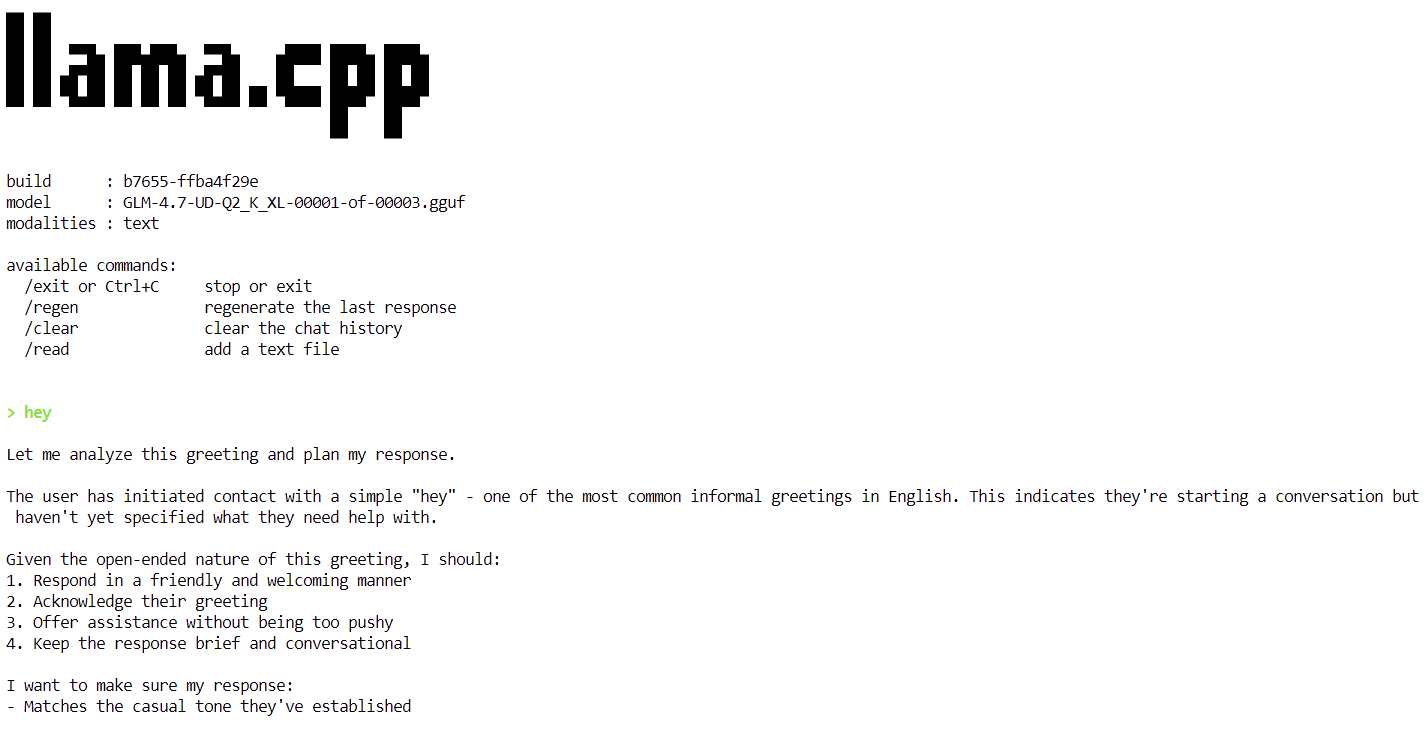
At the end of each response, llama.cpp prints performance statistics, including token generation speed. At this stage, the model runs at approximately 2.2 tokens per second, which confirms that the model is working correctly on a single H100 GPU.

In the next steps, we will apply additional optimizations to increase throughput and move closer to the target of 20 tokens per second.
In this step, we run GLM-4.7 as a persistent inference server using llama.cpp, optimized for a single H100 PCIe GPU. These settings are tuned to improve throughput, stability, and memory efficiency when serving requests.
To achieve stable and efficient performance, the following optimizations are used:
--fit on): Automatically offloads as much of the model and KV cache to GPU memory as possible, safely spilling the remainder to system RAM. This avoids manual layer tuning and prevents out-of-memory errors.--flash-attn auto): Enables optimized attention kernels on supported GPUs such as the H100, significantly improving token generation speed and reducing memory overhead.--ctx-size 8192): Large context windows slow decoding over time. Reducing the context size from 16k to 8k provides more consistent token throughput for most workloads.--batch-size, --ubatch-size): Improves GPU utilization and overall throughput by processing tokens in larger, more efficient batches.--threads 32): Prevents CPU oversubscription and reduces scheduling overhead in cloud environments like RunPod.Run the following command in the terminal to start the GLM-4.7 inference server.
/workspace/llama.cpp/llama-server \
--model "/workspace/models/unsloth/GLM-4.7-GGUF/UD-Q2_K_XL/GLM-4.7-UD-Q2_K_XL-00001-of-00003.gguf" \
--alias "GLM-4.7" \
--threads 32 \
--host 0.0.0.0 \
--ctx-size 8192 \
--temp 1.0 \
--top-p 0.95 \
--port 8080 \
--fit on \
--prio 3 \
--jinja \
--flash-attn auto \
--batch-size 1024 \
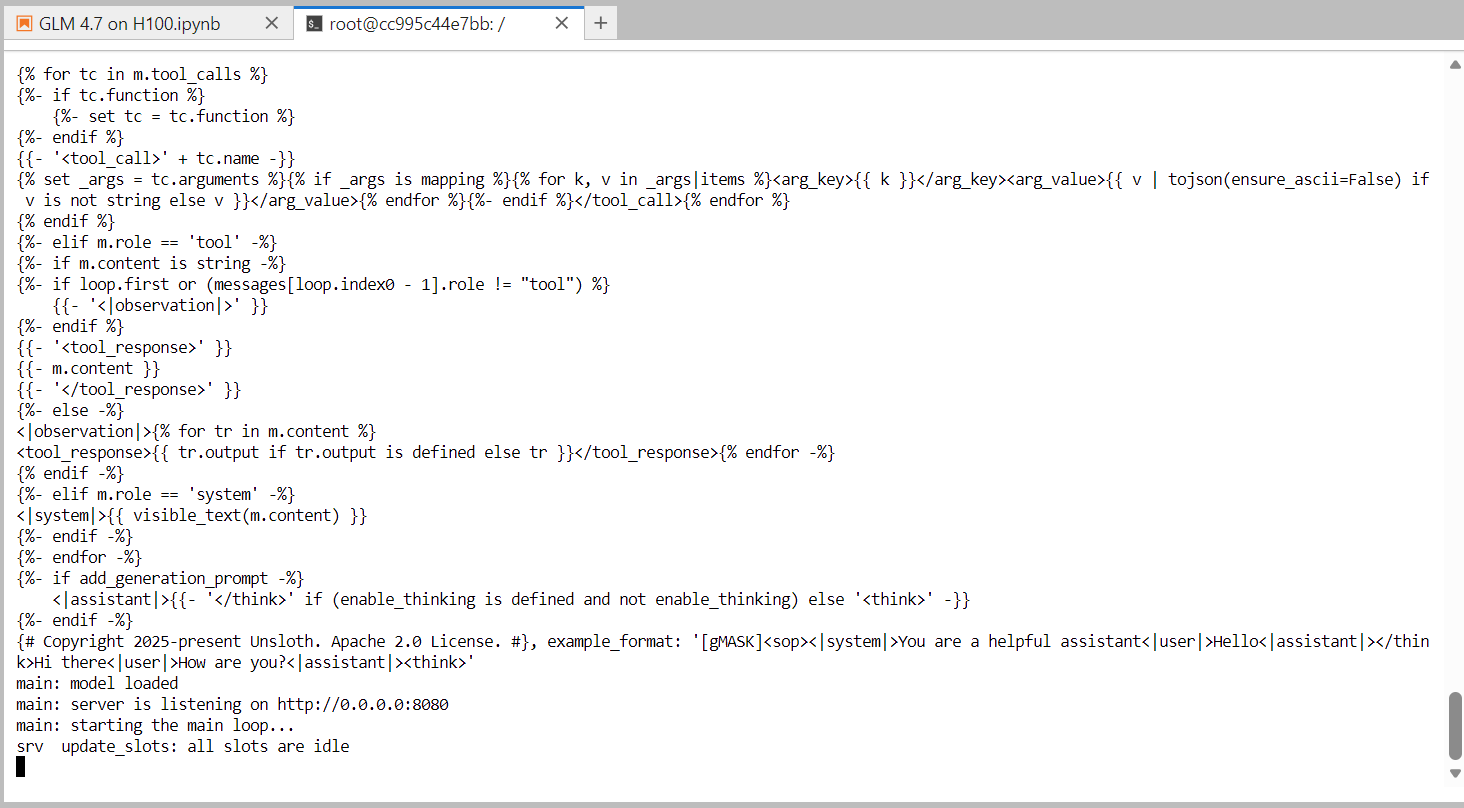
--ubatch-size 256Once the model finishes loading, the server starts listening on port 8080 and is ready to accept inference requests. At this point, GLM-4.7 is running as a high-performance inference service on a single H100 GPU.
In the next step, we will test the server using the built-in web UI that comes with the llama.cpp server.
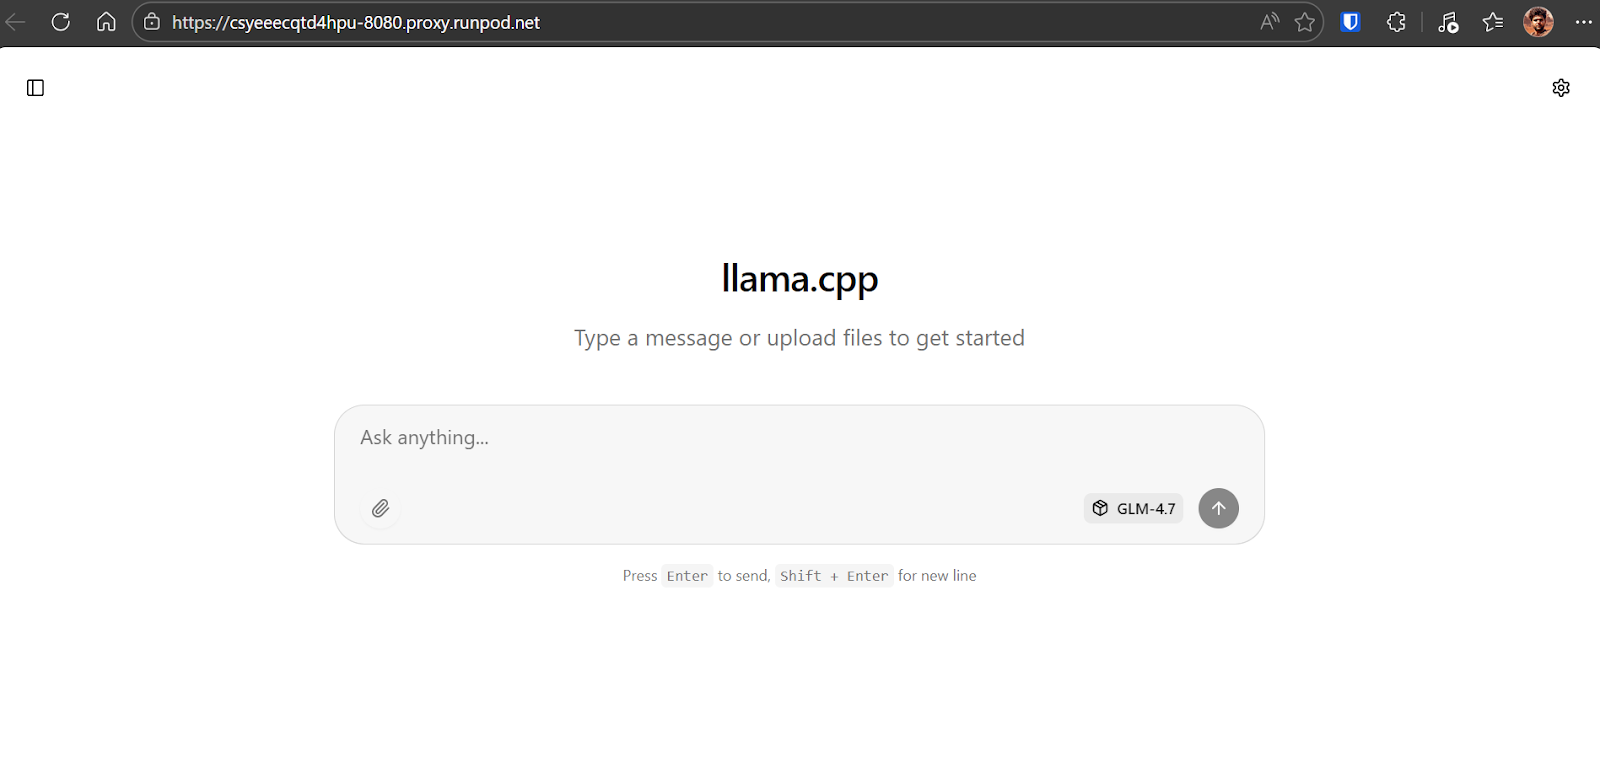
To test the running inference server, open your RunPod dashboard and locate the exposed HTTP service on port 8080. Click the link, and it will launch the llama.cpp web UI in your browser.

The llama.cpp web UI is similar to ChatGPT. It allows you to enter prompts, attach files, adjust settings, and select available models from the interface.
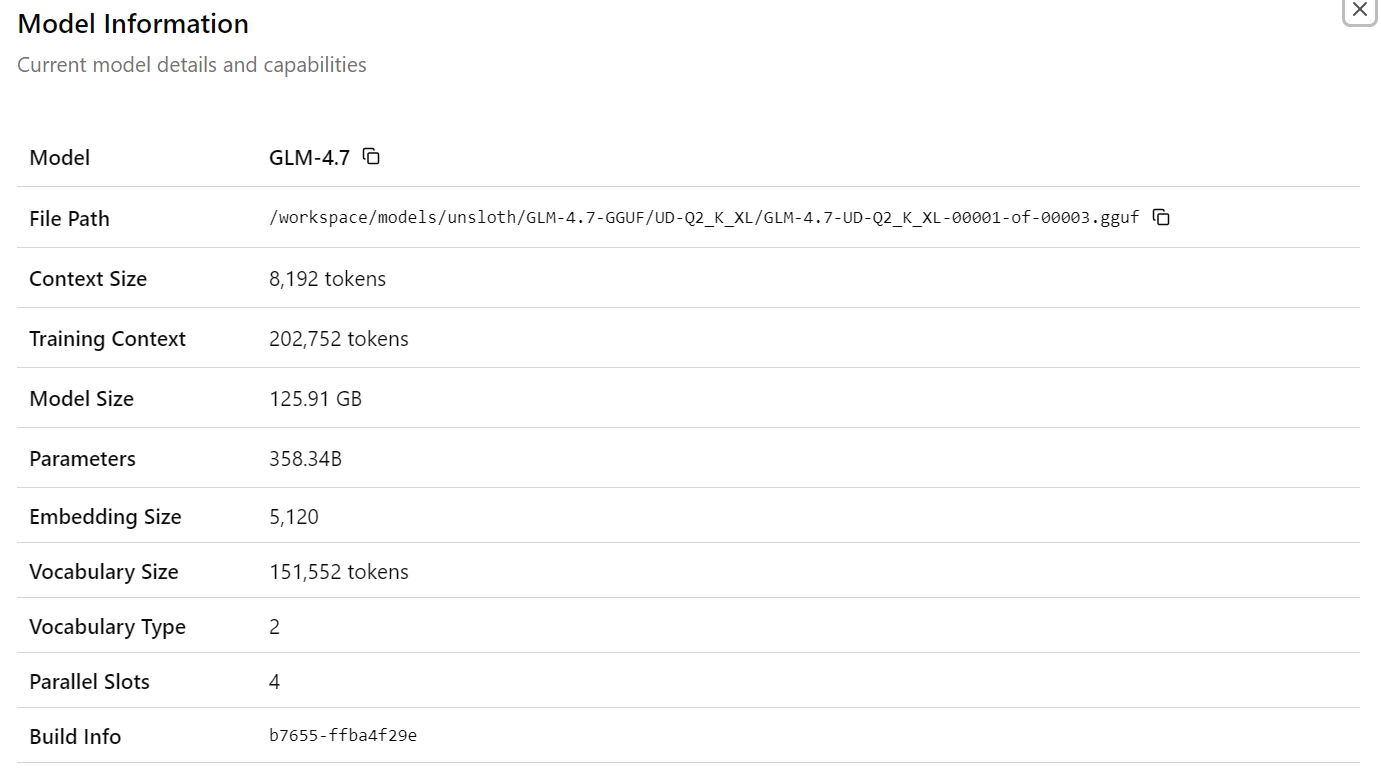
After selecting the GLM-4.7 model, you will see detailed information about the loaded model, including file paths, context size, model size, parameter count, embedding dimensions, and other runtime details. This confirms that the correct model and configuration are active.
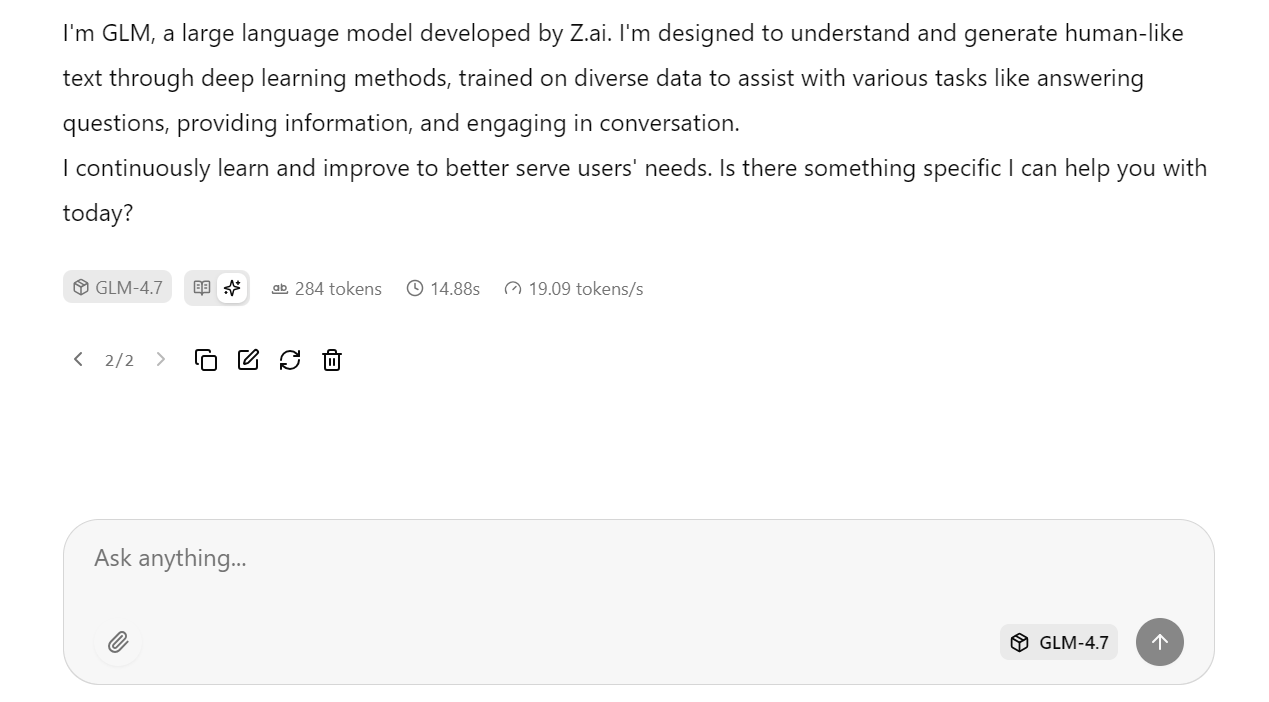
Now enter your first prompt. Within a second, the model will begin generating a response directly in the web UI.
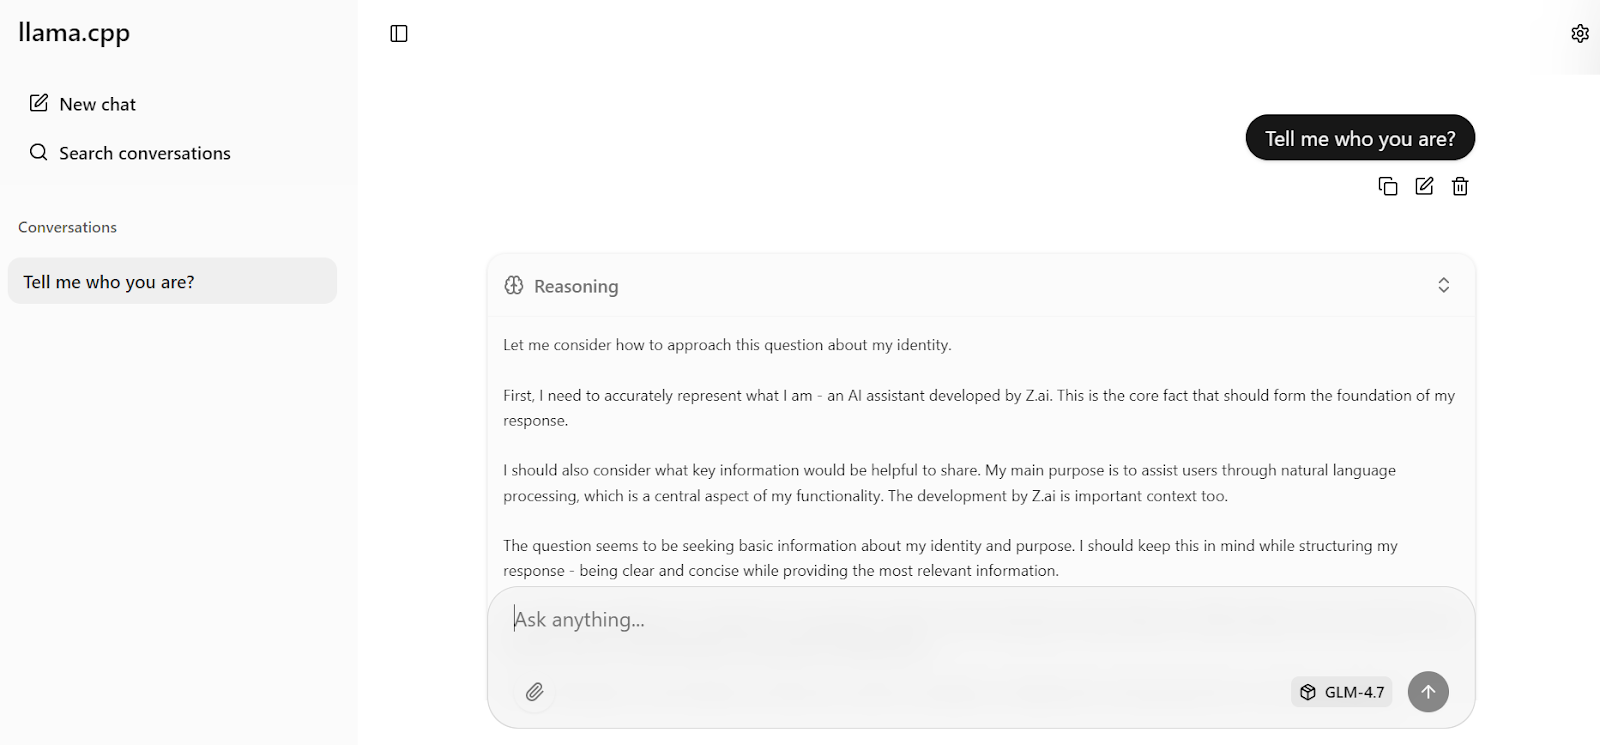
With the optimized server settings applied earlier, the model achieves around 19 tokens per second, which confirms that the inference pipeline is working efficiently. The responses are accurate and coherent.
You can then ask a follow-up question, such as a general knowledge query. In testing, GLM-4.7 consistently reaches around 20 tokens per second, including both reasoning and response tokens, demonstrating stable high performance on a single H100 GPU.

In this section, we will test the running llama.cpp inference server using the OpenAI-compatible Python SDK. This confirms that the server works correctly for programmatic access and can be integrated into real applications.
First, return to the Jupyter Notebook. Make sure the llama-server process is still running in the terminal and do not stop or restart it.
To verify that the server is active and listening on port 8080, run the following command:
!ss -lntp | grep 8080 || trueYou should see output similar to this, confirming that llama-server is listening:
LISTEN 0 512 0.0.0.0:8080 0.0.0.0:* users:(("llama-server",pid=1108,fd=15))Next, install the OpenAI Python SDK, which we will use to send requests to the local server.
!pip -q install openaiNow, create an OpenAI client that points to the local llama.cpp server. The API key value is not required, but must be provided for compatibility.
from openai import OpenAI
client = OpenAI(
base_url="http://127.0.0.1:8080/v1",
api_key="sk-no-key-required",
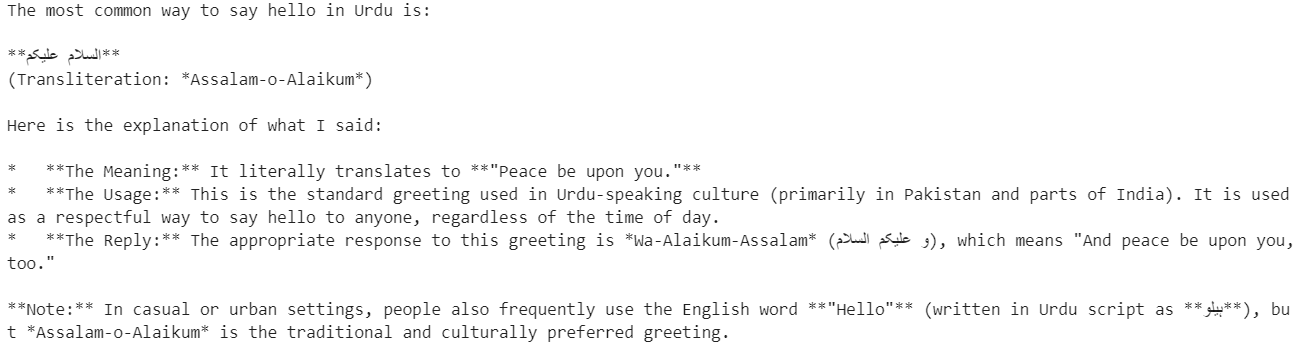
)Send a simple chat completion request to test multilingual capabilities.
resp = client.chat.completions.create(
    model="GLM-4.7",
    messages=[{"role": "user", "content": "Say hello in Urdu and explain what you said."}],
    temperature=0.7,
)

print(resp.choices[0].message.content)
The model responds in Urdu and provides a clear explanation of each word, demonstrating both multilingual understanding and reasoning capability.
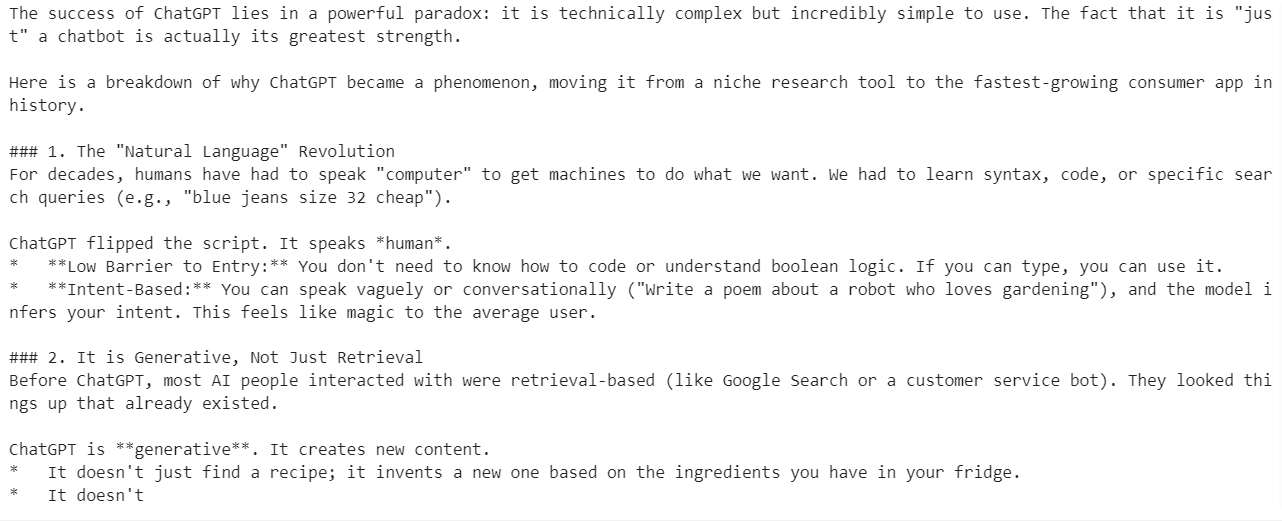
Next, test streaming inference, which is critical for real-time applications such as chat interfaces.
from openai import OpenAI

client = OpenAI(
    base_url="http://127.0.0.1:8080/v1",
    api_key="sk-no-key-required",
)

stream = client.chat.completions.create(
    model="GLM-4.7",
    messages=[
        {
            "role": "user",
            "content": "What makes ChatGPT so successful and popular, given that it's "just" a chatbot?"
        }
    ],
    temperature=0.7,
    stream=True,
)

for event in stream:
    choice = event.choices[0]
    if getattr(choice, "delta", None) and getattr(choice.delta, "content", None):
        text = choice.delta.content
        print(text, end="", flush=True)
        full_text.append(text)
The response streams smoothly, token by token, confirming that llama.cpp streaming works reliably with GLM-4.7. The generated answer is coherent, well-structured, and accurate, making this setup suitable for production-style workloads.
At this point, GLM-4.7 is fully operational through both the web UI and the OpenAI-compatible API, running efficiently on a single H100 GPU with optimized settings.
llama.cpp has matured rapidly over the past few months, to the point where it can fully replace tools like Ollama and other local chat applications for running large language models.
It offers a highly configurable and fast inference engine, a terminal-based CLI for interactive use, and a built-in web UI that closely resembles the ChatGPT experience.
You also gain fine-grained control over model behavior through runtime flags and UI settings, allowing you to tune performance and quality based on your hardware.
One important takeaway is that you do not need enterprise hardware to run GLM-4.7. With sufficient system RAM and a GPU such as an RTX 3090, the 2-bit GLM-4.7 model can run locally by using --fit on and applying the right llama.cpp optimizations.
The llama.cpp ecosystem has a large and active community, making it easy to find optimized configurations and help when tuning for specific GPUs or workloads.
In this tutorial, we set up the RunPod environment, built llama.cpp with CUDA support, downloaded the GLM-4.7 model using high-speed Hugging Face transfers, and ran the model in interactive mode. We then launched an optimized inference server, tested it through the web UI, and validated it programmatically using the OpenAI-compatible API.
The result is a fully local, high-performance GLM-4.7 deployment that delivers strong accuracy and near real-time inference on a single GPU. This setup is well-suited for experimentation, research, and even production-style workloads where control, performance, and transparency matter.
Top DataCamp Courses
Course
Course
Course
Tutorial
Abid Ali Awan
Tutorial
Abid Ali Awan
Tutorial
Abid Ali Awan
Tutorial
Abid Ali Awan
Tutorial
Abid Ali Awan
Tutorial
Abid Ali Awan