Course
Data Preparation in Excel
3 hr
85.3K
Gain the skills to maximize Excel—no experience required.
Excel normally shows results, not the formulas that produce them. That’s efficient for day-to-day work, but it hides the logic needed when something requires review.
When a number looks wrong, displayed formulas make it easier to diagnose the issue. Instead of hunting through individual cells, you can scan the sheet and spot problems immediately, such as:
Broken references: A formula pointing to a deleted cell returns errors like #REF!.
Incorrect ranges: Totals may skip rows or columns because the formula only covers part of the data.
Faulty logic: Conditions, operators, or calculation order may not match the intended logic.
Inconsistent formulas: One cell in a column may follow a different pattern than the rest.
Hardcoded values: A result may look calculated, but actually contains a fixed number.
Showing formulas is also one of the fastest ways to understand how a spreadsheet works if it wasn’t built by you.
This is particularly helpful in two situations:
This approach works well with spreadsheets that rely on:
Cross-sheet references like =Revenue!F2
Conditional logic like =IF(C2="Paid","Yes","No")
Lookup formulas like =XLOOKUP(A2,Products[ID],Products[Price])
Excel includes a built-in feature that displays all formulas at once. Here are three quick and easy ways to show all formulas in a worksheet:
The fastest way to show formulas is to use a keyboard shortcut.
Here’s how:
` key; it looks like a backwards apostrophe. You can find it between the esc and tab keys on the keyboard.Note: Press the same shortcut again to switch back to normal view.
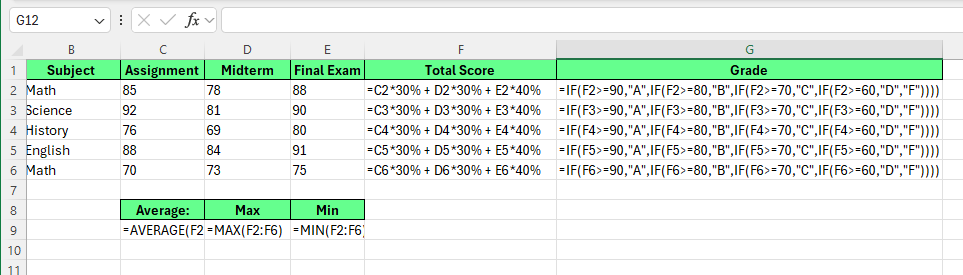
Display all the formulas using keyboard shortcut. Image by Author.
Here, Excel replaces all results with their formulas across the entire worksheet. It will automatically expand column widths to fit longer formulas.
Note: This shortcut affects only the active worksheet. Other sheets in the same workbook remain unchanged.
We can do the same thing using a feature available on the Excel ribbon:
Excel switches the worksheet to formula view immediately.
To turn it off, click Show Formulas again.
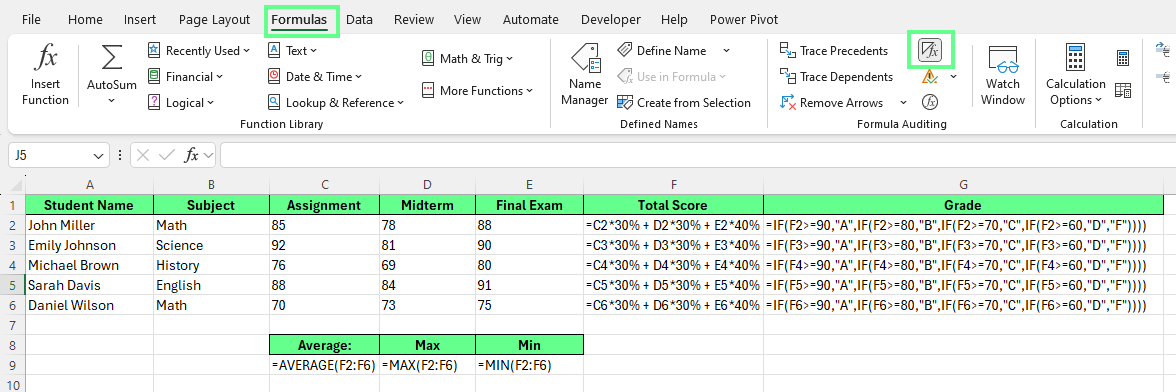
Show all the formulas using the Ribbon button. Image by Author.
Excel Options is another way to display formulas in cells.
To do this:
Now, when we enter a formula into a cell, it will only display the formula, not the result.
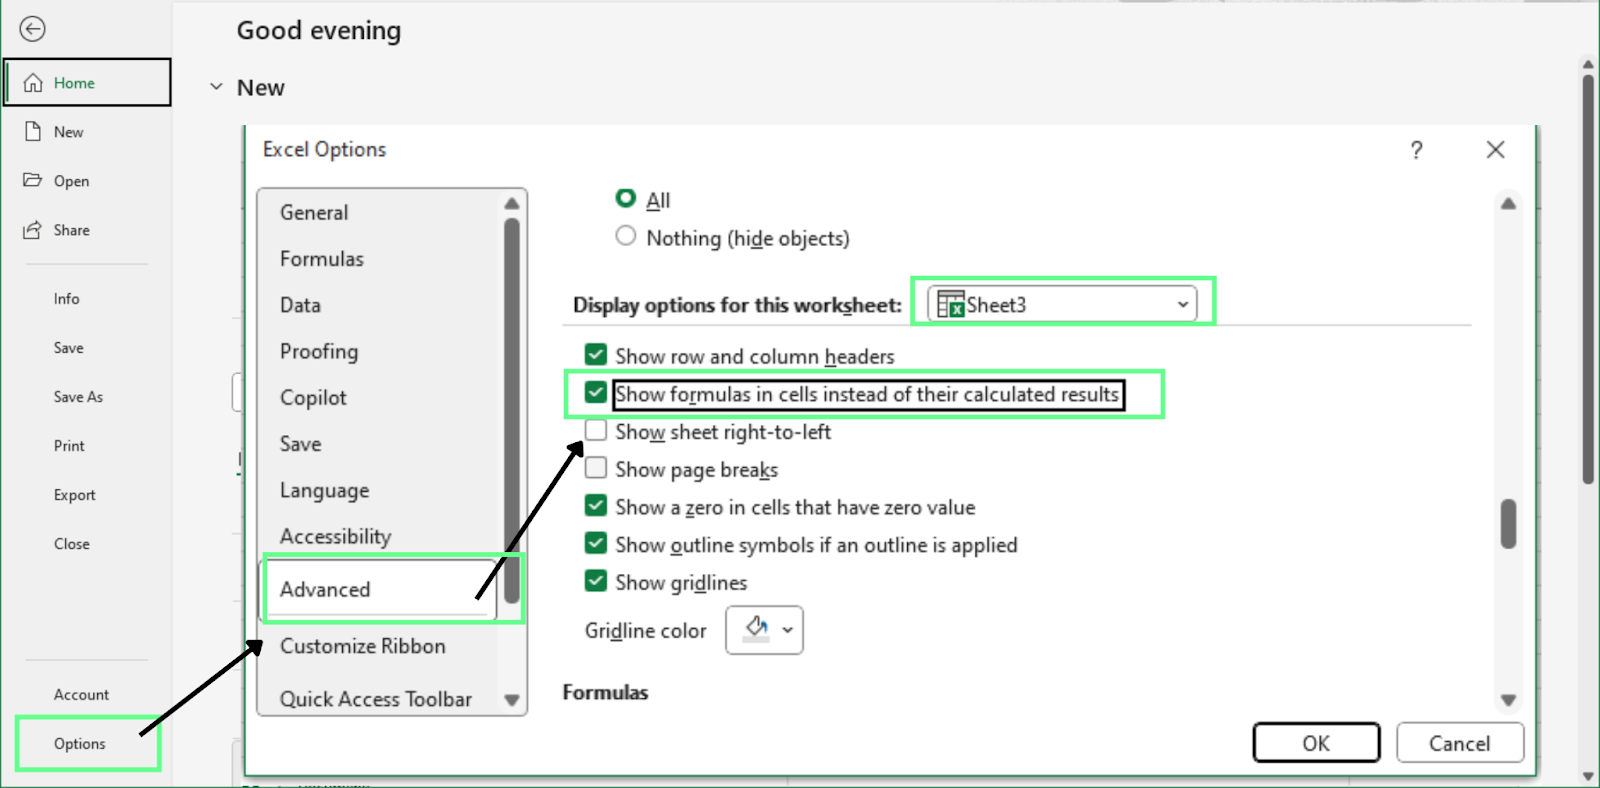
Display the formulas using the Excel Options menu. Image by Author.
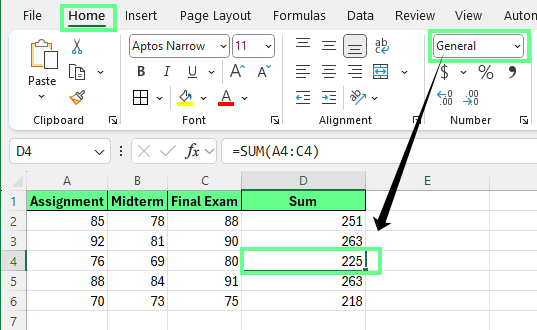
Sometimes we don’t want to see every formula in a worksheet. Instead, we want to see a single cell formula.
The simplest way to check a formula in individual cells is to use the formula bar:
Excel shows the full formula in the formula bar while the cell shows the result.
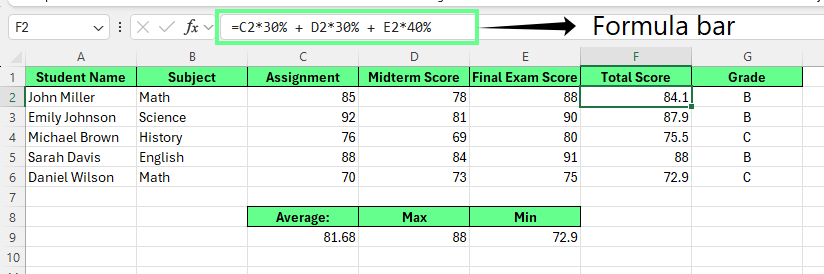
Show the formula of a single cell in the formula bar. Image by Author.
In this method, the worksheet stays unchanged, and Excel shows the formula without expanding the layout or affecting other cells.
Note: If the formula bar is hidden, enable it by going to View > Formula Bar.
Sometimes, you want formulas to appear inside cells as text instead of being calculated. This is common when you’re creating training materials, writing documentation, or sharing examples where the formula itself matters more than the result.
Excel gives you two reliable ways to do this:
Use an apostrophe to turn a formula into text
Use the FORMULATEXT() function to display an existing formula
Each method works slightly differently and is helpful in different situations.
The quickest way to display a formula as text is to add an apostrophe before it. Excel then treats the formula as plain text and does not calculate it. Here’s how to do this:
Double-click the cell, or select it and click in the formula bar
Type an apostrophe (') before the formula
Press Enter
Excel will display the formula exactly as written in the cell, without calculating it.
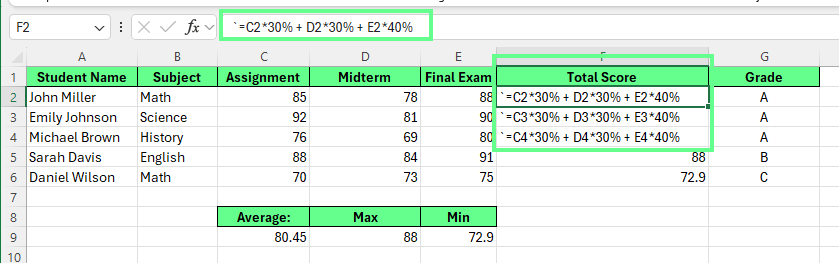
Display formula in cells using an apostrophe. Image by Author.
You can also use Find & Replace to apply this approach more quickly:
Go to the Home tab > Find & Select > Replace. Or press Ctrl + H
In Find what, enter =
In Replace with, enter '= (apostrophe followed by equals sign)
Click Find Next > Replace to update one formula at a time. If you don’t press Find Next, it will throw an error pop-up. Or click Replace All to update all formulas in the worksheet
Excel will stop calculating those formulas and display them as text instead.
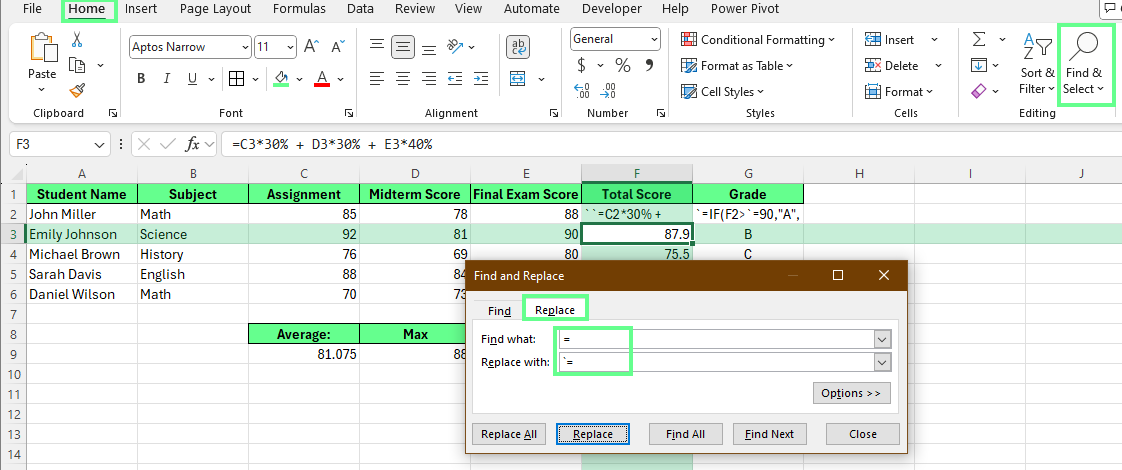
Display formulas of a cell using the Find & Select option. Image by Author.
Note: This method affects other formulas linked to the same cells.
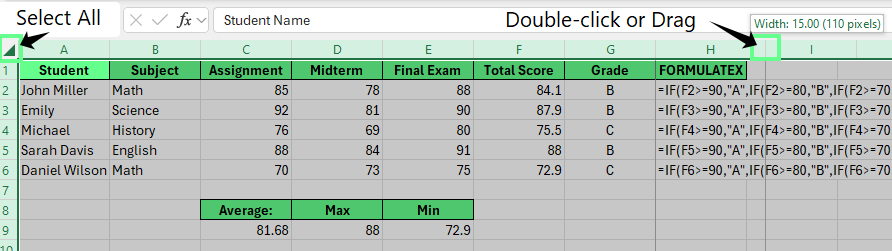
The FORMULATEXT() function displays a formula from another cell as text, while leaving the original formula intact. This is helpful when formulas may change and you want the displayed text to update automatically.
Here’s how to use this function:
Click an empty cell
Enter the formula: =FORMULATEXT(reference)
Replace reference with the cell that contains the formula you want to display
For example, you can display the formulas from G2:G6 in H2:H6 by referencing each corresponding cell.
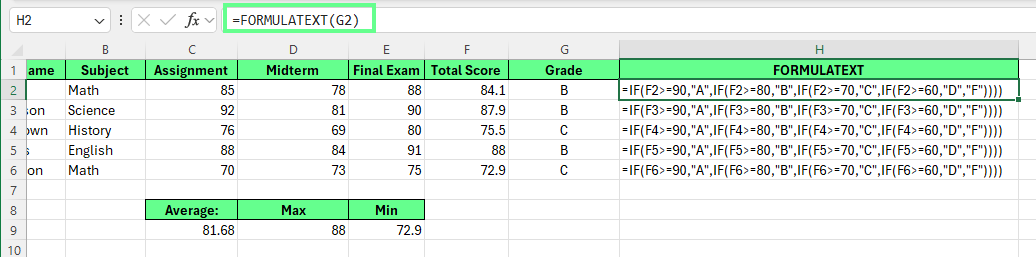
Display the formulas as text using FORMULATEXT(). Image by Author.
Tip:
Use apostrophes for static examples and teaching files.
Use FORMULATEXT() when formulas may change and need to stay visible.
When you turn on formula view, Excel prioritizes showing the full formula, not preserving your layout. Columns may expand, text can wrap, and cells may look cluttered. That’s normal, but it doesn’t mean you have to live with a messy worksheet.
With a few small adjustments, you can keep formulas visible and maintain a readable layout.
Formulas are usually longer than the values they calculate. When they are shown, Excel widens columns so the entire formula fits on one line.
You have a couple of easy ways to manage this:
Option 1: Set column widths before showing formulas
If layout is important, resize your columns first. Excel keeps those widths when you turn on formula view, even if the formulas are longer than the cell.
This works well for training files or screenshots where consistency matters.
Option 2: Auto-fit columns intentionally
If you want Excel to adjust columns automatically:
Excel then widens columns based on the longest visible formula.
Fix the column width. Image by Author.
After you finish reviewing formulas, you can turn formula view off and auto-fit the columns again to return the sheet to a normal layout.
Long formulas can become hard to read if Wrap Text is enabled. Excel may break a single formula across multiple lines inside the same cell, which quickly looks cluttered.
To keep formulas on one line:
This keeps formulas on a single line, making them easier to scan.
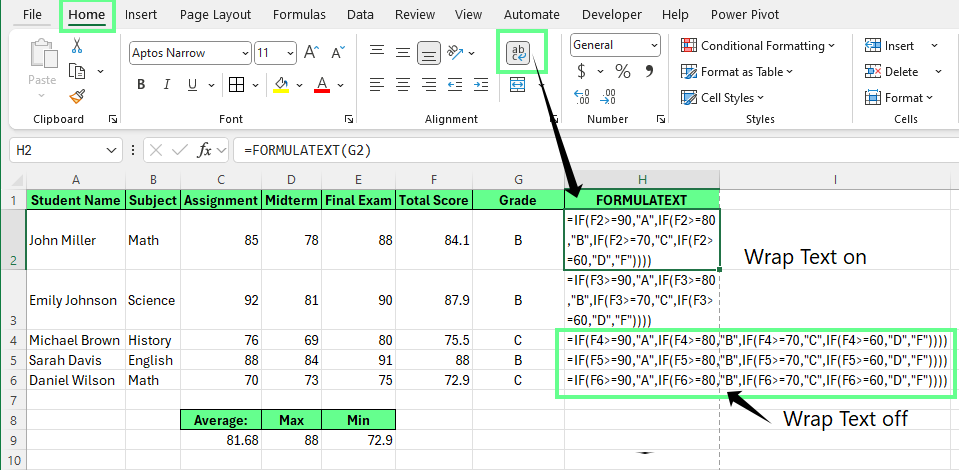
Turn off the Wrap Text. Image by Author.
Note: These changes only affect how formulas are displayed. They do not change how Excel calculates results.
By default, Excel prints results, not formulas. But during audits, peer reviews, or training sessions, the formulas themselves are often what you want to see.
With a little setup, you can prepare a worksheet so formulas are easy to read on paper or in a shared file, without disrupting the layout or confusing reviewers.
Before printing, make sure the formulas are displayed clearly and fit on the page. Here’s how to do it:
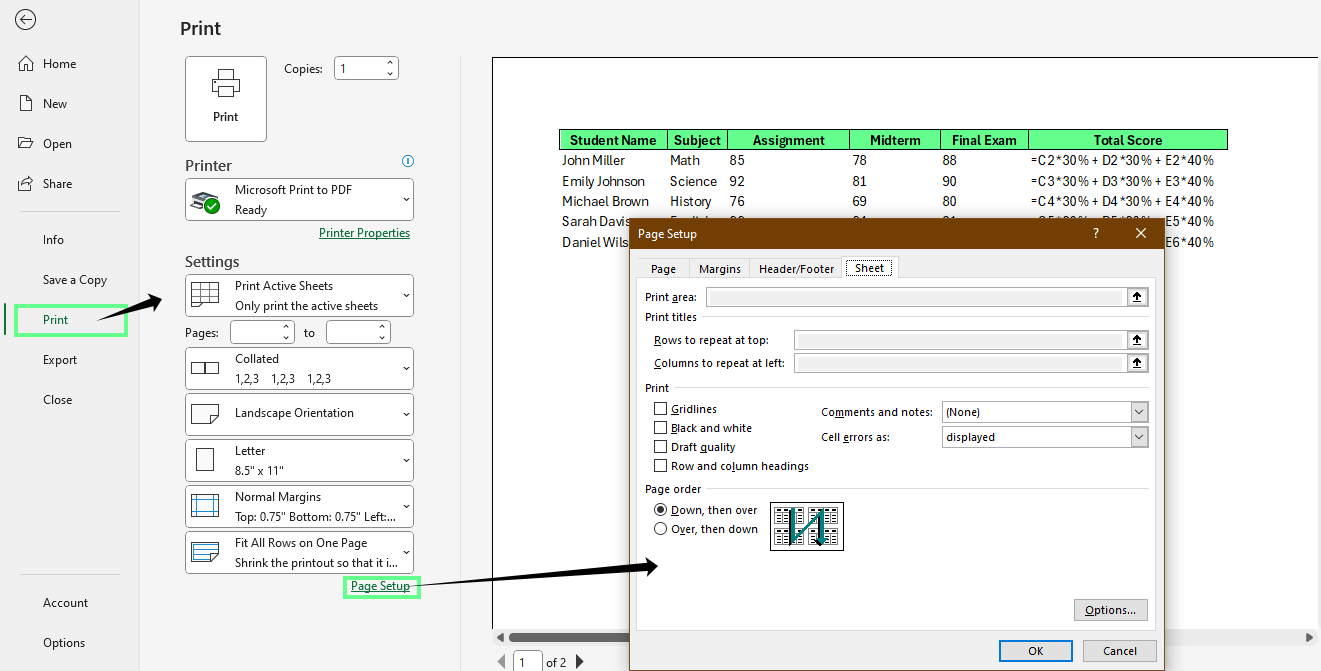
Print the sheets with formulas visible in the cells. Image by Author.
When you’re sharing a spreadsheet for formula review, clarity weighs more than presentation.
Here are a few best practices to follow so your reviewers understand the logic quickly:
Note: Turn off formula view before final delivery unless the recipient specifically asks to see formulas. Most end users only need results.
Showing formulas may be confusing the first time you use Excel. But you should know in most cases, Excel isn’t broken, but maybe a setting is toggled or the cell is being treated as text.
Here’s how to recognize each situation and fix it quickly.
Sometimes, Excel displays formulas instead of results across the entire worksheet. This usually happens when Show Formulas is turned on by accident, often by pressing a keyboard shortcut.
When this happens, all calculated values disappear and are replaced by formulas.
How to fix it:
The worksheet immediately returns to showing results.
Sometimes a formula appears in a cell, but Excel never calculates it even though Show Formulas is turned off. This usually means the cell was formatted as text before the formula was entered. Excel treats anything typed into a text-formatted cell as plain text.
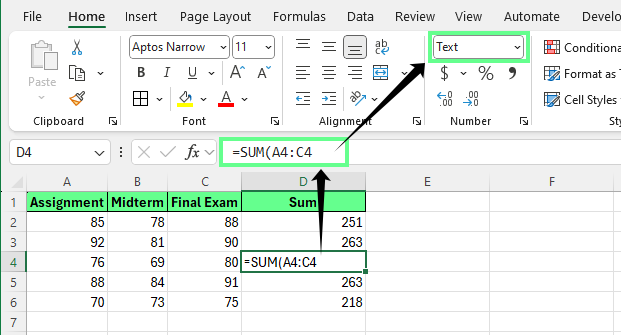
Formula displayed as text instead of the result. Image by Author.
How to fix it:
Select the affected cell
Go to the Home tab > Number group
Change the format from Text to General
Click inside the cell, press F2, then press Enter
This forces Excel to re-read the formula and calculate it correctly.
Change the cell format to General. Image by Author.
Sometimes a cell looks like it contains a formula, but Excel still doesn’t calculate it even after changing the format to General.
This usually happens because the formula starts with:
A leading apostrophe ('=SUM(A1:A5))
Or a leading space before the equals sign
Both tell Excel to treat the content as text. How to fix it:
Once the extra character is removed, Excel calculates the formula normally.

Remove the characters from the formula. Image by Author.
Showing formulas may be helpful, but you don’t want it turned on all the time. The goal is to move smoothly between views and protect formulas when files are shared with others.
Here are a few best practices to help you stay efficient and avoid mistakes.
When editing or reviewing a worksheet, you’ll often switch back and forth between results and formulas. The fastest way to do this is with the keyboard shortcut.
This lets you quickly inspect logic, then return to normal values without changing any formatting or calculations.
Recommended workflow:
Using the shortcut keeps you focused and avoids unnecessary layout changes.
In shared spreadsheets, formulas are easy to change by accident. One misplaced click can overwrite a key calculation without anyone noticing.
To prevent this, you can lock formula cells while still allowing others to edit inputs. So here’s how to protect formulas:
Select the entire worksheet (Ctrl + A or click the Select All button)
Right-click and choose Format Cells
In the Format cells dialog box > open the Protection tab and uncheck Locked and Hidden
Select only the cells that contain formulas
Right-click > Format Cells > Protection, then check Locked
Click OK
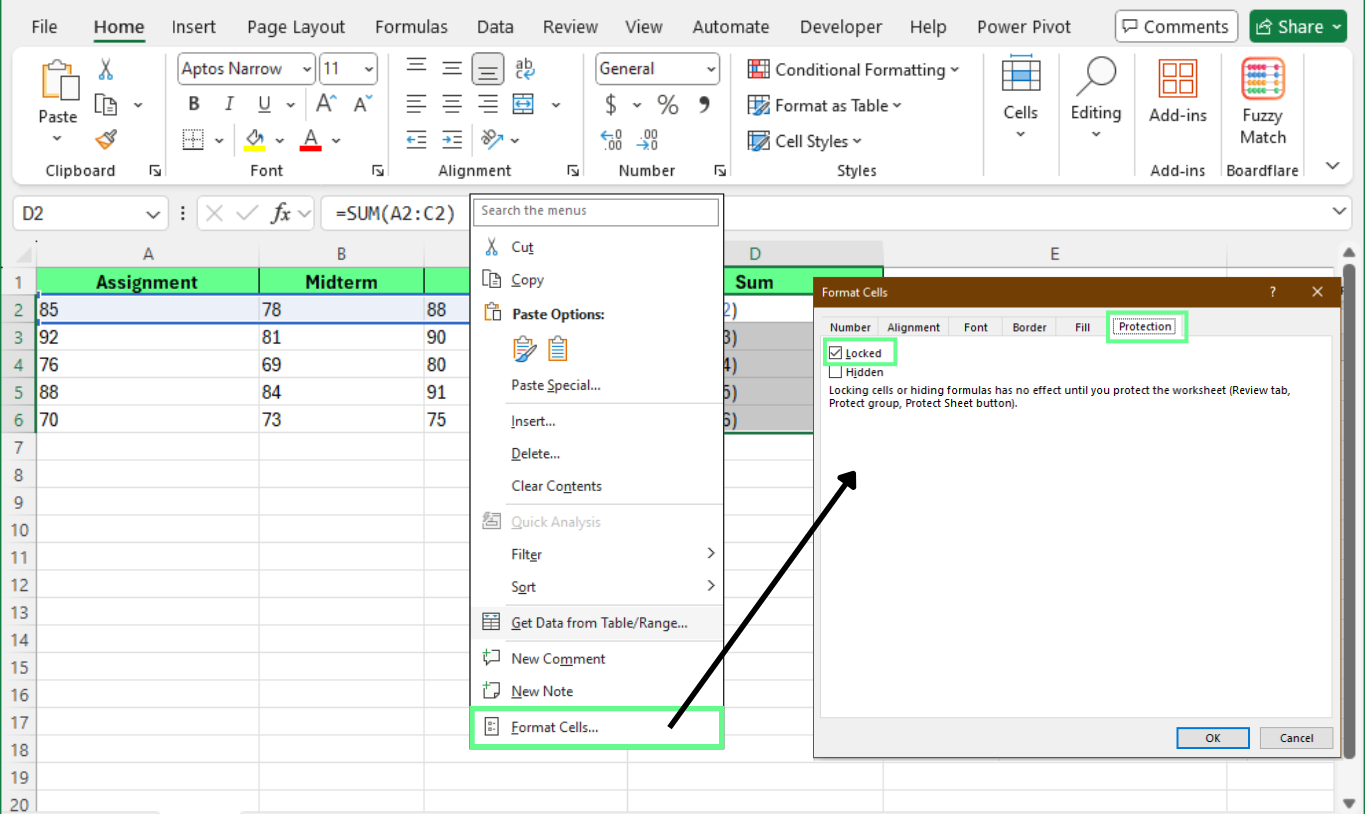
Lock specific cells using the Format Cells option. Image by Author.
Now, users can edit input cells but cannot change protected formulas.
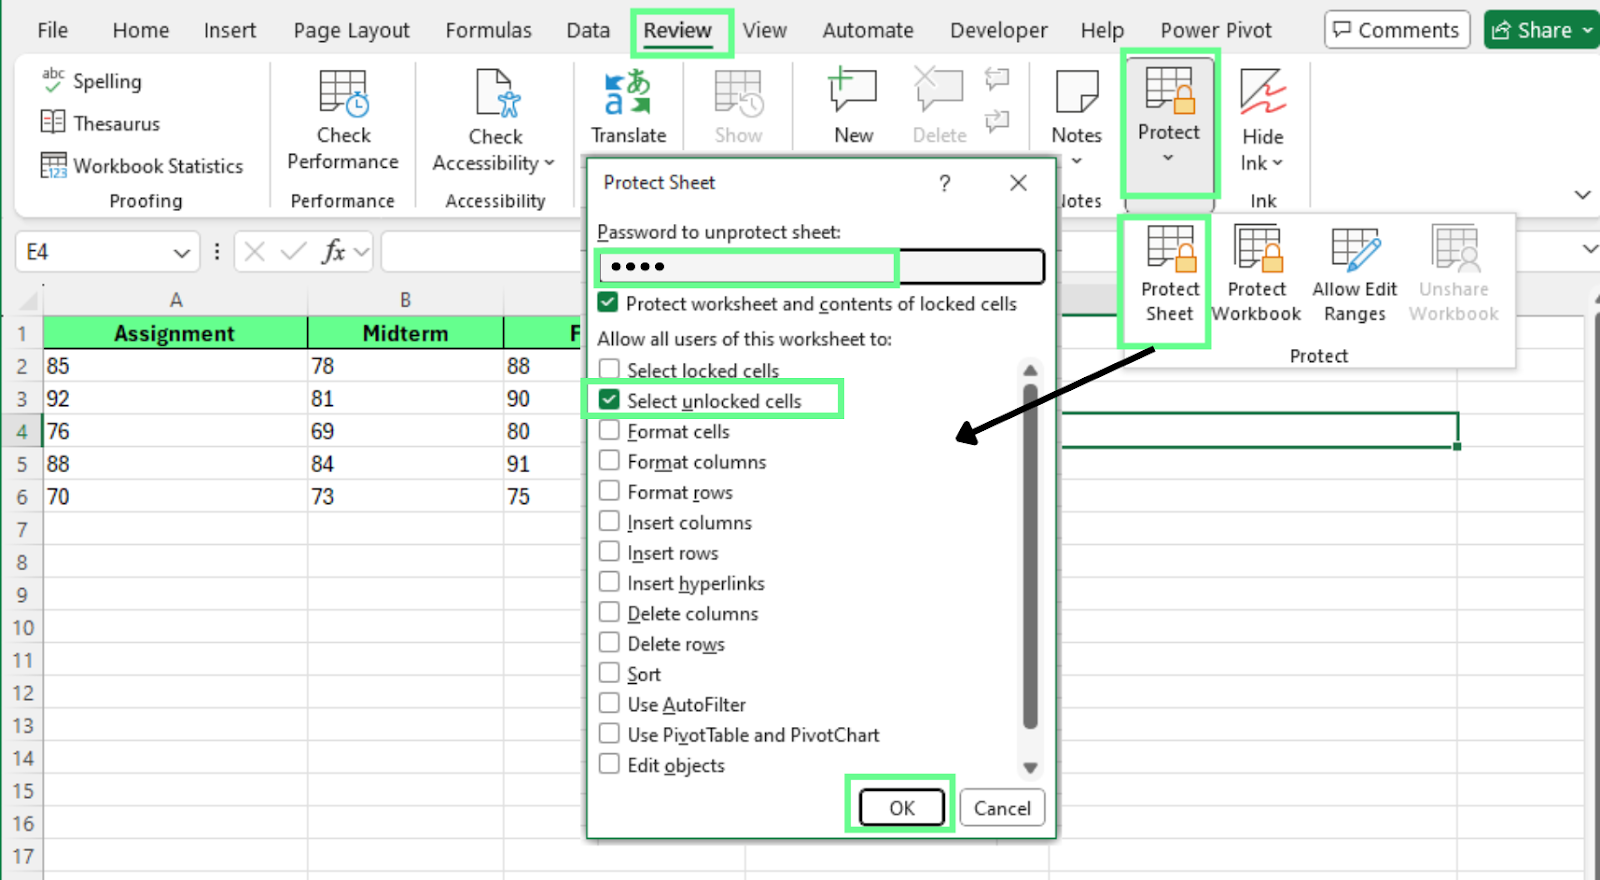 Protect the sheet from accidental edits. Image by Author.
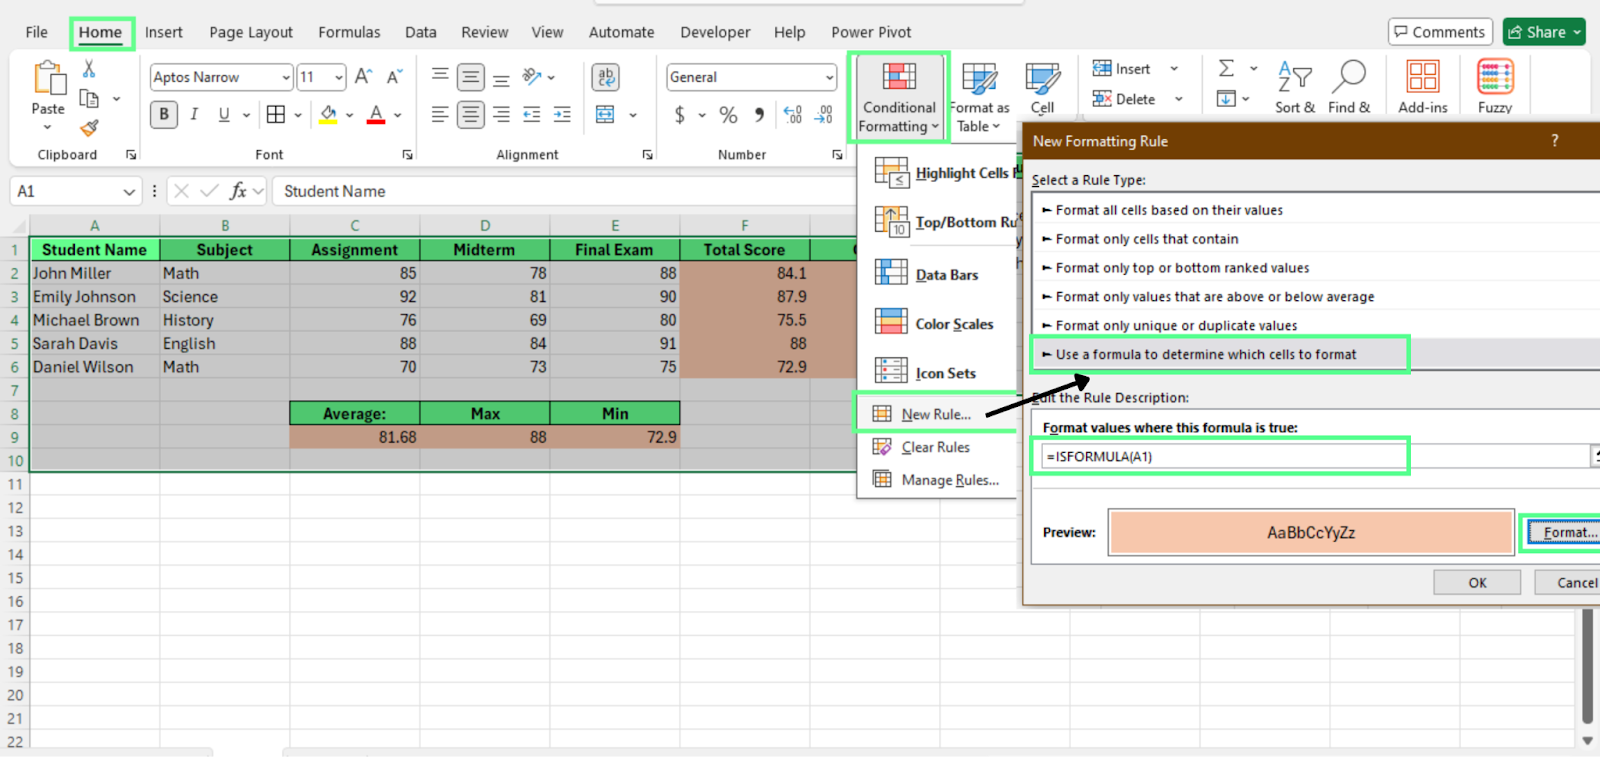
Sometimes you don’t need to see formulas everywhere. You just want to know which cells contain formulas. In this case, highlighting formula cells is safer and easier than turning on a full formula view.
Conditional formatting highlights formula cells automatically without changing what the worksheet displays.
Here’s how to use it:
Select the range you want to scan
Go to Home > Conditional Formatting > New Rule
Choose Use a formula to determine which cells to format
Enter: =ISFORMULA(A1)(Replace A1 with the first cell in your selected range.)
Choose a fill color or border and apply the rule
Click OK
This way, all formula cells in the range stay highlighted.
Highlight cells with formulas using Conditional Formatting. Image by Author.
The Find & Select option is helpful for quick checks. Here’s how to use it:
The highlight disappears as soon as you click another cell.
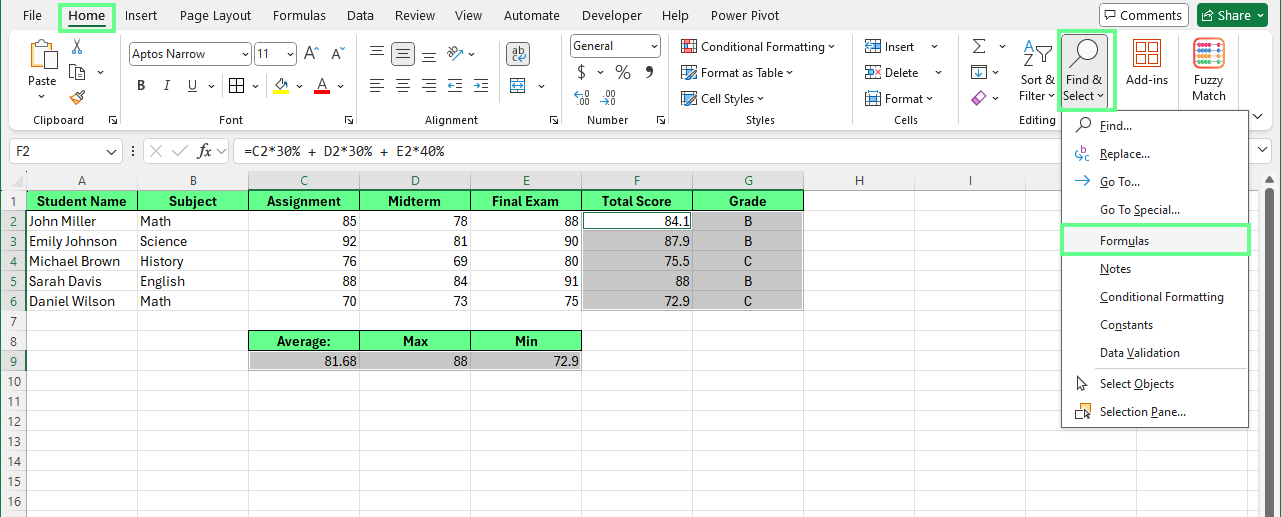
Highlight cells with formulas using Find & Select. Image by Author.
Now that you know the different ways to show formulas in Excel, you can choose the one that works best for your spreadsheet. Some options are better for quick checks, while others are better for reviews, sharing, or keeping formulas safe.
If you want to learn more, try to understand how formulas support analysis. You can start with our Data Analysis in Excel course to understand the basics, then move on to our Data Analysis with Excel Power Tools skills track to work more efficiently with more complex datasets.
Learn Excel with DataCamp
Course
Course
Course
cheat-sheet
Richie Cotton
Tutorial
Laiba Siddiqui
Tutorial
Javier Canales Luna
Tutorial
Abid Ali Awan
Tutorial
Joleen Bothma
Tutorial
Laiba Siddiqui